1
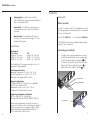
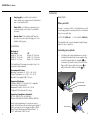
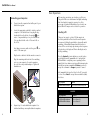
SwitchView User Manual
Installation
•
Hot-pluggable - new PCs can be added or
removed without powering down the SwitchView
unit or other attached PCs.
•
Status LEDs - two LEDs per computer give you
constant readings on the status of your SwitchView unit.
•
Monitor Stand - The SwitchView DT may also
be used as a monitor stand, allowing you to save
valuable desktop space.
Specifications
Mechanical
2 or 4 Port
Height:1.9" (4.83 cm)
Width: 8.1" (20.57 cm)
Depth: 5.0" (12.7 cm)
Basic Install
Before you install
In order to connect your PCs to the SwitchView, you will
need the appropriate connecting cables. We recommend
these Avocent cable kits:
For PS/2 PSs: CPS2-6A
For AT/serial PCs: CSER-6A
The SwitchView also accepts standard straight-through
cables for these connections.
Connecting your peripherals
DT
Height:1.75" (4.45 cm)
Width: 11.0" (27.94 cm)
Depth: 11.0" (27.94 cm)
The SwitchView DT can support a weight of up to 100
pounds (45.36Kg) maximum.
1.
Your VGA monitor, keyboard and mouse connect to
the SwitchView unit instead of your computer. Plug
your PS/2 keyboard cable into the purple
port
on the back of your unit in the User Console section.
Plug your PS/2 mouse cable into the green port
and your VGA video cable into the blue
port.
Environmental/Power
Operating Temperature: 41° (5°C) to 104° (40°C)
Storage Temperature: -4° (-20°C) to 122° (50°C)
Optional Power Supply: 6VDC @ 700 mA
Supported Hardware
Computer: IBM PC/AT, PS/2 and 100% compatibles
Video Modes: VGA and SVGA
Maximum Resolution: 1600 x 1200 @ 75 Hz
Peripherals: PS/2 keyboard, PS/2 mouse
PS/2 MOUSE CABLE
PS/2 KEYBOARD CABLE
Regulatory Compliance Standards
UL 1950, CSA C22.2 No. 950, EN60950
FCC part 15B, EN55022, EN50082, CISPR22, ICES-003
Under certain circumstances it may be necessary to
power the SwitchView with an external power supply. If
this is necessary, the power supply should be a Listed
Direct Plug-In Transformer unit marked “Class 2” or
“L.P.S.” and rated at 6 VDC, 700 mA.
2
VGA VIDEO CABLE
3