1
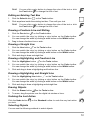
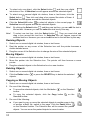
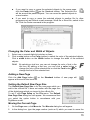
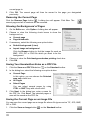
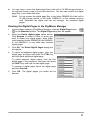
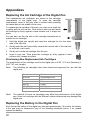
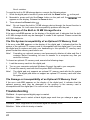
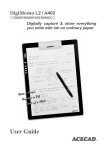
Digitally capture & store everything
you write with ink on ordinary paper.
User Guide
Federal Communications Commission (FCC) Radio
Frequency Interference Statement
This equipment has been tested and found to comply with the limits for a Class B digital
device, pursuant to Part 15 of the FCC Rules. These limits are designed to provide
reasonable protection against harmful interference in a residential installation. This
equipment generates, uses, and can radiate radio frequency energy and, if not installed
and used in accordance with the instructions, may cause harmful interference to radio
communications. However, there is no guarantee that interference will not occur in a
particular installation. If this equipment does cause harmful interference to radio or
television reception, which can be determined by turning the equipment off and on, the
user is encouraged to try to correct the interference by one or more of the following
measures:
z
Reorient or relocate the receiving antenna.
z
Increase the separation between the equipment and receiver.
z
Connect the equipment to an outlet on a circuit different from that to which the
receiver is connected.
z
Consult the dealer or an experienced radio/TV technician for help.
The user should not modify or change this device without written approval from ACE
CAD Enterprise Co., Ltd. Modification could void authority to use this equipment.
Trademark Information
ACECAD and ACECAT are registered trademarks of ACE CAD Enterprise Co., Ltd.
Microsoft, Windows, Office and OneNote are registered trademarks of Microsoft
Corporation.
SanDisk is a registered trademark of SanDisk Corporation.
Pentium is a registered trademark of Intel Corporation.
Internet is a trademark of Digital Equipment Corporation.
Adobe and Acrobat are registered trademarks of Adobe Systems Inc.
All other trademarks are the property of their respective owners.
Copyright Notice
©2008 ACE CAD Enterprise Co., Ltd. All rights reserved. No part of this publication
may be reproduced, stored in a retrieval system, or transmitted, in any form or by any
means (electronic, mechanical, photocopying, recording, or otherwise), without the prior
written permission of the publisher.
i
GETTING STARTED.................................................................................................... 1
EQUIPMENT CHECKLIST .............................................................................................. 1 THE PARTS OF THE DIGITAL PAD ................................................................................. 2 INSTALLING THE BATTERIES INTO THE DIGITAL PAD ................................................... 2 INSTALLING THE BATTERY INTO THE DIGITAL INKING PEN .......................................... 3 PUTTING A NOTEPAD OR PAPER ON THE DIGITAL PAD.................................................. 3 THE WRITING AREA AND THICKNESS FOR MODEL DIGIMEMO A502 .......................... 4 THE WRITING AREA AND THICKNESS FOR MODEL DIGIMEMO 692 ............................. 4 STORAGE DEVICE IN THE DIGITAL PAD ....................................................................... 4 WRITING AND RECORDING YOUR HANDWRITTEN NOTES ......................... 6 TURNING ON THE DIGITAL PAD ................................................................................... 6 CHANGING THE CURRENT DIGITAL PAGE .................................................................... 6 THE PEN ICON ............................................................................................................. 7 WRITING YOUR NOTES ON A NEW PAGE ..................................................................... 7 WRITING YOUR NOTES ON A PAGE ALREADY WITH CONTENTS ................................... 7 ERASING A DIGITAL PAGE ON THE DIGITAL PAD .......................................................... 7 TURNING OFF THE DIGITAL PAD .................................................................................. 8 LOW BATTERY INDICATION ON THE DIGITAL PAD ........................................................ 8 FULL MEMORY INDICATION ........................................................................................ 8 ORGANIZING YOUR DIGITAL PAGES IN WINDOWS ........................................ 9 INSTALLING THE DIGIMEMO MANAGER SOFTWARE .................................................... 9 CONNECTING THE DIGITAL PAD TO YOUR COMPUTER................................................. 9 CREATING YOUR E-BOOK FILE ................................................................................. 10 Toolbars ............................................................................................................... 10 Importing Your Digital Pages .............................................................................. 10 Saving an e-Book File ......................................................................................... 11 Saving a Copy of an e-Book File ......................................................................... 11 Opening an e-Book File....................................................................................... 11 Creating a New e-Book File ................................................................................ 12 Printing an e-Book file ........................................................................................ 12 EDITING YOUR E-BOOK FILE .................................................................................... 12 Zooming in and Zooming out .............................................................................. 12 Inserting a Text Box ............................................................................................. 12 Editing an Existing Text Box................................................................................ 13 Drawing a Freeform Line and Writing ................................................................ 13 Drawing a Straight Line ...................................................................................... 13 Drawing a Highlighting and Freeform Line........................................................ 13 Drawing a Highlighting and Straight Line .......................................................... 13 Erasing Objects ................................................................................................... 13 Undoing the Last Action ...................................................................................... 13 Selecting Objects ................................................................................................. 13 Resizing Objects .................................................................................................. 14 ii
Moving Objects ....................................................................................................14 Deleting Objects ..................................................................................................14 Copying or Moving Objects .................................................................................14 Changing the Color and Width of Objects ...........................................................15 Adding a New Page..............................................................................................15 Setting the Default New Page Size .......................................................................15 Moving the Current Page .....................................................................................15 Removing the Current Page .................................................................................16 Showing the Background of Pages .......................................................................16 Saving Your Handwritten Notes as a PDF File....................................................16 Saving the Current Page as an Image File ..........................................................16 Switching the Current Page by Keyboard Shortcuts ............................................17 SENDING YOUR E-BOOK FILE IN E-MAIL ...................................................................17 CONVERTING YOUR HANDWRITTEN NOTES IN YOUR E-BOOK FILE ..........................18 SENDING YOUR HANDWRITTEN NOTES TO MICROSOFT OFFICE ONENOTE ...............18 Sending to OneNote from the DigiMemo Manager Software...............................18 Using Send DHW to OneNote Icon on the Windows Desktop ..............................19 Changing the Default Program to OneNote for Digital Page File (DHW) .........20 USING ANOTHER OPTIONAL CARD READER ..............................................................20 EASILY MANAGING DIGITAL PAGE FILES ...................................................................20 Deleting the Digital Pages in the DigiMemo Manager .......................................21 APPENDIXES ............................................................................................................. 22 REPLACING THE INK CARTRIDGE OF THE DIGITAL PEN ..............................................22 Purchasing New Replacement Ink Cartridges .....................................................22 REPLACING THE BATTERY IN THE DIGITAL PEN .........................................................22 REMOVING THE DIGIMEMO MANAGER SOFTWARE IN WINDOWS ..............................23 CARING FOR THE DIGIMEMO A502/692 ....................................................................23 ERROR CODES ON THE DISPLAY OF THE DIGITAL PAD ................................................23 The Malfunction of the Built-in 32 MB Storage Device .......................................23 The Damage of the Built-in 32 MB Storage Device .............................................24 The File System Incompatibility of an Optional CF Memory Card .....................24 The Damage or Incompatibility of an Optional CF Memory Card ......................24 TROUBLESHOOTING ...................................................................................................24 SPECIFICATIONS .........................................................................................................27 Digital Pad Specifications ...................................................................................27 Digital Pen Specifications....................................................................................27 File Formats ........................................................................................................27 System Requirements............................................................................................28 Environment .........................................................................................................28 iii
iv
Getting Started
The DigiMemo A502/692 is a stand-alone device with storage capability that digitally
captures and stores everything you write or draw with ink on ordinary paper, without the
use of computer and special paper. Then you can easily view, edit, organize and share
your handwritten notes in Windows.
Equipment Checklist
The following items are included in your DigiMemo A502/692 package:
z
z
Digital Inking Pen
(DigiPen P100)
z
Paper Clip
Portable Digital Pad
z
Notepad (already held on the digital pad)
z
Two Replacement Ink Cartridges (already stored in the digital pad)
z
USB Cable for DigiMemo A502/692
z
Four Batteries (1.5 volt, size AAA)
z
One 1.55V Button Cell Battery
z
User Guide
z
DigiMemo Manager Software CD
1
The Parts of the Digital Pad
Battery Compartment
Cover
Card-Slot
USB Connector
Battery
Compartment
Power Button
Display
Buzzer
Four Function
Buttons
Notepad Slot
Cartridge
Compartment
Notepad
Holder
Cartridge
Compartment
Cover
Two Replacement Ink
Cartridges
Pen Holder
Pen Holder
Installing the Batteries into the Digital Pad
To open the battery compartment cover of the digital
pad, slide it outward while pressing the raised dots on
the middle of the cover. Insert four batteries (1.5 volt,
size AAA) into the battery compartment in accordance
with the indication in the battery compartment. Close
the battery compartment cover.
Note!
Incorrect battery installation may damage the
digital pad.
Note!
Do not mix new and used batteries.
Note!
With continuous use of the digital pad, four
AAA alkaline batteries will last approximately 100 hours.
Note!
The battery compartment cover has a safe function. When the battery
compartment cover is not completely closed or is opened, the digital pad can
2
not be turned on to capture and store your handwriting.
Installing the Battery into the Digital Inking Pen
Unscrew the barrel cover counterclockwise from the barrel of
the pen. Take out the button cell battery (SR626SW, 377 or
IEC-SR66) that is included in the package of the DigiMemo
A502/692. Insert the battery into the battery compartment with
the negative (-) cap facing the battery compartment. Screw
the barrel cover clockwise onto the barrel until tight.
Note!
Incorrect battery installation will
malfunction of the digital inking pen.
Pen Clip
Pen Cap
Front Section
result
in
(+) Can
(-) Cap
the
Battery
Compartment
Barrel
Ink Cartridge
Barrel Cover
Rear Section
Note!
The battery of the digital
approximately 14 months.
inking
pen
Note!
The front or rear section of the pen can hold
the pen cap.
Note!
You can attach some cord or accessory to
the pen through the two holes on the pen
end.
Note!
You can clip the pen to the pad by using the
pen clip to clip to the right or left pen holder
of the pad.
will
last
Pen End
Putting a Notepad or Paper on the Digital Pad
To hold a notepad on the pad, slide the backing of the notepad down into the notepad
slot on the pad as far as the backing can possibly go.
Note!
The size of the notepad holder on the
pad is 6.0" x 9.1" (153 mm x 232 mm).
Your notepad size can not be over this
size.
You can directly put a few sheets of paper on
the writing area of the pad for your writing. You
also can use the paper clip to clip a few sheets
of paper on the pad for your writing.
Paper Clip
3
The Writing Area and Thickness for Model DigiMemo
A502
The writing area is the area on the digital pad where the digital pad
can digitally capture and store everything you write with the digital
inking pen as digital ink. The writing area is 150 mm x 211 mm (5.9"
x 8.3").
Writing
Area
The writing thickness is the maximum thickness above the writing
area where the digital pad can digitally capture and store everything
you write with the digital inking pen as digital ink. The writing
thickness is 12 mm (0.47") about 120 sheets of paper.
The Writing Area and Thickness for Model DigiMemo 692
The writing area is the area on the digital pad
where the digital pad can digitally capture and
store everything you write with the digital inking
pen as digital ink. The writing area is 5.9" x 8.3"
(150 mm x 211 mm) which is shown as the white
area in the illustration. The carving lines on the pad
are the margin indicators which indicate the right or
upper boundary of the writing area.
Note!
When you use the 6.0" x 9.0" notepad,
your handwriting on paper outside the
writing area can not be digitally captured
and stored by the digital pad.
The writing thickness is the maximum thickness
above the writing area where the digital pad can
digitally capture and store everything you write with
the digital inking pen as digital ink. The writing
thickness is 0.47" (12 mm) about 120 sheets of
paper.
Margin Indicator
Writing Area
Notepad Holder
Storage Device in the Digital Pad
The digital pad is equipped with a builtin 32 MB storage device to store your
handwritten notes. You also can load
an optional CompactFlash (CF)
memory card into the pad to expand
the storage capacity of the pad.
To load an optional CompactFlash
(CF) memory card, open the battery
compartment cover of the pad. By
holding the memory card with the rear
label facing upward, insert the memory
card into the card-slot firmly. Close the
battery compartment cover of the pad.
4
Rear Label
Card-Slot
Terminals
Note!
The optional memory card must be Type I CompactFlash (CF) memory card.
Note!
Some brands of memory cards may not be compatible with this digital pad.
Before purchasing a memory card, consult its manufacturer or dealer. Along
with the digital pad, we recommend you to use CompactFlash (CF) memory
cards (8 MB to 512 MB) of the brand SanDisk.
5
Writing and Recording Your Handwritten Notes
Using the digital inking pen on the digital pad produces both familiar ink notes on
ordinary paper and digital pages in the storage device of the pad.
Turning on the Digital Pad
Press and hold the Power button on the digital pad until the
icon
appears on the display. Release the Power button to turn on the pad. The
display will be on and show the Digital Page Number, Storage Device icon
and Page icon.
z
Storage Device Icon
Without loading an optional memory card, the Storage Device icon
is displayed and the built-in 32 MB storage device is the current storage device.
Your handwritten notes will be stored in the built-in 32 MB storage device.
is displayed
With loading an optional memory card, the Storage Device icon
and the optional memory card is the current storage device. Your handwritten notes
will be stored in the optional memory card.
z
Digital Page Number
The Digital Page Number indicates the current digital page in the
current storage device. Your handwriting will be captured and stored in
the current digital page in the current storage device (the built-in 32 MB
storage device or the optional memory card).
The digital pad can manage up to 999 digital pages for each storage device (the
built-in 32 MB storage device or the optional memory card).
z
Page Icon
The Blank Page icon indicates that the current digital page contains no
digital ink.
The Page with Contents icon indicates that the current digital page
contains digital ink.
Changing the Current Digital Page
You can use the following function buttons on the pad to change the current digital page
in the current storage device.
z
Page Backward Button
Press the Page Backward button
to move to the previous digital page. By
pressing and holding the Page Backward button , the Digital Page Number
moves fast and backward. Once release the button , it stops moving.
z
Page Forward Button
z
Press the Page Forward button
to move to the next digital page. By pressing
and holding the Page Forward button , the Digital Page Number moves fast
and forward. Once release the button , it stops moving.
z
Next Blank Page Button
6
Press the Next Blank Page button
to move to the next blank digital page.
The Pen Icon
When you are writing or drawing on paper by using the digital pen on the digital
pad, the Pen icon appears on the display. The Pen icon indicates that the
digital pad is capturing and storing your handwriting as digital ink.
Note!
If you do not see the Pen icon while writing, try to alter the pressure you apply
on the pen tip.
Writing Your Notes on a New Page
By using the ,
or
function button, select any blank digital page in which you
want to store a new page of your handwritten notes on paper. We recommend you to
put down the same page number on this new page of paper as the Digital Page
Number. It helps you to synchronize your paper notes and digital pages.
Under the current Digital Page Number displayed, everything you write will be
immediately captured and stored in the current digital page file of the current storage
device. The file name of this digital page is PAGE_XXX.DHW (the XXX is the Digital
Page Number such as 001).
While the Storage Device icon
is displayed, the digital page file is stored in the
DMEMO-M folder in the built-in 32 MB storage device.
is displayed, the digital page file is stored in the
While the Storage Device icon
DMEMO-C folder in the optional memory card.
Note!
To avoid creating a superimposed digital page, make sure that you select a
blank digital page each time you change a page on paper.
Note!
As you will see later, it is quite important to keep your written page number and
the Digital Page Number aligned. For example, you can know the contents in
the digital page from the page number that you wrote on paper.
Note!
If you frequently alternate the built-in 32 MB storage device and an optional
memory card, we recommend you to write the page number like “Page M24”,
“P M24”, “Page CF24”, “P CF24” … etc. It is more convenient for you to know
which storage device the digital page is stored in.
Note!
The more you write on a digital page, the bigger size of the digital page file will
be.
Writing Your Notes on a Page Already with Contents
Anytime you can switch to the paper page already with the contents and continue to
write your notes. Moreover, use the
or
function button to move the Digital Page
Number to the one same as you wrote on the paper page. Now, start to write! Through
this way, your new handwriting will be captured and stored in the right digital page.
Erasing a Digital Page on the Digital Pad
Erasing a digital page is similar to tearing off a paper page. By using the
or
function button to move the Digital Page Number to the one which you want to erase.
7
Then press the Erase button
on the pad. The display will show
message.
Press the Erase button
again to erase all contents stored in the digital page.
Here is a brief recommendation: you may want to tear off the paper page or simply
cross out the page number you wrote on the paper page.
Note!
When
message appears, the erase procedure will be cancelled if
you write or press any button
,
or
to execute other functions. All
contents remain intact in the digital page.
Note!
Once a digital page is erased, its original contents can not be recovered.
Turning off the Digital Pad
Press the Power button to turn off the digital pad. The display will be blank.
If you have not written or pressed any function button within the previous 30 minutes,
the digital pad sounds a beep and automatically shuts down. The display will be blank.
Note!
Since the pad has the automatic shutdown capability, please make sure that
the display is on if you want to write again after a long period of time.
As you turn on the digital pad, the display will show the last Digital Page Number at the
time it was turned off.
Low Battery Indication on the Digital Pad
When the batteries remain too low power and are in need of replacement, the
Low Battery icon will appear on the display. Please replace the batteries in
the pad.
When the batteries are exhausted, the pad sounds 3 beeps and the Battery
Exhausted icon appears. Then the pad is turned off immediately.
Full Memory Indication
The 90% icon will appear to indicate that 90% capacity of the current storage
device (
or
) is used.
The Full icon will be shown if the memory is full in the current storage device
(
or
). If that is the case, the digital pad can not store your new
handwriting. Also, if you still keep writing, the pad sounds 2 beeps.
Note!
Under such circumstances, you need to erase unwanted digital pages if you
want to continue to write.
Note!
In the following chapter, you will find that it is very easy to import, copy, move
and delete the digital pages when connecting the pad to your PC through USB
cable.
8
Organizing Your Digital Pages in Windows
With its DigiMemo Manager software, you can easily view, edit, organize and share your
digital pages in Windows. You can save any digital pages you arbitrarily select as a
book file (e-Book).
Installing the DigiMemo Manager software
1.
Turn on your computer and start Windows.
2.
Insert the DigiMemo Manager software CD into the CD-ROM drive. The software
installer will automatically launch. If the CD auto-run feature is not enabled, doubleclick the Setup icon on the DigiMemo Manager software CD. Select the Install
DigiMemo Manager option in the dialog box.
3.
Click Next in the “Welcome” dialog box.
4.
Click Next in the “Select Installation Folder” dialog box.
5.
In the “Confirm Installation” dialog box, click Next to start the installation.
6.
The DigiMemo Manager software has been successfully installed. Click Close in
the “Installation Complete” dialog box. Please restart your Windows.
Connecting the Digital Pad to Your Computer
Turn on your computer. Take out the USB cable for
DigiMemo A502/692 that is included in the package. Plug
the wide connector of the cable into an available USB port
on your computer. Connect the other end of the cable to the
USB connector of the digital pad.
USB
Connector
The Connection icon
will appear on the display of the
indicates the connection
pad. The Connection icon
between the digital pad and your computer. Your Windows
will automatically detect the built-in 32 MB storage device
and the optional memory card in the pad as removable
storage devices.
Note!
When connecting the pad to the computer, please notice the following:
z
The pad is powered by the computer.
z
The digital pad can not be turned on and is not able to capture your
handwriting at this moment.
z
You can store any computer files such as Word files to the built-in 32 MB
storage device and the optional memory card.
z
By using the DigiMemo Manager software, you
can easily import and organize your digital pages
as a book file (e-Book). Moreover, if you doubleclick a digital page file, the DigiMemo Manager
software will be opened and it will import the
digital page to a new book file (e-Book).
Digital Page
File Icon
e-Book
File Icon
9
Creating Your e-Book File
On the Windows desktop, double-click the ACECAD
DigiMemo Manager icon to open the software.
Toolbars
ACECAD
DigiMemo
Manager Icon
The following toolbars are on the software window:
z
Standard Toolbar
z
Tools Toolbar
z
Color Toolbar
z
Width Toolbar
To move a toolbar to the new location, drag the move handle on a docked toolbar or the
title bar on a floating toolbar.
Move
Handle
Move
Handle
Docked Toolbar
Title Bar
Docked
Toolbar
Floating Toolbar
Importing Your Digital Pages
1.
Click the Digital Page button
Page dialog box will appear.
on the Standard toolbar. The Digital
2.
Select the Import digital pages option button. Click Browse to select a folder from
which you want to import your digital pages. Such folder could possibly be the
DMEMO-M, the DMEMO-C or any folder that contains digital pages.
3.
Click OK. The Import Digital Pages dialog box will
appear.
4.
To select nonadjacent digital pages, click one digital
page, and then hold down the CTRL key and click each
additional digital page.
To select adjacent digital pages, click the first digital
10
page in the sequence, and then hold down the SHIFT
key and click the last digital page.
To preview a digital page, select the digital page and
click Preview.
5.
Click OK. The digital pages you select will be imported
to this book file.
Note!
You can click any page thumbnail to quickly
switch the current page.
Note!
Note!
You can import and insert any digital pages after the current page.
The current page number indicates the current page of this book file (eBook).
Current Page
Current Page
Indicator
Page Thumbnails
Current Page Number
and Size
Note!
As importing, the original digital page remains intact.
Saving an e-Book File
Click the Save button
on the Standard toolbar.
Note!
If you are saving the e-Book file for the first time, you will be asked to
give it a name.
Note!
The icon of a book file (e-Book) is
a book file (e-Book) is DND.
. The extension of
e-Book
File Icon
Saving a Copy of an e-Book File
On the File menu, click Save As. In the dialog box, enter a new name for the e-Book
file. Click Save.
Opening an e-Book File
You can use the following methods to open your e-Book file.
11
z
In the folder of the e-book file, double-click the e-Book file to open the file
in a new software window.
Note!
z
By this way, you can open various e-Book files in different
software windows.
on the Standard toolbar.
In the software window, click the Open button
In the dialog box, select the folder and then the e-Book file. Click Open.
Note!
If the previous e-Book file is not saved in its software window, you will be
asked to save that e-Book file.
Creating a New e-Book File
You can use the following methods to create a new e-Book file.
z
On the Windows desktop, double-click the ACECAD DigiMemo Manager
icon to create a new and blank e-Book file with a new page in a new
software window.
Note!
z
In the folder of a digital page file, double-click the digital page file. The
digital page will be imported to a new e-Book file in a new software
window.
Note!
z
By this way, you can open various e-Book files in different software
windows.
By this way, you can open various e-Book files in different
software windows.
In the software window, click the New button
on the Standard toolbar.
A new and blank e-Book file with a new page will be created in the software
window.
Note!
If the previous e-Book file is not saved in its software window, you will be
asked to save that e-Book file.
Printing an e-Book file
Click the Print button
file.
on the Standard toolbar. Click Ok to print the e-Book
Editing Your e-Book File
Zooming in and Zooming out
You can click the Zoom in button
to get a close-up view of the current page
or the Zoom out button
to see more of the page at a reduced size.
Inserting a Text Box
1.
Click the Text Box button
2.
Click and drag in the current page where you want to insert the text box.
3.
Type and edit your text in the text box.
12
on the Tools toolbar.
Note!
You can click a color button to change the color of the text or click
the Font button
to change the font of text.
Editing an Existing Text Box
1.
Click the Select button
2.
Click anywhere inside the existing text box. Then edit your text.
Note!
on the Tools toolbar.
You can click a color button to change the color of the text or click
to change the font of text.
the Font button
Drawing a Freeform Line and Writing
1.
Click the Pen button
on the Tools toolbar.
2.
You can switch the color by clicking a color button on the Color toolbar.
You can change the width by clicking a width button on the Width toolbar.
3.
Drag to draw a freeform line or write.
Drawing a Straight Line
1.
Click the Line button
2.
You can switch the color by clicking a color button on the Color toolbar.
You can change the width by clicking a width button on the Width toolbar.
on the Tools toolbar.
3.
Click and drag to draw a straight line.
Drawing a Highlighting and Freeform Line
1.
Click the Highlighter button
on the Tools toolbar.
2.
You can switch the color by clicking a color button on the Color toolbar.
You can change the width by clicking a width button on the Width toolbar.
3.
Click and drag to draw a highlighting and freeform line.
Drawing a Highlighting and Straight Line
1.
Click the Highlighting Line button
on the Tools toolbar.
2.
You can switch the color by clicking a color button on the Color toolbar.
You can change the width by clicking a width button on the Width toolbar.
3.
Click and drag to draw a highlighting and straight line.
Erasing Objects
1.
Click the Eraser button
2.
To erase, drag the pointer over the digital ink strokes or lines.
on the Tools toolbar.
Undoing the Last Action
Click the Undo button
you took.
on the Standard toolbar to undo the very last action
Selecting Objects
You can use the following methods to select objects:
13
z
To select only one object, click the Select button
and then one digital
ink stroke or line. A Selection box will appear around the selected object.
z
To select one or several digital ink strokes, lines or text boxes, click the
Select button
. Then click and drag a box around the whole of them. A
Selection box will appear around the selected objects.
z
Click the Select All button
to select all objects in the current page. A
Selection box will appear around the selected objects.
Note!
By clicking the Select button
and then one text box, you can edit the text in
the text box. However you can not select the text box by this way.
Note!
. Then you must click and
To select one text box, click the Select button
drag a box around the text box. A Selection box will appear around the
selected text box. However you can not edit the text in the text box by this way.
Resizing Objects
1.
Select one or several digital ink strokes, lines or text boxes.
2.
Rest the pointer on any corner of the Selection box until the pointer becomes a
double-headed arrow.
3.
Drag the corner of the Selection box to change the size of the selected objects.
Moving Objects
1.
Select one or several digital ink strokes, lines or text boxes.
2.
Move the pointer into the Selection box. The pointer will then become a move
pointer.
3.
Drag the selected objects in the Selection box to a new location.
Deleting Objects
1.
Select one or several digital ink strokes, lines or text boxes.
2.
Click the Delete button
objects.
or press the DELETE key to delete the selected
Copying or Moving Objects
1.
Select one or several digital ink strokes, lines or text boxes.
2.
Do one of the following:
3.
z
To move the selected objects, click the Cut button
toolbar.
z
To copy the selected objects, click the Copy button
Standard toolbar.
on the
Do one of the following:
z
14
on the Standard
If you want to copy or move the selected objects to another page in this
or another e-Book file, switch to the page. Click the Paste button
on the Standard toolbar. The Selection box will be around the pasted
objects. You can move the pasted objects to a new location.
z
If you want to copy or move the selected objects to the same page,
click the Paste button
on the Standard toolbar. The Selection box
will be around the pasted objects. You can move the pasted objects to
a new location.
z
If you want to copy or move the selected objects to another file for other
programs such as Outlook e-mail message, Word file or Excel file, switch to the
file. Click the Paste command in the program.
Changing the Color and Width of Objects
1.
Select one or several digital ink strokes or lines.
2.
Click a color button on the Color toolbar to switch the color of the selected objects.
Click a width button on the Width toolbar to change the width of the selected
objects.
Note!
By selecting a text box, you can not change the color of text in the
text box. By editing a text box, you can click a color button to
change the color of the selected text or click the Font button
to
change the font of the selected text.
Adding a New Page
Click the Add Page button
on the Standard toolbar. A new page will
appear at the end of this book file.
Setting the Default New Page Size
The Default New Page Size is for the new page which you
add in the e-Book file. It does not matter with the page size
of the digital page which you import to the e-Book file.
To set it, click Page Setup on the File menu. The Default
New Page Size dialog box will appear. We recommend that
you select the option button in accordance with your
DigiMemo model.
Moving the Current Page
1.
On the Page menu, click Move to. The Move to dialog box will appear.
2.
In the dialog box, type the page number (such as 5) which you want to move the
15
current page to.
3.
Click OK. The current page will then be moved to the page you designated
previously.
Removing the Current Page
Click the Remove Page button
. A dialog box will appear. Click Yes. The
current page and all its contents will be removed.
Showing the Background of Pages
1.
On the Edit menu, click Option. A dialog box will appear.
2.
Choose or clear the following check boxes to show the
background on:
3.
z
Current page
z
Page thumbnails
If necessary, select the following one option button:
z
Default background (Lines)
z
Import image as background
Click the Browse button to find the image file such as
BMP, JPG, GIF or PNG file which you want to be the
background.
4.
Choose or clear the Print background when printing check box.
5.
Click OK.
Saving Your Handwritten Notes as a PDF File
1.
Click the Save as a PDF File button
2.
In the dialog box, select the following one option button:
z
on the Standard toolbar.
Current Page
In this option, you can choose the Selected
area only check box.
z
All Pages
z
Select Pages
You can select several pages by using
CTRL or SHIFT key with mouse click.
3.
Click Next. In the dialog box, enter a name for
the PDF file. Click Save. The selected pages or
area will be saved as the PDF file.
Saving the Current Page as an Image File
You can save the current page as an image file whose file types can be TIF, JPG, BMP,
GIF or PNG.
1.
16
Click the Save as Image button
on the Standard toolbar.
2.
In the dialog box, select a file type and enter a file name. Click Save.
Switching the Current Page by Keyboard Shortcuts
First Page
CTRL+HOME
Last Page
CTRL+END
Previous Page
PAGE UP
Next Page
PAGE DOWN
Sending Your e-Book File in E-mail
You can use one of the following methods to send your e-Book file in e-mail:
z
In the software window of DigiMemo Manager, you can copy or move several
pages or just part of a page in your e-Book file to your Outlook e-mail message.
Note!
z
You can not use this copy or move technique in an Outlook Express email message.
In an e-mail message, insert your e-Book file as an attachment.
Note!
To view and edit your e-Book file, the recipient must have the DigiMemo
Manager software. If he or she does not have this software, please
download it on the ACECAD website.
http://www.acecad.com.tw/digimemo/download.html
z
Open your e-Book file in the DigiMemo Manager software. Click the E-mail
button
on the Standard toolbar. In the dialog box, select the Attach
your e-Book file option. Click OK. Your e-Book file will be attached to a
new e-mail message.
17
z
Open your e-Book file in the DigiMemo Manager software. Click the E-mail
button
on the Standard toolbar. In the dialog box, select the Attach
images option. Click OK. Every page of your e-Book file will be saved as a
JPG image file and be attached to a new e-mail message.
Converting Your Handwritten Notes in Your e-Book File
1.
If you have installed the optional DigiMemo Handwriting Recognition
software, click the Conversion button
on the Standard toolbar in the
software window of DigiMemo Manager.
2.
In the dialog box, select the following one option button:
z
Current Page
In this option, you can choose the Selected
area only check box.
z
All Pages
z
Select Pages
You can select several pages by using CTRL
or SHIFT key with mouse click.
3.
Click Next. The selected pages or area will be
imported into the DigiMemo Handwriting
Recognition software.
Sending Your Handwritten Notes to Microsoft Office
OneNote
If you have installed Microsoft Office OneNote software, you can send your handwritten
notes to OneNote, which can be convertible to digital text, organized and searchable in
OneNote. There are three ways in the following sections to send to OneNote.
Sending to OneNote from the DigiMemo Manager Software
1.
Click the Send to OneNote button
software window of DigiMemo Manager.
2.
In the dialog box, select the following one option button:
z
on the Standard toolbar in the
Current Page
In this option, you can choose the Selected area
only check box.
z
All Pages
z
Select Pages
You can select several pages by using CTRL or
SHIFT key with mouse click.
3.
Click Next. The Send to OneNote Properties dialog
box will appear. Select the following options you want.
z
18
For OneNote 2007, you can choose the Send to Unfiled Notes Section check
box to send your handwritten notes to the default
Unfiled Notes section in OneNote. For OneNote
2003, the Send to Unfiled Notes Section check
box is disabled.
4.
z
When the Send to Unfiled Notes Section check
box is cleared or disabled, you can click the
Browse button to select the existing Notebook,
Section Group (Folder) and Section in OneNote
which you want to send your handwritten notes in.
You also can type a new name in Section Group
(Folder) or Section text box to create a new
Section Group (Folder) or Section in OneNote
which you want to send in.
z
Under Send as option, select Handwriting Ink (for OneNote 2007), Drawing
Ink (for OneNote 2003) or Image option which your handwritten notes will be
sent in OneNote as. The Handwriting Ink can be converted into typewritten text
in OneNote according to handwriting recognition specification of your operating
system. The Drawing Ink can be converted to Handwriting Ink in OneNote.
z
Choose or clear the Send with page background check box.
z
If necessary, type a name in the Page Title text box for every page which you
send in OneNote. Choose or clear the Contain page number in page title
check box. If you choose it, you can type or select the starting number in the
Start at text box. You can review the page title in the Example box.
z
Choose or clear Navigate to OneNote check box.
Click Finish to start to send to OneNote. When finished, the dialog box will appear
and show Pages have been sent to OneNote successfully. Click OK.
Note!
When the Send to Unfiled Notes Section check box is cleared or
disabled, the Section text box can not be empty or the Finish button will
be disabled.
Using Send DHW to OneNote Icon on the Windows Desktop
1.
On the Windows desktop, double-click the Send DHW to
OneNote icon.
Note!
If you do not install OneNote in your Windows, the
dialog box will appear and show that No Office
OneNote in your Windows.
2.
The Select Digital Page dialog box will appear. Click
Browse to select a folder from which you want to send
your digital pages (DHW files) to OneNote. Such folder
could possibly be the DMEMO-M, the DMEMO-S, the
DMEMO-C or any folder that contains digital pages.
3.
You can select several digital pages by using CTRL or
SHIFT key with mouse click.
4.
Choose or clear the Delete DHW file after sending to
OneNote check box.
Send DHW
to OneNote
19
Note!
5.
Such deletion can not be recovered.
Click Next. The Send to OneNote Properties dialog box will appear. Select the
options you want. Then click Finish to send your handwritten notes to OneNote.
Changing the Default Program to OneNote for Digital Page File
(DHW)
The original default program to open digital page file (DHW) is DigiMemo Manager
software. If you have installed OneNote software, you can change the default program
to OneNote to open digital page file (DHW).
To change the default program for digital page file (DHW),
click DHW Default Program on the File menu in the
software window of DigiMemo Manager. Select the following
one option button and then click OK:
z
Open DHW by ACECAD DigiMemo Manager.
z
Open DHW by Microsoft Office OneNote.
In this option, you can choose or clear the Delete DHW file after sending to
OneNote check box.
Note!
Such deletion can not be recovered.
After you select the option Open DHW by Microsoft Office OneNote, when you
double-click a digital page file (DHW), the digital page will immediately be sent to
Unfiled Notes section as Handwriting Ink with untitled page title in OneNote for OneNote
2007.
Note!
For OneNote 2003, when you double-click a digital page file (DHW), the Send
to OneNote Properties dialog box will appear. Select the options you want.
Then click Finish to send the digital page to OneNote.
Using Another Optional Card Reader
If you have another optional card reader for Type I CompactFlash (CF) memory card,
you can organize your digital page or other computer files in the optional memory card
through this card reader.
Easily Managing Digital Page Files
When connecting the digital pad to your computer, the removable storage device, such
as the built-in 32 MB storage device or the optional memory card of the pad, is
accessed to your computer. The following procedures can be easily executed in your
Windows.
z
Delete the digital page files in the built-in 32 MB storage device or the optional
memory card of the digital pad.
Here is a brief recommendation: you may want to tear off the paper page or simply
cross out the page number you wrote on the paper page.
Note!
20
Once a digital page file is deleted in a removable storage device (the builtin 32 MB storage device or the optional memory card), it can not be
recovered
z
You can copy or move the digital page files in the built-in 32 MB storage device or
the optional memory card to your hard disk drive. You also can rename the digital
page files in your hard disk drive.
Note!
Do not rename the digital page files in the folder DMEMO-M of the built-in
32 MB storage device or the folder DMEMO-C of the optional memory
card. Otherwise the digital pad can not manage the renamed digital
pages.
Deleting the Digital Pages in the DigiMemo Manager
1.
In the software window of DigiMemo Manager, click the Digital Page button
on the Standard toolbar. The Digital Page dialog box will appear.
2.
Select the Delete digital pages option button.
Click Browse to select a folder in which you
want to delete your digital pages. Such folder
could possibly be the DMEMO-M, the DMEMOS, the DMEMO-C or any folder that contains
digital pages.
3.
Click OK. The Delete Digital Pages dialog box
will appear.
4.
To select nonadjacent digital pages, click one
digital page, and then hold down the CTRL key
and click each additional digital page.
To select adjacent digital pages, click the first
digital page in the sequence, and then hold down
the SHIFT key and click the last digital page.
To preview a digital page, select the digital page
and click Preview.
5.
Click OK. The digital pages you select will be
deleted.
21
Appendixes
Replacing the Ink Cartridge of the Digital Pen
Two replacement ink cartridges are stored in the cartridge
compartment of the digital pad. To open the cartridge
compartment cover of the pad, slide it outward while pressing
the raised dots on the middle of the cover.
Clip Hole
To replace the ink cartridge of the pen, you may use a small clip
to gently pull the old one out. Then insert a new one and press
the cartridge tip firmly against a hard surface until it snaps into
place.
You can also use the clip hole in the cartridge compartment to
replace the ink cartridge.
1.
Hold the digital pen upright and insert the cartridge tip into the wider
side of the clip hole.
2.
Gently push the pen horizontally towards the narrow side of the clip hole
to as far as it can reach.
3.
Gently pull out the ink cartridge from the pen.
4.
Insert a new one. Then press the cartridge tip firmly against a hard
surface until it snaps into place.
Purchasing New Replacement Ink Cartridges
1
3
2
The specification of ink cartridge used for the digital pen is 0.09" / 2.3 mm (Diameter) x
2.64" / 67 mm (Length).
Note!
The following ink cartridges have been tested and approved for use with the
digital pen:
Brand
ACECAD
Cross
Lamy
Sterling
SPALDING
STAEDTLER
Note!
Model
ink cartridge series
8518-1
M21
01800T
RFR80A
930-ASBK3V
The material of some ink cartridges may affect the performance of the digital
pen. Some ink cartridge with the different outside dimensions may damage the
digital pen.
Replacing the Battery in the Digital Pen
Even though the battery of the digital pen can last approximately 14 months, the battery
in the pen may be exhausted if any of the following situations occurs. If so, please
replace the battery.
22
z
Severe missing digital ink strokes
z
Serious lengthened or shortened digital ink strokes
z
Significant twisted digital ink strokes
z
Decreasing of the writing thickness
Removing the DigiMemo Manager Software in Windows
Open Add or Remove Programs icon in the Control Panel window. Remove the
ACECAD DigiMemo Manager software.
Caring for the DigiMemo A502/692
To assure proper functioning of the digital pen and pad, please observe the following
precautions:
z
Remove the batteries from the digital pad if it is not expected to be used for long
periods. This will eliminate the possibility of battery liquid leaking from the batteries
and corroding the digital pad.
z
Remove the button-cell battery from the digital inking pen if it is not expected to be
used for long periods. This will eliminate the possibility of battery liquid leaking from
the batteries and corroding the digital pen.
z
Avoid placing diskettes or other magnetic media on the pad surface.
z
Avoid placing hot or heavy items on the pad.
z
Clean the pen and pad with a soft cloth lightly dampened with water or a neutral
detergent.
z
Never drop the pen or pad. The pen or pad may malfunction if subjected to strong
shocks or vibration.
z
Avoid cutting or scratching the pad surface.
z
Never immerse the pen and pad in liquid.
z
Avoid operating or storing the pen and pad in extremely hot or cold temperatures, or
where the relative humidity is high.
z
Never take the pad or pen apart.
z
Do not use or store the product in the vicinity of equipment that generates strong
electromagnetic radiation or magnetic fields.
Error Codes on the Display of the Digital Pad
The Malfunction of the Built-in 32 MB Storage Device
If any of the following situations occurs, you need to reset the built-in 32 MB storage
device in the digital pad.
z
The malfunction of the built-in 32 MB storage device occurs.
z
The error code E04 appears on the display of the pad. It indicates that the file
system of the built-in 32 MB storage device is incompatible with the pad.
Note!
Resetting the built-in 32 MB storage device permanently deletes all data and
23
files it contains.
To reset the built-in 32 MB storage device, execute the following steps:
1.
While the digital pad is turned off, press and hold the Erase button
2.
Meanwhile, press and hold the Power button on the pad until the
appears on the display. Release the Power button.
3.
Then release the Erase button
Note!
on the pad.
icon
.
Do not format the built-in 32 MB storage device through the format function in
Windows. Or it will cause the incompatibility problem with the pad.
The Damage of the Built-in 32 MB Storage Device
If the error code E03 appears on the display of the digital pad, it indicates that the builtin 32 MB storage device may be damaged. It needs to be repaired. Please contact the
ACECAD distributor.
The File System Incompatibility of an Optional CF Memory Card
If the error code E02 appears on the display of the digital pad, it indicates that the file
system of the optional CF memory card is incompatible with the digital pad. If you want
the digital pad to capture and store your handwriting in this optional CF memory card,
please format this memory card before use.
Note!
Formatting an optional memory card permanently deletes all data and files it
contains. Before formatting, be sure to transfer to a computer any files you
would like to keep.
To format an optional CF memory card, execute the following steps:
1.
Load the memory card into the digital pad.
2.
Turn on your computer and start Windows.Connect the pad to your computer.
3.
Format the memory card with the file system FAT in Windows.
Note!
The digital pad only supports an optional CF memory card with the file system
FAT. The digital pad does not support an optional CF memory card with other
file system.
The Damage or Incompatibility of an Optional CF Memory Card
If the error code E01 appears on the display of the digital pad, it indicates that the
optional memory card may be damaged or the memory in the memory card is
incompatible with the digital pad. You can not use it with the pad.
Troubleshooting
Problem: A superimposed digital page is created.
Solution: Make sure to select a blank digital page each time you change a page on
paper.
Problem: Minor lengthened or shortened digital ink strokes occur
Solution: Write a little bit slowly or harder.
24
Problem: Significant missing, twisted, lengthened or shortened digital ink strokes
occur.
Solution: Please check the following situations for the digital pen:
z
The battery is correctly installed in the pen.
z
The battery must be inserted into the battery compartment with the
negative (-) cap facing the battery compartment.
z
The cushion (copper color) of the
battery is still located inside the
barrel cover. In fact, such cushion
will remain at its original position
unless it is improperly removed.
Barrel Cover
z
The barrel cover is screwed tightly onto the barrel of the pen.
z
Once the battery inside the digital pen has been used for a long time, it
should be replaced with a new one.
z
If you just replace an ink cartridge of the pen, please press the new
cartridge tip firmly against a hard surface until it snaps into place.
Please verify that the thickness of paper is under the writing thickness of the
digital pad.
Do not try to trace or write through any conductive material (for example:
steel ruler).
Problem: When you are writing or drawing on paper by using the digital pen on the
digital pad, the Pen icon does not appear on the display.
Solution: Try to alter the pressure you apply on the pen tip.
Problem: The digital pad can not be turned on.
Solution: Please verify the followings:
z
The battery compartment cover of the pad has been closed correctly
and completely.
z
The pad is not connected to your computer.
Problem: After using for a period of time, you can not turn on the digital pad.
Solution: The batteries in the pad may be exhausted. Please replace the batteries.
Problem: After you load an optional CF memory card into the digital pad and then turn
on the pad, the Storage Device icon
is not shown on the display. The
display still shows the Storage Device icon
.
Solution: Make sure that you insert the memory card correctly and firmly into the cardslot in the pad.
Problem: Even though the stored digital pages have not reached 999, the memory
(either in the built-in 32 MB storage device or in an optional memory card) is
25
full.
Solution: Although the digital pad has the ability to manage up to 999 digital pages
(either for the built-in 32 MB storage device or for an optional memory card),
such ability is unrelated to the maximum storage capacity.
The full memory means that the used space for the digital page files and the
other computer files reaches the maximum capacity of the built-in 32 MB
storage device or an optional memory card.
Problem: When connecting the digital pad to your computer through an USB port, your
Windows can not recognize the built-in 32 MB storage device and an
optional memory card in the pad as removable storage devices.
Solution: Please verify the followings:
z
The USB port is available.
z
Make sure that a power adapter provides enough power to the USB hub
while connecting the digital pad via an USB hub.
z
We recommend you connect the digital pad directly to an USB port on
the computer.
z
Occasionally, if your Windows can not recognize them, please restart
your Windows.
Problem: In the software window of DigiMemo Manager, the selected objects in an eBook file can not be copied or moved to a file for some programs such as
Notepad.
Solution: You can copy or move the selected objects to another file for other programs
such as Outlook e-mail message, Word file or Excel file. However, this
function is not suitable for all Windows programs.
Problem: After replacing the ink cartridge with the new one, the performance level of
the digital pen is lowered.
Solution: Please purchase and use an ink cartridge which we recommend.
Problem: Before disconnecting the digital pad from your computer, what should be
noticed?
Solution: The following stated notice is applied for all removable storage devices.
Close any associated windows for the built-in 32 MB storage device or an
optional CF memory card before attempting to disconnect the digital pad
from your computer.
Problem: Problems occur on the printing results.
Solution: We recommend you to use the Letter, A4 or A5 paper size.
26
Specifications
Digital Pad Specifications
Size
12.17" (length) x 8.23" (width)
309 mm (length) x 209 mm (width)
Thickness
The thinner part 0.39" (9.8 mm)
The thicker part 0.62" (15.7 mm)
Weight
Approx. 1.13 lbs (512 g) without batteries
Approx. 1.24 lbs (560 g) with batteries
Writing Area
5.9" x 8.3" (150 mm x 211 mm)
Writing Thickness
0.47" (12 mm); approx. 120 sheets of paper
Notepad Holder
DigiMemo 692:
DigiMemo A502:
Storage Medium
Built-in 32 MB storage device
Optional Storage
Medium
Type I CompactFlash (CF) memory card
(FAT file system)
Power Source
Four (4) batteries (1.5volt, size AAA)
Power Voltage:
3V
Power Current:
Approx. 25 mA
Power Consumption: Approx. 75 mW
Battery Life
Approx. 100 hours
Power Source
Supplied from USB port when connecting the digital pad to
PC.
Interface to PC
USB port
6.0" x 9.1" (153 mm x 232 mm)
150 mm x 232 mm (5.9" x 9.1")
Digital Pen Specifications
Size
5.28" (length) x 0.45" (diameter)
134 mm (length) x 11.3 mm (diameter)
Weight
0.03 lbs (13.8 g) with battery
Power Source
One (1) 1.55V button cell battery
(SR626SW, 377 or IEC-SR66)
Battery Life
Approx. 14 months
Ink Cartridge
0.09" (diameter) x 2.64" (length)
2.3 mm (diameter) x 67 mm (length)
File Formats
Digital Page
ACECAD digital page file format (DHW)
e-Book File
ACECAD e-Book file format (DND)
27
System Requirements
Operating System
Windows 2000 or XP
CPU
500 MHz Pentium III or better
RAM
128 MB or more recommended
Equipment
Available USB port
CD-ROM drive
Hard Disk Space
32 MB
Environment
Operating Temperature
32 °F to 104 °F (0 °C to 40 °C)
Operating Humidity
Less than 85% (no condensation)
Storage Temperature
-4 °F to 140 °F (-20 °C to 60 °C)
Note!
28
These specifications are subject to change without notice.
www.acecad.com.tw
Part Number: 91100-40850
English Version v2.40
Printed in China 2008.11