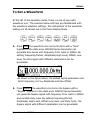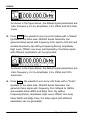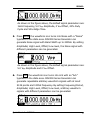
1
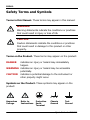
RIGOL Quick Guide DG2000 Series Function/Arbitrary Waveform Generator Sept. 2010 RIGOL Technologies, Inc. RIGOL Guaranty and Declaration Copyright © 2010 RIGOL Technologies, Inc. All Rights Reserved. Trademark Information RIGOL is a registered trademark of RIGOL Technologies, Inc. Notices RIGOL products are protected by patent law in and outside of P.R.C. RIGOL reserves the right to modify or change parts of or all the specifications and pricing policies at company’s sole decision. Information in this publication replaces all previously corresponding material. RIGOL shall not be liable for losses caused by either incidental or consequential in connection with the furnishing, use or performance of this manual as well as any information contained. Any part of this document is forbidden to be copied or photocopied or rearranged without prior written approval of RIGOL. Product Certification RIGOL guarantees this product conforms to the national and industrial standards in China. International standard conformance certification is in progress, e.g. ISO. Contact Us If you have any problem or requirement when using our products, please contact RIGOL Technologies, Inc. or your local distributors, or visit: www.rigol.com Quick Guide for DG2000 I RIGOL Safety Notice Please review the following safety precautions carefully before putting the instrument into operation so as to avoid any personal injuries or damages to the instrument and any product connected to it. To prevent potential hazards, please use the instrument only specified by this manual. Use Proper Power Cord. Only the power cord designed for the instrument and authorized by local country could be used. Ground The Instrument. The instrument is grounded through the Protective Earth lead of the power cord. To avoid electric shock, it is essential to connect the earth terminal of power cord to the Protective Earth terminal before any inputs or outputs. Observe All Terminal Ratings. To avoid fire or shock hazard, observe all ratings and markers on the instrument and check your manual for more information about ratings before connecting. Do Not Operate Without Covers. Do not operate the instrument with covers or panels removed. Avoid Circuit or Wire Exposure. Do not touch exposed junctions and components when the unit is powered. II Quick Guide for DG2000 RIGOL Do Not Operate With Suspected Failures. If you suspect damage occurs to the instrument, have it inspected by qualified service personnel of RIGOL before further operations. Keep Well Ventilation. Inadequate ventilation may cause increasing of temperature or damages to the device. So please keep well ventilated and inspect the intake and fan regularly. Do Not Operate in Wet Conditions. In order to avoid short circuiting to the interior of the device or electric shock, please do not operate in a humid environment. Do Not Operate in an Explosive Atmosphere. In order to avoid damages to the device or personal injuries, it is important to operate the device away from an explosive atmosphere. Keep Product Surfaces Clean and Dry. To avoid the influence of dust and/or moisture in air, please keep the surface of device clean and dry. Quick Guide for DG2000 III RIGOL Safety Terms and Symbols Terms in this Manual. These terms may appear in this manual: WARNING Warning statements indicate the conditions or practices that could result in injury or loss of life. CAUTION Caution statements indicate the conditions or practices that could result in damage to this product or other property. Terms on the Product. These terms may appear on the product: DANGER indicates an injury or hazard may immediately happen. WARNING indicates an injury or hazard may be accessible potentially. CAUTION indicates a potential damage to the instrument or other property might occur. Symbols on the Product. These symbols may appear on the product: Hazardous Voltage IV Refer to Instructions Protective Earth Terminal Chassis Ground Test Ground Quick Guide for DG2000 RIGOL Content Guaranty and Declaration ..................................................I Safety Notice .................................................................... II Safety Terms and Symbols .............................................. IV Quick Start ........................................................................ 1 General Inspection ............................................................ 1 Handle Adjustment ........................................................... 2 The Front/Rear Panel ........................................................ 3 Device Connection ............................................................ 5 Power Connection ...................................................... 5 USB Connection ......................................................... 5 BNC Connection ......................................................... 5 User Interface .................................................................. 6 To Set a Waveform ........................................................... 7 To Use the Mod/ Sweep/Burst Function ..............................11 To Trigger/Output ............................................................13 To Use the Digital Input....................................................14 To Use the Store/Utility/Help Function................................15 Troubleshooting .............................................................. 16 Quick Guide for DG2000 V RIGOL Quick Start General Inspection 1. Inspect the shipping container for damage Keep the damaged shipping container or cushioning material until the contents of the shipment have been checked for completeness and the instrument has passed both electrical and mechanical tests. The consigner or carrier shall be liable for the damage to instrument resulting from shipment. RIGOL would not be responsible for free maintenance/rework or replacement of the unit. 2. Inspect the instrument In case of any damage, or defect, or failure, notify your RIGOL sales representative. 3. Check the accessories Please check the accessories according to the packing lists. If the accessories are incomplete or damaged, please contact your RIGOL sales representative. Quick Guide for DG2000 1 RIGOL Handle Adjustment To adjust the handle position of DG2000 Function/ Arbitrary Waveform Generator, please grip the handle by the sides and pull it outward. Then, make the handle rotate to the desired position. The operating methods are shown below. Adjusting the Handle Viewing Positions 2 Carrying Position Quick Guide for DG2000 RIGOL The Front/Rear Panel This section will make a brief introduction and description for the operation and functions of the Front/ Rear Panel of DG2000 Series Function/ Arbitrary Waveform Generator. Front Panel at a Glance DG2000 has clear and simple front panel. The Front Panel has a knob, functional keys and menu softkeys. The 6 grey keys below the screen are menu softkeys, with the help of which, you can choose different options on the current menu. The rests are the functional keys, with which you can enter different function menus or obtain specific functional applications directly. LCD Screen Power Key USB Host ! Graph/ Text Mode Key Menu Operation Softkeys Mode/ Functions Waveform Selection Keys Number Keys Direction Knob Keys Output Control Output Connector Trigger Sync Control Output CAUTION: The [Output] and [Sync] connectors on the front panel can be only used for the signal output. If they are used for input, it may make the circuit burned and the instrument in trouble. Quick Guide for DG2000 3 RIGOL Rear Panel at a Glance 10MHz 10MHz Reference Input Reference Output Terminal Terminal Modulation Input Terminal 10/100 Ethernet External Digital Output Trig/FSK/Burst GPIB ( IEEE 488 ) USB Device RS232 Power Socket Main Power Switch Signs for the panel keys in this manual: The signs for the panel keys in this manual are the same as the panel keys. Please note that the signs for the functional keys on the operation panel are represented by squared words, such as Sine, which represents the transparent functional key with Sine on it on the front panel, while the menu softkeys are represented by shadow words such as Frequency , which means the “Frequency” option in the Sine menu. 4 Quick Guide for DG2000 RIGOL Device Connection Power Connection Connect the power socket and AC supply with power cord attached to the instrument. Turn on the power switch at the rear panel to power on the generator, then press the power key on the front panel to start the instrument immediately. If start abnormally, please check according to the following steps: 1. Check if the power cord is normally connected and the power switch on the rear panel has been turned on. 2. Check if the fuse is intact, or esle please replace it. 3. If the instrument still cannot be started, contact RIGOL for help. USB Connection USB Host: This port is used to transfer data when external USB device connects to the generator regarded as a “Host” device. For example, connect a USB flash device for data storage. USB Device: This port is used to transfer data when external USB device connects to the generator regarded as a “Slave” device. For example, connect with PC for remote control. BNC Connection Interfaces need to be connected by BNC Cable include: [Sync], [Output] on the front panel and [10MHz In], [10MHz Out], [Modulation In], [Ext Trig/FSK/Burst] on the rear panel. Insert BNC cable to the connector vertically, and rotate clockwise to lock it. Quick Guide for DG2000 5 RIGOL User Interface DG2000 Series Function/ Arbitrary Waveform Generator provide two display modes: Menu and Graph. These two display modes can be switched to each other by pressing the /A key. Menu Display Mode Under the Menu display mode, the display interface is divided into these parts: state, waveform icon, operation menu, and parameter display. See the figure below. Parameter Display State Waveform Icon Operation Menu Graph Display Mode Under the Graph display mode, you can check the current waveform parameters in the graphics. The display interface is also divided into these parts: state, parameter display, display menu softkey and waveform display. See the figure below. The operation menu will appear at the bottom of the screen when you press any menu softkey. Parameter Display State Parameters Display Menu button 6 Waveform Display Quick Guide for DG2000 RIGOL To Set a Waveform At the left of the operation panel, there is a set of keys with waveform icon. The exercise below will help you familiarized with the waveform selection settings. The instructions of the waveform setting are all carried out in the Menu Display Mode. 1. Press Sine, the waveform icon turns into Sine with a “Sine” typeface in the state area. DG2000 Series Generator can generate Sine signal with frequency from 1μHz to 40MHz. By setting Frequency/Period, Amplitude/ High Level, Offset/ Low level, the Sine signal with different parameters can be generated. As shown in the figure above, the default signal parameters are: 1kHz Frequency, 5.0 Vpp Amplitude and 0Vdc Offset. 2. Press Square, the waveform icon turns into Square with a “Square” typeface in the state area. DG2000 Series Generator can generate Square signal with frequency from 1μHz to 40MHz and variable duty cycle. By setting Frequency/Period, Amplitude/ High Level, Offset/ Low level, and Duty Cycle, the Square signal with different parameters can be generated. Quick Guide for DG2000 7 RIGOL As shown in the figure above, the default signal parameters are: 1kHz Frequency, 5.0 Vpp Amplitude, 0 Vdc Offset and 50% Duty Cycle. 3. Press Ramp, the waveform icon turns into Ramp with a “Ramp” typeface in the state area. DG2000 Series Generator can generate Ramp signal with frequency from 1μHz to 400 kHz and variable Symmetry. By setting Frequency/Period, Amplitude/ High Level, Offset/ Low level, and Symmetry, the Ramp signal with different parameters can be generated. As shown in the figure above, the default signal parameters are: 1kHz Frequency, 5.0 Vpp Amplitude, 0 Vdc Offset and 50% Symmetry. 4. Press Pulse, the waveform icon turns into Pulse with a “Pulse” typeface in the state area. DG2000 Series Generator can generate Pulse signal with frequency from 500μHz to 16MHz and variable Pulse Width and Edge Time. By setting Frequency/Period, Amplitude/ High Level, Offset/ Low level, Pulse Width and Edge Time, the Pulse signal with different parameters can be generated. 8 Quick Guide for DG2000 RIGOL As shown in the figure above, the default signal parameters are: 1kHz Frequency, 5.0 Vpp Amplitude, 0 Vdc Offset, 20% Duty Cycle and 50ns Edge Time. 5. Press Noise, the waveform icon turns into Noise with a “Noise” typeface in the state area. DG2000 Series Generator can generate Noise signal with Band Width up to 20MHz. By setting Amplitude/ High Level, Offset/ Low level, the Noise signal with different parameters can be generated. As shown in the figure above, the default signal parameters are: 5.0 Vpp Amplitude and 0 Vdc Offset. 6. Press Arb, the waveform icon turns into Arb with an “Arb” typeface in the state area. DG2000 Series Generator can generate repeatable arbitrary waveform signals with at most 512K points and 12MHz frequency. By setting Frequency/Period, Amplitude/ High Level, Offset/ Low level, arbitrary waveform signals with different parameters can be generated. Quick Guide for DG2000 9 RIGOL As shown in the figure above, the default Exponential Rise Signal parameters are: 1kHz Frequency, 5.0 Vpp Amplitude and 0 Vdc Offset. 7. Digital is a reserved function key for the Logic Signal Output Module. Note: Description of the parameter range based on the DG2041A model in this section. 10 Quick Guide for DG2000 RIGOL To Use the Mod/ Sweep/Burst Function As shown in the figure below, there are three keys on the front panel, which are used for Mod, Sweep and Burst settings. The instructions below will help you familiarize with the setting of these functions. 1. Press Mod, a modulated waveforms will be generated. DG2000 Series can generate AM, FM, PM, PWM and FSK modulate waveforms. Parameters are set by using the menu softkeys. The modulated waveform can be changed by changing the parameters such as Type, Internal/External Modulation, Depth, Frequency, Waveform, etc. 2. Press Sweep, Sine, Square, Ramp or Arbitrary waveform can be swept (Pulse, Noise and DC cannot be swept). In the Sweep Mode, DG2000 Series generate signal with variable frequencies. Quick Guide for DG2000 11 RIGOL 3. Press Burst, Burst for Sine, Square, Ramp, Pulse or Arbitrary waveform can be generated (Noise can only be used in the gated Burst). Term Explanation Burst: Output Waveforms with set cycle times Burst can last for certain times of waveform cycle (N-Cycle Burst) or be controlled by external gated signals (Gated Burst). Burst applies to all kinds of waveforms, but noise can only be used in gated burst. Generally it is called BURST function within every Signal Generator. 12 Quick Guide for DG2000 RIGOL To Trigger/Output As shown in the figure below, there are two keys on the right side of the operation panel, which are used to set Trigger and Output Control. The instruction below will help you familiarize with these functions. 1. Press Trigger, choose internal/external or manual Trigger (Manual Trigger can only be used in Sweep and N-Cycle Burst) The default setting for Trigger is “Internal”. In this mode, when the Sweep or Burst Mode is also selected, the Generator will continuously generate sweep or burst waveform. At this time, press Trigger, the instrument will shift from the “Automatic” Trigger mode into “Manual” Trigger mode. When the generator uses the” External” Trigger Mode, if the Sweep or the Burst Mode is selected, the signal will be continuously generated. At this time, press Trigger, the instrument state will not change, and it will show the information “The instrument has already been triggered”. Every time you press the Trigger, “Manual” Trigger will start a sweep or generate a burst. Press the key again, and the generator will be triggered again. 2. Press Output, activate or deactivate the output signal. If an overload message is shown, disconnect the external equipment from the [Output] terminal and press Output, reactivate the output terminal. Quick Guide for DG2000 13 RIGOL To Use the Digital Input As shown in the figure below, there are two groups of keys on the operation panel, which are the direction keys, the knob and the keyboard. The instruction below will help you familiarize with the Digital Input Function. Direction Keys and the Knob Keyboard 1. Use the Direction keys to move the cursor left or right. Rotate the knob to change a digit (clockwise to increase 1), and the range of digit is 0~9. 2. Use the Keypad to set the parameters values of the waveforms, which can change its value directly. 14 Quick Guide for DG2000 RIGOL To Use the Store/Utility/Help Function As shown in the figure below, there are three keys on the operation panel, which are used to call the store/recall, utility and help function. The instruction below will help you familiarize with these Functions. 1. The Store/Recall key is used to store waveform data and configure information. 2. The Utility key is used to set the auxiliary system function, change the output configure parameters, interface setting, system setting information or perform the instrument self-test and read the calibration information, etc. 3. The Help key is used to see the help information. Get help on any key: To get help on any key of the front panel, press the key and last for about 1 second, then the help message will appear. Quick Guide for DG2000 15 RIGOL Troubleshooting 1. If the screen does not turn on even if the generator is on, please follow the steps below: (1) Check if the power is correctly connected. (2) Check if the power switch is really on. (3) Restart the instrument after taking the above steps. (4) If it does not work correctly, contact RIGOL for our service. 2. If the settings are correct but no waveform is generated, please follow the steps below: (1) Check if the Signal Line is correctly connected to the [Output] terminal. (2) Check the BNC if it works correctly. (3) Check the Output key, if it is turned on. (4) Press Utility System Setting PowOn Latest when all the above steps have been finished. Restart the computer. 3. The U-disk cannot be recognized: (1) Check if the U-disk can work normally. (2) Make sure the U-disk is USB flash disk. The generator doesn’t support hard drive-based U-disk. (3) Restart the instrument, reinsert the USB device and check it. (4) If the U-disk still does not work normally, please contact RIGOL. 16 Quick Guide for DG2000