1
Programmer’s
Reference Manual
Intermec Fingerprint® v7.61
Information in this manual is subject to change without prior notice and does not represent a
commitment on the part of Intermec Printer AB.
© Copyright Intermec Printer AB, December 2001. All rights reserved. Published in Sweden.
EasyCoder, EasyLAN, Fingerprint, and LabelShop are registered trademarks of Intermec
Technologies Corp. The word Intermec, the Intermec logo, InterDriver, and PrintSet are
trademarks of Intermec Technologies Corp.
Bitstream is a registered trademark of Bitstream, Inc.
Centronics is a registered trademark of Genicom Corp.
IBM is a registered trademark of International Business Machines Corporation.
Intel is a registered trademark of Intel Corporation.
Macintosh and TrueType are registered trademarks of Apple Computer, Inc.
Microsoft, MS, and MS-DOS are registered trademarks of Microsoft Corporation.
TrueDoc is a trademark of Bitstream, Inc.
Unicode is a trademark of Unicode Inc.
Windows is a trademark of Microsoft Corporation.
Chapter 1
1. Introduction
Contents
1. Introduction
Contents.............................................................................................1
Preface...............................................................................................7
News in Intermec Fingerprint v7.61................................................8
Auxiliary Files in Intermec Fingerprint v7.61................................9
2. Program Instructions
Syntax..............................................................................................11
ABS ................................................................................................ 12
ACTLEN........................................................................................ 13
ALIGN (AN) ................................................................................. 14
ASC ................................................................................................ 17
BARADJUST................................................................................ 18
BARCODENAME$...................................................................... 19
BARFONT (BF)............................................................................ 20
BARFONT ON/OFF (BF ON/OFF) ........................................... 22
BARHEIGHT (BH) ...................................................................... 23
BARMAG (BM)............................................................................ 24
BARRATIO (BR).......................................................................... 25
BARSET ........................................................................................ 26
BARTYPE (BT) ............................................................................ 28
BEEP .............................................................................................. 29
BREAK.......................................................................................... 30
BREAK ON/OFF.......................................................................... 33
BUSY ............................................................................................. 34
CHDIR ........................................................................................... 35
CHECKSUM................................................................................. 36
CHR$.............................................................................................. 37
CLEANFEED................................................................................ 38
CLEAR .......................................................................................... 39
CLIP ............................................................................................... 40
CLL ................................................................................................ 41
CLOSE........................................................................................... 43
COM ERROR ON/OFF ............................................................... 44
COMBUF$ .................................................................................... 45
COMSET ....................................................................................... 46
COMSET OFF .............................................................................. 48
COMSET ON................................................................................ 49
COMSTAT..................................................................................... 50
CONT............................................................................................. 51
COPY ............................................................................................. 52
COUNT& ...................................................................................... 53
CSUM ............................................................................................ 55
CUT................................................................................................ 56
CUT ON/OFF................................................................................ 57
DATE$............................................................................................ 58
DATEADD$ .................................................................................. 59
DATEDIFF..................................................................................... 60
Intermec Fingerprint v7.61
Programmer's Reference
Manual
Edition 7, December 2001
Part No. 1-960434-06
Intermec Fingerprint v7.61 – Programmer’s Reference Manual Ed. 7
1
Chapter 1
Introduction
2. Program Instructions, cont.
2
DBBREAK.................................................................................... 61
DBBREAK OFF ........................................................................... 62
DBEND.......................................................................................... 63
DBSTDIO...................................................................................... 64
DBSTEP......................................................................................... 65
DELETE ........................................................................................ 66
DELETEPFSVAR......................................................................... 67
DEVICES....................................................................................... 68
DIM ................................................................................................ 71
DIR ................................................................................................. 72
END................................................................................................ 75
ENDIF (see IF...THEN...ELSE)................................................. 117
EOF ................................................................................................ 76
ERL ................................................................................................ 77
ERR ................................................................................................ 78
ERROR .......................................................................................... 79
EXECUTE..................................................................................... 81
FIELD ............................................................................................ 82
FIELDNO ...................................................................................... 83
FILE& LOAD ............................................................................... 84
FILENAME$................................................................................. 85
FILES ............................................................................................. 86
FLOATCALC$.............................................................................. 87
FONT (FT)..................................................................................... 88
FONTD .......................................................................................... 90
FONTNAME$............................................................................... 91
FONTS........................................................................................... 92
FOR...TO...NEXT ......................................................................... 92
FORMAT ....................................................................................... 94
FORMAT DATE$ ......................................................................... 96
FORMAT INPUT.......................................................................... 97
FORMAT TIME$.......................................................................... 98
FORMAT$..................................................................................... 99
FORMFEED................................................................................ 102
FRE............................................................................................... 103
FUNCTEST................................................................................. 104
FUNCTEST$............................................................................... 106
GET .............................................................................................. 108
GETASSOC$............................................................................... 109
GETASSOCNAME$ .................................................................. 110
GETPFSVAR............................................................................... 111
GOSUB........................................................................................ 112
GOTO........................................................................................... 114
HEAD........................................................................................... 115
IF..THEN...(ELSE)...................................................................... 117
IMAGE BUFFER SAVE............................................................ 119
IMAGE LOAD............................................................................ 120
IMAGENAME$ .......................................................................... 121
IMAGES ...................................................................................... 122
IMMEDIATE............................................................................... 123
INKEY$ ....................................................................................... 125
INPUT (IP)................................................................................... 126
Intermec Fingerprint v7.61 – Programmer’s Reference Manual Ed. 7
Chapter 1
2. Program Instructions, cont.
Introduction
INPUT ON/OFF.......................................................................... 128
INPUT#........................................................................................ 129
INPUT$........................................................................................ 130
INSTR .......................................................................................... 131
INVIMAGE (II)........................................................................... 132
KEY BEEP .................................................................................. 133
KEY ON/OFF.............................................................................. 134
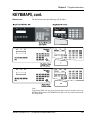
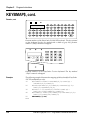
KEYBMAP$ ............................................................................... 136
KILL............................................................................................. 139
LAYOUT ..................................................................................... 140
LAYOUT END............................................................................ 143
LAYOUT INPUT........................................................................ 144
LAYOUT RUN............................................................................ 145
LBLCOND .................................................................................. 146
LED ON/OFF.............................................................................. 148
LEFT$ .......................................................................................... 149
LEN .............................................................................................. 150
LET............................................................................................... 151
LINE INPUT ............................................................................... 152
LINE INPUT# ............................................................................. 153
LIST.............................................................................................. 154
LISTPFSVAR.............................................................................. 155
LOAD........................................................................................... 156
LOC.............................................................................................. 157
LOF .............................................................................................. 158
LSET ............................................................................................ 159
LTS& ON/OFF............................................................................ 160
MAG............................................................................................. 161
MAKEASSOC ............................................................................ 162
MAP ............................................................................................. 163
MERGE........................................................................................ 165
MID$ ............................................................................................ 166
NAME DATE$ ............................................................................ 167
NAME WEEKDAY$.................................................................. 168
NASC ........................................................................................... 169
NASCD ........................................................................................ 171
NEW............................................................................................. 172
NEXT (see FOR TO NEXT)........................................................ 93
NORIMAGE (NI) ....................................................................... 173
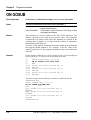
ON BREAK GOSUB ................................................................. 174
ON COMSET GOSUB .............................................................. 175
ON ERROR GOTO..................................................................... 177
ON GOSUB................................................................................. 178
ON GOTO.................................................................................... 179
ON HTTP GOTO........................................................................ 180
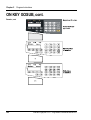
ON KEY GOSUB....................................................................... 181
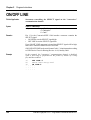
ON/OFF LINE............................................................................. 184
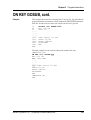
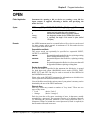
OPEN ........................................................................................... 185
OPTIMIZE ON/OFF................................................................... 187
PORTIN ....................................................................................... 188
PORTOUT ON/OFF................................................................... 189
PRBAR (PB)................................................................................ 190
Intermec Fingerprint v7.61 – Programmer’s Reference Manual Ed. 7
3
Chapter 1
Introduction
2. Program Instructions, cont.
4
PRBOX (PX) ............................................................................... 191
PRBUF......................................................................................... 197
PRIMAGE (PM).......................................................................... 198
PRINT (?)..................................................................................... 199
PRINT KEY ON/OFF ................................................................ 200
PRINT# ........................................................................................ 201
PRINTFEED (PF) ....................................................................... 202
PRINTONE ................................................................................. 204
PRINTONE# ............................................................................... 205
PRLINE (PL)............................................................................... 206
PRPOS (PP)................................................................................. 207
PRSTAT........................................................................................ 209
PRTXT (PT)................................................................................. 211
PUT .............................................................................................. 213
RANDOM ................................................................................... 214
RANDOMIZE............................................................................. 215
READY........................................................................................ 216
REBOOT...................................................................................... 217
REDIRECT OUT........................................................................ 218
REM (')......................................................................................... 219
REMOVE IMAGE...................................................................... 220
RENDER ON/OFF ..................................................................... 221
RENUM....................................................................................... 222
RESUME ..................................................................................... 223
RETURN ..................................................................................... 224
RIGHT$ ....................................................................................... 225
RSET ............................................................................................ 226
RUN.............................................................................................. 227
SAVE............................................................................................ 228
SET FAULTY DOT .................................................................... 230
SETASSOC.................................................................................. 231
SETPFSVAR ............................................................................... 232
SETSTDIO .................................................................................. 233
SETUP ......................................................................................... 235
SETUP GET ................................................................................ 238
SETUP WRITE ........................................................................... 239
SGN.............................................................................................. 241
SORT............................................................................................ 242
SOUND........................................................................................ 243
SPACE$........................................................................................ 244
SPLIT ........................................................................................... 245
STOP ............................................................................................ 246
STORE IMAGE .......................................................................... 247
STORE INPUT............................................................................ 248
STORE OFF ................................................................................ 249
STR$............................................................................................. 250
STRING$..................................................................................... 251
SYSVAR ...................................................................................... 252
TESTFEED.................................................................................. 259
TICKS .......................................................................................... 260
TIME$.......................................................................................... 261
TIMEADD$................................................................................. 262
Intermec Fingerprint v7.61 – Programmer’s Reference Manual Ed. 7
Chapter 1
Introduction
2. Program Instructions, cont.
TIMEDIFF................................................................................... 263
TRANSFER KERMIT ............................................................... 264
TRANSFER STATUS ................................................................ 265
TRANSFER ZMODEM............................................................. 266
TRANSFER$............................................................................... 267
TRANSFERSET ......................................................................... 268
TRON/TROFF............................................................................. 269
VAL .............................................................................................. 270
VERBON/VERBOFF................................................................. 271
VERSION$.................................................................................. 272
WEEKDAY ................................................................................. 273
WEEKDAY$ ............................................................................... 274
WEEKNUMBER........................................................................ 275
WHILE...WEND......................................................................... 276
XORMODE ON/OFF................................................................. 277
External Commands; ZMODEM............................................... 278
External Commands; Dynamic Modules................................... 279
3. Image Transfer
Intelhex......................................................................................... 280
UBI00........................................................................................... 280
UBI01........................................................................................... 280
UBI02........................................................................................... 280
UBI03........................................................................................... 280
Image Format............................................................................... 281
UBI10........................................................................................... 284
PRBUF-Protocol ......................................................................... 286
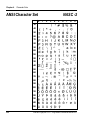
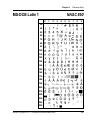
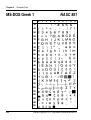
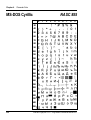
4. Character Sets
Introduction.................................................................................. 288
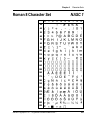
Roman 8 Character Set ............................................................... 289
French Character Set ................................................................... 290
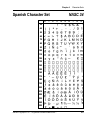
Spanish Character Set.................................................................. 291
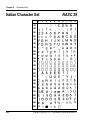
Italian Character Set .................................................................... 292
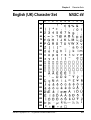
English (UK) Character Set ........................................................ 293
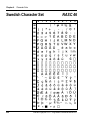
Swedish Character Set................................................................. 294
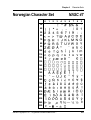
Norwegian Character Set ............................................................ 295
German Character Set ................................................................. 296
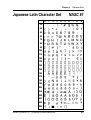
Japanese Latin Character Set ...................................................... 297
Portuguese Character Set ............................................................ 298
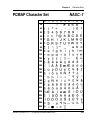
PCMAP Character Set ................................................................ 299
ANSI Character Set..................................................................... 300
MS-DOS Latin 1 Character Set.................................................. 301
MS-DOS Greek 1 Character Set ................................................ 302
MS-DOS Latin 2 Character Set.................................................. 303
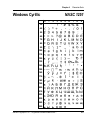
MS-DOS Cyrillic Character Set ................................................. 304
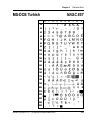
MS-DOS Turkish Character Set................................................. 305
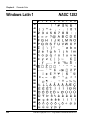
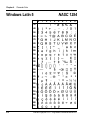
Windows Latin 2 Character Set.................................................. 306
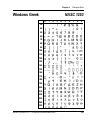
Windows Cyrillic Character Set ................................................. 307
Windows Latin 1 Character Set.................................................. 308
Windows Greek Character Set.................................................... 309
Windows Latin 5 Character Set.................................................. 310
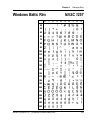
Windows Baltic Rim Character Set............................................ 311
Intermec Fingerprint v7.61 – Programmer’s Reference Manual Ed. 7
5
Chapter 1
Introduction
5. Bar Codes
Introduction.................................................................................. 312
Standard Bar Codes..................................................................... 313
EAN 8........................................................................................... 314
EAN 13 ........................................................................................ 314
UPC-E .......................................................................................... 315
UPC-A.......................................................................................... 315
Interleaved 2 of 5 ......................................................................... 316
Code 39 ........................................................................................ 316
Code 128 ...................................................................................... 317
EAN 128 ...................................................................................... 317
Setup Bar Codes .......................................................................... 318
6. Fonts
Introduction.................................................................................. 319
Bitmap Fonts................................................................................ 320
Font Aliases.................................................................................. 320
Printout Samples.......................................................................... 321
OCR-A BT Character Set ........................................................... 322
OCR-B 10 Pitch BT Character Set............................................. 323
Zapf Dingbats BT Character Set ................................................ 324
7. Error Messages
Interpretation Table...................................................................... 325
8. EasyLAN 100i Setup
Sections, Objects, and Values ..................................................... 327
6
Intermec Fingerprint v7.61 – Programmer’s Reference Manual Ed. 7
Chapter 1
Preface
Introduction
Intermec Fingerprint is a BASIC-inspired, printer-resident programming
language that has been developed for use with the Intermec EasyCoder XPand EasyCoder F-series of direct thermal and thermal transfer printers.
The Intermec Fingerprint firmware is an easy-to-use intelligent programming
tool for label formatting and printer customizing, which allows you to
design your own label formats and write your own printer application
software.
You may easily create a printer program by yourself that exactly fulfils your
own unique requirements. Improvements or changes due to new demands
can be implemented quickly and without vast expenses.
Intermec Fingerprint also contains an easy-to-use slave protocol, called
Intermec Direct Protocol. It allows layouts and variable data to be downloaded
from the host and combined into labels, tickets and tags with a minimum
of programming. Intermec Direct Protocol also includes a versatile error
handler and a flexible counter function.
This Reference Manual contains detailed information on all programming
instructions in the Intermec Fingerprint programming language in alphabetical
order. It also contains other program-related information that is common for all
Intermec Fingerprint-compatible printer models from Intermec.
All information needed by the operator, like how to run the printer, how
to load the media or ribbon supply and how to maintain the printer, can
be found in the User’s Guide and the Installation & Operation manual
for the printer model in question.
In the Installation & Operation manual for each type of printer, you will
find information on installation, setup, print resolution, media specifications,
relations between printhead and media, and other technical information,
which is specific for each printer model.
The Intermec Fingerprint v7.xx Programmer’s Guide supplements the
Reference Manual and gives a comprehensive introduction to Fingerprint
programming, even if some new features introduced with Fingerprint
v7.61 are not included.
IMPORTANT!
Note that version 7.0 and later versions of Intermec Fingerprint only apply
to the EasyCoder XP- and EasyCoder F-series printers. Current and
phased-out printer models not supporting Intermec Fingerprint 7.xx, but
restricted to Intermec Fingerprint 6.xx, are:
EasyCoder 101
EasyCoder 201 IIS
EasyCoder 401
EasyCoder 401 LinerLess
EasyCoder 501 S
EasyCoder 501 Ticketing
EasyCoder 601 S
EasyCoder 101 E
EasyCoder 201 II E
EasyCoder 101 SA
EasyCoder 201 II SA
EasyCoder 501 E
EasyCoder 501 LinerLess
EasyCoder 601 E
EasyCoder 501 SA
There are also a number of non Fingerprint-compatible printers in the
Intermec EasyCoder product range.
Intermec Fingerprint v7.61 – Programmer’s Reference Manual Ed. 7
7
Chapter 1
Introduction
News in Intermec Fingerprint v7.61
Intermec Fingerprint v7.61 is an enhanced and bug-corrected version of Intermec Fingerprint v7.60.
General Improvements
• New version of Intermec Shell (v4.8). Autohunting bug corrected.
• Bug corrections.
Modified Instructions
• PRSTAT
• SYSVAR
Corrections
• FORMAT$
• SETSTDIO
• SETUP GET
• STORE INPUT
• SYSVAR
New detection of out-of-ribbon/ribbon-installed.
SYSVAR (41) and SYSVAR (42) added.
Examples corrected.
100 = Autohunting enabled (not -1). Example corrected.
Error in example corrected.
Error in example corrected.
SYSVAR (28) new default value (1).
SYSVAR(29), SYSVAR(30), and SYSVAR(33) read DSR (not DTR).
Other Modifications
• Setup using an EasySet Bar Code Wand and the creation of setup bar codes has been (or will be)
moved from the Intermec Fingerprint v7.61, Programmer’s Reference Manual and the Installation
& Operation manuals of EasyCoder 501 XP/601 XP and EasyCoder F2/F4 to a dedicated manual
(EasySet Bar Code Wand Setup, P/N 1-960560-00).
8
Intermec Fingerprint v7.61 – Programmer’s Reference Manual Ed. 7
Chapter 1
Auxiliary Files in
Intermec Fingerprint
v7.61
Introduction
The Intermec Fingerprint v7.61 firmware contains the following
auxiliary files in addition to the system files (“kernel”):
In device "rom:"
.FONTALIAS
.flk
.profile
.setup.saved
.ubipfr1.bin
CHESS2X2.1
CHESS4X4.1
DIAMONDS.1
ERRHAND.PRG
FILELIST.PRG
GLOBE.1
LBLSHTXT.PRG
LINE_AXP.PRG
LSHOPXP1.SUB
MKAUTO.PRG
PUP.BAT
SHELLXP.PRG
WINXP.PRG
copyright.htmf
default.html
diagnostics.htmf
dochead.htmf
footer.htmf
framelay.cgi
home.htmf
htmlhead.htmf
images/blackbal.gif
images/itclogo1.gif
images/pixel.gif
images/redbar.gif
images/sm_bg1.gif
monitor
nav.html
secure/config.html
secure/configbase.html
secure/configj.js
secure/configtitle.html
secure/configtree.html
secure/empty.htm
secure/ftie4style.css
secure/ftiens4.js
secure/ftv2blank.gif
secure/ftv2doc.gif
secure/ftv2folderclosed.gif
secure/ftv2folderopen.gif
secure/ftv2lastnode.gif
Intermec Fingerprint v7.61 – Programmer’s Reference Manual Ed. 7
Creates reference fonts
System file
System file
Default setup values
Standard fonts
Standard image for test labels
Standard image for test labels
Standard image for test labels
Error Handler
List the lines of a file
Standard image for test labels
Intermec Shell auxiliary file
Intermec Shell Line Analyzer
Intermec Shell auxiliary file
Create a startup (autoexec) file
Intermec Shell Startup file
Intermec Shell startup program
Intermec Shell auxiliary file
EasyLAN 100i home page
EasyLAN 100i home page
EasyLAN 100i home page
EasyLAN 100i home page
EasyLAN 100i home page
EasyLAN 100i home page
EasyLAN 100i home page
EasyLAN 100i home page
EasyLAN 100i home page
EasyLAN 100i home page
EasyLAN 100i home page
EasyLAN 100i home page
EasyLAN 100i home page
EasyLAN 100i home page
EasyLAN 100i home page
EasyLAN 100i home page
EasyLAN 100i home page
EasyLAN 100i home page
EasyLAN 100i home page
EasyLAN 100i home page
EasyLAN 100i home page
EasyLAN 100i home page
EasyLAN 100i home page
EasyLAN 100i home page
EasyLAN 100i home page
EasyLAN 100i home page
EasyLAN 100i home page
EasyLAN 100i home page
9
Chapter 1
Introduction
Auxiliary Files in
Intermec Fingerprint
v7.61, cont.
In device "rom:", cont.
secure/ftv2link.gif
secure/ftv2mlastnode.gif
secure/ftv2mnode.gif
secure/ftv2node.gif
secure/ftv2plastnode.gif
secure/ftv2pnode.gif
secure/ftv2vertline.gif
secure/main.html
secure/view.html
support.htmf
tof.html
EasyLAN 100i home page
EasyLAN 100i home page
EasyLAN 100i home page
EasyLAN 100i home page
EasyLAN 100i home page
EasyLAN 100i home page
EasyLAN 100i home page
EasyLAN 100i home page
EasyLAN 100i home page
EasyLAN 100i home page
EasyLAN 100i home page
In device "c:"
.setup.saved
APPLICATION
STDIO
Current setup values
Intermec Shell auxiliary file
Intermec Shell auxiliary file
To read the contents of these files, run the FILELIST.PRG program
or COPY the file in question to the serial port "uart1:".
10
Intermec Fingerprint v7.61 – Programmer’s Reference Manual Ed. 7
Chapter 2
2. Program Instructions
Syntax
In the syntax descriptions which follow, certain punctuation
marks are used to indicate various types of data. They must not
be included in the program.
[ ]
|
< >
.....
↔
"
↵
indicate that the enclosed entry is optional.
indicates alternatives on either side of the bar.
indicate grouping.
indicate repetition of the same type of data.
indicates a compulsory space character between
two keywords.
is a quotation mark (ASCII 34 dec).
indicates a carriage return or linefeed on the host
Uppercase letters indicate keywords, which must be entered
exactly as listed, with the exception that lowercase letters also are
allowed unless otherwise stated.
The following abbreviations are used:
<scon>
string constant
<ncon>
numeric constant
<sexp>
string expression
<nexp>
numeric expression
<svar>
string variable
<nvar>
numeric variable
<stmt>
statement
<line label> line label
Intermec Fingerprint v7.61 – Programmer’s Reference Manual Ed. 7
11
Chapter 2
Program Instructions
ABS
Field of Application
Function returning the absolute value of a numeric expression.
Syntax
ABS(<nexp>)
<nexp>
is a numeric expression, from which the absolute value
will be returned.
Remarks
The absolute value of a number is always positive or zero. Note that the
expression must be enclosed within parentheses.
Examples
PRINT ABS(20-25)
5
PRINT ABS(25-20)
5
PRINT ABS(5-5)
0
PRINT ABS(20*-5)
100
12
Intermec Fingerprint v7.61 – Programmer’s Reference Manual Ed. 7
Chapter 2 Program Instructions
ACTLEN
Field of Application
Function returning the length of the most recently executed PRINTFEED,
FORMFEED, or TESTFEED statement.
Syntax
ACTLEN
Remarks
The length of the most recently executed paper feed operation, resulting
from a PRINTFEED, FORMFEED, or TESTFEED statement, will be
returned as a number of dots. Due to technical reasons concerning the
stepper motor control and label gap detection, a small deviation from
the expected result may occur.
Example
In this example, a 12 dots/mm printer is loaded with 90 mm (1080 dots)
long labels separated by a 3 mm (36 dots) gap. Start- and stopadjust
setup values are both set to 0:
10
20
RUN
FORMFEED
PRINT ACTLEN
yields:
1121
The deviation from the expected result (1116) is normal and should have no
practical consequences (less than 1 mm).
Intermec Fingerprint v7.61 – Programmer’s Reference Manual Ed. 7
13
Chapter 2
Program Instructions
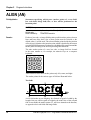
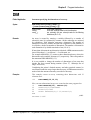
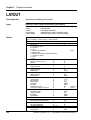
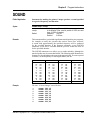
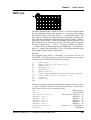
ALIGN (AN)
Field Application
Statement specifying which part (anchor point) of a text field,
bar code field, image field, line, or box will be positioned at the
insertion point.
Syntax
ALIGN|AN<nexp>
<nexp>
Default value:
Reset to default by:
Remarks
is the anchor point of the object (1–9).
1
PRINTFEED execution
Each text, bar code, or image field has nine possible anchor points, whereas
lines and boxes have three. One of these points must be selected, or the
default value (1) will be used. The selected anchor point decides the position
of the object in relation to the insertion point, which is decided by the nearest
preceding PRPOS statement. Furthermore, the field will be rotated around the
anchor point according to the nearest preceding DIR statement.
The nine anchor points of a text, bar code, or image field are located
in the same manner as, for example, the numeric keys on a computer
keyboard:
Lines and boxes have three anchor points only: left, center, and right.
The anchor points for the various types of field are illustrated below.
Text field:
A text field makes up an imaginary box limited in regard of width by the
length of the text, and in regard of height by the matrix size of the selected
font. In text fields, the anchor points 4, 5, and 6 are situated on the baseline,
as opposed to bar code fields and image fields.
14
Intermec Fingerprint v7.61 – Programmer’s Reference Manual Ed. 7
Chapter 2 Program Instructions
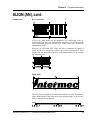
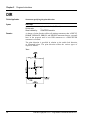
ALIGN (AN), cont.
Remarks, cont.
Bar Code Field:
A bar code field makes up an imaginary box sufficiently large to
accommodate the bar code interpretation, regardless if it will be printed
or not (provided that the selected type of bar code may include an
interpretation at all).
However, for EAN and UPC codes, the box is restricted in regard of
width by the size of the bar pattern, not by the interpretation. This
implies that the first digit of the bar code interpretation will be outside
the imaginary box:
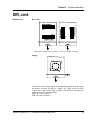
Image field:
The size of an image field is decided when the field is created. Note that an
image field consists of the entire area of the original image, even possible
white or transparent background.
Line:
Intermec Fingerprint v7.61 – Programmer’s Reference Manual Ed. 7
15
Chapter 2
Program Instructions
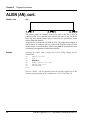
ALIGN (AN), cont.
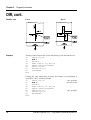
Remarks, cont.
Box:
The anchor points are situated at the lower side of the line or box in
relation to how text is printed in the selected direction. Lines and boxes
have only three anchor points, each of which can be specified by means
of three different numbers.
A special case is multi-line text fields in a box. The fields can be aligned in
nine positions in relation to the box, whereas the box itself only has three
anchor points, as described above. Refer to the PRBOX statement for more
information on alignment of multi-line text fields.
Example
Printing of a label with a single line of text being aligned left on
the baseline:
10
20
30
40
50
60
RUN
PRPOS 30,250
DIR 1
ALIGN 4
FONT "Swiss 721 BT"
PRTXT "Hello!"
PRINTFEED
The text “Hello!” will be positioned with the baseline aligned left to the
insertion point specified by the coordinates X=30; Y=250 in line 10.
16
Intermec Fingerprint v7.61 – Programmer’s Reference Manual Ed. 7
Chapter 2 Program Instructions
ASC
Field of Application
Function returning the decimal ASCII value of the first character
in a string expression.
Syntax
ASC(<sexp>)
<sexp>
is a string expression, from which the ASCII decimal value of
the first character will be returned.
Remarks
ASC is the inverse function of CHR$. The decimal ASCII value will be given
according to the selected character set (see NASC statement).
Examples
10
20
RUN
A$="GOOD MORNING"
PRINT ASC(A$)
yields:
71
10
20
30
RUN
B$="123456"
C% = ASC(B$)
PRINT C%
yields:
49
Intermec Fingerprint v7.61 – Programmer’s Reference Manual Ed. 7
17
Chapter 2
Program Instructions
BARADJUST
Field of Application
Statement for enabling/disabling automatic adjustment of bar code
position in order to avoid faulty printhead dots.
Syntax
BARADJUST<nexp1>,<nexp2>
<nexp1>
is the maximum left offset in dots.
<nexp2>
is the maximum right offset in dots.
Default:
0,0 (BARADJUST disabled)
Remarks
Under unfortunate circumstances, a printer may have to be run for some
time with a faulty printhead, before a replacement printhead can be installed.
Single faulty dots will produce very thin ”white” lines along the media.
This may be tolerable for text, graphics, and vertical (ladder) bar codes,
but for horizontal bar codes (picket fence), this condition is likely to
render the bar code unreadable.
If the bar code is moved slightly to the left or right, the trace of a faulty
dot may come between the bars of the bar code and the symptom is
remedied for the time being.
The BARADJUST statement allows the Intermec Fingerprint firmware to
automatically readjust the bar code position within certain limits, when
a faulty dot is detected (see HEAD function) and marked as faulty (see
SET FAULTY DOT statement). The maximum deviation from the original
position, as specified by the PRPOS statement, can be set up separately
for the directions left and right. Setting both parameters to 0 (zero) will
disable BARADJUST.
The BARADJUST statement does not work with:
• Vertically printed bar codes (ladder style)
• Stacked bar codes (for example Code 16K)
• Bar codes with horizontal lines (for example DUN-14/16)
• EAN/UPC-codes (interpretation not repositioned)
Examples
Enabling BARADJUST within 10 dots to the left and 5 dots to the right of the
original position for a specific bar code, then disabling it:
10
20
30
40
50
60
70
18
BARADJUST 10,5
PRPOS 30,100
BARSET "CODE39",2,1,3,120
BARFONT ON
PRBAR "ABC"
BARADJUST 0,0
PRINTFEED
Intermec Fingerprint v7.61 – Programmer’s Reference Manual Ed. 7
Chapter 2 Program Instructions
BARCODENAME$
Field of Application
Function returning the names of the bar code generators stored in the
printer’s temporary memory ("tmp:").
Syntax
BARCODENAME$(<nexp>)
<nexp>
the result of the expression should be either false or
true, where...
False (0) indicates first font.
True (≠0) indicates next font.
Remarks
BARCODENAME$(0) produces the first bar code name in alphabetical
order. BARCODENAME$(≠0) produces next name. Can be repeated as
long as there are any bar code names left.
Example
Use a program like this to list the names of all bar codes in "tmp:". Note that bar
codes with dynamic downloading (like DATAMATRIX) will not appear before
they have been called by a BARSET or BARTYPE statement.
10
20
30
40
50
RUN
A$ = BARCODENAME$ (0)
IF A$ = "" THEN END
PRINT A$
A$ = BARCODENAME$ (-1)
GOTO 20
yields for example:
CODABAR
CODE11
CODE16K
CODE39
CODE39A
CODE39C
CODE49
CODE93
CODE128
DUN
EAN8
EAN13
EAN128
ADDON5
C2OF5IND
C2OF5INDC
INT2OF5
INT2OF5C
etc, etc.
Intermec Fingerprint v7.61 – Programmer’s Reference Manual Ed. 7
19
Chapter 2
Program Instructions
BARFONT (BF)
Field of Application
Statement specifying fonts for the printing of bar code interpretation.
Syntax
BARFONT|BF[#<ncon>,]<sexp1>[,<nexp1>[,<nexp2>[,<nexp3>[,<nexp4>
[,<nexp5>[,<nexp6>]]]]][ON]
#<ncon>
is, optionally, the start parameter in the syntax above.
<sexp1>
is the name of the font selected for bar code interpretations.
<nexp1>
is the height in points of the font.
<nexp2>
is the clockwise slant in degrees (0-90°).
<nexp3>
is the distance in dots between bar code and bar font.
<nexp4>
is the magnification in regard of height (1-4).
<nexp5>
is the magnification in regard of width (1-4).
<nexp6>
is the width enlargement in percent relative the height (1-1000).
Default: 100. Does not work with bitmap fonts.
ON
optionally enables the printing of bar code interpretation.
Reset to default by:
PRINTFEED execution.
Remarks
Start Parameter:
The start parameter specifies which parameter in the syntax above should
be the first parameter in the statement. Thereby you may bypass some
of the initial parameters.
Default value: #1
Font Name:
This parameter corresponds to the FONT statement, but will only affect bar
code interpretation. Double-byte fonts cannot be used.
Default : Swiss 721 BT
Font Size:
This parameter corresponds to the FONT statement, but will only affect
bar code interpretation. The size is specified in points. (1 point = 1/72
inch ≈ 0.352 mm.)
Default : 12
Font Slant:
This parameter corresponds to the FONT statement, but will only affect
bar code interpretation. Slanting increases clockwise. Values greater that
65-70° will be unreadable.
Default : 0
Vertical Offset:
The distance between the bottom of the bar code pattern and the top of the
character cell is given as a number of dots.
Default value: 6
Magnification:
Two parameters allows you to specify the magnification separately in regard
of height and width (corresponding to MAG statement). Note that if a MAG
statement is executed after a BARFONT statement, the size of the barfont
will be affected by the MAG statement.
Default value for both parameters: 1
20
Intermec Fingerprint v7.61 – Programmer’s Reference Manual Ed. 7
Chapter 2 Program Instructions
BARFONT (BF), cont.
Remarks, cont.
Width:
A scaleable font can enlarged in regard of width relative height. The value
is given as percent (1-1000). This means that if the value is 100, there is no
change in the appearance of the characters, whereas if the value is given as
for example 50 or 200, the width will be half the height or double the height
respectively. When using this parameter, all parameters in the syntax must be
included in the statement, (name, height, slant, and width).
Enabling Interpretation Printing:
The printing of bar code interpretation can enabled by a trailing ON, which
corresponds to a BARFONT ON statement.
Exceptions:
Note that in all EAN and UPC bar codes, the interpretation is an integrated part
of the code. Such an interpretation is not affected by a BARFONT statement,
but will be printed in according to specification, provided that interpretation
printing has been enabled by a BARFONT ON statement.
Certain bar codes, like Code 16K, cannot contain any interpretation at all.
In such a case, the selected barfont will be ignored.
Example
Programming a Code 39 bar code, selecting the same barfont for all
directions, and enabling the printing of the bar code interpretation
can be done this way:
10
20
30
40
50
60
70
80
PRPOS 30,400
DIR 1
ALIGN 7
BARSET "CODE39",2,1,3,120
BARFONT "Swiss 721 BT",10,8,5,1,1,100 ON
PRBAR "ABC"
PRINTFEED
END
Intermec Fingerprint v7.61 – Programmer’s Reference Manual Ed. 7
21
Chapter 2
Program Instructions
BARFONT ON/OFF (BF ON/OFF)
Field of Application
Statement enabling or disabling the printing of bar code interpretation.
Syntax
BARFONT|BF↔ON|OFF
Default:
BARFONT OFF
Reset to default by:
PRINTFEED execution
Remarks
Usually, you start your program by selecting a suitable bar code interpretation
font, see BARFONT. Then use BARFONT ON and BARFONT OFF
statements to control whether to print the interpretation or not, depending
on application.
BARFONT ON can be replaced by a BARFONT statement appended by a
trailing ON, see BARFONT statement.
Example
Programming a Code 39 bar code, selecting a barfont for each direction
and enabling the printing of the bar code interpretation. Compare with the
example for BARFONT statement:
10
20
30
40
50
60
70
80
90
22
PRPOS 30,400
DIR 1
ALIGN 7
BARSET "CODE39",2,1,3,120
BARFONT "Swiss 721 BT",10,8,5,1,1
BARFONT ON
PRBAR "ABC"
PRINTFEED
END
Intermec Fingerprint v7.61 – Programmer’s Reference Manual Ed. 7
Chapter 2 Program Instructions
BARHEIGHT (BH)
Field of Application
Statement specifying the height of a bar code.
Syntax
BARHEIGHT|BH<nexp>
<nexp>
is the height of the bars in the bar code expressed in
number of dots.
Default value:
100 dots.
Reset to default by:
PRINTFEED execution.
Remarks
The barheight specifies the height of the bars, that make up the code. In bar
codes consisting of several elements on top of each other, for example Code
16K, the barheight specifies the height of one element. The height is not
affected by BARMAG statements.
BARHEIGHT can be replaced by a parameter in the BARSET statement.
Example
Programming a Code 39 bar code, selecting a barfont for all directions and
enabling the printing of the bar code interpretation:
10
20
30
40
50
60
70
80
90
100
PRPOS 30,400
DIR 1
ALIGN 7
BARTYPE "CODE39"
BARRATIO 2,1
BARHEIGHT 120
BARMAG 3
BARFONT "Swiss 721 BT"ON
PRBAR "ABC"
PRINTFEED
A more compact method is illustrated by the example for BARSET
statement.
Intermec Fingerprint v7.61 – Programmer’s Reference Manual Ed. 7
23
Chapter 2
Program Instructions
BARMAG (BM)
Field of Application
Statement specifying the magnification in regard of width of the
bars in a bar code.
Syntax
BARMAG|BM<nexp>
<nexp>
is the magnification in regard of width of the bars, which
make up the bar code.
Allowed input:
Depends on type of bar code.
Default value:
2
Reset to default by:
PRINTFEED execution.
Remarks
The magnification only affects the bar code ratio (see BARRATIO),
not the height of the bars (see BARHEIGHT). For example, by default
the BARRATIO is 3:1 and the BARMAG is 2, which means that the
wide bars will be 6 dots wide and the narrow bars will be 2 dots wide
(2 × 3:1 = 6:2).
The magnification also affects the interpretation in EAN and UPC bar codes,
since the interpretation is an integrated part of the EAN/UPC code.
BARMAG can be replaced by a parameter in the BARSET statement.
Example
Programming a Code 39 bar code, selecting a barfont for all directions and
enabling the printing of the bar code interpretation:
10
20
30
40
50
60
70
80
90
100
PRPOS 30,400
DIR 1
ALIGN 7
BARTYPE "CODE39"
BARRATIO 2,1
BARHEIGHT 120
BARMAG 3
BARFONT "Swiss 721 BT" ON
PRBAR "ABC"
PRINTFEED
A more compact method is illustrated by the example for BARSET
statement.
24
Intermec Fingerprint v7.61 – Programmer’s Reference Manual Ed. 7
Chapter 2 Program Instructions
BARRATIO (BR)
Field of Application
Statement specifying the ratio between the wide and the narrow
bars in a bar code.
Syntax
BARRATIO|BR<nexp1>,<nexp2>
<nexp1>
is the thickness of the wide bars relative to the narrow bars.
<nexp2>
is the thickness of the narrow bars relative to the wide bars.
Default value:
3:1
Reset to default by:
PRINTFEED execution.
Remarks
This statement specifies the ratio between the wide and the narrow bars in a
bar code in relative terms. To decide the width of the bars in number of dots,
the ratio must be multiplied by the BARMAG value.
Example:
The default BARRATIO is 3:1 and the default BARMAG is 2.
(3:1) × 2 = 6:2
that is, the wide bars are 6 dots wide and the narrow bars are 2 dots wide.
Note that certain bar codes have a fixed ratio, for example EAN and UPC
codes. In those cases, any BARRATIO statement will be ignored. Refer to
Chapter 5, “Bar Codes” later in this manual.
BARRATIO can be replaced by two parameters in the BARSET statement.
Example
Programming a Code 39 bar code, selecting a barfont for all directions and
enabling the printing of the bar code interpretation:
10
20
30
40
50
60
70
80
90
100
PRPOS 30,400
DIR 1
ALIGN 7
BARTYPE "CODE39"
BARRATIO 2,1
BARHEIGHT 120
BARMAG 3
BARFONT "Swiss 721 BT"ON
PRBAR "ABC"
PRINTFEED
A more compact method is illustrated by the example for BARSET
statement.
Intermec Fingerprint v7.61 – Programmer’s Reference Manual Ed. 7
25
Chapter 2
Program Instructions
BARSET
Field of Application
Statement specifying a bar code and setting additional parameters
to complex bar codes.
Syntax
BARSET[#<ncon>,][<sexp>[,<nexp1>[,<nexp2>[,<nexp3>[,<nexp4>[,<nexp5>
[,<nexp6>[,<nexp7>[,<nexp8>[,<nexp9>[,<nexp10>]]]]]]]]]]]
#<ncon>
is the the start parameter in the syntax above.
<sexp>
is the barcode type.
<nexp1>
is the ratio of the large bars.
<nexp2>
is the ratio of the small bars.
<nexp3>
is the enlargement.
<nexp4>
is the height of the code in dots.
<nexp5>
is the security level according to bar code specification.
<nexp6>
is the aspect height ratio.
<nexp7>
is the aspect width ratio.
<nexp8>
is the number of rows in the bar code.
<nexp9>
is the number of columns in the bar code.
<nexp10>
is a truncate flag according to bar code specifications
Reset to default by:
PRINTFEED execution.
Remarks
This statement can replace the statements BARHEIGHT, BARRATIO,
BARTYPE, and BARMAG. Although being primarily intended for some
complex bar codes such as PDF417, it can be used for any type of
bar code if non-relevant parameters are left out (for example <nexp5>
to <nexp10>).
Start Parameter:
Start parameter specifies which parameter in the syntax above should be
the first parameter (#1-11). Thereby you may bypass some of the initial
parameters, for example barcode type, ratio, and enlargement.
Default value: #1
Bar Code Type:
The bar code type parameter corresponds to the BARTYPE statement.
Default bar code: "INT2OF5"
Bar Code Ratio:
The two ratio parameters correspond to the BARRATIO statement.
Default value: 3:1
Enlargement:
The enlargement parameter corresponds to the BARMAG statement.
Default value: 2
Bar Code Height:
The height parameter corresponds to the BARHEIGHT statement.
Default value: 100 dots
Security Level:
The security level is only used in some complex bar codes and should be used
according to the specifications of the bar code in question.
Default value: 2
26
Intermec Fingerprint v7.61 – Programmer’s Reference Manual Ed. 7
Chapter 2 Program Instructions
BARSET, cont.
Remarks, cont.
Aspect Ratios:
The aspect height ratio and aspect width ratio is used for complex bar codes
to define the relation between height and width of the pattern. This method of
defining the bar code size has lower priority than rows and colomns, see below.
Refer to the specifications of the bar code for allowed input.
Default values:
1 for aspect ratio height
2 for aspect ratio width.
Rows and Columns:
The rows in bar code and columns in bar code parameters have priority over
the aspect height ratio and aspect width ratio, but have the same purpose.
Refer to the specifications of the bar code for allowed input.
Default value: 0
Truncate Flag:
The truncate flag is used in some complex bar codes to omit parts of the code
pattern. Refer to the specifications of the bar code for allowed input.
Default value: 0
Examples
This example shows how a BARSET statement is used to specify a Code 39 bar
code (compare for example with the example for BARTYPE stmt):
10
20
30
40
50
60
70
PRPOS 30,400
DIR 1
ALIGN 7
BARSET "CODE39",2,1,3,120
BARFONT "Swiss 721 BT",10,8,5,1,1 ON
PRBAR "ABC"
PRINTFEED
This example shows how BARSET is used to print a two-dimensional
PDF 417 bar code:
10
20
30
40
50
60
70
80
90
PRPOS 30,400
DIR 1
ALIGN 7
BARSET "PDF417",1,1,3,15,0,1,4,0,14,0
A$="123456789012345678901234567890
123456789012345678901234567890123456789012"
B$="123456789012345678901234567890
123456789012345678901234567890123456789012"
C$="123456789012345678901234567890
123456789012345678901234567890123456789012"
PRBAR A$; B$; C$
PRINTFEED
Intermec Fingerprint v7.61 – Programmer’s Reference Manual Ed. 7
27
Chapter 2
Program Instructions
BARTYPE (BT)
Field of Application
Statement specifying the type of bar code.
Syntax
BARTYPE|BT<sexp>
<sexp>
Allowed input:
Default value:
Reset to default by:
Remarks
specifies the type of bar code.
Valid bar type name.
"INT2OF5"
PRINTFEED execution.
The selected bar code type must exist in the printer’s memory and be entered
in the form of a string expression. If a bar code require dynamic downloading,
the downloading will be initiated when a BARTYPE or BARSET statement
is executed. Please refer to Chapter 5, “Bar Codes” later in this manual for
a list of the bar codes that are included in the Intermec Fingerprint firmware
and their respective designations.
BARTYPE can be replaced by a parameter in the BARSET statement.
Example
Programming a Code 39 bar code, selecting a barfont for all directions, and
enabling the printing of the bar code interpretation:
10
20
30
40
50
60
70
80
90
100
PRPOS 30,400
DIR 1
ALIGN 7
BARTYPE "CODE39"
BARRATIO 2,1
BARHEIGHT 120
BARMAG 3
BARFONT "Swiss 721 BT" ON
PRBAR "ABC"
PRINTFEED
A more compact method is illustrated by the example for BARSET
statement.
28
Intermec Fingerprint v7.61 – Programmer’s Reference Manual Ed. 7
Chapter 2 Program Instructions
BEEP
Field of Application
Statement ordering the printer to emit a beep.
Syntax
BEEP
Remarks
This statement makes the printer’s built-in buzzer sound at ≈800 Hz for
1/4 of a second. If a different frequency and/or duration is desired, use
a SOUND statement instead.
Example
In this example, a beep is emitted when an error occurs:
10
ON ERROR GOTO 1000
.....
.....
.....
1000 BEEP
1010 RESUME NEXT
Intermec Fingerprint v7.61 – Programmer’s Reference Manual Ed. 7
29
Chapter 2
Program Instructions
BREAK
Field of Application
Statement specifying a break interrupt character separately for the
keyboard and each serial communication channel.
Syntax
BREAK<nexp1>,<nexp2>
<nexp1>
is one of the following devices:
0 = "console:"
1 = "uart1:"
2 = "uart2:"
3 = "uart3:"
<nexp2>
is the decimal ASCII value for the break interrupt character.
Default:
Comm. channels: ASCII 03 decimal
Console:
ASCII 158 decimal (<Shift> + <Pause>)
Remarks
The execution of a program can be interrupted using a method specified
by the BREAK statement. In addition, the printing of a batch of labels can
also be interrupted and resumed by pressing the <Pause> or the <Print>
key on the printer’s front panel.
To issue a break interrupt, by default, hold down the <Shift> key and press
the <Pause> key. Together these keys will produce the ASCII character
158 decimal (128 + 30).
30
Intermec Fingerprint v7.61 – Programmer’s Reference Manual Ed. 7
Chapter 2 Program Instructions
BREAK, cont.
Remarks, cont.
It is possible to remap the keyboard, which may affect the keys used for break
interrupt. Please refer to the variable KEYBMAP$.
Another method is to transmit the character ASCII 03 decimal (default)
to the printer on one of the serial communication channels. The execution
will be interrupted regardless of any INPUT waiting (that is, INPUT [#],
LINE INPUT [#], and INPUT$).
The BREAK statement allows you to specify other ways of interrupting
the execution, for example by pressing another combination of keys
on the printer’s keyboard or transmitting another ASCII character
from the host.
Intermec Fingerprint v7.61 – Programmer’s Reference Manual Ed. 7
31
Chapter 2
Program Instructions
BREAK, cont.
Remarks, cont.
A specified break interrupt character is saved in the temporary memory until
the printer is restarted or REBOOTed, which may be confusing for example
when switching between programs. To change a break interrupt character,
specify a new one for the same device using a BREAK statement and to
remove it from memory, use a BREAK OFF statement.
The use of break interrupt is enabled or disabled separately for each
device by BREAK ON or BREAK OFF statements. By default, break
interrupt on the "console:" is enabled, while break interrupt on any of the
communication channels is disabled.
It is strongly recommended to include some facility for issuing a break
interrupt from the host computer in startup (autoexec) files. If not, you
may find yourself with an erroneous program running in a loop without
being able to break it!
Examples
In this example, the ASCII character 127 decimal is selected and enabled as
BREAK character on the communication channel "uart1:":
10
BREAK 1,127
20
BREAK 1 ON
.....
.....
.....
In next example, BREAK characters are specified for both the keyboard
("console:") and the serial communication channel "uart1:". The loop can be
interrupted either by pressing the key usually marked “F1” on the printer’s
keyboard, or by typing an uppercase X on the keyboard of the host:
10
20
30
RUN
BREAK 0,1:BREAK 1,88
BREAK 0 ON:BREAK 1 ON
GOTO 30
Reset BREAK to default by turning the printer off and on.
32
Intermec Fingerprint v7.61 – Programmer’s Reference Manual Ed. 7
Chapter 2 Program Instructions
BREAK ON/OFF
Field of Application
Statement enabling or disabling break interrupt separately for the
keyboard and each serial communication channel.
Syntax
BREAK<nexp>ON|OFF
<nexp>
is one of the following devices:
0 = "console:"
1 = "uart1:"
2 = "uart2:"
3 = "uart3:"
Default:
Comm. ports:
Disabled
Console:
Enabled
Remarks
The use of the break interrupt specified by a BREAK statement can be
enabled or disabled separately for each serial communication channel or for
the printer’s built-in keyboard by BREAK ON or BREAK OFF statements.
By default, break interrupt is enabled from the printer’s keyboard, and
disabled from all communication channels.
BREAK OFF deletes any existing break interrupt character stored in the
printer’s temporary memory for the specified device.
Example
In this example, the ASCII character 127 decimal is selected and enabled as
BREAK character on the communication channel "uart1:". At the same time,
BREAK from the printer’s keyboard is disabled.
10
BREAK 1,127
20
BREAK 1 ON:BREAK 0 OFF
.....
.....
.....
Intermec Fingerprint v7.61 – Programmer’s Reference Manual Ed. 7
33
Chapter 2
Program Instructions
BUSY
Field of Application
Statement ordering a busy signal, for example XOFF, CTS/RTS, or
PE, to be transmitted from the printer on the specified communication
channel.
Syntax
BUSY[<nexp>]
<nexp>
Remarks
optionally specifies the channel as:
1 = "uart1:"
2 = "uart2:"
3 = "uart3:"
4 = "centronics:"
Communication protocol usually contain some “busy” signal, which
tells the host computer that the printer, for some reason, is unable to
receive data.
The BUSY statement allows you to order a busy signal to be transmitted
on the specified communication channel. If no channel is specified, the
signal will be transmitted on the standard OUT communication channel,
see SETSTDIO statement.
To allow the printer to receive more data, use a READY statement.
For the optional "centronics:" communication channel, BUSY/READY
control the PE (paper end) signal on pin 12 according to an error-trapping
routine (BUSY = PE high).
Example
You may, for example, want to prevent the printer from receiving more data
on "uart2:" during the process of printing a label (running this example
requires an optional interface board to be fitted):
10
20
30
40
50
RUN
34
FONT "Swiss 721 BT"
PRTXT "HELLO!"
BUSY2
PRINTFEED
READY2
Intermec Fingerprint v7.61 – Programmer’s Reference Manual Ed. 7
Chapter 2 Program Instructions
CHDIR
Field of Application
Statement specifying the current directory.
Syntax
CHDIR<scon>
<scon>
Default:
Remarks
specifies the current directory (see DEVICES)
"c:"
By default, the printer’s permanent memory ("c:" ) is the current directory,
which means the directory that is used if the Intermec Fingerprint instruction
does not contain any reference to a directory, for example FILES. This
implies that to access the temporary memory ("tmp:"), the storage part
of the RTC/Dallas key circuit ("storage:"), or an optional memory card
("rom:" or "card1:"), you must include such a reference in your instructions,
for example FILES "rom:".
The CHDIR statement allows you to appoint another directory than "c:"
as the current directory. Obviously, this implies that you must specify the
permanent memory ("c:") whenever you want to access it.
Example
In this example, the current directory is changed to "lock:", all files
in "lock:" are listed, and finally the current directory is changed back
to "c:". (This example is only included to illustrate the principles of
changing the current directory. It is more efficient to use FILES "lock:"
to read its contents.)
10
20
30
RUN
CHDIR"lock:"
FILES
CHDIR"c:"
yields for example:
Files on lock:
SYS1
238 bytes free
11
11 bytes used
Intermec Fingerprint v7.61 – Programmer’s Reference Manual Ed. 7
35
Chapter 2
Program Instructions
CHECKSUM
Field of Application
Statement calculating the checksum of a range of program lines in
connection with the transfer of programs.
Syntax
CHECKSUM(<nexp1>,<nexp2)
<nexp1>
is the number of the first line in a range of program lines.
<nexp2>
is the number of the last line in a range of program lines.
Remarks
The checksum is calculated from parts of the internal code using an
advanced algorithm. Therefore, it is recommended to let the printer
calculate the checksum before the transfer of a program. After the
transfer is completed, let the receiving printer do the same calculation
and compare the checksums.
Example
In this example, the checksum is calculated of all program lines between line
10 and line 2000 in the program "DEMO.PRG".
NEW
LOAD "DEMO.PRG"
PRINT CHECKSUM(10,2000)
yields:
60095
36
Intermec Fingerprint v7.61 – Programmer’s Reference Manual Ed. 7
Chapter 2 Program Instructions
CHR$
Field of Application
Function returning the readable character from a decimal ASCII
code.
Syntax
CHR$(<nexp>)
<nexp>
is the decimal ASCII code to be converted to a readable
character.
Remarks
This function is useful for entering characters that cannot be produced
from the keyboard of the host, for example non-printable characters
ASCII 0-31 dec. Only integers between 0 and 255 are allowed. Input
less than 0 or larger than 255 will result in an error condition (Error 41,
“Parameter out of range)."
Example
The decimal ASCII code for “A" is 65 and for “B" is 66.
10
20
30
40
RUN
A$ = CHR$(65)
B$ = CHR$(40+26)
PRINT A$
PRINT B$
yields:
A
B
Intermec Fingerprint v7.61 – Programmer’s Reference Manual Ed. 7
37
Chapter 2
Program Instructions
CLEANFEED
Field of Application
Statement running the printer’s feed mechanism.
Syntax
CLEANFEED<nexp>
<nexp>
is the feed length expressed as a positive or negative
number of dots.
Remarks
The CLEANFEED statement activates the stepper motor that drives the
printer’s platen roller (the rubber roller beneath the printhead). In case of
thermal transfer printers, it also often drives the ribbon mechanism. The motor
will run regardless of possible error conditions, for example if the printhead is
lifted or not, or if there is no ribbon or media supply left.
Thus, the CLEANFEED statement is suitable for cleaning and for the
loading of transfer ribbon.
A positive CLEANFEED value makes the stepper motor rotate the rollers
forward, that is as when feeding out a label.
A negative CLEANFEED value makes the stepper motor rotate the rollers
backwards, that is as when pulling back a label.
The execution of a CLEANFEED statement, as opposed to TESTFEED,
does not affect the adjustment of the label stop sensor or black mark sensor,
regardless what type of media or other objects that passes the sensor.
Note that the CLEANFEED statement, as opposed to FORMFEED, always
must be specified in regard of feed length.
Example
In order to pull a cleaning card back and forth under the printhead three
times, three 1200 dots long positive CLEANFEEDs and then the same
amount of negative CLEANFEEDs are performed:
10
20
30
40
RUN
38
FOR A%=1 TO 3
CLEANFEED 1200
CLEANFEED -1200
NEXT
Intermec Fingerprint v7.61 – Programmer’s Reference Manual Ed. 7
Chapter 2 Program Instructions
CLEAR
Field of Application
Statement clearing strings, variables, and arrays in order to free
memory space.
Syntax
CLEAR
Remarks
The CLEAR statement empties all strings, sets all variables to zero, and
resets all arrays to their default values. As a result, more free memory
space becomes available.
Example
In this example, more free memory space is obtained after the strings have
been emptied by means of a CLEAR statement:
10
20
30
40
50
60
70
80
90
100
110
120
RUN
A$ = "ABCDEFGHIJKLMNOPQRSTUVWXYZ"
B$ = "abcdefghijklmnopqrstuvwxyz"
FOR I%=0 TO 3:FOR J%=0 TO 3:FOR K%=0 TO 20
C$(I%,J%)=C$(I%,J%)+A$
NEXT K%:NEXT J%:NEXT I%
PRINT "String A before:
";A$
PRINT "String B before:
";B$
PRINT "Free memory before: ";FRE(1)
CLEAR
PRINT "String A after:
";A$
PRINT "String B after:
";B$
PRINT "Free memory after: ";FRE(1)
yields:
String A before:
ABCDEFGHIJKLMNOPQRSTUVWXYZ
String B before:
abcdefghijklmnopqrstuvwxyz
Free memory before: 1867368
String A after:
String B after:
Free memory after: 1876200
Ok
Intermec Fingerprint v7.61 – Programmer’s Reference Manual Ed. 7
39
Chapter 2
Program Instructions
CLIP
Field of Application
Statement for enabling/disabling the printing of partial fields.
Syntax
CLIP [BARCODE [HEIGHT|INFORMATION|X|Y]][ON|OFF]
BARCODE
toggles between partial bar code fields enable/disable.
BARCODE HEIGHT
clips the height of the bar so the bar code will fit
inside the print window. A one-dimensional bar code
may still be readable.
BARCODE INFORMATION clips the bar code lengthwise, so some bars will be
missing, making the bar code unreadable.
BARCODE X
clips the part of the bar code that is outside the
X-dimension of the print window.
BARCODE Y
clips the part of the bar code that is outside the
Y-dimension of the print window.
ON
enables use of partial text, image, line, and box fields.
OFF
disables use of partial text, image, line, and box fields.
Remarks
Partial fields means that the firmware will accept and print text, bar code,
image, lines, and box fields even if they extend outside the print window
as specified by the printer’s setup in regard of X-Start, Width, and Length.
Even negative PRPOS values are allowed. However, all parts the fields
outside the print window will be excluded from the printout, that is they will
be clipped at the borders of the print window.
There are two main cases:
CLIP BARCODE [HEIGHT|INFORMATION|X|Y] is used for bar code
fields only. (Note that some bar codes, like Maxicode, consist of images and
should in this context be regarded as image fields.)
CLIP ON|OFF is only used for text, image, line, and box fields.
When the use of partial fields is disabled, the Error 1003, “Field out of label”
will result if any field extends outside the print window.
Note the difference between the physical size of the label and the size of
the print window specified by the printer’s setup. It is the latter that decides
were the fields will be clipped.
Example
In this example, only the last part of the text will be printed:
10
20
30
40
RUN
40
CLIP ON
PRPOS -100,30
PRTXT "INTERMEC PRINTER"
PRINTFEED
Intermec Fingerprint v7.61 – Programmer’s Reference Manual Ed. 7
Chapter 2 Program Instructions
CLL
Field of Application
Statement for partial or complete clearing of the print image buffer.
Syntax
CLL [<nexp>]
<nexp>
Remarks
optionally specifies the field from which the print image
buffer should be cleared.
The print image buffer is used to store the printable image after processing
awaiting the printing to be executed. The buffer can be cleared, partially or
completely, by the use of a CLL statement:
- CLL<nexp> partially clears the buffer from a specified field to the end of
the program. The field is specified by a FIELDNO function.
Partial clearing is useful in connection with print repetition. To avoid
superfluous reprocessing, one or several fields can be erased from the
buffer and be replaced by other information, while the remaining parts
of the label are retained in the buffer.
Note that there must be no changes in the layout between the PRINTFEED
and the CLL statements, or else the layout will be lost. Also note that
partial clearing always starts from the end, which means that the fields
which are executed last are cleared first.
- CLL (without any field number) clears the buffer completely.
When certain error conditions have occurred, it is useful to be able to
clear the print image buffer without having to print a faulty label. Should
the error be attended to, without the image buffer being cleared, there is
a risk that the correct image will be printed on top of the erroneous
one on the same label. It is therefore advisable to include a CLL
statement in your error-handling subroutines, when you are working
with more complicated programs, in which all implications may be
difficult to grasp.
Examples
Partial clearing:
Two labels are printed, each with two lines of text. After the first label is
printed, the last line is cleared from the print image buffer and a new line is
added in its place on the second label:
10
20
30
40
50
60
70
80
90
100
110
RUN
PRPOS 100,300
FONT "Swiss 721 BT"
PRTXT "HAPPY"
A%=FIELDNO
PRPOS 100,250
PRTXT "NEW YEAR!"
PRINTFEED
CLL A%
PRPOS 100,250
PRTXT "BIRTHDAY!"
PRINTFEED
Intermec Fingerprint v7.61 – Programmer’s Reference Manual Ed. 7
41
Chapter 2
Program Instructions
CLL, cont.
Examples, cont.
Complete clearing:
In this example, the print image buffer will be cleared completely if Error
1030, “Character missing in chosen font” occurs.
10
.....
.....
.....
1000
1010
.....
....
1100
1110
1120
42
ON ERROR GOTO 1000
IF ERR=1030 GOSUB 1100
RESUME NEXT
CLL
PRINT "CHARACTER MISSING"
RETURN
Intermec Fingerprint v7.61 – Programmer’s Reference Manual Ed. 7
Chapter 2 Program Instructions
CLOSE
Field of Application
Statement closing one or several files and/or devices for input/output.
Syntax
CLOSE[[#] <nexp> [, [#] <nexp>...]]
#
optionally indicates that whatever follows is a number.
<nexp>
is the number assigned to a file or device when it was
OPENed.
Remarks
This statement revokes OPEN. Only files or devices, which already have
been OPENed, can be CLOSEd.
A CLOSE statement for a file or device OPENed for sequential output
entails that the data in the buffer will be written to the file/device in question
automatically before the channel is closed.
When a file OPENed for random access is CLOSEd, all its FIELD
definitions will be lost.
END, NEW, and RUN will also close all open files and devices.
Examples
This statement closes all open files and devices:
200
CLOSE
A number of files or devices (No. 1-4) can be closed simultaneously using
any of the following types of statement:
200
or
200
or
200
CLOSE 1,2,3,4
CLOSE #1,#2,#3,#4
CLOSE 1,2,#3,4
Intermec Fingerprint v7.61 – Programmer’s Reference Manual Ed. 7
43
Chapter 2
Program Instructions
COM ERROR ON/OFF
Field of Application
Statement enabling/disabling error handling on the specified
communication channel.
Syntax
COM↔ERROR<nexp>ON|OFF
<nexp>
is one of the following communication channels:
1 = "uart1:"
2 = "uart2:"
3 = "uart3:"
4 = "centronics:"
Default:
COM ERROR OFF on all channels.
Remarks
This function is closely related to COMSET, ON COMSET GOSUB,
COMSET ON, COMSET OFF, COMSTAT, and COMBUF$.
Each character received is checked for the following errors:
• Received break
• Framing error
• Parity Error
• Overrun error
If any such communication error occurs and COM ERROR is ON for the
channel in question, the reception will be interrupted. This condition can
be read by means of a COMSTAT function, but you cannot read exactly
what type of error has occurred. COM ERROR OFF disables this type of
error-handling for the specified channel.
COM ERROR ON cannot be used with USB (communication channel #6).
Example
In this example, a message will appear on the screen when the reception is
interrupted by any of four COMSET conditions being fulfilled:
10
20
30
40
50
60
70
80
90
100
1000
1010
1020
1030
1040
1050
44
COM ERROR 1 ON
A$="Max. number of char. received"
B$="End char. received"
C$="Attn. string received"
D$="Communication error"
COMSET 1, "A",CHR$(90),"#","BREAK",20
ON COMSET 1 GOSUB 1000
COMSET 1 ON
IF QDATA$="" THEN GOTO 90
END
QDATA$=COMBUF$(1)
IF COMSTAT(1) AND 2 THEN PRINT A$
IF COMSTAT(1) AND 4 THEN PRINT B$
IF COMSTAT(1) AND 8 THEN PRINT C$
IF COMSTAT(1) AND 32 THEN PRINT D$
PRINT QDATA$:RETURN
Intermec Fingerprint v7.61 – Programmer’s Reference Manual Ed. 7
Chapter 2 Program Instructions
COMBUF$
Field of Application
Function reading the data in the buffer of the communication channel
specified by a COMSET statement.
Syntax
COMBUF$(<nexp>)
<nexp>
Remarks
is one of the following communication channels:
1 = "uart1:"
2 = "uart2:"
3 = "uart3:"
4 = "centronics:"
5 = "net1:"
6 = "usb1:"
This function is closely related to COMSET, ON COMSET GOSUB,
COMSET ON, COMSET OFF, COM ERROR ON/OFF, and COMSTAT.
Using COMBUF$, the buffer can be read and the content be used in
your program.
When the communication has been interrupted by any of the three conditions
"end character", "attention string", or "max. no. of char." (see COMSET), you
may use an ON COMSET GOSUB subroutine and assign the data from the
buffer to a variable as illustrated in the example below.
Note that COMBUF$ filters out any incoming ASCII 00 dec. characters
(NUL).
Example
In this example, the data from the buffer is assigned to the string variable
A$ and printed on the screen:
1
10
20
30
40
50
.....
.....
1000
2000
2010
2020
2030
REM Exit program with #STOP&
COMSET1,"#","&","ZYX","=",50
ON COMSET 1 GOSUB 2000
COMSET 1 ON
IF A$ <> "STOP" THEN GOTO 40
COMSET 1 OFF
END
A$= COMBUF$(1)
PRINT A$
COMSET 1 ON
RETURN
Intermec Fingerprint v7.61 – Programmer’s Reference Manual Ed. 7
45
Chapter 2
Program Instructions
COMSET
Field of Application
Statement setting the parameters for background reception of data to the
buffer of a specified communication channel (see COMBUF$).
Syntax
COMSET<nexp1>,<sexp1>,<sexp2>,<sexp3>,<sexp4>,<nexp2>
<nexp1>
is one of the following communication channels:
1 = "uart1:"
2 = "uart2:"
3 = "uart3:"
4 = "centronics:"
5 = "net1:"
6 = "usb1:"
<sexp1>
specifies the start of the message string (max. 12 char).
<sexp2>
specifies the end of the message string (max. 12 char).
<sexp3>
specifies characters to be ignored (max. 42 char).
<sexp4>
specifies the attention string (max. 12 char).
<nexp2>
specifies the max. number of characters to be received.
Enter a value ≥1. (If <nexp2> = 0, the first character
will be lost.)
Remarks
Data can be received by a buffer on each of the communication channels
without interfering with the running of the current program. At an appropriate
moment, the program can fetch the data in the buffer and use them according
to your instructions. Such background reception has priority over any
ON KEY GOSUB statement.
Related instructions are COMSTAT, ON COMSET GOSUB, COMSET ON,
COMSET OFF, COM ERROR ON/OFF, and COMBUF$.
The communication channels are explained in connection with the
DEVICES statement.
The start and end strings are character sequences which tells the printer when
to start or stop receiving data. Max. 12 characters, may be "".
It is possible to make the printer ignore certain characters. Such characters
are specified in a string, where the order of the individual characters does
not matter. Max. 42 characters, may be "".
The attention string interrupts the reception. Max. 12 characters, may be "".
The length of the afore-mentioned COMSET strings are checked before
they are copied into the internal structure. If any of these strings are too long,
Error 26, “Parameter too large” will occur.
When the printer has received the specified maximum number of characters,
without previously having encountered any end string or attention string, the
transmission will be interrupted. The maximum number of characters also
decides how much of the memory will be allocated to the buffer.
46
Intermec Fingerprint v7.61 – Programmer’s Reference Manual Ed. 7
Chapter 2 Program Instructions
COMSET, cont.
Remarks, cont.
The reception of data to the buffer can be interrupted by four conditions:
• An end string being encountered.
• An attention string being encountered.
• The maximum number of characters being received.
• If error-handling is enabled for the communication channel in question
(see COM ERROR ON/OFF) and an communication error occurs. This
condition can be checked by a COMSTAT function.
Any interruption will have a similar effect as a COMSET OFF statement,
that is close the reception, but the buffer will not be emptied and can
still be read by a COMBUF$ function. After the reception has been
interrupted, an ON COMSET GOSUB statement can be issued to control
what will happen next.
COMSET does not support auto-hunting (see SETSTDIO).
Example
This example shows how "uart1:" is opened for background communication.
Any record starting with the character # and ending with the character & will
be received. The characters Z, Y and X will be ignored. The character = will
stop the reception. Max. 50 characters are allowed.
1
10
20
30
40
50
.....
.....
1000
2000
2010
2020
2030
REM Exit program with #STOP&
COMSET1,"#","&","ZYX","=",50
ON COMSET 1 GOSUB 2000
COMSET 1 ON
IF A$ <> "STOP" THEN GOTO 40
COMSET 1 OFF
END
A$= COMBUF$(1)
PRINT A$
COMSET 1 ON
RETURN
Intermec Fingerprint v7.61 – Programmer’s Reference Manual Ed. 7
47
Chapter 2
Program Instructions
COMSET OFF
Field of Application
Statement turning off background data reception and emptying the
buffer of the specified communication channel.
Syntax
COMSET<nexp>OFF
<nexp>
is one of the following communication channels:
1 = "uart1:"
2 = "uart2:"
3 = "uart3:"
4 = "centronics:"
5 = "net1:"
6 = "usb1:"
Remarks
This statement is closely related to COMSET, ON COMSET GOSUB,
COMSTAT, COMSET ON, COM ERROR ON/OFF, and COMBUF$.
The COMSET OFF statement closes the reception and empties the buffer
of the specified communication channel.
Example
In this example, the COMSET OFF statement is used to close "uart1:" for
background reception and empty the buffer:
1
10
20
30
40
50
.....
.....
1000
2000
2010
2020
2030
48
REM Exit program with #STOP&
COMSET1,"#","&","ZYX","=",50
ON COMSET 1 GOSUB 2000
COMSET 1 ON
IF A$ <> "STOP" THEN GOTO 40
COMSET 1 OFF
END
A$= COMBUF$(1)
PRINT A$
COMSET 1 ON
RETURN
Intermec Fingerprint v7.61 – Programmer’s Reference Manual Ed. 7
Chapter 2 Program Instructions
COMSET ON
Field of Application
Statement emptying the buffer and turning on background data
reception on the specified communication channel.
Syntax
COMSET<nexp>ON
<nexp>
Remarks
is one of the following communication channels:
1 = "uart1:"
2 = "uart2:"
3 = "uart3:"
4 = "centronics:"
5 = "net1:"
6 = "usb1:"
This statement is closely related to COMSET, ON COMSET GOSUB,
COMSTAT, COMSET OFF, COM ERROR ON/OFF, and COMBUF$. It
allows you to open any of the communication channels for background data
reception with an empty buffer, provided the communication parameter for
the channel has already been set up by a COMSET statement.
When the reception has been interrupted by the reception of an end
character, an attention string or the max. number of characters, the
buffer can be emptied and the reception reopened by issuing a new
COMSET ON statement.
Example
In this example, the COMSET ON statement on line 30 is used to open
"uart1:" for background reception. After the buffer has been read, it is
emptied and the reception is reopened by a new COMSET ON statement
in the subroutine on line 2020:
1
10
20
30
40
50
.....
.....
1000
2000
2010
2020
2030
REM Exit program with #STOP&
COMSET1,"#","&","ZYX","=",50
ON COMSET 1 GOSUB 2000
COMSET 1 ON
IF A$ <> "STOP" THEN GOTO 40
COMSET 1 OFF
END
A$= COMBUF$(1)
PRINT A$
COMSET 1 ON
RETURN
Intermec Fingerprint v7.61 – Programmer’s Reference Manual Ed. 7
49
Chapter 2
Program Instructions
COMSTAT
Field of Application
Function reading the status of the buffer of a communication channel.
Syntax
COMSTAT(<nexp>)
<nexp>
Remarks
is one of the following communication channels:
1 = "uart1:"
2 = "uart2:"
3 = "uart3:"
4 = "centronics:"
5 = "net1:"
6 = "usb1:"
This function is closely related to COMSET, ON COMSET GOSUB,
COMSET ON, COMSET OFF, COM ERROR ON/OFF, and COMBUF$.
It allows you to find out if the buffer is able to receive background data, orif not-what condition has caused the interruption.
The buffer’s status is indicated by a numeric expression, which is the sum
of the values given by the following conditions:
• Copy of hardware handshake bit (not on "net1:" or "usb1:") .........0 or 1
• Interruption: Max. number of characters received...................................2
• Interruption: End character received.........................................................4
• Interruption: Attention string received......................................................8
• Interruption: Communication error (not on "net1:" or "usb1:")........... 32
Example
A message will appear on the screen when the reception is interrupted by
any of four COMSET conditions being fulfilled:
10
20
30
40
50
60
70
80
90
100
1000
1010
1020
1030
1040
1050
1060
50
COM ERROR 1 ON
A$="Max. number of char. received"
B$="End char. received"
C$="Attn. string received"
D$="Communication error"
COMSET 1, "A",CHR$(90),"#","BREAK",20
ON COMSET 1 GOSUB 1000
COMSET 1 ON
IF QDATA$="" THEN GOTO 90
END
QDATA$=COMBUF$(1)
IF COMSTAT(1) AND 2 THEN PRINT A$
IF COMSTAT(1) AND 4 THEN PRINT B$
IF COMSTAT(1) AND 8 THEN PRINT C$
IF COMSTAT(1) AND 32 THEN PRINT D$
PRINT QDATA$
RETURN
Intermec Fingerprint v7.61 – Programmer’s Reference Manual Ed. 7
Chapter 2 Program Instructions
CONT
Field of Application
Statement for resuming execution of a program that has been interrupted
by means of a STOP, BREAK, or DBBREAK statement.
Syntax
CONT
Remarks
The CONT statement may be used to resume program execution after a
STOP, BREAK, or DBBREAK statement has been executed. Execution
continues at the point where the break happened with the STDIO
settings restored.
CONT is usually used in conjunction with DBBREAK or STOP for
debugging. When execution is stopped, you can examine or change the
values of variables using direct mode statements. You may then use
CONT to resume execution. CONT is invalid if the program has been
editied during the break.
It is also possible to resume execution at a specified program line using a
GOTO statement in the immediate mode.
Example
10
20
30
40
50
A%=100
B%=50
IF A%=B% THE GOTO QQQ ELSE STOP
GOTO 30
QQQ:PRINT "Equal"
Ok
RUN
Break in line 30
Ok
PRINT A%
100
Ok
PRINT B%
50
Ok
B%=100
OK
CONT
Equal
Ok
Intermec Fingerprint v7.61 – Programmer’s Reference Manual Ed. 7
51
Chapter 2
Program Instructions
COPY
Field of Application
Statement for copying files.
Syntax
COPY<sexp1>[,<sexp2>]
<sexp1>
is the name and optionally directory of the original file.
<sexp2>
is, optionally, a new name and/or directory for the copy.
Remarks
This statement allows you to copy a file to another name and/or directory as an
alternative to LOADing the file in question and then SAVEing it.
If no directory is specified for the original and/or copy, the current directory
will be used by default (see CHDIR statement). By default, the current
directory is "c:", which is the printer’s permanent memory. If the file is to
be be copied from or to another directory than the current one, the file name
must contain a directory reference.
A file cannot be copied to the same name in the same directory.
In addition to copying files to the printer’s permanent or temporary memory
or a DOS-formatted memory card, a file can also be copied to an output
device such as the printer’s display or a serial communication channel.
Copying a program to the standard OUT channel has the same effect as
LOADing and LISTing it.
Note that bitmap fonts and images are not files and therefore cannot
be copied.
Examples
In the following examples, "c:" is the current directory.
Copying a file from "card1:" to the current directory without changing
the file name:
COPY "card1:LABEL1.PRG"
Copying a file from "card1:" to the current directory and changing
the file name:
COPY "card1:FILELIST.PRG","COPYTEST.PRG"
Copying a file from "c:" to a directory other than the current one without
changing the file name:
COPY "c:FILELIST.PRG","card1:FILELIST.PRG"
Copying a file in the current directory to a new name within the same
directory:
COPY "LABEL1.PRG","LABEL2.PRG"
Copying a file in the current directory to serial channel "uart1:":
COPY "LABEL1.PRG","uart1:"
52
Intermec Fingerprint v7.61 – Programmer’s Reference Manual Ed. 7
Chapter 2 Program Instructions
COUNT&
Field of Application
Statement for creating a counter (Intermec Direct Protocol only).
Syntax
COUNT& <sexp1>,<nexp1>,<sexp2>
<sexp1>
is the type of counter parameter to be set:
START
(start value)
WIDTH
(minimum number of digits)
COPY
(number of copies before update)
INC
(increment/decrement at update)
STOP
(stop value)
RESTART
(restart counting at this value)
<nexp1>
is the counter reference number (integers only)
<sexp2>
is the parameter value
Remarks
This instruction can only be used in the Intermec Direct Protocol.
The counters can be used in text and bar code fields and are global, which
means that they are not connected to any special label or layout, but
will be updated at every execution of PRINTFEED statements where
the counter in question is used.
Counters are designated using positive integers, for example 1, 2, or 3. When
used for printing, they are referred to by “CNT<ncon>$” variables, where
<ncon> is the number of the counter as specified by COUNT&, for example
CNT5$. A counter variable without a matching counter will be regarded
as a common string variable.
The value of the start, stop, and restart parameters decide the type of
counter (alpha or numeric). If different types of counter are specified
in these parameters, the last entered parameter decides the type. Alpha
counters count A-Z whereas numeric counters use numbers without
any practical limit.
Counters are not saved in the printer’s memory, but will have to be recreated
after each power up. Therefore, it may be wise to save the COUNT&
statements as a file in the host.
START:
Decides the first value to be printed. If a single letter is entered (A-Z), the
counter will become an alpha counter, and if one or several digits are entered
the counter will be numeric. Numeric values can be positive or negative.
Negative values are indicated by a leading minus sign.
Default: 1 (numeric) or A (alpha)
WIDTH:
This parameter can only be used in numeric counters and decides the
minimum number of digits to be printed. If the counter value contains a
lesser number of digits, leading zero (0) characters will be added until
the specified number of digits is obtained. If the number of digits in the
counter value is equal to or larger than specified in the width parameter, the
value will be printed in its entity.
Default: 1 (no leading zeros)
Intermec Fingerprint v7.61 – Programmer’s Reference Manual Ed. 7
53
Chapter 2
Program Instructions
COUNT&, cont.
Remarks, cont.
COPY:
Decides how many copies (labels etc.) will be printed before the counter is
updated according to the INC parameter.
Default: 1
INC:
Decides by which value the counter should be incremented or decremented
when it is updated. In case of decrementation, the value should contain
a leading minus sign.
Default: 1
STOP:
Decides the value after which the counter should start all over again at the
value specified by the RESTART parameter. If a single letter is entered
(A-Z), the counter will become an alpha counter, and if one or several digits
are entered the counter will be numeric. When a counter is decremented,
a stop value less than the start value must be given, since the default stop
value will never be reached.
Default: 2,147,483,647 (numeric) or Z (alpha)
RESTART:
Decides at which value the counter should start all over again after having
exceeded the STOP parameter value. If a single letter is entered (A-Z),
the counter will become an alpha counter, and if one or several digits are
entered the counter will be numeric.
Default: 1 (numeric) or A (alpha)
Examples
In this example, a counter is created. It will start at number 100 and be
updated by a value of 50 after every second label until the value 1000 is
reached. Then the counter will start again at the value 200. All values will
be expressed as 4-digit numbers with leading zeros.
COUNT&
COUNT&
COUNT&
COUNT&
COUNT&
COUNT&
54
"START",1,"100" ↵
"WIDTH",1,"4" ↵
"COPY",1,"2" ↵
"INC",1,"50" ↵
"STOP",1,"1000" ↵
"RESTART",1,"200" ↵
Intermec Fingerprint v7.61 – Programmer’s Reference Manual Ed. 7
Chapter 2 Program Instructions
CSUM
Field of Application
Statement calculating the checksum of an array of strings.
Syntax
CSUM<ncon>,<svar>,<nvar>
<ncon>
is the type of checksum calculation:
1: Longitudinal Redundancy Check (LRC)
XOR in each character in each string
array[0][0] xor array[0][1] ... array[n][n]
2: Diagonal Redundancy Check (DRC)
right rotation, then XOR on each character in each
string
rot(array[0][0] xor array[0][1]
3: Longitudinal Redundancy Check (LRC)
Strip string of DLE (0x10) before doing the LRC
<svar>
if <ncon> =1 or 2: The array of strings of which the checksum
is to be calculated.
if <ncon> = 3: Checksum string.
<nvar>
is the variable in which the result will be presented.
Remarks
These types of checksum calculation can only be used for string arrays,
not for numeric arrays. In case of CSUM 3,<svar>,<nvar>, the resulting
variable will be the indata for next CSUM calculation, unless the
variable is reset.
Example
In this example, the DRC checksum of an array of strings is calculated:
10
20
30
40
50
60
RUN
ARRAY$(0)="ALPHA"
ARRAY$(1)="BETA"
ARRAY$(2)="GAMMA"
ARRAY$(3)="DELTA"
CSUM 2,ARRAY$,B%
PRINT B% :REM DRC CHECKSUM
yields:
252
Intermec Fingerprint v7.61 – Programmer’s Reference Manual Ed. 7
55
Chapter 2
Program Instructions
CUT
Field of Application
Statement activating an optional cutter.
Syntax
CUT
Remarks
Obviously, this statement only works with printers fitted with a cutter. A
cutter is normally used to cut non-adhesive paper strip or to cut through the
liner between self-adhesive labels.
When a PRINTFEED statement is executed, the printer feeds out a certain
amount of the media according to the printer’s setup in regard of startadjust
and stopadjust, as explained in its Installation & Operation manual. Then
the cutter can be activated by a CUT statement.
Example
This program orders the printer to print a text and then cut off the media:
10
20
30
40
50
60
70
RUN
56
PRPOS 250,250
DIR 1
ALIGN 4
FONT "Swiss 721 BT"
PRTXT "Hello everybody!"
PRINTFEED
CUT
Intermec Fingerprint v7.61 – Programmer’s Reference Manual Ed. 7
Chapter 2 Program Instructions
CUT ON/OFF
Field of Application
Statement enabling or disabling automatic cutting after PRINTFEED
execution and optionally adjusting the media feed before and after
the cutting.
Syntax
CUT [<nexp>] ON|OFF
<nexp>
is optionally the length of media to be fed out before cutting
and pulled back after cutting.
Default: CUT OFF
Remarks
This statement makes it possible to enable or disable automatic execution of
a CUT operation directly after the execution of each PRINTFEED statement.
If any extra media feed in connection with the cutting operation is required,
use startadjust and stopadjust setup or specify the desired length of media
to be be fed out before the cutting is performed and pulled back afterwards
in the CUT ON statement.
Example
This program enables automatic cutting and orders the printer to print a text
and feed out an extra amount of strip before cutting the media. The media is
then pulled back the same distance:
10
20
30
40
50
60
70
RUN
CUT 280 ON
PRPOS 250,250
DIR 1
ALIGN 4
FONT "Swiss 721 BT"
PRTXT "Hello everybody!"
PRINTFEED
Intermec Fingerprint v7.61 – Programmer’s Reference Manual Ed. 7
57
Chapter 2
Program Instructions
DATE$
Field of Application
Variable for setting or returning the current date.
Syntax
Setting the date:
<sexp>
DATE$=<sexp>
sets the current date by a 6-digit number specifying Year,
Month and Day (YYMMDD).
Returning the date: <svar>=DATE$[(<sexp>)]
<svar>
returns the current date according to the printer’s calendar.
<sexp>
is an optional flag "F", indicating that the date will be returned
according to the format specified by FORMAT DATE$.
Remarks
This variable works best if a real-time clock circuit (RTC) is fitted on the
printer’s CPU board. The RTC is battery backed-up and will keep record of
the time even if the power is turned off or lost.
If no RTC is installed, the internal clock will be used. After startup, an error
will occur when trying to read the date or time before the internal clock has
been manually set by means of either a DATE$ or a TIME$ variable. If only
the date is set, the internal clock starts at 00:00:00 and if only the time
is set, the internal clock starts at Jan 01, 1980. After setting the internal
clock, you can use the DATE$ and TIME$ variables the same way as
when an RTC is fitted, until a power off or REBOOT causes the date
and time values to be lost.
Date is always entered and, by default, returned in the order YYMMDD,
where:
YY = Year
Last two digits
(for example 2000 = 00)
MM = Month
Two digits
(01-12)
DD = Day
Two digits
(01-28|29|30|31)
Example: December 1, 2000 is entered as "001201".
The built-in calendar corrects illegal values for the years 1980-2048, for
example the illegal date 001232 will be corrected to 010101.
The format for how the printer will return dates can be changed by means of a
FORMAT DATE$ statement and returned by DATE$("F").
Example
Setting the date and then returning the date in two different formats:
10
20
30
40
RUN
DATE$ = "001201"
FORMAT DATE$ "DD/MM/YY"
PRINT DATE$
PRINT DATE$("F")
(sets date)
(sets date format)
(returns unformatted date)
(returns formatted date)
yields:
001201
01/12/00
58
Intermec Fingerprint v7.61 – Programmer’s Reference Manual Ed. 7
Chapter 2 Program Instructions
DATEADD$
Field of Application
Function returning a new date after a number of days have been
added to, or subtracted from, the current date or optionally a
specified date.
Syntax
DATEADD$([<sexp1>,]<nexp>[,<sexp2>])
<sexp1>
is any date given according to the DATE$ format, which a
certain number of days should be added to or subtracted
from.
<nexp>
is the number of days to be added to (or subtracted
from) the current date or optionally the date specified
by <sexp1>.
<sexp2>
is an optional flag "F", indicating that the date will be returned
according to the format specified by FORMAT DATE$.
Remarks
The original date (<sexp1>) should be entered according to the syntax for the
DATE$ variable, that is in the order YYMMDD, where:
YY = Year
Last two digits
(for example 2000 = 00)
MM = Month
Two digits
(01-12)
DD = Day
Two digits
(01-28|29|30|31)
Example: December 1, 2000 is entered as "001201".
The built-in calendar corrects illegal values for the years 1980-2048, for
example the illegal date 001232 will be corrected to 010101.
The number of days to be added or subtracted should be specified as a
positive or negative numeric expression respectively.
If no "F" flag is included in the DATEADD$ function, the result will be
returned according to the DATE$ format, see above.
If the DATEADD$ function includes an "F" flag, the result will be returned
in the format specified by FORMAT DATE$.
Example
10
20
30
40
50
60
70
RUN
DATE$ = "001201"
A%=15
B%=-10
FORMAT DATE$ "DD/MM/YY"
PRINT DATEADD$("001201",A%)
PRINT DATEADD$("001201",A%,"F")
PRINT DATEADD$(B%,"F")
yields:
001216
16/12/00
21/11/00
Intermec Fingerprint v7.61 – Programmer’s Reference Manual Ed. 7
59
Chapter 2
Program Instructions
DATEDIFF
Field of Application
Function returning the difference between two dates as a number
of days.
Syntax
DATEDIFF(<sexp1>,<sexp2>)
<sexp1>
is one of two dates (date 1).
<sexp2>
is the other of two dates (date 2).
Remarks
To get the result as a positive numeric value, the two dates, for which
the difference is to be calculated, should be entered with the earlier of
the dates (date 1) first and the later of the dates (date 2) last, see the
first example below.
If the later date (date 2) is entered first, the resulting value will be negative,
see the second example below.
Both dates should be entered according to the syntax for the DATE$ variable,
that is in the order YYMMDD, where:
YY = Year
Last two digits
(for example 2000 = 00)
MM = Month
Two digits
(01-12)
DD = Day
Two digits
(01-28|29|30|31)
Example: December 1, 2000 is entered as "001201".
The built-in calendar corrects illegal values for the years 1980-2048, for
example the illegal date 001232 will be corrected to 010101.
Examples
Calculation of the difference in days between the dates October 1, 2000
and November 30, 2000:
10
20
RUN
A%=DATEDIFF("001001","001130")
PRINT A%
yields:
60
If the later date is entered first, the result will be negative:
10
20
RUN
A%=DATEDIFF("001130","001001")
PRINT A%
yields:
-60
60
Intermec Fingerprint v7.61 – Programmer’s Reference Manual Ed. 7
Chapter 2 Program Instructions
DBBREAK
Field of Application
Statement for adding or deleting a breakpoint for the Fingerprint
Debugger.
Syntax
DBBREAK<nexp>|<sexp>[ON|OFF]
<nexp>
is the line number where the debugger will break and also
the name of the breakpoint.
<sexp>
is the line label where the debugger will break and also the
name of the breakpoint.
ON
adds the specified breakpoint (default).
OFF
deletes the specified breakpoint.
Remarks
The execution of a program will break at each program line, that has been
specified as a breakpoint, and the message “break in line nnn” will be
transmitted on the Debug STDOUT port. If a CONT statement is issued, the
execution will continue at next line, whereas if RUN is issued, the execution
will start again from the first program line.
The line number or line label does not to have to exist when a breakpoint
is added, but if a non-existing breakpoint is deleted an error will occur
(Error 39 or 70).
There is no error given if a breakpoint is added more than once. When a
breakpoint is deleted, all breakpoints with the same name are deleted at the
same time. There will only be one break for each line even if there are more
than one breakpoint on that line.
When a NEW statement is issued, all breakpoints will be deleted.
If a breakpoint is set on a line with a call to a FOR or WHILE loop, there will
only be one break on that line (the first time it is executed).
Related instructions are DBBREAK OFF, DBEND, DBSTDIO, and
DBSTEP.
Example
10
PRINT "A"
20
PRINT "B"
30
PRINT "C"
DBBREAK 20 ON
RUN
yields:
A
Break in line 20
Intermec Fingerprint v7.61 – Programmer’s Reference Manual Ed. 7
61
Chapter 2
Program Instructions
DBBREAK OFF
Field of Application
Statement for deleting all breakpoints for the Fingerprint Debugger.
Syntax
DBBREAK OFF
Remarks
This statement is similar to DBBREAK<nexp>|<sexp>OFF but deletes all
breakpoints instead of just one breakpoint at the time.
Related instructions are DBBREAK, DBEND, DBSTDIO, and DBSTEP.
62
Intermec Fingerprint v7.61 – Programmer’s Reference Manual Ed. 7
Chapter 2 Program Instructions
DBEND
Field of Application
Statement for terminating the Fingerprint Debugger.
Syntax
DBEND
Remarks
This statement is used for termianting the Fingerprint Debugger prematurely
and restore the STDIO settings as they were before the Debugger
was started.
Related instructions are DBBREAK, DBBREAK OFF, DBSTDIO,
and DBSTEP.
Intermec Fingerprint v7.61 – Programmer’s Reference Manual Ed. 7
63
Chapter 2
Program Instructions
DBSTDIO
Field of Application
Statement for selecting the standard IN/OUT channel for the Fingerprint
Debugger.
Syntax
DBSTDIO <nexp1>,<nexp2>[,<sexp1>,<sexp2>]
DBSTDIO [<nexp1>,<nexp2>,]<sexp1>,<sexp2>
<nexp1>
is the desired Debug STDIN channel:
0 = "console:"
1 = "uart1:" (default)
2 = "uart2:"
3 = "uart3:"
4 = "centronics:"
5 = "net1:"
6 = "usb1:"
<nexp2>
is the desired Debug STDOUT channel:
0 = "console:"
1 = "uart1:" (default)
2 = "uart2:"
3 = "uart3:"
5 = "net1:"
6 = "usb1:"
<sexp1>
Preamble
(default: empty string)
<sexp2>
Postamble
(default: empty string)
Remarks
The maximum size of the preamble and postamble strings is 12 characters.
Related instructions are DBBREAK, DBBREAK OFF, DBEND, and
DBSTEP.
Example
This statement selects "uart2:" as Debug STDIO channel. Preamble is
specified as “in" and postamble as “out":
DBSTDIO 2,2,"in","out"
64
Intermec Fingerprint v7.61 – Programmer’s Reference Manual Ed. 7
Chapter 2 Program Instructions
DBSTEP
Field of Application
Statement for specifying the interval between breaks for the the
Fingerprint Debugger and execute the program accordingly.
Syntax
DBSTEP<ncon>
<ncon>
Remarks
is the number of lines that will be executed before break.
Default: 1 line.
If <ncon> is omitted, one line will be executed, but if <ncon> is specified
as 0, nothing at all will happen.
DBSTEP cannot be used in execution mode (yields Error 78).
When DBSTEP is used on the last line in a program, the line will be
executed but there will be no break.
If DBSTEP is used in a program with a FOR or WHILE loop, there will
only be one break on the line which is calling for the FOR or WHILE
loop (the first time it is executed).
Related instructions are DBBREAK, DBBREAK OFF, DBEND, and
DBSTDIO.
Example
10
PRINT "11"
20
PRINT "22"
30
PRINT "33"
40
PRINT "44"
50
PRINT "55"
60
PRINT "66"
70
PRINT "77"
80
PRINT "88"
90
PRINT "99"
DBSTEP 4
11
22
33
44
Break in line 50
Ok
DBSTEP
55
Break in line 60
Ok
DBSTEP 2
66
77
Break in line 80
CONT
88
99
Ok
Intermec Fingerprint v7.61 – Programmer’s Reference Manual Ed. 7
65
Chapter 2
Program Instructions
DELETE
Field of Application
Statement deleting one or several consecutive program lines from the
printer’s working memory.
Syntax
DELETE<ncon1>[-<ncon2>]
<ncon1>
is the line, or the first line in a range of lines, to be deleted.
<ncon2>
is (optionally) the last line in a range of program lines to be
deleted.
Remarks
This statement can only be used for editing the current program in
the Immediate Mode and cannot be included as a part of the program
execution.
Examples
DELETE 50
deletes line 50 from the program.
DELETE 50–100
66
deletes line 50 thru 100 from the program.
DELETE 50–
deletes all lines from line 50 to the end of the program.
DELETE –50
deletes all lines from the start of the program to line 50.
Intermec Fingerprint v7.61 – Programmer’s Reference Manual Ed. 7
Chapter 2 Program Instructions
DELETEPFSVAR
Field of Application
Statement for deleting variables saved at power failure.
Syntax
DELETEPFSVAR<sexp>
<sexp>
is the name of the variable to be deleted.
Remarks
Related instructions are SETPFSVAR, GETPFSVAR, and LISTPFSVAR.
Examples
DELETEPFSVAR "QCPS%"
DELETEPFSVAR "QS$"
Intermec Fingerprint v7.61 – Programmer’s Reference Manual Ed. 7
67
Chapter 2
Program Instructions
DEVICES
Field of Application
Statement returning the names of all devices to the standard OUT
channel.
Syntax
DEVICES
Remarks
All devices available to the user in the Intermec Fingerprint firmware will
be listed, regardless if they are installed or not. There are also a number of
devices for internal use only. The list below indicates if and how the device
can be OPENed (see OPEN statement). If you try to OPEN a device, which
is not fitted or is disconnected, the message "Error in file name" will be
printed to the standard OUT channel (see SETSTDIO). Note that all names
of devices are lowercase and appended by a colon (:).
Device
c:
card1:
cardx:
centronics:
console:
dll:
lock:
net1:
par:
rom:
rs485:
status:
storage:
tmp:
uart1:
uart2:
uart3:
usb1:
wand:
Explanation
Printer’s permanent memory
SRAM memory card
Special applications only
Parallel communication port
Printer’s display and/or keyboard
Special applications only
Electronic keys
EasyLAN 100i
Special applications only
Kernel and Read-only memory card
RS 485 communication
EasyLAN100i
Electronic keys
Printer’s temporary memory
Serial communication port
Serial communication port
Serial communication port
Serial communication port
Data from Code 128 bar code
Can be OPENed for...
Input/Output/Random
Input/Output/Random
Output
Input
Input/Output
–
Input
Input/Output
–
Input
Input/Output
Input/Output
Input/Output/Random
Input/Output/Random
Input/Output
Input/Output
Input/Output
Input/Output
Input
c: is the printer’s permanent read/write memory (Flash SIMMs). It will retain
its content when the power is turned off. For compatibility with programs
created in previous versions of Intermec Fingerprint, the designation
"ram:" will also be accepted.
card1: is a read/write DOS-formatted SRAM-type memory card inserted in
the printer’s memory card adapter.
cardx: is used for special applications only.
centronics: is the Centronics parallel port. Three different types can be
selected by means of SYSVAR(25).
console: is the printer’s display and keyboard. The keyboard can be used
for input only and the display for output only.
dll: is used for special applications only.
68
Intermec Fingerprint v7.61 – Programmer’s Reference Manual Ed. 7
Chapter 2 Program Instructions
DEVICES, cont.
Remarks, cont.
lock: is all electronic key items that has been specified as locks by means
of special software. Each electronic key may contain several key items with
different properties (counter, lock, or storage). The device name calls all
key items with the corresponding properties, regardless if they are stored
in the key circuit on the CPU board or in an inserted external key. Each
key item has a 4-character name, usually appended by a delimiter (?) and a
4-character password. Also see OPEN statement.
net1: is the communication channel for the EasyLAN 100i interface board
(Ethernet communication).
par: is used for special applications only.
rom: is both the read-only kernel sectors in the Boot-Bank flash SIMM,
and any read-only memory card inserted in the printer’s memory card
adapter, for example an OTPROM card, a Flash card, or a read-only
formatted SRAM card.
rs485: is used in connection with RS 485 point-to-point or multidrop
communication to specify that the RS 485 protocol is used and to specify the
protocol address of the unit, for example "rs485:23".
status: is used in connection with sending error messages from the printer to
the home page of an EasyLAN 100i interface board.
storage: is all electronic key items (see below) in the printer that has
been specified as storages by means of special software. Note that this
memory is comparatively slow.
tmp: is the printer’s temporary read/write memory (DRAM SIMMs). It will
lose its content when the power is turned off or at a power failure. Thus, do
not use DRAM for valuable data that cannot be recreated, but copy it to "c:".
One advantage of using "tmp:" instead of "c:" is that data can be written to
DRAM faster than to the flash memory. To speed up operation, the Intermec
Fingerprint firmware (except program modules with dynamic downloading)
is copied from "rom:" to "tmp:" at startup and used from "tmp:".
uart1: is the standard RS 232C port.
uart2: is an additional serial port on an optional interface board.
uart3: is an additional serial port on an optional interface board.
usb1: is the standard USB (Universal Serial Bus) port on EasyCoder
F-series printers.
wand: is any input from an Code 128 bar code not containing any
FNC3 character via a bar code wand or reader connected to the wand
interface.
Intermec Fingerprint v7.61 – Programmer’s Reference Manual Ed. 7
69
Chapter 2
Program Instructions
DEVICES, cont.
Example
DEVICES
yields for example:
c:
card1:
cardx:
centronics:
console:
dll:
lock:
net1:
par:
rom:
rs485:
status:
storage:
tmp:
uart1:
uart2:
uart3:
usb1:
wand:
70
(optional interface board in EasyCoder F-series)
(only if an optional interface board is fitted)
(only if an optional interface board is fitted)
(only if an optional interface board is fitted)
(only if an optional interface board is fitted)
(EasyCoder F-series only)
Intermec Fingerprint v7.61 – Programmer’s Reference Manual Ed. 7
Chapter 2 Program Instructions
DIM
Field of Application
Statement specifying the dimensions of an array.
Syntax
DIM<<nvar>|<svar>>(<nexp1>[,<nexp2>...])...
...[,<<nvar>|<svar>>(<nexp1>[,<nexp2>...])]
<nvar>|<svar>
is the name of the array.
<nexp1>
is the max. subscript value for the first dimension.
<nexp2-10>
are, optionally, the max. subscript value for the following
dimensions (No. 2-10).
Remarks
An array is created by entering a variable followed by a number of
subscripts (max 10) separated by commas. All the subscripts are enclosed
by parentheses. Each subscript represents a dimension. The number of
subscripts in an array variable, the first time (regardless of line number) it
is referred to, decides its number of dimensions. The number of elements in
each dimension is by default restricted to four (No. 0-3).
If more than 4 elements in any dimension is desired, a DIM statement must be
issued. Note that 0 = 1:st element, 1 = 2:nd element, etc.
For example ARRAY$(1,2,3) creates a three-dimensional array, where the
dimensions each contain 4 elements (0-3) respectively. This corresponds to
the statement DIM ARRAY$(3,3,3).
It is not possible to change the number of dimensions of an array that
already has been created during runtime. (Error 57, “Subscript out of
range” will occur.)
Considering the printer’s limited memory and other practical reasons, be
careful not to make the arrays larger than necessary. A DIM statement can be
used to limit the amount of memory set aside for the array.
Examples
This example creates an array containing three dimensions with 13
elements each:
100
DIM NAME$(12,12,12)
Here, two one-dimensional arrays are created on the same program line:
10
20
30
40
RUN
DIM PRODUCT$(15), PRICE%(12)
PRODUCT$(2)="PRINTER"
PRICE%(2)=1995
PRINT PRODUCT$(2);" $";PRICE%(2)
yields:
PRINTER $1995
Intermec Fingerprint v7.61 – Programmer’s Reference Manual Ed. 7
71
Chapter 2
Program Instructions
DIR
Field of Application
Statement specifying the print direction.
Syntax
DIR<nexp>
<nexp>
Default value:
Reset to default by:
Remarks
is the print direction (1, 2, 3, or 4).
1
PRINTFEED execution
A change of print direction affects all printing statements, that is PRTXT,
PRBAR, PRIMAGE, PRBOX, and PRLINE statements that are executed
later in the program until a new DIR statement or a PRINTFEED
statement is executed.
The print direction is specified in relation to the media feed direction
as illustrated below. The print direction affects the various types of
objects as follows:
Text:
72
Intermec Fingerprint v7.61 – Programmer’s Reference Manual Ed. 7
Chapter 2 Program Instructions
DIR, cont.
Remarks, cont.
Bar Codes:
Horizontal “picket fence" printing. Vertical “ladder" printing.
Images:
The relation of the image and the print direction depends how the image
was drawn. An image can only be “rotated" 180˚. Thus, it may be useful
to have two copies of the image available with different extensions for
either horizontal or vertical printing:
DIR 1 & 3, use extension .1
DIR 2 & 4, use extension .2
Intermec Fingerprint v7.61 – Programmer’s Reference Manual Ed. 7
73
Chapter 2
Program Instructions
DIR, cont.
Remarks, cont.
Lines:
Examples
Printing a label with one line of text and drawing a line beneath the text:
10
20
30
40
50
60
70
80
RUN
Boxes:
PRPOS 30,300
DIR 1
ALIGN 4
FONT "Swiss 721 BT",18
PRTXT "TEXT PRINTING"
PRPOS 30,280
PRLINE 555,10
PRINTFEED
Printing the same information vertically necessitates new positioning to
avoid Error 1003, “Field out of label."
10
20
30
40
50
60
70
80
RUN
74
PRPOS 300,30
DIR 4
ALIGN 4
FONT "Swiss 721 BT",18
PRTXT "TEXT PRINTING"
PRPOS 320,30
PRLINE 555,10
PRINTFEED
(new position)
(new direction)
(new position)
Intermec Fingerprint v7.61 – Programmer’s Reference Manual Ed. 7
Chapter 2 Program Instructions
END
Field of Application
Statement ending the execution of the current program or subroutine
and closing all OPENed files and devices.
Syntax
END
Remarks
END can be placed anywhere in a program, but is usually placed at the
end. It is also useful for separating the “main” program from possible
subroutines with higher line numbers. It is possible to issue several END
statements in the same program.
Example
A part of a program, which produces fixed line-spacing, may look this way:
10
20
30
40
50
60
70
80
90
FONT"Swiss 721 BT"
X%=300:Y%=350
INPUT A$
PRPOS X%,Y%
PRTXT A$
Y%=Y%-50
IF Y%>=50 GOTO 30
PRINTFEED
END
The Y-coordinate will be decremented by 50 dots for each new line until it
reaches the value 50. The END statement terminates the program.
Intermec Fingerprint v7.61 – Programmer’s Reference Manual Ed. 7
75
Chapter 2
Program Instructions
EOF
Field of Application
Function for checking for an end-of-file condition.
Syntax
EOF(<nexp>)
<nexp>
is the number assigned to the file when it was OPENed.
Remarks
The EOF function can be used with files OPENed for sequential input in
connection with the statements INPUT#, LINE INPUT#, and INPUT$ to
avoid the error condition “Input past end” which has no error message.
When the EOF function encounters the end of a file, it returns the value -1
(true). If not, it returns the value 0 (false).
Example
10
20
30
40
50
60
70
80
90
100
110
120
RUN
DIM A%(10)
OPEN "DATA" FOR OUTPUT AS #1
FOR I%=1 TO 10
PRINT #1, I%*1123
NEXT I%
CLOSE #1
OPEN "DATA" FOR INPUT AS #2
I%=0
WHILE NOT EOF(2)
INPUT #2, A%(I%):PRINT A%(I%)
I%=I%+1:WEND
IF EOF(2) THEN PRINT "End of File"
yields:
1123
2246
3369
4492
5615
6738
7861
8984
10107
11230
End of File
76
Intermec Fingerprint v7.61 – Programmer’s Reference Manual Ed. 7
Chapter 2 Program Instructions
ERL
Field of Application
Function returning the number of the line on which an error condition
has occurred.
Syntax
ERL
Remarks
Also useful in connection with an ON ERROR GOTO statement.
Examples
You can check at which line the last error since power up occurred
like this:
PRINT ERL
yields for example
40
In this example, the line number of the line, where an error has occurred,
decides the action to be taken (in this case the font size is too large
for the label width):
10
20
30
40
50
1000
1010
RUN
ON ERROR GOTO 1000
FONT "Swiss 721 BT",100
PRTXT "HELLO EVERYBODY"
PRINTFEED
END
IF ERL=40 THEN PRINT "PRINT ERROR"
RESUME NEXT
yields:
PRINT ERROR
You can use the ERL function in programs without line numbers too,
because such programs have automatically generated hidden line numbers
that are revealed when the program is LISTed (see Intermec Fingerprint
7.50, Programmer’s Guide). This is the same program as above but
without line numbers:
NEW
IMMEDIATE OFF
ON ERROR GOTO QAAA
FONT "Swiss 721 BT",100
PRTXT "HELLO EVERYBODY"
PRINTFEED
END
QAAA: IF ERL=40 THEN PRINT "PRINT ERROR"
RESUME NEXT
IMMEDIATE ON
RUN
yields:
PRINT ERROR
Intermec Fingerprint v7.61 – Programmer’s Reference Manual Ed. 7
77
Chapter 2
Program Instructions
ERR
Field of Application
Function returning the code number of an error that has occurred.
Syntax
ERR
Remarks
The firmware is able to detect a number of error conditions. The errors are
represented by code numbers according to Chapter 7, “Error Messages.”
The ERR function enables the program to read the coded error number.
Thereby you may design your program to take proper action depending on
which type of error that may have occurred.
Example
In this example, the code number of the error decides the action to
be taken:
10
. . .
. . .
100
110
120
. . .
. . .
. . .
1000
1010
ON ERROR GOTO 1000
. .
. .
PRTXT "HELLO"
PRINTFEED
END
. .
. .
. .
IF ERR=1005 THEN PRINT "OUT OF PAPER"
RESUME NEXT
You can also check the number of the last error since power up:
PRINT ERR
yields for example:
1022
78
Intermec Fingerprint v7.61 – Programmer’s Reference Manual Ed. 7
Chapter 2 Program Instructions
ERROR
Field of Application
Statement for defining error messages and enabling error handling for
specified error conditions (Intermec Direct Protocol only).
Syntax
ERROR <nexp>[,<sexp>]
<nexp>
is the number of the error condition.
<sexp>
is the desired error message.
Remarks
The ERROR statement can only be used in the Intermec Direct Protocol
for the purpose of enabling error-handling and creating customized error
messages, as described below.
The built-in error-handler of the Intermec Direct Protocol will always
handle the following error conditions (also see the Intermec Direct Protocol
v7.50, Programmer’s Guide):
• Out of paper
• No field to print
• Head lifted
• Out of transfer ribbon
• Next label not found
Other errors will not be handled unless they have been specified by an
ERROR statement. The number of the error should be entered according to
the list of error messages at the end of this manual.
The ERROR statement also allows you to edit a suitable message in any
language. This message will appear in the printer’s display window if the
error occurs. The error message will be truncated to 33 characters. Character
No. 1-16 will appear on the upper line and character 18-33 will appear on the
lower line, whereas character No. 17 always is ignored.
ANSI control characters can be used in the error message string, see chapter
“Printer Function Control; Display” in the Intermec Fingerprint v7.50,
Programmer’s Guide. An empty string removes any previously entered error
message for the error in question. Likewise, a previously entered messages
string can be replaced by a new one.
When an error defined by an ERROR statement is detected, the printer
sets its standard IN port BUSY and displays the error messages. The error
message will be cleared and the standard IN port will be set READY when
the printer’s <Print> key is pressed. However, in case of the standard errors,
the error condition must also be physically dealt with, for example by loading
a fresh stock of labels or lowering the printhead.
Error messages are not saved in the printer’s memory, but new ERROR
statements will have to be downloaded after each power up. Therefore,
it is recommended to save a set of ERROR statements as a file in the
host computer.
Note that the ERROR statements affects both the error messages in the
printer’s display window and the error messages returned to the host via the
standard OUT channel (see SETSTDIO statement).
Intermec Fingerprint v7.61 – Programmer’s Reference Manual Ed. 7
79
Chapter 2
Program Instructions
ERROR, cont.
Remarks, cont.
By default, no error messages are returned to the host in the Intermec
Direct Protocol, since the statement INPUT ON sets the verbosity level
to off, that is SYSVAR (18)= 0. However, the verbosity level can be
changed by means of VERBON/VERBOFF statements or the SYSVAR
(18) system variable.
Different types of error messages to be returned on the standard OUT
channel can be selected by means of the SYSVAR (19) system variable.
If SYSVAR (19) is set to 2 or 3, the error message specified by ERROR
is transmitted. If no such error message is available, a standard error
message in English will be transmitted (see list of Error Messages
in Chapter 7).
Examples
In these examples, a few errors are specified. Note the blank spaces for
character position 17 in each message (space characters are indicated
by doubleheaded arrows):
ERROR
ERROR
ERROR
ERROR
80
43,"MEMORY↔↔↔↔↔↔↔↔↔↔↔OVERFLOW" ↵
1003,"FIELD↔OUT↔OF↔↔↔↔↔LABEL" ↵
1010,"HARDWARE↔↔↔↔↔↔↔↔↔ERROR" ↵
1029,"PRINTHEAD↔VOLT-↔↔AGE↔TOO↔HIGH" ↵
Intermec Fingerprint v7.61 – Programmer’s Reference Manual Ed. 7
Chapter 2 Program Instructions
EXECUTE
Field of Application
Statement for executing a Fingerprint program line or a file with
Fingerprint program lines from within another Fingerprint program.
Syntax
EXECUTE<sexp>
<sexp>
Remarks
is one line of Fingerprint instructions or the name of a file
containing at least one line of a Fingerprint program.
This statement allows you to create a library of layouts, subroutines,
texts, etc, which can be executed as a part of a program without having
to merge the programs.
The program called by EXECUTE must not contain any line numbers
or line labels.
If the EXECUTE statement is followed by a string of Fingerprint instructions,
they should be separated by colons.
When an error occurs in an EXECUTE file, the line number in the error
message is that of the EXECUTE file, not of the program where the
EXECUTE statement is issued.
EXECUTE is only allowed in the execute mode, not in the immediate
mode (yields Error 69).
Recursive call of EXECUTE is not allowed (yields Error 78).
Example
This example shows how a preprogrammed file containing a bar code
is executed as a part of a Fingerprint program, where the input data
and printfeed are added:
IMMEDIATE OFF
DIR 1
ALIGN 7
BARSET "CODE39",2,1,3,120
BARFONT "Swiss 721 BT",10,8,5,1,1
BARFONT ON
IMMEDIATE ON
SAVE "BARCODE.PRG",L
NEW
10
20
30
40
RUN
PRPOS 30,400
EXECUTE "BARCODE.PRG"
PRBAR "ABC"
PRINTFEED
Intermec Fingerprint v7.61 – Programmer’s Reference Manual Ed. 7
81
Chapter 2
Program Instructions
FIELD
Field of Application
Statement for creating a single-record buffer for a random file
and dividing the buffer into fields to which string variables are
assigned.
Syntax
FIELD[#]<nexp1>,<nexp2>AS<svar1>[,<nexp3>AS<svar2>...]
#
indicates that whatever follows is a number. Optional.
<nexp1>
is the number assigned to the file when it was OPENed.
<nexp2-n>
is the number of bytes to be reserved for the string variable
that follows. (Null not allowed.)
<svar1-n>
is the designation of the string variable, for which space
has been reserved.
Remarks
The buffer is divided into fields, each of which is given an individual length
in bytes. A string variable is assigned to each field. This statement does not
put any data in the buffer, it only creates and formats the buffer, allowing you
to place the data using LSET and RSET statements.
Before using this statement, consider the maximum number of characters
(incl. space characters) needed for each variable and check that the
total does not exceed the record size given when the file was OPENed
(by default 128 bytes).
When a file is CLOSEd, all its FIELD definitions will be lost.
Example
This example opens and formats a file buffer for a single record. The
buffer is divided into three fields, with the size of 25, 30, and 20 bytes
respectively.
10
20
OPEN "ADDRESSES" AS #8 LEN=75
FIELD#8,25 AS F1$, 30 AS F2$, 20 AS F3$
(Imagine a spreadsheet matrix where the file is the complete spreadsheet,
the records are the lines and the fields are the columns. The buffer can only
contain one such line at the time.)
82
Intermec Fingerprint v7.61 – Programmer’s Reference Manual Ed. 7
Chapter 2 Program Instructions
FIELDNO
Field of Application
Function getting the current field number for partial clearing of the
print buffer by a CLL statement.
Syntax
FIELDNO
Remarks
By assigning the FIELDNO function to one or several numeric variables,
you can divide the print buffer into portions, which can be cleared
using a CLL statement.
Example
10
20
30
40
50
60
70
80
90
100
110
120
130
140
150
160
170
180
190
200
RUN
PRPOS 100,300
FONT "Swiss 721 BT"
PRTXT "HAPPY"
A%=FIELDNO
PRPOS 100,250
PRTXT "NEW YEAR"
B%=FIELDNO
PRPOS 100, 200
PRTXT "EVERYBODY!"
PRINTFEED
CLL B%
PRPOS 100,200
PRTXT "TO YOU!"
PRINTFEED
CLL A%
PRPOS 100,250
PRTXT "BIRTHDAY"
PRPOS 100,200
PRTXT "DEAR TOM!"
PRINTFEED
yields three labels:
#1
#2
#3
HAPPY
NEW YEAR
EVERYBODY!
HAPPY
NEW YEAR
TO YOU!
HAPPY
BIRTHDAY
DEAR TOM!
Intermec Fingerprint v7.61 – Programmer’s Reference Manual Ed. 7
83
Chapter 2
Program Instructions
FILE& LOAD
Field of Application
Statement for receiving and storing binary files in the printer’s
memory.
Syntax
FILE& LOAD[<nexp>1,]<sexp>,<nexp2>[,<nexp3>]
<nexp1>
is optionally the number of bytes to skip before starting
to read the file data.
<sexp>
is the desired name of the file when stored in the printer’s
memory.
<nexp2>
is the size of the file in number of bytes.
<nexp3>
optionally specifies a communication channel OPENed for
INPUT by the number assigned to the device.
(Default: Std IN channel.)
Remarks
This statement prepares the printer to receive a binary file on the standard
IN channel (see SETSTDIO statement) or on another communication
channel OPENed for INPUT.
Another, but more cumbersome, way of obtaining the same result is to use
the TRANSFER KERMIT statement.
Image files and font files can also be downloaded using the IMAGE
LOAD statement.
As opposed to IMAGE LOAD and TRANSFER KERMIT statements,
FILE& LOAD will not immediately install the fonts, but the font files will
remain as files in the printer’s memory until next power-up.
The optional first parameter makes it possible to use this statement in
MS-DOS (CR/LF problem).
The name of the file, when stored in the printer’s memory, may consist of
max. 30 characters including possible extension.
The size of the original file should be given in bytes according to its
size in the host.
Before the FILE& LOAD statement can be used on a serial channel, the
setup must be changed to 8 characters, RTS/CTS handshake. When a FILE&
LOAD statement is executed, the execution stops and waits for the number
of bytes specified in the statement to be received. During the transfer of file
data to the printer, there is a 25 sec. timeout between characters. If a new
character has not been received within the timeout limit, an error occurs
(Error 80, “Download timeout”). When the specified number of characters
have been received, the execution is resumed.
Example
84
10
20
30
OPEN "uart2:" FOR INPUT AS 5
FILE& LOAD "FILE1.PRG",65692,5
CLOSE 5
Intermec Fingerprint v7.61 – Programmer’s Reference Manual Ed. 7
Chapter 2 Program Instructions
FILENAME$
Field of Application
Function returning the names of the files stored in the specified part
of the printer’s memory.
Syntax
FILENAME$[(<sexp>)]
<sexp>
is the name of the memory device from which the first
file name (in alphabetical order) will be listed. Parts of
file names and wildcards (*) are allowed. Maximum size
is 30 characters.
If <sexp> is omitted, the next file name in the same memory
device is listed. Can be repeated. When there are no files left
to list, the output string will be empty.
Remarks
The specified memory device must be mounted. The file name must
correspond to the name of the file stored in the memory device in regard of
upper- and lowercase characters. Wildcards (* = ASCII 42 dec.) can be used.
The list may include all type of files. Even system files, that are preceded by
a period character (for example .FONTALIAS), may be listed. No device
names are included in the listed file names.
Example
This example shows how all files in "rom:" with the extension .PRG
are listed:
10
20
30
40
50
RUN
FNAME$ = FILENAME$("rom:*.PRG")
WHILE FNAME$<> ""
PRINT FNAME$
FNAME$ = FILENAME$
WEND
yields for example:
ERRHAND.PRG
FILELIST.PRG
LBLSHTXT.PRG
LINE_AXP.PRG
LSS-SENSOR.PRG
MKAUTO.PRG
SHELLXP.PRG
WINXP.PRG
Intermec Fingerprint v7.61 – Programmer’s Reference Manual Ed. 7
85
Chapter 2
Program Instructions
FILES
Field of Application
Statement for listing the files stored in one of the printer’s directories
to the standard OUT channel.
Syntax
FILES[<sexp>][,A]
<sexp>
Remarks
optionally specifies the directory (see DEVICES).
If no directory is specified, the files in the printer’s current directory will be
listed. As default, the current directory is the printer’s permanent memory
("c:"), see CHDIR statement.
By including a reference to a memory device ("c:", "tmp:", "rom:",
"card1:", "lock:", or "storage:", see DEVICES statement), the files of
the specifies directory will be returned without having to change the
current directory.
System files are indicated by a leading period character (.) in their
names. If an “A" flag is included in the statement, all files including
system files will be listed. If the “A" flag is omitted, all files, except
system files, will be listed.
The number of bytes for each file and the total number of free and used bytes
in the specified directory will also be included in the list.
Example
The presentation may look like this on the host screen:
FILES "c:",A
Files on c:
APPLICATION
2
DIRECT
157
496653 bytes free
1
STDIO
0 .setup.saved
160 bytes used
Ok
Note that all programs you create yourself automatically get the extension
.PRG, unless you manually give a program another extension, see SAVE.
86
Intermec Fingerprint v7.61 – Programmer’s Reference Manual Ed. 7
Chapter 2 Program Instructions
FLOATCALC$
Field of Application
Function for calculation with float numbers.
Syntax
FLOATCALC$(<sexp1>,<sexp2>,<sexp3>[,<nexp1>])
<sexp1>
is the first operand.
<sexp2>
is the operator (+, -, *, or /).
<sexp3>
is the second operand.
<nexp1>
is, optionally, the precision in decimals (default 10).
Remarks
Operands are float numbers, that is, a string of digits with a decimal point to
separate decimals from integers. Operands can also contain leading plus
(+), minus (-), and space characters. Space characters are ignored, whereas
the usual mathematical rules apply to plus and minus signs. All other
characters (or plus, minus, and space characters in other positions than
leading) generate errors.
Note the mathematical rules:
-yields +
-+
yields +yields ++
yields +
The following arithmetic operators are allowed:
+ addition
ASCII 043 dec
- subtraction
ASCII 045 dec
* multiplication ASCII 042 dec
/ division
ASCII 047 dec
Any other type of operators or other characters will generate an error.
The precision parameter optionally specifies the number of decimals in
the result of the calculation. The result will be truncated accordingly. For
example, if the number of decimals is specified as 5, the result 5.76123999
will be presented as 5.76123.
The result of a FLOATCALC$ function can be formatted using a
FORMAT$ function.
Examples
Addition:
A$ = "234.9"
B$ = "1001"
PRINT FLOATCALC$ (A$,"+",B$,5)
yields:
1235.90000
Subtraction:
A$ = "234.9"
C% = 2
PRINT FLOATCALC$ (A$,"-",100.013,C%)
yields:
134.88
Intermec Fingerprint v7.61 – Programmer’s Reference Manual Ed. 7
87
Chapter 2
Program Instructions
FONT (FT)
Field of Application
Statement for selecting a scaleable TrueType or TrueDoc single-byte
font or a single-byte bitmap font for the printing of the subsequent
PRTXT statements.
Syntax
FONT|FT<sexp1>[,<nexp1>[,<nexp2>[,<nexp3>]]]
<sexp1>
is the name of the font. Default: "Swiss 721 BT".
<nexp1>
is optionally the height in points of the font. Default: 12 points.
Use MAG to enlarge with bitmap fonts.
<nexp2>
is the clockwise slant in degrees (0–90°). Default: 0.
Does not work with bitmap fonts.
<nexp3>
is the width enlargement in percent relative the height
(1-1000). Default: 100.
Does not work with bitmap fonts.
Reset to default by:
PRINTFEED execution.
Remarks
Intermec Fingerprint v7.60 supports scaleable fonts in TrueType and
TrueDoc format that comply with the Unicode standard. A large number
of scaleable fonts are available on special request, so it is quite possible
that your printer is fitted with a unique selection of fonts. Use a FONTS
statement to list the names of all fonts installed in your own printer to
the standard OUT channel.
To maintain compatibility with programs created in earlier versions of
Intermec Fingerprint, you can also specify bitmap font names, for example
"SW030RSN" or "MS060BMN.2". In case of standard bitmap font name,
the firmware will select the corresponding scaleable font in the printer’s
memory and set its parameters so its direction, appearance, and size come
as close to the specified bitmap font as possible. A prerequisite is that
the printer’s memory contains the standard complement of outline fonts.
Non-standard bitmap fonts can also be used. They will not produce
any outline fonts, but will retain their bitmap format. Any extension
to the bitmap font name is of no consequence. See Chapter 6, “Fonts”
in this manual.
The height of the font is given in points (same as in your PC), which means
that a text will be printed in the same size regardless of the printhead density
of the printer. The unit of measure is points (1 point = 1/72 inch ≈ 0.352
mm) and specifies the height of the font including ascenders and descenders.
Sizes less than 4 points will be unreadable. In case of bitmap fonts, it is
recommended to use MAG to enlarge the font instead of specifying a font
height (works only in multiples of 12 points).
Any font may be magnified up to 4 times separately in regard of height and
width using a MAG statement. Bitmap fonts will get somewhat jagged edges
when magnified, whereas outline fonts will remain smooth.
88
Intermec Fingerprint v7.61 – Programmer’s Reference Manual Ed. 7
Chapter 2 Program Instructions
FONT (FT), cont.
Remarks, cont.
Slanting means that you can create the same effect as in ITALIC characters.The
higher value, the more askew the upright parts of the characters will come.
Slanting increases clockwise. Values greater than 65-70° will be unreadable.
Slanting cannot be used with bitmap fonts.
Slanting value: 10
Slanting value: 20
ABCDEFGH
ABCDEFGH
A scaleable font can enlarged in regard of width relative the height. The
value is given as percent (1-1000). This means that if the value is 100, there
is no change in the appearance of the characters, whereas if the value is
given as, for example, 50 or 200, the width will the half the height or
double the height respectively. When using this parameter, all parameters
in the syntax must be included in the statement, that is, name, height,
slant, and width.
The standard complement of fonts listed in Chapter 6 can be supplemented
with more fonts using three methods:
• Downloading fonts from a Font Install Card.
The card must be inserted before the printer is started. At startup
the fonts are automatically downloaded, installed, and permanently
stored in the printer’s memory. The fonts can be used without the
card being present.
• Using fonts from a Font Card.
The card must be inserted before the printer is started. At startup the fonts
are automatically installed, but not copied to the printer’s memory. Thus,
the card must always be present before such a font can be used.
• Downloading font files.
Font files can be downloaded and installed by means of either of the two
statements IMAGE LOAD and TRANSFER KERMIT. There is no need
to restart the printer before using the font in question.
It is possible to create aliases for one or several font to get shorter or more
adequate names. Refer to Chapter 6 for further explanation.
Examples
Printing a label with one line of 12p text with default direction and
alignment:
10
20
30
RUN
FONT "Swiss 721 BT"
PRTXT "HELLO"
PRINTFEED
Printing the same text but with 24p size, 20° slant, and 75% width:
10
20
30
RUN
FONT "Swiss 721 BT",24,20,75
PRTXT "HELLO"
PRINTFEED
Intermec Fingerprint v7.61 – Programmer’s Reference Manual Ed. 7
89
Chapter 2
Program Instructions
FONTD
Field of Application
Statement for selecting a scaleable TrueType or TrueDoc double-byte
font for the printing of the subsequent PRTXT statements.
Syntax
FONTD<sexp1>[,<nexp1>[,<nexp2>[,<nexp3>]]]
<sexp1>
is the name of the font.
Default: none.
<nexp1>
is optionally the height in points of the font.
Default: 12 points.
<nexp2>
is the clockwise slant in degrees (0-90°).
Default: 0.
<nexp3>
is the width enlargement in percent relative the height
(1-1000). Default: 100.
Reset to default by:
PRINTFEED execution or CLL.
Remarks
This statement is identical to the FONT statement, but is used for fonts
specified by a double byte (16 bits) instead of a single byte (7 or 8 bits). To
use a double-byte font, a double-byte character set must be selected using
a NASCD statement. Usually, if the first byte has an ASCII value between
161 dec. (A1 hex) and 254 dec (FE hex), the character will be treated
as a double-byte character and the firmware waits for next byte to make
the 16 bit address complete. The character will be printed using the font
specified by FONTD and according to the character set specified by NASCD
and the Unicode standard.
On the other hand, if the first byte has an ASCII value below 161 dec.
(A1 hex), the character is treated as a single byte character and next byte
received will be regarded as the start of a new character. This implies
that the character set specified by NASC and the font specified by FONT
will be used. However, the selected Unicode double-byte character set
may specify some other ASCII value as the breaking point between single
and double byte character sets.
Note that 8 bit communication must be selected.
Only writing from left to right in the selected print direction is supported.
Example
The following text contains both single- and double-byte fonts. The double-byte
font and its character set are stored in a Font Install Card:
10
20
30
40
50
60
RUN
NASC 46
FONT "Swiss 721 BT", 24, 10
NASCD "rom:BIG5.NCD"
FONTD "Chinese"
PRTXT CHR$(65);CHR$(161);CHR$(162)
PRINTFEED
This program yields a printed text line that starts with the Latin character A
(ASCII 65 dec.) followed by the Chinese font that corresponds to the address
161+162 dec. in the character set “BIG5.NCD".
90
Intermec Fingerprint v7.61 – Programmer’s Reference Manual Ed. 7
Chapter 2 Program Instructions
FONTNAME$
Field of Application
Function returning the names of the fonts stored in the printer’s
memory.
Syntax
FONTNAME$(<nexp>)
<nexp>
the result of the expression should be either false or
true, where...
False (0) indicates first font.
True (≠0) indicates next font.
Remarks
FONTNAME$(0) produces the first name in the memory.
FONTNAME$(≠0) produces next name. Can be repeated as long as
there are any fontnames left.
Example
Use a program like this to list all fontnames:
10
20
30
40
50
RUN
A$ = FONTNAME$ (0)
IF A$ = "" THEN END
PRINT A$
A$ = FONTNAME$ (-1)
GOTO 20
yields for example:
-UPC11.1
-UPC11.2
-UPC21.1
-UPC21.2
-UPC31.1
-UPC31.2
-UPC51.1
-UPC51.2
Century Schoolbook BT
Dutch 801 Bold BT
Dutch 801 Roman BT
Futura Light BT
Letter Gothic 12 Pitch BT
MS030RMN
MS030RMN.1
MS030RMN.2
MS050RMN
MS050RMN.1
MS050RMN.2
MS060BMN
MS060BMN.1
MS060BMN.2
Monospace 821 BT
Monospace 821 Bold BT
OB035RM1
etc, etc.
Intermec Fingerprint v7.61 – Programmer’s Reference Manual Ed. 7
91
Chapter 2
Program Instructions
FONTS
Field of Application
Statement returning the names of all fonts stored in the printer’s
memory to the standard OUT channel.
Syntax
FONTS
Example
A list of the fonts stored in the printer may look like this:
FONTS
Century Schoolbook BT
Dutch 801 Roman BT
Letter Gothic 12 Pitch BT
MS030RMN.1
MS050RMN
MS050RMN.2
MS060BMN.1
Monospace 821 BT
OB035RM1
OB035RM1.2
OCR-B 10 Pitch BT
SW020BSN
SW020BSN.2
SW030RSN.1
SW050RSN
SW050RSN.2
SW060BSN.1
SW080BSN
SW080BSN.2
SW120BSN.1
Swiss 721 BT
Swiss 721 Bold Condensed BT
Zurich Extra Condensed BT
1548380 bytes free
Ok
92
yields for example:
Dutch 801 Bold BT
Futura Light BT
MS030RMN
MS030RMN.2
MS050RMN.1
MS060BMN
MS060BMN.2
Monospace 821 Bold BT
OB035RM1.1
OCR-A BT
Prestige 12 Pitch Bold BT
SW020BSN.1
SW030RSN
SW030RSN.2
SW050RSN.1
SW060BSN
SW060BSN.2
SW080BSN.1
SW120BSN
SW120BSN.2
Swiss 721 Bold BT
Zapf Dingbats BT
307200 bytes used
Intermec Fingerprint v7.61 – Programmer’s Reference Manual Ed. 7
Chapter 2 Program Instructions
FOR...TO...NEXT
Field of Application
Statement for creating a loop in the program execution, where a counter
is incremented or decremented until a specified value is reached.
Syntax
FOR<nvar>=<nexp1>TO<nexp2>[STEP<nexp3>]NEXT[<nvar>]
<nvar>
is the variable to be used as a counter.
<nexp1>
is the initial value of the counter.
<nexp2>
is the final value of the counter.
<nexp3>
is the value of the increment (decrement).
Remarks
This statement is always used in connection with a NEXT statement.
The counter (<nvar>) is given an initial value by the numeric expression
(<nexp1>). If no increment value is given (STEP <nexp3>), the value 1 is
assumed. A negative increment value will produce a decremental loop. Each
time the statement NEXT is encountered, the loop will be executed again until
the final value, specified by (<nexp2>), is reached. Then the execution will
proceed from the first line after the NEXT statement.
If the optional variable is omitted in the NEXT statement, the program
execution will loop back to the most recently encountered FOR statement.
If the NEXT statement does include a variable, the execution will loop back
to the FOR statement specified by the same variable.
FOR...NEXT loops can be nested, which means that a loop can contain
another loop, etc. However, each loop must have a unique counter designation
and the inside loop must be concluded by a NEXT statement before the
outside loop can be executed.
Example
The counter A% is incremented from 20 to 100 in steps of 20 by means
of a FOR...NEXT loop:
10
20
30
RUN
FOR A%=20 TO 100 STEP 20
PRINT A%
NEXT
yields:
20
40
60
80
100
Intermec Fingerprint v7.61 – Programmer’s Reference Manual Ed. 7
93
Chapter 2
Program Instructions
FORMAT
Field of Application
Statement for formatting the printer’s permanent memory, or formatting
a SRAM-type memory card to MS-DOS format.
Syntax
FORMAT<sexp>[,<nexp1>[,<nexp2>]][,A]
<sexp>
specifies the device to be formatted either as "c:" or "card1:"
<nexp1>
Specifies the number of entries in the root directory (only
applicable when <sexp> = "card1:"). Default: 208 entries.
<nexp2>
Specifies the number of bytes per sector (only applicable
when <sexp> = "card1:" and “A” flag is set).
Default: 512 bps.
FORMAT "c:"
Formats the printers permanent memory partially or completely. System files
are distinguished by a leading period character, for example .setup.saved.
This makes it possible to format the permanent memory without removing
the system files.
Remarks
If no “A” flag is included in the statement, all files excluding those starting
with a period character (.) will be removed (“soft” formatting).
If an “A” flag is included in the statement, all files including those starting with
a period character (.) will be removed (“hard” formatting).
Be careful. There is no way to undo a FORMAT operation.
FORMAT "card1:"
Formats a JEIDA-4 memory card of SRAM-type, which is inserted in the
printer’s optional memory card adapter, to MS-DOS format. Optionally, the
number of entries in the root directory (that is number of files on the card)
and the number of bytes per sector can be specified, provided an “A” flag is
included in the statement (“hard” formatting).
When a FORMAT statement is executed, any existing data or previous
formatting in the card will be erased. After formatting, such a memory card
can be OPENed for INPUT/OUTPUT/APPEND or RANDOM access and
can also be used in a PC for storing MS-DOS files. The DOS-formatted
memory card is referred to as device "card1:".
94
Intermec Fingerprint v7.61 – Programmer’s Reference Manual Ed. 7
Chapter 2 Program Instructions
FORMAT, cont.
Examples
Issuing the statement FILES before and after a FORMAT "c:" statement
shows how the memory is affected. Note that system files starting with
a period character are not removed, since the FORMAT statement does
not contain any “A” flag:
FILES "c:",A
yields for example:
Files on c:
.theDefaultSetup
STDIO
FILELIST.DAT
505856 bytes free
157
2
0
DIRECT
APPLICATION
0
1
160 bytes used
Ok
FORMAT "c:"
Ok
FILES "c:",A
yields for example:
Files on c:
.theDefaultSetup
514048 bytes free
157
157 bytes used
Ok
In the following statement, a RAM-type memory card is formatted to
MS-DOS format in the immediate mode. The number of entries is increased
from 208 (default) to 500 and the size of the sectors in decreased from 512
bps (default) to 256 in order to make the card better suited for more but
smaller files. The “A” flag specifies “hard" formatting.
FORMAT "card1:",500,256,A
Intermec Fingerprint v7.61 – Programmer’s Reference Manual Ed. 7
95
Chapter 2
Program Instructions
FORMAT DATE$
Field of Application
Statement for specifying the format of the string returned by
DATE$("F") and DATEADD$(..... ,"F") instructions.
Syntax
FORMAT DATE$<sexp>
<sexp>
is a string representing the order between year, month and
date plus possible separating characters.
“Y” represents Year (one digit per Y).
“M” represents Month (one digit per M).
“D” represents Day (one digit per D).
Default:
YYMMDD
Reset to default by:
Empty string ("")
Remarks
DATE$ and DATEADD$ will only return formatted dates if these functionss
include the flag "F".
In the FORMAT DATE$ statement, each Y, M or D character generates one
digit from the number of the year, month or day respectively, starting from the
end. If the number of Y's exceeds 4, or the number of M's or D's exceeds 2, the
exceeding characters generate leading space characters.
Examples (the year is 2001):
Y
generates
YY
generates
YYY
generates
YYYY
generates
YYYYY
generates
1
01
001
2001
2001 (↔ represents a space)
↔
Separating characters are returned as entered in the string. Any character
except Y, M, or D are regarded as separators.
The date format is saved in the temporary memory and has to be transmitted
to the printer after each power-up.
Examples
Changing the date format according to British standard:
FORMAT DATE$ "DD/MM/YY"
Changing date format back to default (YYMMDD):
FORMAT DATE$ ""
Changing the date format to Swedish standard:
FORMAT DATE$ "YY-MM-DD"
96
Intermec Fingerprint v7.61 – Programmer’s Reference Manual Ed. 7
Chapter 2 Program Instructions
FORMAT INPUT
Field of Application
Statement for specifying separators for the LAYOUT RUN statement
used in the Intermec Direct Protocol.
Syntax
FORMAT INPUT<sexp1>[,<sexp2>[,<sexp3>[,<sexp4>]]]
<sexp1>
is the start -of-text separator, default STX (ASCII 02 dec.).
<sexp2>
is the end-of-text separator, default EOT (ASCII 04 dec.).
<sexp3>
is the field separator, default CR (ASCII 13 dec.).
<sexp4>
is a string of characters to be filtered out.
Remarks
The LAYOUT RUN statement is used in the Intermec Direct Protocol
to transmit variable data to a predefined layout. By default, the string
of input data to the various layout fields starts with a STX character
and ends with a EOT character. The various fields are separated by CR
(carriage return) characters.
To provide full compatibility with various protocols and computer systems,
these separators can be changed at will by means of the FORMAT
INPUT statement. Each separator can have a maximum length of 10
characters.
As an option, it is possible to specify a string of max. 10 characters to be
filtered out. By default, the string is empty and will be reset to default if a new
FORMAT INPUT with less than four arguments is issued.
There is a timeout if ETX is not found within 60 seconds after STX
has been received.
Always execute the FORMAT INPUT statement in the Immediate Mode. If
you are using the Intermec Direct Protocol, exit it by means of an INPUT
OFF statement before changing the separators using a FORMAT INPUT
statement. Then you can enter the Intermec Direct Protocol again by means
of an INPUT ON statement.
An error will occur if you, for some reason, issue a FORMAT INPUT
statement where one, two or three separators are identical to those already in
effect without leaving the Intermec Direct Protocol.
If a certain separating character cannot be produced by the keyboard of the host,
use a CHR$ function to specify the character by its ASCII value.
The separators are stored in the temporary memory and must to be transmitted
to the printer after each power-up.
Example
Changing the start-of-text separator to #, the end-of-text separator to LF
(linefeed), and the field separator to @ after having temporarily switched
to the Immediate Mode.
INPUT OFF ↵
FORMAT INPUT "#",CHR(10),"@" ↵
INPUT ON ↵
Intermec Fingerprint v7.61 – Programmer’s Reference Manual Ed. 7
97
Chapter 2
Program Instructions
FORMAT TIME$
Field of Application
Statement for specifying the format of the string returned by
TIME$("F") and TIMEADD$("F") instructions.
Syntax
FORMAT TIME$<sexp>
<sexp>
is a string representing the order between hours, minutes and
seconds plus possible separating characters.
“H” represents hours in a 24 hour cycle (one digit per H).
“h” represents hours in a 12 hour cycle (one digit per h).
“M” represents minutes (one digit per M).
“S” represents seconds (one digit per S).
“P” represents AM/PM in connection with a 12 hour cycle.
“p” represents am/pm in connection with a 12 hour cycle.
All other character produce separator characters.
Default:
HHMMSS
Reset to default by:
Empty string
Remarks
Each H, h, M, and S character generates one digit. If the number of each
character exceeds 2, leading space characters are inserted. Each uppercase
or lowercase P character generates one character of AM/PM or am/pm
respectively, when a 12-hour cycle is selected.
Hour, minute and second fields are right-justified, whereas am/pm and
AM/PM fields are left-justified.
Example (the hour is 8 o’clock in the morning):
h
generates 8
P
generates
hh
generates 08
PP
generates
hhh
generates ↔08
p
generates
pp
generates
A
AM
a
am
To get 12-hour cycle, all hour format characters must be lowercase “h”.
Separating characters are returned as entered in the string. Any character but
H, h, M, S, P, or p are regarded as separators.
The time format is saved in the temporary memory and has to be transmitted
to the printer after each power-up.
Examples
Changing the time format according to Swedish standard:
FORMAT TIME$ "HH.MM.SS"
Changing the date format to British standard:
FORMAT TIME$ "hh:MM pp"
98
Intermec Fingerprint v7.61 – Programmer’s Reference Manual Ed. 7
Chapter 2 Program Instructions
FORMAT$
Field of Application
Function for formatting a number represented by a string.
Syntax
FORMAT$(<sexp1>,<sexp2>)
<sexp1>
is the string of numerals, optionally with decimals, which
is to be formatted.
<sexp2>
specifies the format of the string.
Remarks
The original string (<sexp1>) is a string of digits, optionally with a decimal
point to separate decimals from integers. It can also contain leading
plus (+), minus (-), and space characters. Space characters are ignored,
whereas the usual mathematical rules apply to plus and minus signs. All
other characters (or plus, minus, and space characters in other positions
than leading) generate errors.
Note the mathematical rules:
-yields +
-+
yields +yields ++
yields +
The format is specified by a string (<sexp2>). Different format will give
different result. The string can contain any characters, but some have special
meanings. Note the explanation of the following characters.
0 = Digit place holder, display a digit or zero.
If the input number has fewer digits than there are zeros (on either side
of the decimal separator) in the format string, leading or trailing zeros are
displayed. If the number has more digits to the left side of the decimal
separator than there are zeros to the left side of the separator in the format
string the digits will be displayed. If the number has more digits to the
right of the separator than there are zeros to the right of the decimal
separator in the format string, the decimal will be truncated to as many
decimal places as there are zeros.
# = Digit placeholder, display a digit or nothing.
If there is a digit in the expression being formatted in the position where
the # appears in the format string, display the digit or otherwise display
nothing in that position. If the number has more digits to the left side of
the decimal separator than there are # to the left side of the separator in the
format string the digits will be displayed.
. = Decimal separator, to separate the integer and the decimal digits.
, = Decimal separator, to separate the integer and the decimal digits.
\ = Display the next character in the format string.
The backslash itself is not displayed. To display a \ use two backslashes.
The only character, which will be displayed in the formatted string without
a backslash is space.
space = Space
A space will be displayed as literal character wherever it is in the
expression format.
Intermec Fingerprint v7.61 – Programmer’s Reference Manual Ed. 7
99
Chapter 2
Program Instructions
FORMAT$, cont.
• An empty format string is equivalent to "0.##########".
Remarks, cont.
• 0 and # cannot be mixed in every way. Before the decimal separator,
use # first and then 0. After the decimal separator, use 0 first and then
#. For example: ####00.000### is OK and #00##0.##0#00
is not OK.
• A point or a comma separates integers and decimals. The decimal
separator used in the format is the one that will be the returned separator
type. Independent of the separator type in the number the format type
will control the return type. Default type is a point.
• A format can consist of separators as space between thousands either a
unit as $. For example: "$ ### ### 000.00".
• The attached number string will be truncated to the quantity of
decimal in the format.
• Characters will not be displayed on the left side of the decimal separator if
there is a # on the left side of the characters and the string to be formatted
do not have a digit in the same position as the #. On the right side of the
decimal separator, characters will not be displayed if there is a # on the
right side of the characters and the string to be formatted do not have a
digit in the same position as the #. For example:
Format string:
String to be formatted:
Returned strings:
"\$#\t\e\x\t0.0\t\e\x\t#\$"
1.1
55
0.33
55.33
$1.1$
$5text5.0$ $0.3text3$ $5text5.3text3$
Input number:
Input format:
""
"0"
"0.00"
"\$0,0"
"0.0##"
"###\,000.0"
"# 0 0.0"
"5"
"-5"
Returned number:
5
-5
5
-5
5.00
-5.00
$5,0
$-5,0
5.0
-5.0
005.0
-005.0
0 5.0
-0 5.0
Examples
=>
=>
=>
=>
=>
=>
=>
"0.5"
"55555"
"0.666666666666"
0.5
0
0.50
$0.5
0.5
000.5
0 0.5
55555
55555
55555.00
$55555,0
55555.0
55,555.0
555 5 5.0
0.6666666666
0
0.66
$0,6
0.666
000.6
0 0.6
The following examples show how FLOATCALC$ and FORMAT$ functions
can be combined.
Addition.
B$="234.9"
C$="1001"
D$="# ##0.##"
A$=FLOATCALC$(B$,"+",C$,15)
PRINT A$
yields:
"1235.900000000000000"
PRINT FORMAT$(A$,D$)
yields:
"1 235.9"
100
Intermec Fingerprint v7.61 – Programmer’s Reference Manual Ed. 7
Chapter 2 Program Instructions
FORMAT$, cont.
Examples, cont.
Subtraction. The third parameter will be subtracted from the first.
A$=FLOATCALC$("234.90","-","100.013",2)
PRINT A$
yields:
"134.88"
PRINT FORMAT$(A$,"\$ 0,000#")
yields:
"$ 134,880"
Note: If a higher precision is used in FLOATCALC$, A$ will yield
"$134,887".
Multiplication
B$="3"
A$=FLOATCALC$("100", "*", B$, 1)
PRINT A$
yields:
"300.0"
C$="0 0 0,00###"
PRINT FORMAT$(A$,C$)
yields:
"3 0 0,00"
Division. The first parameter will be divided by the third.
B$="1.0"
A$=FLOATCALC$(B$,"/","3.0")
PRINT A$
yields:
"0.3333333333"
PRINT FORMAT$(A$,"\$ 000.00###")
yields:
"$ 000.33333"
Intermec Fingerprint v7.61 – Programmer’s Reference Manual Ed. 7
101
Chapter 2
Program Instructions
FORMFEED (FF)
Field of Application
Statement for activating the media feed mechanism in order to feed out
or pull back a certain length of media.
Syntax
FORMFEED|FF[<nexp>]
<nexp>
is, optionally, the feed length expressed as a positive or
negative number of dots.
Remarks
If no value is entered after the FORMFEED statement, the printer will feed
out one single label, ticket, tag, or a portion of continuous stock according
to the printer’s setup. See start- and stopadjustments and media type in the
Installation & Operation manual for the printer model in question.
If a value is entered after the FORMFEED statement, the media will be fed
out or pulled back the corresponding number of dots:
- A positive number of dots makes the printer feed out the specified
length of media.
- A negative number of dots makes the printer pull back the specified length
of media. In this case, be careful not to enter a value larger than the length
of the label to avoid the risk of causing a media jam.
It is important whether a FORMFEED statement is issued before or after
a PRINTFEED statement:
- FORMFEED statement issued before PRINTFEED affects the position
of the origin on the first copy to be printed.
- FORMFEED statement issued after PRINTFEED does not affect
the position of the origin on the first copy, but next copy will be
affected.
Do not use FORMEED as a replacement for start and stop adjustments in the
Setup Mode or in connection with batch printing.
.
Examples
Printing a line of text and feeding out an extra length (60 dots) of
media after printing:
10
20
30
40
50
RUN
FONT "Swiss 721 BT"
PRPOS 30,200
PRTXT "HELLO"
PRINTFEED
FORMFEED 60
Pulling back the media 20 dots before printing:
10
20
30
40
50
RUN
FORMFEED -20
FONT "Swiss 721 BT"
PRPOS 30,200
PRTXT "HELLO"
PRINTFEED
Note that in this case, the positioning of the text line will be performed after
the media has been pulled back.
102
Intermec Fingerprint v7.61 – Programmer’s Reference Manual Ed. 7
Chapter 2 Program Instructions
FRE
Field of Application
Function returning the number of free bytes in spcified part of the
printer’s memory.
Syntax
FRE(<<sexp>|<nexp>>)
<sexp>
is the designation of the part of the printer’s memory from
which the number of free bytes should be returned, for
example "c:", "tmp:", "card1:".
<nexp>
is a dummy argument. Returns the number of free bytes in
the printer’s temporary memory ("tmp:").
Remarks
The firmware looks for a colon (:) sign in the argument for the FRE function.
If the argument is valid name of a memory device, the number of free
bytes in that device is returned.
If the argument specifies device "card1:", but no card is inserted, Error
1039, “Not mounted" will occur.
If the name of a device, that is not a part of the printer’s memory (for
example "uart1:" or "console:"), is entered as an argument, the FRE
function will return 0.
Refer to DEVICES for more information on memory and non-memory
devices.
If the argument contains a colon, but is not a valid name of any device (for
example "QWERTY:"), Error 1013, “Device not found” will occur.
Any argument, that does not include a colon sign (for example “7”
or "QWERTY”), will return the amount of free bytes in the printer’s
temporary memory ("tmp:").
Example
PRINT FRE("tmp:")
yields for example:
2382384
PRINT FRE("uart1:")
yields:
0
PRINT FRE(1)
yields for example:
2382384
Intermec Fingerprint v7.61 – Programmer’s Reference Manual Ed. 7
103
Chapter 2
Program Instructions
FUNCTEST
Field of Application
Statement for performing various hardware tests.
Syntax
FUNCTEST<sexp>,<svar>
<sexp>
is the type of test to be performed:
"CARD"
Test of memory card.
"HEAD"
Test of the thermal printhead.
"KERNEL"
Test of the live kernel in RAM.
ROMn
Test of ROM where n is a digit denoting the number of
the SIMM socket.
<svar>
is the variable in which the result will be placed.
Remarks
Each of the FUNCTEST hardware tests has a number of possible
responses:
<sexp> = "CARD"
If RAM-type memory card:
RAM OK
FAIL,x
If ROM-type memory card:
"NO CARD"
<sexp> = "HEAD"
HEAD OK, SIZE:n DOTS
HEAD LIFTED
FAULTY PRINTHEAD
Test was successful
An error was detected.
(x is the hexadecimal address of the first
faulty memory byte).
Card is not recognized.
The test was successful.
n is the number of dots on the printhead.
Printhead is lifted and must be lowered
before test can be performed.
One or more dots on the printhead are
not working.
Note that the 24V voltage for the printhead
is not checked. Use the HEAD function
for additional printhead tests.
<sexp> = "KERNEL"
xxxxxxxx
ERROR IN KERNEL CRC
xxxxxxxx is an 8-digit hex checksum.
The kernel checksum differs from the
on in the header.
KERNEL BADLY CORRUPTED The kernel is corrupted.
CANNOT FIND KERNEL
The kernel header cannot be found.
ERROR <nexp> IN KERNEL The error number (<nexp>) is returned.
<sexp> = "ROMn"
xxxx
NO ROM
104
xxxx is a 4-digit hexadecimal checksum.
An illegal SIMM socket was specified or
no ROM is found in the socket.
Intermec Fingerprint v7.61 – Programmer’s Reference Manual Ed. 7
Chapter 2 Program Instructions
FUNCTEST, cont.
Example
This example shows how a test program using the FUNCTEST statement
may be composed:
10
20
30
40
50
60
70
80
RUN
FUNCTEST "CARD", A$
FUNCTEST "HEAD", B$
FUNCTEST "KERNEL", C$
FUNCTEST "ROM1", D$
PRINT "CARDTEST:", A$
PRINT "HEADTEST:", B$
PRINT "KERNELTEST:", C$
PRINT "ROM1-TEST:", D$
yields for example:
CARDTEST: NO CARD
HEADTEST: HEAD OK,SIZE:1280 DOTS
KERNELTEST:
8E4791DC
ROM1-TEST:
NO ROM
Ok
Intermec Fingerprint v7.61 – Programmer’s Reference Manual Ed. 7
105
Chapter 2
Program Instructions
FUNCTEST$
Field of Application
Function returning the result of various hardware tests.
Syntax
FUNCTEST$(<sexp>)
<sexp>
"CARD"
"HEAD"
"KERNEL"
ROMn
Remarks
is the type of test to be performed:
Test of memory card.
Test of the thermal printhead.
Test of the live kernel in RAM.
Test of ROM where n is a digit denoting the number of
the SIMM socket.
Each of the FUNCTEST$ hardware tests has a number of possible
responses:
<sexp> = "CARD"
If RAM-type memory card:
RAM OK
FAIL,x
If ROM-type memory card:
"NO CARD"
<sexp> = "HEAD"
HEAD OK, SIZE:n DOTS
HEAD LIFTED
FAULTY PRINTHEAD
Test was successful
An error was detected.
(x is the hexadecimal address of the first
faulty memory byte.)
Card is not recognized.
The test was successful.
n is the number of dots on the printhead.
Printhead is lifted and must be lowered
before test can be performed.
One or more dots on the printhead are
not working.
Note that the 24V voltage for the printhead
is not checked. Use the HEAD function
for additional printhead tests.
<sexp> = "KERNEL"
xxxxxxxx
ERROR IN KERNEL CRC
xxxxxxxx is an 8-digit hex checksum.
The kernel checksum differs from the
on in the header.
KERNEL BADLY CORRUPTED The kernel is corrupted.
CANNOT FIND KERNEL
The kernel header cannot be found.
ERROR <nexp> IN KERNEL The error number (<nexp>) is returned.
<sexp> = "ROMn"
xxxx
NO ROM
106
xxxx is a 4-digit hexadecimal checksum.
An illegal SIMM socket was specified or
no ROM is found in the socket.
Intermec Fingerprint v7.61 – Programmer’s Reference Manual Ed. 7
Chapter 2 Program Instructions
FUNCTEST$, cont.
Example
This example shows how a test program using the FUNCTEST$ function may
be composed (compare with the example for FUNCTEST statement):
10
20
30
40
RUN
PRINT
PRINT
PRINT
PRINT
"CARDTEST:", FUNCTEST$ ("CARD")
"HEADTEST:", FUNCTEST$ ("HEAD")
"KERNELTEST:", FUNCTEST$ ("KERNEL")
"ROM1-TEST:", FUNCTEST$ ("ROM1")
yields for example:
CARDTEST: NO CARD
HEADTEST: HEAD OK,SIZE:1280 DOTS
KERNELTEST:
8E4791DC
ROM1-TEST:
NO ROM
Ok
Intermec Fingerprint v7.61 – Programmer’s Reference Manual Ed. 7
107
Chapter 2
Program Instructions
GET
Field of Application
Statement for reading a record from a random file to a random buffer.
Syntax
GET[#]<nexp1>,<nexp2>
#
indicates that whatever follows is a number. Optional.
<nexp1>
is the number assigned to the file when it was OPENed.
<nexp2>
is the number of the record. Must be ≠ 0.
Remarks
The GET statement is used to read a certain record in a certain random file
to a buffer, where the record will be assigned to variables according to the
FIELD statement given for the buffer. After the GET statement has been
executed, you can use references to the variables defined by the FIELD
statement to read the characters in the random buffer.
Numeric expressions, which have been converted to string expressions by
STR$ functions before being put into the buffer, can be converted back to
numeric expressions using VAL functions.
Example
10
20
30
40
50
60
70
80
90
100
RUN
OPEN "PHONELIST" AS #8 LEN=26
FIELD#8,8 AS F1$, 8 AS F2$, 10 AS F3$
SNAME$="SMITH"
CNAME$="JOHN"
PHONE$="12345630"
LSET F1$=SNAME$
LSET F2$=CNAME$
RSET F3$=PHONE$
PUT #8,1
CLOSE#8
SAVE "PROGRAM 1.PRG "
NEW
10
20
30
40
RUN
OPEN "PHONELIST" AS #8 LEN=26
FIELD#8,8 AS F1$, 8 AS F2$, 10 AS F3$
GET #8,1
PRINT F1$,F2$,F3$
yields:
SMITH — — — JOHN — — — — — —
108
12345630
Intermec Fingerprint v7.61 – Programmer’s Reference Manual Ed. 7
Chapter 2 Program Instructions
GETASSOC$
Field of Application
Function for getting a value from a string association.
Syntax
GETASSOC$ (<sexp1>, <sexp2>)
<sexp1>
is the name of the association (case-sensitive).
<sexp2>
is the name of a tuple in the association.
Remarks
An association is an array of tuples, where each tuple consists of a
name and a value.
Example
This example shows how a string, including three stringnames associated
with three start values, will be defined and one of them (time) will
be changed:
10
20
30
40
50
60
70
80
RUN
QUERYSTRING$=
"time=UNKNOWN&label=321&desc=DEF"
MAKEASSOC"QARRAY",QUERYSTRING$,"HTTP"
QTIME$=GETASSOC$("QARRAY","time")
QLABELS%=VAL(GETASSOC$("QARRAY","label"))
QDESC$=GETASSOC$("QARRAY","desc")
PRINT"time=";QTIME$,"LABEL=";QLABELS%,
"DESCRIPTION=";QDESC$
SETASSOC"QARRAY","time",time$
PRINT"time=";GETASSOC$("QARRAY","time")
yields:
time=UNKNOWN LABEL=321 DESCRIP
time=153355
Intermec Fingerprint v7.61 – Programmer’s Reference Manual Ed. 7
TION=DEF
109
Chapter 2
Program Instructions
GETASSOCNAME$
Field of Application
Function for traversing the tuples of a string association.
Syntax
GETASSOCNAME$(<sexp>,<nexp>)
<sexp>
is the association to be traversed (case-sensitive).
<nexp>
specifies the tuple in the association.
<nvar> = 0 specifies first tuple.
<nvar> ≠ 0 specifies next tuple.
Remarks
An association is an array of tuples, where each tuple consists of a name
and a value. To get the first position in the string association, <nvar> should
be zero. Consecutive calls to GETASSOCNAME$ witn <nvar> non zero
will traverse all variables in an undefined order. When a blank string ("") is
returned, the last variable has been traversed.
Example
This example shows how “QARRAY" is travered (run example from
GETASSOC first):
10 LVAL$=GETASSOCNAME$("QARRAY",0)
20 WHILE LVAL$<>""
30 RVAL$=GETASSOC$("QARRAY",LVAL$)
40 PRINT LVAL$;"=";RVAL$
50 LVAL$=GETASSOCNAME$("QARRAY",1)
60 WEND
RUN
yields:
label=321
desc=DEF
time=153355
110
Intermec Fingerprint v7.61 – Programmer’s Reference Manual Ed. 7
Chapter 2 Program Instructions
GETPFSVAR
Field of Application
Function for recovering saved variables.
Syntax
GETPFSVAR(<sexp>[,D])
<sexp>
is the name of the variable (uppercase characters only).
D
optionally specifies that the variable is to be deleted
after recovery.
Remarks
This function is used to recover variables registered to be saved at power
failure by means of a SETPFSVAR statement and returns either -1 on
success or 0 at failure.
If a D flag is included, the variable is deleted after it has been recovered.
This can be used to make sure that the variable is up to date and that no
old obsolete value is recovered.
Related instructions are SETPFSVAR, DELETEPFSVAR, and LISTPFSVAR.
Example
10
20
30
40
50
60
99
100
IF NOT GETPFSVAR("QS$") THEN QS$ ="<this is
the default vaule, set a new one>"
IF NOT GETPFSVAR("QCPS%") THEN PRINT "No
copies available":END
QSTATUS%=GETPFSVAR("AWE$",D):IF QSTATUS%
THEN PRINT "Recovered successfully!"
SETPFSVAR "QCPS%"
’Build label
.....
PRINTFEED; QCPS%=QCPS%
.....
Intermec Fingerprint v7.61 – Programmer’s Reference Manual Ed. 7
111
Chapter 2
Program Instructions
GOSUB
Field of Application
Statement for branching to a subroutine.
Syntax
GOSUB<ncon>|<line label>
<ncon>|<line label>
is the number or label of the first line in the desired
subroutine.
Remarks
After branching, the subroutine will be executed line by line until a RETURN
statement is encountered.
The same subroutine can be branched to many times from different lines
in the main program. GOSUB always remembers where the branching
took place, which makes it possible to return to the correct line in the main
program after the subroutine has been executed.
Subroutines may be nested, which means that a subroutine may contain a
GOSUB statement for branching to a secondary subroutine and so on until
the printer runs out of memory.
Subroutines are normally placed on program lines with higher numbers
than the main program. The main program should be appended by an END
statement to avoid unintentional execution of subroutines.
Example
This example makes use of line numbers:
10
20
30
40
1000
1010
1020
1030
2000
2010
2020
2030
3000
3010
3020
RUN
PRINT "This is the main program"
GOSUB 1000
PRINT "You’re back in the main program"
END
PRINT "This is subroutine 1"
GOSUB 2000
PRINT "You’re back from subroutine 2 to 1"
RETURN
PRINT "This is subroutine 2"
GOSUB 3000
PRINT "You’re back from subroutine 3 to 2"
RETURN
PRINT "This is subroutine 3"
PRINT "You’re leaving subroutine 3"
RETURN
yields:
This is the main program
This is subroutine 1
This is subroutine 2
This is subroutine 3
You’re leaving subroutine 3
You’re back from subroutine 3 to 2
You’re back from subroutine 2 to 1
You’re back in the main program
Ok
112
Intermec Fingerprint v7.61 – Programmer’s Reference Manual Ed. 7
Chapter 2 Program Instructions
GOSUB, cont.
Examples, cont.
In this examples, line numbers have been omitted and line labels are used
to make the program branch to subroutines:
IMMEDIATE OFF
PRINT "This is the main program"
GOSUB SUB1
PRINT "You’re back in the main program"
END
SUB1: PRINT "This is subroutine 1"
GOSUB SUB2
PRINT "You’re back from subroutine 2 to 1"
RETURN
SUB2: PRINT "This is subroutine 2"
GOSUB SUB3
PRINT "You’re back from subroutine 3 to 2"
RETURN
SUB3: PRINT "This is subroutine 3"
PRINT "You’re leaving subroutine 3"
RETURN
Intermec Fingerprint v7.61 – Programmer’s Reference Manual Ed. 7
113
Chapter 2
Program Instructions
GOTO
Field of Application
Statement for branching unconditionally to a specified line.
Syntax
GOTO<ncon>|<line label>
<ncon>/<line label>
is the number or label of the line to be branched to.
Remarks
If the specified line contains an executable statement, both that statement
and all that follows will be executed. If the specified line does not exist,
an error condition will occur.
The GOTO statement can also be used in the immediate mode to resume
execution of a program, which has been terminated using a STOP statement,
at a specified program line.
Example
In this example the first bar of the tune "Colonel Boogie" will be played only
if the title is entered correctly. Otherwise the message "Try again" will be
displayed until you manage to type the right name.
10
20
30
40
50
60
100
110
120
130
140
150
160
170
180
RUN
A$="COLONEL BOOGIE"
B$="TRY AGAIN"
INPUT "TITLE"; C$
IF C$=A$ GOTO 100 ELSE PRINT B$
GOTO 30
END
SOUND 392,15
SOUND 330,20
SOUND 330,15
SOUND 349,15
SOUND 392,15
SOUND 659,25
SOUND 659,20
SOUND 523,25
GOTO 60
yields:
TITLE?
Note the way GOTO is used in line 50 to create a loop, which makes the
printer await the condition specified in line 40 before the execution is resumed.
Instead of line numbers, line labels can be used following the same principles
as illustrated in the second example for GOSUB statement.
114
Intermec Fingerprint v7.61 – Programmer’s Reference Manual Ed. 7
Chapter 2 Program Instructions
HEAD
Field of Application
Function returning the result of a thermal printhead check.
Syntax
HEAD(<nexp1>)
<nexp1> ≥ 0
<nexp1> = -1
<nexp1> = -7
specifies the number of a dot for which the resistance in
ohms will be returned.
printhead check:
Returns -1 (true) if OK
Returns 0 (false) if error
returns mean printhead resistance in ohms.
<nexp2> = HEAD(<sexp>)
<nexp2>
returns the number (quantity) of faulty dots.
<sexp>
returns the dot number and resistance for each faulty dot.
Remarks
This function allows you to examine the printhead in regard of dot resistance.
There is no guarantee that all defect “dots" will detected by the HEAD
function, since only the resistance is checked. For example, dirty or cracked
dots can only be detected visually.
The detection of a possibly faulty dot or printhead by means of the dot
sensing facility does not automatically imply that the printhead is defect
and that replacement will be covered by the warranty. Intermec reserves
the right of physical examination of the printhead before any replacement
free of charge can be discussed.
<nexp1> ≥ 0
A positive value specifies a single dot on the printhead and returns its
resistance value as a number of ohms. A dot resistance value that deviates
considerably from the mean resistance value of the printhead (see below)
indicates that the dot may be faulty. The dot numbering starts at 0
(zero). This implies that in, for example, a 640 dots printhead, the dots
are numbered 0-639.
<nexp1> = -1
A check of the complete printhead is performed.
HEAD(-1)=-1
The printhead is within the allowed limits (no dot is
more than ±15% from the mean resistance value). This
does not guarantee the printout quality.
HEAD(-1)=0
A possible error has been detected.
<nexp1> = -7
The mean resistance value in ohms of all dots of the printhead is returned.
The second version of the HEAD function measures the dot resistance
for every dot in the printhead and faulty dots are reported to the system,
so you do not need to use a SET FAULTY DOT statement to report
bad dots one at the time.
Intermec Fingerprint v7.61 – Programmer’s Reference Manual Ed. 7
115
Chapter 2
Program Instructions
HEAD, cont.
Examples
Read the resistance value of dot No. 5:
PRINT HEAD(5)
Perform a printhead check:
PRINT HEAD(-1)
Read the printhead’s mean resistance value:
PRINT HEAD(-7)
Check printhead for faulty dots and their respective resistance values:
A%=HEAD(B$)
yields for example:
Ok
PRINT A%
5
Ok
PRINT B$
25, 2944
42, 2944
106, 2944
107, 2944
140, 2944
Ok
116
Intermec Fingerprint v7.61 – Programmer’s Reference Manual Ed. 7
Chapter 2 Program Instructions
IF...THEN...(ELSE)
Field of Application
Statement for conditional execution controlled by the result of a
numeric expression.
Syntax
IF<nexp>[,]THEN<stmt1>[ELSE<stmt2>]
IF<nexp>[,]THEN
<stmt1>
[...<stmt1+n>]
[ELSE
<stmt2>
[...<stmt2+n>]]
ENDIF
<nexp>
<stmt1>
<stmt2>
Remarks
↵
↵
↵
↵
↵
↵
↵
is a numeric expression, which is either true or false.
is the statement or list of statements telling the program what
to do, should the IF-condition be true.
is an optional statement or list of statements specifying what
will happen, should the IF-condition be false.
THEN and ELSE statements may be nested.
Multiple THEN and ELSE statements can alternatively be entered on
separate lines. If so, the instruction should be appended by ENDIF. See
second example below.
Examples
These two examples illustrates the different syntaxes:
10
20
30
40
RUN
A%=100:B%=20
C$="A LARGER THAN B"
D$="A NOT LARGER THAN B"
IF A%>B% THEN PRINT C$ ELSE PRINT D$
yields:
A LARGER THAN B
10
20
30
40
50
60
70
80
RUN
A%=VAL(TIME$)
IF A%>120000 THEN
PRINT "TIME IS ";TIME$; ". ";
PRINT "GO TO LUNCH!"
ELSE
PRINT "CARRY ON - ";
PRINT "THERE’S MORE WORK TO DO!"
ENDIF
yields for example:
TIME IS 121500. GO TO LUNCH!
Intermec Fingerprint v7.61 – Programmer’s Reference Manual Ed. 7
117
Chapter 2
Program Instructions
IF...THEN...(ELSE), cont.
Examples, cont.
IF ... THEN are often used in connection with GOTO. In this example, line
numbering is used. Also see the example for the GOTO statement.
10
20
30
40
50
RUN
A%=100
B%=50
IF A%=B% THEN GOTO 50 ELSE PRINT "NOT EQUAL"
END
PRINT "EQUAL":END
yields:
NOT EQUAL
This example correspond to the preceding example, but line labels are
used instead of line numbers.
IMMEDIATE OFF
A%=100
B%=50
IF A%=B% THEN GOTO QQQ ELSE PRINT "NOT EQUAL"
END
QQQ: PRINT "EQUAL":END
IMMEDIATE ON
RUN
yields:
NOT EQUAL
118
Intermec Fingerprint v7.61 – Programmer’s Reference Manual Ed. 7
Chapter 2 Program Instructions
IMAGE BUFFER SAVE
Field of Application
Statement for saving the content of the image buffer as a file.
Syntax
IMAGE BUFFER SAVE<sexp>
<sexp>
is the desired name of the file, optionally with a reference to
the device where the file should be saved.
Remarks
This statement saves the current content of the print buffer as an image
file in RLL format. After saving, the file is automatically installed as an
image, that can be printed using a PRIMAGE statement in DIR 1 and
DIR 3. Thereby, you can create label templates, to which variable data
easily can be added at will.
The size of the print buffer image depends on the size of the print image
at the moment the buffer is saved. The width is decided by the Media,
Media Size, Width setup value with the first pixel according to the Media,
Media Size, Xstart setup value. The height is decided by the actual height
in y-dimension of the print image. Note that space characters or invisible
"white" parts of an image are included in the height of the print image, even
if they are not visible on the printed label.
Example
IMAGE BUFFER SAVE "TEMPLATE7"
Intermec Fingerprint v7.61 – Programmer’s Reference Manual Ed. 7
119
Chapter 2
Program Instructions
IMAGE LOAD
Field of Application
Statement for receiving, converting and installing image and font files.
Syntax
IMAGE LOAD[<nexp1>,]<sexp1>,<nexp2>[,<sexp2>[,<nexp3>]]
<nexp1>
is optionally the number of bytes to skip before starting
to read the data.
<sexp1>
is the desired name of the image or font to be created.
<nexp2>
is the size of the original file in number of bytes.
<sexp2>
is an optional flag:
“S” specifies that the image or font will be saved in the printer’s
permanent memory ("c:"). Avoid this option (slow).
An empty string ("") specifies that the image or font will be
stored in the printer’s temporary memory ("tmp:" ).
<nexp3>
optionally specifies a communication channel OPENed for
INPUT by the number assigned to the device.
(Default: Std IN channel.)
Remarks
This statement prepares the printer to receive a .PCX image file, an image
file in the internal Intermec Fingerprint bitmap format, or a font file
on the standard IN channel (see SETSTDIO statement) or on another
communication channel OPEN for INPUT. When the file is received, it will
automatically be converted to an image in the internal bitmap format of
Intermec Fingerprint or to a scaleable font respectively.
The optional first parameter makes it possible to use this statement in
MS-DOS (CR/LF problem).
The name of an image may consist of max. 30 characters including possible
extension. The image will have the same direction as the original image
file and can only be rotated 180° by means of a DIR statement. We
therefore recommend that you include the extension .1 or .2 to indicate
for which print directions the image is intended, according to the Intermec
Fingerprint conventions.
The name of font files is only restricted to 30 characters.
The size of the original file should be given in bytes according to its
size in the host.
Before IMAGE LOAD can be used on a serial channel, the setup must be
changed to 8 characters, CTS/RTS handshake. When an IMAGE LOAD
statement is executed, the execution stops and waits for the number of bytes
specified in the statement to be received. During the transfer of image file
data to the printer, there is a 25 seconds timeout between characters. If
a new character has not been received within the timeout limit, Error 80
“Download timeout” occurs. When the specified number of characters have
been received, the execution is resumed.
If the downloading was successful, the downloaded image or font will be
installed automatically and can be used without any rebooting.
Example
120
IMAGE LOAD "Logotype.1",400,""
Intermec Fingerprint v7.61 – Programmer’s Reference Manual Ed. 7
Chapter 2 Program Instructions
IMAGENAME$
Field of Application
Function returning the names of the images stored in the printer’s
memory.
Syntax
IMAGENAME$(<nexp>)
<nexp>
is the result of the expression which is either false or true:
False (0) indicates first image.
True (≠0) indicates next image.
Remarks
This function can be used to produce a list of all images (another method is
to use the IMAGES statement).
Image files downloaded by means of a TRANSFER KERMIT statement
will not be returned, since the software will regard them as files rather
than images.
IMAGENAME$(0) produces the first name in the memory.
IMAGENAME$(≠0) produces next name. Can be repeated as long there
are any image names left.
Example
Use a program like this to list all image names:
10
20
30
40
50
RUN
A$=IMAGENAME$(0)
IF A$=""THEN END
PRINT A$
A$=IMAGENAME$(-1)
GOTO 20
yields for example:
CHESS2X2.1
CHESS4X4.1
DIAMONDS.1
GLOBE.1
Ok
Intermec Fingerprint v7.61 – Programmer’s Reference Manual Ed. 7
121
Chapter 2
Program Instructions
IMAGES
Field of Application
Statement for returning the names of all images stored in the printer’s
memory to the standard OUT channel.
Syntax
IMAGES
Remarks
This statement can be used to list all image names (another method is to use
an IMAGENAME$ function).
Image files downloaded by means of a TRANSFER KERMIT statement
will not be printed, since the firmware will regard them as files rather
than images.
Example
A list of images stored in the printer’s memory may look like this:
IMAGES
yields for example:
CHESS2X2.1
CHESS4X4.1
DIAMONDS.1
GLOBE.1
1695316 bytes free
Ok
122
307200 bytes used
Intermec Fingerprint v7.61 – Programmer’s Reference Manual Ed. 7
Chapter 2 Program Instructions
IMMEDIATE
Field of Application
Statement for enabling or disabling the immediate mode of Intermec
Fingerprint in connection with program editing without line numbers,
for reading the current mode, or for reading the current standard
IN and OUT channels.
Syntax
IMMEDIATE ON|OFF|MODE|STDIO
ON
Enables the Immediate Mode
OFF
Disables the Immediate Mode
MODE
Prints a line to the STDOUT port with information on the
current status of the following modes (ON or OFF):
- Execution
- Immediate
- Input
- Layout Input
- Debug STDIO (dbstdio)
STDIO
Prints two lines to the STDOUT port with information on current
settings for the STDIN and STDOUT channels.
Remarks
IMMEDIATE ON|OFF
Before starting to write a program without line numbers, the immediate
mode must be disabled by means of an IMMEDIATE OFF statement. If
not, each line will be executed immediately.
After an IMMEDIATE OFF statement, program lines can be entered without
any leading line numbers. References to lines are done using “line labels”,
which are called in GOTO or GOSUB and related statements.
A line label is a name followed by a colon (:). The label must not interfere
with any keywords or start with a digit and the line must start with the line
label. When a line label is used as a reference to another line, for example
within a GOTO statement, the colon should be omitted.
The program should be appended by a IMMEDIATE ON statement. At the
execution of this statement, the program lines will be numbered automatically
in ten-step incremental order, starting with the first line (10-20-30-40-50...).
These line numbers will not appear on the screen until the program
is LISTed, LOADed, or MERGEd. Line labels will not be converted
to line numbers.
Do not issue a RUN statement before the IMMEDIATE ON statement,
or an error will occur.
IMMEDIATE MODE
Execution On/Off indicates if a Fingerprint program is running or not.
Immediate On/Off indicates whether the Immediate Mode is enabled or
disabled as specified by IMMEDIATE ON/OFF.
Input On/Off indicates whether the Direct Protocol is enabled or disabled as
specified by INPUT ON/OFF.
Intermec Fingerprint v7.61 – Programmer’s Reference Manual Ed. 7
123
Chapter 2
Program Instructions
IMMEDIATE, cont.
Remarks, cont.
IMMEDIATE MODE
Layout Input On/Off indicates whether or not a layout is being recorded in the
Direct Protocol as specified by LAYOUT INPUT and LAYOUT END.
Dbstdio On/Off indicates whether the debug standard I/O is active or not.
The following conditions are not reported:
- Running a Fingerprint application.
- Execution of a TRANSFER KERMIT, FILE& LOAD, IMAGE LOAD,
LOAD, RZ, and STORE INPUT instruction.
- Running external commands (ush).
- Running the Setup Mode or execution of a SETUP statement.
IMMEDIATE STDIO
Two lines will be transmitted on the STDOUT port with information on the
current STDIN and STDOUT channels regarding port, baud rate, character
length, parity, and stop bits.
Examples
A program can be written without using any line numbers, as illustrated by
this short example. QQQ is used as a line label:
IMMEDIATE OFF
yields:
Ok
PRINT "LINE 1"
GOSUB QQQ
END
QQQ: PRINT "LINE 2"
RETURN
IMMEDIATE ON
Ok
RUN
yields:
LINE 1
LINE 2
Ok
This example shows how the status of the various modes are checked:
IMMEDIATE MODE
yields for example:
execution=OFF, immediate=ON, input=OFF, layout input = Off
This example shows how the status of the STDIN and STDOUT channels
are checked:
IMMEDIATE STDIO
yields for example:
stdin=uart1:, 9600, 8, NONE, 1
stdout=uart1:, 9600, 8, NONE, 1
124
Intermec Fingerprint v7.61 – Programmer’s Reference Manual Ed. 7
Chapter 2 Program Instructions
INKEY$
Field of Application
Function reading the first character in the receive buffer of the
standard IN channel.
Syntax
INKEY$
Remarks
For information on standard I/O channels, see SETSTDIO statement. By
default, "uart1:" is the standard I/O channel.
As opposed to the INPUT statement, INKEY$ does not interrupt the program
flow to wait for input data, unless a loop is created by means of a GOTO
statement, see line 20 in the example below.
INKEY$ is useful when the host computer is unable to end the input
data with a “Carriage Return” (CR; ASCII 13 dec.), but must use some
other character, for example “End of Text" (ETX; ASCII 3 dec.). Then
a routine, which interprets the substitute character as a carriage return,
can be created.
Example
In this example, none of the characters received on the standard IN
channel will be printed on the host screen until a # character (ASCII
35 decimal) is encountered.
10
20
30
40
50
60
RUN
A$ = INKEY$
IF A$ = "" GOTO 10
IF A$ = CHR$(35) THEN PRINT B$
IF A$ = CHR$(35) THEN END
B$ = B$ + A$
GOTO 10
Type a number of characters on the keyboard of the host. They will not be
printed on the host screen until you type a # character. Then all the characters
will appear simultaneously, except for the #-sign.
Note the loop between line 10 and 20, which makes the program wait
for you to activate a key.
Intermec Fingerprint v7.61 – Programmer’s Reference Manual Ed. 7
125
Chapter 2
Program Instructions
INPUT (IP)
Field of Application
Statement for receiving input data via the standard IN channel during
the execution of a program.
Syntax
INPUT|IP[<scon><;|,>]<<nvar>|<svar>>[,<<nvar>|<svar>>...]
<scon><;|,>
is an optional prompt string, followed by a semicolon
or comma.
<<nvar>|<svar>>
are variables to which the input data will be assigned.
Remarks
For information on standard I/O channel, see SETSTDIO statement. By
default, "uart1:" is the standard I/O channel.
During the execution of a program, an INPUT statement will interrupt
the execution. A question mark and/or a prompt will be displayed on the
screen of the host to indicate that the program is expecting additional data
to be entered. The prompt can be used to tell the operator what type of
data he or she is expected to enter.
The prompt will be appended by a question mark if a semicolon (;) is entered
after the prompt string. If a comma (,) is used in that position, the printing
of the question mark will be suppressed.
If a prompt is not used, the question mark will always be displayed.
Do not enter any comma or semicolon directly after the keyword, only after
the prompt, or in order to separate variables.
The input data should be assigned to one or several variables. Each item
of data should be separated from next item by a comma. The number of
data items entered must correspond to the number of variables in the list, or
else an error condition will occur. The variables may be any mix of string
variables and numeric variables, but the type of input data must agree with
the type of the variable, to which the data is assigned.
Input can also be done directly to the system variables TIME$, DATE$,
and SYSVAR.
The maximum number of characters that can be read using an INPUT
statement is 32,767 characters.
Note that INPUT filters out any incoming ASCII 00 dec. characters (NUL).
INPUT does not support auto-hunting (see SETSTDIO).
126
Intermec Fingerprint v7.61 – Programmer’s Reference Manual Ed. 7
Chapter 2 Program Instructions
INPUT (IP), cont.
Examples
This example shows input to one numeric variable and one string variable:
10
20
30
40
50
RUN
INPUT "ADDRESS";A%,B$
PRINT A%;" ";B$
IF A% > 0 THEN GOTO 50
GOTO 10
END
yields:
ADDRESS?
When the prompt “ADDRESS?” appears on the screen, you can type the
input data on the terminal’s keyboard, for example:
999, HILL STREET
Note the separating comma.
If the input text data contains a comma, which shall be printed, you must
enclose the input data with quotation marks ("...."), for example:
999, "HILL STREET, HILLSBOROUGH"
Numeric input data must not include any decimal points.
This example shows how the date can be set directly from the keyboard
of the host:
INPUT "Enter date: ",DATE$
yields:
Enter date:
When the prompt “Enter date:" appears on the screen of the host, you can
type the date as a six-digit combination of year, month and day (see DATE$
variable). Time can also be set using the same method.
Intermec Fingerprint v7.61 – Programmer’s Reference Manual Ed. 7
127
Chapter 2
Program Instructions
INPUT ON/OFF
Field of Application
Statement enabling or disabling the Intermec Direct Protocol.
Syntax
INPUT ON|OFF
Default:
Remarks
INPUT OFF
These statements are used to enter or leave the Intermec Direct Protocol. Also
refer to Intermec Direct Protocol v7.50, Programmer’s Guide.
INPUT ON
Enables the Intermec Direct Protocol:
- Enables reception of input data to a stored layout
- Starts the error handler
- Sets the verbosity to off (SYSVAR (18) = 0)
- Shows “Direct Protocol 7.50” in the display
INPUT OFF Disables the Intermec Direct Protocol:
- Disables reception of input data to a stored layout
- Stops the error handler
- Resets the verbosity to the level selected before last
INPUT ON was executed
- Shows “Fingerprint 7.50” in the display
The following instructions will only work with the Intermec Direct Protocol,
that is after a INPUT ON statement has been executed:
COUNT&
ERROR
FORMAT INPUT
INPUT OFF
LAYOUT END
LAYOUT INPUT
LAYOUT RUN PRINT KEY ON|OFF
Example
This example illustrates how the Intermec Direct Protocol is enabled, how
new separators are specified, how a layout is stored in the printer’s memory,
how variable data are combined with the layout, and how a label is printed.
Finally, the Intermec Direct Protocol is disabled:
INPUT ON ↵
FORMAT INPUT "#","@","&" ↵
LAYOUT INPUT "tmp:LABEL1" ↵
FT "Swiss 721 BT" ↵
PP 100,250 ↵
PT VAR1$ ↵
PP 100,200 ↵
PT VAR2$ ↵
LAYOUT END ↵
LAYOUT RUN "tmp:LABEL1" ↵
#Line number 1&Line number 2&@ ↵
PF ↵
INPUT OFF ↵
128
Intermec Fingerprint v7.61 – Programmer’s Reference Manual Ed. 7
Chapter 2 Program Instructions
INPUT#
Field of Application
Statement for reading a string of data from an OPEN device or
sequential file.
Syntax
INPUT#<nexp>,<<nvar>|<svar>>[,<<nvar>|<svar>>...]
<nexp>
is the number assigned to the file or device when it was
OPENed.
<<nvar>|<svar>>
is the variable to which the input data will be assigned.
Remarks
This statement resembles the INPUT statement, but allows the input to
come from other devices than the standard IN channel or from various
files. Like the INPUT statement, commas can be used to assign different
portions of the input to different variables. INPUT# does not allow
prompts to be used.
When reading from a sequential file, the records can be read one after
the other by the repeated issuing of INPUT# statements with the same
file reference.
Once a file record has been read, it cannot be read again until the file is
CLOSEd and then OPENed again.
The maximum number of characters that can be read using an INPUT#
statement is 32,767 characters.
Note that INPUT# filters out any incoming ASCII 00 dec. characters
(NUL).
Example
This example assigns data from the first record in the sequential file
"Addresses" to the three string variables A$, B$, and C$ and from the second
record in the same file to the string variables D$ and E$:
. .
. .
100
110
120
. .
. .
. . .
. . .
OPEN "ADDRESSES" FOR INPUT AS #5
INPUT#5, A$, B$, C$
INPUT#5, D$, E$
. . .
. . .
Intermec Fingerprint v7.61 – Programmer’s Reference Manual Ed. 7
129
Chapter 2
Program Instructions
INPUT$
Field of Application
Function returning a string of data, limited in regard of number
of characters, from the standard IN channel, or optionally from an
OPENed file or device.
Syntax
INPUT$(<nexp1>[,<nexp2>])
<nexp1>
is the number of characters to be read.
<nexp2>
optionally specifies a file or device using the number assigned
to it when it was OPENed.
Remarks
If no file or device is specified, the input will come from the standard I/O
channel (default "uart1:", see SETSTDIO statement). Otherwise, it will
come from the specified file or device. The execution will be held until the
specified number of characters has been received from the keyboard console,
file, or communication channel. If a file does not contain the specified
number of characters, the execution will be resumed as soon as all available
characters in the file have been received.
The maximum number of characters that can be returned using an INPUT$
statement is 65,536 characters.
Examples
This example reads a sequence of 25 characters from the printer’s built-in
keyboard and assigns them to a string variable named Z$:
. . .
. . .
1000
1010
. . .
. . .
. .
. .
OPEN "CONSOLE:" FOR INPUT AS #1
Z$=INPUT$(25,1)
. .
. .
In this example, 10 characters are read from the standard IN channel
and assigned to a variable.
10
130
A$=INPUT$(10)
Intermec Fingerprint v7.61 – Programmer’s Reference Manual Ed. 7
Chapter 2 Program Instructions
INSTR
Field of Application
Function searching a specified string for a certain character, or
sequence of characters, and returning its position in relation to the
start of the string.
Syntax
INSTR([<nexp>,]<sexp1>,<sexp2>)
<nexp>
is , optionally, the position where the search will start.
<sexp1>
is the string to be searched.
<sexp2>
is the character(s) for which the string will be searched.
Remarks
INSTR allows you to search a string for some particular character(s) and return
the position of the character, or the first character in the sequence, as a number
of characters positions measured from the start of the string.
As an option, it is possible to specify a certain position in the string from
which the search will start. If no start position is specified, the search will
start at the beginning of the string.
The result will be zero if
- the start position value exceeds the length of the string.
- the string is empty.
- the searched combination of characters cannot be found.
Examples
In this example, the string "INTERMEC_PRINTER_AB" is searched for the
character combination "AB". No start position is specified.
10
20
30
RUN
A$="INTERMEC PRINTER AB"
B$="AB"
PRINT INSTR(A$,B$)
yields:
18
In next example, the string "INTERMEC_PRINTER_AB" is searched for the
character "I" and the start position is specified as 4.
10
20
30
RUN
A$="INTERMEC PRINTER AB"
B$="I"
PRINT INSTR(4,A$,B$)
yields:
12
Intermec Fingerprint v7.61 – Programmer’s Reference Manual Ed. 7
131
Chapter 2
Program Instructions
INVIMAGE (II)
Field of Application
Statement for inversing the printing of text and images from
“black-on-white" to “white-on-black."
Syntax
INVIMAGE | II
Default:
Reset to default by:
Remarks
NORIMAGE
PRINTFEED execution
This statement can only be used in connection with the printing of text and
images (PRTXT and PRIMAGE). In the matrix of the font or image, all
“white” dots will be black and all black dots will be “white.” (Obviously,
“white” means that the dots will not be subjected to heat and the media
therefore will retain its original color, whereas “black” means the color
of the printing.)
This implies that most fonts will be printed on a black background which
ascends and descends slightly more than most of the characters. Not all
fonts are suited for inverse printing. Thin lines, serifs, and ornaments may
be difficult to distinguish. There may also be an imbalance between the
ascending and descending black background.
The same principles apply to images. The normally invisible background
may be larger than expected or be less favourably balanced. Small “white”
details tend to be blurred out by the black background. Therefore, before
using an inverse image, make a printout sample.
INVIMAGE will be revoked by a NORIMAGE statement.
Example
132
10
20
30
40
50
60
70
RUN
PRPOS 30,300
DIR 1
ALIGN 4
INVIMAGE
FONT "Swiss 721 BT"
PRTXT "Inverse printing"
PRINTFEED
Intermec Fingerprint v7.61 – Programmer’s Reference Manual Ed. 7
Chapter 2 Program Instructions
KEY BEEP
Field of Application
Statement for resetting the frequency and duration of the sound
produced by the beeper, when any of the keys on the printer’s
keyboard is pressed down.
Syntax
KEY↔BEEP<nexp1>,<nexp2>
<nexp1>
is the frequency of the sound in Hz.
<nexp2>
is the duration of the sound in periods of 0.020 seconds each
(max. 15,0000 = 5 minutes).
Default:
Frequency: 1200 Hz
Duration:
0.030 sec.
Remarks
This statement sets the response for all keys of the printer. To turn off the
audible key response, set the frequency to a value higher than 9999.
Note that the beeper is disabled during printing.
The table below illustrates the relation between frequencies and the musical
scale (same as in the SOUND statement).
Note Hz
C
131
C#
138
D
147
D#
155
E
165
F
175
F#
185
G
196
G#
208
A
220
A#
233
B
247
(small octave)
Example
Note Hz
C
262
C#
277
D
294
D#
311
E
330
F
349
F#
370
G
392
G#
415
A
440
A#
466
B
494
(one-line octave)
Note Hz
C
523
C#
554
D
587
D#
622
E
659
F
699
F#
740
G
784
G#
831
A
880
A#
933
B
988
(two-line octave)
Note Hz
C
1047
C# 1109
D
1175
D# 1245
E
1319
F
1397
F# 1480
G
1568
G# 1662
A
1760
A# 1865
B
1976
(three-line octave)
In this example, the beeper will produce an A in the one-line octave for 1
second each time a key is pressed down.
10
KEY BEEP 440,50
. . . . .
. . . . .
Intermec Fingerprint v7.61 – Programmer’s Reference Manual Ed. 7
133
Chapter 2
Program Instructions
KEY ON/OFF
Field of Application
Statement enabling or disabling a specified key on the printer’s
front panel to be used in connection with an ON KEY...GOSUB
statement.
Syntax
KEY(<nexp>)OFF|ON
<nexp>
is the id. number of one of the keys on the printer’s front
panel (see illustration below).
OFF|ON
disables|enables the specified key.
Remarks
Using an ON KEY... GOSUB statement, any key (except the <Shift> key)
can be assigned to make the program branch to a subroutine. The keys are
enabled/disabled individually and are specified by means of their respective
id. numbers in unshifted and/or shifted position. To specify a shifted key, add
100 to the unshifted id. number the key, as illustrated below.
Please note the difference between the id. numbers of the keys and the ASCII
values they are able to produce (see KEYBMAP$).
134
Intermec Fingerprint v7.61 – Programmer’s Reference Manual Ed. 7
Chapter 2 Program Instructions
KEY ON/OFF, cont.
Remarks, cont.
Example
In this example, the F1 key (id. No. 10) is first enabled, then used for
branching to a subroutine and finally disabled.
10
20
30
KEY (10) ON
ON KEY (10) GOSUB 1000
KEY (10) OFF
Intermec Fingerprint v7.61 – Programmer’s Reference Manual Ed. 7
135
Chapter 2
Program Instructions
KEYBMAP$
Field of Application
Variable returning or setting the keyboard map table.
Syntax
Read the map table:
<svar>
<nexp>
<svar> = KEYBMAP$(<nexp>)
returns the keyboard mapping
is the type of string to be returned:
0 = Unshifted 64 characters
1 = Shifted 64 characters
Set the map table: KEYBMAP$(<nexp>) = <sexp>
<nexp>
is the type of string to be remapped:
0 = Unshifted 64 characters
1 = Shifted 64 characters
<sexp>
is the string specifying the ASCII value for each key position
in the selected type of string.
Remarks
In the KEYBMAP$ statement, each key on the printer’s front panel
has two characteristics:
• The physical location of the key (position number).
(This is not the same thing as the key’s Id No, see KEE ON/OFF
or ON KEY GOSUB.)
• The ASCII decimal value that will be produced when the key is pressed.
(Compare with BREAK.)
In principle, each physical key can produce two different ASCII values, one
in unshifted position and another in shifted position. One key is appointed
<Shift> key. When the <Shift> key is pressed at the same time as another key,
the unshifted ASCII value of the latter will be increased by 128.
You can use the KEYBMAP$ instruction in two ways:
Reading the keyboard mapping
You can read how the keyboard is mapped in regard of either unshifted
or shifted characters. The printer will return a string of ASCII values in
ascending key position number. Because many keys return non-printable
ASCII values (ASCII 00-31 dec.), all will not be returned to the screen
of the host or printed on a label.
Changing the keyboard mapping
You can change the mapping of the keyboard, so a key will produce
another ASCII value than before. To do that, you must create a string which
specifies the ASCII value for each of all unshifted or shifted key positions
in ascending order. Regardless of what the keyboard looks like, there are
always 64 theoretical key positions.
Characters, that cannot be produced by the keyboard of the host, can be
substituted by CHR$ functions, where the character is specified by its ASCII
decimal value according to the selected character set (see NASC statement.)
The same applies to special characters. Key positions which should be
disabled or are not included in the physical keyboard can be mapped as
NUL, using the function CHR$(0). Note that the position of the <Shift> key
cannot be remapped.
136
Intermec Fingerprint v7.61 – Programmer’s Reference Manual Ed. 7
Chapter 2 Program Instructions
KEYBMAP$, cont.
Remarks, cont.
The keyboards return the following ASCII values:
Note!
In the Setup Mode, the keys have fixed positions and are not affected by any
KEYBMAP$ statement. KEYBMAP$ only affects the keys when used outside
the Setup Mode.
Intermec Fingerprint v7.61 – Programmer’s Reference Manual Ed. 7
137
Chapter 2
Program Instructions
KEYBMAP$, cont.
Remarks, cont.
Position numbers of the EasyCoder 501/601 XP keyboard . The keys printed
on the keyboard overlay are marked with a shade of gray. Key position
number 1 (Shift) cannot be remapped.
Position numbers of the EasyCoder F-series keyboard. The key marked
“Shift" cannot be remapped.
Examples
The following example illustrates the mapping of the keyboard for EasyCoder
501 XP (unshifted keys only).
10
20
30
40
50
RUN
138
B$=CHR$128+CHR$1+STRING$(4,0)+CHR$(2)+
STRING$(4,0)+CHR$(3)
B$=B$+STRING$(4,0)+CHR$(4)+STRING$(4,0)+
CHR$(5)+STRING$(18,0)
B$=B$+".147"+CHR$(0)+"0258"+CHR$(0)+
CHR$(8)+"369"+CHR$(0)+CHR$(31)
B$=CHR$(0)+CHR$(28)+CHR$(30)+STRING$(2,0)+
CHR$(13)+CHR$(29)+CHR$(0)
KEYBMAP$(0)=B$
Intermec Fingerprint v7.61 – Programmer’s Reference Manual Ed. 7
Chapter 2 Program Instructions
KILL
Field of Application
Statement for deleting a file from the printer’s memory or from a
DOS-fomatted SRAM memory card inserted in the memory card
adapter.
Syntax
KILL<sexp>
<sexp>
Remarks
is the name, including extension, of the file which is to
be deleted.
The name of the file to be deleted must match the name given when the file
was saved, see SAVE statement. The name must include the extension. If no
extension was entered manually by the operator when the file was SAVEd,
the extension “.PRG” was added automatically.
To KILL a file residing in another directory than the current one (see CHDIR
statement), you must include a reference to the directory in question when you
specify the file, for example "card1:<filename>.XYZ".
KILL cannot be used for files residing in "rom:", "storage:", or "lock:".
Examples
KILL "LABEL14.PRG"
KILL "c:LABEL14.PRG
KILL "card1:LABEL7.PRG"
Startup files and outline font files have other extensions than .PRG:
KILL "AUTOEXEC.BAT"
KILL "NNNNNNNN.TTF"
Intermec Fingerprint v7.61 – Programmer’s Reference Manual Ed. 7
(startup file)
(TrueType font file)
139
Chapter 2
Program Instructions
LAYOUT
Field of Application
Statement for handling of layout files.
Syntax
LAYOUT[F,] <sexp1>,<sexp2>,<svar>|<sexp3>,<nvar>|<sexp4>
F,
optionally allows use of data and error files instead of arrays
<sexp1>
is the layout file.
<sexp2>
is the logotype name file.
<svar>|<sexp3>
is the data array (<svar>) or data file (<sexp3).
<nvar>/<sexp4>
is the error array (<nvar>) or error file (<sexp4).
Remarks
<sexp1>: Layout file format sorted in ascending order (Records 1-n, 52 bytes each)
Input: H = hex digit, D = Numeric digit, C = Alpha character
Byte # Parameter
Layout Type
Input
Notes
0-1
Element number
HH
2
Layout type
C
A = Logotype by name
B = Bar code
C = Text
E = Bar code extended field
Note 1
H = Barfont on/off
J = Baradjust (corresponds to BARADJUST stmt)
L = Logotype by number
S = Line
X = Box
3
Direction
A,B,C,L,S,or X
D
Barfont on/off (0=off; 1=on)
H
D
Security
E
D
4
Alignment
A,B,C,L,S,X
D
Aspect height ratio
E
D
5-8
X-position
A,B,C,L,S,or X
DDDD
Aspect width ratio
E
D
Baradjust left
J
DDDD
9-12 Y-position
A,B,C,L,S,or X
DDDD
Rows in bar code
E
DD
Baradjust right
J
DDDD
13-22 Font name
C
C1-C10
Note 2
Logotype name
A
C1-C10
Bar code name
B
C1-C10
Barfont name
H
C1-C10
Line length
S
DDDD
Box width
X
DDDD
Columns in bar code
E
DD
Byte 13-14
Truncate according to code spec's
E
D
Byte 15
23-42 Fixed text or alphanumeric data
B or C
C1-C20
Fixed numeric data
B
D1-D20
Logotype number
L
DD
Box height
X
DDDD
Line thickness
S
DDDD
43-44 No of char. to print (of byte 23-42)
B or C
DD
45-46 Image type (I = inverse image)
A,C, or L
C
Bar code ratio (wide/narrow bars)
B
DD
47
Vertical magnification
A,C, or L
D
Bar code magnification
B
D
48
Horizontal magnification
A,C, or L
D
49-51 Bar code height
B
DDD
Line thickness
X
DDD
140
Intermec Fingerprint v7.61 – Programmer’s Reference Manual Ed. 7
Chapter 2 Program Instructions
LAYOUT, cont.
Remarks, cont.
Note 1:
The bar code extended field record (E) corresponds to the six last
parameters in the BARSET statement. Must have a lower element number
than the corresponding bar code record (B), which specifies the other
bar code parameters.
Note 2:
The maximum font name length in the LAYOUT statement is 10 characters.
Most font names in Intermec Fingerprint are longer. A workaround method
is to use font name aliases with a maximum length of 10 characters,
See Chapter 6, “Fonts”.
Logotype name file format #1:
(no embedded spaces in name)
Record 1–n, 10 bytes each.
C1...C10
Name for logotype No. 1
...
...
C1...C10
Name for logotype No. n
Logotype name file format #2:
(Records sorted in ascending logotype number order)
Record 1-n, 13 bytes each.
DD
Logotype number (2 digits)
C
always ":" (colon). Separator. Distinguishes format 2.
C1...C10
Name of logotype (10 characters)
Note: Logotype name file formats #1 and #2 are alternative.
Data array/file format:
(sorted in ascending order)
One array position/One file line.
HH
Element number
C1...Cn
Data
If a data element cannot be used in the layout, an error will occur and the index of the unused
element and error code -1 is placed in the error array/file.
Error array/file format:
(sorted in ascending order)
Array position/File line No. 0:
Array position/File line No.1:
...
...
Array position/File line No. 2n-2:
Array position/File line No. 2n-1:
Record number for error 1
Error number for error 1
Record number for error n
Error number for error n
Also refer to the chapter “Label Design; Layout Files" in the Intermec
Fingerprint v7.50, Programmer’s Guide.
To improve the performance, it is strongly recommended to create the layout
and logotype name files in the printer’s temporary memory ("tmp:"). Once
they have been created in "tmp:", they could be copied to the printer’s
permanent memory to avoid losing them at power off.
Do not confuse this statement with the statements LAYOUT INPUT,
LAYOUT END, and LAYOUT RUN.
Intermec Fingerprint v7.61 – Programmer’s Reference Manual Ed. 7
141
Chapter 2
Program Instructions
LAYOUT, cont.
Example
Note that the 10 characters available to define a font in the LAYOUT statement in most cases cannot
accommodate modern outline font names. Instead, use font aliases as described in Chapter 6. In the
example below, the font aliases are indicated by lowercase italic typing (lines 90–120, 150).
10
20
30
40
50
60
70
80
90
100
110
120
130
140
150
160
170
180
190
200
210
220
230
240
250
260
142
DIM QERR%(10)
LAYDATA$(0)="01DAY"
LAYDATA$(1)="04123456789012"
QERR%(0)=0
OPEN "tmp:LOGNAME.DAT" FOR OUTPUT AS 19
PRINT# 19,"DIAMONDS.1";
CLOSE 19
OPEN "tmp:LAYOUT.DAT" FOR OUTPUT AS 6
PRINT# 6,"01C11100 10 font alias
00I 11
";
PRINT# 6,"01C11100 40 font alias
00 22
";
PRINT# 6,"01C11100 100 font aliasWEDNES
06I 11
";
PRINT# 6,"01C11100 130 font aliasSATURNUS
05I 11
";
PRINT# 6,"02L11300 70
1
33
";
PRINT# 6,"03S11100 210 300
3
";
PRINT# 6,"04H1
font alias
";
PRINT# 6,"04B14100 300 EAN13
0 312 100";
CLOSE 6
LAYOUT "tmp:LAYOUT.DAT","tmp:LOGNAME.DAT",LAYDATA$,QERR%
IF QERR% (1) = 0 THEN GOTO 260
PRINT "-ERROR- LAYOUT 1"
I%=0
IF QERR%(I%)=0 THEN GOTO 260
PRINT "
ERROR ";QERR%(I%+1);" in record ";QERR%(I%)
I%=I%+2
GOTO 220
PRINTFEED
Intermec Fingerprint v7.61 – Programmer’s Reference Manual Ed. 7
Chapter 2 Program Instructions
LAYOUT END
Field of Application
Statement for stopping the recording of a layout description and saving
the layout (Intermec Direct Protocol only).
Syntax
LAYOUT END
Remarks
This statement can only be used in the Intermec Direct Protocol after
a layout has been recorded by means of a LAYOUT INPUT statement.
After a LAYOUT END statement has been executed, no more data will
be added to the layout.
By default, the layout will be saved in the printer’s permanent memory
("c:"). To speed up the execution it can, as an alternative, be saved in the
temporary memory (see LAYOUT INPUT statement). The layout can be
copied and killed as any other program file.
Example
This example illustrates how the Intermec Direct Protocol is enabled, how
new separators are specified, how a layout is stored in the printer’s temporary
memory, how variable data are combined with the layout, and how a label is
printed. Finally, the Intermec Direct Protocol is disabled:
INPUT ON ↵
FORMAT INPUT "#","@","&" ↵
LAYOUT INPUT "tmp:LABEL1" ↵
FT "Swiss 721 BT"↵
PP 100,250 ↵
PT VAR1$ ↵
PP 100,200 ↵
PT VAR2$ ↵
LAYOUT END ↵
LAYOUT RUN "tmp:LABEL1" ↵
#Line number 1&Line number 2&@ ↵
PF ↵
INPUT OFF ↵
Intermec Fingerprint v7.61 – Programmer’s Reference Manual Ed. 7
143
Chapter 2
Program Instructions
LAYOUT INPUT
Field of Application
Statement for starting the recording of a layout description (Intermec
Direct Protocol only).
Syntax
LAYOUT INPUT <sexp>
<sexp>
is the desired name of the layout (max.30 characters) including
name of the device where the layout is to be stored.
Remarks
This statement can only be used in the Intermec Direct Protocol and starts
the recording of a layout. All formatting instructions, such as PRPOS, MAG,
FONT, BARFONT, BARSET, PRTXT, PRBAR, PRIMAGE, PRBOX,
PRLINE, etc., which are transmitted to the printer on the standard IN
channel after a LAYOUT INPUT statement and before a LAYOUT END
statement, will be included in the layout.
Due to inherent restrictions in Flash memories, layouts cannot be created
in "c:" (which by default is the current directory), but must be created
in the printer’s temporary memory ("tmp:"), or possibly in an SRAM
card ("card1:"). Once a layout has been created in the temporary memory
("tmp:"), it can be copied to either "c:" or "card1:" so it will not be
lost at power-off or reboot.
Variable input data to text, bar code, and image fields can be provided
separately by means of a LAYOUT RUN statement. Such variable data are
indicated in the layout by string variables VARn$ where “n" is the number
of the field in the LAYOUT RUN string of data. For example, the statement
PRTXT "Hello" in the layout results in a fixed text, whereas the statement
PRTXT VAR1$ results in a variable text, which is provided by the first
field in a LAYOUT RUN string.
The layout must not contain any PRINTFEED statements.
The layout will not be saved until a LAYOUT END statement is executed.
Example
This example illustrates how the Intermec Direct Protocol is enabled, how
new separators are specified, how a layout is stored in the printer’s temporary
memory, how variable data are combined with the layout, and how a label is
printed. Finally, the Intermec Direct Protocol is disabled:
INPUT ON ↵
FORMAT INPUT "#","@","&" ↵
LAYOUT INPUT "tmp:LABEL1" ↵
FT "Swiss 721 BT" ↵
PP 100,250 ↵
PT VAR1$ ↵
PP 100,200 ↵
PT VAR2$ ↵
LAYOUT END ↵
LAYOUT RUN "tmp:LABEL1" ↵
#Line number 1&Line number 2&@ ↵
PF ↵
INPUT OFF ↵
144
Intermec Fingerprint v7.61 – Programmer’s Reference Manual Ed. 7
Chapter 2 Program Instructions
LAYOUT RUN
Field of Application
Statement for providing variable input data to a predefined layout
(Intermec Fingerprint Direct Protocol only).
Syntax
LAYOUT RUN <sexp>
<sexp>
is the name of the layout as specified in the LAYOUT
INPUT statement.
Remarks
This instruction can only be used in the Intermec Direct Protocol and is
used to select a predefined layout in a specified part of the printer’s memory
(default is "c:", see LAYOUT INPUT statement) and provide input to
string variables in the layout. Such variables are indicated by VARn$,
where “n” indicates a field in the string of data that should follow the
LAYOUT RUN statement.
The string of input data should be composed according to the following
syntax, where <STX> is the start-of-text separator, <CR> is the field
separator and <EOT> is the end-of-text separator (see FORMAT INPUT
statement):
<STX><input to VAR1$><CR><input to VAR2$><CR>. . . . . . . <input to VARn$><CR><EOT>
Example
This example illustrates how the Intermec Direct Protocol is enabled, how
new separators are specified, how a layout is stored in the printer’s temporary
memory, how variable data are combined with the layout, and how a label is
printed. Finally, the Intermec Direct Protocol is disabled:
INPUT ON ↵
FORMAT INPUT "#","@","&" ↵
LAYOUT INPUT "tmp:LABEL1" ↵
FT "Swiss 721 BT" ↵
PP 100,250 ↵
PT VAR1$ ↵
PP 100,200 ↵
PT VAR2$ ↵
LAYOUT END ↵
LAYOUT RUN "tmp:LABEL1" ↵
#Line number 1&Line number 2&@ ↵
PF ↵
INPUT OFF ↵
Intermec Fingerprint v7.61 – Programmer’s Reference Manual Ed. 7
145
Chapter 2
Program Instructions
LBLCOND
Field of Application
Statement for overriding the media feed setup.
Syntax
LBLCOND<nexp1>,<nexp2>|<nexp3>
<nexp1>
specifies the type of action:
0 = Overriding the stop adjust.
1 = Overriding the start adjust.
2 =Turning off the Label Stop Sensor/Black Mark Sensor.
3 = Selecting the mode specified by <nexp3>
<nexp2>
specifies <nexp1> = 0, 1, or 2 as a number of dots.
<nexp3>
Specifies one of the following modes:
0 = Default Mode
1 = IPL Mode
2 = Gap Truncate Mode
Remarks
This instruction allows you to override the printer’s feed-adjust setup or to
temporarily disable the label stop sensor or black mark sensor:
<nexp1> = 0
temporarily sets the stop adjust to the value specified
by <nexp2>.
<nexp1> = 1
temporarily sets the start adjust to the value specified
by <nexp2>.
<nexp1> = 2
makes the label stop sensor (LSS) or black mark
sensor temporarily ignore any gaps or marks detected
within the length of media feed specified by <nexp2>.
However, the label length must be greater than than the
distance between the LSS and the tear bar (if not, use
LBLCOND 3,xx). This allows the use of labels of such
shapes that would make the LSS react prematurely, or
tickets with preprint at the back of the media that would
interfere with the detection of the black mark.
<nexp1> = 3
is useful as an alternative to LBLCOND 2,xx when the
length of the label or ticket is shorter than the distance
between the LSS and the tear bar. It makes it possible to
select one of the modes specified by <nexp3>.
Default Mode (<nexp3> = 0):
If the print image is longer than the physical length of
the label or ticket, the print image will extend into the
next label until the media feed stops according to the
stop adjust setup (for example when the gap becomes
aligned with the tear bar). This means that the print
image may be truncated, the next label may have
to be discarded, and some of the print image may
coincide with a gap or slot.
146
Intermec Fingerprint v7.61 – Programmer’s Reference Manual Ed. 7
Chapter 2 Program Instructions
LBLCOND, cont.
Remarks, cont.
IPL Mode (<nexp3> = 1):
If the print image is longer than the physical length of
the label or ticket, the print image will extend into the
following label(s) until the entire print image has been
printed. Then the media is fed out to the next gap or
mark according to the stop adjust setup. This means that
the print image will not be truncated but may extend
into one or more consecutive labels, and some of the
print image may coincide with gaps or slots.
Gap Truncate Mode (<nexp3> = 2):
If the print image is longer than the physical length
of the label or ticket, only the part of the print image
that fits on the label or ticket will be printed and the
remainder will be ignored. This means that some of the
print image may not be printed at all, but the following
labels will not be affected.
Verifying a start adjust or stop adjust value in the Setup Mode by pressing
key No. 16 (normally labeled “Enter”), or setting the value by means
of a setup file or setup string, will revoke any LBLCOND statement for
the parameter in question.
The label stop sensor will be returned to normal operation by the statement:
LBLCOND 2,0
All current LBLCOND statements will be revoked at startup or the execution
of a REBOOT statement. This means that the start and stop adjust will be
decided by the setup and the label stop sensor will work normally.
Example
In this example, the start adjust value in the setup mode is overridden and
the label stop sensor is set to ignore any gaps in the web within 20 mm (240
dots at 12 dots/mm) of media feed:
10
20
30
40
RUN
LBLCOND 1,5: LBLCOND 2,240
FONT "Swiss 721 BT"
PRTXT "Hello"
PRINTFEED
Intermec Fingerprint v7.61 – Programmer’s Reference Manual Ed. 7
147
Chapter 2
Program Instructions
LED ON/OFF
Field of Application
Statement for turning a specified LED control lamp on or off.
Syntax
LED<nexp>ON|OFF
<nexp>
Remarks
is the LED which is to be turned on or off.
0 is the “Ready” LED.
1 is the “Error” LED.
All present Intermec Fingerprint printers are equipped with three LED (Light
Emitting Diode) control lamps on the front panel. Two of the LEDs can be
used to indicate for example when an error occurs or when the printer is ready.
It is up to the programmer to decide how they will be used, but since the LEDs
are marked with text, some restriction is recommended.
The “Power” LED is connected to the On/Off switch and cannot be
controlled by the program.
Example
In this example, the “error” LED will be lighted if you, for example,
attempt to run the program with a raised printhead. Lower the printhead
and a label will be fed out. The “error” LED goes out and the “ready”
LED comes on.
10
20
30
40
50
60
70
80
90
100
.....
.....
.....
1000
1010
1020
148
LED 0 ON
LED 1 OFF
ON ERROR GOTO 1000
PRPOS 30,300
FONT "Swiss 721 BT"
PRTXT "OK!"
PRINTFEED
LED 0 ON
LED 1 OFF
END
LED 0 OFF
LED 1 ON
RESUME
Intermec Fingerprint v7.61 – Programmer’s Reference Manual Ed. 7
Chapter 2 Program Instructions
LEFT$
Field of Application
Function returning a specified number of characters from a given
string starting from the extreme left side of the string, that is
from the start.
Syntax
LEFT$(<sexp>,<nexp>)
<sexp>
is the string from which the characters will be returned.
<nexp>
is the number of characters to be returned.
Remarks
This function is the complementary function for RIGHT$, which returns the
characters starting from the extreme right side, that is from the end.
If the number of characters to be returned is greater than the number of
characters in the string, then the entire string will be returned. If the number of
characters is set to zero, a null string will be returned.
Examples
10
RUN
PRINT LEFT$("THERMAL PRINTER",7)
yields:
THERMAL
10
20
RUN
A$="THERMAL PRINTER":B$="LABEL"
PRINT LEFT$(A$,8);LEFT$(B$,10);"S"
yields:
THERMAL LABELS
Intermec Fingerprint v7.61 – Programmer’s Reference Manual Ed. 7
149
Chapter 2
Program Instructions
LEN
Field of Application
Function returning the number of character positions in a string.
Syntax
LEN(<sexp>)
<sexp>
is the string from which the number of characters will
be returned.
Remarks
The number of characters to be returned includes unprintable characters, but
the quotation marks enclosing the string expression are not included.
Examples
In this example, lines 40 and 50 illustrate two ways of using the LEN
function, when the number of characters from several string expressions
are to be added up.
10
20
30
40
50
RUN
A$="INTERMEC"
B$="THERMAL"
C$="PRINTERS"
PRINT LEN(A$+B$+C$)
PRINT LEN(A$)+LEN(B$)+LEN(C$)
(8 char.)
(7 char.)
(8 char.)
yields:
23
23
This example illustrates that unprintable characters, for example space
characters, are included in the value returned by the LEN function:
PRINT LEN("INTERMEC THERMAL PRINTERS")
yields:
25
150
Intermec Fingerprint v7.61 – Programmer’s Reference Manual Ed. 7
Chapter 2 Program Instructions
LET
Field of Application
Statement for assigning the value of an expression to a variable.
Syntax
[LET]<<nvar>=<nexp>>|<<svar>=<sexp>>
<nvar>
is the numeric variable to which a value will be assigned.
<nexp>
is the numeric expression from which the value will be
assigned to the numeric variable.
or...
<svar>
is the string variable to which the content of the string
expression will be assigned.
<sexp>
is the string expression from which the content will be
assigned to the string variable.
Remarks
The keyword LET is not necessary, but retained for compatibility with
old versions of Intermec Fingerprint. The equal sign (=) is sufficient
to make the assignment. Both the expression and the variable most be
either string or numeric.
Example
10
20
30
40
50
RUN
LET A%=100
B%=150
LET C$="INTERMEC"
D$="THERMAL PRINTERS"
PRINT A%+B%,C$+" "+D$
250
INTERMEC THERMAL PRINTERS
(numeric variable)
(numeric variable)
(string variable)
(string variable)
yields:
Intermec Fingerprint v7.61 – Programmer’s Reference Manual Ed. 7
151
Chapter 2
Program Instructions
LINE INPUT
Field of Application
Statement for assigning an entire line, including punctuation marks,
from the standard IN channel to a single string variable.
Syntax
LINE↔INPUT[<scon>;]<svar>
<scon>;
is an optional prompt plus a semicolon
<svar>
is the string variable to which the input line is assigned.
Remarks
For information on standard I/O channel, see SETSTDIO statement. By
default, "uart1:" is the standard I/O channel.
LINE INPUT differs from INPUT in that an entire line of max. 32,767
characters will be read. Possible commas will appear as punctuation marks
in the string instead of dividing the line into portions.
During the execution of a program, a LINE INPUT statement will interrupt
the execution. You can make a prompt being displayed on the host screen
to notify the operator that the program is expecting additional data to be
entered. The input is terminated and the program execution is resumed when
a carriage return character (ASCII 13 decimal) is encountered. The carriage
return character will not be included in the input line.
Note that LINE INPUT filters out any incoming ASCII 00 dec. characters
(NUL).
Example
Print your own visiting card like this:
10
20
30
40
50
60
70
80
90
100
110
120
130
RUN
152
LINE INPUT "ENTER NAME: ";A$
LINE INPUT "ENTER STREET: ";B$
LINE INPUT "ENTER CITY: ";C$
LINE INPUT "ENTER STATE + ZIPCODE: ";D$
LINE INPUT "ENTER PHONE NO: ";E$
FONT "Swiss 721 BT", 8
ALIGN 5
PRPOS 160,300:PRTXT A$
PRPOS 160,250:PRTXT B$
PRPOS 160,200:PRTXT C$
PRPOS 160,150:PRTXT D$
PRPOS 160,100:PRTXT "Phone: "+E$
PRINTFEED
Intermec Fingerprint v7.61 – Programmer’s Reference Manual Ed. 7
Chapter 2 Program Instructions
LINE INPUT#
Field of Application
Statement for assigning an entire line, including punctuation marks,
from a sequential file or a device to a single string variable.
Syntax
LINE´INPUT#<nexp>,<svar>
<nexp>
is the number assigned to the file when it was OPENed.
<svar>
is the string variable to which the input line is assigned.
Remarks
This statement differs from the INPUT# statement in that an entire
line of max. 32,767 characters will be read, and possible commas in
the line will be included in the string as punctuation marks instead of
dividing it into portions.
When reading from a sequential file, the lines can be read one after
the other by the repeated issuing of LINE INPUT# statements, using
the same file reference.
Once a line has been read, it cannot be read again until the file is CLOSEd
and then OPENed again.
The LINE INPUT# statement is useful when the lines in a file has
been broken into fields.
Note that LINE INPUT# filters out any incoming ASCII 00 dec.
characters (NUL).
Example
This example assigns data from the three first lines of the file "Addresses" to
the string variables A$, B$, and C$ respectively:
. .
. .
100
110
120
130
. .
. .
. . .
. . .
OPEN
LINE
LINE
LINE
. . .
. . .
"ADDRESSES" FOR INPUT AS #5
INPUT# 5, A$
INPUT# 5, B$
INPUT# 5, C$
Intermec Fingerprint v7.61 – Programmer’s Reference Manual Ed. 7
153
Chapter 2
Program Instructions
LIST
Field of Application
Statement for listing the current program completely or partially, or
listing all variables, to the standard OUT channel.
Syntax
LIST[[<ncon1>[–<ncont2>]]|,V|,B]
<ncon1>
is a single line, or the first line number in a range of lines.
<ncon2>
is optionally the last line number in a range of lines.
,V
lists all variables.
,B
lists all breakpoints.
Remarks
This instruction is useful after LOADing a program, or if you during
programming have changed any program lines, renumbered the lines, or
added new lines and want to bring some order in the presentation on the
screen of the host. LIST also removes unnecessary characters and adds
assumed keywords. The instruction is usually given in the immediate mode,
that is on a line without any preceding line number.
The LIST statement can be used in seven different ways:
• If no line number is entered after LIST, the entire current program will
be listed. In case the program has been written without line numbers
(see IMMEDIATE ON/OFF statements), the lines will be automatically
numbered with 10-step incrementation starting with line number 10
(10-20-30-40-50....).
• If a single line number is entered after LIST, only the specified
line will be listed.
• If a line number followed by a hyphen (-) is entered after LIST, all lines
from the specified line to the end of the program will be listed.
• If a hyphen (-) followed by line number is entered after LIST, all lines from
the start of the program through the specified line will be listed.
• If two line numbers are entered after LIST, they will specify the first and
last line in a range of lines to be listed.
• If LIST,V is entered, all integer variables, integer array variables,
string variables, and string array variables in the printer’s memory
will be listed.
• If LIST,B is entered, all breakpoints of the Fingerprint Debugger
(see DBBREAK) will be printed in line number order. Line labels
that have not been updated, which occurs at program execution,
may be misplaced.
Examples
LIST
LIST 100
LIST 100–
LIST –500
LIST 100–500
LIST,V
LIST,B
154
Lists all lines in the program.
Lists line No. 100 only.
Lists all lines from line No 100
to the end of the program.
Lists all lines from the start of
the program through line No. 500.
Lists all lines from line 100
through line 500.
Lists all variables.
Lists all breakpoints.
Intermec Fingerprint v7.61 – Programmer’s Reference Manual Ed. 7
Chapter 2 Program Instructions
LISTPFSVAR
Field of Application
Statement for listing variables saved at power failure.
Syntax
LISTPFSVAR
Remarks
Related instructions are SETPFSVAR, GETPFSVAR, and DELETEPFSVAR.
Example
LISTPFSVAR
yields for example:
QS$
QCPS%
A%
Intermec Fingerprint v7.61 – Programmer’s Reference Manual Ed. 7
155
Chapter 2
Program Instructions
LOAD
Field of Application
Statement for loading a copy of a program, residing in the current
directory or in another specified directory, into the printer’s working
memory.
Syntax
LOAD<scon>
<scon>
Remarks
is the program to be loaded into the working memory.
If the program has the extension .PRG, the name of the program can be
given with or without any extension. Otherwise, the extension must be
included in the name. If the program resides in another directory than the
current one (see CHDIR statement), the name must also contain a reference
to the directory in question.
LOAD closes any open files and deletes all program lines and variables
residing in the working memory before loading the specified program. If the
previous program in the working memory has not been saved, see SAVE
statement, it will be lost and cannot be retrieved.
While the program is loaded, a syntax check is performed. If a syntax error
is detected, the loading will be interupted and an error message will be
transmitted on the standard OUT channel.
Examples
Load the program "LABEL127.PRG" from the current directory:
LOAD "LABEL127"
or
LOAD "LABEL127.PRG"
When “Ok” appears on the screen, the loading is completed. Use a LIST
statement to display the program on the screen of your terminal.
You may also load a program stored in another directory than the current
one, for example a read-only memory card ("rom:") or an optional
DOS-formatted SRAM memory card ("card1:"). Start the file name by
specifying the directory, for example:
LOAD "rom:MKAUTO"
or
LOAD "card1:PROGRAM1.PRG"
This will create a copy, which you can list or change and then save
under a new name.
156
Intermec Fingerprint v7.61 – Programmer’s Reference Manual Ed. 7
Chapter 2 Program Instructions
LOC
Field of Application
Function returning the current position in an OPEN file or the status of
the buffers in an OPEN communication channel.
Syntax
LOC(<nexp>)
<nexp>
Remarks
is the number assigned to the file or communication channel
when it was OPENed.
In a random file, LOC will return the number of the last record read or written
by the use of GET or PUT statements respectively.
In a sequential file, the number of 128-byte blocks, that have been read or
written since the file was OPENed, will be returned.
LOC can also be used to check the receive or transmit buffer of the specified
communication channel:
• If the channel is OPENed for INPUT, the remaining number of characters
(bytes) to be read from the receive buffer is returned.
• If the channel is OPENed for OUTPUT, the remaining free space (bytes)
in the transmit buffer is returned.
The number of bytes includes characters that will be MAPped as NUL.
Examples
This example closes the file "addresses" when record No. 100 has been
read from the file:
10
OPEN "ADDRESSES" FOR INPUT AS #1
.....
.....
.....
200
IF LOC(1)=100 THEN CLOSE #1
.....
.....
This example reads the number of bytes which remains to be received from
the receive buffer of "uart2:":
100
110
120
OPEN "uart2:" FOR INPUT AS #2
A%=LOC(2)
PRINT A%
Intermec Fingerprint v7.61 – Programmer’s Reference Manual Ed. 7
157
Chapter 2
Program Instructions
LOF
Field of Application
Function returning the length in bytes of an OPEN sequential or
random file, or returning the status of the buffers in an OPEN
communication channel.
Syntax
LOF(<nexp>)
(<nexp>)
is the number assigned to the file or communication channel
when it was OPENed.
Remarks
LOF can also be used to check the receive or transmit buffer of the specified
communication channel:
• If a channel is OPENed for INPUT, the remaining free space (bytes) in
the receive buffer is returned.
• If a channel is OPENed for OUTPUT, the remaining number of characters
to be transmitted from the transmit buffer is returned.
Examples
The first example illustrates how the length of the file "Pricelist" is
returned:
10
OPEN "PRICELIST" AS #5
20
A%=LOF(5)
30
PRINT A%
. . . .
. . . .
The second example shows how the number of free bytes in the receive buffer
of communication channel "uart2:" is calculated:
100
110
120
158
OPEN "uart2:" FOR INPUT AS #2
A%=LOF(2)
PRINT A%
Intermec Fingerprint v7.61 – Programmer’s Reference Manual Ed. 7
Chapter 2 Program Instructions
LSET
Field of Application
Statement for placing data left-justified into a field in a random
file buffer.
Syntax
LSET<svar>=<sexp>
<svar>
is the string variable assigned to the field by a FIELD
statement.
<sexp>
holds the input data.
Remarks
After having OPENed a file and formatted it using a FIELD statement,
you can enter data into the random file buffer using the LSET and RSET
statements (RSET right-justifies the data).
The input data can only be stored in the buffer as string expressions. Therefore,
a numeric expression must be converted to string format by the use of an STR$
function before an LSET or RSET statement is executed.
If the length of the input data is less than the length of the field, the
data will be left justified and the remaining number of bytes will be
printed as space characters.
If the length of the input data exceeds the length of the field, the input data
will be truncated on the right side.
Example
10
OPEN "PHONELIST" AS
20
FIELD#8,8 AS F1$, 8
30
SNAME$="SMITH"
40
CNAME$="JOHN"
50
PHONE$="12345630"
60
LSET F1$=SNAME$
70
LSET F2$=CNAME$
80
RSET F3$=PHONE$
90
PUT #8,1
100
CLOSE#8
RUN
SAVE "PROGRAM 1.PRG "
NEW
10
OPEN "PHONELIST" AS
20
FIELD#8,8 AS F1$, 8
30
GET #8,1
40
PRINT F1$,F2$,F3$
RUN
#8 LEN=26
AS F2$, 10 AS F3$
#8 LEN=26
AS F2$, 10 AS F3$
yields:
SMITH — — — JOHN — — — — — —
Intermec Fingerprint v7.61 – Programmer’s Reference Manual Ed. 7
12345630
159
Chapter 2
Program Instructions
LTS& ON/OFF
Field of Application
Statement for enabling or disabling the label taken sensor.
Syntax
LTS& ON|OFF
Default:
Remarks
LTS& OFF
The label taken sensor (LTS) is a photoelectric device that can be fitted
in the vicinity of the printer’s label outfeed slot and detects if a printed
label or ticket has been removed or not. (Usually, a self-adhesive label
is not fed out completely, but will remain partly stuck to the liner so
it will not fall off.)
Using the LTS ON statement, you can order the printer to stop the execution
at next PRINTFEED statement until the LTS no longer detects any label.
Then the PRINTFEED is executed. This is most useful when printing
batches of labels or tickets. As soon as a label is taken, the next one is printed
and awaits being taken care of.
The same result can also be obtained in a more cumbersome way by a
program based on the PRSTAT(2) function.
LTS& OFF revokes LTS& ON.
Example
160
10
20
30
40
50
60
70
80
RUN
LTS& ON
FOR A%=1 TO 5
B$=STR$(A%)
FONT "Swiss 721 BT"
PRPOS 200,200
PRTXT B$
PRINTFEED
NEXT
Intermec Fingerprint v7.61 – Programmer’s Reference Manual Ed. 7
Chapter 2 Program Instructions
MAG
Field of Application
Statement for magnifying a font, barfont, or image up to four times
separately in regard of height and width.
Syntax
MAG<nexp1>,<nexp2>
<nexp1>
<nexp2>
Default value:
Reset to default by:
Remarks
is the magnification in regard of height (1, 2, 3, or 4).
is the magnification in regard of width (1, 2, 3, or 4).
1,1
PRINTFEED execution
Magnification makes the object grow in directions away from the selected
anchor point, see ALIGN statement.
The MAG statement has become more or less obsolete for fonts and bar
fonts with the implementation of scaleable fonts. Even if MAG works for
such fonts, the printout quality will be much better by using a larger font
size rather than magnifying a smaller one. However, the MAG statement is
retained to allow compatibility with programs originally written for older
Intermec Fingerprint versions.
The MAG statement also works with images. However, since the MAG
statement simply enlarges the bitmap pattern of an image, it gives a better
printout quality to download and use a larger version of an image rather
than magnifying a smaller one.
Note that the MAG statement cannot be used for bar code patterns (use
BARHEIGHT and BARMAG statement for that purpose).
Example
This example illustrates how the image "GLOBE.1" is printed both with
its original size and magnified 4 times. Note the jagged edges of the
curves in the enlarged image.
10
20
30
40
50
60
70
80
90
100
110
120
RUN
ALIGN 2
PRPOS 300,50
FONT "Swiss 721 BT"
PRTXT "Normal Size"
PRPOS 300,125
PRIMAGE "GLOBE.1"
PRPOS 300,300
PRTXT "Enlarged 4X"
PRPOS 300,375
MAG 4,4
PRIMAGE "GLOBE.1"
PRINTFEED
Intermec Fingerprint v7.61 – Programmer’s Reference Manual Ed. 7
161
Chapter 2
Program Instructions
MAKEASSOC
Field of Application
Statement for creating an association.
Syntax
MAKEASSOC <sexp1>, <sexp2>, <sexp3>
<sexp1>
specifies the name of the association to be created
(case-sensitive).
<sexp2>
contains an argument list of parameter tuples according to
the convention in <sexp3>.
<sexp 3>
should always be "HTTP" (case sensitive).
Remarks
HTTP implies that the argument list in <sexp2> is encoded in “x-wwwurl-encoding.”
Example
This example shows how a string, including three stringnames associated
with three start values, will be defined and one of them (time) will
be changed:
10
20
30
40
50
60
70
80
RUN
QUERYSTRING$ =
"time=UNKNOWN&label=321&desc=DEF"
MAKEASSOC "QARRAY", QUERYSTRING$, "HTTP"
QTIME$ = GETASSOC$("QARRAY", "time")
QLABELS% = VAL(GETASSOC$("QARRAY", "label"))
QDESC$ = GETASSOC$("QARRAY", "desc")
PRINT "time=";QTIME$, "LABEL=";QLABELS%,
"DESCRIPTION=";QDESC$
SETASSOC "QARRAY", "time", time$
PRINT "time="; GETASSOC$("QARRAY", "time")
yields:
time=UNKNOWN LABEL=321
time=153355
162
DESCRIP
TION=DEF
Intermec Fingerprint v7.61 – Programmer’s Reference Manual Ed. 7
Chapter 2 Program Instructions
MAP
Field of Application
Statement for changing the ASCII value of a character when received
on the standard IN channel, or optionally on another specified
communication channel.
Syntax
MAP[<nexp1>,]<nexp2>,<nexp3>
<nexp1>
optionally specifies a communication channel:
0 = "console:"
1 = "uart1:"
2 = "uart2:"
3 = "uart3:"
4 = "centronics:"
5 = "net1:"
6 = "usb1:"
Default: Standard I/O channel.
<nexp2>
is the original ASCII decimal value.
<nexp3>
is the new ASCII decimal value after mapping.
Remarks
This statement is used to modify a character set (see NASC and NASCD
statements) or to filter out undesired character. If you for example want a
“Q” (ASCII 81 dec.) to be printed as the letter “Z” (ASCII 90 dec.), the
MAP statement should be entered as:
MAP 81,90
The mapping interprets any ASCII 81 dec. value received on the standard IN
channel as ASCII 90 dec., that is when you press “Q” on the keyboard of the
host, the character “Z” will be printed (see note). However, pressing “Z” will
still produce a “Z”, because that character has not been remapped.
To reset the mapping performed above, map the character back to its
original ASCII value like this:
MAP 81,81
When a character is received by the printer, it is processed in regard
of possible MAP statements before it “enters” the Intermec Fingerprint
firmware. That allows you to filter out undesired control characters, which
may confuse the Intermec Fingerprint firmware, for example by mapping
them as NUL (ASCII 0 decimal).
After processing, the selected character set (see NASC and NASCD
statements) controls how characters will be printed or displayed. If none
of the character sets meets your demands completely, use MAP statements
to modify the set that comes closest. Note that MAP statements will be
processed before any COMSET or ON KEY..GOSUB strings are checked.
NASC and NASCD statements will be processed last.
Do not map any characters to ASCII values occupied by characters used
in Intermec Fingerprint instructions, for example keywords, operators,
%, $, #, and certain punctuation marks. Mapping will be reset to normal
at power-up or reboot.
Intermec Fingerprint v7.61 – Programmer’s Reference Manual Ed. 7
163
Chapter 2
Program Instructions
MAP, cont.
Examples
You can check what characters the host produces using a simple program.
Pressing different keys on the host should produce the corresponding
characters both on the label and on the screen of the host. If not, try another
character set (see NASC). In this example we presume that the keyboard
produces ASCII 81 dec. and ASCII 90 dec. when you press the Q and Z keys
respectively. Should any unexpected characters be printed on the labels or
the screen, check the manuals of the host for information on what ASCII
values will be produced by the various keys and how the screen will present
various ASCII values received from the printer.
10
20
30
40
50
FONT "Swiss 721 BT"
PRPOS 30,100
INPUT "Enter character";A$
PRTXT A$
PRINTFEED
By adding a MAP statement in line 5, you can test what happens. In this
case we remap the character Q to be printed as Z, as in the explanation
on the previous page. After printing, we map the character Q back to
its original position.
5
10
20
30
40
50
60
MAP 81,90
FONT "Swiss 721 BT"
PRPOS 30,100
INPUT "Enter character";A$
PRTXT A$
PRINTFEED
MAP 81,81
Assume that a device connected to "uart2:" produces strings always starting
with the control character STX (ASCII 2 decimal). STX can be filtered out
by mapping it as NUL (ASCII 0 decimal):
10
MAP 2,2,0
Should "uart2:" be appointed standard IN channel (see SETSTDIO), the first
parameter can be omitted from the example above:
10
164
MAP 2,0
Intermec Fingerprint v7.61 – Programmer’s Reference Manual Ed. 7
Chapter 2 Program Instructions
MERGE
Field of Application
Statement for merging a program in the printer’s current directory, or
optionally in another specified directory, with the program currently
residing in the printer’s working memory.
Syntax
MERGE<scon>
<scon>
Remarks
is the name (optionally including a reference to another
directory than the current one) of the program, which is
to be merged with the program currently residing in the
printer’s working memory.
MERGE creates a copy of a program stored in the current directory
(see CHDIR statement), or optionally in a specified other directory,
and blends its lines into the program currently residing in the printer’s
working memory.
Important:
If there are lines with the same numbers in both programs, the lines in the
program currently residing in the working memory will be replaced by the
corresponding lines in the MERGEd program. This also applies to programs
written without line numbers, since they will automatically be assigned
hidden line numbers (10-20-30... etc.) at the execution of the IMMEDIATE
ON statement. In order to avoid overwriting any lines, you may SAVE a
program without line numbers using a SAVE <scon>, L statement. When
MERGEd, it will be appended to the current program and assigned line
numbers that start with the number of the last line of the current program plus
10. For safety reasons, a backup copy of the current program is recommended
before issuing a MERGE statement.
MERGE makes it possible to store blocks of program instructions, which
are frequently used, and include them into new programs. The printer’s
ROM memory contains a number of useful programs, which also can be
MERGEd into programs of your own creation.
Be careful not to include any MERGE statement as a part of a program,
or else the execution will stop after the MERGE statement has been
executed.
The EXECUTE statement offers an alternative method for combining
Fingerprint programs.
Examples
The program “XYZ.PRG" will be merged with the current program. If there
are identical line numbers in both programs, the lines from “XYZ.PRG"will
replace those in the current program.
MERGE
MERGE
MERGE
MERGE
MERGE
"XYZ.PRG"
"c:XYZ.PRG"
"tmp:XYZ.PRG"
"rom:XYZ.PRG"
"card1:XYZ.PRG"
Intermec Fingerprint v7.61 – Programmer’s Reference Manual Ed. 7
(from current directory)
(from permanent memory)
(from temporary memory)
(from read-only memory card)
(from DOS-formatted memory card)
165
Chapter 2
Program Instructions
MID$
Field of Application
Function returning a specified part of a string.
Syntax
MID$(<sexp>,<nexp1>[,<nexp2>])
<sexp>
is the original string.
<nexp1>
is the start position in the original string.
[,<nexp2>]
is the number of characters to be returned (optional).
Remarks
<sexp> is the original string from which a specified part is to be returned.
<nexp1> specifies which character position in the original string is to be the
first character in the part to be returned.
<nexp2> restricts the number of characters to be returned. This information
is optional. If omitted, all characters from the start position specified by
<nexp1> to the end of the string will be returned.
If the value of <nexp1> is less than or equal to zero, then Error 44, “Parameter
out of range” will occur.
If the value of <nexp2> is less than zero, then Error 44, “Parameter
out of range” will occur.
If the value of <nexp1> exceeds the length of the original string, an empty
string will be returned, but no error condition will occur.
If the value of <nexp1> does not exceed the length of the original string, but
the sum of <nexp1> and <nexp2> exceeds the length of the original string,
the remainder of the original string will be returned.
Examples
10
20
RUN
A$=MID$("INTERMEC PRINTERS",6,3)
PRINT A$
yields:
MEC
10
20
30
40
50
RUN
A$="INTERMEC PRINTERS"
B%=10
C%=7
D$=MID$(A$,B%,C%)
PRINT D$
yields:
PRINTER
166
Intermec Fingerprint v7.61 – Programmer’s Reference Manual Ed. 7
Chapter 2 Program Instructions
NAME DATE$
Field of Application
Statement for formatting the month parameter in return strings of
DATE$("F") and DATEADD$(...,"F").
Syntax
NAME DATE$ <nexp>, <sexp>
<nexp>
is the month number (1-12).
<sexp>
is the desired name of the month.
Remarks
This statement allows you to assign names to the different months in
any form and language you like. The names will be returned instead
of the corresponding numbers in connection with DATE$("F") and
DATEADD$("F") instructions, provided that a FORMAT DATE$ statement
has been executed.
The number of characters assigned to represent months in the FORMAT
DATE$ statement decides how much of the names, as specified in the
NAME DATE$ statement, will be returned. The names will be truncated
at the left side. For example:
FORMAT DATE$ "YY.MMM:DD"
NAME DATE$ 1,"JANUARY"
PRINT DATE$("F")
yields for example:
01.ARY.06
Usually, it is best to restrict the month parameter in the FORMAT DATE$
statement to 2 or 3 characters (MM or MMM) and enter the names of the
months in the NAME DATE$ statement accordingly.
Example
This example shows how to make the printer return dates in accordance
with British standard:
10
DATE$="010115"
20
NAME DATE$ 1, "JAN"
30
NAME DATE$ 2, "FEB"
40
NAME DATE$ 3, "MAR"
50
NAME DATE$ 4, "APR"
60
NAME DATE$ 5, "MAY"
70
NAME DATE$ 6, "JUN"
80
NAME DATE$ 7, "JUL"
. . . . .
140
FORMAT DATE$ "MMM DD, YYYY"
150
PRINT DATE$("F")
RUN
yields:
JAN 15, 2001
Intermec Fingerprint v7.61 – Programmer’s Reference Manual Ed. 7
167
Chapter 2
Program Instructions
NAME WEEKDAY$
Field of Application
Statement for formatting the day parameter in return strings of
WEEKDAY$.
Syntax
NAME WEEKDAY$ <nexp>, <sexp>
<nexp>
is the number of the weekday according to the WEEKDAY$
function syntax (Monday = 1... Sunday = 7).
<sexp>
is the desired name of the weekday.
Default: Full English name in lowercase characters, that
is Monday, Tuesday, etc.
Remarks
This statement allows you to assign names to the different weekdays in
any form and language you like. The names will be returned instead of the
corresponding numbers in connection with WEEKDAY$ function.
Example
This example shows how to make the printer return the name of the weekday
as an English 3-letter abbreviation:
10
20
30
40
50
60
70
80
90
100
RUN
FORMAT DATE$ ", MM/DD/YY"
DATE$="001201"
NAME WEEKDAY$ 1, "Mon"
NAME WEEKDAY$ 2, "Tue"
NAME WEEKDAY$ 3, "Wed"
NAME WEEKDAY$ 4, "Thu"
NAME WEEKDAY$ 5, "Fri"
NAME WEEKDAY$ 6, "Sat"
NAME WEEKDAY$ 7, "Sun"
PRINT WEEKDAY$ (DATE$) + DATE$("F")
yields:
Fri, 12/01/00
168
Intermec Fingerprint v7.61 – Programmer’s Reference Manual Ed. 7
Chapter 2 Program Instructions
NASC
Field of Application
Statement for selecting a single-byte character set.
Syntax
NASC<nexp>
<nexp>
Remarks
is the reference number of a character set:
1
=
Roman 8 (default)
33 =
French
34 =
Spanish
39 =
Italian
44 =
English (UK)
46 =
Swedish
47 =
Norwegian
49 =
German
81 =
Japanese Latin (romají)
351 =
Portuguese
-1 =
PCMAP
-2 =
ANSI (same as 1252)
850 =
MS-DOS Latin 1
851 =
MS-DOS Greek 1
852 =
MS-DOS Latin 2
855 =
MS-DOS Cyrillic
857 =
MS-DOS Turkish
1250 =
Windows Latin 2 (Central Europe)
1251 =
Windows Cyrillic (Slavic)
1252 =
Windows Latin 1 (ANSI, same as -2)
1253 =
Windows Greek
1254 =
Windows Latin 5 (Turkish)
1257 =
Windows Baltic Rim
Please refer to Chapter 4 for complete character set tables.
By default, after processing of possible MAP statements, the Intermec
Fingerprint firmware will print and, when applicable, display all characters
according to the Roman 8 character set. However, the Intermec Fingerprint
firmware contains a number of other character sets, which allows you
to print and display such characters that are characteristic for a number
of countries or language areas, or to adapt the printer for the operating
system of the host.
That implies that a certain ASCII code received by the printer may
result in a different character is printed or displayed depending on which
character set has been selected.
If none of the character sets available contains the desired character(s), use a
MAP statement to reMAP the character set that comes closest to your needs.
Note that MAP statements are processed before NASC statements.
Intermec Fingerprint v7.61 – Programmer’s Reference Manual Ed. 7
169
Chapter 2
Program Instructions
NASC, cont.
Remarks, cont.
A NASC statement will have the following consequences:
Text printing:
Text on labels etc. will be printed according to the selected character set.
However, parts of the label, that already has been processed and stored in
the print buffer before the NASC statement is executed, will not be affected.
This implies that labels may be multi-lingual.
LCD Display:
New messages in the display will be affected by a NASC statement.
However, a message that is already displayed will not be updated
automatically. The display is, for all practical reasons, able to show
all printable characters. In the Setup Mode, all characters are mapped
according to US-ASCII standard.
Communication:
Data transmitted via any of the communication channels will not be affected
as the data is defined as ASCII values, not as alphanumeric characters. The
active character set of the receiving unit will decide the graphic presentation
of the input data, for example the screen of the host.
Bar Code Printing:
The pattern of the bars reflects the ASCII values of the input data and is
not affected by a NASC statement. The bar code interpretation (the human
readable characters below the bar pattern) is affected by a NASC statement.
However, the interpretation of bar codes, that have been processed and are
stored in the print buffer, will not be affected.
Example
This example selects the Italian character set:
10
170
NASC 39
Intermec Fingerprint v7.61 – Programmer’s Reference Manual Ed. 7
Chapter 2 Program Instructions
NASCD
Field of Application
Statement for selecting a double-byte character set according to
the Unicode standard.
Syntax
NASCD <sexp>
<sexp>
Default:
Remarks
is the name of the character set.
"" (disables double-byte interpretation).
When a double-byte character set has been selected, the firmware will usually
treat all characters from ASCII 161 dec. to ASCII 254 dec (ASCII A1-FE
hex) as the first part of a two-byte character. Next character byte received
will specify the second part. However, the selected Unicode double-byte
character set may specify some other ASCII value as the breaking point
between single and double byte character sets.
There are various ways to produce double-byte characters from the keyboard
of the computer. By selecting the proper character set using a NASCD
statement, the typed-in ASCII values will be translated to the corresponding
Unicode values, so the desired glyph will be printed.
Double-byte fonts and character set tables are available from Intermec
on special request.
Example
The following text contains both single- and double-byte fonts. The double-byte
font and its character set are stored in a Font Install Card:
10
20
30
40
50
60
RUN
NASC 46
FONT "Swiss 721 BT", 24, 10
NASCD "rom:BIG5.NCD"
FONTD "Chinese"
PRTXT CHR$(65);CHR$(161);CHR$(162)
PRINTFEED
This program yields a printed text line that starts with the Latin character A
(ASCII 65 dec.) followed by the Chinese font that corresponds to the address
161+162 dec. in the character set “BIG5.NCD.”
Intermec Fingerprint v7.61 – Programmer’s Reference Manual Ed. 7
171
Chapter 2
Program Instructions
NEW
Field of Application
Statement for clearing the printer’s working memory in order to allow
a new program to be created.
Syntax
NEW
Remarks
The NEW statement will delete the program currently residing in the printer’s
working memory, close all files, and clear all variables and breakpoints.
If the current program has not been saved (see SAVE statement), it will
be lost and cannot be restored.
In the Intermec Direct Protocol, all counters will be removed when a
NEW statement is executed.
Note that clearing the printer’s working memory does not imply that the host
screen will be cleared too. The lines of the previous program will remain on
the screen until gradually being replaced by new lines.
Example
172
NEW
Intermec Fingerprint v7.61 – Programmer’s Reference Manual Ed. 7
Chapter 2 Program Instructions
NORIMAGE (NI)
Field of Application
Statement for returning to normal printing after an INVIMAGE
statement has been issued.
Syntax
NORIMAGE|NI
Remarks
Normal image is the default type of printing and means that text and images
will be printed in black-on-white.
Using an INVIMAGE statement, the printing of text and images can
be inversed. Such inverse printing will be discontinued for all PRTXT
and PRIMAGE statements that follows the encounter of a NORIMAGE
statement.
Example
In this example, the first line is printed in inversed fashion and the second
line in the normal fashion:
10
20
30
40
50
60
70
80
90
RUN
PRPOS 30,300
ALIGN 4
INVIMAGE
FONT "Swiss 721 BT"
PRTXT "INVERSE PRINTING"
PRPOS 30, 200
NORIMAGE
PRTXT "NORMAL PRINTING"
PRINTFEED
Intermec Fingerprint v7.61 – Programmer’s Reference Manual Ed. 7
173
Chapter 2
Program Instructions
ON BREAK GOSUB
Field of Application
Statement for branching to a subroutine, when break interrupt
instruction is received.
Syntax
ON↔BREAK<nexp>GOSUB<ncon>|<line label>
<nexp>
is one of the following communication channels:
0 = "console:"
1 = "uart1:"
2 = "uart2:"
3 = "uart3:"
4 = "centronics:"
<ncon>|<line label>
is the number or label of the program line to be branched to.
Remarks
This statement is closely related BREAK and BREAK ON/OFF. When break
interrupt is enabled (see BREAK ON) and the operator issues a break interrupt
instruction (see BREAK), the execution of the currently running program will
be interrupted and branched to a specified line in a subroutine.
Examples
In this example, the printer emits a special signal when a break interrupt is
issued from the printer’s keyboard:
10
20
. . .
. . .
1000
1010
1020
1030
1040
ON BREAK 0 GOSUB 1000
GOTO 20
. .
. .
FOR A%=1 TO 3
SOUND 440,50
SOUND 349,50
NEXT A%
END
The same example without line numbers will look like this:
IMMEDIATE OFF
ON BREAK 0 GOSUB QQQ
WWW: GOTO WWW
. . . . .
. . . . .
QQQ: FOR A%=1 TO 3
SOUND 440,50
SOUND 349,50
NEXT A%
END
IMMEDIATE ON
174
Intermec Fingerprint v7.61 – Programmer’s Reference Manual Ed. 7
Chapter 2 Program Instructions
ON COMSET GOSUB
Field of Application
Statement for branching to a subroutine, when the background reception
of data on the specified communication channel is interrupted.
Syntax
ON↔COMSET<nexp1>GOSUB<nexp2>|<line label>
<nexp1>
is one of the following communication channels:
0 = "console:"
1 = "uart1:"
2 = "uart2:"
3 = "uart3:"
4 = "centronics:"
6 = "usb1:"
<nexp2>/<line label> is number or label of the program line to be branched to.
Remarks
This statement is closely related to COMSET, COMSTAT, COMSET ON,
COMSET OFF, COM ERROR ON/OFF, and COMBUF$. It is used to branch
to a subroutine when one of the following conditions occur:
- End character is received.
- Attention string received.
- Max. number of characters received.
These three parameters are set for the specified communication channel
by a COMSET statement.
Examples
In this example, the program branches to a subroutine for reading the buffer
of the communication channel:
1
10
20
30
40
50
.....
.....
1000
2000
2010
2020
2030
REM Exit program with #STOP&
COMSET1,"#","&","ZYX","=",50
ON COMSET 1 GOSUB 2000
COMSET 1 ON
IF A$ <> "STOP" THEN GOTO 40
COMSET 1 OFF
END
A$= COMBUF$(1)
PRINT A$
COMSET 1 ON
RETURN
Intermec Fingerprint v7.61 – Programmer’s Reference Manual Ed. 7
175
Chapter 2
Program Instructions
ON COMSET GOSUB, cont.
Examples, cont.
The same example written without line numbers would look like this:
IMMEDIATE OFF
REM Exit program with #STOP&
COMSET1,"#","&","ZYX","=",50
ON COMSET 1 GOSUB QQQ
COMSET 1 ON
WWW: IF A$ <> "STOP" THEN GOTO WWW
COMSET 1 OFF
.....
.....
END
QQQ: A$=COMBUF$(1)
PRINT A$
COMSET 1 ON
RETURN
IMMEDIATE ON
176
Intermec Fingerprint v7.61 – Programmer’s Reference Manual Ed. 7
Chapter 2 Program Instructions
ON ERROR GOTO
Field of Application
Statement for branching to an error-handling subroutine when
an error occurs.
Syntax
ON↔ERROR↔GOTO<ncon>|<line label>
<ncon>
is the number or label of the line to which the program should
branch when an error condition occurs.
Remarks
If any kind of error condition occurs after this statement has been
encountered, the standard error-trapping routine will be ignored and the
program will branch to the specified line, which should be the first line
in an error-handling subroutine.
If the line number is 0, the standard error-trapping routine will be enabled and
no error-branching within the current program will be executed.
Examples
If you try to run this example with the printhead raised (or if any
other error occurs), a warning signal will sound and the error LED
will be lighted.
10
20
30
40
50
60
. . .
1000
1010
1020
1030
1040
1050
LED 0 ON:LED 1 OFF
ON ERROR GOTO 1000
FONT "Swiss 721 BT"
PRTXT "HELLO"
PRINTFEED
END
. .
LED 0 OFF:LED 1 ON
FOR A%=1 TO 3
SOUND 440,50
SOUND 359,50
NEXT A%
RESUME NEXT
The same example written without line numbers would look like this:
IMMEDIATE OFF
LED 0 ON:LED 1 OFF
ON ERROR GOTO QQQ
FONT "Swiss 721 BT"
PRTXT "HELLO"
PRINTFEED
END
. . . . .
QQQ: LED 0 OFF:LED 1 ON
FOR A%=1 TO 3
SOUND 440,50
SOUND 359,50
NEXT A%
RESUME NEXT
IMMEDIATE ON
Intermec Fingerprint v7.61 – Programmer’s Reference Manual Ed. 7
177
Chapter 2
Program Instructions
ON GOSUB
Field of Application
Statement for conditional branching to one of several subroutines.
Syntax
ON<nexp>GOSUB<ncon>|<line label>[,<ncon>|<line label>...]
<nexp>
is a numeric expression that determines which line the
program should branch to.
<ncon>/<line label>
is the number or label of the line, or list of lines, to which
the program should branch.
Remarks
This statement is closely related to the ON GOTO statement. The
numeric expression may result in any positive value. The expression
is truncated to an integer value before the statement is executed. If the
resulting value is negative, 0, or larger than the number of subroutines,
the statement will be ignored.
The value of the numeric expression determines which of the subroutines
the program should branch to. For example, if the the value of the
numeric expression is 2, the program will branch to the second subroutine
in the list.
Examples
In this example, different texts will be printed on the screen depending on
which of the keys 1-3 you press on the keyboard of the host.
10
20
30
1000
1010
2000
2010
3000
3010
INPUT "PRESS KEY 1-3 ", A%
ON A% GOSUB 1000,2000,3000
END
PRINT "You have pressed key 1"
RETURN
PRINT "You have pressed key 2"
RETURN
PRINT "You have pressed key 3"
RETURN
The same example written without line numbers would look like this:
IMMEDIATE OFF
INPUT "PRESS KEY 1-3 ", A%
ON A% GOSUB QQQ,WWW,ZZZ
END
QQQ: PRINT "You have pressed key 1"
RETURN
WWW: PRINT "You have pressed key 2"
RETURN
ZZZ: PRINT "You have pressed key 3"
RETURN
IMMEDIATE ON
178
Intermec Fingerprint v7.61 – Programmer’s Reference Manual Ed. 7
Chapter 2 Program Instructions
ON GOTO
Field of Application
Statement for conditional branching to one of several lines.
Syntax
ON<nexp>GOTO<ncon>|<line label>[,<ncon>|<line label>...]
<nexp>
is a numeric expression that determines which line the
program should branch to.
<ncon>/<line label>
is the number or label of the line, or list of lines, to which
the program should branch.
Remarks
This statement is closely related to the ON GOSUB statement. The
nu1meric expression may result in any positive value. The expression
is truncated to an integer value before the statement is executed. If the
resulting value is negative, 0, or larger than the number of lines, the
statement will be ignored.
The value of the numeric expression determines which of the lines the program
should branch to. For example, if the the value of the numeric expression is 2,
the program will branch to the second line in the list.
Examples
In this example, different texts will be printed on the screen depending on
which of the keys 1-3 you press on the keyboard of the host.
10
20
30
1000
1010
2000
2010
3000
3010
INPUT "PRESS KEY 1-3 ", A%
ON A% GOTO 1000,2000,3000
END
PRINT "You have pressed key 1"
GOTO 30
PRINT "You have pressed key 2"
GOTO 30
PRINT "You have pressed key 3"
GOTO 30
The same example written without line numbers would look like this:
IMMEDIATE OFF
INPUT "PRESS KEY 1-3 ", A%
ON A% GOSUB QQQ,WWW,ZZZ
YYY: END
QQQ: PRINT "You have pressed key 1"
GOTO YYY
WWW: PRINT "You have pressed key 2"
GOTO YYY
ZZZ: PRINT "You have pressed key 3"
GOTO YYY
IMMEDIATE ON
Intermec Fingerprint v7.61 – Programmer’s Reference Manual Ed. 7
179
Chapter 2
Program Instructions
ON HTTP GOTO
Field of Application
Statement for branching to a subroutine when a request for an
application CGI is received.
Syntax
ON↔HTTP↔GOTO<ncon>|<line label>
<ncon>/<line label>
is the number or label of the line to which the program will
branch when the CGI request is received.
Remarks
This statement is used in connection with EasyLAN 100i and defines a
Fingerprint subroutine that handles the CGI-request. Setting the handler’s
line number or line label to 0 disables the handler.
When a request for an application CGI is received, the current execution point
will be pushed on to the stack and then the execution will commence in the
handler with stdin and stdout redirected from/to the Web browser.
Related instruction: RESUME HTTP.
180
Intermec Fingerprint v7.61 – Programmer’s Reference Manual Ed. 7
Chapter 2 Program Instructions
ON KEY GOSUB
Field of Application
Statement for branching to a subroutine when a specified key on the
printer’s front panel is activated.
Syntax
ON↔KEY(<nexp>)GOSUB<ncon>|<line label>
<nexp>
is the id. number of one of the keys on the printer’s front
panel (see illustration below).
<ncon>/<line label>
is the number or label of the line to which the program will
branch when the specified key is pressed down.
Remarks
All Intermec Fingerprint v7.xx-compatible printer models are fitted with a
membrane-switch keyboard. Each key can be enabled individually using its
id. number in a KEY ON statement. Then the key can be assigned, alone or in
combination with the <Shift> key, to make the program branch to a subroutine
using an ON KEY... GOSUB statement. The <Shift> key adds 100 to the
unshifted id. number of each key, as illustrated below.
Note the difference between the id. numbers of the keys and the ASCII values
they are able to produce (see for example BREAK).
Note that BREAK takes precedence over any ON KEY statement,
provided that break interrupt is not disabled for the "console:" by a
BREAK 0 OFF statement.
Intermec Fingerprint v7.61 – Programmer’s Reference Manual Ed. 7
181
Chapter 2
Program Instructions
ON KEY GOSUB, cont.
Remarks, cont.
182
Intermec Fingerprint v7.61 – Programmer’s Reference Manual Ed. 7
Chapter 2 Program Instructions
ON KEY GOSUB, cont.
Examples
This example illustrates how activating the F1 key (id. No. 10) will make the
program branch to a subroutine, which contains the PRINTFEED statement.
Note line 30 where the execution will wait for the key to be pressed.
10
20
30
.....
.....
.....
1000
1010
1020
1030
1040
RUN
ON KEY (10) GOSUB 1000
KEY (10) ON
GOTO 30
FONT "Swiss 721 BT"
PRPOS 30,100
PRTXT "HELLO"
PRINTFEED
END
The same example can be written without line numbers this way:
IMMEDIATE OFF
ON KEY (10) GOSUB QQQ
KEY (10) ON
WWW: GOTO WWW
.....
.....
.....
QQQ: FONT "Swiss 721 BT"
PRPOS 30,100
PRTXT "HELLO"
PRINTFEED
END
IMMEDIATE ON
RUN
Intermec Fingerprint v7.61 – Programmer’s Reference Manual Ed. 7
183
Chapter 2
Program Instructions
ON/OFF LINE
Field of Application
Statement controlling the SELECT signal on the "centronics:"
communication channel.
Syntax
ON|OFF↔LINE<nexp>
<nexp>
specifies the communication channel:
4 = "centronics:"
6 = "usb1:"
Remarks
Pin 13 in the Centronics/IEEE 1284 interface connector contains the
SELECT signal:
• ON LINE 4 sets the SELECT signal high.
• OFF LINE 4 sets the SELECT signal low.
If no ON/OFF LINE statement is issued, the SELECT signal will be high,
that is the Centronics channel will be ON LINE.
ON LINE/OFF LINE for the serial channel "usb1:" is implemented according
to USB Device Class for Printing Devices v1.09, January 2000.
Example
In this example, the "centronics:" communication channel is disabled,
while a new setup is performed on the printer by means of a setup
file, and then enabled:
10
OFF LINE 4
20
SETUP "New Setup.SYS"
30
ON LINE 4
. . . . .
. . . . .
. . . . .
184
Intermec Fingerprint v7.61 – Programmer’s Reference Manual Ed. 7
Chapter 2 Program Instructions
OPEN
Field of Application
Statement for opening a file or device–or creating a new file–for
input, output, or append, allocating a buffer, and specifying the
mode of access.
Syntax
OPEN<sexp>[FOR↔<INPUT|OUTPUT|APPEND>↔]AS [#]<nexp1>[LEN=<nexp2>]
<sexp>
is the file or device to be opened, of the file to becreated. File
names must not contain any colon character (:).
#
indicates that whatever follows is a number. Optional.
<nexp1>
is a designation number for the OPENed file or device.
<nexp2>
is, optionally, the length of the record in bytes (default
128 bytes).
Remarks
An OPEN statement must be executed before a file or device can be used
for input, output, and/or append. A maximum of 25 files and/or devices
can be open at the same time.
Sequential Access Mode:
The access mode can optionally be specified as sequential INPUT,
OUTPUT, or APPEND:
INPUT
Sequential input from the file/device, replacing existing
data. Existing files/devices only.
OUTPUT
Sequential output to the file/device, replacing existing
data.
APPEND
Sequential output to the file/device, where new data will
be appended without replacing existing data.
Random Access Mode:
If no access mode is specified in the statement, the file/device is opened
for both input and output (RANDOM access mode). FIELD, LSET,
RSET, PUT, and GET can only be used on records in files OPENed in
the RANDOM access mode.
Please refer to the DEVICES statement for information on which devices
can be opened for the different modes of access.
Lists of the files stored in the various parts of your printer’s memory can be
obtained by the use of the FILES statements.
Electronic Keys:
Each key circuit may contain a number of “key items.” There are two
types of key items:
• Lock
(device "lock:")
• Storage
(device "storage:")
Each key item has a file name consisting of max. 4 characters, usually
appended by a password. The password consists of a delimiter character
(?) indicating the password followed by the actual password (max. 4
characters). Failure to include the correct password (if such is required) in
the file name will result in an error.
Intermec Fingerprint v7.61 – Programmer’s Reference Manual Ed. 7
185
Chapter 2
Program Instructions
OPEN, cont.
Examples
Allow sequential output to the printer’s display using the OPEN statement
this way:
10
20
30
40
RUN
OPEN "console:" FOR OUTPUT AS #1
PRINT#1:PRINT#1
PRINT#1, "GONE TO LUNCH"
PRINT#1, "BACK SOON";
The text will appear on the printer’s display as:
GONE TO LUNCH
BACK SOON
Open the file "PRICELIST" for random access with the reference number
#8 and a record length of 254 bytes:
10
OPEN "PRICELIST" AS #8 LEN=254
Open the file "ADDRESSES" for sequential input with the reference number
#4 and a record length of 128 bytes.
10
OPEN "ADDRESSES" FOR INPUT AS #4
This example shows how a few lines can be added to a program to make it
possible to unlock it using an electronic key:
10
20
30
.....
.....
.....
80000
90000
90010
186
OPEN "lock:LCK1?PAS1" FOR INPUT AS #1
INPUT#1, A$
IF A$ AND 1 <>1 THEN GOTO 90000
CLOSE #1
PRINT "Access to program denied!"
END
Intermec Fingerprint v7.61 – Programmer’s Reference Manual Ed. 7
Chapter 2 Program Instructions
OPTIMIZE BATCH ON/OFF
Field of Application
Statement for enabling/disabling optimizing for batch printing.
Syntax
OPTIMIZE "BATCH"↔ON|OFF
ON|OFF
enables/disables optimizing respectively.
Default:
Disabled (OFF)
Remarks
This facility is intended to speed up batch printing, which means the
uninterrupted printing of large numbers of identical or very similar labels.
OPTIMIZE BATCH is not recommended for the printing of labels with
frequently varying content.
The program execution will not wait for the printing of the label to be
completed, but proceeds executing next label image into the other of the two
image buffers as soon as possible.
By default, OPTIMIZE BATCH is disabled (OFF). However, if the following
conditions are all fulfilled, the OPTIMIZE BATCH is automatically
enabled (ON):
- A value larger than 1 has been entered for the PRINTFEED statement.
- LTS& OFF
(default)
- CUT OFF
(default)
Examples
Run these two examples and watch the differences in the printer’s
performance:
10
20
30
40
50
60
70
RUN
OPTIMIZE "BATCH" ON
FOR I%=1 TO 10
PRTXT I%
PRINT "Before printfeed"
PRINTFEED
PRINT "After printfeed"
NEXT
10
20
30
40
50
60
70
RUN
OPTIMIZE "BATCH" OFF
FOR I%=1 TO 10
PRTXT I%
PRINT "Before printfeed"
PRINTFEED
PRINT "After printfeed"
NEXT
Intermec Fingerprint v7.61 – Programmer’s Reference Manual Ed. 7
187
Chapter 2
Program Instructions
PORTIN
Field of Application
Function reading the status of a port on an Industrial Interface Board.
Syntax
PORTIN(<nexp>)
<nexp>
Remarks
is the number of the port to be read:
IN ports (optical):
101-108
OUT ports (relay):
201-204
OUT ports (optical):
221-228
This function works with the Industrial Interface Board and is able to read
the status of 8 IN ports with optocouplers, 8 OUT ports with optocouplers,
and 4 OUT ports with relays. For information on how to set the OUT ports,
please refer to the PORTOUT statement.
A current can be lead through an optocoupler in each IN port:
• If the current is on, the PORTIN function returns the value -1 (true).
• If the current is off, the PORTIN function returns the value 0 (false).
This feature is intended to allow the execution of the Intermec Fingerprint
to be controlled by various types of external sensors or non-digital
switches.
The status of the OUT ports, as set by PORTOUT statements, can also
be read by PORTIN functions.
Please refer to the documentation of the Industrial Interface Board for
more information.
Example
The status of IN port 101 on an Industrial Interface Board decides
when a label is to be printed. The printing will be held until the current
is switched off:
10
20
30
40
50
188
FONT "Swiss 721 BT"
PRTXT "POWER IS OFF"
IF PORTIN (101) THEN GOTO 30
PRINTFEED
END
Intermec Fingerprint v7.61 – Programmer’s Reference Manual Ed. 7
Chapter 2 Program Instructions
PORTOUT ON/OFF
Field of Application
Statement for setting one of four relay port or one of eight optical ports
on an Industrial Interface Board to either on or off.
Syntax
PORTOUT (<nexp>) ON|OFF
<nexp>
is the number of the port to be set:
OUT ports (relay):
201-204
OUT ports (optical):
221-228
Remarks
This statement works with the Industrial Interface Board and is able to
control 8 IN ports with optocouplers, 8 OUT ports with optocouplers, and
4 OUT ports with relays. For information on how to read the status of the
various ports, please refer to the PORTIN function.
This feature is intended to allow the execution of the Intermec Fingerprint
program to control various external units like gates, lamps, or conveyor
belts.
Please refer to the documentation of the Industrial Interface Board for
more information.
Example
The relay of OUT port 201 on an Industrial Interface Board is Opened
and then Closed like this:
. . .
. . .
1000
. . .
. . .
2000
. . .
. . .
. .
. .
PORTOUT (201) ON
. .
. .
PORTOUT (201) OFF
. .
. .
Intermec Fingerprint v7.61 – Programmer’s Reference Manual Ed. 7
189
Chapter 2
Program Instructions
PRBAR (PB)
Field of Application
Statement for providing input data to a bar code.
Syntax
PRBAR|PB<<sexp>|<nexp>>
<<sexp>|<nexp>>
is the input data to the bar code generator.
Remarks
The bar code must be defined by BARSET, BARTYPE, BARRATIO,
BARHEIGHT, BARMAG, BARFONT, and/or BARFONT ON/OFF
statements, or by the corresponding default values.
Make sure that the type of input data (numeric or string) and the number
of characters agree with the specification for the selected bar code type.
Information on some of the most commonly used bar codes are provided
at the end of this manual.
Example
Two different bar codes, one with numeric input data and one with string
input data, can be generated this way. The input data could also have been
entered in the form of variables:
10
20
30
40
50
60
70
80
90
RUN
190
BARFONT "Swiss 721 BT", 8 ON
PRPOS 50,400
ALIGN 7
BARSET "INT2OF5",2,1,3,120
PRBAR 45673
PRPOS 50,200
BARSET "CODE39",3,1,2,100
PRBAR "ABC"
PRINTFEED
Intermec Fingerprint v7.61 – Programmer’s Reference Manual Ed. 7
Chapter 2 Program Instructions
PRBOX (PX)
Field of Application
Statement for creating a box, optionally containing a single text line or
a frame of mulitiple hyphenated text lines.
Syntax
PRBOX|PX<nexp1>,<nexp2>,<nexp3>
[,<sexp1>[,<nexp4>[,<nexp5>[,<sexp2>[,<sexp3>]]]]]
<nexp1>
is the height of the box in dots (1-6000).
<nexp2>
is the width of the box in dots (1-6000).
<nexp3>
is the line weight in dots (0/1-6000).
<sexp1>
is the framed text to be written inside the box (max. 300
char./line, max. 20 lines). Single-byte fonts only.
<nexp4>
is the horizontal distance between inner edge of the box line
and the text frame (-100 to 100 dots). Default: 0.
<nexp5>
is the vertical distance between the inner edge of the box line
and text frame and also between each line of text in the frame
(-100 to 100 dots). Default: Same value as <nexp4>.
<sexp2>
is a line delimiter (max. 9 characters), which replaces the
default delimiter string CHR$(10) or CHR$(13). Each time
this delimiter is encountered in the text string (<sexp1>, the
rest of the text is wrapped to the next line.
<sexp3>
is a control string for hyphen delimiter and replacement,
see Remarks.
Remarks
This statement has two purposes: to create a rectangular white box surrounded
by a line with a certain thickness, or to specify a text frame that can contain
up to 20 lines of hyphenated text. These two purposes can be combined so
a text frame is surrounded by a black box.
Creating a simple box:
In this case you only need to specify the first three parameters, that is
height, width, and line weight (thickness). The box will be drawn with
its anchor point (see ALIGN) at the insertion point, as specified by the
nearest preceding PRPOS statement. A box can be aligned left, right,
or center along its baseline.
The print direction specifies how the box is rotated in relation to its
anchor point.
The line weight (thickness) grows inward from the anchor point. The heavier
the line, the less white area inside the box. Thus, it is possible to create
a black area using a box with very heavy lines. For a simple box without
any text field, the line weight must be >0. The white area inside a box
can be used for printing. Boxes, lines, and text may cross (also see
XORMODE ON/OFF).
Intermec Fingerprint v7.61 – Programmer’s Reference Manual Ed. 7
191
Chapter 2
Program Instructions
PRBOX, cont.
Remarks, cont.
Creating a simple box, cont.
The illustration below shows how the height and width of the box are
defined for different print directions.
Creating a multiline text field
The PRBOX statement can also be used to create an area in which a field
of wrapped and hyphenated text can be printed. As opposed to the PRTXT
statement, there is no need to specify each line of text separately. The text
field can be framed by the box (line weight > 0), or the box can be invisible
(line weight = 0). The maximum number of characters on each line is 300
and the maximum number of lines is 20.
The position of the text frame inside the box is affected by the direction (see
DIR statement), the alignment (see ALIGN statement), and by two parameters
in the PRBOX statement (<nexp4> and <nexp5>.
The direction rotates the box with its text field around the anchor point as
specified by the alignment. The alignment specifies the anchor point of the box
itself as left-, right-, or center-aligned (see ALIGN), and at the the same time
also decides how the field will be aligned inside the box (9 possible positions)
and if the text lines will be left, right, or center justified.
In the following description, horizontal and vertical should be understood
in relation to how the text is printed. (That means that in directions 2
and 4, horizontal and vertical have opposite meanings than in directions
1 and 3).
The horizontal distance between the inner edge of the box line and the
borders of the text field is specified by <nexp4>:
- In case of ALIGN 1, 4, or 7, it decides the distance between the inner edge
of the left side box line and the left-hand edge of the text field.
- In case of ALIGN 3, 6, or 9, it decides the distance between the inner edge
of the right side box line and the right-hand edge of the text field.
- In case of ALIGN 2, 5, or 8, this parameter has no consequence.
192
Intermec Fingerprint v7.61 – Programmer’s Reference Manual Ed. 7
Chapter 2 Program Instructions
PRBOX, cont.
Remarks, cont.
Creating a multiline text field, cont.
The vertical distance between the inner edge of the box line and the borders of
the text field as well as the empty vertical space between the character cells of
two adjacent lines (line spacing) is specified by <nexp5>:
- In case of ALIGN 1, 2, or 3, it decides the distance between the inner
edge of the bottom box line and the bottom edge of the text field
as well as line spacing.
- In case of ALIGN 7, 8, or 9, it decides the distance between the inner
edge of the right side box line and the right-hand edge of the text
field as well as line spacing.
- In case of ALIGN 4, 5, or 6, this parameter only decides the line
spacing.
See the illustration on next page for examples of how the alignment affects
the location of multi-line text.
If the text in <sexp1> is entered as a continuous string of characters without any
spaces, linefeeds, or carriage returns, the text will wrap to the next line when
there is no room left for any more characters on a line.
If any combination of a carriage return (CR = ASCII 13 dec,) and a
linefeed (LF = ASCII 10 dec.) is encountered, the remaining text will be
wrapped once to the next line.
Space characters (ASCII 32 dec.) will also initiate a line wrap. If there
are more than one space character, the wrapping will be at the last one
that fits into the line in question.
It is possible to replace the default line delimiters (CR, LF, and CR/LF) with
some other line delimiter specified in a string of max. 9 characters (<sexp2>).
This delimiter will not be printed, even if it is a printable character. Each time
the delimiter is encountered, the text will wrap to a new line.
Hyphenation Support
In <sexp3> you can modify the way hyphenation will be performed using a
special syntax described later on.
You can put “invisible” hyphen delimiters in the text string at suitable
wrap-around positions. The delimiter is by default a hyphen sign (ASCII 45
dec.). However, you can use a string of any characters up to nine characters
long instead, but be careful so it will not be confused with the text. If a
wrap-around is performed, the corresponding hyphen delimiter will by
default be printed as a hyphen sign (ASCII 45 dec.), whereas hyphen
delimiters not used for wrap-around will not be printed.
If you for some reason would like to print some other character(s) than
hyphens, you can specify a string of hyphen replacement characters. It is
possible to use a string up to nine characters long, but the shorter the string
the lesser risk that a line will wrap outside the box.
If you have a text string with long words and for some reason have not
inserted all necessary line delimiters, a line-wrap may occur unexpectedly
in a word. You can specify a hyphen delimeters for this case as well. By
default, there is no such delimeter.
Intermec Fingerprint v7.61 – Programmer’s Reference Manual Ed. 7
193
Chapter 2
Program Instructions
PRBOX, cont.
Remarks, cont.
<nexp 5>
and now comes line 3
followed by No. 4.
ALIGN 7
This is line number 1
<nexp 4>
and this is line 2
and now comes line 3
followed by No. 4.
ALIGN 8
followed by No. 4.
ALIGN 9
This is line number 1
This is line number 1
<nexp 5>
<nexp 5>
and this is line 2
and this is line 2
and now comes line 3
followed by No. 4.
ALIGN 4
This is line number 1
and this is line 2
and now comes line 3
followed by No. 4.
ALIGN 1
followed by No. 4.
followed by No. 4.
ALIGN 5
ALIGN 6
This is line number 1
<nexp 5>
and this is line 2
and now comes line 3
followed by No. 4.
<nexp 5>
<nexp 5>
and now comes line 3
and now comes line 3
<nexp 5>
<nexp 4>
and this is line 2
and now comes line 3
<nexp 5>
194
<nexp 5>
and this is line 2
ALIGN 2
<nexp 4>
<nexp 5>
and this is line 2
<nexp 5>
This is line number 1
<nexp 4>
<nexp 5>
This is line number 1
This is line number 1
<nexp 5>
and this is line 2
and now comes line 3
<nexp 4>
<nexp 4>
<nexp 5>
This is line number 1
followed by No. 4.
<nexp 5>
ALIGN 3
Intermec Fingerprint v7.61 – Programmer’s Reference Manual Ed. 7
Chapter 2 Program Instructions
PRBOX, cont.
Remarks, cont.
Hyphenation Support, cont.
Specify the parameter <sexp3> in PRBOX using the following syntax:
<sexp3>=<sexp3a>[space<sexp3b>[space<sexp3c>]]
<sexp3a>
is a soft hyphen delimiter. If the text does not have enough
room on one line, the rest of the text will be wrapped
from the last space or from the position marked by the
soft hyphen delimiter.
Exception: Two adjacent soft hyphen delimiters revoke
each other.
Default: Normal hyphen (-).
Max length: 9 characters.
space
is a string delimiter with the value CHR$(32).
<sexp3b>
is one or more characters, that will be printed at the end of
a line which has been hyphenated according to a hyphen
delimiter (see <sexp3a>).
Default: Normal hyphen (-).
Max length: 9 characters (less is preferred).
<sexp3c>
is a string of hyphen extension characters, used on single
words which are too long to be printed on one line and have no
hyphen delimiter specified.The hyphen extension character(s)
will be printed at the right end of line and the remainder of
the word will be printed on the next line.
Default: No character.
Max length: 9 characters.
If no <sexp3> is specified, the rule for hyphen delimiter and replacement
will be the same as for printing hyphens in text. Two adjacent hyphens
will be printed as one.
Examples
This examples draws a rectangle without any text:
10
20
30
RUN
PRPOS 50,50
PRBOX 200,400,5
PRINTFEED
Intermec Fingerprint v7.61 – Programmer’s Reference Manual Ed. 7
195
Chapter 2
Program Instructions
PRBOX, cont.
Examples, cont.
This program illustrates a multi-line text field with line wrap, where “&S”
is the soft hyphen delimiter:
10
20
30
40
50
60
70
80
90
RUN
196
DIR 1
ALIGN 8
R$="Hyphen&Sated words will be divid&Sed
into sylla&Sbles."
NL$="NEWLINE"
S$="&S&Special Cases and EXTRAORDINARY long
words."
T$=R$+NL$+S$
PRPOS 300,300
PRBOX 700,500,20,T$,25,1,NL$,"&S - +"
PRINTFEED
Intermec Fingerprint v7.61 – Programmer’s Reference Manual Ed. 7
Chapter 2 Program Instructions
PRBUF
Field of Application
Statement for receiving and printing bitmap image data using the
PRBUF protocol.
Syntax
PRBUF<nexp1>[,<nexp2]<new line><image data>
<nexp1>
is the number of bytes of the image in PRBUF protocol.
<nexp2>
is, optionally, a timeout between characters in TICKS (0.01
sec). Default ≈ 12.7 sec./character.
<new line>
is any combination of CR, CR/LF, or LF.
<image data>
is the image according to the PRBUF protocol.
Remarks
This statement is useful for receiving and printing bitmap images from, for
example, a Windows printer driver. It is more effective and requires less
memory than using a STORE IMAGE...PRIMAGE sequence. The bitmap
image is printed directly and is not saved anywhere in the printer’s memory
after the image buffer has been cleared.
At the PRBUF statement, the printer waits for image data to be received on
the standard IN channel. PRBUF only works with binary transfers, that is
XON/XOFF must be disabled. You can optionally set a timeout between
characters (default 12.7 sec.) When the specified number of bytes according
to the PRBUF protocol have been received, the image data are processed
directly into the printer’s image buffer and printed without requiring any
more Fingerprint instructions.
PRBUF does not work if <nexp1> bytes cannot be allocated. If memory is low,
it is possible to download the bitmap image in two or more blocks.
The field settings (alignment, clipping, direction, xor mode, inverse image,
magnification, x-position, and y-position) are handled by the current protocol,
but the basic rule is that x- and y-positions, field clipping, and xor mode are
handled and the other attributes are ignored.
If PRPOS x,y, then the real print position will be PRPOS x,y+1.
The PRBUF protocol is decribed in Chapter 3, “Image Transfer.”
The <newline> is not part of the statement, but any combination of carriage
return (ASCII 13 dec,) and/or linefeed (ASCII 10 dec.) is allowed without
interfering with the PRBUF protocol.
Example
This example shows how the printer is instructed to receive and print 1,424
bytes of image data according to the PRBUF protocol:
PRBUF 1424 ↵
<binary image data>
Intermec Fingerprint v7.61 – Programmer’s Reference Manual Ed. 7
197
Chapter 2
Program Instructions
PRIMAGE (PM)
Field of Application
Statement for selecting an image stored in the printer’s memory.
Syntax
PRIMAGE|PM<sexp>
<sexp>
is the full name of the desired image including extension.
Remarks
An image is positioned according to the preceding PRPOS, DIR, and ALIGN
statements. It can be magnified by means of a MAG statement.
For the best printout quality, create and download a larger version of the
image rather than magnifying a smaller one.
All images provided by Intermec have an extension which indicates for
which directions the image is intended:
• Extension .1 indicates print directions 1 & 3.
• Extension .2 indicates print directions 2 & 4.
Even if the Intermec Fingerprint firmware does not require such an extension,
we strongly recommend you to follow the same convention when creating
your own images as to make it easier to select the correct image.
Example
This example illustrates the printing of a label containing an image
printed “upside down”:
10
20
30
40
50
RUN
198
PRPOS 200,200
DIR 3
ALIGN 5
PRIMAGE "GLOBE.1"
PRINTFEED
Intermec Fingerprint v7.61 – Programmer’s Reference Manual Ed. 7
Chapter 2 Program Instructions
PRINT (?)
Field of Application
Statement for printing data to the standard OUT channel.
Syntax
PRINT|?[<<nexp>|<sexp>>[<,|;><<nexp>|<sexp>>...][;]]
<<nexp>|<sexp>>
are string or numeric expressions, which will be printed to
the standard OUT channel.
Remarks
If no expressions are specified after the PRINT statement, it will yield a
blank line. If one or more expressions are listed, the expression(s) will
be processed and the resulting values will be presented on standard OUT
channel (see SETSTDIO statement), for example usually on the screen of the
host. The shorthand form of PRINT is a question mark.
Do not confuse the PRINT statement with the PRINTFEED statement.
Each line is divided into zones of 10 character positions each. These zones
can be used for positioning the values:
• A comma sign (,) between the expressions causes next value to be printed
at the beginning of next zone.
• A semicolon sign (;) between the expressions causes next value to be
printed immediately after the last value.
• A plus sign (+) between two string expressions also causes next value to
be printed immediately after the last value. (Plus signs cannot be used
between numeric expressions.)
• If the list of expressions is terminated by a semicolon, the next PRINT
statement will be added on the same line. Otherwise, a carriage
return is performed at the end of the line. If the printed line is wider
than the screen, the software will automatically wrap to a new line
and go on printing.
Printed numbers are always followed by a space character.
Printed negative numbers are preceded by a minus sign.
Example
10
20
30
40
50
60
RUN
LET X%=10
LET A$="A"
PRINT X%;X%+1,X%+5;X%-25
PRINT A$+A$;A$,A$
PRINT X%;
? "PIECES"
yields:
10 11
15 -15
AAA
A
10 PIECES
Intermec Fingerprint v7.61 – Programmer’s Reference Manual Ed. 7
199
Chapter 2
Program Instructions
PRINT KEY ON/OFF
Field of Application
Statement for enabling or disabling printing of a label by pressing
the Print key.
Syntax
PRINT KEY ON|OFF
Default:
Remarks
PRINT KEY OFF
In the Immediate Mode and in the Intermec Direct Protocol, the <Print>
key can be enabled to issue printing commands, corresponding to
PRINTFEED statements. This implies that each time the <Print> key
is pressed, one single label, ticket, tag, or portion of continuous stock
will be printed and fed out.
Note that this statement cannot be entered in the Programming Mode (use
KEY ON and ON KEY GOSUB statements instead).
Example
This example shows how the Print key is enabled in the Intermec Direct
Protocol and a label is printed (abbreviated instructions are used
whenever available):
INPUT ON ↵
PRINT KEY ON ↵
PP 100,100 ↵
FT "Swiss 721 BT" ↵
PT "TEST LABEL" ↵
<Press Print Key>
INPUT OFF ↵
200
Intermec Fingerprint v7.61 – Programmer’s Reference Manual Ed. 7
Chapter 2 Program Instructions
PRINT#
Field of Application
Statement for printing data to a specified OPENed device or
sequential file.
Syntax
PRINT#<nexp1>[,<<nexp2>|<sexp1>>[<,|;><<nexp3>|<sexp2>>...][;]]
<nexp1>
is the number assigned to the file or device when it was
OPENed.
<<nexp2-n>|<sexp1-n>> are the string or numeric expressions, which will be printed
to the specified file or device.
Remarks
Expressions can be separated by commas or semicolons according to the
same rules as for the PRINT statement. It is important that the expressions are
separated properly, so they can be read back when needed, or be presented
correctly on the printer’s LCD display.
PRINT# can only be used to print to sequential files, not to random files.
When sending data to the printer’s display ("console:"), PRINT# will
work same way as PRINT does on the standard OUT channel. The display
can for example be cleared by sending PRINT#<nexp> twice (see line
20 in the example below).
Example
The display on the printer’s keyboard console is able to show two lines with
16 characters each. Before sending any text, the device must be OPENed
(line 10) and both lines on the display must be cleared (line 20). Note the
trailing semicolon on line 40!
10
20
30
40
50
RUN
OPEN "console:" FOR OUTPUT AS #1
PRINT# 1:PRINT# 1
PRINT# 1,"OUT OF LABELS"
PRINT# 1,"PLEASE RELOAD!";
CLOSE# 1
Since the last line was appended by a semicolon, there will be no carriage
return and the text will appear on both line on the printer’s display as:
OUT OF LABELS
PLEASE RELOAD!
An alternative method is to send all the data to the display in a single
PRINT# statement. Character No. 1-16 will be displayed on the upper
line and character No. 17-33 will be displayed on the lower line, whereas
character No. 17 will be ignored. Note the trailing semicolon on line 30! (The
double-headed arrows in line 30 represent space characters.)
10
20
30
40
RUN
OPEN "console:" FOR OUTPUT AS #1
PRINT# 1: PRINT# 1
PRINT# 1,"OUT↔OF↔LABELS↔↔↔↔PLEASE↔RELOAD!";
CLOSE# 1
Intermec Fingerprint v7.61 – Programmer’s Reference Manual Ed. 7
201
Chapter 2
Program Instructions
PRINTFEED (PF)
Field of Application
Statement for printing and feeding out one or a specified number of labels,
tickets, tags, or portions of strip, according to the printer’s setup.
Syntax
PRINTFEED|PF [<nexp1>] | [-1,<nexp2>]
<nexp1>
specifies number of copies to be printed.
-1,<nexp2>
specifies that <nexp2> number of identical copies of the
last printed label should be reprinted (cannot be used with
Intermec Direct Protocol).
Remarks
Each time a PRINTFEED statement without any appending value is
executed, one new label, ticket, tag, or portion of continuous stock
will be printed.
The PRINTFEED statement can optionally be appended by a numeric
expression, which specifies the number of copies to be printed. In the
Intermec Direct Protocol, possible counter, time, and date values will
be updated between copies printed using a predefined layout. Note that
you must never include any PRINTFEED statements in layouts in the
Intermec Direct Protocol.
If the number of copies is >1 and LTS& and CUT are disabled (= LTS&
OFF and CUT OFF), the BATCH optimizing strategy is automatically
enabled, which corresponds to an OPTIMIZE BATCH ON statement.
When theses conditions are no longer fulfilled, BATCH optimizing
strategy is automatically disabled, which corresponds to an OPTIMIZE
BATCH OFF statement.
It is also possible to reprint a specified number of copies of the last printed label,
for example after an out-of-media condition (also see PRSTAT).
The execution of a PRINTFEED statement clears the following statements
to their default values:
ALIGN
BARRATIO
INVIMAGE
BARFONT
BARTYPE
MAG
BARFONT ON/OFF
BARSET
PRPOS
BARHEIGHT
DIR
XORMODE ON
BARMAG
FONT
Fields defined by statements, that have been executed before the PRINTFEED
statement, are not affected. Note that, when using a PRINTFEED in
a loop, all formatting parameters are reset to default each time the
PRINTFEED statement is executed and must therefore be included
inside the loop.
The length of media to be fed out at execution of a PRINTFEED statement
is decided by the choice of media type in the printer’s setup (label w gaps,
ticket w gaps, fix length strip, or var length strip) and globally by the start and
stop adjustment setup (positive or negative). Please refer to the Installation
& Operation manual for more information. The length of media to be
fed out after a PRINTFEED can be further modified by an additional
positive or negative FORMFEED statement, either before or after the
PRINTFEED statement.
202
Intermec Fingerprint v7.61 – Programmer’s Reference Manual Ed. 7
Chapter 2 Program Instructions
PRINTFEED (PF), cont.
Examples
Printing a single label with one line of text:
10
20
30
RUN
FONT "Swiss 721 BT"
PRTXT "Hello!"
PRINTFEED
Printing five identical labels with one line of text:
10
20
30
RUN
FONT "Swiss 721 BT"
PRTXT "Hello!"
PRINTFEED 5
Printing five labels using a FOR...NEXT loop. Note that formatting
parameters are placed inside the loop:
10
20
30
40
50
60
70
80
RUN
FOR A%=1 TO 5
FONT "Swiss 721 BT"
PRPOS 200, 100
DIR 3
ALIGN 5
PRTXT "Hello!"
PRINTFEED
NEXT A%
Printing of five labels in the Intermec Direct Protocol, illustrating how
the TICKS value is updated between labels, provided a predefined layout
is used (1 TICK = 0.01 sec):
INPUT ON ↵
FORMAT INPUT "#","@","&" ↵
LAYOUT INPUT "tmp:LABEL1" ↵
FT "Swiss 721 BT" ↵
PP 100,100 ↵
PT TICKS ↵
PP 100,200 ↵
PT VAR1$ ↵
LAYOUT END ↵
LAYOUT RUN "tmp:LABEL1" ↵
#See how time flies&@ ↵
PF 5 ↵
INPUT OFF ↵
Intermec Fingerprint v7.61 – Programmer’s Reference Manual Ed. 7
203
Chapter 2
Program Instructions
PRINTONE
Field of Application
Statement for printing characters, specified by their ASCII values,
to the standard OUT channel.
Syntax
PRINTONE<nexp>[<,|;><nexp>...][;]
<nexp>
is the ASCII decimal value of a character, which will be printed
to the standard OUT channel.
Remarks
When, for some reason, certain characters cannot be produced by the host
computer, they can be substituted by the corresponding ASCII decimal values
using the PRINTONE statement. The characters will be printed, according
to the currently selected character set (see NASC statement), to the standard
OUT channel, that is usually to the screen of the host.
PRINTONE is very similar to the PRINT statement and the use of commas
and semicolons follows the same rules.
Example
PRINTONE 80;82;73;67;69;58,36;52;57;46;57;53
yields:
PRICE:
204
$49.95
Intermec Fingerprint v7.61 – Programmer’s Reference Manual Ed. 7
Chapter 2 Program Instructions
PRINTONE#
Field of Application
Statement for printing characters specified by their ASCII values to
a device or sequential file.
Syntax
PRINTONE#<nexp1>[,<nexp2>[<,|;><nexp3>...][;]]
<nexp1>
is the number assigned to the file or device when it was
OPENed.
<nexp2-n>
is the ASCII decimal value of the character, which is to be
printed to the specified file or device.
Remarks
This statement is useful, when the host for some reason cannot produce
certain characters. The ASCII values entered will produce characters
according to the currently selected character set, see NASC. The ASCII
values can be separated by commas or semicolons according to the same
rules as for the PRINT# statement.
PRINTONE# can only be used to print to sequential files, not to
random files.
When sending data to the printer’s display, PRINTONE# will work in a way
similar to PRINT#. The display can be cleared by sending PRINT#<nexp>
twice (see line 20 in the example below).
Example
The display on the printer’s keyboard console is able to show two lines with 16
characters each. Before sending any text, the device must be OPENed and the
display be cleared. Note the trailing semicolon sign on line 40.
10
20
30
40
50
RUN
OPEN "console:" FOR OUTPUT AS #1
PRINT# 1:PRINT# 1
PRINTONE# 1,80;82;69;83;83
PRINTONE# 1,69;78;84;69;82;
CLOSE #1
Since the last line was appended by a semicolon, there will be no carriage
return and the text will appear on both line on the printer’s display as:
PRESS
ENTER
Intermec Fingerprint v7.61 – Programmer’s Reference Manual Ed. 7
205
Chapter 2
Program Instructions
PRLINE (PL)
Field of Application
Statement for creating a line.
Syntax
PRLINE|PL<nexp1>,<nexp2>
<nexp1>
is the length of the line in dots (max. 6000).
<nexp2>
is the line weight in dots (max. 6000).
Remarks
The line will be drawn from the insertion point and away according to the
nearest preceding DIR and ALIGN statements (that is the line runs in parallel
with any text printed in the selected direction).
A line can be ALIGNed left, right or center. The anchor points are situated
at the bottom of the line, which means that with an increasing line weight
(thickness), the line will the grow upward in relation to the selected direction.
In the illustration below, all lines are aligned left. Lines may cross (see
XORMODE ON/OFF statement).
Example
This example draws a 2.5 cm (1 inch) long and 10 dots thick line across the
media in a 12 dots/mm printer:
10
20
30
RUN
206
PRPOS 50,100
PRLINE 300,10
PRINTFEED
Intermec Fingerprint v7.61 – Programmer’s Reference Manual Ed. 7
Chapter 2 Program Instructions
PRPOS (PP)
Field of Application
Statement for specifying the insertion point for a line of text, a bar
code, an image, a box, or a line.
Syntax
PRPOS|PP<nexp1>,<nexp2>
<nexp1>
is the X-coordinate (number of dots from the origin).
<nexp2>
is the Y-coordinate (number of dots from the origin).
Default value:
0,0
Reset to default by:
PRINTFEED execution.
Remarks
When the printer is set up, a “print window” is created. This involves
specifying the location of the origin along the X-axis, setting the max.
print width along the X-axis from origin, and setting the max. print length
along the Y-axis from origin.
The X-coordinate goes across the media path and the Y-coordinate along
the media feed direction, as illustrated below. They are set in relation to the
origin on the printhead, not in relation to the media. Thus, the position where
an object actually will be printed depends on the relation between printhead
and media at the moment when the printing starts.
Intermec Fingerprint v7.61 – Programmer’s Reference Manual Ed. 7
207
Chapter 2
Program Instructions
PRPOS (PP), cont.
Remarks, cont.
The insertion point must be selected so the field in question will fit inside
the print window. This implies that the print direction, the size of the field
including “invisible” parts of for example an image, the alignment, and other
formatting instructions must be considered. A field that does not fit entirely
inside the print window will cause Error 1003, “Field out of label”, except
when a CLIP ON statement is issued.
To find out the present insertion point, use the PRSTAT function.
Examples
Programming and printing a line of text:
10
20
30
40
RUN
FONT "Swiss 721 BT"
PRPOS 30,200
PRTXT "HELLO"
PRINTFEED
Each text line is normally positioned separately by is own PRPOS statement.
If no position is given for a printable statement, it will be printed immediately
after the preceding printable statement.
10
20
30
40
50
RUN
FONT "Swiss 721 BT"
PRPOS 30,200
PRTXT "SUMMER"
PRTXT "TIME"
PRINTFEED
yields a label with the text:
SUMMERTIME
A program for fixed line-spacing of text may be composed this way (another
way is to use the extended PRBOX statement):
10
20
30
40
50
60
70
80
90
RUN
FONT"Swiss 721 BT"
X%=30:Y%=500
INPUT A$
PRPOS X%,Y%
PRTXT A$
Y%=Y%-50
IF Y%>=50 GOTO 30
PRINTFEED
END
Enter the text for each line after the question mark shown on the screen of the
host. The Y-coordinate will be decremented by 50 dots for each new line until it
reaches the value 50, which means that ten lines will be printed.
208
Intermec Fingerprint v7.61 – Programmer’s Reference Manual Ed. 7
Chapter 2 Program Instructions
PRSTAT
Field of Application
Function returning the printer’s current status or, optionally, the
current position of the insertion point.
Syntax
PRSTAT[(<nexp>)]
<nexp> = 1
<nexp> = 2
<nexp> = 3
<nexp> = 4
<nexp> =
<nexp> =
<nexp> =
<nexp> =
<nexp> =
<nexp> =
Remarks
5
6
7
8
9
10
returns the X-position for the insertion point at DIR 1&3.
returns the Y-position for the insertion point at DIR 2&4.
returns the X-position of the corner with the lowest coordinates
of the last object.
returns the Y-position of the corner with the lowest coordinates
of the last object.
returns the width along the X-axis of the last object.
returns the height along the Y-axis of the last object.
returns the print job identifier
returns the print job state (see table below).
returns the print job error.
returns the remaining number of copies to be printed in
a batch print job.
PRSTAT
Returns a numeric expression, which is the sum of the values given by
the following conditions, at the moment when the PRSTAT function
is executed:
- OK................................................................................................................. 0
- Printhead lifted ..............................................................................................1
- Label not removed (see note)......................................................................2
- Printer out of media ......................................................................................4
- Printer out of transfer ribbon (TTR) or ribbon installed (DT) ...................8
- Printhead voltage too high..........................................................................16
- Printer is feeding .........................................................................................32
Note: Always returns 0 in printers not fitted with a label taken sensor.
If two error conditions occur at the same time, for example the printhead
is lifted and the printer is out of media, the sum will be (1+4) = 5. Every
combination of errors will result in a unique sum. You can use it to branch to
a subroutine which notifies the operator, interrupts the program or whatever
you like. When checking for out-of-media conditions, the use of error
codes 1031 “Next label not found” and 1005 “Out of paper” gives more
reliable result (multiple checks).
PRSTAT(1) & PRSTAT(2)
The current position of the insertion point in regard of either the X or the Y
position can be returned, depending on the selected print direction. This is
useful for for example measuring the length of a text or a bar code.
PRSTAT(3)-PRSTAT(6)
These functions are used to return the position and size of the last object
regardless of RENDER ON/OFF. Their values are not updated by the
execution of a PRBUF statement.
Intermec Fingerprint v7.61 – Programmer’s Reference Manual Ed. 7
209
Chapter 2
Program Instructions
PRSTAT, cont.
Remarks, cont.
PRSTAT(7)-PRSTAT(10)
These functions are used to detect if a print job has been interrupted, so steps
can be taken to reprint missing copies (see PRINTFEED).
PRSTAT (7) returns a print job identifier that is automatically assigned
to the print job by the firmware.
PRSTAT (8) returns the state of the print job as a numeric expression, which is
the sum of the values given by the following conditions:
- Print cycle not set up for printing, perhaps due to out-of-ribbon............... 0
- The previous print cycle never ended (timeout).......................................... 1
- Print cycle has started ................................................................................... 2
- All lines successfully printed........................................................................ 4
- Printing truncated (media shorter than print image)................................... 8
- Printhead strobing error or label length exceeded..................................... 16
- Ribbon low .................................................................................................. 32
PRSTAT (8) = 6 or 22 indicates a sucessfully printed label (in the latter case
error “next label not found” may have been detected).
PRSTAT (9) returns the number of any print error that may have occurred
(see Chapter 7, “Error Messages).”
PRSTAT (10) returns the number of copies that remains to be printed in
an interrupted batch print job.
Examples
This examples shows how two error conditions are checked:
10
20
30
40
.....
1000
1010
RUN
A% = PRSTAT
IF A% AND 1 THEN GOSUB 1000
IF A% AND 4 THEN GOSUB 1010
END
PRINT "Printhead is lifted":RETURN
PRINT "Printer out of media":RETURN
This example illustrates how you can check the length of a text:
10
20
30
RUN
PRPOS 100,100: FONT "Swiss 721 BT"
PRTXT "ABCDEFGHIJKLM"
PRINT PRSTAT(1)
yields:
519
210
Intermec Fingerprint v7.61 – Programmer’s Reference Manual Ed. 7
Chapter 2 Program Instructions
PRTXT (PT)
Field of Application
Statement for providing the input data for a text field.
Syntax
PRTXT|PT<<nexp>|<sexp>>[;<<nexp>|<sexp>>...][;]
<<nexp>|<sexp>>
specifies one line of text (max. 300 characters)
Remarks
A text field consists of one line of text. The text field must be defined in
regard of FONT or FONTD and may be further defined and positioned by
DIR, ALIGN, MAG, PRPOS, INVIMAGE, or NORIMAGE statements or
their respective default values.
Two or more expressions can be combined to form a text line. They
must be separated by semicolons (;) and will be printed adjacently.
Plus signs can also be used for the same purpose, but only between
string expressions.
String constants must be enclosed by quotation marks, whereas numeric
constants or any kind of variables must not.
Examples
Programming and printing a line of text:
10
20
30
40
RUN
FONT "Swiss 721 BT"
PRPOS 30,300
PRTXT "How do you do?"
PRINTFEED
Several string constants and string variables can be combined into one line
of text by the use of plus signs or semicolons:
10
20
30
40
50
60
70
80
RUN
FONT "Swiss 721 BT"
PRPOS 30,300
PRTXT "SUN";"SHINE"
A$="MOON"
B$="LIGHT"
PRPOS 30,200
PRTXT A$+B$
PRINTFEED
yields a label with the text:
SUNSHINE
MOONLIGHT
Intermec Fingerprint v7.61 – Programmer’s Reference Manual Ed. 7
211
Chapter 2
Program Instructions
PRTXT (PT), cont.
Examples, cont.
Numeric constants and numeric variables can be combined by the
use of semicolons, but plus signs cannot be used in connection with
numeric expressions:
10
20
30
40
50
60
70
80
RUN
FONT "Swiss 721 BT"
PRPOS 30,300
PRTXT 123;456
A%=222
B%=555
PRPOS 30,200
PRTXT A%;B%
PRINTFEED
yields a label with the text:
123456
222555
Numeric and string expressions can be mixed on the same line, for
example:
10
20
30
40
50
80
RUN
FONT "Swiss 721 BT"
PRPOS 30,300
A$="December"
B%=27
PRTXT A$;" ";B%;" ";"2000"
PRINTFEED
yields a label with the text:
December 27 2000
Two program lines of text will be printed on the same line if the first program
line is appended by a semicolon:
10
20
30
40
50
RUN
FONT "Swiss 721 BT"
PRPOS 30,300
PRTXT "HAPPY"+" ";
PRTXT "BIRTHDAY"
PRINTFEED
yields a label with the text:
HAPPY BIRTHDAY
212
Intermec Fingerprint v7.61 – Programmer’s Reference Manual Ed. 7
Chapter 2 Program Instructions
PUT
Field of Application
Statement for writing a given record from the random buffer to
a given random file.
Syntax
PUT[#]<nexp1>,<nexp2>
#
indicates that whatever follows is a number. Optional.
<nexp1>
is the number assigned to the file when it was OPENed.
<nexp2>
is the number of the record. Must be ≥1.
Remarks
Use LSET or RSET statements to place data in the random buffer before
issuing the PUT statement.
Example
10
20
30
40
50
60
70
80
90
100
RUN
OPEN "PHONELIST" AS #8 LEN=26
FIELD#8,8 AS F1$, 8 AS F2$, 10 AS F3$
SNAME$="SMITH"
CNAME$="JOHN"
PHONE$="12345630"
LSET F1$=SNAME$
LSET F2$=CNAME$
RSET F3$=PHONE$
PUT #8,1
CLOSE#8
SAVE "PROGRAM 1.PRG "
NEW
10
20
30
40
RUN
OPEN "PHONELIST" AS #8 LEN=26
FIELD#8,8 AS F1$, 8 AS F2$, 10 AS F3$
GET #8,1
PRINT F1$,F2$,F3$
yields:
SMITH↔↔↔JOHN↔↔↔↔↔↔12345630
Intermec Fingerprint v7.61 – Programmer’s Reference Manual Ed. 7
213
Chapter 2
Program Instructions
RANDOM
Field of Application
Function generating a random integer within a specified interval.
Syntax
RANDOM(<nexp1>,<nexp2>)
<nexp1>
is the first integer in the interval.
<nexp2>
is the last integer in the interval.
Remarks
<nexp1> ≤ <random integer> ≤ <nexp2>, that is the random integer will be:
Equal to or greater than <nexp1>
Equal to or less than <nexp2>
Example
The following example will produce ten random integers between 1
and 100:
10
20
30
40
RUN
FOR I%=1 TO 10
A% = RANDOM (1,100)
PRINT A%
NEXT I%
yields for example:
31
45
82
1
13
16
41
77
20
70
214
Intermec Fingerprint v7.61 – Programmer’s Reference Manual Ed. 7
Chapter 2 Program Instructions
RANDOMIZE
Field of Application
Statement for reseeding the random number generator, optionally
with a specified value.
Syntax
RANDOMIZE[<nexp>]
<nexp>
is the integer (0 -99999999) with which the random number
generator will be reseeded
Remarks
If no value is specified, a message will appear asking you to enter a value
between 0 and 99,999,999.
Examples
In the following example, no reseeding integer is specified in the program.
Thus a prompt will appear, asking you to do so:
10
RANDOMIZE
20
A%=RANDOM1,100)
30
PRINT A%
RUN
Random Number Seed (0 to 99999999) ?
Enter 555
yields for example:
36
When the reseeding integer is specified, no prompt will appear:
10
20
30
RUN
RANDOMIZE 556
A%=RANDOM(1,100)
PRINT A%
yields for example:
68
A higher degree of randomization will be obtained in the random integer
generator is reseeded with a more or less random integer, for example
provided by a TICKS function:
10
20
30
40
RUN
A%=TICKS
RANDOMIZE A%
B%=RANDOM(1,100)
PRINT B%
yields for example:
42
Intermec Fingerprint v7.61 – Programmer’s Reference Manual Ed. 7
215
Chapter 2
Program Instructions
READY
Field of Application
Statement for ordering a ready signal, for example XON, CTS/RTS or
PE, to be transmitted from the printer on the specified communication
channel.
Syntax
READY[<nexp>]
<nexp>
Remarks
optionally specifies a communication channel:
1 = "uart1:"
2 = "uart2:"
3 = "uart3:"
4 = "centronics:"
6 = "usb1:"
The selected communication protocol usually contains some “ready” signal,
which tells the host computer that the printer is ready to receive more
data. The READY statement allows you to order a ready signal to be
transmitted on the specified communication channel. If no channel is
specified, the signal will be transmitted on the standard OUT channel
(see SETSTDIO statement).
The READY signal is used to revoke a previously transmitted BUSYsignal.
However, the printer may still be unable to receive more data, for example
because of a full receive buffer.
For the "centronics:" communication channel, BUSY/READY controls
the PE (paper end) signal on pin 12 according to an error-trapping routine
(READY = PE low).
Example
You may, for example, want to allow the printer to receive more data on
"uart2:" after the process of printing a label is completed. (Running this
example may require an optional interface board to be fitted):
10
20
30
40
50
RUN
216
FONT "Swiss 721 BT"
PRTEXT "HELLO!"
BUSY2
PRINTFEED
READY2
Intermec Fingerprint v7.61 – Programmer’s Reference Manual Ed. 7
Chapter 2 Program Instructions
REBOOT
Field of Application
Statement for restarting the printer.
Syntax
REBOOT
Remarks
This statement has exactly the same effect as switching off and on the power
to the printer.
Intermec Fingerprint v7.61 – Programmer’s Reference Manual Ed. 7
217
Chapter 2
Program Instructions
REDIRECT OUT
Field of Application
Statement fo redirecting the output data to a created file.
Syntax
REDIRECT↔OUT[<sexp>]
<sexp>
is, optionally, the name of the file to be created and where
the output will be stored.
Remarks
Normally the output data will be transmitted on the standard output channel
(see SETSTDIO statement). In most cases, this means the screen of the host.
However, by means of a REDIRECT OUT <sexp> statement, a file can be
created to which the output will be redirected. That implies that no data will be
echoed back to the host. Normal operation, with the output being transmitted
on the standard output channel again, will be resumed when a REDIRECT
OUT statement without any appending file name is executed.
Example
In this example, a file ("LIST.DAT") is created to which the names of the
files in the printer’s permanent memory is redirected. The redirection is then
terminated (line No. 30) and the file is OPENed for input.
10
REDIRECT OUT "LIST.DAT"
20
FILES "c:"
30
REDIRECT OUT
40
OPEN "LIST.DAT" FOR INPUT AS #1
. . . . .
. . . . .
. . . . .
218
Intermec Fingerprint v7.61 – Programmer’s Reference Manual Ed. 7
Chapter 2 Program Instructions
REM (')
Field of Application
Statement for adding headlines and explanations to the program
without including them in the execution.
Syntax
REM|'<remark>
<remark>
Remarks
is a text inserted in the program for explanatory purpose.
Max. 32,767 characters per line.
A REM statement may either be entered on a program line of its own or be
inserted at the end of a line containing another instruction. In the latter case,
REM must be preceded by a colon (“:REM”).
A shorthand form for REM is an apostrophe (ASCII 39 dec.).
It is possible to branch to a line of REM statement. Execution will then
continue at the first executable line after the REM line.
REM statements slow down execution and transfer of data and also
take up valuable memory space. Therefore, use REM statements with
judgement.
Example
A program containing REM statements:
10
20
30
40
50
60
70
80
RUN
'Label format No. 1
FONT "Swiss 721 BT"
PRPOS 30,100
DIR 1 :REM Print across web
ALIGN 4 :REM Aligned left/baseline
MAG 2,2 :'Double height and width
PRTXT "HELLO"
PRINTFEED
Intermec Fingerprint v7.61 – Programmer’s Reference Manual Ed. 7
219
Chapter 2
Program Instructions
REMOVE IMAGE
Field of Application
Statement for removing a specified image from the printer’s memory.
Syntax
REMOVE↔IMAGE <sexp>
<sexp>
is the full name including extension of the image to be
removed.
Remarks
Useful for removing obsolete or faulty images from the printer’s memory in
order to save valuable memory space.
Note that there is a distinction between on one hand images and on the other
hand image files (compare with IMAGES and FILES statements). This
implies that REMOVE IMAGE statements can only be used for images
downloaded by means of a STORE statement (see STORE and STORE
IMAGE). Image files downloaded using for example a TRANSFER
KERMIT statement should be removed the same way as other files
using a KILL statement.
Be careful, REMOVE IMAGE is irreversible!
Example
220
10
RUN
REMOVE IMAGE "LOGOTYPE.1"
Intermec Fingerprint v7.61 – Programmer’s Reference Manual Ed. 7
Chapter 2 Program Instructions
RENDER ON/OFF
Field of Application
Statement for enabling/disabling rendering of text, bar code, image,
box, and line fields.
Syntax
RENDER ON|OFF
ON
OFF
Remarks
enables rendering (default).
disables rendering.
These statements are intended to get information regarding size and position
of a field without actually rendering it, that is the field will not be printed
when the program is executed. The information on the field is retrieved
using PRSTAT functions.
RENDER OFF disables the rendering, which means that PRTXT, PRBAR,
PRIMAGE, PRLINE, and PRBOX statements will not give any result when
a PRINTFEED statement is executed. Any other statements than PRPOS
will not update the insertion point. Field numbers (see FIELDNO) will
not be updated. Statement such as CLIP ON/OFF, XORMODE ON/OFF,
or BARSET will retain their usual meanings. PRBUF will render a field
regardless of RENDER ON/OFF.
RENDER ON enables field rendering after a RENDER OFF statement.
Duplicate statement have no effect, that is if a RENDER OFF statement
has been executed, another RENDER OFF statement will be ignored. The
same applies to RENDER ON.
Example
This examples retrieves information on the size of a text field which
was not rendered. (The actual result may vary depending on font, font
size, and printer type.)
10
20
30
40
50
RUN
RENDER OFF
PRTXT "Render off"
PRINT "Width:",PRSTAT(5),"Height:",PRSTAT(6)
RENDER ON
PRINTFEED
yields for example:
Width:
153
Height:
46
No field to print in line 50
Ok
Intermec Fingerprint v7.61 – Programmer’s Reference Manual Ed. 7
221
Chapter 2
Program Instructions
RENUM
Field of Application
Statement for renumbering the lines of the program currently residing
in the printer’s working memory.
Syntax
RENUM[<ncon1>][,[<ncon2>][,<ncon3>]]
<ncon1>
is the first line number of the new sequence.
<ncon2>
is the line in the current program at which renumbering
is to start.
<ncon3>
is the desired increment between line numbers in the
new sequence.
Default values:
10, 1, 10
Remarks
This statement is useful for providing space for more program lines when
expanding an existing program, and for renumbering programs written without
line numbers, for example after being LISTed, LOADed, or MERGEd. Line
references following GOTO statements will be renumbered accordingly. Use
a LIST statement to print the new numbers on the screen.
Example
A program may be renumbered like this:
10
20
30
40
50
60
70
RENUM
LIST
FONT "Swiss 721 BT"
PRPOS 30,100
PRTXT "HELLO"
A%=A%+1
PRINTFEED
IF A%<3 GOTO 40
END
100,20,50
10
100
150
200
250
300
350
FONT "Swiss 721 BT"
PRPOS 30,100
PRTXT "HELLO"
A%=A%+1
PRINTFEED
IF A%<3 GOTO 200
END
yields:
Note that the line number in the GOTO statement on line 300 has changed.
Line 10 is not renumbered, since line 20 was specified as starting point.
The new increment is 50.
222
Intermec Fingerprint v7.61 – Programmer’s Reference Manual Ed. 7
Chapter 2 Program Instructions
RESUME
Field of Application
Statement for resuming program execution after an error-handling
subroutine has been executed.
Syntax
RESUME[<<ncon>|<line label>|<NEXT>|<0>>|<HTTP>]
<ncon>
is the number or label of the line to which the program
should return.
Remarks
RESUME must only be used in connection with error-handling subroutines
(see ON ERROR GOTO).
There are five ways of using RESUME:
RESUME
Execution is resumed at the statement where
the error occurred.
RESUME 0
Same as RESUME.
RESUME NEXT
Execution is resumed at the statement
immediately following the one that caused
the error.
RESUME <ncon>
Execution is resumed at the specified line.
RESUME <line label> Execution is resumed at the specified line
label.
RESUME <HTTP>
Execution is resumed at the point where
it was branched by an ON HTTP GOTO
statement. Stdin and stdout are restored to
their original values.
Examples
This short program is the basis for two examples of alternative subroutines:
10
20
30
40
50
60
70
80
ON ERROR GOTO 1000
FONT "Swiss 721 BT"
PRPOS 100,100
PRTXT "HELLO"
PRPOS 100, 300
PRIMAGE "GLOBE.1"
PRINTFEED
END
1. A font is selected automatically and execution is resumed from the line
after where the error occurred. If another error than the specified error
condition occurs, the execution is terminated.
1000
1010
IF ERR=15 THEN FONT "Swiss 721 BT":RESUME NEXT
RESUME 80
2. An error message is displayed and the execution goes on from the line
following the one where the error occurred.
1000
1010
IF ERR=15 THEN PRINT "Font not found"
RESUME NEXT
Intermec Fingerprint v7.61 – Programmer’s Reference Manual Ed. 7
223
Chapter 2
Program Instructions
RETURN
Field of Application
Statement for returning to the main program after having branched to
a subroutine because of a GOSUB statement.
Syntax
RETURN[<ncon>|<line label>]
<ncon>
is optionally the number or label of a line in the main
program to return to.
Remarks
When the statement RETURN is encountered during the execution of
a subroutine, the execution will return to the main program. Execution
will continue from the statement immediately following the most recently
executed GOSUB or from an optionally specified line.
If a RETURN statement is encountered without a GOSUB statement
having been previously executed, Error 28, “Return without Gosub”
will occur.
Example
10
20
30
40
1000
1010
1020
1030
2000
2010
2020
2030
3000
3010
3020
RUN
PRINT "This is the main program"
GOSUB 1000
PRINT "You’re back in the main program"
END
PRINT "This is subroutine 1"
GOSUB 2000
PRINT "You’re back in subroutine 1"
RETURN
PRINT "This is subroutine 2"
GOSUB 3000
PRINT "You’re back in subroutine 2"
RETURN
PRINT "This is subroutine 3"
PRINT "You’re leaving subroutine 3"
RETURN
yields:
This is the main program
This is subroutine 1
This is subroutine 2
This is subroutine 3
You’re leaving subroutine 3
You’re back in subroutine 2
You’re back in subroutine 1
You’re back in the main program
224
Intermec Fingerprint v7.61 – Programmer’s Reference Manual Ed. 7
Chapter 2 Program Instructions
RIGHT$
Field of Application
Function returning a specified number of characters from a given string
starting from the extreme right side (end) of the string.
Syntax
RIGHT$(<sexp>,<nexp>)
<sexp>
is the string from which the characters will be returned.
<nexp>
specifies the number of characters to be returned.
Remarks
This function is the complementary function for LEFT$, which returns the
characters starting from the extreme left side, that is from the start.
If the number of characters to be returned is greater than the number of
characters in the string, then the entire string will be returned. If the number of
characters is set to zero, a null string will be returned.
Examples
PRINT RIGHT$("THERMAL_PRINTER",7)
yields:
PRINTER
10
20
RUN
A$="THERMAL_PRINTER":B$ = "LABEL"
PRINT RIGHT$(B$,5);RIGHT$(A$,8);"S"
yields:
LABEL_PRINTERS
Intermec Fingerprint v7.61 – Programmer’s Reference Manual Ed. 7
225
Chapter 2
Program Instructions
RSET
Field of Application
Statement for placing data right-justified into a field in a random
file buffer.
Syntax
RSET<svar>=<sexp>
<svar>
is the string variable assigned to the field by a FIELD
statement.
<sexp>
holds the input data.
Remarks
After having OPENed a file and formatted it using a FIELD statement,
you can enter data into the random file buffer using the RSET and LSET
statements (LSET left-justifies the data).
The input data can only be stored in the buffer as string expressions. Therefore,
a numeric expression must be converted to string by the use of a STR$
function before an LSET or RSET statement is executed.
If the length of the input data is less than the field, the data will be
right justified and the remaining number of bytes will be printed as
space characters.
If the length of the input data exceeds the length of the field, the input data
will be truncated on the left side.
Example
10
20
30
40
50
60
70
80
90
100
RUN
OPEN "PHONELIST" AS #8 LEN=26
FIELD#8,8 AS F1$, 8 AS F2$, 10 AS F3$
SNAME$="SMITH"
CNAME$="JOHN"
PHONE$="12345630"
LSET F1$=SNAME$
LSET F2$=CNAME$
RSET F3$=PHONE$
PUT #8,1
CLOSE#8
SAVE "PROGRAM 1.PRG "
NEW
10
20
30
40
RUN
OPEN "PHONELIST" AS #8 LEN=26
FIELD#8,8 AS F1$, 8 AS F2$, 10 AS F3$
GET #8,1
PRINT F1$,F2$,F3$
yields:
SMITH↔↔↔JOHN↔↔↔↔↔↔12345630
226
Intermec Fingerprint v7.61 – Programmer’s Reference Manual Ed. 7
Chapter 2 Program Instructions
RUN
Field of Application
Statement for starting the execution of a program.
Syntax
RUN[<<scon>|<ncon>>]
<scon>
optionally specifies an existing program to be run.
<ncon>
optionally specifies the number of a line in the current program
where the execution will start.
Remarks
The RUN statement starts the execution of the program currently residing in
the printer’s working memory, or optionally of a specified program residing
elsewhere. The execution will begin at the line with the lowest number, or
optionally from a specified line in the current program.
If a program stored in another directory than the current one (see CHDIR
statement), and has not been LOADed, its designation must be preceded
by a reference to that device ("c:", "tmp:", "rom:", or "card1:", see
the last example).
Never use RUN on a numbered line or in a line without number in
the Programming Mode, or Error 40, “Run statement in program”
will occur.
A RUN statement executed in the Intermec Direct Protocol will make
the printer switch to the Immediate Mode, that is it has the same effect
as an INPUT OFF statement.
Examples
Order the execution of a program this way:
RUN
Executes the current program from its first line.
RUN 40
Executes the current program, starting from line 40.
RUN "TEST"
Executes the program “TEST.PRG" from its first line.
RUN "TEST.PRG"
Executes the program “FILELIST.PRG", which is stored in a read-only
memory card, from its first line.
RUN "rom:FILELIST.PRG"
Intermec Fingerprint v7.61 – Programmer’s Reference Manual Ed. 7
227
Chapter 2
Program Instructions
SAVE
Field of Application
Statement for saving a file in the printer’s memory or optionally in a
DOS-formatted memory card.
Syntax
SAVE<scon>[,P|L]
<scon>
P
L
Remarks
is the name of the file, optionally starting with a reference to
a directory (see DEVICES).
Allowed input: Max. 30 characters incl. extension.
Max. 26 characters excl. extension
optionally protects the file.
optionally saves the file without line numbers.
When a file is SAVEd, it must be given a designation consisting of max. 30
characters including extension. By default, the program will automatically
append the name with the extension .PRG and convert all lowercase characters
to uppercase. The name must not contain any quotation marks (") and the
extension must always start with a period (.) character.
By starting the file name with a period character (.), you can avoid having it
removed at a soft formatting operation, see FORMAT statement. Such a file
will also be listed differently, see FILES statement.
When saving a file in a directory other than the current one (see CHDIR
statement), a reference to that directory must be included in the file name.
Files can only be SAVEd in the printer’s permanent memory ("c:"), the
printer’s temporary memory ("tmp:"), or in an optional DOS-formatted
JEIDA-4 SRAM-type memory card ("card1:"). If a file with the selected
name already exists in the selected directory, that file will be deleted and
replaced by the new file without any warning.
Files cannot be SAVEd in a flash memory card, or in a non DOS-formatted
RAM-type memory card.
You can continue to work with a file after saving it, until a NEW, LOAD,
KILL, or REBOOT instruction is issued.
A protected file (SAVE <filename>,P) is encrypted at saving and cannot be
LISTed after being LOADed. Program lines cannot be removed, changed,
or added. Once a file has been protected, it cannot be deprotected again.
Therefore, it is advisable to save an unprotected copy, should a programming
error be detected later on. If you are going to use an electronic key to prevent
unautorized access to a file, you should protect it.
A SAVEd program can be MERGEd with the program currently residing
in the printer’s working memory. If the program is SAVEd normally, there
is a risk that the line numbers automatically assigned to the program may
interfere with the line numbers in the current program. Therefore, you can
choose to SAVE the program without line numbers (SAVE <filename>,L).
That entails that the MERGEd program will be appended to the current
program and its lines will be assigned line numbers in ten-step incremental
order, starting with the number of the last line in the current program plus 10.
In this case, the MERGEd program should either make use of line labels for
referring to other lines, or not contain any such instructions at all.
228
Intermec Fingerprint v7.61 – Programmer’s Reference Manual Ed. 7
Chapter 2 Program Instructions
SAVE, cont.
Examples
SAVE "LABEL14"
saves the file as “Label 14.PRG" in current directory.
SAVE "LABEL14",P
saves and protects the file "Label14.PRG".
SAVE "LABEL14",L
saves the file "Label14.PRG" without line numbers.
SAVE "card1:LABEL14.PRG"
saves the file in an optional DOS-formatted SRAM memory card.
Intermec Fingerprint v7.61 – Programmer’s Reference Manual Ed. 7
229
Chapter 2
Program Instructions
SET FAULTY DOT
Field of Application
Statement for marking one or several dots on the printhead as faulty,
or marking all faulty dots as correct.
Syntax
SET↔FAULTY↔DOT<nexp1>[,<nexpn>...]
<nexp1>
is the number of the dot to be marked as faulty. Successive
executions add more faulty dots.
<nexp1> = -1
marks all dots as correct (default).
Remarks
This statement is closely related to the HEAD function and the BARADJUST
statement. You can check the printhead for possible faulty dots by means of
the HEAD function and mark them as faulty, using the SET FAULTY
DOT statement. Using the BARADJUST statement, you can allow the
firmware to automatically reposition horizontal bar codes sideways so
as to place the faulty dots between the bars, where no harm to the
readability will be done.
Once a number a dot has been marked faulty by a SET FAULTY DOT
statement, it will remain so until all dots are marked as correct by a SET
FAULTY DOT -1 statement.
Note that an enhancement of the HEAD function (introduced with
Intermec Fingerprint 7.3) makes it possible to mark all faulty dots
using a single instruction instead of specifying each faulty dot in a
SET FAULTY DOT.
Example
This example illustrates how a bar code is repositioned by means of
BARADJUST when a number of dots are marked as faulty by a SET
FAULTY DOTS statement. Type RUN and send various numbers of
faulty dots from the host a few times and see how the bar code moves
sideways across the label.
10
20
30
40
50
60
70
80
90
100
110
120
RUN
230
INPUT "No. of faulty dots"; A%
FOR B% = 1 TO A%
C% = C% + 1
SET FAULTY DOT C%
NEXT
D% = A%+2
BARADJUST D%, D%
PRPOS 0, 30
BARTYPE "CODE39"
PRBAR "ABC"
SET FAULTY DOT -1
PRINTFEED
Intermec Fingerprint v7.61 – Programmer’s Reference Manual Ed. 7
Chapter 2 Program Instructions
SETASSOC
Field of Application
Statement for setting a value for a tuple in a string association.
Syntax
SETASSOC <sexp1>, <sexp2>, <sexp3>
<sexp1>
is the name of the association (case-sensitive).
<sexp2>
is the name of the tuple
<sexp3>
is the value of the tuple.
Remarks
An association is an array of tuples, where each tuple consists of a
name and a value.
Example
This example shows how a string, including three string names associated
with three start values, will be defined and one of them (time) will
be changed:
10
20
30
40
50
60
70
80
RUN
QUERYSTRING$=
"time=UNKNOWN&label=321&desc=DEF"
MAKEASSOC "QARRAY",QUERYSTRING$,"HTTP"
QTIME$=GETASSOC$("QARRAY","time")
QLABELS%=VAL(GETASSOC$("QARRAY","label"))
QDESC$=GETASSOC$("QARRAY","desc")
PRINT"time=";QTIME$,"LABEL=";QLABELS%,
"DESCRIPTION=";QDESC$
SETASSOC "QARRAY","time",time$
PRINT "time=";GETASSOC$("QARRAY","time")
yields:
time=UNKNOWN LABEL=321 DESCRIP
time=153355
Intermec Fingerprint v7.61 – Programmer’s Reference Manual Ed. 7
TION=DEF
231
Chapter 2
Program Instructions
SETPFSVAR
Field of Application
Statement for registering variable to be saved at power failure.
Syntax
SETPFSVAR<sexp>[,<nexp>]
<sexp>
is the name of a numeric or string variable (uppercase
characters only).
<nexp>
is the size in bytes of a string variable (compulsory).
Remarks
When a program is loaded, it is copied to and executed in the printer’s
temporary memory ("tmp:"). Should an unexpected power failure occur,
the printer tries to save as much data as possible in the short time available
before all power is lost. To minimize the risk of lose important variable values
at a power failure, you can register numeric and string variables to be saved.
There is 2176 bytes (incl. overhead) available for this purpose.
However, should the power failure occur while the printer is printing, there
will not be any power left to save the current variables.
When you register a string variable, you must also specify its size in bytes.
Related instructions are GETPFSVAR, DELETEPFSVAR, and LISTPFSVAR.
Examples
Example with string variable:
100
110
IF QA$="" THEN QA$="Hello":QA%=LEN(QA$)
SETPFSVAR "QA$",QA%
Example with numeric variable:
200
232
SETPFSVAR"QCPS%"
Intermec Fingerprint v7.61 – Programmer’s Reference Manual Ed. 7
Chapter 2 Program Instructions
SETSTDIO
Field of Application
Statement for selecting standard IN and OUT communication
channel.
Syntax
SETSTDIO<nexp1>[,<nexp2>]
<nexp1>
is the desired input/output channel:
0 = "console:"
1 = "uart1:"
2 = "uart2:"
3 = "uart3:"
4 = "centronics:"
5 = "net1:"
6 = "usb1:"
100 = autohunting enabled
<nexp2>
optionally specifies an output channel other than the
input channel:
0 = "console:"
1 = "uart1:"
2 = "uart2:"
3 = "uart3:"
5 = "net1:"
6 = "usb1:"
100 = autohunting enabled
Remarks
The printer is usually controlled from its host computer or terminal via the
standard communication channel. By default, the serial communication
channel "uart1:" is used for both input and output. If only one channel
is specified, it will serve as both standard input (stdin) and standard
output (stdout) channel. Alternatively, different channels can be selected
for stdin and stdout.
For programming, it is recommended to use "uart1:" as standard input and
output channel. If another channel is selected, use the same serial channel for
both input and output. The "centronics:" channel can only be used for input
to the printer and is thus not suited for programming.
Autohunting means that all available channels are continuously scanned for
input. At startup, "uart1:" is selected as stdout. If data is received on the stdin
channel, the same channel is used as stdout channel. If no data is received
on the present stdin channel within a 2 second timeout period, the firmware
scans the other existing channels (except "console:) looking for input
data. The channel where input data is first found will now be appointed
stdin/stdout channel. The same procedure is repeated infinitely as long
as autohunting is enabled.
There are some restrictions that apply to autohunting:
- If "centronics:" is used as input channel and autohunting is enabled for both
input and output, "uart1:" is selected stdout channel.
- Autohunting does not work with "console:".
- Autohunting does not work with COMSET or INPUT.
Intermec Fingerprint v7.61 – Programmer’s Reference Manual Ed. 7
233
Chapter 2
Program Instructions
SETSTDIO, cont.
Example
This example selects the "uart2:" communication channel as the standard
input and output channel:
10
SETSTDIO 2
. . . .
. . . .
This example enables autohunting for input and "uart1:" for output:
10
SETSTDIO 100,1
. . . .
. . . .
234
Intermec Fingerprint v7.61 – Programmer’s Reference Manual Ed. 7
Chapter 2 Program Instructions
SETUP
Field of Application
Statement for entering the printer’s Setup Mode or changing the
setup.
Syntax
SETUP
If no parameter is specified, the printer enters the Setup
Mode.
SETUP <sexp>
<sexp>
is the name of an existing setup file that will be used to change
the printer’s entire current setup, or
a string used to change a single parameter in the printer’s
current setup.
SETUP <sexp1>,<sexp2>
<sexp1>
is the name of a setup section (see Chapter 8).
<sexp2>
is the name of a file that will be used to change the specified
setup section.
SETUP <sexp1>,<sexp2>,<sexp3>
<sexp1>
is the name of a setup section (see Chapter 8). Not
implemented for "prt".
<sexp2 >
is the name of the setup object (see Chapter 8).
<sexp3>
specifies the new value (see Chapter 8).
Remarks
The SETUP statement can be used for several purposes as illustrated above.
Related instructions are SETUP GET and SETUP WRITE.
By default, the setup parameters are saved as a file in the printer’s permanent
memory. However, using SYSVAR (35) it is possible to decide that any new
change will not be saved (volatile). See SYSVAR.
The methods of manual setup via the printer’s built-in keyboard are
described in the Installation & Operation manuals for the various printer
models. You can also use setup files and setup strings to change the setup
as a part of the program execution, or to change the setup by remote
control from the host.
A setup file may contain new values for one or several setup parameters,
whereas a setup string only can change a single parameter. Another difference
is that, while the creation of setup files requires several operations, setup
strings can be created in a single operation which makes them suitable for
use with the Intermec Direct protocol.
When a SETUP<sexp> statement is encountered, the setup will be changed
accordingly, then the program execution will be resumed. Note that some
printing instructions (ALIGN, DIR, FONT, and PRPOS) may be changed
when test labels are printed.
The content of setup files can be listed using the program FILELIST.PRG
stored in the printer’s permanent memory ("rom:"), or by COPYing the file to
the communication channel of the host, usually "uart1:".
Intermec Fingerprint v7.61 – Programmer’s Reference Manual Ed. 7
235
Chapter 2
Program Instructions
SETUP, cont.
Remarks, cont.
When creating setup files or setup strings, there is a special syntax for each
parameter that must be followed exactly. Variable numeric input data are
indicated by “n” – “nnnnn”, alternative data are indicated by bold characters
separated by vertical bars (|). Compulsory space characters are indicated by
double-headed arrows (↔). Note that some parameters listed below may only
apply to a certain printer model or an optional device.
Important!
Do not include any double-headed arrows (↔) or vertical bars (|) when
typing a setup string or file!
"SER-COM,UART1|UART2|UART3,BAUDRATE,300|600|1200|2400|4800|9600|19200|38400|57600|115200"
"SER-COM,UART1|UART2|UART3,CHAR↔LENGTH,7|8"
"SER-COM,UART1|UART2|UART3,PARITY,NONE|EVEN|ODD|MARK|SPACE"
"SER-COM,UART1|UART2|UART3,STOPBITS,1|2"
"SER-COM,UART1|UART2|UART3,FLOWCONTROL,RTS/CTS,ENABLE|DISABLE"
"SER-COM,UART1|UART2|UART3,FLOWCONTROL,ENQ/ACK,ENABLE|DISABLE"
"SER-COM,UART1|UART2|UART3,FLOWCONTROL,XON/XOFF,DATA↔FROM↔HOST,ENABLE|DISABLE"
"SER-COM,UART1|UART2|UART3,FLOWCONTROL,XON/XOFF,DATA↔TO↔HOST,ENABLE|DISABLE"
"SER-COM,UART2,PROT↔ADDR,ENABLE|DISABLE"
"SER-COM,UART1|UART2|UART3,NEW↔LINE,CR/LF|LF|CR"
"SER-COM,UART1|UART2|UART3,REC↔BUF,nnnnn"
"SER-COM,UART1|UART2|UART3,TRANS↔BUF,nnnnn"
"SER-COM,UART2,PROTOCOL↔ADDR.,nn"
"NET-COM,NET1,NEW↔LINE,CR/LF|LF|CR"
"FEEDADJ,STARTADJ,nnnn"
(negative value allowed)
"FEEDADJ,STOPADJ,nnnn"
(negative value allowed)
"MEDIA,MEDIA↔SIZE,XSTART,nnnn"
"MEDIA,MEDIA↔SIZE,WIDTH,nnnn"
"MEDIA,MEDIA↔SIZE,LENGTH,nnnnn"
"MEDIA,MEDIA↔TYPE,LABEL↔(w↔GAPS)|TICKET↔(w↔MARK)|TICKET↔(w↔GAPS)|FIX↔LENGTH↔STRIP|VAR↔LENGTH↔STRIP"
"MEDIA,PAPER↔TYPE,TRANSFER|DIRECT↔THERMAL"
"MEDIA,PAPER↔TYPE,DIRECT↔THERMAL,LABEL↔CONSTANT,nnn"
"MEDIA,PAPER↔TYPE,DIRECT↔THERMAL,LABEL↔FACTOR,nnn"
"MEDIA,PAPER↔TYPE,TRANSFER,RIBBON↔CONSTANT,nnn"
"MEDIA,PAPER↔TYPE,TRANSFER,RIBBON↔FACTOR,nnn"
"MEDIA,PAPER↔TYPE,TRANSFER,LABEL↔OFFSET,nnn"
"MEDIA,PAPER↔TYPE,TRANSFER,LOW↔DIAMETER,nnn"
"MEDIA,CONTRAST,-10%|-8%|-6%|-4%|-2%|0%|2%|4%|6%|8%|10%"
"PRINT↔DEFS,PRINT↔SPEED,nnn"
"PRINT↔DEFS,LTS↔VALUE,nn"
"NETWORK,IP↔SELECTION,MANUAL|DHCP|BOOTP|RARP"
"NETWORK,IP↔ADDRESS,nnn.nnn.nnn.nnn"
"NETWORK,NETMASK,nnn.nnn.n.n"
"NETWORK,DEFAULT↔ROUTER,nnn.nnn.nnn.nnn"
236
Intermec Fingerprint v7.61 – Programmer’s Reference Manual Ed. 7
Chapter 2 Program Instructions
SETUP, cont.
Examples
This example enables a key for branching to the Setup Mode:
10
20
.....
1000
1010
ON KEY(18) GOSUB 1000
KEY(18)ON
SETUP
RETURN
This example shows how a new file is OPENed for output and each parameter
in the setup is changed by means of PRINT# statements. Then the file is
CLOSEd. Any lines, except the first and the last line in the example, may be
omitted. Finally, the printer’s setup is changed using this file.
10
20
30
40
50
60
70
80
90
100
110
120
130
140
150
160
170
180
190
200
210
220
230
240
250
260
OPEN "tmp:SETUP.SYS" FOR OUTPUT AS #1
PRINT#1,"SER-COM,UART1,BAUDRATE,19200"
PRINT#1,"SER-COM,UART1,CHAR LENGTH,7"
PRINT#1,"SER-COM,UART1,PARITY,EVEN"
PRINT#1,"SER-COM,UART1,STOPBITS,2"
PRINT#1,"SER-COM,UART1,FLOWCONTROL,RTS/CTS,ENABLE"
PRINT#1,"SER-COM,UART1,FLOWCONTROL,ENQ/ACK,ENABLE"
PRINT#1,"SER-COM,UART1,FLOWCONTROL,XON/XOFF,DATA FROM HOST,ENABLE"
PRINT#1,"SER-COM,UART1,FLOWCONTROL,XON/XOFF,DATA TO HOST,ENABLE"
PRINT#1,"SER-COM,UART1,NEW LINE,CR"
PRINT#1,"SER-COM,UART1,REC BUF,800"
PRINT#1,"SER-COM,UART1,TRANS BUF,800"
PRINT#1,"FEEDADJ,STARTADJ,-135"
PRINT#1,"FEEDADJ,STOPADJ,-36"
PRINT#1,"MEDIA,MEDIA SIZE,XSTART,50"
PRINT#1,"MEDIA,MEDIA SIZE,WIDTH,1000"
PRINT#1,"MEDIA,MEDIA SIZE,LENGTH,2000"
PRINT#1,"MEDIA,MEDIA TYPE,LABEL (w GAPS)"
PRINT#1,"MEDIA,PAPER TYPE,TRANSFER"
PRINT#1,"MEDIA,PAPER TYPE,TRANSFER,RIBBON CONSTANT,110"
PRINT#1,"MEDIA,PAPER TYPE,TRANSFER,RIBBON FACTOR,25"
PRINT#1,"MEDIA,PAPER TYPE,TRANSFER,LABEL OFFSET,00"
PRINT#1,"MEDIA,CONTRAST,-4%"
PRINT#1,"PRINT DEFS,PRINT SPEED,300"
CLOSE
SETUP "tmp:SETUP.SYS"
This example shows how a setup parameter is changed in the Immediate
Mode or the Intermec Direct Protocol, using a setup string.
SETUP"MEDIA,MEDIA TYPE,VAR LENGTH STRIP" ↵
This method can also be used in the Programming Mode, for example:
10 SETUP"MEDIA,MEDIA TYPE,VAR LENGTH STRIP"
Intermec Fingerprint v7.61 – Programmer’s Reference Manual Ed. 7
237
Chapter 2
Program Instructions
SETUP GET
Field of Application
Statement for getting the current setting for a single setup object.
Syntax
SETUP GET<sexp1>,<sexp2>,<sexp3>
<sexp1>
specifies the setup section.
<sexp2>
specifies the setup object.
<sexp3>
stores the result.
Remarks
Refer to Chapter 8, EasyLAN 100i Setup for a list of setup sections
and objects.
Examples
SETUP GET "lan1","RTEL_PR1",A$
SETUP GET "prt","MEDIA,MEDIA TYPE", B$
SETUP GET "alerts","lts",C$
238
Intermec Fingerprint v7.61 – Programmer’s Reference Manual Ed. 7
Chapter 2 Program Instructions
SETUP WRITE
Field of Application
Statement for creating a file containing the printer’s current setup or for
returning it on a specified communication channel.
Syntax
SETUP WRITE[<sexp1>] ,<sexp2>
<sexp1>
is an optional parameter specifying the setup section.
<sexp2>
is the name of a file or device to which the printer's current
setup is to be written.
Remarks
The SETUP WRITE statement is useful when you want to return to the
printer’s current setup at a later moment. You can make a copy of the current
setup using SETUP WRITE<filename>, change the setup using a SETUP
<filename> statement, and, when so is required, return to the original setup by
issuing a new SETUP<filename> statement containing the name of the file
created by the SETUP WRITE<filename> statement.
It is strongly recommended to create the file in the printer’s temporary
memory ("tmp:"), for example SETUP WRITE "tmp:OLDSETUP". Once
it has been created in "tmp:", it can be copied to the printer’s permanent
memory "c:" so it will not be lost at power off.
Another application of SETUP WRITE is transmitting the printer’s
current setup on a serial communication channel, for example SETUP
WRITE "uart1:".
Setup sections are used in connection with EasyLAN 100i. Refer to Chapter
8, EasyLAN 100i Setup for a list of setup sections.
SETUP WRITE returns the printer’s setup in the following order (the example
shows default values for a standard EasyCoder 501 XP printer):
SETUP WRITE "uart1:"
yields:
SER-COM,UART1,BAUDRATE,9600
SER-COM,UART1,CHAR LENGTH,8
SER-COM,UART1,PARITY,NONE
SER-COM,UART1,STOPBITS,1
SER-COM,UART1,FLOWCONTROL,RTS/CTS,DISABLE
SER-COM,UART1,FLOWCONTROL,ENQ/ACK,DISABLE
SER-COM,UART1,FLOWCONTROL,XON/XOFF,DATA FROM HOST,DISABLE
SER-COM,UART1,FLOWCONTROL,XON/XOFF,DATA TO HOST,DISABLE
SER-COM,UART1,NEW LINE,CR/LF
SER-COM,UART1,REC BUF,300
SER-COM,UART1,TRANS BUF,300
FEEDADJ,STARTADJ,0
FEEDADJ,STOPADJ,0
MEDIA,MEDIA SIZE,XSTART,36
MEDIA,MEDIA SIZE,WIDTH,1244
MEDIA,MEDIA SIZE,LENGTH,1800
MEDIA,MEDIA TYPE,LABEL (w GAPS)
MEDIA,PAPER TYPE,TRANSFER
MEDIA,PAPER TYPE,DIRECT THERMAL,LABEL CONSTANT,70
MEDIA,PAPER TYPE,DIRECT THERMAL,LABEL FACTOR,30
Intermec Fingerprint v7.61 – Programmer’s Reference Manual Ed. 7
239
Chapter 2
Program Instructions
SETUP WRITE, cont.
Remarks, cont.
MEDIA,PAPER TYPE,TRANSFER,RIBBON CONSTANT,100
MEDIA,PAPER TYPE,TRANSFER,RIBBON FACTOR,25
MEDIA,PAPER TYPE,TRANSFER,LABEL OFFSET,0
MEDIA,CONTRAST,0%
#MEDIA,TESTFEED,10 3
(Info only. Comparator 0–15; amplifier 0–7)
PRINT DEFS,HEAD RESIST, 1166
(Info only)
PRINT DEFS,PRINT SPEED,150
Note that when a SETUP WRITE file is used to change the setup, the printer’s
present TESTFEED adjustment is not affected.
Examples
In this example, the current setup is saved in the printer’s temporary memory
under the name "SETUP1.SYS". Then the start adjustment is changed to
“200” by the creation of a new setup file named "SETUP2.SYS.” The setup
file is finally used to change the printer’s setup.
10
20
30
40
50
SETUP WRITE "tmp:SETUP1.SYS"
OPEN "tmp:SETUP2.SYS" FOR OUTPUT AS #1
PRINT#1,"FEEDADJ,STARTADJ,200"
CLOSE
SETUP "tmp:SETUP2.SYS"
In this example, the setup section "prt" is returned on the serial channel
"uart1:":
SETUP WRITE "prt","uart1:"
240
Intermec Fingerprint v7.61 – Programmer’s Reference Manual Ed. 7
Chapter 2 Program Instructions
SGN
Field of Application
Function returning the sign (positive, zero, or negative) of a specified
numeric expression.
Syntax
SGN(<nexp>)
<nexp>
is the numeric expression from which the sign will be
returned.
Remarks
The sign will be returned in this form:
SGN(<nexp>) = -1
(negative)
SGN(<nexp>) = 0
(zero)
SGN(<nexp>) = 1
(positive)
Examples
Positive numeric expression:
10
20
RUN
A%=(5+5)
PRINT SGN(A%)
yields:
1
Negative numeric expression:
10
20
RUN
A%=(5-10)
PRINT SGN(A%)
yields:
-1
Zero numeric expression:
10
20
RUN
A%=(5-5)
PRINT SGN(A%)
yields:
0
Intermec Fingerprint v7.61 – Programmer’s Reference Manual Ed. 7
241
Chapter 2
Program Instructions
SORT
Field of Application
Statement for sorting a one-dimensional array.
Syntax
SORT<<nvar>|<svar>>,<nexp1>,<nexp2>,<nexp3>
<<nvar>|<svar>>
is the array to be sorted.
<nexp1>
is the number of the first element.
<nexp2>
is the number of the last element.
<nexp3>
> 0: Ascending sorting
< 0: Descending sorting
= 0: Illegal value
In a string array, the value specifies the position according to
which the array will be sorted.
Remarks
A numeric or string array can be sorted, in its entity or within a specified
range of elements in ASCII value order.
The 4:th parameter (<nexp3>) is used differently for numeric and string
arrays. The sign always specifies ascending or descending order. For numeric
arrays, the value is of no consequence, but for string arrays, the value
specifies for which character position the elements will be sorted. <nexp3>
= 0 results in Error 41, “Parameter out of range.”
Example
One numeric and one string array are sorted in descending order. The
string array is sorted in ascending according to the third character
position in each string:
10
20
30
40
50
60
70
80
90
100
110
120
130
RUN
ARRAY% (0) = 1001
ARRAY% (1) = 1002
ARRAY% (2) = 1003
ARRAY% (3) = 1004
ARRAY$ (0) = "ALPHA"
ARRAY$ (1) = "BETA"
ARRAY$ (2) = "GAMMA"
ARRAY$ (3) = "DELTA"
SORT ARRAY%,0,3,-1
SORT ARRAY$,0,3,3
FOR I% = 0 TO 3
PRINT ARRAY% (I%), ARRAY$ (I%)
NEXT
yields:
1004
1003
1002
1001
242
DELTA
GAMMA
ALPHA
BETA
Intermec Fingerprint v7.61 – Programmer’s Reference Manual Ed. 7
Chapter 2 Program Instructions
SOUND
Field of Application
Statement for making the printer’s beeper produce a sound specified
in regard of frequency and duration.
Syntax
SOUND<nexp1>,<nexp2>
<nexp1>
is the frequency of the sound in Hz.
<nexp2>
is the duration of the sound in periods of 0.020 sec. each
(max. 15,0000 = 5 minutes).
Default:
Frequency: 1200 Hz.
Duration:
0.030 sec.
Remarks
This statement allows you include significant sound signals in your programs,
for example to notify the operator that various errors have occurred.
A sound with approximately the specified frequency will be produced
for the specified duration. If the program encounters a new SOUND
statement, it will not be executed until the previous sound has been on
for the specified duration.
The SOUND statement even allows you to make melodies, although the
musical quality may be somewhat limited. The following table illustrates the
frequencies corresponding to the notes in the musical scale. To create a period
of silence, set the frequency to value higher than 9,999 Hz.
Note Hz
C
131
C#
138
D
147
D#
155
E
165
F
175
F#
185
G
196
G#
208
A
220
A#
233
B
247
(small octave)
Example
Note Hz
C
262
C#
277
D
294
D#
311
E
330
F
349
F#
370
G
392
G#
415
A
440
A#
466
B
494
(one-line octave)
Note Hz
C
523
C#
554
D
587
D#
622
E
659
F
699
F#
740
G
784
G#
831
A
880
A#
933
B
988
(two-line octave)
Note Hz
C
1047
C# 1109
D
1175
D# 1245
E
1319
F
1397
F# 1480
G
1568
G# 1662
A
1760
A# 1865
B
1976
(three-line octave)
The tune “Colonel Boogie" starts like this:
10
20
30
40
50
60
70
80
SOUND
SOUND
SOUND
SOUND
SOUND
SOUND
SOUND
SOUND
392,15
330,20
330,15
349,15
392,15
659,25
659,25
523,25
Intermec Fingerprint v7.61 – Programmer’s Reference Manual Ed. 7
243
Chapter 2
Program Instructions
SPACE$
Field of Application
Function returning a specified number of space characters.
Syntax
SPACE$(<nexp>)
<nexp>
is the number of space characters to be returned.
Remarks
This function is useful for more complicated spacing, for example in tables.
Examples
Printing of two left-justified columns on the screen:
10
20
30
40
50
60
70
80
90
RUN
FOR Q%=1 TO 6
VERBOFF:INPUT "",A$
VERBON:PRINT A$;
VERBOFF:INPUT "",B$
VERBON
C$=SPACE$(25-LEN(A$))
PRINT C$+B$
NEXT Q%
END
Enter:
January ↵
February ↵
March ↵
April ↵
May ↵
June ↵
July ↵
August ↵
September ↵
October ↵
November ↵
December ↵
yields:
January
March
May
July
September
November
244
February
April
June
August
October
December
Intermec Fingerprint v7.61 – Programmer’s Reference Manual Ed. 7
Chapter 2 Program Instructions
SPLIT
Field of Application
Function splitting a string into an array according to the position
of a specified separator character and returning the number of
elements in the array.
Syntax
SPLIT(<sexp1>,<sexp2>,<nexp>)
<sexp1>
is the string to be split.
<sexp2>
is the string array in which the parts of the split string
should be put.
<nexp>
specifies the ASCII value for the separator.
Remarks
The string is divided by a specified separating character which may found
an infinite number of times in the string. Each part of the string will
become an element in the string array, but the separator character itself
will not be included in the array.
Should the string be split into more than four elements, Error 57, “Subscript
out of range” will occur. To avoid this error, issue a DIM statement to create
a larger array before the string is split.
Example
In this example a string is divided into five parts by the separator character
# (ASCII 35 decimal). The result will be an array of five elements numbered
0-4 as specified by a DIM statement. Finally, the number of elements is
also printed on the screen.
10
20
30
40
50
60
70
80
90
100
RUN
A$="ONE#TWO#THREE#FOUR#FIVE"
B$="ARRAY$"
DIM ARRAY$(5)
C%=SPLIT(A$,B$,35)
PRINT ARRAY$(0)
PRINT ARRAY$(1)
PRINT ARRAY$(2)
PRINT ARRAY$(3)
PRINT ARRAY$(4)
PRINT C%
yields:
ONE
TWO
THREE
FOUR
FIVE
5
Intermec Fingerprint v7.61 – Programmer’s Reference Manual Ed. 7
245
Chapter 2
Program Instructions
STOP
Field of Application
Statement for terminating execution of a program and to return
to immediate mode.
Syntax
STOP
Remarks
When a STOP statement is encountered, the following message is
returned to the host:
Break in line <line number>
You can resume execution where it was stopped by means of a CONT
statement or at a specified program line using a GOTO statement in
the immediate mode.
STOP is usually used in conjunction with CONT for debugging. When
execution is stopped, you can examine or change the values of variables using
direct mode statements.You may then use CONT to resume execution. CONT
is invalid if the program has been editied during the break.
Example
10
20
30
40
50
A%=100
B%=50
IF A%=B% THEN GOTO QQQ ELSE STOP
GOTO 30
QQQ:PRINT "Equal"
Ok
RUN
Break in line 30
Ok
PRINT A%
100
Ok
PRINT B%
50
Ok
B%=100
OK
CONT
Equal
Ok
246
Intermec Fingerprint v7.61 – Programmer’s Reference Manual Ed. 7
Chapter 2 Program Instructions
STORE IMAGE
Field of Application
Statement for setting up parameters for storing an image in the
printer’s memory.
Syntax
STORE↔IMAGE [RLL] [KILL]<sexp1>,<nexp1>,<nexp2>,[<nexp3>],<sexp2>
[RLL]
optionally indicates RLL compression.
[KILL]
optionally specifies that the image will be erased from the
temporary memory at startup (recommended).
<sexp1>
is the name of the image (max 30 char. incl. extension).
<nexp1>
is the width of the image in bits (=dots).
<nexp2>
is the height of the image in bits (=dots).
[<nexp3>]
is the size of the images in bytes (RLL only).
<sexp2>
is the name of the protocol:
"INTELHEX"
"UBI00"
"UBI01"
"UBI02"
"UBI03"
"UBI10"
Remarks
The name of the protocol must be entered in one sequence (for example
"INTELHEX"). Upper- or lowercase letter can be used at will. Refer
to the Chapter 3, “Image Transfer” for more information on the syntax
of the protocols.
STORE IMAGE RLL is used when the image to be received is compressed
into RLL format. In this case the size of the image must be included in
the list of parameters (<nexp3>).
STORE IMAGE KILL implies that the image will be stored in the printer’s
temporary memory, which is erased at power off or REBOOT. It is strongly
recommended to use this option to improve the performance. If you need to
store the image permanently, copy it from the temporary memory ("tmp:") to
the permanent memory ("c:") after the download is completed.
A STORE IMAGE statement must precede any STORE INPUT statement.
Example
This example shows how an Intelhex file is received via the standard input
channel and stored in the printer’s temporary memory:
10
20
30
40
50
60
70
80
90
100
STORE OFF
INPUT "Name:", N$
INPUT "Width:", W%
INPUT "Height:", H%
INPUT "Protocol:", P$
STORE IMAGE N$, W%, H%, P$
INPUT "", F$
STORE F$
IF MID$(F$,8,2,)<>"01" THEN GOTO 70
STORE OFF
Intermec Fingerprint v7.61 – Programmer’s Reference Manual Ed. 7
247
Chapter 2
Program Instructions
STORE INPUT
Field of Application
Statement for receiving and storing protocol frames of image data
in the printer’s memory.
Syntax
STORE↔INPUT<nexp1>[,<nexp2>]
<nexp1>
is the timeout in ticks (0.01 sec.) before next character
is received.
<nexp2>
is, optionally, the number assigned to a device when it was
OPENed for INPUT. Default: Standard IN channel.
Remarks
The STORE INPUT statement receives and stores a protocol frame of image
data as specified by preceding INPUT and STORE IMAGE statements. It also
performs an end frame check. (STORE INPUT is usually more convenient
than the old STORE statement, which still works even if it has been omitted in
this manual, refer to the Intermec Fingerprint v6.xx manuals.)
STORE INPUT works differently for various types of protocol:
INTELHEX
Receives and stores frames until timeout or end
frame is received.
UBI00-03
Receives and stores frames until timeout or required
number of bytes are received.
UBI10
Receives and stores frames until timeout or end
frame is received.
Examples
This example shows how an Intelhex file is stored using the STORE IMAGE
statement. The number of input parameters may vary depending on type of
protocol, see STORE INPUT statement.
10
20
30
40
50
60
70
80
STORE
INPUT
INPUT
INPUT
INPUT
STORE
STORE
STORE
OFF
"Name:", N$
"Width:", W%
"Height:", H%
"Protocol:", P$
IMAGE N$, W%, H%, P$
INPUT 100
OFF
To receive the input from another channel than std IN channel, the
device must be OPENed for INPUT and a reference be included in the
STORE INPUT statement.
10
20
30
40
50
60
70
80
90
100
248
STORE OFF
OPEN "uart2:" FOR INPUT AS #9
INPUT "Name:", N$
INPUT "Width:", W%
INPUT "Height:", H%
INPUT "Protocol:", P$
STORE IMAGE N$, W%, H%, P$
STORE INPUT 100,9
CLOSE #9
STORE OFF
Intermec Fingerprint v7.61 – Programmer’s Reference Manual Ed. 7
Chapter 2 Program Instructions
STORE OFF
Field of Application
Statement for terminating the storing of an image and resetting
the storing parameters.
Syntax
STORE↔OFF
Remarks
After having stored all protocol frames of an image, the storing must
be terminated by a STORE OFF statement. Even if you want to store
another image, you must still issue a STORE OFF statement before
the parameters for the new image can be set up using a new STORE
IMAGE statement.
It is recommended always to start an image storing procedure by issuing
a STORE OFF statement to clear the parameters of any existing STORE
IMAGE statement.
Example
This example shows how an Intelhex file is received via the standard IN
channel and stored in the printer’s memory:
10
20
30
40
50
60
70
80
STORE
INPUT
INPUT
INPUT
INPUT
STORE
STORE
STORE
OFF
"Name:", N$
"Width:", W%
"Height:", H%
"Protocol:", P$
IMAGE N$, W%, H%, P$
INPUT 100
OFF
Intermec Fingerprint v7.61 – Programmer’s Reference Manual Ed. 7
249
Chapter 2
Program Instructions
STR$
Field of Application
Function returning the string representation of a numeric expression.
Syntax
STR$(<nexp>)
<nexp>
is the numeric expression from which the string representation
will be returned.
Remarks
This is the complementary function for the VAL function.
Example
In this example, the value of the numeric variable A% is converted to string
representation and assigned to the string variable A$:
10
20
30
40
RUN
A%=123
A$=STR$(A%)
PRINT A%+A%
PRINT A$+A$
yields:
246
123123
250
Intermec Fingerprint v7.61 – Programmer’s Reference Manual Ed. 7
Chapter 2 Program Instructions
STRING$
Field of Application
Function repeatedly returning the character of a specified ASCII value,
or the first character in a specified string.
Syntax
STRING$(<nexp1>,<<nexp2>|<sexp>>)
<nexp1>
is the number of times the specified character should
be repeated.
<nexp2>
is the ASCII decimal code of the character to be repeated.
<sexp>
is a string expression, from which the first character will
be repeated.
Remarks
The character to be repeated is specified either by its ASCII decimal code
according to the selected character set (see NASC), or as the first character
in a specified string expression.
Example
In this example, both ways of using STRING$ are illustrated. The character
“*” is ASCII 42 decimal:
10
20
30
40
RUN
A$="*INTERMEC*"
LEADING$ = STRING$(10,42)
TRAILING$ = STRING$(10,A$)
PRINT LEADING$; A$; TRAILING$
yields:
***********INTERMEC***********
Intermec Fingerprint v7.61 – Programmer’s Reference Manual Ed. 7
251
Chapter 2
Program Instructions
SYSVAR
Field of Application
System array for reading or setting various system variables.
Syntax
SYSVAR(<nexp>)
<nexp> is the reference number of the system variable:
0
Not intended for public use
1
Not intended for public use
2
Not implemented
3
Not intended for public use
4
Not implemented
5
Not implemented
6
Not implemented
7
Not implemented
8
Not implemented
9
Reserved special applications
10
Reserved special applications
11
Reserved special applications
12
Not implemented
13
Read ribbon counter (XP-series)
14
Read errors since power on
15
Read errors since last SYSVAR(15)
16
Read number of bytes received at execution of STORE INPUT
17
Read number of frames received at execution of STORE INPUT
18
Read or Set verbosity level
19
Read or Set type of error message
20
Read direct or transfer mode
21
Read printhead density (dots/mm)
22
Read number of printhead dots
23
Read status of transfer ribbon sensor
24
Read if startup has occurred since last SYSVAR(24)
25
Read or Set type of Centronics communication
26
Read ribbon low condition (F-series)
27
Not implemented
28
Set paper feed data erase at headlift
29
Read DSR condition on "uart2:"
30
Read DSR condition on "uart3:"
31
Read last sent ACK, NAK, or CAN character in the MUSE protocol.
32
Read odometer value
33
Read DSR condition on "uart1:"
34
Read or Set positioning mode for TrueType characters
35
Setup saving (non-volatile/volatile)
36
Print changes of program modes
37
Set minimum gap length
38
Set equal safe (for TESTFEED)
39
Enable/disable slack compensation
40
Not implemented
41
“Next label not found” at predefined feed length
42
Stop media feed in the middle of label gaps
252
Intermec Fingerprint v7.61 – Programmer’s Reference Manual Ed. 7
Chapter 2 Program Instructions
SYSVAR, cont.
Remarks
1-12.
Not for public use or not implemented.
13. Ribbon counter
(Read only)
Reads the value of the optional ribbon counter in EasyCoder 501 XP/601
XP. At startup, the counter is set to a value of approximately 65,000 and
is decremented by 1 for each pulse. There are 40 pulses for each turn
of the ribbon unwind unit.
14. Errors since power up
Reads number of errors detected since last power up.
(Read only)
15. Errors since last SYSVAR(15)
(Read only)
Reads number of errors detected since last executed SYSVAR(15).
16. Number of bytes received
(Read only)
Reads the number of bytes received after the execution of a STORE INPUT
statement. Reset by the execution of a STORE IMAGE statement.
17. Number of frames received
(Read only)
Reads the number of frames received after the execution of a STORE INPUT
statement. Reset by the execution of a STORE IMAGE statement.
18. Verbosity level
The verbosity level can be set or read.
(Set or Read)
In the Immediate and Programming Modes, all levels are enabled by
default.
In the Intermec Direct Protocol, all levels are disabled by default.
Different verbosity levels can be selected:
SYSVAR (18) = -1 All levels enabled
(= VERBON)
SYSVAR (18) = 0
No verbosity
(= VERBOFF)
SYSVAR (18) = 1
Echo received characters
SYSVAR (18) = 2
“Ok” after correct command lines
SYSVAR (18) = 4
Echo input characters from comm. port
SYSVAR (18) = 8
Error after failed lines
The levels can be combined, so for example SYSVAR(18)=3 means both
“Echo received characters” and “Ok after correct command line.”
The presently selected verbosity level can also be read and is returned as a
numeric value, for example by PRINT SYSVAR(18).
Intermec Fingerprint v7.61 – Programmer’s Reference Manual Ed. 7
253
Chapter 2
Program Instructions
SYSVAR, cont.
Remarks, cont.
19. Type of error message
(Set or Read)
Four types of error messages can be selected:
SYSVAR(19) = 1
<string> in line <line>
(default)
for example “Invalid font in line 10”
SYSVAR(19) = 2
Error <number> in line <line>: <string>
for example “Error 19 in line 10: Invalid font”
SYSVAR(19) = 3
E<number>
for example “E19”
SYSVAR(19) = 4
Error <number> in line <line>
for example “Error 19 in line 10”
The presently selected type of error message can also be read and is returned as
a numeric value (1-4), for example by PRINT SYSVAR(19).
20. Direct or transfer mode
(Read only)
SYSVAR(20) allows you to read if the printer is set up for direct thermal
printing or thermal transfer printing, which is decided by your choice of
paper type in the printer’s setup.
The printer returns:
0 =
Direct thermal printing
1 =
Thermal transfer printing
21. Printhead density
(Read only)
SYSVAR(21) allows you to read the density of the printer’s printhead,
expressed as number of dots per millimeter.
22. Number of dots
(Read only)
SYSVAR(22) allows you to read the number of dots in the printer’s
printhead.
23. Transfer ribbon sensor
(Read only)
SYSVAR(23) allows you to read the status of the transfer ribbon sensor
in thermal transfer printers.
The printer returns:
0 =
No ribbon detected
1 =
Ribbon detected
24. Power up since last SYSVAR(24)
(Read only)
This system variable is important when using the Intermec Direct Protocol.
At power up, all data not saved as programs, files, fonts or images will
be deleted, and most instructions will be reset to their respective default
values. SYSVAR(24) allows the host to poll the printer to see if a power up
has occurred, for example because of a power failure and, if so, download
new data and new instructions.
The printer returns:
0 =
No power up since last SYSVAR(24)
1 =
Power up has occurred since last SYSVAR(24)
254
Intermec Fingerprint v7.61 – Programmer’s Reference Manual Ed. 7
Chapter 2 Program Instructions
SYSVAR, cont.
Remarks, cont.
25. Type of Centronics communication
(Set or Read)
Three types of Centronics communication in the compatible mode
can be selected or read. (Nibble, byte, ECP and EPP are presently
not supported.)
SYSVAR(25) = 0 Standard type
Predefined timing for the ACK and BUSY signals
when responding to host data is:
500 ns ACK, BUSY inactivated after ACK
finishes.
SYSVAR(25) = 1 IBM/Epson type
Predefined timing for the ACK and BUSY signals
when responding to host data is:
2500 ns ACK, BUSY inactivated as soon as ACK
pulse starts.
SYSVAR(25) = 2 Classic type
Predefined timing for the ACK and BUSY signals
when responding to host data is:
BUSY deactivated, wait 2500 ns, then give 2500
ns pulse on ACK.
Default:
0 = Standard type
26: Ribbon low condition
(Read only)
This parameter allows you to read the status of the ribbon low sensor in
EasyCoder F-series thermal transfer printers. In the Setup Mode, you can
specify a diameter in mm of the ribbon supply roll, when the SYSVAR(26)
will switch from 0 to 1.
The printer returns:
0 =
Ribbon not low
1 =
Ribbon low
28. Erase paper feed data at headlift
(Set only)
The firmware keeps track of all labels (or similar) between the label stop
sensor and the dot line of the printhead. If the printhead is lifted, there is a large
risk that the paper is moved, so the paper feed will not work correctly before
those labels have been fed out. This parameter allows you to decide whether
these data should be cleared when the printhead is lifted or not.
SYSVAR(28) = 0
SYSVAR(28) = 1
Media feed data are not cleared at headlift
Media feed data are cleared at headlift (default)
29: DSR condition on "uart2:"
(Read only)
This parameter allows you to read the DSR (Data Send Ready) condition
on the serial channel "uart2:"
The printer returns:
0 =
No
1 =
Yes
Intermec Fingerprint v7.61 – Programmer’s Reference Manual Ed. 7
255
Chapter 2
Program Instructions
SYSVAR, cont.
Remarks, cont.
30: DSR condition on "uart3:"
(Read only)
This parameter allows you to read the DSR (Data Send Ready) condition
on the serial channel "uart3:"
The printer returns:
0 =
No
1 =
Yes
31: Last control character sent
(Read only)
This parameter allows you to read the last control character sent from the
MUSE protocol (special applications).
The printer returns one of the following alternatives:
NUL
ACK
NAK
CAN
32: Odometer value
(Read only)
Returns the length of media feed past the printhead. Resolution: 10 meters.
33: DSR condition on "uart1:"
(Read only)
This parameter allows you to read the DSR (Data Send Ready) condition
on the serial channel "uart1:".
The printer returns:
0 =
No
1 =
Yes
34: TrueType character positioning mode
(Set or Read)
This parameter allows you to select one of three modes for the positioning of
TrueType characters and also to read for which mode the printer is set.
The modes are:
0 =
Standard mode (default)
This mode was introduced with Intermec Fingerprint 7.2.
1 =
Compatible mode
This mode is compatible with Intermec Fingerprint 7.xx earlier
than version 7.2.
2 =
Adjusted mode
This mode was introduced with Intermec Fingerprint 7.2.
35: Setup Saving
(Set or Read)
This parameter allows you to decide whether a change in the printer’s setup
is to be saved as a file (that is be effective after a reboot or power down) or
not be saved (volatile). You can also read for which alternative the printer is
set. Note that the SYSVAR (35) setting at the moment when the new setup
is entered decides whether it will be saved or not.
The alternatives are:
0 =
Setup saved to file (non-volatile)
1 =
Setup not saved to file (volatile)
256
Default
Intermec Fingerprint v7.61 – Programmer’s Reference Manual Ed. 7
Chapter 2 Program Instructions
SYSVAR, cont.
Remarks, cont.
36: Print changes of program modes
(Set or Read)
This parameter is used with the Fingerprint debugger and controls whether
changes of program modes should be printed to the Debug Standard
Out port (see DBSTDIO).
The options are:
0 =
Disable printout (default)
1 =
Enable printout
37: Set Minimum Gap Length
(Set or Read)
The media may have perforations or marks that not are intended to be
interpreted as gaps or black marks by the LSS. Using this SYSVAR
parameters, it is possible to make the LSS ignore gaps or marks that are
shorter that a specified value. (In this context, long and short are related
to the media feed direction.) The minimum gap length is specified in dots
within a range of 1-32. Default value is 1 mm (0.039 inches). Note that
SYSVAR(37) affects PRINTFEED and FORMFEED. For TESTFEED,
see SYSVAR(38).
38: Set Equal Safe for TESTFEED
(Set or Read)
This parameter is similar to SYSVAR(37), but it only affects how TESTFEED
will detect gaps and black marks. SYSVAR(38) specifies how many
consecutive detections of a gap or mark the LSS will have to make before
the firmware registers it as a gap or mark. The allowed range is 0-255
and the default value is 6.
39: Enable/Disable Slack Compensation
(Set or Read)
Label slack compensation is a method of eliminating slack in the belts
after having fed the media back. At a negative FORMFEED, the printer
will pullback the media slightly more than specified by the FORMFEED
statement and the feed the media forward the same distance. For example, if
FORMFEED -100 is specified, the printer will pull back the media -112 dots
and then feed the media forward +12 dots to take out the slack.
In some applications, this method could be inconvenient, so it is possible
to enable/disable it.
The options are:
0 =
Disable slack compensation
1 =
Enable slack compensation (default)
40: Not Implemented
41: “Next label not found” at Predefined Feed Length
(Set or Read)
The automatic detection of the error condition “Next label not found” (error
1031) by the label stop sensor can be overridden by specifying a fixed length
in dots. The length should preferably correspond to at least the distance
between the tops of two consecutive labels. During printing, error 1031
occurs if the media does not come loose from the core (media glued to core)
or if a label is missing on the liner. Especially useful for short labels (10–40
mm/0.4–1.5 inches long). Default value is 0.
Intermec Fingerprint v7.61 – Programmer’s Reference Manual Ed. 7
257
Chapter 2
Program Instructions
SYSVAR, cont.
Remarks, cont.
42: Stop Media Feed in the Middle of Label Gaps
(Set or Read)
If SYSVAR(42) = 0, the media feed stops so the middle of a 3 mm (0.12
in) gap becomes aligned with the tear bar when using labels (w gaps).
This is the default setting.
If SYSVAR(42) = 1, the media feed stops so the middle of the gap becomes
aligned with the tear bar, regardless of gap size
Examples
Reading the value of a system variable, in this case the transfer ribbon
sensor:
PRINT SYSVAR(23)
Setting the value of a system variable. In this case the standard type
of Centronics is selected:
SYSVAR(25)= 0
258
Intermec Fingerprint v7.61 – Programmer’s Reference Manual Ed. 7
Chapter 2 Program Instructions
TESTFEED
Field of Application
Statement for adjusting the label stop sensor while performing a
number of formfeeds.
Syntax
TESTFEED[<nexp>]
<nexp>
Remarks
is an optional feed length in dots.
The TESTFEED statement feeds <nexp> dots while adjusting the label
stop/black mark sensor (LSS) for the characteristics of the media presently
loaded in the printer. The adjustment is needed to detect media, gaps,
black marks, and out-of-paper conditions, therefore is must be done
for all media types.
If <nexp> is omitted, <nexp> is automatically set to 1.5 times the
media length specified in the setup. For the TESTFEED operation to
be successful, at least one gap or black mark must pass the LSS. Also
see SYSVAR(38).
In the Immediate Mode, a TESTFEED is performed when the <Shift> and
<Feed> keys are pressed simultaneously.
Since the TESTFEED is essential for a proper media load, some facility
for issuing a TESTFEED statement should be included in all custom-made
label-printing programs (see the example below).
Example
This program performs a TESTFEED statement when the <Shift>
and <Feed> key are pressed simultaneously on the printer’s built-in
keyboard:
10
20
30
40
. . .
. . .
. . .
1000
1010
1020
ON KEY (119) GOSUB QTESTFEED
KEY (119) ON
QLOOP:
GOTO QLOOP
. .
. .
. .
QTESTFEED:
TESTFEED
RETURN
Intermec Fingerprint v7.61 – Programmer’s Reference Manual Ed. 7
259
Chapter 2
Program Instructions
TICKS
Field of Application
Function returning the time, that has passed since the last power
up in the printer, expressed in number of “TICKS" (1 TICK =
0.01 seconds.)
Syntax
TICKS
Remarks
TICKS allows you to measure time more exactly than the TIME$ variable,
which cannot handle time units smaller than 1 second.
The TICKS counter is reset to zero at power up.
Example
10
20
RUN
A%=TICKS
PRINT A%
yields for example:
1081287
The time which has passed since the printer was started is 10812.87 seconds,
that is 3 hours 12.87 seconds.
260
Intermec Fingerprint v7.61 – Programmer’s Reference Manual Ed. 7
Chapter 2 Program Instructions
TIME$
Field of Application
Variable for setting or returning the current time.
Syntax
Setting the time:
<sexp>
TIME$=<sexp>
sets the current time by a 6-digit number specifying Hour,
Minute and Second.
Reading the time: <svar>=TIME$[(<sexp>)]
<svar>
returns the current time according to the printer’s clock.
<sexp>
is an optional flag "F", indicating that the time will be returned
according to the format specified by FORMAT TIME$.
Remarks
This variable works best if a real-time clock circuit (RTC) is fitted on the
printer’s CPU board. The RTC is battery backed-up and will keep record of
the time even if the power is turned off or lost.
If no RTC is installed, the internal clock will be used. After startup, an error
will occur when trying to read the date or time before the internal clock has
been manually set by means of either a DATE$ or a TIME$ variable. If only
the date is set, the internal clock starts at 00:00:00 and if only the time
is set, the internal clock starts at Jan 01 1980. After setting the internal
clock, you can use the DATE$ and TIME$ variables the same way as
when an RTC is fitted, until a power off or REBOOT causes the date
and time values to be lost.
The time is always entered and, by default, returned in the following
order HHMMSS, where:
HH
=
Hour
Two digits
(00-23)
MM
=
Minute
Two digits
(00-59)
SS
=
Second
Two digits
(00-59)
Time is entered as a 24-hour cycle, for example 8 o’clock pm is entered
as "200000".
The clock will be reset at the exact moment, when the appending carriage
return character is received, for example when you press the Return key
(Immediate Mode and Intermec Direct Protocol), or when the instruction is
executed (Programming Mode).
The format for how the printer will return time from a TIME$("F") variable
can be changed by means of a FORMAT TIME$ statement.
Example
Setting and reading the time, then printing it on the screen of the host:
10
20
30
RUN
TIME$ = "154300"
FORMAT TIME$ "HH.MM"
PRINT "Time is "+TIME$("F")
yields:
Time is 15.43
Intermec Fingerprint v7.61 – Programmer’s Reference Manual Ed. 7
261
Chapter 2
Program Instructions
TIMEADD$
Field of Application
Function returning a new time after a number of seconds have
been added to, or subtracted from, the current time or optionally
a specified time.
Syntax
TIMEADD$([<sexp1>,]<nexp>[,<sexp2>])
<sexp1>
is any time given according to the TIME$ format, which a
certain number of seconds should be added to or subtracted
from.
<nexp>
is the number of seconds to be added to (or subtracted
from) the current time, or optionally the time specified
by <sexp1>.
<sexp2>
is an optional flag "F", indicating that the time will be returned
according to the format specified by FORMAT TIME$.
Remarks
The original time (<sexp1>) should always be entered according to the
TIME$ format (HHMMSS), where:
HH
=
Hour
Two digits
(00-23)
MM
=
Minute
Two digits
(00-59)
SS
=
Second
Two digits
(00-59)
Time is entered as a 24-hour cycle, for example 8 o’clock pm is entered
as "200000".
The number of seconds to be added or subtracted from the original
time should be specified as a positive or negative numeric expression
respectively.
If no "F" flag is included in the TIMEADD$ function, the result will be
returned according to the TIME$ format, see above.
If the TIMEADD$ function includes an "F" flag, the result will be returned
in the format specified by FORMAT TIME$.
Examples
10
20
30
RUN
A%=30
B$=TIMEADD$ ("133050",A%)
PRINT B$
yields:
133120
10
20
30
40
RUN
TIME$="133050"
FORMAT TIME$ "hh.mm.ss pp"
A% = -40
PRINT TIMEADD$(A%,"F")
yields:
01.30.10 pm
262
Intermec Fingerprint v7.61 – Programmer’s Reference Manual Ed. 7
Chapter 2 Program Instructions
TIMEDIFF
Field of Application
Function returning the difference between two specified moments of
time in number of seconds.
Syntax
TIMEDIFF(<sexp1>,<sexp2>)
<sexp1>
is one of two moments of time (time 1).
<sexp2>
is the other of the two moments (time 2).
Remarks
To get the result as a positive value, the two moments of time, for
which the difference is to be calculated, should be entered with the
earlier moment (time 1) first and the later moment (time 2) last, see
the first example below.
If the later moment (time 2) is entered first, the resulting value will be
negative, see the second example below.
The time should be entered according to the format for the TIME$ variable,
that is in the order HHMMSS, where:
HH
=
Hour
Two digits
(00-23)
MM
=
Minute
Two digits
(00-59)
SS
=
Second
Two digits
(00-59)
Time is entered as a 24-hour cycle, for example 8 o’clock pm is entered
as "200000".
The resulting difference in seconds will be returned.
Examples
PRINT TIMEDIFF ("133050","133120")
yields:
30
PRINT TIMEDIFF ("133120","133050")
yields:
-30
Intermec Fingerprint v7.61 – Programmer’s Reference Manual Ed. 7
263
Chapter 2
Program Instructions
TRANSFER KERMIT
Field of Application
Statement for transferring data files using KERMIT communication
protocol.
Syntax
TRANSFER↔K[ERMIT]<sexp1>[,<sexp2>[,<sexp3>[,sexp4>]]]
<sexp1>
specifies the direction of the transmission by the expression
"S " (= send) or "R" (= receive).
<sexp2>
is, optionally, the name of the file transmitted from the printer
(default "KERMIT.FILE").
<sexp3>
specifies, optionally, the input device as "uart1:", "uart2:", or
"uart3:" (default: std IN channel).
<sexp4>
specifies, optionally, the output device as "uart1:", "uart2:", or
"uart3:" (default: std OUT channel).
Remarks
Kermit is a protocol for serial binary transfer of a complete file between for
example a PC and a printer. Kermit is included in Windows HyperTerminal
and in many other communication programs.
Warning, tests have shown that Microsoft Windows Terminal, versions
3.0 and 3.1, is unable to receive a file from the printer, even if capable
of sending a file to the printer.
Consult the application program manual or the reference volume “Kermit
-A File Transfer Protocol" by Frank da Cruz (Digital Press 1987, ISBN
0-932376-88-6).
TRANSFER KERMIT can only handle one single file at a time.
When transmitting files from the printer to the host, carefully observe possible
restrictions concerning the number of characters, etc. in the file name, that
is imposed by the operating system of the host.
When receiving a file, you must start the transmission within 30 seconds
from completing the TRANSFER KERMIT "R" statement. The printer will
store the file in the current directory "c:", "tmp:", or "card1:", see CHDIR
statement. (Obviously, files cannot be received into "rom:".) If there already
exists a file in the current directory with the same name as the one to be
transferred, the existing file will be replaced by the new file. Thus, it is up
to you to keep record of the files already stored in the current directory
(see FILES statement). Before transfer, give the new file a name that is not
already occupied by an existing file, unless you want to replace the existing
file. If you use TRANSFER KERMIT to download a font or image file,
the font or image will automatically be installed after the downloading is
completed without any need for a reboot.
Examples
Setting up the printer for file reception on the standard IN channel:
TRANSFER KERMIT "R"
Transmission from printer to host of the file "FILE1.TXT" on a channel
other than the standard OUT channel:
TRANSFER K "S","FILE1.TXT","uart2:","uart2:"
264
Intermec Fingerprint v7.61 – Programmer’s Reference Manual Ed. 7
Chapter 2 Program Instructions
TRANSFER STATUS
Field of Application
Statement for checking last TRANSFER KERMIT or TRANSFER
ZMODEM operation.
Syntax
TRANSFER↔S[TATUS]<nvar>,<svar>
<nvar>
is a five-element one-dimensional numeric array where
the elements will return:
0: Number of packets.
(Kermit only)
1: Number of NAK’s.
(Kermit only)
2: ASCII value of last status character.
(Kermit only)
3: Last error.
(Kermit and ZMODEM)
4: Block check type used.
(Kermit only)
<svar>
is a two-element one-dimensional string array where the
elements will return:
0: Type of protocol.
("KERMIT" or “ZMODEM")
1: Last file name received.
Remarks
After a file transfer using the Kermit or ZMODEM protocol has been
performed (see TRANSFER KERMIT and TRANSFER ZMODEM
statements), you can check how the transfer was performed. Note that the
numeric array requires the use of a DIM statement, since the array will
contain more than four elements.
Example
10
20
30
40
50
.....
.....
.....
TRANSFER KERMIT "R"
DIM A%(4)
TRANSFER STATUS A%, B$
PRINT A%(0), A%(1), A%(2), A%(3), A%(4)
PRINT B$(0), B$(1)
Intermec Fingerprint v7.61 – Programmer’s Reference Manual Ed. 7
265
Chapter 2
Program Instructions
TRANSFER ZMODEM
Field of Application
Statement for transferring data files using ZMODEM communication
protocol.
Syntax
TRANSFER↔Z[MODEM]<sexp1>[,<sexp2>[,<sexp3>[,sexp4>]]]
<sexp1>
specifies the direction of the transmission by the expression
"S " (= send) or "R" (= receive).
<sexp2>
is, optionally, the name of the file transmitted from the printer
(default "ZMODEM.FILE").
<sexp3>
specifies, optionally, the input device as "uart1:", "uart2:", or
"uart3:" (default: std IN channel).
<sexp4>
specifies, optionally, the output device as "uart1:", "uart2:", or
"uart3:" (default: std OUT channel).
Remarks
ZMODEM is a protocol for serial transfer of a complete file between
for example a PC and a printer. For more information on the ZMODEM
protocol, please refer to http://www.omen.com. Related instructions are
RZ (receive data using the ZMODEM protocol) and SZ (send data using
the ZMODEM protocol).
TRANSFER ZMODEM can only handle one single file at a time.
When transmitting files from the printer to the host, carefully observe
possible restrictions concerning the number of characters etc. in the file name,
that is imposed by the operating system of the host.
When receiving a file, you must start the transmission within 30 seconds
from completing the TRANSFER ZMODEM "R" statement. The printer
will store the file in the current directory "c:", "tmp:", or "card1:", see
CHDIR statement. (Obviously, files cannot be received into "rom:".) If there
already exists a file in the current directory with the same name as the one
to be transferred, the existing file will be replaced by the new file. Thus, it is
up to you to keep record of the files already stored in the current directory
(see FILES statement). Before transfer, give the new file a name that is not
already occupied by an existing file, unless you want to replace the existing
file. If you use TRANSFER ZMODEM to download a font or image file,
the font or image will automatically be installed after the downloading is
completed without any need for a reboot.
Examples
Setting up the printer for file reception on the standard IN channel:
TRANSFER ZMODEM "R"
Transmission from printer to host of the file "FILE1.TXT" on a channel
other than the standard OUT channel:
TRANSFER Z "S","FILE1.TXT","uart2:","uart2:"
266
Intermec Fingerprint v7.61 – Programmer’s Reference Manual Ed. 7
Chapter 2 Program Instructions
TRANSFER$
Field of Application
Function executing a transfer from source to destination as specified by
a TRANSFERSET statement.
Syntax
TRANSFER$(<nexp>)
<nexp>
is the character time-out in ticks (10 milliseconds).
Remarks
The TRANSFER$ function executes the transfer from source to destination
as specified by the TRANSFERSET statement. It also checks the transfer and
breaks it if no character has been transmitted before the specified time-out has
expired or if any break character, as specified by the break character string
in the TRANSFERSET statement, is encountered.
If the transmission was interrupted because a character in the break set was
encountered, that character will be returned.
If the transmission was interrupted because of a time-out error, an empty
string will be returned.
If the transmission was interrupted because of the reception of a character
on any other communication channel than the source (as specified by
TRANSFERSET statement), an empty string will be returned.
Example
The transfer will be executed by the TRANSFER$ function in line 60 and
possible interruptions will be indicated by a break character or empty
string ("") in the string variable C$.
10
20
30
40
50
60
.....
.....
.....
OPEN "LABEL1.PRG" FOR INPUT AS #1
OPEN "UART1:" FOR OUTPUT AS #2
A$=CHR$(13)
B$=CHR$(10)
TRANSFERSET #1, #2, A$+B$
C$=TRANSFER$(100)
Intermec Fingerprint v7.61 – Programmer’s Reference Manual Ed. 7
267
Chapter 2
Program Instructions
TRANSFERSET
Field of Application
Statement for entering setup for the TRANSFER$ function.
Syntax
TRANSFERSET[#]<nexp1>,[#]<nexp2>,<sexp>[,<nexp3>]
#
optional number sign.
<nexp1>
is the number of the source (the file or device OPENed
for input).
<nexp2>
is the number of the destination file (the file or device OPENed
for output or append).
<sexp>
is a set of break characters.
<nexp3>
optionally enables or disables break on any other channel
than the source:
<nexp> = 0 Break disabled
<nexp> ≠ 0 Break enabled
Default:
Standard I/O with no break characters.
Break on any other channel enabled.
Remarks
This statement sets up the transfer of data from a file or device OPENed for
input to another file or device OPENed for output or append. The transfer
will be interrupted if any character in a string of break characters,
specified in this statement, is encountered (optionally on another specified
channel). The actual transfer is executed by means of a TRANSFER$
function, that also returns the break character that has caused any
possible interruption.
Example
In this example, the data transfer from a file in the current directory to
an external device connected to the communication port "uart1:" will
be interrupted as soon as a carriage return or a line feed character is
encountered in the file.
10
20
30
40
50
60
.....
.....
.....
268
OPEN "LABEL1.PRG" FOR INPUT AS #1
OPEN "UART1:" FOR OUTPUT AS #2
A$=CHR$(13)
B$=CHR$(10)
TRANSFERSET #1, #2, A$+B$
C$=TRANSFER$(100)
Intermec Fingerprint v7.61 – Programmer’s Reference Manual Ed. 7
Chapter 2 Program Instructions
TRON/TROFF
Field of Application
Statements enabling/disabling tracing of the program execution.
Syntax
TRON|TROFF
TRON
TROFF
Remarks
enables tracing.
disables tracing (default)
Useful for debugging purposes. When tracing is enabled, each line
number of the program is displayed on the screen within parentheses
as the execution goes on.
Tracing will be disabled when a TROFF statement is executed.
Example
10
20
30
TRON
RUN
PRINT "HELLO"
INPUT"Enter Text"; A$
PRINT A$
yields:
(10)
(20)
(30)
HELLO
Enter text?
WORLD
Intermec Fingerprint v7.61 – Programmer’s Reference Manual Ed. 7
(Operator enters "WORLD")
269
Chapter 2
Program Instructions
VAL
Field of Application
Function returning the numeric representation of a string expression.
Syntax
VAL(<sexp>)
<sexp>
Remarks
is the string expression from which the numeric representation
will be returned.
VAL is the complementary function for STR$.
VAL ignores space characters from the argument string to determine
the result.
If the first character in the string expression is anything else but a digit, a plus
sign, or a minus sign, the VAL function returns the value 0.
Example
In this example, the values of the string variables A$ and B$ are read and
assigned to the numeric variables A% and B%:
10
20
30
40
50
60
70
80
RUN
A$="123, MAIN STREET"
A%=VAL(A$)
B$="PHONE 123456"
B%=VAL(B$)
PRINT A$
PRINT A%
PRINT B$
PRINT B%
yields:
123, MAIN STREET
123
PHONE 123456
0
270
Intermec Fingerprint v7.61 – Programmer’s Reference Manual Ed. 7
Chapter 2 Program Instructions
VERBON/VERBOFF
Field of Application
Statements for specifying the verbosity level of the communication
from the printer on the standard OUT channel (serial communication
only).
Syntax
VERBON|VERBOFF
VERBON
VERBOFF
Remarks
enables all verbosity levels (default).
disables all verbosity levels.
VERBON:
By default, when a character is received on the standard IN channel (see
SETSTDIO statement), the corresponding character will be echoed back
on the standard OUT channel. As the serial channel "uart1:" is by default
selected both standard IN and OUT channel, this implies that when you enter
a character on the keyboard of the host, the same character will appear on the
screen after having been transmitted to the printer and back.
When an instruction has been successfully executed, “Ok” will be displayed
on the screen, else an error message will be returned. Obviously, this requires
two-way communication, so verbosity has no meaning in case of the parallel
"centronics:" communication protocol.
VERBON corresponds to SYSVAR(18)=-1.
VERBOFF corresponds to SYSVAR(18)=0.
Other verbosity levels can be selected using SYSVAR(18), and the type of
error message can be selected using SYSVAR (19).
VERBOFF:
All responses will be suppressed, which means that no characters or
error messages will be echoed back. VERBOFF statements do not affect
question marks and prompts displayed as a result of an INPUT statement.
Instructions like DEVICES, FILES, FONTS, IMAGES, LIST, and PRINT
will also work normally.
Example
This example shows how VERBOFF is used to suppress the printing of INPUT
data in lines 20 and 40 during the actual typing on the host, and VERBON to
allow the printing of the resulting string variables on the screen:
10
20
30
40
50
60
70
80
90
FOR Q%=1 TO 6
VERBOFF:INPUT "", A$
VERBON:PRINT A$;
VERBOFF:INPUT "", B$
VERBON
C$=SPACE$(25-LEN(A$))
PRINT C$+B$
NEXT Q%
END
Intermec Fingerprint v7.61 – Programmer’s Reference Manual Ed. 7
271
Chapter 2
Program Instructions
VERSION$
Field of Application
Function returning the version of the firmware, printer family, or
type of CPU board.
Syntax
VERSION$[(<nexp>)]
<nexp>
is, optionally, the type of information to be returned:
0 = Version of firmware (default)
1 = Printer family
2 = Type of CPU board
Remarks
The name of the firmware depends on if the printer is running in the Immediate
or Programming Modes, or in the Intermec Direct Protocol.
The printer family is returned as one of the following alternatives:
501XP
601XP
F2
F4
The type of CPU-board is returned as a string of text, for example:
hardware version 2.1
(EasyCoder 501/601 XP)
hardware version 3.0
(EasyCoder F-series)
Examples
PRINT VERSION$(0)
yields for example:
Fingerprint 7.60
PRINT VERSION$(1)
yields for example:
501XP
PRINT VERSION$(2)
yields for example:
hardware version 2.1
272
Intermec Fingerprint v7.61 – Programmer’s Reference Manual Ed. 7
Chapter 2 Program Instructions
WEEKDAY
Field of Application
Function returning the weekday of a specified date.
Syntax
WEEKDAY(<sexp>)
<sexp>
Remarks
is the date in DATE$ format from which the weekday
will be returned.
This function returns the weekday as a numeric constant:
1 = Monday
2 = Tuesday
3 = Wednesday
4 = Thursday
5 = Friday
6 = Saturday
7 = Sunday
The date should be entered according to the syntax for the DATE$ variable,
that is in the following order:
YY = Year
Last two digits
(for example 2000 = 00)
MM = Month
Two digits
(01-12)
DD = Day
Two digits
(01-28|29|30|31)
Example: December 1, 2000 is entered as "001201".
The built-in calendar corrects illegal values for the years 1980-2048, for
example the illegal date 001232 will be corrected to 010101.
Example
In this example the weekday for the current date is printed on the screen
of the host (another way is to use NAME WEEKDAY$ statement and
WEEKDAY$ function):
10
20
30
40
50
60
70
80
90
RUN
B$=DATE$
A% = WEEKDAY (B$)
IF A% = 1 THEN PRINT
IF A% = 2 THEN PRINT
IF A% = 3 THEN PRINT
IF A% = 4 THEN PRINT
IF A% = 5 THEN PRINT
IF A% = 6 THEN PRINT
IF A% = 7 THEN PRINT
"MONDAY"
"TUESDAY"
"WEDNESDAY"
"THURSDAY"
"FRIDAY"
"SATURDAY"
"SUNDAY"
yields for example:
THURSDAY
Intermec Fingerprint v7.61 – Programmer’s Reference Manual Ed. 7
273
Chapter 2
Program Instructions
WEEKDAY$
Field of Application
Returning the name of the weekday from a specified date.
Syntax
WEEKDAY$(<sexp>)
<sexp>
is the date for which the name of the weekday, according
to a list of weekday names created by means of NAME
WEEKDAY$ statement , will be returned.
Remarks
This function returns the name of the weekday according to a list of
weekday names specified by means of NAME WEEKDAY$ statement
or–if the name is missing–the full English name in lowercase characters,
for example “friday".
YY = Year
Last two digits
(for example 2000 = 00)
MM = Month
Two digits
(01-12)
DD = Day
Two digits
(01-28|29|30|31)
Example: December 1, 2000 is entered as "001201".
The built-in calendar corrects illegal values for the years 1980-2048, for
example the illegal date 001232 will be corrected to 010101.
Example
This example shows how to make the printer return the name of the
weekday as a three-letter English abbreviation in connection with a
formatted date:
10
20
30
40
50
60
70
80
90
100
RUN
FORMAT DATE$ ", MM/DD/YY"
DATE$="001201"
NAME WEEKDAY$ 1, "Mon"
NAME WEEKDAY$ 2, "Tue"
NAME WEEKDAY$ 3, "Wed"
NAME WEEKDAY$ 4, "Thu"
NAME WEEKDAY$ 5, "Fri"
NAME WEEKDAY$ 6, "Sat"
NAME WEEKDAY$ 7, "Sun"
PRINT WEEKDAY$ (DATE$) + DATE$("F")
yields:
Fri, 12/01/00
274
Intermec Fingerprint v7.61 – Programmer’s Reference Manual Ed. 7
Chapter 2 Program Instructions
WEEKNUMBER
Field of Application
Function returning the number of the week for a specified date.
Syntax
WEEKNUMBER(<sexp>[,<nexp])
<sexp>
is the date for which the week number will be returned
(1-53).
<nexp>
specifies the calculating function (0-14) as listed below.
Default is 0.
Remarks
WEEKNUMBER calculating function:
<nexp>
0
1
2
3
4
5
6
7
8
9
10
11
12
13
14
Week #1 starts...
according to ISO 8601 (European standard):
• week #1 will start on the last Monday at or before the New Year, if January 1 occurs
on a Monday, Tuesday, Wednesday, or Thursday.
• week #1 will start on the first Monday after the New Year, if January 1 occurs on
a Friday, Saturday, or Sunday.
at Sunday in the first week with 7 days in the actual year
at January 1:st, with each following week starting on a Sunday
at Monday in the first week with 7 days in the actual year
at January 1:st, with each following week starting on a Monday
at Tuesday in the first week with 7 days in the actual year
at January 1:st, with each following week starting on a Tuesday
at Wednesday in the first week with 7 days in the actual year
at January 1:st, with each following week starting on a Wednesday
at Thurday in the first week with 7 days in the actual year
at January 1:st, with each following week starting on a Thursday
at Friday in the first week with 7 days in the actual year
at January 1:st, with each following week starting on a Friday
at Saturday in the first week with 7 days in the actual year
at January 1:st, with each following week starting on a Saturday
The date should be entered according to the syntax for the DATE$ variable,
that is in the following order:
YY = Year
Last two digits
(for example 2000 = 00)
MM = Month
Two digits
(01-12)
DD = Day
Two digits
(01-28|29|30|31)
Example: December 1, 2000 is entered as "001201".
The built-in calendar corrects illegal values for the years 1980-2048, for
example the illegal date 001232 will be corrected to 010101.
Examples
This example returns the week number of December 29, 2000 using
calculating function 2:
PRINT WEEKNUMBER ("001229",2)
yields for example:
53
Intermec Fingerprint v7.61 – Programmer’s Reference Manual Ed. 7
275
Chapter 2
Program Instructions
WHILE...WEND
Field of Application
Statement for executing a series of statements in a loop providing
a given condition is true.
Syntax
WHILE <nexp>
<stmt>
[...<stmt>]
WEND
<nexp>
<stmt>
Remarks
is a numeric expression that is either TRUE (-1) of FALSE
(0).
is a statement, or a list of statements on separate lines, that
will be executed provided <nexp> is TRUE.
If <nexp> is TRUE, all following statements will be executed successively
until a WEND statement is encountered. The program execution then
goes back to the WHILE statement and repeats the process, provided
<nexp> still is TRUE.
If <nexp> is FALSE, the execution resumes at the statement following
the WEND statement.
WHILE...WEND statements can be nested. Each WEND matches the
most recent WHILE statement.
Example
In this example, the WHILE...WEND loop will only be executed if the character
“Y” (ASCII 89 dec.) is entered on the keyboard of the host.
10
20
30
40
50
60
70
80
RUN
B%=0
WHILE B%<>89
INPUT "Want to exit? Press Y=Yes or N=No ",A$
B%=ASC(A$)
WEND
PRINT "The answer is Yes"
PRINT "You will exit the program"
END
yields:
Want to exit?
Want to exit?
The answer is
You will exit
276
Press Y=Yes or N=No
Press Y=Yes or N=No
Yes
the program
N
Y
Intermec Fingerprint v7.61 – Programmer’s Reference Manual Ed. 7
Chapter 2 Program Instructions
XORMODE ON/OFF
Field of Application
Statement for enabling or disabling the xor/flip mode of Intermec
Fingerprint in connection with graphical operations.
Syntax
XORMODE ON|OFF
Remarks
When XORMODE is set ON, dots are reversed, as opposed to set, by all
graphical operations except bar codes. This means that if, for example two
black lines cross, the intersection will be white. If XORMODE is set to
OFF, the intersection will be black.
The XORMODE statement will only have effect if issued on a program
line with a line number.
Default is XORMODE OFF. XORMODE is automatically set to default
when a PRINTFEED statement is executed.
Example
The following program illustrates the difference between XORMODE ON
and XORMODE OFF. The two lines to the left are drawn with XORMODE
disabled and the lines to the right with XORMODE enabled.
10
20
30
40
50
60
70
80
90
100
110
120
130
140
RUN
XORMODE OFF
PRPOS 0,50
PRLINE 300,30
DIR 4
PRPOS 100,0
PRLINE 200,30
XORMODE ON
DIR 1
PRPOS 400,50
PRLINE 300,30
DIR 4
PRPOS 500,0
PRLINE 200,30
PRINTFEED
Intermec Fingerprint v7.61 – Programmer’s Reference Manual Ed. 7
277
Chapter 2
Program Instructions
External Commands; ZMODEM
Field of Application
External commands for receiving and sending data using the ZMODEM
protocol.
Syntax
RUN "rz [<switches>] [<filename>]"
(receive data)
<switches>:
-c
Forces no crash recovery, even if sender requests ZCRESUM
(resume interrupted file transfer).
-e
Print last error to std OUT channel.
-l[<logfile>]
Send verbose output to logfile. Default logfile name is
"tmp:.zmodemlog".
-r
If ZMCLOB is not set and the file already exists, replace file
if the transfer is successful.
-v[<level>]
Set verbosity level. Level is a decimal number. Default
level is 1.
-u
Translate file name to uppercase. If a filename is given as
parameter, no translation is done.
<filename>
is optionally the name under which the file will be saved.
RUN "sz [<switches>] [<filename>]"
(send data)
<switches>:
-l[<logfile>]
Send verbose output to logfile. Default logfile name is
"tmp:.zmodemlog".
-v[<level>]
Set verbosity level. Level is a decimal number. Default
level is 1.
<filename>
is the name of the file.
Remarks
Note that rz and sz must be entered in lowercase characters.
If a file name is given in the rz statement, this name overrides the name
given by the transmitting unit.
For more information on the ZMODEM protocol, please refer to
http://www.omen.com. Related instruction is TRANSFER ZMODEM.
278
Intermec Fingerprint v7.61 – Programmer’s Reference Manual Ed. 7
Chapter 2 Program Instructions
External Commands; Dynamic Modules
Field of Application
External commands for inserting, listing, and removing dynamic
modules in the running kernel.
Syntax
RUN "insmod <device><file>"
(insert module)
<device>
is the device where the dynamic module is stored.
<file>
is the name of the dynamic module.
RUN "rl m"
<device>
<name>
(list modules)
is the device where the dynamic module is stored.
is the name of the dynamic module.
RUN "rmmod<name>"
<name>
is the name of the dynamic module.
Remarks
(remove module)
At startup, the kernel is copied from the printer’s flash memory ("rom:")
to the printer’s temporary DRAM memory ("tmp:"), where it is executed. In
order to save space in the DRAM memory, dynamic program modules could
be downloaded and linked to the running kernel when they are needed and
be removed when they are not needed any longer.
Dynamic modules also allow new or custom-made program modules to
be added to an existing version of Intermec Fingerprint. Previously, it
was necessary to create a new Fingerprint version for each new module
or combination of modules.
In case of bar codes, the run "insmod" command is executed automatically
if a bar code referred to in a BARSET or BARTYPE statement is not found
in the running kernel. If the bar code still is not found, an error occurs. For
all other types of dynamic modules, the run "insmod" command must be
perfomed manually. The downloading is made “on-the-fly”, so there is no
need to reboot the printer or even to stop program execution.
The method of creating dynamic modules is outside the scope of this manual
and is not publically released.
Note that insmod, rl m, and rmmod must be entered as lowercase
characters.
Intermec Fingerprint v7.61 – Programmer’s Reference Manual Ed. 7
279
Chapter 3
3. Image Transfer
The following five image transfer file protocols are used in connection with
the STORE IMAGE statement and use a common format for the image
data, as descibed on next page.
Intelhex
Intel hex [Intel Hexadecimal Intellec 8/MDS (I_hex) file format] is a
well-known standard format for transfer of bitmap images. Please refer to
the standard literature on the subject.
Note that:
• Hex digits in Intelhex frames must be uppercase.
• Null frames may be omitted.
• Frames can be received in any order.
• Maximum file size is 64 kbytes.
UBI00
Each frame contains:
<data bytes>
<data bytes>
UBI01
Binary images. Modulo 2 bytes.
Each frame of data contains:
<data bytes> <checksum>
<data bytes>
Binary images. Modulo 2 bytes.
<checksum>
Modulo 65536 byte-wise sum of what is defined in protocol
of “data bytes.”
2 byte binary. MSB, LSB.
UBI02
Each frame of data contains:
<number of data bytes> <data bytes> <checksum>
<number of data bytes> 2 bytes binary. MSB, LSB.
<data bytes>
Binary images. Modulo 2 bytes.
<checksum>
Modulo 65536 byte-wise sum of what is defined in protocol of
“number of data bytes” and “data bytes.”
2 byte binary. MSB, LSB.
UBI03
Each frame of data contains:
<start of frame id.> <number of data bytes> <data bytes> <checksum>
<start of frame id.>
1 byte (ASCII 42 dec = "*").
<number of data bytes> 2 bytes binary. MSB, LSB.
<data bytes>
Binary images. Modulo 2 bytes.
<checksum>
Modulo 65536 byte-wise sum of what is defined in protocol
of “start of frame id” and “number of data bytes” and
”data bytes.”
2 byte binary. MSB, LSB.
280
Intermec Fingerprint v7.61 – Programmer’s Reference Manual Ed. 7
Chapter 3
Image Format
Image Transfer
The following image format is valid for Intelhex, UBI00, UBI01, UBI02,
and UBI03 image transfer protocols, but not for the UBI10 protocol, which
is a combined image transfer protocol and format.
A bitmap picture can be encoded in one of two ways, as a plain bit representation
or encoded with a Run Lenght Limited (RLL) algoritm.
Pictures can be magnified, by the printer, up to four times independently
in both x and y directions.
The pictures can be rotated 180 degres by the printer (that is printed
upside-down.) To print a bitmap in all four directions you have to define
two bitmaps, one straight and one rotated 90 degrees. To comply with the
Intermec Fingerprint convention, use the extension .1 for the straight bitmap
and extension .2 for the rotated one.
Bitmap pictures, in both encoding schemes, are printed with the lowest
address first, that is the first row of defined data is the first thing out. (This
may be somewhat confusing. The only result, if you misinterpret this, is that
your picture will come out upside-down.)
Bitmap pattern, bit representation
The bitmap picture is encoded word oriented (16 bits), low byte first. The
bits in each byte is read from lsb first (bit 0.)
Bitmap pattern, Run Lenght Limited (RLL)
RLL encoding is a very efficient way of compressing big bitmaps with
relatively big black and/or white areas.
The RLL encoded picture is encoded byte oriented (8 bits.) Each byte
represents the number of consecutive black or white dots. The sum of bytes
for each row must equal the width of the pattern. The first byte represent
white dots, the second black and so on. The last byte must alter the
color back to white. If the first dot is black just enter a zero first. Valid
values for dot fields is 0 to 127 (0 to 7f hex.) To get a row longer then
127, concatenate two rows with zero, for example to get a row of 240
dots, enter 128,0,112.
The next step in our RLL encoding algoritm is to compress identicals rows,
two identical rows are compressed by adding a byte in both ends of the dot row,
the valid range for these bytes are -1 to -128 (ff to 80 hex.)
Intermec Fingerprint v7.61 – Programmer’s Reference Manual Ed. 7
281
Chapter 3
Image Transfer
Image Format,
cont.
Example 1: Bitmap encoding
To clarify this, lets try a simple example. X’s represent black dots in the final
printout. The pattern shown is 22 bits wide and 28 rows high.
NOTE!
• The bit order in each byte. Note also word fill to nearest word (16 bit).
• To the right is a hex representation of the pattern, as it would appear
in a memory dump.
• To get the pattern to appear as printed on this page with direction one, the
last row (row 27) should have the lowest address.
row
282
|byte 3 |byte 2 |byte 1 |byte 0 |
76543210765432107654321076543210
0 ..........XXXXXXXXXXXXXXXXXXXXXX
1 ..........X....................X
2 ..........X..............XX....X
3 ..........X.............X.X....X
4 ..........X............X..X....X
5 ..........X...........X...X....X
6 ..........X..........X....X....X
7 ..........X.........X.....X....X
8 ..........X........X......X....X
9 ..........X...... X.......X....X
10 ..........X......X........X....X
11 ..........X.....X.........X....X
12 ..........X....X..........X....X
13 ..........X...X...........X....X
14 ..........X..X............X....X
15 ..........X.X.............X....X
16 ..........X.XXXXXXXXXXXXXXXXXX.X
17 ..........X...............X....X
18 ..........X...............X....X
19 ..........X...............X....X
20 ..........X...............X....X
21 ..........X...............X....X
22 ..........X...............X....X
23 ..........X...............X....X
24 ..........X...............X....X
25 ..........X.............XXXXX..X
26 ..........X....................X
27...........XXXXXXXXXXXXXXXXXXXXXX
ff,ff,3f,00
01,00,20,00
61,00,20,00
a1,00,20,00
21,01,20,00
21,02,20,00
21,04,20,00
21,08,20,00
21,10,20,00
21,20,20,00
21,40,20,00
21,80,20,00
21,00,21,00
21,00,22,00
21,00,24,00
21,00,28,00
fd,ff,2f,00
21,00,20,00
21,00,20,00
21,00,20,00
21,00,20,00
21,00,20,00
21,00,20,00
21,00,20,00
21,00,20,00
f9,03,20,00
01,00,20,00
ff,ff,3f,00
Intermec Fingerprint v7.61 – Programmer’s Reference Manual Ed. 7
Chapter 3
Image Format,
cont.
Image Transfer
Example 2: RLL Encoding
To clarify this, lets try a simple example. X’s represent black dots in the final
print out. The pattern shown is 22 bits wide and 32 rows high.
NOTE!
• Notice the reverse byte order. Count dots from right.
• To the right is a decimal representation of the pattern.
• To get the pattern to appear as printed on this page with direction one,
the last row (row 27) should have the lowest address. Row 18 until 24 is
repeted by the data in row 17.
row
0
1
2
3
4
5
6
7
8
9
10
11
12
13
14
15
16
17
18
19
20
21
22
23
24
25
26
27
28
29
30
31
32
XXXXXXXXXXXXXXXXXXXXXX
X....................X
X..............XX....X
X.............X.X....X
X............X..X....X
X...........X...X....X
X..........X....X....X
X.........X.....X....X
X........X......X....X
X...... X.......X....X
X......X........X....X
X.....X.........X....X
X....X..........X....X
X...X...........X....X
X..X............X....X
X.X.............X....X
X.XXXXXXXXXXXXXXXXXX.X
X...............X....X
X...............X....X
X...............X....X
X...............X....X
X...............X....X
X...............X....X
X...............X....X
X...............X....X
X.............XXXXX..X
X....................X
XXXXXXXXXXXXXXXXXXXXXX
..........X...........
..........X...........
..........X...........
..........X...........
......XXXXXXXXX.......
0,22,0
0,1,20,1,0
0,1,4,2,14,1,0
0,1,4,1,1,1,13,1,0
0,1,4,1,2,1,12,1,0
0,1,4,1,3,1,11,1,0
0,1,4,1,4,1,10,1,0
0,1,4,1,5,1,9,1,0
0,1,4,1,6,1,8,1,0
0,1,4,1,7,1,7,1,0
0,1,4,1,8,1,6,1,0
0,1,4,1,9,1,5,1,0
0,1,4,1,10,1,4,1,0
0,1,4,1,11,1,3,1,0
0,1,4,1,12,1,2,1,0
0,1,4,1,13,1,1,1,0
0,1,1,18,1,1,0
-8,0,1,4,1,15,1,0,-8
0,1,2,5,13,1,0
0,1,20,1,0
0,22,0
-4,11,1,10,-4
7,9,6
Intermec Fingerprint v7.61 – Programmer’s Reference Manual Ed. 7
283
Chapter 3
UBI10
Image Transfer
UBI10 is a combined protocol/file format for image transfer, as opposed
to Intelhex and UBI00-UBI03 protocols described earlier in this chapter.
UBI10 is used in various Intermec Windows Drivers.
Protocol Description
!BG ↵
!X<pos>A ↵
!Y<pos>A ↵
!X<pos>A | !Y<pos>A !SB<bytes>W<data>
!X<pos>A | !Y<pos>A !SB<bytes>W<data>
!X<pos>A | !Y<pos>A !SB<bytes>W<data>
.....
!X<pos>A | !Y<pos>A !SB<bytes>W<data>!EG ↵
!PRINT ↵
Frame Definitions
The width of the image in the STORE IMAGE statement should be
given as a multiple of 16 bits.
!BG
Begin graphics.
Always appended by a carriage return character.
!X<pos>A
Set absolute x position <pos>.
The value must be divisible by 8.
Default value is 0.
Once set, it will affect all consecutive y-positions in
the image, until a new x-position is set.
Appended by a carriage return character, unless
followed by a !SB<bytes>W<data> string on the
same line.
!Y<pos>A
Set absolute y position <pos>.
Default value is 0.
Appended by a carriage return character, unless
followed by a !SB<bytes>W<data> string on the
same line.
!SB<bytes>W<data> Send one line of bitmap with <bytes> number of
bytes. <data> is bitmap bytes.
Can be preceded by a new x- and/or y-position.
If appended by a carriage return character, next !SB
set of data will be positioned at the current y-position
incremented by 1.
If no appending carriage return character is used,
a new y-position must be specified for next !SB
set of data.
284
!EG
End graphics.
Always appended by a carriage return character.
!PRINT
End page (end frame).
Always appended by a carriage return character.
Intermec Fingerprint v7.61 – Programmer’s Reference Manual Ed. 7
Chapter 3
Image Transfer
UBI10, cont.
The image illustrated above contains 2 bytes (= 16 bits) in each horizontal
line. By setting the absolute start position to x = 8, you can start counting
from the start of the second byte, that is x = 8 in the matrix above. The
first 3 bits (x-positions) are white, then comes one black bit followed by
three white bits, and finally one black bit. Expressed in 0:s and 1:s, where 0
represents a white bit and 1 a black bit, the pattern will be 00010001. This
binary number can be expressed as 11 hex. The same pattern is repeated
for each y-position from y = 1 thru y = 7 with the exception of position y
= 4, where all bits are black except for the leading three, i.e. the pattern is
00011111, which can be expressed as 1F hex. Use this hexadecimal values
as input data as shown in the example below.
Example:
The simplified image above is transmitted to the printer. Do not use
XON/XOFF (11 hex/13 hex) protocol, since these characters may coincide
with input data. Use RTS/CTS instead. Do not strip LF.
10
20
30
40
50
60
70
80
90
100
RUN
STORE OFF
OPEN ”uart1:” FOR INPUT AS #1
QNAME$=”H.1”
QWIDTH%=16
QHEIGHT%=10
QPRO$=”UBI10”
STORE IMAGE QNAME$,QWIDTH%,QHEIGHT%,QPROT$
STORE INPUT 900,4: ’Timeout 9 sec.
CLOSE#1
STORE OFF
The input string in line 80 should contain the following data. Carriage returns
(↵ ) after each !SB set of data increments the y-position by 1 in consecutive
order. It may also be sent as a continuous string.
!BG ↵
!X8A ↵
!Y1A!SB1W<11 hex> ↵
!SB1W<11 hex> ↵
!SB1W<11 hex> ↵
!SB1W<1F hex> ↵
!SB1W<11 hex> ↵
!SB1W<11 hex> ↵
!SB1W<11 hex>!EG ↵
!PRINT ↵
Intermec Fingerprint v7.61 – Programmer’s Reference Manual Ed. 7
(Begin graphic)
(Set x-position)
(Set y-position + data for y = 1)
(Data for y = 2)
(Data for y = 3)
(Data for y = 4)
(Data for y = 5)
(Data for y = 6)
(Data for y = 7 + end graphics)
(End frame)
285
Chapter 3
Image Transfer
PRBUF-Protocol
The PRBUF Protocol is designed for downloading bitmap print image
data directly from an application program, such as a Windows printer
driver, directly to the printer’s image buffer in connection with the
PRBUF statement.
The protocol consist of a two-byte header and a number of data bytes:
Header
Byte No 1. is always the @-sign (Commercial at; Unicode 0x0040) and
indicates start of the protocol header.
Byte No 2 is:
0
Reserved (bitmap format)
1
Reserved (RLL image format)
2
RLL buffer format
3-255 Reserved
RLL Buffer format
The RLL buffer format is optimized for use by Windows drivers. In most
cases the performance of the host outruns the performance of the printer,
so it is preferred to to do most of the processing in the host before sending
the job down to the printer.
- Data byte 1 & 2 specifies the pixelwidth (unsigned) of data in BIG
Endian format for one line.
- Data byte 3 & 4 specifies the pixelheight (unsigned) of the buffer when
it is expanded BIG Endian.
- Data byte 5-nn specifies the bitmap in RLL format.
Example of RLL buffer protocol header, 515x212 pixels hexdump:
40 02 02 03 00 d4
RLL format
The RLL format is good for black and white pixel runs. It compresses data
in both dimensions. It works well with one-dimensional bar codes, but
grayscales grow in size instead of shrinking. The format is symmetric
so that all pixel runs start and end with a white pixel and with line
repetitions whenever applicable. This makes the format possible to
turn upside down.
The RLL format is specified on the next page.
286
Intermec Fingerprint v7.61 – Programmer’s Reference Manual Ed. 7
Chapter 3
PRBUF-Protocol,
cont.
Image Transfer
Specification of the RLL format
<begin><toggling pixelruns><end>
<- total width of RLL pattern ->
<begin>
<end>
<toggling pixelruns>
:= <linereps>|<small white pixelrun>
:= <begin>|<empty>
:= <whiteAndBlack pixelruns>|
<blackAndWhite pixelruns>|
<white pixelrun>|<empty>
<whiteAndBlack pixelruns> := <white pixelrun><black pixelrun>|
<small white pixelrun><black pixelrun>
<blackAndWhite pixelruns> := <black pixelrun><white pixelrun>
<linereps>
:= ((-1)-(-128))*-1 number of equal lines
<small white pixelrun>
:= 0-127, number of white pixels
<black pixelrun>
:= 0-255, number of black pixels
<white pixelrun>
:= 0-255, number of white pixels
<empty>
:= empty, extreme if the entire line fits in
one pixelrun.
If there is no line repetion, there does not have to be any line repeat. If the
pixelrun is out of range, it must be split into several runs.
Example of RLL format for an eight bit pattern:
-*-*-*-* 1,1,1,1,1,1,1,1,0 Note the last 0 to end with a white pixelrun
*-*-*-*- 0,1,1,1,1,1,1,1,1 begins with a white pixelrun of 0 pixels
--**--** 2,2,2,2,0
repetion, stopped with a white pixelrun of 0
pixels
**--**-- -2,0,2,2,2,2,-2 line and pixel repetions
**--**-Example of coding a black square of 800 dots to valid RLL format:
-128,0,255,0,255,0,255,0,35,0,-128
-128,0,255,0,255,0,255,0,35,0,-128
-128,0,255,0,255,0,255,0,35,0,-128
-128,0,255,0,255,0,255,0,35,0,-128
-128,0,255,0,255,0,255,0,35,0,-128
-128,0,255,0,255,0,255,0,35,0,-128
-32,0,255,0,255,0,255,0,35,0,-32
Intermec Fingerprint v7.61 – Programmer’s Reference Manual Ed. 7
287
Chapter 4
4. Character Sets
Introduction
This chapter contains the various single-byte character sets, that can be
selected using the NASC statement. Printouts are made using the font “Swiss
721 BT”. Other fonts may not include all characters listed in the character
sets. Double-byte character sets are not included, but are available separately
on special request. For more information on character sets and fonts, refer to
the Intermec Fingerprint, Font Reference Manual.
The following information applies to all single-byte character sets:
• Characters between ASCII 0 decimal and ASCII 31 decimal are
unprintable control characters as listed below.
• Characters between ASCII 32 decimal and ASCII 127 decimal can always
be printed, regardless of 7-bit or 8-bit communication protocol, provided
that the selected font contains the characters in question.
• Characters between ASCII 125 decimal and ASCII 255 decimal can only
be printed if the selected font contains the characters in question and an
8-bit communication protocol is used. If you use 7-bit communication,
select another national character set (see NASC statement) or use a MAP
statement to remap a character set.
• If a character, which does not exist in the selected font, is used, an
error condition will occur.
Non-printable control characters (ASCII 00-31 dec)
00
01
02
03
04
05
06
07
08
09
10
11
12
13
14
15
288
NUL
SOH
STX
ETX
EOT
ENQ
ACK
BEL
BS
HT
LF
VT
FF
CR
SO
SI
Null
Start of heading
Start of text
End of text
End of transmission
Enquiry
Acknowledge
Bell
Backspace
Horizontal tabulation
Line feed
Vertical tabulation
Form feed
Carriage Return
Shift out
Shift in
16
17
18
19
20
21
22
23
24
25
26
27
28
29
30
31
DLE
DC1
DC2
DC3
DC4
NAK
SYN
ETB
CAN
EM
SUB
ESC
FS
GS
RS
US
Data link escape
Device control one
Device control two
Device control three
Device control four
Negative acknowledge
Syncronous idle
End of transmission block
Cancel
End of medium
Substitute
Escape
File separator
Group separator
Record separator
Unit separator
Intermec Fingerprint v7.61 – Programmer’s Reference Manual Ed. 7
Chapter 4
Roman 8 Character Set
0
1
Character Sets
NASC 1
2
3
4
5
6
7
8
9
30
40
50
60
70
80
90
100
110
120
130
140
150
160
170
180
190
200
210
220
230
240
250
Intermec Fingerprint v7.61 – Programmer’s Reference Manual Ed. 7
289
Chapter 4
Character Sets
French Character Set
0
NASC 33
1
2
3
4
5
6
7
8
9
30
40
50
60
70
80
90
100
110
120
130
140
150
160
170
180
190
200
210
220
230
240
250
290
Intermec Fingerprint v7.61 – Programmer’s Reference Manual Ed. 7
Chapter 4
Spanish Character Set
0
1
Character Sets
NASC 34
2
3
4
5
6
7
8
9
30
40
50
60
70
80
90
100
110
120
130
140
150
160
170
180
190
200
210
220
230
240
250
Intermec Fingerprint v7.61 – Programmer’s Reference Manual Ed. 7
291
Chapter 4
Character Sets
Italian Character Set
0
NASC 39
1
2
3
4
5
6
7
8
9
30
40
50
60
70
80
90
100
110
120
130
140
150
160
170
180
190
200
210
220
230
240
250
292
Intermec Fingerprint v7.61 – Programmer’s Reference Manual Ed. 7
Chapter 4
English (UK) Character Set
0
1
2
3
Character Sets
NASC 44
4
5
6
7
8
9
30
40
50
60
70
80
90
100
110
120
130
140
150
160
170
180
190
200
210
220
230
240
250
Intermec Fingerprint v7.61 – Programmer’s Reference Manual Ed. 7
293
Chapter 4
Character Sets
Swedish Character Set
0
1
NASC 46
2
3
4
5
6
7
8
9
30
40
50
60
70
80
90
100
110
120
130
140
150
160
170
180
190
200
210
220
230
240
250
294
Intermec Fingerprint v7.61 – Programmer’s Reference Manual Ed. 7
Chapter 4
Norwegian Character Set
0
1
2
Character Sets
NASC 47
3
4
5
6
7
8
9
30
40
50
60
70
80
90
100
110
120
130
140
150
160
170
180
190
200
210
220
230
240
250
Intermec Fingerprint v7.61 – Programmer’s Reference Manual Ed. 7
295
Chapter 4
Character Sets
German Character Set
0
1
NASC 49
2
3
4
5
6
7
8
9
30
40
50
60
70
80
90
100
110
120
130
140
150
160
170
180
190
200
210
220
230
240
250
296
Intermec Fingerprint v7.61 – Programmer’s Reference Manual Ed. 7
Chapter 4
Japanese Latin Character Set
0
1
2
3
4
Character Sets
NASC 81
5
6
7
8
9
30
40
50
60
70
80
90
100
110
120
130
140
150
160
170
180
190
200
210
220
230
240
250
Intermec Fingerprint v7.61 – Programmer’s Reference Manual Ed. 7
297
Chapter 4
Character Sets
Portuguese Character Set
0
1
2
NASC 351
3
4
5
6
7
8
9
30
40
50
60
70
80
90
100
110
120
130
140
150
160
170
180
190
200
210
220
230
240
250
298
Intermec Fingerprint v7.61 – Programmer’s Reference Manual Ed. 7
Chapter 4
PCMAP Character Set
0
1
Character Sets
NASC -1
2
3
4
5
6
7
8
9
30
40
50
60
70
80
90
100
110
120
130
140
150
160
170
180
190
200
210
220
230
240
250
Intermec Fingerprint v7.61 – Programmer’s Reference Manual Ed. 7
299
Chapter 4
Character Sets
ANSI Character Set
0
NASC -2
1
2
3
4
5
6
7
8
9
30
40
50
60
70
80
90
100
110
120
130
140
150
160
170
180
190
200
210
220
230
240
250
300
Intermec Fingerprint v7.61 – Programmer’s Reference Manual Ed. 7
Chapter 4
MS-DOS Latin 1
Character Sets
NASC 850
0
1
2
3
4
5
6
7
8
9
30
40
50
60
70
80
90
100
110
120
130
140
150
160
170
180
190
200
210
220
230
240
250
Intermec Fingerprint v7.61 – Programmer’s Reference Manual Ed. 7
301
Chapter 4
Character Sets
MS-DOS Greek 1
NASC 851
0
1
2
3
4
5
6
7
8
9
30
40
50
60
70
80
90
100
110
120
130
140
150
160
170
180
190
200
210
220
230
240
250
302
Intermec Fingerprint v7.61 – Programmer’s Reference Manual Ed. 7
Chapter 4
MS-DOS Latin 2
Character Sets
NASC 852
0
1
2
3
4
5
6
7
8
9
30
40
50
60
70
80
90
100
110
120
130
140
150
160
170
180
190
200
210
220
230
240
250
Intermec Fingerprint v7.61 – Programmer’s Reference Manual Ed. 7
303
Chapter 4
Character Sets
MS-DOS Cyrillic
NASC 855
0
1
2
3
4
5
6
7
8
9
30
40
50
60
70
80
90
100
110
120
130
140
150
160
170
180
190
200
210
220
230
240
250
304
Intermec Fingerprint v7.61 – Programmer’s Reference Manual Ed. 7
Chapter 4
MS-DOS Turkish
Character Sets
NASC 857
0
1
2
3
4
5
6
7
8
9
30
40
50
60
70
80
90
100
110
120
130
140
150
160
170
180
190
200
210
220
230
240
250
Intermec Fingerprint v7.61 – Programmer’s Reference Manual Ed. 7
305
Chapter 4
Character Sets
Windows Latin 2
NASC 1250
0
1
2
3
4
5
6
7
8
9
30
40
50
60
70
80
90
100
110
120
130
140
150
160
170
180
190
200
210
220
230
240
250
306
Intermec Fingerprint v7.61 – Programmer’s Reference Manual Ed. 7
Chapter 4
Windows Cyrillic
Character Sets
NASC 1251
0
1
2
3
4
5
6
7
8
9
30
40
50
60
70
80
90
100
110
120
130
140
150
160
170
180
190
200
210
220
230
240
250
Intermec Fingerprint v7.61 – Programmer’s Reference Manual Ed. 7
307
Chapter 4
Character Sets
Windows Latin 1
NASC 1252
0
1
2
3
4
5
6
7
8
9
30
40
50
60
70
80
90
100
110
120
130
140
150
160
170
180
190
200
210
220
230
240
250
308
Intermec Fingerprint v7.61 – Programmer’s Reference Manual Ed. 7
Chapter 4
Windows Greek
Character Sets
NASC 1253
0
1
2
3
4
5
6
7
8
9
30
40
50
60
70
80
90
100
110
120
130
140
150
160
170
180
190
200
210
220
230
240
250
Intermec Fingerprint v7.61 – Programmer’s Reference Manual Ed. 7
309
Chapter 4
Character Sets
Windows Latin 5
NASC 1254
0
1
2
3
4
5
6
7
8
9
30
40
50
60
70
80
90
100
110
120
130
140
150
160
170
180
190
200
210
220
230
240
250
310
Intermec Fingerprint v7.61 – Programmer’s Reference Manual Ed. 7
Chapter 4
Windows Baltic Rim
0
Character Sets
NASC 1257
1
2
3
4
5
6
7
8
9
30
40
50
60
70
80
90
100
110
120
130
140
150
160
170
180
190
200
210
220
230
240
250
Intermec Fingerprint v7.61 – Programmer’s Reference Manual Ed. 7
311
Chapter 5
5. Bar Codes
Introduction
The printer contains a number of bar code generators, which can
produce highly readable bar codes in four different directions.
However, a general rule which applies to all thermal printers is that
it is more difficult to print a bar code with the bars across the media
path (ladder style) than along the media path (picket fence style.)
Therefore, to ensure a highly readable printout, we recommend that
you do not use narrow bars less than 3 dots, when printing bar codes
with the bars across the media path (ladder style).
No such restrictions apply for bar codes with the bars along the
media path (picket fence style).
Another factor, that affects the printout quality of the bar codes,
is the print speed. Generally, a lower print speed gives a better
quality, especially for ladder style bar codes and at low ambient
temperatures. Do not use a higher print speed than necessary and
consider the overall print cycle time. In some instances, a lower
print speed may actually give better overall performance. We
recommend you do your own tests with your unique applications
to find the best compromise between printout quality, performance,
and media.
312
Intermec Fingerprint v7.61 – Programmer’s Reference Manual Ed. 7
Chapter 5
Standard Bar
Codes
Bar Codes
Codabar
Code 11
Code 16K
Code 39
Code 39 full ASCII
Code 39 w. checksum
Code 49
Code 93
Code 128
Datamatrix (dynamic module only)
DUN-14/16
EAN-8
EAN-13
EAN-128
Five-Character Supplemental Code
Industrial 2 of 5
Industrial 2 of 5 w. checksum
Interleaved 2 of 5
Interleaved 2 of 5 w. checksum
Interleaved 2 of 5 A
Matrix 2 of 5
MaxiCode
MSI (modified Plessey)
PDF 417
Plessey
Postnet
QR (dynamic module only)
Straight 2 of 5
Two-Character Supplemental Code
UCC-128 Serial Shipping Container Code
UPC-5 digits Add-On Code
UPC-A
UPC-D1
UPC-D2
UPC-D3
UPC-D4
UPC-D5
UPC-E
UPC Shipping Container Code
Bar Codes
Designation
"CODABAR"
"CODE11"
"CODE16K"
"CODE39"
"CODE39A"
"CODE39C"
"CODE49"
"CODE93"
"CODE128"
"DATAMATRIX"
"DUN"
"EAN8"
"EAN13"
"EAN128"
"ADDON5"
"C2OF5IND"
"C2OF5INDC"
"INT2OF5"
"INT2OF5C"
"I2OF5A"
"C2OF5MAT"
"MAXICODE"
"MSI"
"PDF417"
"PLESSEY"
"POSTNET"
"QRCODE"
"C2OF5"
"ADDON2"
"UCC128"
"SCCADDON"
"UPCA"
"UPCD1"
"UPCD2"
"UPCD3"
"UPCD4"
"UPCD5"
"UPCE"
"UPCSCC"
On the following pages, a quick survey of the characteristics of some
of the most common bar codes will be given. This information is only
intended to help you avoid entering unacceptable parameters or input
data. For further information, please refer to the standard literature on
the subject of bar codes.
Intermec Fingerprint v7.61 – Programmer’s Reference Manual Ed. 7
313
Chapter 5
EAN-8
Bar Codes
BARTYPE:
BARRATIO:
BARMAG:
BARHEIGHT:
BARFONT:
INPUT DATA:
No. of characters:
Check digit:
Digits:
Uppercase letters:
Lowercase letters:
Punctuation marks:
Start characters:
Stop characters:
EAN-13
BARTYPE:
BARRATIO:
BARMAG:
BARHEIGHT:
BARFONT:
INPUT DATA:
No. of characters:
Check digit:
Digits:
Uppercase letters:
Lowercase letters:
Punctuation marks:
Start characters:
Stop characters:
314
"EAN8"
Fixed ratio.
BARRATIO statement ignored.
Max. 8
No restriction.
Barfont generated automatically.
BARFONT statement ignored.
BARFONT ON/OFF statements work.
7
1 added automatically.
0-9
No
No
No
No
No
"EAN13"
Fixed ratio.
BARRATIO statement ignored.
Max. 8
No restriction.
Barfont generated automatically.
BARFONT statement ignored.
BARFONT ON/OFF statements work.
12
1 added automatically.
0-9
No
No
No
No
No
Intermec Fingerprint v7.61 – Programmer’s Reference Manual Ed. 7
Chapter 5
UPC-E
BARTYPE:
BARRATIO:
BARMAG:
BARHEIGHT:
BARFONT:
INPUT DATA:
No. of characters:
Check digit:
Digits:
Uppercase letters:
Lowercase letters:
Punctuation marks:
Start characters:
Stop characters:
UPC-A
BARTYPE:
BARRATIO:
BARMAG:
BARHEIGHT:
BARFONT:
INPUT DATA:
No. of characters:
Check digit:
Digits:
Uppercase letters:
Lowercase letters:
Punctuation marks:
Start characters:
Stop characters:
Bar Codes
"UPCE"
Fixed ratio.
BARRATIO statement ignored.
Max. 8
No restriction.
Barfont generated automatically.
BARFONT statement ignored.
BARFONT ON/OFF statements work.
6
1 added automatically.
0-9
No
No
No
No
No
"UPCA"
Fixed ratio.
BARRATIO statement ignored.
Max. 8
No restriction.
Barfont generated automatically.
BARFONT statement ignored.
BARFONT ON/OFF statements work.
11
1 added automatically.
0-9
No
No
No
No
No
Intermec Fingerprint v7.61 – Programmer’s Reference Manual Ed. 7
315
Chapter 5
Bar Codes
Interleaved 2 of 5
BARTYPE:
BARRATIO:
BARMAG:
BARHEIGHT:
BARFONT:
"INT2OF5"
2:1-3:1
No restriction.
No restriction.
No restriction.
INPUT DATA:
No. of characters:
Check digit:
Digits:
Uppercase letters:
Lowercase letters:
Punctuation marks:
Start characters:
Stop characters:
Unlimited
No
0-9
No
No
No
Added automatically.
Added automatically.
Note:
A numeric code where input digits are encoded in pairs. If an odd number of
digits is entered, a leading zero will be added automatically.
Code 39
BARTYPE:
BARRATIO:
BARMAG:
BARHEIGHT:
BARFONT:
"CODE39"
2:1-3:1
No restriction, but if the narrow element is less
than 4 dots wide, then the ratio must be larger
than 2.25:1 (9:4).
No restriction.
No restriction.
INPUT DATA:
No. of characters:
Check digit:
Digits:
Uppercase letters:
Lowercase letters:
Punctuation marks:
Start characters:
Stop characters:
Unlimited.
No
0-9
A-Z (no national characters).
No
- . space $ / + %
* (is added automatically).
* (is added automatically).
Note:
An alphanumeric self-checking discrete code.
316
Intermec Fingerprint v7.61 – Programmer’s Reference Manual Ed. 7
Chapter 5
Code 128
BARTYPE:
BARRATIO:
BARMAG:
BARHEIGHT:
BARFONT:
INPUT DATA:
No. of characters:
Check digit:
Input characters:
Function characters:
Start characters:
Stop character:
Bar Codes
"CODE128"
Fixed. BARRATIO statement ignored.
≥ 2.
No restriction.
No restriction.
Unlimited
1 check digit added automatically.
ASCII 0-127 decimal according to Roman 8
character set.
FNC1:
ASCII 128 decimal1
FNC2:
ASCII 129 decimal1
FNC3:
ASCII 130 decimal1
FNC4:
ASCII 131 decimal1
Added automatically2.
Added automatically2.
1
/. Function characters FNC1-4 require either an 8-bit communication
protocol, remapping to an ASCII value between 0-127 dec., or the use
of an CHR$ function.
2
/. The Intermec Fingerprint firmware automatically calculates and inserts
the start, code and shift characters that are required to optimize the code
according to the Code 128 specifications.
EAN-128
BARTYPE:
BARRATIO:
BARMAG:
BARHEIGHT:
BARFONT:
INPUT DATA:
No. of characters:
Check digit:
Input characters:
Start characters:
Stop character:
"EAN128"
Fixed. BARRATIO statement ignored.
≥ 2.
No restriction.
No restriction.
Unlimited.
Trailing symbol check character added automatically.
ASCII 0-127 decimal according to Roman 8
character set.
Added automatically1.
Added automatically1.
1
/. The Intermec Fingerprint firmware automatically calculates and inserts
the start, code, and shift characters that are required to optimize the code
according to the EAN 128 specifications.
This bar code is identical to Code 128 with the exception that the initial
FNC1 function character is generated automatically.
Intermec Fingerprint v7.61 – Programmer’s Reference Manual Ed. 7
317
Chapter 5
Bar Codes
Setup Bar Codes
The EasyCoder XP- and F-series printers can optionally be fitted with an
EasySet bar code wand. By reading a special bar code containing encoded
data for one or several setup parameters, the printer’s setup can easily be
changed, even by a person without any knowledge of Intermec Fingerprint,
the Direct Protocol, or their supporting software.
This chapter explains how to create such setup bar codes. You could
print them in your printer and paste them on a board in the vicintity of
the printer. When, for example, the operator needs to switch to another
type of media, he or she will only have to pick up the EasySet wand and
read the appropriate bar code.
The only bar code that can be used is a Code 128 containing the function
character FNC3 (ASCII 130 dec). If the FNC character is missing, the
printer will regard the bar code as containing ordinary ASCII input to
the "wand:" device.
Please refer to the EasySet Bar Code Wand Setup manual for syntax
and parameter descriptions
318
Intermec Fingerprint v7.61 – Programmer’s Reference Manual Ed. 7
Chapter 6
6. Fonts
Introduction
As standard, the printer’s permanent memory is loaded with 15 scaleable
single-byte TrueDoc fonts at delivery:
• Century Schoolbook BT
(Includes the € currency sign)
• Dutch 801 Roman BT
(Includes the € currency sign)
• Dutch 801 Bold BT
(Includes the € currency sign)
• Futura Light BT
(Includes the € currency sign)
• Letter Gothic 12 Pitch BT
(Includes the € currency sign)
• Monospace 821 BT
(Includes the € currency sign)
• Monospace 821 Bold BT
(Includes the € currency sign)
• OCR-A BT
(see “Important Information” below)
• OCR-B 10 Pitch BT
(see “Important Information” below)
• Prestige 12 Pitch Bold BT
(Includes the € currency sign)
• Swiss 721 BT
(Includes the € currency sign)
• Swiss 721 Bold BT
(Includes the € currency sign)
• Swiss 721 Bold Condensed BT
(Includes the € currency sign)
• Zapf Dingbats BT
(see “Important Information” below)
• Zurich Extra Condensed BT
(Includes the € currency sign)
Note: In the FONT statement, the full names according to the list above must be used (case
sensitive). Also see Font Aliases later in this chapter.
TrueDoc fonts come as PFR (Portable Font Resources) files and are organized
according to the UNICODE standard. A PFR consists of one or several fonts in a
single file and can only be obtained from Intermec.
Intermec Fingerprint can also use TrueType fonts, provided they comply with the
Unicode standard. (This is usually the case with TrueType fonts for Windows 95/98
and Windows NT.) The benefits of using TrueDoc fonts are that they work faster
in Intermec Fingerprint and require less memory space.
To improve compatibility with Intermec Fingerprint 6.xx, bitmap fonts in .ATF
format are also supported, see below.
Some of the character sets listed in Chapter 4, for example Greek and Cyrillic,
are only available as standard in the font Swiss 721 BT.
When using IMAGELOAD or TRANSFER KERMIT to download a PFR or a
TrueType font file, it will be installed automatically. Any other method requires the
printer to be restarted before the font can be used, either by turning off and on the
power to the printer, or by executing a REBOOT statement.
Single-anddouble-bytefontscanbeobtainedfromIntermectogetherwithasuitable
mapping tables in the form of Font Cards or Font Install Cards.
Important Information!
When you select certain fonts, the printer will automatically switch
from the presently selected character set to a special one for the font in
question (see later in this chapter). As soon as any other font is selected
again, the printer will automatically return to the previously selected
character set. This applies to:
• OCR-A BT
• OCR-B 10 Pitch BT
• Zapf Dingbats BT
Intermec Fingerprint v7.61 – Programmer’s Reference Manual Ed. 7
319
Chapter 6
Fonts
Bitmap Fonts
Starting with Intermec Fingerprint v7.3, it is possible to use fonts in
the “old” Intermec .ATF bitmap font format. This feature improves
compatibility with custom-made programs originally created in Fingerprint
v6.xx or earlier versions.
Downloading an .ATF font (for example XX030RSN.ATF) to the printer
produces three fonts in the memory; one without any extension (for example
XX030RSN), one with the extension .1 (for example XX030RSN.1), and
one with the extension .2 (for example XX030RSN.2). When using bitmap
fonts in Fingerprint v7.3 or later, the relation between print direction and
extension is of no consequence.
It is recommended to exclude the font height parameter in the FONT and
BARFONT statements and use MAG to enlarge the font. Slant does not
work at all with bitmap fonts.
Font Aliases
The standard font names in Intermec Fingerprint are much longer than
in earlier versions of Fingerprint and may be cumbersome to use. They
are also incompatible with the LAYOUT statement, which restricts the
font name to 10 characters.
However, it is possible to create a file containing a list of font aliases. The file
should be named exactly as shown here (note the leading period character
that specifies it as a system file):
"c:.FONTALIAS"
The format of the file should be:
"<Alias name #1>","<Name of font>"[,size[,<slant>[,<width>]]]
"<Alias name #2>","<Name of font>"[,size[,<slant>[,<width>]]]
"<Alias name #3>","<Name of font>"[,size[,<slant>[,<width>]]]
etc., etc.
The file can contain as many fontname aliases as required. The default size is
12 points, the default slant is 0°, and the default width is 100 (%).
A font alias can be used as any other font, but its size, slant, and width
cannot be changed.
Examples:
"BODYTEXT","Century Schoolbook BT",10,0,80
"HEADLINE","Swiss 721 Bold BT",18,0,110
"WARNING","Swiss 721 BT",12
For more information on fonts and character sets, refer to the Intermec
Fingerprint, Font Reference Manual.
320
Intermec Fingerprint v7.61 – Programmer’s Reference Manual Ed. 7
Chapter 6
Printout Samples
Fonts
The printout samples below are in 10 point size, no slant, and 100% width. The
quality of these samples does not exactly correspond to the printout quality
from your printer, which is affected by printhead density, printing method,
type of media and ribbon, and a number of other factors.
Intermec Fingerprint v7.61 – Programmer’s Reference Manual Ed. 7
321
Chapter 6
Fonts
OCR-A BT Character Set
322
Intermec Fingerprint v7.61 – Programmer’s Reference Manual Ed. 7
Chapter 6
Fonts
OCR-B 10 Pitch BT Character Set
Intermec Fingerprint v7.61 – Programmer’s Reference Manual Ed. 7
323
Chapter 6
Fonts
Zapf Dingbats BT Character Set
324
Intermec Fingerprint v7.61 – Programmer’s Reference Manual Ed. 7
Chapter 7
7. Error Messages
Interpretation Table
Code
0
1
2
3
4
5
6
7
8
9
10
11
12
13
14
15
16
17
18
19
20
21
22
23
24
25
26
27
28
29
30
31
32
33
34
37
38
39
40
41
42
43
44
45
46
47
48
49
50
51
52
53
54
Message/Explanation
No error
Syntax error.
Unbalanced parenthesis.
Feature not implemented.
Evaluation syntax error.
Unrecognized token.
Tokenized line too long.
Evaluation stack overflow.
Error in exectab.
Undefined token.
Non-executing token.
Evaluation stack underflow.
Type mismatch.
Line not found.
Division with zero.
Font not found.
Bar code device not found.
Bar code type not implemented.
Disk full.
Error in file name.
Input line too long.
Error stack overflow.
RESUME without error.
Image not found.
Overflow in temporary string buffer.
Wrong number of parameters.
Parameter too large.
Parameter too small.
RETURN without GOSUB
Error in startup file.
Assign to a read-only variable.
Illegal file number.
File is already open.
Too many files open.
File is not open.
Cutter device not found.
User break.
Illegal line number.
Run statement in program.
Parameter out of range.
Illegal bar code ratio.
Memory overflow.
File is write protected.
Unknown store option.
Store already in progress.
Unknown store protocol.
No store defined.
NEXT without FOR
Bad store record header.
Bad store address.
Bad store record.
Bad store checksum.
Bad store record end.
Code
55
56
57
58
59
60
61
62
63
64
65
66
67
68
69
70
71
72
73
74
75
76
77
78
79
80
81
82
83
1001
1002
1003
1004
1005
1006
1007
1008
1009
1010
1011
1012
1013
1014
1015
1016
1017
1018
1019
1020
1021
1022
1023
1024
Message/Explanation
Remove in ROM.
Illegal communication channel.
Subscript out of range.
Field overflow.
Bad record number.
Too many strings.
Error in setup file.
File is list protected.
ENTER function.
FOR without NEXT
Evaluation overflow.
Bad optimizing type.
Error from communication channel.
Unknown execution entity.
Not allowed in immediate mode.
Line label not found.
Line label already defined.
IF without ENDIF.
ENDIF without IF.
ELSE without ENDIF.
ELSE without IF.
WHILE without WEND.
WEND without WHILE
Not allowed in execution mode.
Not allowed in a layout.
Download timeout
Exit to system
Invalid cont environment
ETX Timeout
Not implemented.
Memory too small.
Field out of label.
Wrong font to chosen direction.
Out of paper.
No field to print.
Lss too high.
Lss too low.
Invalid parameter.
Hardware error.
I/O error.
Too many files opened.
Device not found.
File not found.
File is read-only.
Illegal argument.
Result too large.
Bad file descriptor.
Invalid font.
Invalid image.
Too large argument for MAG.
Head lifted.
Incomplete label.
File too large.
Intermec Fingerprint v7.61 – Programmer's Reference Manual Ed. 7
325
Chapter 7
Code
1025
1026
1027
1028
1029
1030
1031
1032
1033
1034
1035
1036
1037
1038
1039
1040
1041
1042
1043
1044
1045
1046
1047
1051
1052
1053
1054
1055
1056
1057
1058
1059
1060
1061
1062
1081
1082
1083
1101
1102
1103
1104
1105
1106
1107
1108
Error Messages
Message/Explanation
File does not exist.
Label pending.
Out of transfer ribbon.
Paper type is not selected.
Printhead voltage too high.
Character is missing in chosen font.
Next label not found.
File name too long.
Too many files are open.
Not a directory.
File pointer is not inside the file.
Subscript out of range.
No acknowledge received within specified timeout.
Communication checksum error.
Not mounted.
Unknown file operating system.
Error in fos structure.
Internal error in mcs.
Timer table full.
Low battery in memory card.
Media was removed.
Memory checksum error.
Interrupted system call.
Dot resistance measure out of limits.
Error in printhead.
Unable to complete a dot measurement.
Error when trying to write to device.
Error when trying to read from device.
O_BIT open error.
File exists.
Transfer ribbon fitted.
Cutter does not respond.
DC motor to ribbon save did not start/stop.
Wrong type of media.
Not Allowed.
Timer expired
Unsupported protocol
Ribbon Low
Illegal character in bar code.
Illegal bar code font.
Too many characters in bar code.
Bar code too large.
Bar code parameter error.
Wrong number of characters.
Illegal bar code size.
Number or rows out of range.
Code
1109
1201
1202
1203
1204
1205
1206
1207
1208
1209
1210
1211
1212
1213
1214
1215
1216
1217
1218
1219
1220
1221
1222
1223
1224
1225
1301
1302
1303
1304
1305
1306
1601
1602
1603
1604
1605
1606
1607
1608
1609
1610
1701
1702
1703
1704
Message/Explanation
Number of columns out of range.
Insufficient font data loaded.
Transformation matrix out of range.
Font format error.
Specifications not compatible with output module.
Intelligent transform not supported.
Unsupported output mode requested.
Extended font not supported.
Font specifications not set.
Track kerning data not available.
Pair kerning data not available.
Other Speedo error.
No bitmap or outline device.
Speedo error six.
Squeeze or clip not supported.
Character data not available.
Unknown font.
Font format is not supported.
Correct mapping table is not found.
Font is in the wrong direction.
Error in external map table.
Map table was not found.
Double byte map table is missing.
Single byte map table is missing.
Character map function is missing.
Double byte font is not selected.
Index outside collection bounds.
Collection could not be expanded.
Parameter is not a collection.
Item not a member of the collection.
No compare function, or compare returns faulty value.
Tried to insert a duplicate item.
Reference Font Not Found.
Error in Wand-Device.
Error in Slave Processor.
Print Shift Error.
No Hardware Lock.
Testfeed not done.
General Print Error.
Access Denied.
Specified Feed Length Exceeded.
Illegal Character Map File.
Cutter Error1
(EasyCoder F-series only1)
Cutter Error2
(EasyCoder F-series only1)
Cutter Error3
(EasyCoder F-series only1)
Cutter open
(EasyCoder F-series only1)
1
/. See EasyCoder F2 & F4 Service Manual.
326
Intermec Fingerprint v7.61 – Programmer's Reference Manual Ed. 7
Chapter 8
8. EasyLAN 100i Setup
Sections, Objects,
and Values
Setup sections are used in connection with EasyLAN 100i. There are
three setup sections:
"prt"
is the legacy section as it was before the introduction of sections.
It is the default section.
"alerts"
controls printer alerts in regard of individual enable/disable and
delay conditions for repeated traps.
"lan1"
contains all the variables available in the print server.
Setup objects are used in connection with EasyLAN 100i. There are different
objects for each setup section:
prt section
This is the default section. The syntax corresponds to the syntax of the
SETUP statement, see Chapter 2.
alerts section
Object
cutter
headlifted
ribbonend
paperend
ribbonlow
Enabled by default
Trap if cutter error
Trap if head lifted and printfeed
Trap if ribbon end and printfeed
Trap if paper end and printfeed
Trap if ribbon low and printfeed
Object
lts
pause
setup
error
Disabled by default
Send trap when the printer is waiting for a label to be taken.
Send trap if a batch printing is paused.
Send trap if Setup Mode is entered via "console:".
Send trap when a Fingerprint/Direct Protocol error occurs
(before giving control to the error-handler).
break
Send trap if the user breaks the program or if an error
breaks the running program, that is, it is not sent after
stop or breakpoint.
jobcomplete Send trap when all labels in a printfeed batch are started.
Value Syntax
(enabled|disabled,<integer>,seconds|occurrences)
Example
SETUP "alerts","cutter","enabled,10,seconds)"
Intermec Fingerprint v7.61 – Programmer’s Reference Manual Ed. 7
327
Chapter 8
EasyLAN 100i Setup
Sections, Objects,
and Values, cont.
lan1 section
Objects
NODE_ADDR, HP_JETADMIN, DEF_OUT, SYS_LOC, SYS_CONT, NETW_ENB,
PS_NAME, JOB_CHECK_DELAY, CONF_CHECK_DELAY, FR_802_3,
FR_ETH_2, FR_802_2, FR_SNAP, NCP_BURST_MODE, PSERVER_NDS,
PSERVER_BINDERY1, PSERVER_BINDERY2, PSERVER_BINDERY3,
PSERVER_BINDERY4, PSERVER_BINDERY5, PSERVER_BINDERY5,
PSERVER_BINDERY7, PSERVER_BINDERY8, PSERVER_BINDERY9,
PSERVER_BINDERY10, PSERVER_BINDERY11, PSERVER_BINDERY12,
PSERVER_BINDERY13, PSERVER_BINDERY14, PSERVER_BINDERY15,
PSERVER_BINDERY16, NPRINTER1, NPRINTER2, NPRINTER3,
NPRINTER4, NPRINTER5, NPRINTER6, NPRINTER7, NPRINTER8,
LSLM_ENB, NB_FR_TYPE, LPRINT_1, LLOGIC_1, LPRINT_2, LLOGIC_2,
LPRINT_3, LLOGIC_3, LPRINT_4, LLOGIC_4, LPRINT_5, LLOGIC_5,
LPRINT_6, LLOGIC_6, LPRINT_7, LLOGIC_7, LPRINT_8, LLOGIC_8,
PR1_IN, PR1_BEF, PR1STR, PR1_AFT, PR1_IN, PR1_BEF, PR1STR,
PR1_AFT, PR1_IN, PR1_BEF, PR1STR, PR1_AFT, PR2_IN, PR2_BEF,
PR2STR, PR2_AFT, PR3_IN, PR3_BEF, PR3STR, PR3_AFT, PR4_IN,
PR4_BEF, PR4STR, PR4_AFT, PR5_IN, PR5_BEF, PR5STR, PR5_AFT,
PR6_IN, PR6_BEF, PR6STR, PR6_AFT, PR7_IN, PR7_BEF, PR7STR,
PR7_AFT, PR8_IN, PR8_BEF, PR8STR, PR8_AFT, TCP_ENB, INT_ADDR,
DEF_ROUT, NET_MASK, PROSPRT, LPD_BANN, DHCP_ENB, BOOTP_ENB,
RARP_ENB, WINS_ENB, WINS_ADDR1, WINS_ADDR2, NBT_SCOPE_ID,
RTN_OPT, RTEL_PR1, RTEL_PR2, RTEL_PR3, RTEL_PR4, RTEL_PR5,
RTEL_PR6, RTEL_PR7, RTEL_PR8, READ_COM, WRT_COM, TRAPADDR,
TRAP_COM, SYS_NAME, SNMP_AUT,TRAP_PRT
Value Syntax
As defined by Axis.
Example
SETUP "lan1","RTEL_PR1","9090"
Limitations
NODE_ADDR is read-only.
Section "lan1" is impervious to volatile setup mode, that is, the setting
will be stored non-volatile.
If the ip-settings are changed, the printer must be rebooted to update
to the new settings.
328
Intermec Fingerprint v7.61 – Programmer’s Reference Manual Ed. 7
Intermec Printer AB
Idrottsvägen 10, P.O. Box 123
S-431 22 Mölndal, Sweden
tel +46 31 869500
fax +46 31 869595
www.intermec.com
Intermec Fingerprint v7.61 Programmer’s Reference Manual
*1-960434-06*
*1-960434-06*