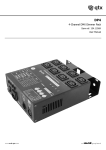
1
2-Station Deluxe FM Wireless Intercom System
OWNER’S MANUAL — Please read before using this equipment.
Your RadioShack 2-Station Deluxe FM Wireless Intercom System is an advanced onechannel intercom system that is convenient
and easy to use. Installation is quick and
simple; it requires no special wiring. Just by
plugging each of the two supplied stations
into a standard 3-wire AC outlet, you're ready
to send and receive calls or to monitor an
area where a station is installed. Each station’s features include:
Your intercom system is ETL listed and
meets all applicable FCC standards.
Precision PLL (Phase-Locked Loop) Circuit — provides clear and reliable communications.
CAUTION: TO REDUCE THE RISK OF
Built-In Frequency Modulation Circuit —
reduces line noise and interference from appliances.
WARNING: To reduce the risk of fire or
shock hazard, do not expose this product to rain
or moisture.
CAUTION
RISK OF ELECTRIC SHOCK.
DO NOT OPEN.
ELECTRIC SHOCK, DO NOT REMOVE
COVER OR BACK. NO USER-SERVICEABLE PARTS INSIDE. REFER SERVICING
TO QUALIFIED PERSONNEL.
This symbol is intended to alert
you to the presence of uninsulated dangerous voltage within
the product’s enclosure that might
be of sufficient magnitude to constitute a risk of electric shock. Do
not open the product’s case.
Lockable Talk Button — lets you set up a
station for any type of one-way communication, such as monitoring a room.
Call Tone — alerts the other station that you
are about to talk.
Talk Button — lights when the station is on.
It can even serve as a night-light.
Talk Indicator — lights when you transmit to
another station by pressing CALL, TALK, or
LOCK.
Expandable — individually boxed intercom
systems are labeled by frequency indicators
(A, B, or C) so you can select additional stations with the same frequency to add to your
system, or you can set up a separate system
using a different frequency.
!
!
This symbol is intended to inform
you that important operating and
maintenance instructions are
included in the literature accompanying this product.
INSTALLATION
You can install your intercom system almost
anywhere there is a standard AC outlet. Simply plug each station into an AC outlet, then
place it directly on a desk, shelf, or table, or
mount it on a wall.
Caution: This product is equipped with a
three-wire grounding-type plug (a plug having a third grounding pin). This plug will only
© 2001 RadioShack Corporation. All Rights Reserved.
RadioShack and RadioShack.com are trademarks
used by RadioShack Corporation.
OPERATION
fit into a grounding-type power outlet. This is a
safety feature. If you are unable to insert the
plug into your AC outlet, contact your electrician to replace your outlet. Do not defeat the
safety purpose of the grounding-type plug.
Turning a Station On and Off
To turn on a station, rotate VOLUME counterclockwise until it clicks. When TALK lights
steadily to show the station has power, rotate
VOLUME counter-clockwise to increase or
clockwise to decrease the volume level.
Important: Be sure you install the stations at
least 10 feet away from each other. Placing
the stations too close together produces feedback (a squeal or howl from the speakers).
The stations can transmit up to 300 feet, including between buildings, as long as they are
connected to the same power line transformer.
To turn off the station, rotate VOLUME clockwise until it clicks.
Calling Another Station
Mounting the Stations
Be sure the stations you plan to use are
turned on and adjusted to the desired volume.
To mount a station on the wall, you need two
screws (not supplied) with heads that fit into
the keyhole slots on the bottom of each station.
Press CALL to sound a tone alerting whoever
is at the other station that you are about to
speak.
1. Mark the mounting screw locations 21/2
inches (63.5 mm) apart, one above the
other.
Hold down TALK and speak in a normal voice.
When you finish speaking, release TALK and
listen for a response.
2. Drill a hole at each marked location.
Notes:
3. Thread a screw into each hole until the
screw's head extends about 1/8 inch (3.5
mm) from the wall.
• Only one party can talk at a time. Wait
until the other party finishes before
answering.
4. Align the keyhole slots on the bottom of
the station with the screw heads in the
wall, then slide the station down to secure
it.
• The red indicator on the station you are
using remains lit as long as you hold
down TALK or CALL, or when you press
LOCK (see “Monitoring”).
• If your voice sounds distorted, you might
be speaking too loudly or too close to the
station’s microphone.
Monitoring
You can set one station so it continuously
transmits. For example, set one station in a
baby's bedroom to pick up any sounds in that
bedroom, then listen at the other station in the
kitchen to monitor the sounds.
2
Note: You can monitor only one station at a
time.
should, take it to your local RadioShack store
for assistance.
Press LOCK on the station in the area you
want to monitor. The indicator lights to let you
know the station is transmitting.
THE FCC WANTS YOU
TO KNOW
When you finish monitoring, press TALK or
CALL on the station in the area you are monitoring to release the lock. The indicator turns
off.
Your intercom system might cause TV or radio interference even when it is operating
properly. To determine whether your stations
are causing the interference, turn them off. If
the interference goes away, your stations are
causing it. Try to eliminate the interference by:
Note: When you press LOCK on a station, you
cannot call or talk to that station until you release the lock by pressing TALK or CALL on
that station. (Or you can turn off that station to
release the lock.)
• Moving both stations away from the
receiver
• Connecting the stations to outlets that are
on a different electrical circuit from the
receiver
Using Additional Stations
You can add additional stations to your intercom system as long as they transmit on the
same frequency. The stations and their boxes
are labeled by frequency indicators — A (200
kHz), B (270 kHz), or C (230 kHz). Stations in
the same box have the same frequency.
This equipment has been tested and found to
comply with the limits for a Class B digital device, pursuant to Part 15 of the FCC Rules.
These limits are designed to provide reasonable protection against harmful interference in
a residential installation. This equipment generates, uses and can radiate radio frequency
energy and, if not installed and used in accordance with the instructions, may cause harmful interference to radio communications.
Be sure the letter on the stations you plan to
add matches the letter on your current stations. If you want to set up a separate intercom system, however, be sure it operates on
a different frequency.
However, there is no guarantee that interference will not occur in a particular installation.
If this equipment does cause harmful interference to radio or television reception, which
can be determined by turning the equipment
off and on, the user is encouraged to try to
correct the interference by one or more of the
following measures:
CARE
Keep the intercom system dry; if it gets wet,
wipe it dry immediately. Use and store the intercom system only in normal temperature environments. Handle the intercom system
carefully; do not drop it. Keep the intercom
system away from dust and dirt, and wipe it
with a damp cloth occasionally to keep it looking new.
• Reorient
antenna.
or
relocate
the
receiving
• Increase the separation between the
equipment and receiver.
Modifying or tampering with the intercom system’s internal components can cause a malfunction and might invalidate its warranty and
void your FCC authorization to operate it. If
your intercom system is not performing as it
• Connect the equipment into an outlet on
a circuit different from that to which the
receiver is connected.
3
• Consult your local RadioShack store or
an experienced radio/TV technician for
help.
• If you cannot eliminate the interference,
the FCC requires that you stop using your
intercom system.
Changes or modifications not expressly approved by RadioShack may cause interference and void the user’s authority to operate
the equipment.
You must use shielded interface cables with
this equipment.
This device complies with Part 15 of the FCC
Rules. Operation is subject to the following
two conditions: (1) this device may not cause
harmful interference, and (2) this device must
accept any interference received, including interference that may cause undesired operation.
Limited Ninety-Day Warranty
This product is warranted by RadioShack against manufacturing defects in material and workmanship under normal
use for ninety (90) days from the date of purchase from RadioShack company-owned stores and authorized RadioShack franchisees and dealers. EXCEPT AS PROVIDED HEREIN, RadioShack MAKES NO EXPRESS WARRANTIES AND ANY IMPLIED WARRANTIES, INCLUDING THOSE OF MERCHANTABILITY AND FITNESS FOR A
PARTICULAR PURPOSE, ARE LIMITED IN DURATION TO THE DURATION OF THE WRITTEN LIMITED WARRANTIES CONTAINED HEREIN. EXCEPT AS PROVIDED HEREIN, RadioShack SHALL HAVE NO LIABILITY OR RESPONSIBILITY TO CUSTOMER OR ANY OTHER PERSON OR ENTITY WITH RESPECT TO ANY LIABILITY, LOSS
OR DAMAGE CAUSED DIRECTLY OR INDIRECTLY BY USE OR PERFORMANCE OF THE PRODUCT OR ARISING OUT OF ANY BREACH OF THIS WARRANTY, INCLUDING, BUT NOT LIMITED TO, ANY DAMAGES RESULTING FROM INCONVENIENCE, LOSS OF TIME, DATA, PROPERTY, REVENUE, OR PROFIT OR ANY INDIRECT,
SPECIAL, INCIDENTAL, OR CONSEQUENTIAL DAMAGES, EVEN IF RadioShack HAS BEEN ADVISED OF THE
POSSIBILITY OF SUCH DAMAGES.
Some states do not allow limitations on how long an implied warranty lasts or the exclusion or limitation of incidental or
consequential damages, so the above limitations or exclusions may not apply to you.
In the event of a product defect during the warranty period, take the product and the RadioShack sales receipt as proof
of purchase date to any RadioShack store. RadioShack will, at its option, unless otherwise provided by law: (a) correct
the defect by product repair without charge for parts and labor; (b) replace the product with one of the same or similar
design; or (c) refund the purchase price. All replaced parts and products, and products on which a refund is made, become the property of RadioShack. New or reconditioned parts and products may be used in the performance of warranty service. Repaired or replaced parts and products are warranted for the remainder of the original warranty period.
You will be charged for repair or replacement of the product made after the expiration of the warranty period.
This warranty does not cover: (a) damage or failure caused by or attributable to acts of God, abuse, accident, misuse,
improper or abnormal usage, failure to follow instructions, improper installation or maintenance, alteration, lightning or
other incidence of excess voltage or current; (b) any repairs other than those provided by a RadioShack Authorized
Service Facility; (c) consumables such as fuses or batteries; (d) cosmetic damage; (e) transportation, shipping or insurance costs; or (f) costs of product removal, installation, set-up service adjustment or reinstallation.
This warranty gives you specific legal rights, and you may also have other rights which vary from state to state.
RadioShack Customer Relations, 200 Taylor Street, 6th Floor, Fort Worth, TX 76102
We Service What We Sell
RadioShack Corporation
Fort Worth, Texas 76102
12/99
43-3103
AO0039ABA1
01A01
Printed in China