1
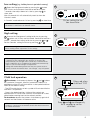
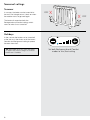
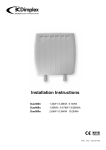
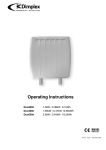
 Contact Details Please note that some of the contact details on this PDF document may not be current. Please use the following details if you need to contact us: Telephone: 0844 879 3588 Email: [email protected] The customer support section of our website also features a wide range of information which may be of use to you and is available 24 hours a day. It includes: • Operating and installation instructions • Easy ‘How to use’ guides for storage heaters • Service and repairs • Where to buy our products • Literature downloads • Heating requirement calculator Visit ‐ www.dimplex.co.uk/support A division of GDC Group Ltd
Millbrook House Grange Drive Hedge End Southampton SO30 2DF
www.dimplex.co.uk
Registered No: 1313016 England
VAT GB 287 1315 50004
EEE Producer Registration Number –
WEE/GE0057TS
Paper from sustainable sources
Operating Instructions
These instructions should be read carefully and
retained for future reference. Note also the
information given on the appliance.
DuoHeat® radiator
Models: Duo300N
Duo400N
Duo500N
Issue 1
December 2010
IMPORTANT
SETTING UP YOUR NEW HEATER
These instructions
should be read
carefully and retained
for future reference.
Note also the
information given on
the appliance.
Setting up your new heater, called ‘commissioning’ is simple as instructed on
page 3. Please note that the new materials in the heater will produce a slight
smell for the first few days of operation. Rooms must be well ventilated and
young children, caged birds, or persons with respiratory complaints
must not remain in close proximity to the heater during the first 48
hours of the set-up period. If several new heaters have been installed it’s
recommended that the set-up for each one (commissioning) is phased over
several days.
WARNING - THE SURFACE OF THIS HEATER CAN BE HOT.
•The surface temperatures of this heater are within the requirements of
EN60335-2-61, the European Standard covering the safety requirements
for Electric Storage Heaters, and momentary contact with any part of the
heater should not cause injury. However, in order to be effective, heaters of
any type do get hot, especially around the air outlet grille.
•If aged or infirm persons, or young children, are likely to be left unsupervised in
the vicinity of a heater precautions should be taken to ensure that prolonged
contact with the heater cannot occur. We recommend that a guard is fitted
around the heater, as is normal with some types of heating appliances in similar
circumstances. A range of guards specially designed for Dimplex storage
heaters is available. If you require further information on these guards, please
see contact details on back page.
•This appliance is not intended for use by persons (including children) with
reduced physical, sensory or mental capabilities, or lack of experience and
knowledge, unless they have been given supervision or instruction concerning use of the appliance by a person responsible for their safety.
•Children should be supervised to ensure that the do not play with
the appliance.
CAUTION: DO NOT COVER SURFACES OF THE HEATER AND DO NOT
OBSTRUCT AIR OUTLET GRILLES.
•Surfaces of the heater should not be covered or obstructed as this can
cause excessive temperatures that can be hazardous and may cause
safety cut-outs to operate.
•Do not put clothes, fabrics or any combustible materials on the heater.
•Do not allow curtains to come within 75mm (3”) of the top and ends of the
heater.
•DO NOT SIT OR STAND ON THE HEATER.
•DO NOT PLACE OBJECTS IN CONTACT WITH THE HEATER.
PLEASE NOTE: YOUR DUO HEATER IS VERY HEAVY AND MUST BE
SECURELY FIXED TO A SOUND WALL.
•No attempt should be made to move the heater without first seeking
specialist advice. If you are not happy that the heater has been securely
fixed, please inform your installer.
•If, during any reassembly of the heater, a part of the thermal insulation
shows damaged or deterioration which may impair safety, it should be
replaced with an identical part.
•UNDER NO CIRCUMSTANCES SHOULD THE WALL FIXINGS BE
LOOSENED ON THIS HEATER BEFORE THE BRICKS HAVE BEEN REMOVED FROM ITS CORE.
2
The benefits of DuoHeat®
The DuoHeat radiator is the latest in energy efficient heating.
With a slim modern design and user friendly electronic
controls DuoHeat is the perfect choice to provide efficient,
controllable heating.
Your DuoHeat radiator works by providing continuous warmth
from a carefully balanced combination of “stored” and
“radiant” heating. Some energy is taken in by the radiator
when electricity tariffs are low and this is supplemented
by top up from the low wattage element attached to the
front panel, to ensure the room temperature remains at
your preferred level throughout the day.
Know your heater
Controls: ‘Comfort’ and ‘Background’
Off-peak electricity is supplied from the National Grid to your
house – usually overnight – when national demand for electricity
is low. This is called the off-peak period.
Because it is off-peak it is supplied at a cheaper price than
normal day rate electricity and requires a separate off-peak
electrical circuit and meter. This circuit operates the storage
heaters and switches on automatically during the off-peak time
period which will occur at times of the night or day. If you are
unsure what off-peak tariff you have, you will need to contact
your electricity supplier.
❅ Min
Max
Identity
label
In the same way as you charge up a battery, electricity is used
to heat elements in your heater, then over a number of hours,
the elements gradually transfer the heat to a very high density
material that absorbs and stores the heat for use during the
next day. This process is referred to as ‘charging’ the heater.
Front
panel
However in order to ensure your room stays warm overnight,
DuoHeat is designed to give out some heat even when the
heater is ‘charging’.
The normal on-peak (or day rate) circuit supplies energy to
operate the low wattage radiant panel and the controls within
the heater, when needed for top-up heating.
Feet
Switch for on-peak
radiant panel
[leave ‘ON’ for
heating season]
Off-peak
electricity switch
[leave ‘ON’ for
heating season]
3
Setting up your new heater
The controls
Models DUO300N, DUO400N, DUO500N
Illuminated bars
show heat levels
1
Child lock
DuoHeat radiators have just one simple electronic
temperature control display on the top right hand of the heater.
1
The TEMPERATURE CONTROL has two output modes:
Mode 1 ‘Comfort’: (on-peak: radiant heat) - default setting
❅ Min
Mode 2 ‘Background’: (off-peak: stored heat)
Max
Illuminates BLUE when in frost
protection mode/low setting
Each mode needs to be set to the correct level to
provide the optimum heating comfort.
To commission a new heater
To commission a new heater, adjust the background setting to
max - 10 bars lit and the comfort setting at 5. Leave for 48 hours.
Please remember that any subsequent changes you make can
take at least 24 hours to take effect.
2
3
2 For DuoHeat to operate correctly, both electricity supplies from
the wall switches must be switched ‘on’ at all times.
3
When the radiator is switched on, illuminated bars will indicate
the temperature setting – the radiator will automatically be in
‘Comfort’ mode.
3
3
Depending on your comfort requirements, there are three
recommended settings: Normal, Low, High. See below.
IMPORTANT - The new materials in the heater are likely to
produce a smell for the first few days of operation.
Rooms must be well ventilated and young children, caged
birds, or persons with respiratory complaints must not
remain in close proximity to the heater during the first 48
hours of the set-up period.
Multiple installations
If several new heaters have been installed it’s recommended that
the set up (commissioning) is phased over several days.
Setting up your heater for normal use
4
The heater is set at a factory default setting, however you can
check this has not been altered by the installer. The normal setting
shows 5 bars.
4 Check or set the ‘Background’ mode: This controls the
amount of heat that is stored. To show the hidden menu press the
+ button until 10 bars are illuminated and continue to hold for a
further 7 seconds. Then adjust by pressing the + or – buttons
and set at the mid point (5th bar).
Setting the ‘Comfort’ mode: This controls the level of
radiant heat. Set at the mid point (5 bar) by pressing the + or –
buttons for more or less radiant heat.
TIP After 20 seconds the temperature control display will
automatically show the ‘Comfort’ mode. The illuminated bars
will dim after approx 10 seconds if no adjustment is made.
4
Max
❅ Min
Max
Press and hold for 7 seconds.
Then adjust – or +
❅ Min
Max
Background mode
Comfort mode
After 20 seconds, the display will go back to the default
Comfort mode. You need to set the Comfort mode as described
below.
5
❅ Min
5
Press for more or less
radiant heat.
❅ Min
Max
❅ Min
Max
Low setting
[e.g. holiday home in period of vacancy]
Select the Background mode by pressing the + button
until 10 bars are illuminated. Continue to hold for a further
7 seconds, then adjust down to 1st bar by pressing – to
show blue.
6
6
After 20 seconds this will automatically revert to show the
‘Comfort’ mode.
❅ Min
In ‘Comfort’ mode reduce to 1st bar by pressing – to show blue.
On low setting the first
bar shows blue
TIP The blue frost protection bar may be illuminated because
the heater is connected to an external control.
High setting
7 Increase the ‘Background’ setting to 8th bar by pressing
Max
7
the + button until 10 bars are illuminated. Continue to hold for a
further 7 seconds then adjust to 8th bar by pressing – or +
Set the ‘Comfort’ setting to 5th bar by pressing – or +
❅ Min
TIP After setting the controls: Operate the radiator for 24 hours
before making further adjustments to the settings.
Max
TIP It may require a few days fine-tuning to achieve an optimum
comfort level. On subsequent days increase or decrease the
temperature by one red light until a satisfactory comfort level has
been established. Once established the radiator will automatically
adjust to suit seasonal changes in temperature.
During mild weather Background heat may not operate or be required, however the Comfort heat - low wattage - may still operate.
Child lock operation
8
8 To activate: simultaneously depress the + and – buttons
for a period of 3 seconds. After this period the childlock is in
operation and the LED will illuminate for a short period and then
revert to the setback setting.
- The LED beside the key or lock symbol will illuminate while the
child lock is in operation.
- Once in the locked position, if either of the controls are
operated the LED will resume maximum illumination for a short
period before reverting back to the setback position.
To deactivate: depress the buttons simultaneously again for 3
seconds and the buttons will become active.
TIP If the child lock is illuminated green this shows that the
radiator is connected to an external control. See these instructions
for further information.
Glows red when
child lock ‘ON’
❅ Min
Max
❅
Min
Press – and + simultaneously
for 3 seconds to set the
child lock
5
Seasonal settings
Summer
In summer, the heater can be turned off at
the wall. Don’t forget to turn it back on when
the weather starts to get cold again.
OFF
X
X
The heater wil remember both the
Background and Comfort settings which
were set when it was turned off.
Holidays
In the summer the heater can be turned off
at the wall, or in the winter set at the lowest
Comfort and Background setting to protect
the room from frost.
TIP Remember when you switch the heater
on again it may need a ‘charge’ for 24 hours
before heat is available.
6
❅ Min
Max
Set both Background and Comfort
modes to min/frost setting
OFF
Troubleshooting guide
Please note this guide refers to heaters being operated individually. If a central control system is installed some issues may require
that you refer to the instructions provided with the system controlling the heaters.
ISSUE
SOLUTION
My heater is too cold •
Has there been an interruption to mains power? A power cut during the off-peak period could affect the charge taken by the heater.
•
Ensure that the off-peak circuit is working, the wall switch is on and the fuse is ok.
•
Turn up the BACKGROUND control (this may take up to 24hrs to take effect).
•
Turn up the COMFORT control (this will start to take effect immediately).
•
Has the heater been inadvertently covered? If so, the safety cut-out may have operated.
Please contact Customer Services if this is the case. A service call out will be necessary to reset the cut-out and there will be a charge for the call out.
•
Do you have another heater nearby? If so please see ‘One of my heaters is colder than the other’ below.
•
The room temperature will have an effect on the charge taken, therefore if the room is already warm the heater will not take an unnecessary charge.
My heater is too hot
•
Adjust the Comfort setting down to determine if background is set too high.
•
Turn the BACKGROUND control down (this may take up to 24hrs to take effect).
One of my heaters is
•
If two heaters are fitted in one area, they may affect each other’s operation.
colder than another •
Set one heater higher as a ‘primary’ source of heat, and the other lower to provide ‘supporting’ heat to avoid the heaters cancelling each other out and taking a reduced charge.
My room is not warm
•
Turn up the BACKGROUND control (this may take up to 24hrs to take effect).
enough in the evening
•
Turn up the COMFORT control.
Smells other than •
Apart from the commissioning period and perhaps after a long period of inactivity when there may be that caused during
an accumulation of dust within the heater, no smells should be present. One exception is when
commissioning
decoration is being carried out, especially if the substances used have a petrochemical base.
If decorating is to be carried out, turn off the heater and ensure the room is well ventilated before the •
heater is turned back on again.
The heater has
Lit cigarettes, candles and oil burners, combined with the convection effect of a heater can
•
left black marks
cause soot deposits to build up on the surface directly above and to the sides of the heater.
on the wall • Installing a shelf above the heater is one solution, as the heat rising above the heater will be diverted away from the wall and into the centre of the room. Please ensure a minimum of 250mm clearance between the top of the heater and the shelf.
Unable to adjust •
Turn the power supplies off for five minutes and then switch them back on.
any controls
•
Check external controller if one is connected.
7
Cleaning
To maintain the external appearance of the radiator it need only be wiped over
occasionally with a dry duster. During the summer months, or at other times when the
appliance is not in use and is completely cold, the opportunity should be taken to wipe
over with a damp cloth. Do not use abrasive cleaning powders or furniture polish.
Discoloration of wall finishes can sometimes occur immediately above a storage heater
due to the properties of some paints and decorating materials or the presence of
environmental impurities in the air (such as soot or incense generated from the
burning of candles, etc.) A suitable shelf (available from Dimplex) may be fitted to limit
the extent of any wall discoloration.
After sales service
Your product is guaranteed for two years from the date of purchase.
Within this period, we undertake to repair this product free of charge provided it has
been installed and operated in accordance with these instructions.
Your rights under this guarantee are additional to your statutory rights, which in turn
are not affected by this guarantee.
Should you require after sales information please go to www.dimplex.co.uk
where you will find our self help guides and videos by clicking on ‘Customer
Support’. If you cannot find the information you need, a simple online form is
provided for your convenience, or contact the number below.
You will need the model number, serial number and series, date of purchase, and nature
of the fault to complete the online form or before contacting us.
Please do not return a faulty product to us in the first instance as this may result in loss
or damage and delay in providing you with a satisfactory service.
Please retain your receipt as proof of purchase.
Spare parts
Spare parts information is available on the website www.dimplex.co.uk, and the customer
services help desk will be able to advise you should you need to purchase any spares.
You will need the model number, serial number and series, date of purchase, and nature
of the fault to complete the online form or before contacting us.
Protective guards
A range of protective guards designed for Dimplex storage heaters is available to order.
For more information contact Norfolk Industries on 01603 667957.
Recycling
For electrical products sold within the European Community.
At the end of the electrical products useful life it should not be disposed of with
household waste. Please recycle where facilities exist. Check with your Local Authority
or retailer for recycling advice in your country.
This product complies with the European Safety Standards EN60335-2-30 and the European Standard Electromagnetic
Compatibility (EMC) EN55014, EN60555-2 and EN60555-3.
These cover the essential requirements of EEC Directives 2006/95/EC and 2004/108/EC
© GDC
Dimplex, a division of GDC Group Limited, Millbrook House, Grange Drive, Hedge End, Southampton SO30 2DF
Email [email protected] Website www.dimplex.co.uk
Customer Help Line 0845 600 5111
Fax 01489 773050