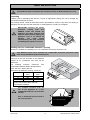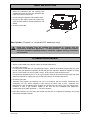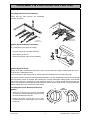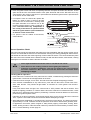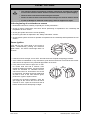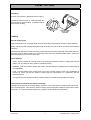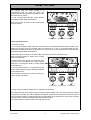
1
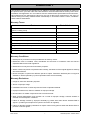
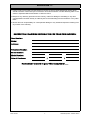
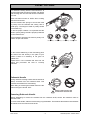
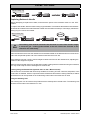
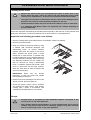
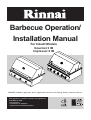
Barbecue Operation/
Installation Manual
For Inbuilt Models
Gourmet 3 IB
Impressor 6 IB
DO NOT install or op e r a t e t h is a p p lia n c e b e fo r e r e a d in g t h e s e in s t r u c t io n s .
Th is a p p lia n c e s h a ll b e in s ta lle d and operated in
a c c o rd a n c e with :
• These instructions
• Current AS 5601 'Gas Installations'
• Any other local relevant Statutory Regulations
All Rinnai gas products
are A.G.A. certified.
Distributed and serviced in Australia under a Quality
System certified as com plying with ISO 9001 by
SAI Global
© Copyright Rinnai Australia Pty Ltd ABN 74 005 138 769
All rights reserved
Produced by Rinnai Australia Technical Services Department
3 January 2006 - Issue 1.
No part of this manual may be copied without permission from Rinnai Australia Pty Ltd.
Rinnai Australia reserves the right to make modifications and change specifications without notice.
WARNING
•
Read these instructions carefully before installation and operation and retain
for future reference.
•
Illustration may vary from barbecue contained in carton.
•
Failure to comply with these instructions may result in fire or explosion which
could cause property damage, serious bodily injury or death.
•
This Barbecue must be installed and commissioned by an Authorised person
only.
FOR YOUR SAFETY
IF YOU SMELL GAS:
1. Shut off gas to the appliance, if possible.
2. Extinguish any open flame.
3. Open hood.
4. If odour continues, immediately call your gas supplier.
STORAGE:
1. Do not store or use petrol or other flammable vapours and liquids in the
vicinity of this or any other appliance.
2. Do not store gas cylinders that are not connected for use in the vicinity of
this appliance.
3. Only to be used outdoors.
Rinnai Australia
- ii -
Inbuilt BBQ Operation / Installation Manual
TABLE OF CONTENTS
Congratulations on purchasing a state of the art Rinnai lifestyle Barbecue.
Please read this manual carefully.
It contains important information for safety and enjoyable cooking.
TABLE OF CONTENTS ...................................................................... iii
WARRANTY .........................................................................................1
SPECIFICATIONS ...............................................................................3
END USER - SAFETY INFORMATION ...............................................4
CLEARANCES AND LOCATION .........................................................9
INSTALLATION ..................................................................................10
COMMISSIONING .............................................................................11
ASSEMBLY & PREPARATION FOR USE .........................................12
HOW TO USE ....................................................................................15
CLEANING AND MAINTENANCE .....................................................21
TROUBLE SHOOTING ......................................................................23
CONTACT INFORMATION ................................................................24
Rinnai Australia
- iii -
Inbuilt BBQ Operation / Installation Manual
WARRANTY
The benefits conferred by this warranty are in addition to all other rights and remedies in respect of
the product which you have under the Trade Practices Act and similar state or territory laws. Given
installation and application is in accordance with the manufacturers specifications and instructions,
Rinnai Barbecues are warranted by Rinnai for the cost of labour and components in the event of
defects arising from faulty materials and/or workmanship in accordance with the Terms, Conditions
and Exclusions listed below.
Warranty Terms
Parts
Parts & Labour
All Stainless Steel components (such as frame structure,
panels, roasting hood)
5 years
Gas Valves
5 years
Knobs and handles
1 year
Burner Components
1 year
Cooking Grills / Cooking Plate / Cooking Rack / Flame Tamers
1 year
Electronic Ignition components
1 year
Regulator and Hose assembly
1 year
Temperature Indicator
1 year
Accessories
1 year
Warranty Conditions
1. Dated proof of purchase must be provided with all warranty claims.
2. Barbecues must be installed, used, maintained and serviced in accordance with the Owner’s
Operation Manual and local regulations.
3. Barbecues must only be used for domestic purposes.
4. Where a failed component is replaced under warranty, the balance of the original appliance warranty
will remain effective.
5. Rinnai will repair or replace the defective part at it's option. Should the defective part no longer be
available, it will be replaced by a part of equivalent value and functionality.
Warranty Exclusions
1. Usage for other than domestic purposes.
2. Abuse or improper usage.
3. Installation other than in conformity with the Owner’s Operation Manual.
4. Improper maintenance, failure to maintain or improper storage.
5. Discolouration of metallic components due to excessive heat.
6. Wear, general deterioration and corrosion as a result of improper storage, extreme weather or
extreme local atmospheric conditions.
7. Failure or damage caused by improper assembly by parties other than Rinnai Australia Staff or
Agents - (includes gas escapes from cylinder connection to regulator).
8. Failure or damage caused by alterations or repairs carried out by persons other than Rinnai Service
persons or service agents.
Rinnai Australia
-1-
Inbuilt BBQ Operation / Installation Manual
WARRANTY
9. Labour costs incurred due to a Rinnai Service person or service agent performing checks which
should have been carried out by the customer in accordance with the “Trouble Shooting table” in the
Owner’s Operation Manual and where no defect is found.
10.Subject to any statutory provisions to the contrary, claims for damage to a building or any other
consequential loss either directly or indirectly due to fire emanating from the barbecue or any other
faults.
11. Rinnai does not accept liability for consequential damage or any incidental expenses resulting from
any breach of the warranty.
RECORD THE FOLLOWING INFORMATION FOR YOUR OWN RECORDS:
Your Retailer:
Name:
Address:
Telephone Number:
Serial Number:
Model Number:
/
Date of Purchase:
/
Remember to send in your Warranty Card .....
Rinnai Australia
-2-
Inbuilt BBQ Operation / Installation Manual
SPECIFICATIONS
Main Barbecue Components
Hood
Gourmet 3 IB
pictured
Temperature Gauge
Drip Tray
Control Knobs
Under the Hood
Warming Rack
Solid Hot Plate
(Cooking grill)
Rotisserie Bar
& Skewer
Removable Handle
Back Burner
Impressor 6 IB
Grill Plate
Smoker Box
(3 Burner optional
extra)
Main Burners
Impressor 6 IB
Flame Tamers
Gourmet 3 IB
Model Name /
Model No.
Gourmet 3 IB
GOUR3SSIB
Assembled
Dimensions
Hood Open
(mm)
Width: 935
Depth: 620
Total Cooking
surface
(mm)
Width: 800 x
Depth: 465
Height: 576 *
Impressor 6 IB
IMP6SSIB
As above
Main Burners
Gourmet 3 IB
Flame Tamers
Impressor 6 IB
Heat Shields
Cooking surface area
(mm)
Gril plate: 330 x 465
Hotplate: 330 x 465
Net
Weight
(KG)
HotPlate
Burner
MJ/h
Rating
Back Burner
MJ/h
Rating
Total Gas
Rate
MJ/h
Net 59.48
Nat Gas: 43.5
ULPG: 55.5
N/A
NG: 43.5
ULPG:
55.5
Net 60.88
Nat Gas: 51.0
ULPG: 56.0
NG: 15.0
ULPG: 13.5
NG: 66.0
ULPG:
69.5
Warming Rack: 840 x 140
Width: 800 x
Depth: 465
As Above
* Note: 299 mm above the benchtop and 277 mm below the benchtop
Gas Supply
Pressure
(kPa)
Nat Gas
Connector
ULPG Hose and
Regulator
Burners
Accessories
Gourmet 3 S/S ‘U’ Burners x 3
Nat Gas 1.13
ULPG 2.75
1/2” BSP
Adaptor UNF to
1/2” BSP
2 Kg Reg with
5/8” UNF FI
Thread
Impressor 6 S/S ‘I’ Burners x 5 plus 1 x
rear Back Burner
Rotisserie Kit
(5 Kg capacity)
Cook book / Instruction
book
Rinnai Australia reserves the right to make modifications and change the specifications
without notice.
Rinnai Australia
-3-
Inbuilt BBQ Operation / Installation Manual
END USER - SAFETY INFORMATION
General Safety Information
WARNING
•
Failure to comply with these Instructions could result in a fire or explosion
which could cause serious injury, death or property damage.
•
This Barbecue must be installed and commissioned by an Authorised person
only.
If you smell gas:
WARNING
1. Shut off gas to the barbecue, and at its source if possible.
2. Extinguish any open flame.
3. Open hood.
4. Perform gas leak check procedure.
If odour continues, immediately call your gas supplier.
WARNING
•
Never connect the barbecue directly to the gas cylinder / reticulated gas supply
without a Regulator.
•
Always use the hose and regulator supplied (Propane or Universal LPG models
only).
•
Never store your gas cylinder indoors. Gas cylinders must be stored outdoors
in a well ventilated area out of reach of children or the infirm.
•
DO NOT test for gas leaks with an open flame.
•
DO NOT allow children or the infirm to operate or handle any parts of the
barbecue or rotisserie.
•
Observe the instructions and warnings on the rotisserie motor case and
electrical cord at all times. If electrical cord is damaged, return to supplier for
repair.
Check that the barbecue supplied is correct for the gas type being used. The gas type is clearly labelled
on the barbecue.
Barbecues are labelled “Propane”, “Universal LPG”, or “Natural Gas”.
If the barbecue is “Propane” or “Universal LPG” it is normally used with a gas cylinder. However, it is
possible to install these barbecues on a reticulated “Propane” or “Universal LPG” supply and not use a
gas cylinder.
Pipe sizing for reticulated Natural, Propane or Universal LPG gas supplies must be in accordance with
an approved sizing chart such as the one in AS 5601.
Natural Gas Barbecues:
1. Must be connected to the reticulated supply either by hard plumbing or the use of an approved
hose.
2. Must be installed with the pressure regulator supplied for Natural Gas.
3. Connection to the reticulated gas supply must incorporate an isolation valve.
4. The isolation valve must be closed when the barbecue is not in use.
Rinnai Australia
-4-
Inbuilt BBQ Operation / Installation Manual
END USER - SAFETY INFORMATION
Hose and Regulator (“Propane” or “Universal LPG” barbecues used with gas
cylinder):
1. The pressure regulator and hose assembly supplied with the barbecue are suitable for use on
bottled LP gas only.
2. The pressure regulator and hose assembly supplied with the appliance MUST be used.
3. Replacement pressure regulators and hose assemblies must be those specified by Rinnai for use
with this appliance.
4. The pressure regulator supplied has been fixed to have an outlet pressure of 2.75 kPa.
A different pressure is not suitable.
5. Propane or universal gas cylinders must be installed and positioned to conform with AS 5601,
Appendix J - “LP Gas Cylinders”.
6. When the barbecue is not in use, the hose and regulator must only be disconnected from the
cylinder. The hose and regulator must not be disconnected from the barbecue unless it is being
replaced. Such replacement must only be carried out by an Authorised person.
7. Inspect the gas hose when replacing the gas cylinder, or once per year, whichever is more
frequent. If the hose is cracked, cut, abraded, discoloured or damaged in any other way, the
barbecue must not be used. The hose must be replaced if damaged or when local regulations
require this. Contact your supplier or local regulating authority if uncertain. Such replacement must
only be carried out by an Authorised person.
Gas Cylinder (“Propane” or “Universal LPG” barbecues only)
1. This barbecue is designed for use with a 9 kg LP Gas cylinder. This cylinder should conform to
AS 2030.1 - 1999. Do not connect this barbecue to a gas cylinder of different capacity.
2. The barbecue is designed for use in the vapour withdrawal mode. Therefore it is important to
always store and use the gas cylinder in an upright position.
3. For storage and when refilling / exchanging cylinders, disconnect the hose and regulator at the
cylinder end only. Do not disconnect the hose and regulator from the barbecue end.
4. The gas cylinder should be refilled by a reputable gas dealer, or exchanged at a reputable gas
cylinder exchange outlet. Gas cylinders should be inspected and re-qualified periodically in
accordance with local statutory regulations. A dented or rusty gas cylinder may be hazardous and
should not be used.
5. Do not subject the gas cylinder to excessive heat.
6. Always close the cylinder valve when the barbecue is not in use.
7. Gas cylinders must be stored outdoors in a well ventilated area out of reach of children and must
not be stored in a building, garage or any other enclosed area.
8. Propane or Universal LPG Gas Cylinders must be installed and positioned to conform with
AS 5601 Appendix J - “LP Gas Cylinders”.
Rinnai Australia
-5-
Inbuilt BBQ Operation / Installation Manual
END USER - SAFETY INFORMATION
Gas Installation - "Propane" or "Universal LPG" barbecues using a gas cylinder
1. Familiarise yourself with the information in this
manual, in particular the items under "Safety
Information".
2. Ensure all burners are in the "OFF" position as
shown.
OFF
OFF
POSITION
HI
3. Connect the regulator to the gas cylinder by
turning the coupling nut anti-clockwise to
tighten to a full stop (left hand thread). The
seal has now engaged. An additional one half
to three quarter turn is required to complete the
connection. Tighten by hand only. Do not use
tools.
LO
4. Make a soapy solution by mixing one part liquid
detergent (such as dish-washing liquid) and
one part water.
5. Open the gas valve on the cylinder by turning it
anticlockwise.
6. Apply the soapy solution to all visible gas
connections in the vicinity of the cylinder and
regulator and where the gas hoses attach to
the fitting on the solid barbecues gas pipe and
to the side shelf burner (if fitted). Gas leaks will
show as small bubbles in the soapy solution.
7. If there is a gas leak from the connection
between the regulator and gas cylinder, close
the gas valve on the cylinder by turning it
clockwise. Disconnect the regulator and hose
assembly from the cylinder by turning the
coupling nut clockwise to disengage. Inspect
for debris inside the cylinder fitting and fitting at
the end of the regulator. Remove debris and
reconnect as per step 3). Retest for gas leaks.
ON
OFF
8. Removal of the gas hose, regulator and
cylinder is the reverse of the connection
procedure.
CAUTION
If there is still a gas leak from the connection between the regulator and gas cylinder
or any other connections contact your supplier or Rinnai for assistance.
Connections other than the connection between the regulator and gas cylinder
must only be altered by an Authorised person.
If gas leaks are present DO NOT operate the Barbecue.
Rinnai Australia
-6-
Inbuilt BBQ Operation / Installation Manual
END USER - SAFETY INFORMATION
Storage
•
DO NOT store or use petrol or other flammable vapours and liquids in the
vicinity of this barbecue or any other appliance.
•
This barbecue is for OUTDOOR use only. Refer to page 9 for details.
•
DO NOT operate the barbecue indoors.
WARNING
Location
WARNING
•
DO NOT operate in an enclosed area.
•
DO NOT operate in an unventilated area.
•
DO NOT install on recreational vehicles or boats.
•
DO NOT obstruct the flow of air around the barbecue whilst in use. Refer to
“Clearances and Location” section page 9.
•
Certain materials or items when placed near the barbecue may be affected by
the radiant heat and could be damaged. Keep these items away from your
barbecue.
•
Keep barbecue away from combustible materials. Maintain the Clearances
shown on page 9.
•
Never test for gas leaks with a match or open flame.
•
If burners go out during operation, close the gas supply at the source and turn
all burner controls to ‘OFF’. Open the hood and wait at least 5 minutes before
attempting to relight.
•
Should a grease fire occur attempt to shut off the gas supply at the source, turn
off all burners and remove food if possible.
•
Inspect the gas hose at least once per year, or whenever the gas cylinder is
replaced. If the hose is cracked, cut, abraded, discoloured or damaged in any
other way the barbecue must not be used. The hose must be replaced if
damaged or when local regulations require this. Contact your supplier or local
regulating authority if uncertain. Replacement must only be carried out by an
Authorised person.
•
Avoid unneccesary twisting of the gas hose.
•
Never alter or modify any parts of the barbecue including any of the gas
components.
•
Observe the instructions and warnings on the rotisserie motor case and
electric cord at all times.
•
Never lean over the cooking surfaces whilst lighting the barbecue.
•
DO NOT allow children or the infirm to operate or handle any parts of barbecue.
•
Never light the barbecue with the hood closed.
•
Never leave your barbecue unattended when operating.
•
DO NOT use charcoal, briquettes, rocks or sand on this appliance.
•
DO NOT use aluminium foil to line the flame tamers or drip tray. This can block
off air for combustion and ventilation and result in a dangerous condition.
•
DO NOT smoke whilst operating your barbecue.
•
Wear appropriate clothing whilst operating the barbecue. Some synthetic
fabrics (such as Nylon) are highly flammable and should be avoided.
•
Use good quality insulated oven mitts when operating the barbecue.
•
DO NOT heat unopened food containers as pressure build-up during heating
may cause the container to burst.
Operation
CAUTION
Rinnai Australia
-7-
Inbuilt BBQ Operation / Installation Manual
END USER - SAFETY INFORMATION
Burner Flame Characteristics
•
WARNING
Rinnai Australia
Excessive yellow flame, irregular size or wafty flame, ‘popping’ of the flame,
sooting, black smoke, hissing sounds or other abnormal noises may indicate
incorrect assembly or defect.
-8-
Inbuilt BBQ Operation / Installation Manual
CLEARANCES AND LOCATION
Clearances
The following minimum clearances from combustible materials must be maintained:
•
Top: 1000 mm - measured from top of hood in the closed position.
•
Rear: 200 mm - measured from the rear main panel.
•
Sides: 250 mm - measured from the side main panel.
•
Openings around the perimeter of the appliance provide air for cooling and combustion and must
not be obstructed.
Location
‘Outdoor Use’ is defined as use in an above ground, open air situation with natural ventilation, without
stagnant areas and where gas leakage and products of combustion are rapidly dispersed by wind and
natural convection.
The following figures are diagrammatic representations of ‘Outdoor Use’ as defined:
An enclosure with walls on all sides, but at
least one permanent opening at ground
level and no overhead cover.
Within a partial enclosure that includes an
overhead cover and no more than 2 walls.
Within a partial enclosure that includes an
overhead cover and more than 2 walls the
following shall apply:
•
At least 25% of the total wall area is
completely open and
•
At least 30% of the remaining wall area
is open and unrestricted.
In the case of balconies at least 20% of the
total wall area shall be and remain open
and unrestricted.
Rinnai Australia
-9-
Inbuilt BBQ Operation / Installation Manual
INSTALLATION
This Barbecue must be installed and commissioned by an Authorised person only.
WARNING
Unpacking
Carefully remove packaging and discard / recycle as appropriate, taking care not to damage any
components all discard any parts.
The package should contain all items listed under “Specifications” section. If any items are missing or
damaged, DO NOT proceed with assembly or install appliance. Contact your Supplier.
IMPORTANT: Remove the plastic
protective
coating
from
ALL
PANELS inside and outside the
appliance and clean surfaces from
adhesive debris before lighting the
appliance. This is to remove all
machine
oils
used
during
manufacturing that may discolour
and damage the appliance if burnt.
WARNING
Building into non combustible structure / opening
Barbecue is suitable for installation into ‘non combustible’ (masonry) structures only.
WARNING
This Barbecue must not be installed into combustible structures (structures made
from wood, plasterboard, particle board etc).
Openings at the rear and side of the appliance
provide air for combustion and must not be
obstructed.
The following minimum clearances from
Combustible Materials MUST BE maintained.
Rear: 250 mm / Sides: 250 mm
Dimensions for barbecue opening :(min/max)
250
250
A
B
250
C
Dimension
Minimum
Maximum
(mm)
(mm)
A*
330
330+
B
530
535
C
870
890
Note*. An air gap of 50mm under the
grease tray must be left to allow for
combustion ventilation
WARNING
Gas Supply Connection Point
The minimum clearance from the
rear of the appliance to a noncombustible material is to be at least
100 mm.
This is measured with the hood in
the closed position.
NON-COMBUSTIBLE MATERIAL
Rinnai Australia
- 10 -
Inbuilt BBQ Operation / Installation Manual
INSTALLATION
1. Secure the barbecue into the opening with
suitable fixings via the two holes located at the
lower front of the fascia panel.
2. Connect the gas regulator and isolation valve.
3. Connect to gas supply. Note: Gas supply to be
correctly sized. Refer to Commissioning for full
details.
4. Check for gas leaks.
Gas Cylinder (“Propane” or “Universal LPG” barbecues only)
WARNING
ULPG Gas Cylinders must be installed and positioned to conform with the
requirements of AS 5601 Appendix J - “LP Gas Cylinders”. This appendix contains
important information regarding location, clearances, support, security, connections
and ventilation.
COMMISSIONING
1. Remove hotplate, grill plates, flame tamers and the left hand burner.
2. Attach a manometer to the burner injector of the left hand burner.
3. Check the gas supply:
For barbecues connected to a reticulated gas supply: With all other barbecue gas taps fully open
and all other gas appliances operating at their full gas rate, adjust the barbecue regulator to supply
gas at 1.0 kPa (NG) or 2.75 kPa (LPG / ULPG) to the injector of the left hand burner.
For barbecues supplied by an LP or ULP gas cylinder, with all other barbecue gas taps fully open
adjust the regulator to supply gas at 2.75 kPa to the injector of the left hand burner.
4. Check for gas leaks.
5. Assemble and prepare the barbecue for use in accordance with the section "Assembly and
preparation for use". Other chapters in this manual are titled "How to use", "Cleaning and
maintenance" and "Troubleshooting". Explain the content to the end user. If the gas supply to the
barbecue is from a gas cylinder, explain to the end user the installation and positioning
requirements of AS 5601 Appendix J - “LP Gas Cylinders”.
6. Hand this manual to the end user and remind the end user to complete the warranty card in this
manual and forward to Rinnai.
Rinnai Australia
- 11 -
Inbuilt BBQ Operation / Installation Manual
ASSEMBLY & PREPARATION FOR USE
Checking main burner positioning
Check that the main burners are positioned
correctly as follows:
CLICK !
'U' Burners
Gourmet 3 IB
'I' Burners
Impressor 6 IB
Ignition System Battery Placement
Fit 1 x AA battery into igniter as follows:
•
Unscrew the igniter cap (anticlockwise).
•
Place battery as shown.
•
Replace the ignitor cap (screw clockwise).
Ignition Socket
Ignition
Cap / Button
Ignition System Check
Ignition of the Main and Rotisserie burners is via a common electronic ignition module with wiring and
an electrode to individual burners.
This is indicated on the fascia panel by a black vertical line between the relevant gas knobs.
The ignition systems should be checked when the barbecue is first assembled. It is also recommended
that the ignition system is checked after cleaning the cooking plates/grills, flame tamers, heat shields
and burners and at the beginning of each barbecue season. The check should take place after the
burners are inserted into the barbecue body but with the flame tamers, heat shields, cooking plates/grills
and hot plates removed so the burners are visible.
Checking Burners & Rotisserie Burners
Ignition
OFF
1. Ensure the burners are correctly positioned
and that the cooking plates/grills, flame tamers
and heat shields are removed.
2. Ensure all burner controls are in the 'OFF'
position and that the gas supply on the cylinder
is shut off.
Rinnai Australia
- 12 -
OFF
POSITION
HI
LO
Inbuilt BBQ Operation / Installation Manual
ASSEMBLY & PREPARATION FOR USE
3. Push the ignitor button and check for sparking between the spark electrodes and burners. A blue
spark should be seen and heard between each spark electrode and burner. DO NOT touch any
components in the vicinity of the burner or spark electrode whilst the ignitor button is pressed down
as an electric shock could result.
4. If no spark is seen or heard at all, replace the
battery. If a spark is seen or heard on at least
one burner but not all burners, carefully bend
the spark electrode to be within 5 mm of the
burner(s) without spark by using a small pair of
pliers. DO NOT touch any components in
the vicinity of the burner or spark electrode
whilst the ignitor button is pressed down as
an electric shock could result.
Main Burner
5. If a spark is still not evident at all burners,
contact Rinnai.
Sparker Electrode
Ensure a 5 mm Gap
Burner Operation Check
The burners should be checked when the barbecue is first assembled, after the ignition system check.
It is also recommended the burners are checked after cleaning the cooking plates/grills, flame tamers,
heat shields and burners and at the beginning of each barbecue season. The check should take place
after the burners are inserted into the barbecue body but with the flame tamers, heat shields, cooking
plates/grills are removed so that the burners are visible.
WARNING
•
Never light the barbecue with the hood or side burner lid closed.
•
Never lean over the cooking surfaces whilst lighting the barbecue.
•
If burners go out during operation, close the gas supply at the source and turn
all burner controls to ‘OFF’. Open the hood and wait at least 5 minutes before
attempting to relight.
Checking Burner Operation
1. Push and turn the control knob of any main burner to ‘HIGH’, simultaneously pushing the electronic
igniter button. The burner should light within 15 seconds.
2. If the burner does not light, turn to 'OFF’ and wait 5 minutes. Repeat the lighting procedure.
3. Once a flame is established on any main burner, push and turn the burner control knob of the
other main burners. They should all light within 15 seconds via 'cross ignition' from burners
already lit.
If any main burner does not light, turn control knob to 'OFF' position and wait 5 minutes. Then
repeat the lighting procedure. If a burner flame cannot be achieved on individual burners, check
that burner for obstructions and check it's positioning. If a flame cannot be obtained on all burners,
perform the Ignition System check.
If burners go out during operation, close the gas supply at the source and turn all burner controls to
‘OFF’. Open the hood and wait at least 5 minutes before attempting to relight.
4. With HIGH flame established on all main burners check the burner flames. The flames should be
approximately 2 cm tall, emanate around the perimeter of the burner tube and be generally 'blue'
in appearance. Excessive yellow, irregular or ‘wafty’ flame ‘popping’ of the flame, sooting, black
smoke, hissing sounds or other abnormal noises may indicate incorrect assembly or defect. Refer
to the “Trouble Shooting” section page 23.
Rinnai Australia
- 13 -
Inbuilt BBQ Operation / Installation Manual
ASSEMBLY & PREPARATION FOR USE
Checking Rotisserie Burner Operation
1. Push and turn the control knob of the rotisserie burner to ‘HIGH’, simultaneously pushing the
electronic igniter button. The rotisserie burner should light within 15 seconds.
2. If the rotisserie burner does not light, turn to 'OFF’ and wait 5 minutes. Repeat the lighting
procedure. If a burner flame cannot be achieved, perform the “Ignition System Check” on page 12.
If ignition is satisfactory and a rotisserie burner flame can still not be established contact Rinnai.
If the rotisserie burner goes out during operation, close the gas supply at the source and ensure all
burner controls are ‘OFF’. Open the hood and wait at least 5 minutes before attempting to relight.
3. With ‘HIGH’ flame established on the rotisserie burner check burner combustion. The rotisserie
burner is a 'surface combustion' type ceramic burner. As such, there should be an orange/red
'glow' emanating evenly from the burner surface.
Flames or sparks jumping from the burner surface, an uneven glow, sooting, black smoke,
'streaming' of flames away from the burner surface, hissing sounds or other abnormally noises may
indicate incorrect assembly or defect. Refer to the “Trouble Shooting” section.
Placing Flame Tamers, Heat Shields Hot plates and cooking plates/grills
Dry thoroughly before positioning as shown.
Ensure the plastic protective coating
from these items is removed.
WARNING
It is recommended the flame tamers, heat shields, cooking hot plates and grill plates are cleaned with
a suitable mild household detergent before their first use.
The barbecue is not designed to have
the firebox completely covered by
solid hot plates.
NOTE
The grill plates and hot plates
supplied with the barbecue must be
used or are available as spare parts.
For barbecue models with more than 2
grill plates the plate combination is
grill plate / plate / grill plate.
Flame Tamers
Heat Shields
Flame Tamers
3
3
1
Flame Tamers
1
Heat Shields
4
2
Rinnai Australia
- 14 -
2
4
Inbuilt BBQ Operation / Installation Manual
HOW TO USE
WARNING
•
The rotisserie motor case and plug contains instructions and warnings relating
to use of the rotisserie motor and it's connection to the electric power supply.
•
Observe these instructions and warnings at all times.
•
Failure to observe these instructions and warnings can result in electric shock.
•
In case of damage to electrical cord or plug, return to supplier for repair.
At the beginning of each barbecue season
1. Read these instructions carefully, especially the “Safety Information”.
2. Check for burner obstructions and check burner positioning as explained in the “Assembly and
Preparation for Use” section.
3. Check gas cylinder and ensure it is full (if fitted).
4. Check for gas leaks as explained in the “Safety Information” section.
5. Check ignition system and burner operation as explained in the “Assembly and Preparation for Use”
section.
Burner ignition
OFF
Push and turn the control knob of any burner to
‘HIGH’, simultaneously pushing the electronic
igniter button. The burner should light within 15
seconds.
HIGH / IGNITION
POSITION
HI
LO
1. If the burner does not light, turn to 'OFF’ and wait 5 minutes. Repeat the lighting procedure.
2. Once a flame is established on any main burner, push and turn the burner control knob of the other
main burners as required. They should all light within 15 seconds.
3. If any main burner does not light, turn to 'OFF'
it's control knob and wait 5 minutes. Then
repeat the lighting procedure. If a burner flame
cannot be achieved on individual burners,
check that burner for obstructions and check
it's positioning. If a flame cannot be obtained at
all, that is none of the main burners ignite,
perform the “Ignition System Check”.
OFF
OFF
POSITION
HI
LO
If burners go out during operation, close the
gas supply at the source and turn all burner
controls to ‘OFF’. Open the hood and wait at
least 5 minutes before attempting to relight.
Rinnai Australia
- 15 -
Inbuilt BBQ Operation / Installation Manual
HOW TO USE
Rotisserie Burner Operation
1. Push and turn the control knob of the rotisserie burner to ‘HIGH’, simultaneously pushing the
electronic igniter button. The burner should light within 15 seconds.
2. If the rotisserie burner does not light, turn to 'OFF’ and wait 5 minutes. Repeat the lighting
procedure. If a burner flame cannot be achieved, perform the “Ignition System Check”. If Ignition is
satisfactory and a rotisserie burner flame can still not be established contact Rinnai.
If the rotisserie burner goes out during operation, close the gas supply at the source and ensure all
burner controls are ‘OFF’. Open the hood and wait at least 5 minutes before attempting to relight.
Manual Ignition of Burners
If for some reason the ignition system is unable to produce a spark at the electrodes your barbecue
burners can be lit carefully with a match as detailed below.
•
If the ignition system(s) fails to produce a spark and the problem cannot be
rectified as detailed in the “Ignition System Check” section, contact Rinnai for
service and/or repair.
•
Manual Ignition should only be performed on a temporary basis whilst waiting
for the service and/or repair to the Ignition System(s) to take place.
•
Keep your face and body at a safe distance from the manual lighting.
CAUTION
Lighting burner and rotisserie burner manually using a match.
Remove grill plate and light burner through the
holes in flame tamer.
MANUAL LIGHTING STICK WITH LIT SAFETY MATCH
Main Burner
CAUTION
•
Never lean over the cooking surfaces whilst lighting the barbecue.
•
Beware of hot surfaces during manual lighting.
Burning Off
Before cooking on your barbecue for the first time, burn off with moderate heat to remove any residual
oils used during manufacture from barbecue components and panel surfaces.
During the ‘Burning Off’ procedure operate the main burners on ‘LOW’ and keep the hood closed for
approximately 10 minutes. Then open the hood and allow to cool. Wash the cooking grill plates / hot
plates with a suitable mild detergent. Allow to dry and replace.
Rinnai Australia
- 16 -
Inbuilt BBQ Operation / Installation Manual
HOW TO USE
It is best to pre-heat the barbecue before cooking.
OFF
HO
OD
Preheating
SED
LO
C
Operate the main burners on ‘LOW’ and keep the
hood closed for approximately 10 minutes before
commencing cooking.
HI
LO
MAIN BURNERS
SET TO LOW
POSITION
Cooking
General Cooking Tips
A little cooking fat or oil on the grill plate will prevent sticking of food being cooked on these surfaces.
During cooking, fat and scrapings will drip through to the drip tray. Do not allow excess fat and scrapings
to build up.
Fats and juices that drip from the food being cooked onto the hot surfaces beneath may cause 'flare ups'.
Flare ups impart a distinct taste to the food being cooked and are desirable within reason. If flare ups
are excessive turn the burners down a little.
Burner Settings
•
HIGH - Use this setting for searing foods or for burning food residue off from cooking grills and hot
plates. The 'HI' setting is rarely used for extended cooking.
•
MEDIUM - (mid way between 'HIGH' and 'LOW'). Use this setting for grilling and for cooking burgers
and vegetables.
•
LOW - Use this setting when cooking lean or thin cuts of meats, poultry or fish. Any combination of
burners on ’LOW’ can also be used for cooking with the hood down or in conjunction with the
Rotisserie burner.
The required burner settings will also be influenced by the outside air temperature and wind.
Cooking with the hood closed (Indirect Cooking)
Cooking with the hood in the closed position creates an 'oven' style effect by retaining the heat evenly
in the enclosed space. This results in 'indirect cooking' and is especially suitable for large cuts of meat
and poultry. The hood temperature gauge is a guide to the hood internal temperature.
Rinnai Australia
- 17 -
Inbuilt BBQ Operation / Installation Manual
HOW TO USE
For cooking with the hood closed, it is
recommended that the solid hot plates are
removed and that the grill plate is placed over the
centre burners as shown.
It is not recommended that the centre burners
underneath the grill plate are activated.
Never use burners on ‘HIGH’ when cooking with
the hood closed.
OFF
HI
HI
HI
LO
OUTER BURNER(S)
OFF
OFF
LO
LO
CENTRE BURNER(S)
OUTER BURNER(S)
Cooking with Rotisserie
Convection cooking
For convection rotisserie cooking with the hood closed, it is recommended that the solid hot plates, grill
plates and warming rack are removed when the rotisserie is in use. It is recommended that any
combination of outside burners are activated for cooking. It is not recommended that the centre burners
underneath the grill plate are activated.
Ensure flame tamer is fitted on the same side of the barbecue as the rotisserie motor.
Never use main burners on ‘HIGH’ when cooking
with the hood closed.
Use the rotisserie bar 'prongs' to secure the meat
or poultry onto the rotisserie bar, taking care to
avoid injury. The weight of meat or poultry should
not exceed 5 kg.
To ensure proper rotation it is important that the
meat or poultry being cooked is properly balanced
on the rotisserie bar.
This is easiest to achieve if the meat or poultry is of
uniform shape and texture.
OFF
HI
HI
HI
LO
OUTER BURNER(S)
OFF
OFF
LO
CENTRE BURNER(S)
LO
OUTER BURNER(S)
Cooking using the Infra Red Back Burner (Impressor 6 IB model)
The rotisserie burner is an 'infrared' type providing intense radiant heat. It is most commonly used for
cooking meat or poultry. The intense radiant heat imparts unique flavours and prevents the natural juices
in the food from escaping. Cooking times will vary depending on the size and cut of the meat or poultry.
For best results, use the rotisserie burner with the hood closed.
The rotisserie burner must be used in the ‘ON’ position only.
Rinnai Australia
- 18 -
Inbuilt BBQ Operation / Installation Manual
HOW TO USE
For rotisserie cooking with the hood closed, it is
recommended that the solid hot plates, grill plates
and warming rack are removed when the rotisserie
is in use.
Never use main burners on ‘HIGH’ when cooking
with the hood closed.
Use the rotisserie bar 'prongs' to secure the meat
or poultry onto the rotisserie bar, taking care to
avoid injury. The weight of meat or poultry should
not exceed 5 kg.
To ensure proper rotation it is important that the
meat or poultry being cooked is properly balanced
on the rotisserie bar.
OFF
OFF
HI
This is easiest to achieve if the meat or poultry is of
uniform shape and texture.
HI
LO
OUTER BURNER(S)
ON
HI
LO
OFF
OFF
LO
CENTRE BURNER(S)
OUTER BURNER(S)
ROTISSERIE BURNER
To test correct balancing of the food being place
the ends of the bar loosely in the palm of your
hands. If there is no tendency to roll, give it a
quarter turn.
Repeat twice. If the rotisserie bar does not roll
during this procedure the food is correctly
balanced.
Rotisserie Handle
OFF
During rotisserie cooking ensure that the handle is
always removed from the rotisserie shaft. This
prevents the handle from overheating.
When fitting or removing the handle make sure the
side burner(s) are turned ‘OFF’.
HI
LO
While cooking remove the
handle from rotisserie bar
Removing Rotisserie Handle
Before attempting to remove the handle from the rotisserie shaft, ensure the rotisserie motor is
switched ‘OFF’.
To remove the handle, slide the brass locking ring backwards. This releases the handle lock and allows
the handle to be removed from the shaft.
Rinnai Australia
- 19 -
Inbuilt BBQ Operation / Installation Manual
HOW TO USE
Brass locking ring
Replacing Rotisserie Handle
Before attempting to replace the handle, ensure that the power to the rotisserie motor is in the ‘OFF’
position.
To replace the handle, slide the brass locking ring backwards. This releases the handle lock and allows
the handle to be fitted to the shaft. Slide the handle onto the shaft until it stops. Then simply release the
locking ring to re-secure the handle.
Brass locking ring
NOTE
CLICK !
The warming rack must be removed if the rotisserie is in use. If the counter weight
is used, the grill / cooking plate beneath it will also need to be removed so the
rotisserie can rotate freely.
Place the rotisserie motor onto the rotisserie motor bracket located on the left hand end next to the hood
and insert the pointed square end of the rotisserie shaft into the motor slot.
If the rotisserie rod rolls, use the ‘counter weight’ to balance the food on the rotisserie bar, adjusting the
position of the weight as required.
Make sure the hood will close over the bracket to enable cooking with the hood down using the rotisserie,
you may need to flip the motor 180 degrees to achieve this.
Cooking using the Smoke Box (optional extra on the 3 Burner model)
The smoke box can be filled with wood chips suitable for smoking of foods. Charcoal, briquettes, rocks
or sand are not suitable. Used in conjunction with the Rotisserie and Indirect cooking methods, a distinct
smoked flavour can be imparted on the foods being cooked when the smoke box is used.
Using the warming rack
The warming rack can be used to keep foods that have already been cooked warm. The warming rack
must be removed when the rotisserie is in use.
Rinnai Australia
- 20 -
Inbuilt BBQ Operation / Installation Manual
CLEANING AND MAINTENANCE
General
Regular cleaning and maintenance will enable reliable and safe operation and prolong the life of your
barbecue.
It is recommended that the cleaning and maintenance routine in this chapter be carried out prior to each
barbecue season or more frequently if required.
If used in coastal areas or areas with high atmospheric moisture content the resulting rain, mist, salt
spray etc. may adversely affect any exposed parts. Frequent cleaning and drying is recommended to
minimise exposure and will avoid material breakdown.
•
Ensure burner controls and gas cylinder valve are 'OFF' and let barbecue cool
before attempting any cleaning or maintenance.
•
DO NOT use oven cleaner to clean any barbecue components.
•
DO NOT use a water pressure machine.
•
The use of 'steel wool' or wire brushes are not recommended for cleaning as
these will leave scratches. Such scratches are not covered under warranty.
•
DO NOT pour cold water over any hot surfaces for cleaning purposes.
CAUTION
Cleaning the cooking plates / hot plates
Using the 'HIGH' setting on the main burners after cooking will burn much of the food residue from the
plates and grills after cooking is over. It is recommended the cooking plates and grills are cleaned before
the first use and after every subsequent use. Use a suitable mild household detergent and a soft textured
cleaning cloth or dishwashing brush. Do not use appliance on ‘High’ for extended duration as this could
discolour stainless steel.
To remove stubborn deposits, submerse the cooking plates and grills in water mixed with a small amount
of suitable mild household detergent for an extended period of time (for example, overnight). After
immersing, any remaining deposits can then be removed using a cloth or brush. Rinse and dry
thoroughly before refitting to barbecue.
Cleaning the flame tamers / heat shields and drip tray
Periodic cleaning is recommended to prevent buildup of food residue. The cleaning method is the same
as described for the cooking plates / hot plates.
Cleaning the barbecue panels
Barbecue panels are made from Stainless Steel for greater durability. Use a stainless steel cleaner and
soft textured cleaning cloth wiping in the same direction as the 'grain' to avoid scratching. Do not use
paint thinners or similar solvents for cleaning.
Cleaning the interior of the barbecue body
Rinnai recommend occasional cleaning of the interior of the barbecue body, as follows:
1. Remove and clean the cooking plates, grills, flame tamers, heat shields, smoke box (if fitted) drip
tray and burners.
2. Remove the gas cylinder (if fitted) in accordance with the gas installation section.
3. Clean the interior panels and cooking tray surfaces using a stainless steel cleaner and soft textured
cleaning cloth wiping in the same direction as the 'grain' to avoid scratching. Do not use paint
thinners or similar solvents for cleaning.
4. Replace rear main panel, burners, flame tamers, heat shields, cooking plates, grills, smoke box (if
fitted) and drip tray.
5. Replace the gas cylinder (if fitted) in accordance with gas installation section.
Rinnai Australia
- 21 -
Inbuilt BBQ Operation / Installation Manual
CLEANING AND MAINTENANCE
Cleaning burner tubes
•
Spiders and small insects can occasionally spin webs or make nests in the
burner tubes and ports. These can lead to gas flow obstruction which could
result in poor combustion or, at worst, a fire in and around the burner tubes.
•
This type of fire is known as 'flash back' and can cause serious damage to your
barbecue and create an unsafe operating condition for the user.
•
Obstructed burner tubes and ports are the most common cause of 'flash back'.
•
It is important that Burner tubes are inspected and cleaned frequently to
prevent ‘flash back’.
CAUTION
Burner tube inspection and cleaning should take place especially in late summer or early autumn when
spiders are most active or when the barbecue has not been used for an extended period.
Inspection and cleaning procedure is as follows:
1. Remove cooking plates, grills, flame tamers, heat shields, smoke box (if fitted).
2. Remove burners as shown.
3. Clean the outside of the burner tubes by using
a suitable mild household detergent and
dishwashing brush. To remove stubborn
deposits and wash the inside of the burner
tubes, immerse the burner tubes in water
mixed with a small amount of suitable mild
household detergent for an extended period of
time (for example, overnight). After immersing,
any deposits remaining on the outside can
then be removed by using a dishwashing
brush. If stubborn deposits still remain, steel
wool or a wire brush can be used, however,
these are more likely to leave scratches and
are not recommended.
CLICK !
IMPORTANT: Rinse and dry burners
thoroughly on both the inside and outside
before refitting to barbecue.
4. Replace burners by following the reverse of the
'burner removal' procedure (Step 2).
5. Check the ignition system, burner operation
and replace the flame tamers, heat shields,
cooking grills / plates in accordance with
"Assembly and Preparation for Use" section.
Storage
•
DO NOT store or use petrol or other flammable vapours and liquids in the
vicinity of this or any other appliance.
•
Gas cylinders must be stored outdoors in a well ventilated area out of reach of
children. They must not be stored in a building, garage or any other enclosed
area or in the vicinity of this or any other appliance.
WARNING
Rinnai Australia
- 22 -
Inbuilt BBQ Operation / Installation Manual
TROUBLE SHOOTING
Burner(s) will not ignite using the igniter:
For “Propane” or “Universal LPG” Barbecues
using gas cylinder: Gas cylinder valve is not ‘ON’
Turn gas cylinder valve ‘ON’.
For “Propane” or “Universal LPG” Barbecues
using gas cylinder: Cylinder is empty
Replace with a ‘full’ gas cylinder.
For “Natural” Gas Barbecues and “Propane” or
“Universal” LPG Barbecues connected to a
reticulated gas supply:
Ensure isolating valve to Barbecue is ‘ON’.
Igniter is not working:
Replace battery (page 12).
Check ignition system (page 12).
Gas Injector has blockage
Contact Rinnai.
Contact an Authorised person (gasfitter) to
check the gas supply.
Burner flame is erratic:
NOTE: Excessive yellow flame, irregular size of flame across the burner, ‘popping’ of the flame,
sooting, abnormal noises and hissing sounds may indicate incorrect assembly or that the appliance
may need servicing. If the following checks do not rectify the problem contact Rinnai.
Burner is incorrectly fitted to the barbecue
Fit burner in accordance with the “Assembly &
Preparation for Use” section (page 12).
Burner is dirty or blocked
Clean the burner (page 22).
Gas cylinder is empty
Replace with a ‘full’ cylinder.
Regulator is faulty
Contact Rinnai.
Injector is partially blocked
Contact Rinnai.
Gas is leaking from hose or connections:
Hose has deteriorated
Contact Rinnai.
Gas valve is faulty
Contact Rinnai.
Threads are damaged
Contact Rinnai.
Other Problems:
Control knobs hard to turn
Contact Rinnai.
Hood will not close with rotisserie motor
connected
Rotate rotisserie motor 180 degrees
WARNING
IMPORTANT:
DO NOT carry out any service work other than that mentioned in the “Trouble
Shooting” table.
Service and Spare Parts
Rinnai has a Service and Spare Parts network with personnel who are fully trained and equipped to give
the best service on your Rinnai Barbecue.
If your Barbecue needs service or spare parts, please ring our National Help Line number which is
located on the back page of this instruction booklet.
Rinnai Australia
- 23 -
Inbuilt BBQ Operation / Installation Manual
CONTACT INFORMATION
Australia Pty. Ltd.
Head Office
10-11 Walker Street,
Braeside, Victoria 3195
P.O. Box 460
Tel: (03) 9271 6625
Fax: (03) 9271 6622
ABN 74 005 138 769
Internet: www.rinnai.com.au E-mail: [email protected]
National Help Line
Spare Parts & Technical Info
Tel: 1300 366 388*
Fax: 1300 300 141*
*Cost of a local call Higher from mobile or public phones.
123 45678 90123 4
Rinnai Australia
Inbuilt BBQ Owner’s Operation Manual - 3/1/06