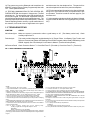
1
SP850 Six Zone Downloadable Panel Installation & Programming Manual Programmed through the keypads or with the ScanPro Downloader Software Use with KP600F LED KYPD KP600L LCD KYPD OR KEYSWITCH P/N 64812822 A PDF 9/15/97 1 Table of Contents SEC 1: INSTALLATION INSTRUCTIONS .................................................................... 4 1.0 SYSTEM DESCRIPTION ........................................................................................ 4 1.1 INSTALLATION ....................................................................................................... 4 1.2 TROUBLESHOOTING ............................................................................................ 5 FIG. 1: SP850 HARDWARE HOOKUP DIAGRAM ...................................................... 5 1.3 WIRING TERMINALS ............................................................................................. 6 1.4 SPECIFICATIONS .................................................................................................. 6 1.5 "TEL-REMOTE" TELEPHONE ACCESS ............................................................... 7 1.6 RING BACK FEATURE .......................................................................................... 7 1.7 OPTIONAL ACCESSORIES ................................................................................... 7 SEC 2: BASIC PROGRAMMING INSTRUCTIONS ..................................................... 8 FIG. 2: BINARY DATA DISPLAY .................................................................................. 8 FIG. 3: ZONE SELECTION DISPLAY .......................................................................... 8 SEC 3: KEYPAD OPERATION & PROGRAMMING INSTRUCTIONS ....................... 10 TABLE 1: LCD KEYPAD PROGRAMMING AND FACTORY DEFAULTED TEXT:.... 11 SEC 4: COMPLIANCE INFORMATION...................................................................... 12 FIG. 4: PROGRAMMING WORKSHEET.................................................................... 15 SEC 5: PROGRAMMING STEPS ............................................................................... 17 SEC 6: LIMITED WARRANTY .................................................................................... 24 2 CANADIAN INSTALLATIONS installe en suivant une method acceptee de raccordement.Dans certains cas, les fils interieurs de lentreprise utilises pour un service individuel a ligne unique peuvent etre prolonges au moyen dun dispositif homologue de raccordement (cordon prolongateur telephonique interne). Labonne ne doit pas oublier quil estpossible que la conformite aux conditions enoncees ci-dessus nempechent pas la degradation du service dans certains situations. Actuellement, les entreprises detelecommunication ne permettent pas que lon raccorde leur materiel a des jacks dabonne, sauf dans les cas precisprevus pas les tarrifs particuliers de ces entreprises. NOTE: The Canadian Department of Communications label identifies certified equipment. This certification means that the equipment meets certain telecommunications network protective, operational and safety requirements. The Department does not guarantee the equipment will operate to the users satisfaction. Before installing the equipment, users should ensure that it is permissible to be connected to the facilities of the local telecommunications company. The equipment must also be installed using an acceptable method of connection. In some cases, the companys inside wiring associated with a single line individual service may be extended by means of a certified connector assembly (telephone extension cord). The customer should be aware that compliance with the above conditions may not prevent degradation of service in some situations. Les reparations de materiel homologue doivent etre effectuees pas un centre dentretien canadien autorise designe par le fournisseur. La compagnie de telecommunications peut demander a lutilisateur dedegbrancher un appareil a la suite de reparations ou de modifications effectuees par lutilisateur ou acause de mauvais fonctionnement. Repairs to certified equipment should be made by an authorized Canadian maintenance facility designated by the supplier. Any repairs or alterations made by the user to this equipment, or equipment malfunctions, may give the telecommunications company cause to request the user to disconnect the equipment. Pour sa propre protection, lutilisateur doit sassurerque tous les fils de mise a la terre de la source denergie electrique, des lignes telephonique et de scanalisations deau metalliques, sil y en a, sontraccordes ensemble. Cette precaution est particulierement importante dans les regions rurales. Users should ensure for their own protection that the electrical ground connections of the power utility, telephone lines and internal metallic water pipe system, if present, are connected together. This precaution may be particularly important in rural areas. AVERTISSEMENT. - Lutilisateur ne doit pas tenter de faire ces raccordements lui-meme; il doit avoir recoursa un service dinspection des installation selectriques, ou a electricien, seelon le cas. CAUTION: Users should not attempt to make such connections themselves, but should contact the appropriate electric inspection authority, or electrician as appropriate. Lindice de charge (IC) assigne a chaquedispositif terminal indique, pour evciter toutesurcharge, le pourcentage de la charge totale quipeut etre raccordee a un circuit telephoniqueboucle utilise par ce dispositif. La terminaison du circuit boucle peut etre constituee de nimportquelle combinaison de dispositifs, pourvu que lasomme des indices de charge de lensemble de sdispositifs ne despasse pas 100. The Load Number (LN) assigned to each terminal device denotes the percentage of the total load to be connected to a telephone loop which is used by the device to prevent overloading. The termination on the loop may consist of any combination of devices subject only to the requirements that the total of the Load Numbers of all the devices does not exceed 100. The load number for this equipment is LN = 3. LIndice de charge de cet produit est 3. This digital apparatus does not exceed the Class B limits for radio noise emissions from digital apparatus as set out in the radio interference regulations of the Canadian Department of Communications. AVIS: Letiquette du ministere des Communications du Canada identifie le materiel homologue. Cette etiquette certifie que le materiel est conforme a certaines normesde protection, dexploitation ed de securite des reseauxde telecommunications. Le Ministere nassure toutefois pas que le materiel fonctionnera a la satisfaction delutilisateur. Le present appareil numerique nemet pas de bruits radioelectriques despassant les limites applicables aux appareils numeriques de Classe B prescrites dans le reglement sur le brouillage radioelectriques edicte par le Ministere des Communications du Canada. Avant dinstaller ce materiel, lutilisateur doit sassurer quil est permis de le raccorder aux installatyons de lentreprise locale de telecommunication. Le materiel doit egalement etre 3 SEC 1: INSTALLATION INSTRUCTIONS 1.0 SYSTEM DESCRIPTION The ARROWHEAD Model SP850 is a multi-zone control panel/digital communicator alarm system. The SP850 can be custom tailored for each installation by programming an Electrically Erasable Programmable Read Only Memory (EEPROM) which is included with the system. Programming can be accomplished using keypad programming or by using the ScanPro Uploading/Downloading software. Zones which may be programmed include 6 EOLR supervised zones; 5 keypad activated Emergency zones, Opening & Closing, Automatic Low Battery & AC Power Loss and their restoral Reports, Tamper and Trouble reports as well as Communication Failure at the keypad. The factory program allows easy out of box testing. minal 6. Blue (clock) lead to terminal 9. Black (-) lead to terminal 8. Yellow (data) lead to terminal 10. NOTE: Wires connecting the keypad(s) to the SP850 must be kept away from A.C. and Telco wiring to minimize transient problems due to lightning. If Using Key Switch (K/S) Option: 4.(K/S). Install a Normally Open Key Switch and LEDs. 5.(K/S). Connect Key Switch and LED wires to SP850. Armed and Ready LED Positives to terminal 5. Armed LED Negative to terminal 12 (Assignable #1). Ready LED Negative to terminal 13 (Assignable #2). Key Switch wires to terminals 11 (Key Switch) and 5 (+ Aux). Four wires must be used for full Key Switch operation. Locations 141 and 142 should be programmed with a 5 and a 6 respectively. Read and become familiar with the information contained in the SP850 Owner’s Manual before proceeding with the installation instructions. 6. Connect the six (6) input zones to terminals 14-22 using the 2.2K End of Line resistors provided as shown in Figure l. The material in this publication is for information purposes only and is subject to change without notice. SENTROL, INC assumes no responsibility for any error which may appear in this publication. The control unit, keypad and wiring should be installed by a professional installer. This equipment should be installed in accordance with chapter 2 of National Fire Alarm Code, ANSI/NFPA 72-1993, and Installation and Classification of Residential Burglar Alarm Systems, UL 1641. Installation wiring locations and wiring methods should be in accordance with the National Electrical Code, ANSI/NFPA 701978 or the most recent revision. For further information contact the NFPA, 1 Battery March Park, Quincy MA 02269. The installer should also observe any State or Local codes that may exist. NOTE: Closed circuit loops are wired with the resistor and contacts In series with the circuit. Open circuit loops are wired with the resistor and contacts parrallel with the loop. WARNING: Failure to properly install E-O-L resistors at the end of the line can compromise security of the system. 7. Connect Terminal 23 to an EARTH GROUND. 1.1 INSTALLATION NOTE: 1) Suggested earth ground and protection levels are: A) Preferred Protection - Separate metal grounding rod B) Acceptable Protection - Metal cold water pipe. CAUTION: CONNECTIONS MUST BE MADE WITH ALL POWER REMOVED. 2) Keep wire run as short as possible and away from other panel wiring. 1. Don’t connect battery until installation is complete. 2. Do not apply power until after step 10. 3) Do not use an existing lightning rod ground; it can provide a path for lightning strikes to panel. 1. Mount control panel in a convenient location. 8. Check all connections, verifying polarity. 2. Connect a 12VDC nominal (300mA MAX.) bell to terminals 4 (+) and 3 (-). Observe polarity. All devices connected to these terminals must operate over a voltage range of 9-14 volts DC. 9. Connect 16.5VAC to terminals 1 and 2. 10. Connect the BLACK FLYING LEAD to the negative (-) terminal of a 12 volt, rechargeable gel type battery. Connect the RED FLYING LEAD to the positive (+) terminal of the battery. If the battery is not fully charged, allow 48 hours for battery to reach full charge. 3. Unswitched 12VDC nominal (400mA MAX.) (+) is available at terminals 5 & 6 and (-) at terminals 7 & 8 for auxiliary devices. All devices connected to these terminals must operate over a voltage range of 9-14 volts DC. 11. As soon as battery is partially charged, disconnect AC power. VERIFY that AC fault condition exists at keypad. NOTE: The total amount of available auxiliary, keypad, and fire power current is 400mA. Each KP600F keypad requires 40mA nominal. KP600L keypads require 135mA nominal. 12. Make sure you have programmed the EEPROM for desired system configuration and features. Refer to the SP850 Programming Instructions (SEC 2) for proper procedures. 4. Mount KP600F or KP600L keypad(s). 13. Attach the telephone interface cable between the panel and the incoming telephone line. 5. Connect the keypad(s) to the SP850. Red (+) lead to ter- 4 14. The system may now be Disarmed and Armed from the KP600F/L using the Primary (Factory Programmed) User code 1111. Leave system disarmed. and disconnect from the telephone line. The panel will restore the telephone line back to the premises telephone. 16. Fill in the appropriate information in the Owner’s Manual, and give it to your customer when you explain how the system operates. Provision is made on the back page for your business card. 15. TESTING COMMUNICATION TO THE CENTRAL REPORTING STATION: Arm the panel. Violate a zone. The Bell should turn on. The appropriate zone LED should flash on the KP600F keypad. For the KP600L keypad the Red LED should flash and the display show the appropriate zone. The premises telephone should be inoperative (DEAD). After the Central Reporting Station receives a good transmission of this violation, it will send a kiss-off signal back to the panel 17. Select a testing method as outlined in the Owner’s Manual. Program SP850 for Bell test from keypad (Memory Location 207). 1.2 TROUBLESHOOTING SYMPTOM CHECK No indicator lights Make sure system is connected to either a good battery or AC. (Test battery under load). Check Auxiliary output fuse F3. Fault Analysis This mode provides diagnostic troubleshooting for AC Power Failure, Low Battery, Zone Trouble, and Failure to Communicate (Status LED flashing on the KP600F keypad, and the Ready LED flashing on the KP600L keypad). See “Fault Analysis” in the Owner’s Manual. (Prealert will also pulsate) No Power at Panel Check Protective Device F1. Check Bell Fuse F2. (Terminal 4) Check Aux Fuse F3. (Terminal 5) FIG. 1: SP850 HARDWARE HOOKUP DIAGRAM NOTES: 1. Test system weekly. See owner’s manual. 2. Use a Yuasa-Exide NP7-12, 12V 7AH battery, or a Power-Sonic PS1242 12V4AH battery. Maximum Charge current, 500mA; Trickle charge current, 20mA; Life expectancy (Standby use), 3-5 years. 3. Maximum Current draw for the Auxiliary, Keypad, and Fire assignable outputs is 400 mA. Bell Output is 300mA. Use UL listed devices rated at 9 - 14VDC. 4. Must be connected to an FCC approved USOC RJ31X or RJ38X jack. 5. Do not connect the transformer to a receptacle controlled by a switch. 6. Alarm sounding devices must be installed so they are clearly heard in all sleeping areas. 7. Use P/N EOL2200 (Optional) End-of-Line Resistors for all fire zones and P/N 123000222 (Enclosed) for all Burglary type zones of protection. 8. Use terminal 5 & 12 for Fire Power. Maximum current is 150mA. See Installation manual for further details. 9. For 24 hours of battery backup time use the following setup: Auxiliary, Keypad and Fire Assignable Output is 175mA Bell=300mA Battery=Yuasa NP7-12 12V 7AH Battery To meet these ratings, only the model KP600F LED keypad can be used. A separate power supply must be installed to increase the available power when using the KP600L keypad. 10. Do not bundle keypad and zone wires with AC or Telco wires. 11. All devices must use U.L. Listed power limited cables. 12. Mount enclosure so hinge is located in the left hand vertical position. 13. CONNECTION OF THE FIRE ALARM SIGNAL TO A FIRE ALARM HEADQUARTERS OR A CENTRAL STATION SHALL BE PERMITTED ONLY WITH THE APPROVAL OF THE LOCAL AUTHORITY HAVING JURISDICTION. 14. BURGLARY ALARM SIGNALS SHALL NOT BE CONNECTED TO A POLICE EMERGENCY NUMBER. 15, Telephone connections must be made using FCC approved RJ31 X Plug and Connector. 16. This circuit is only for use with listed four wire smoke detectors with power supervised by an end of line relay. 17. F1= Battery Reversal-Factory Repairable-5A F2=Bell-2A F3=Auxilliary Power, Keypad, Assign #1 & #2-2A 18. The system should be checked by a qualified technician at least every three years. 5 1.3 WIRING TERMINALS 1.4 SPECIFICATIONS Terminal POWER REQUIREMENTS 120VAC, 20 VA, 16.5 Volts, 50/60 Hz, transformer supplied. Description 1&2 AC Power, 16.5VAC, 20VA 3 Bell Negative ( - ) 4 Bell Positive (+) Output 12VDC nominal 5 Auxiliary Power (+) 12VDC nominal 6 12 Volt 4AH (PS1242) Power-Sonic Battery or 7AH (NP7-12) Yuasa-Exide Battery (not supplied, available on request) AUXILIARY POWER OUTPUT: 9-14VDC (12V nominal.), 300mA. BELL POWER OUTPUT: Burglary and Fire outputs, 9-14VDC (12V nominal.). Maximum combined current output of 300mA. Keypad Power (+) [Red Wire] 7, 15, 18, 21 Aux Power Common (-) 8 Keypad Return (-) [Black Wire] 9 Keypad Clock [Blue Wire] 10 Keypad Data [Yellow Wire] 11 Keyswitch Return (Positive Input to activate) 12 Assignable Out #1 (Default "Fire Power" Output) 13 Assignable Out #2 (Default "Ready Status" Output) 14 Zone Input #1 (Return on Terminal 15) 16 Zone Input #2 (Return on Terminal 15) 17 Zone Input #3 (Return on Terminal 18) 19 Zone Input #4 (Return on Terminal 18) 20 Zone Input #5 (Return on Terminal 21) 22 Zone Input #6 (Return on Terminal 21) 23 Earth Ground 24 Ring [Red] 25 Tip [Green] 26 RD [Brown] 27 TD [Grey] ASSIGNABLE OUTPUT 1 Terminal pulls to Ground. 150mA maximum. Fire Power Output must be assigned to Output 1 for Fire installations. FACTORY DEFAULT ASSIGNABLE OUTPUT 2 Terminal pulls to Ground. 20mA maximum. KEYPADS: Up to 4 per installation. Any combination of KP600F &/or KP600L, subject to total available Auxiliary Power. OPERATING TEMPERATURE: 32o - 120o F., 0o - 50o C. TRANSIENT AND LIGHTNING PROTECTION: Lightning and surge protection provided on all input, power, and telephone lines. ZONE RESPONSE TIME: 300 mSec. During reporting cycles, response time increases to approximately 1 sec. Zones may be programmed in location 193 for Fast Response Times selected in location 126. ZONE LOOP MAXIMUM RESISTANCE: Do not exceed 300 Ohms on any loop (not including EOL resistor). DIMENSIONS: 9"H x 13"W x 3"D. SHIPPING WEIGHT: 7 lbs. FCC REGISTRATION NUMBER: 4T2USA-24862-AL-E RINGER EQUIVALENCE: 0.2B LOAD NUMBER: 3 6 1.5 "TEL-REMOTE" TELEPHONE ACCESS 1.6 RING BACK FEATURE The SP850 control panel can be interrogated and status changed from a remote touchtone telephone. The system will respond with a series of beep tones to indicate whether the system is "Armed", "Ready to Arm", "Not Ready", "In Alarm" or "System Trouble" condition. This feature is enabled by placing a "7" in location 183 of the panel programming. When using this feature, DO NOT select the "3" option for "Defeat Lockout" in location 183. False Alarms may occur. In the case of an answering/fax machine on site, or phone company provided answering service the following is important to remember: The "Ring Count" must be counted at the panel until it equals the programmed value in location 144. Subsequent calls to the site followed by a hangup and then redial before the line is taken by the answering/fax equipment will be required before the panel will answer. The SP850 Control Panel has a built in Ring Back feature. This feature causes the keypad to emit a two to three second tone whenever the Central Station or a ScanPro computer has received a good transmission from the Control Panel. The Ring Back tone will also be heard whenever ScanPro and the SP850 are communicating during an Upload/ Download session. This feature can be disabled in Location 206 by entering a value of "6" (Factory Default = Disabled). 1.7 OPTIONAL ACCESSORIES KP600F Flush mounted keypad with rubberized backlighted keys that display system status from one or more convenient locations. 6 LEDs display zone status and alarm memory for each zone. These same LEDs display armed status for each zone. Single yellow Status LED displays general armed status as well as any fault conditions that may exist. The instant/delay mode is explained in the users manual. When armed in the instant mode a short ½ second tone will be heard when the # key is pressed. If in the delay mode, a short 1/2 second tone will be heard followed by a longer 2 second tone. The system will always default back to the delay mode when disarmed. Up to 4 keypads total may be used. Rating: 12VDC, 40mA nom. 65mA max. How the feature is used: Call the premises telephone number. Allow the phone to ring the programmed number of rings. The system will answer, wait about 5 seconds for a steady tone. Now enter your user code using the [#] sign for each digit. Pause slightly between digits. As an example, if your code was [2346]: Tap [##] pause [###] pause [####] pause [######]. KP600L LCD keypad with 16 character single line display. Backlit keys, User programmable zone descriptions and attractive keypad housing. Displays same status information as KP600F, but printed out in easy to read Alphanumeric messages. Rating: 12VDC, 135mA nom. 172mA max. If you enter the correct code you will hear a series of tones indicating your system's status. Number of Tones System Status 1 = ARMED 2 = READY TO ARM 3 = NOT READY 4 = "ALARM CONDITION" (will always be preceded with one of the top 3 status) 5 = "TROUBLE CONDITION" (will always be preceded with one of the top 3 status) ScanPro Uploading/Downloading software used to program the panel and also change its Arm status. EOL2200 Underwriters Laboratories Inc. requires that the End-ofline resistor Model EOL2200 be used for Fire zones. To alter the status, simply press [###]. A new series of tones will tell you the new status. If the status has changed from Not Ready, the system will be Armed with the faulted zone in a Bypassed condition. Multiple status messages may be sent from the panel. Examples of this are as follows: One Tone/Five Tones = Armed & System Trouble Two Tones/Four Tones = Ready to Arm & System Alarm Three Tones/Five Tones = Not Ready & System Trouble To hang up, when the system is in the desired status, press [#####]. 7 SEC 2: BASIC PROGRAMMING INSTRUCTIONS USING THE KP600F AS A PROGRAMMER A programming overlay is provided with each KP600F. GENERAL 2.0 INTRODUCTION The EEPROM in the SP850 may be programmed either by remote programming using ScanPro Uploading/Downloading software, a KP600L, or a KP600F LED keypad. These instructions describe how the KP600F is used for this purpose. An overlay for the LED keypad is included in the KP600F box. The [*] is used to switch back and forth between the two display modes. When in the memory location mode, the display shows the current memory location and the keypad can be used to move to any desired location. When in the data mode (the sounder pulsates), the display shows the contents of the current memory location and the keypad can be used to modify that data. The EEPROM is capable of storing two types of data, each of which is displayed and manipulated differently. 2.1 PROGRAMMING MODE The SP850 can be programmed from the keypad by entering the following key sequence. The [I I I I] represents the Installers Code. The Factory Default Installers Code is 7777. Any time data is changed in a location the [#] key must be pressed to enter the information into memory. This will also advance you to the next location. ITEMS IN [ ] AND SEPARATED BY THE "&" SIGN MUST BE PRESSED SIMULTANEOUSLY. 2.3 CHANGING MEMORY LOCATIONS AND VIEWING DATA Changing Memory Locations and Viewing Data is accomplished in the following manner. If the display is not showing a Memory Location (sounder pulsates), press the [*] key. [*&0] + [ I I I I ] + [ * ] + [ 8 ] + [ * ] + [ 9 ] + [12345] The Status LED will light to confirm that the SP850 is now in the “PROGRAM” mode. When programming is complete, return the SP850 to the “PANEL” mode by pressing the [*]&[#] simultaneously. New locations should always be entered into the keypad by using three digits. Example: Location 1 = [0]+[0]+[1] Location 52 = [0]+]5]+[2] Location 207 = [2]+[0]+[7] DISPLAY 2.2 BINARY LED DISPLAY The Binary Display (see Figure 2) uses the zone LEDs to display both the memory locations and data that resides in its associated memory location. When the piezo sounder is silent the display shows the binary number equivalent of that memory location. When the sounder is operating (either pulsating or steady) the display shows the data of that memory location. All numerical data is shown in binary. Zone selected data is shown by zone (see Figure 3). The sounder will emit a steady tone instead of a pulsating one for the selected function 8 in memory locations 183, 205 and 206. 2.4 NUMERIC DATA Numeric data is used to store telephone numbers, account codes, entrance/exit delays, etc. 2.5 SELECTION DATA - (SELECT ZONES) SELECTION DATA displays specific data selected for zone configuration selections and special functions. Selection Data is used when configuring zones and is also needed in a location like 183, 190-192 and 205-207 where multiple options can be selected. DISPLAY of Selection data uses the LEDs and Sounder and specifies the functions selected. For example, Figure 3 indicates that zones 2, 4, and 6 have been selected. CLEAR ZONE 1 1 ZONE 2 2 ZONE 3 4 ZONE 4 8 1 2 4 5 CLEAR 1 ZONE 2 2 MODE INSTANT ENTER ZONE 3 4 0 # ZONE 4 8 ENTER DATA AND STEP MEM. LOC ZONE 5 16 CP ZONE 6 32 7 ZONE 7 64 16 ZONE 6 32 7 64 ZONE 8 . SOUNDER PULSING SOUNDER: DATA DISPLAYED (STEADY; ZONE 8 SELECTED) ADD LIT NUMBERS TO DETERMINE MEM. LOC. OR DATA (EXCEPT ZONE DATA) 6 ZONE 1 ZONE 5 CP ZONE 7 3 * SHOW DATA OR MEM. LOC FA 8 9 TO EXIT PROGRAM MODE PRESS ★ AND # ZONE 8 . SOUNDER FIG. 2 PULSING SOUNDER: DATA DISPLAYED (STEADY; ZONE 8 SELECTED) ADD LIT NUMBERS TO DETERMINE MEM. LOC. OR DATA (EXCEPT ZONE DATA) Binary values may be converted to decimal simply by adding the overlay values to the right of the lit LEDs. Since the SP850 uses memory locations above 128, a manner is needed to identify when the memory location goes higher than 128. The zone LEDs will flash. In this case 128 must be added to the displayed value. FIG. 3 8 1 2 3 4 5 6 FA 8 9 MODE INSTANT ENTER * SHOW DATA OR MEM. LOC 0 # ENTER DATA AND STEP MEM. LOC TO EXIT PROGRAM MODE PRESS ★ AND # 2.6 PROGRAMMING NUMERIC DATA The following example shows how to program a telephone number. Let’s program the primary phone number to dial 3647200. A review of the programming worksheet (Pages 12 & 13) shows that the first digit of the first telephone number starts in memory location “1”. To program the telephone number, display memory location “1”. Next press the [*] to switch the display to show data. Next, press key 3, press [#] press key 6, press [#], press key 4, press [#], and continue this sequence until the last digit “0” is entered. Notice that the digit “0” is displayed as a 10. This is similar to the “0” on a rotary telephone dial. Although the dial is marked with a “0”, the actual number of pulses transmitted is 10. After programming the last telephone digit the [1]&[3] must be pressed simultaneously. This will “clear” the next memory location which must be done to inform the SP850 that the dialing sequence is complete. Remember to press [#] to enter the blank location into the memory. old entry) selection data must be cleared if an error is made. Programming "selection" data other than Zone data is the same as Programming Zone Data. Example: Select Touch Tone Dialing and Disable Ringback. The Memory Assignment Chart shows location 206 contains the numbers to be entered. A “3” for Touch Tone Dialing and a “6” for Disable Ringback. Set the display to show the data in Memory Location 206. Press the “3” then the ‘’6” key. Display will now show the ‘’3” and ‘’6” LEDs lit. If a number is already lit, pressing that number on the keypad will "toggle" that digit off again. Press the [#] after all the desired digits are shown on the keypad. This location is now programmed. SUMMARY of keys used in programming 2.10 MODE KEY Changes the display. Display can view a memory location or its associated data, but not both at the same time. Pressing the [*] allows alternating between viewing a memory location or its contents (data). 2.7 REVIEWING THE DATA In order to review the telephone number or any other data, the following procedure is used. Switch to Memory Location Mode and go to location “001” (start of the first telephone number). Switch the display to view data ([*]), a 3 will be displayed (first dialed digit); press [#], a 6 will be displayed; press [#], a 4 will be displayed. Every time the [#] is pressed, the memory location is advanced and the associated data is displayed. When the last digit is displayed, switch the display to show the Memory Location ([*]). Since the last dialed digit is the 7th digit, the display will show 7. This last step is not necessary, and is intended to show the relationship between the Memory Location and its associated data. It also shows a way to check for errors. 2.11 ENTER KEY When the display shows a memory location, pressing the [#] will advance that memory location. When the display shows data, pressing the [#] enters the displayed data into EEPROM and advances to the next memory location. 2.12 NUMERIC KEYS WHEN DISPLAY SHOWS MEMORY LOCATIONS (no sounder is heard). This display is used to change memory locations. Examples: display shows 76 and 1 is desired, enter the following key sequence 0, 0, 1. The display now shows 1. 2.8 REPROGRAMMING NUMERIC DATA It is not necessary to “clear” existing numeric data when reprogramming, just reprogram over the old data — unless the data is a one 1. In this case the location must first be cleared (pressing [1]&[3] simultaneously). Then enter the new data. WHEN DISPLAY SHOWS DATA AND NUMERIC DATA ENTRY IS REQUIRED (sounder pulses). Use numbers 0 thru 15 to enter data. A “0” entry will program and display 10. WHEN DISPLAY SHOWS DATA AND SELECTION DATA ENTRY IS REQUIRED (sounder pulses). Use keys 1 thru 6 to enter Zone Selection or 1 through 8 for Function data. 2.9 PROGRAMMING SELECTION DATA The following example shows how to select Zones 2, 4, and 6 for Burglary. A review of the Programming worksheet shows Burglary Functions are assigned to Memory Location 197. Set the display to Memory Location 197. Change display to show data ([*]). If random data appears, press clear key combination ([1]&[3]). The display will indicate no zones selected. Press key 2, press key 4, press key 6. Notice as you press each key, its associated LED lights up indicating you have selected that zone. If the information is correct press [#]. That location is now programmed. If incorrect press the clear keys again and reselect zones. WHEN THE DISPLAY SHOWS DATA AND THE CLEAR FUNCTION IS REQUIRED (sounder pulses). Pressing the clear key combination keys [1]&[3] simultaneously programs a blank in the associated memory location. This function is used to “clear” data when necessary. NOTE: This function must be used after programming the last telephone number digit. NOTE: Unlike numeric data (where a new entry overwrites an 9 SEC 3: KEYPAD OPERATION & PROGRAMMING INSTRUCTIONS KP600F/L - COMMAND SEQUENCES Use the following sequences to operate and use the system as indicated: 3.0 INTRODUCTION Whether you are an experienced installer/programmer or a newcomer, you will find programming and installing the SP850 simple and easy to understand. For those familiar with programming ARROWHEAD or other products, filling out a Programming Worksheet and reading SEC 2 with an occasional glance at SEC 5 (Programming Steps) is probably all that is necessary. For those that are new to programming, a thorough reading of SEC 2 & 3 is recommended. Programming the system can be accomplished using “ScanPro Downloader” up/downloading Software, KP600F or KP600L keypads. All information programmed is stored in nonvolatile EEPROM memory, which retains its data even if all power is removed. If the Installer Code is unknown, pull the access code programming jumper "J2" off the pins until the keypad generates a two-second continuous tone. Replace the jumper. At this time you have approximately 30 seconds to place a 4 digit installers code followed by the [ # ] key. If the Installer’s Code Privacy bit is set in location 205, the previous entry will only cause the #1 Access Code to be altered. Since the KP600L keypad displays memory locations and data more readily, we will concentrate on the KP600F programming and follow it with the differences using the LCD keypad. Upon initial programming for monitoring, activate the test sequence [AAAA] [ * ] [ 4 ] [ # ] and reenter the sequence. This will erase any unreported alarms from memory. [AAAA] = ANY OF THE 8 ACCESS CODES [Z] = ZONE(S) ZONE(S) BYPASS COMMAND [AAAA] + [Z] + [#] GROUP BYPASS [AAAA]+[*]+[1]+[#] ARMING / DISARMING [AAAA] + [#] DURESS DISARM [DDDD]+[#] NOTE: (DDDD is the DURESS CODE "User #7" if Flag #8 in MISC GRP #1 LOC 205 is set. Otherwise there is no Duress Feature.) INSTANT MODE ON [AAAA]+[*]+[0]+[#] ACTIVATE/DEACTIVATE TEST MODE [AAAA]+[*]+[4]+[#] CHIME MODE ACTIVATE/DEACTIVATE [AAAA]+[*]+[6]+[#] FAULT ANALYSIS MODE [PRESS & HOLD] [#] if Ready/Status light flashing ZONE FAULT INTERROGATION [PRESS & HOLD] [*] if Ready/Status light flashing & TRBL is indicated. Zone in Trouble condition will flash. (KP600F only) 3.1 PROGRAMMING MODE (Using KP600L) There are two types of programming modes with the SP850 system, namely Keypad programming and Panel programming. The following describes the key sequences necessary for each: FORCE PANEL TO CALL 3RD PHONE# [AAAA]+[*]+[6]+[5]+[#] FORCE PANEL TO ANSWER PHONE [AAAA]+[*]+[6]+[6]+[#] ENTER PANEL PROGRAMMING [*&0]+[ I I I I ]+[*]+[8]+[*]+[9]+[12345] Panel programming items are fully described in SEC. 4, Programming Steps. ENTERING ACCESS CODES [PPPP]+[*]+[7]+[*]+[N]+[AAAA]+[#] DELETING ACCESS CODES [PPPP]+[*]+[7]+[*]+[N]+[#] ENTER KEYPAD PROGRAMMING MODE [*&0] KP600L PROGRAMMING COMMANDS The following commands are used when programming with the KP600L keypad. NOTE: The keypad will not show a change of status when entering Keypad Programming Mode directly after entering Panel Programming Mode unless you first press the [#] key. MOVE CURSOR RIGHT [4&5] MOVE CURSOR LEFT [1&2] EXITING PROGRAMMING MODES [*&#] Exit either Panel or Keypad programming mode, by pressing the [* & #] keys simultaneously. NOTE: KP600L programming commands are listed and explained in the KP600L Installation and Programming Manual, P/N 64812824. KP600L - LCD KEYPAD The sequences used for programming the keypad as well as the SP850 are covered in the Installation manual for the LCD keypad P/N 64812824. Table 1 is a programming guide for ALPHANUMERIC data that is stored in the keypad and then used in the LCD display. In order to enter keypad programming refer to the instructions in 3.1 above. [PPPP] [N] [DDDD] [IIII] = = = = #1 ACCESS CODE (FACTORY SET TO 1111) USER CODE # DURESS CODE INSTALLERS CODE (FACTORY SET TO 7777) ITEMS IN [ ] AND SEPARATED BY THE "&" SIGN MUST BE PRESSED SIMULTANEOUSLY. 10 3.2 INSTALLER PROGRAMMING There are a total of five parameters to be programmed in setting the time and date of the system. These five parameters must be programmed in consecutive order as shown above. ANSWER THE DOWNLOADER COMPUTER When the panel is programmed not to answer the telephone it may be forced to answer the telephone by entering the following sequence: AAAA = Any Access Code; DOW = Day of week: “1” represents Sunday, “2” for Monday, and so on (ie.1-7); MON = Month: “1” represents January, “2” for February, and so on (ie.1-12); DOM = Date of the month (ie.01-31); MilHR = Military hour of the day. This is displayed in 24-hour format. As an example 8pm=20 as the MilHR entry (ie.0023); MIN = Minute of the hour (ie.00-59); [AAAA] + [ * ] + [ 6 ] + [ 6 ] + [ # ] CALL DOWNLOADER COMPUTER To have the panel call the “ScanPro Downloader” the following sequence is entered: [AAAA] + [ * ] + [ 6 ] + [ 5 ] + [ # ] NOTE: Third phone and third account number information must be programmed accordingly to call the ScanPro computer. SETTING SYSTEM’S TIME AND DATE (KP600F/L) If it desired to change the date and time enter the key sequence on either KP600F or KP600L keypad as follows: After entering the minute, press the [ # ] key so that the new parameters will be sent to the system. If for any reason you do not want to program these new parameters, you must wait 30 seconds without pressing any key, at which point the system will abort the whole programming process. [AAAA] + [ * ] + [ 3 ] + [ * ] + [ DOW ] + [ * ] + [ MON ] + [ * ] + [ DOM ] + [ * ] + [ MilHR ] + [ * ] + [ MIN ] + [ # ] NOTE: There is no display change during the above sequence. TABLE - 1 LCD KEYPAD PROGRAMMING AND FACTORY DEFAULTED TEXT: LO C. FUNCTIO N 1 2 3 4 5 6 7 8 9 10 11 12 13 14 15 16 17 LENGTH 1 2 3 4 5 6 DEFAULT BLA NK 1 thru 6 S elec t all 24 H r z ones program m ed in the c ontrol panel S et B it 1= No P iez o 1, 2 or B lank S et bit 2 for S P 600/650 panels BLA NK Zone 1 D es c ription 16 Charac ters Z ONE 1 Zone 2 D es c ription 16 Charac ters Z ONE 2 Zone 3 D es c ription 16 Charac ters Z ONE 3 Zone 4 D es c ription 16 Charac ters Z ONE 4 Zone 5 D es c ription 16 Charac ters Z ONE 5 Zone 6 D es c ription 16 Charac ters Z ONE 6 A C F ail D es c ription 8 C harac ters A C FA IL Low B att Des c ription 8 C harac ters LOW BA TT Trouble D es c ription 8 C harac ters TROUBLE A larm Des c ription 8 C harac ters A LA RM B y pas s D es c ription 8 C harac ters BY PA SS V iolated D es c ription 8 C harac ters V IOLA TED A rm ed Des c ription 8 C harac ters A RMED R eady D es c ription 8 C harac ters REA DY F ail C om m unic ate 8 C harac ters COMMFA IL 11 SEC 4: COMPLIANCE INFORMATION U.S. INSTALLATION CONSIDERATIONS FCC WARNINGS Follow the instructions below when installing and programming an SP850 Alarm Control Panel to meet installation requirements. This equipment complies with Part 68 of the FCC rules. On the bottom of this equipment is a label that contains, among other information, the FCC Registration Number and Ringer Equivalence Number (REN) for this equipment. HARDWARE CONSIDERATIONS 1. Do not plug the Basler transformer into a receptacle controlled by a switch. 2. Use a 12 volt 7AH battery (Yuasa NP7-12) in order to have a standby time of at least 4 hours. 3. Use a U.L. listed bell across terminals 3 and 4. Bell Power is 300mA. 4. Maximum combined Auxiliary, keypad, and fire outputs is 400mA at 914VDC. 5. Use P/N EOL 2200 end-of-line resistor (optional) for all fire zones and ARROWHEAD P/N 123-000222 (enclosed) for all burglary type zones of protection. 6. Maximum bell load is 300mA at 9-14VDC. Use U.L. listed Bell or sounding device. Suggested Bells: Wheelock MB-G10-12-R or Amseco MSB10G. 7. Use U.L. listed 9-14VDC 4-wire smoke detector and U.L. listed end-ofline relay module. 8. The optional single or double gang plastic GEM box used for mounting the KP600F keypad must be U.L. listed. 9. Use a U.L. listed momentary keyswitch if keyswitch operation is desired. A UL Listed KP600F or KP600L keypad must still be used with the system and both must be installed within the protected area. 10. Tamper switch must be installed on the control panel cabinet. 11. Use terminals 5 (+) and 12(-) for Fire Power. Max current = 150mA. Upon request, the customer shall notify the telephone company of the particular line to which the connection will be made, and provide the FCC registration number and the ringer equivalence of the protective circuit. FCC Registration Number: 4T2USA-24862-AL-E Ringer Equivalence Number: 0.2B USOC Jack: RJ31X required Except for the telephone company provided ringers, all connections to the telephone network shall be made through standard plugs and telephone company provided jacks, or equivalent, in such a manner as to allow for easy, immediate disconnection of the terminal equipment. Standard jacks shall be so arranged that, if the plug connected thereto is withdrawn, no interference to the operation of the equipment as the customers premises which remains connected to the telephone network shall occur by reason of such withdrawal. Should terminal equipment or protective circuitry cause harm to the telephone network, the telephone company shall, where practicable, notify the customer that temporary disconnection of service may be required; however, where prior notice is not practicable, the telephone company may temporarily discontinue service if such action is deemed reasonable in the circumstances. In the case of such temporary discontinuance, the telephone company shall promptly notify the customer and will be given the opportunity to correct the situation. PROGRAMMING CONSIDERATIONS 1. Maximum Exit time allowed is 60 seconds. (Memory Location 129). 2. Maximum Entry time allowed is 40 seconds. (Memory Location 128). 3. Program all alarm sounding devices to operate for a minimum of 4 minutes. (Memory Location 132). 4. Program manual shutdown on the fire alarm time out. (Memory Location 205 should select a 7). 5. Program Fire power reset through the keypad (1 & 3). (Memory Location 206 should select a 7). 6. Program the panel to report to the Central Station on loss of AC power and low battery. (Memory Locations 112, 113, 134, 190 and/or 191). 7. Program the panel to report all fire zone trouble conditions to the Central Station. (Memory Location 120, 190 and/or 191). 8. Dialing attempts for phone numbers 1 and 2 must be a minimum of 5 and a maximum of 10 attempts. (Memory Location 143). 9. Test message interval must be programmed to 1 every 24 hours. (Memory Locations 136-140, 190-192 and 116). 10. 24 hour fire zones cannot be programmed as bypassable zones. 11. For correct dialer report prioritization, fire zones are to be assigned to the lower numbered zones, Panics on the next lowest numbered zones, and burglary zones on the highest numbers. Example: Zone 1 = Fire, Zone 2 = Panic, Zones 3-8 = Burglary. 12. When Fire Power output is required, program location 141 = 7. The telephone company may make changes in its communications facilities, equipment, operations or procedures, where such actions is reasonably required and proper in its business. Should any such changes render the customers terminal equipment incompatible with the telephone company facilities, the customer shall be given adequate notice to the effect the modifications to maintain uninterrupted service. This equipment may not be used on coin telephone lines. Connection to party lines is subject to state tariffs. The REN is useful to determine the quantity of devices that you may connect to your telephone line and still have all of those devices ring when your telephone number is called. In most, but not all areas, the sum of the RENs of all devices connected to one line should not exceed five (5.0). To be certain of the number of devices you may connect to your line, you may want to contact your local telephone company. If you experience trouble with this telephone equipment, please contact SENTROL Inc. 1510 Tate Boulevard, Hickory, North Carolina 28601 (1-800800-2626) for information on obtaining service or repairs. The telephone company may ask that you disconnect this equipment from the network until the problem has been corrected or until you are sure that the equipment is not malfunctioning. To achieve 24 hours of battery backup, maximum current draw from the Auxiliary and Bell output are as follows: Auxiliary, Fire, Keypad Output = 175mA Max. Bell output = 300mA Max. Use only KP600F keypad unless auxiliary power supply is installed. INFORMATION TO USER This equipment has been tested and found to comply with the limits for Class B digital device, pursuant to Part 15 of FCC rules. These limits are designed to provide reasonable protection against harmful interference in a residential installation. This equipment generates, uses and can radiate radio frequency energy and, if not installed and used in accordance with the instructions, may cause harmful interference to radio communications. However, there is no guarantee that interference will not occur in a particular installation. If this equipment does cause harmful interference to equipment off an on, the user is encouraged to try to correct the interference by one or more of the following measures: Reorient or relocate the receiving antenna. Increase the separation between the equipment and receiver. Connect the equipment into an outlet on a circuit different from that to which the receiver is connected. Consult the dealer or an experienced Radio/TV technician for help. Caution: Changes or Modification not expressly approved by Sentrol, Inc could void the users authority to operate the equipment. 12 TABLE 2: RECEIVER FORMAT EXAMPLE: CONDITION SCANPRO EXTENDED Scenario # 1 A) Trip on Zone 1 Account 1234 03-1234 [11][001] Acc.1234 1 B) Momentary trip on Zone 2 03-1234 [32][001] Acc.1234 3 03-1234 [61][001] 3333 2 03-1234 [E2][002] Acc.1234 E DOWNLOADER 4+2 SILENT ADEMCO KNIGHT SUPERFAST Acc. 1234 11 123456789 Acc. 1234 32 123456789 1111 1 C) Disarm after Alarm Report 155555557 61 Acc. 1234 E2 EEEE 2 Using Usercode #1 615555557 123456789 635555557 122222222 Scenario # 2 D) Closing by Keyswitch 03-1234 [ C][009] Acc.1234 C Acc. 1234 C9 CCCC 9 E) Momentary trip on Zone 3 03-1234 [33][003] Acc.1234 3 F) Momentary trip on Zone 5, 03-1234 [D 5][005] Acc.1234 D 1234 E Acc. 1234 33 123456789 Acc. 1234 D 5 123456789 3333 3 disarm before alarm report 03-1234 [E3][003] 03-1234 [ B][009] 123456789 944444444 551555557 D D D D 5 EEEE 3 Acc.1234 B E3 555515557 B9 553535557 BBBB 9 922222222 Scenario # 3 G) Closing by User 1 03-1234 [ C][001] Acc.1234 C H) Momentary trip on Zone 4 03-1234 [D 4][004] Acc.1234 D 1234 E Acc. 1234 C1 123456789 Acc. 1234 D 4 123456789 CCCC 1 disarm before alarm report 03-1234 [E4][004] Using usercode #1 03-1234 [ B][001] 144444444 D D D D 4 EEEE 4 Acc.1234 B E4 122222222 B1 555155557 BBBB 1 Scenario # 4 I) Closing User 2 03-1234 [ C][002] Acc.1234 C J) Momentary trip on Zone 4 03-1234 [34][004] Acc.1234 3 Acc. 1234 C2 123456789 Acc. 1234 34 123456789 CCCC 2 244444444 3333 4 K) Disarm after alarm report 3-1234 [E4][004] 03-1234 [ B][002] 555155557 Acc.1234 E Acc. 1234 E4 EEEE 2 B2 Acc.1234 B 123456789 555355557 222222222 BBBB 1 Scenario # 5 L) Opening (by User 1) 03-1234 [ B][001] Acc.1234 B Acc. 1234 B1 BBBB 1 M) Low Battery 03-1234 [99][000] Acc.1234 9 Acc. 1234 99 9999 9 N) Station Code (kypd 2) 03-1234 [ 7][001] Acc. 1234 71 7777 1 O) 24 Hour Self Test Acc.1234 8 P) Fire Trouble (Zn 1 opens) 03-1234 [ F][001] Acc.1234 F 123456789 515555556 Acc.1234 7 03-1234 [88][000] 123456789 122222222 Acc. 1234 88 (Not Applicable) 123456789 Acc. 1234 F1 123456789 8888 8 555555559 FFFF 1 155555555 These five Scenarios shown above are using the defaults Z1(11), Z2-Z7 (32-37), Test Cancel (D), Trouble (F) Restoral (E), These examples are Status (6), Closing (C), Opening (B), Station (7), Low Battery (99) using the Ademco They correlate with each of the formats available on the SP850 products. defaults indicated The Ademco defaults are used for the data shown in the rightmost column. on the next page. Note: Formats are not all decoded the same. Some formats can use values that are illegal in other formats. Characteristic examples are shown above, but some actual testing must be done to tailor the transmitted codes to match your receiver and central station automation. It is best to start with a basic set of transmitted codes and then add the supervisory signals. Be aware that a "blank", a "0", and a HEXIDECIMAL "A" program differently in some formats. 13 NOTES: The following corresponds to Table 2 information on page 10. For Ademco Highspeed Format, the following reporting codes must be used. Reporting functions not listed are unavailable. For the eight (8) reporting channels The channel status codes are as follows: Code Meaning 1 NEW ALARM OR CONDITION (previously unreported) 3 NEW RESTORE (previously unreported) 5 NORMAL (no event since previously reported Restore) 6 PREVIOUSLY REPORTED ALARM (or condition) STILL IN EFFECT For the ninth channel, the following channel status codes are used: 1 DURESS 2 OPENING REPORT in the previous 8 channels 3 BYPASS REPORT in the previous 8 channels 4 CLOSING REPORT in the previous 8 channels 5 TROUBLE REPORT in the previous 8 channels 6 SYSTEM TROUBLE REPORTS in the previous 8 channels 7 NORMAL - alarms are reported in previous 8 channels 8 NEW LOW BATTERY (will not re-report on subsequent calls and will not send restore) - old high speed format method for reporting system low battery - alarms are reported in the previous 8 channels 9 TEST REPORT - alarms are reported in the previous 8 channels NOTE: Only NEW events: ALARM (or Opening), or RESTORE (or Closing) on any channel or TROUBLE or 24-hour zone SHUNTS or TEST will trigger transmission, at which time all 9 channels will report. For UL purposes, this control/communicator should be used with the following receivers for Receiver Compatibility. 1. Silent Knight Security Systems Model 9000 Digital Alarm Receiver. 2. Osborn Hoffman Inc. Model Quickalart II 3. Linear Corp. Sescoa Model 3000 Receiver The control/communicator communication formats comply with all published protocol standards for the following common formats. 1. 2. 3. 4. 4+1. Both (10PPS and 20PPS) -- Standard and Extended 3+1. Both (10PPS and 20PPS) -- Standard and Extended 4+2. Both (10PPS and 20PPS) Ademco High Speed (Except on the SESCOA 3000 Receiver) 14 FIG. 4 S P 850 P R OGR A M M IN G W OR K S H E E T CUS TOM E R NA M E _________________________ CUS TOM E R A DDRE S S ________________________A CCO UNT #________ S canPro IT EM # PR OGR AM LOCAT ION P hone num ber digits 1 1 001-021 1ST PHONE NUMBER DIGITS 2 022-042 2ND PHONE NUMBER DIGITS 3 043-063 3RD PHONE NUMBER DIGITS 4 064-067 1ST A CCOUNT NUMBER DIGITS 5 068-071 2ND A CCOUNT NUMBER DIGITS 6 072-075 3RD A CCOUNT NUMBER DIGITS 2 3 4 5 6 7 8 9 10 11 12 13 14 15 16 17 18 19 20 21 1 = Fas t 2 = Ex t Fas t 3 = Slow 4 = Ex tended Slow REPORT ING FORM A T S: 7 76 RECEIV ER #1 FORMA T SELECT ONE FORMA T 5 = SK4+2/10PPS 6 = SK4+2/20PPS 7-9 (Unus ed) 8 77 RECEIV ER #2 FORMA T SELECT ONE FORMA T 10 = Sc anPro FSK 11 = A demc o High Speed 9 78 RECEIV ER #3 FORMA T SELECT ONE FORMA T 10 79 A NTIJA M TIME (x 2 s ec ) 0-30 SECONDS DEFA ULTS (0-15) [1 0] 80 81 82 83 11 080-083 PA NEL PA SSW ORD DIGITS 12 084-085 2 DIGIT REPORT CODE FOR Z ONE 1 [1, 2, 3, 4] [1, 1] 13 086-087 2 DIGIT REPORT CODE FOR Z ONE 2 [1, 2] 14 088-089 2 DIGIT REPORT CODE FOR Z ONE 3 [1, 3] 15 090-091 2 DIGIT REPORT CODE FOR Z ONE 4 [1, 4] 16 092-093 2 DIGIT REPORT CODE FOR Z ONE 5 [1, 5] 17 094-095 2 DIGIT REPORT CODE FOR Z ONE 6 [1, 6] 18 096-099 (Res erv ed f or Future Us e) 19 100-101 KEY PA D (1 & 3) REPORT CODE (1 - 15) 20 102-103 KEY PA D (4 & 6) REPORT CODE (1 - 15) 21 104-105 KEY PA D (7 & 9) REPORT CODE (1 - 15) 22 23 106-107 KEY PA D (* & #) REPORT CODE 108 DURESS REPORT CODE (1 - 15) (1 - 15) 24 25 109 110 OPENING REPORT CODE CLOSING REPORT CODE 26 111 (Res erv ed f or Future Us e) 27 112 REPORT CODE FOR LOW BA TTERY (1 - 15) 28 113 REPORTING CODE FOR A /C FA ILURE (1 - 15) 29 114 REPORT CODE, LOW BA TTERY RESTORA L (1 - 15) 30 115 REPORTING CODE FOR A /C RESTORA L (1 - 15) 31 116 REPORTING CODE FOR 24HR TEST (1 - 15) 32 117 REPORTING CODE FOR UPLOA D/DOWNLOA D (1 - 15) 33 118 REPORTING CODE FOR TA MPER (1 - 15) 34 119 (Res erv ed f or Future Us e) 35 120 Z ONE TROUBLE REPORT CODE (1 - 15) Selec t Trouble z ones in LOC 204 36 121 Z ONE RESTORA L CODE (1 - 15) Selec t Res toral z ones in LOC 194 37 122 Z ONE BY PA SS REPORT CODE (1 - 15) 38 123 Z ONE "OLD A LA RM" REPORT CODE (1 - 15) 39 124-125 40 126 FA ST Z ONE RESPONSE TIME (x 5ms ec . + 10ms ec .) 41 127 (Res erv ed f or Future Us e) (1 - 15) 42 128 ENTRA NCE DELA Y TIME (x 10s ec ) (1 - 15) 43 129 EXIT DELA Y TIME (x 10s ec ) (1 - 15) 44 130-131 (1 - 15) (1 - 15) For Conditional Opening (Res et A f ter A larm), Program only an Opening Code. No Clos ing Code. Enable Open/Clos e reports . (Res erv ed f or Future Us e) (Res erv ed f or Future Us e) (1 - 15) [3] [3] (1 - 15) 45 132 BELL SHUTOFF TIME (x 1min) (1 - 15) 46 133 Z ONE REPORT DELA Y TIME (x 10s ec ) (1 - 15) 47 134 A C LOSS REPORTING DELA Y (x 1min) (1 - 15) 48 135 FA LSE A LA RM SHUTDOW N COUNT (1 - 15) 15 [6] 49 136-140 TIM ER R EPOR T [m onth] [w eekday ] [day ] [hour] [m in] Weekday s=1-7 (Sunday =1 - Saturday =7) 136 M NTH W/DAY 137 138 DAY HOUR 139 M IN . 140 A ll B la nk = 2 4 Hr from la s t re port 50 141 ASSIGN OU T#1 D e fa ult= F ire P ow e r (0-11) Se le ct an Output for LOC 141 & 142 [ LOC 141 Default=7 ] 51 142 ASSIGN OU T#2 Default=R eady /Trouble Status (0-11) 1=Audible Warning 2=5-7 Second Pulse Output [ LOC 142 Default=6 ] 3=Strobe Light 4=Courtes y 8=Fire-Pulsate/Burglary Bell 52 53 5=A rm/Dis arm/A larm 9=Steady Arm /Disarm 143 R EPOR TIN G ATTEM PTS 144 AN SWER ON R IN G N U M BER 6=Ready /Trouble 10=Steady Fire Bell 7=Sm ok e Pow e r (LOC 141 only) 11=Steady Burglary Bell 12-15=(Undefined) F ACT OR Y S E T (refer to compliance s ection in manual) [8] Each Of the C odes M ust be 4 Digits [7 7 7 7] [1 0] 54 145-148 IN STALLER AC C ESS C ODE DIGITS 55 149-152 U SER 1 AC C ESS C ODE DIGIT S 56 153-156 U SER 2 AC C ESS C ODE DIGIT S 57 157-160 U SER 3 AC C ESS C ODE DIGITS 58 161-164 U SER 4 AC C ESS C ODE DIGIT S C ode if selec ted in location 205 59 165-168 U SER 5 AC C ESS C ODE DIGITS Note:User # 8 is the 5-7 second output code if 60 169-172 U SER 6 AC C ESS C ODE DIGITS 5-7 Second Output is selected in location 141 or 142. 61 173-176 U SER 7 AC C ESS C ODE DIGIT S 62 177-180 U SER 8 AC C ESS C ODE DIGIT S 63 181-182 (R eserv ed for Future U se) 64 183 M ISC SELEC TION GR P 3 2=Term inal 13 "Output#2" Inv ersion 4="Dial Only With Dial Tone" [1 1 1 1] Note:User #7 m ay be enabled as Duress (S E L E CT Z ONE S ) 1 2 3 4 5 6 7 8 1=Term . 12 "Output#1" Inv ersion 3=Enable "Defeat Lockout" - When enabled, E/E zand Follow er zones m ay be faulted at tim e of arm ing. 5=N ot U sed 6=Inv alid U ser C ode Tam per 7=Enable Rem ote Telephone Access 65 184 (R eserv ed for Future U se) 66 185 SELEC T E/E ZON ES FR OM #198 WITH FOLLOWER ZONES 67 186 (R eserv ed for Future U se) 68 187 ZONES TO DIAL FIRST RECEIVER (s elect zones ) 69 188 ZON ES TO DIAL SEC ON D R EC EIVER (s elect zones ) 70 189 ZONES TO DIAL THIR D RECEIVER 8=Term inal 3 "Bell Output" Inv ersion Zones M ust be Burglary [2] (s elect zones ) 1=Key pad Panics 2=Opening/Closing, Station 3=AC Loss, Low Battery , Trouble, Upload Report, Tam per A U X ILIA R Y C O D E S T O D IA L S E LE C T 71 190 AU XILIAR Y C ODES TO DIAL PHON E # 1 (s elect event) 72 191 AU XILIAR Y C ODES TO DIAL PHON E # 2 (s elect event) 73 192 AU XILIAR Y C ODES TO DIAL PHON E # 3 (s elect event) 74 193 FAST R ESPONSE ZON E SELECTION (s elect zones ) Zone Response Tim e is in LOC 126 75 194 R ESTOR E ZON E SELEC TION (s elect zones ) Restoral Report C ode is in LOC 121 76 195 R EPOR T IN G DELAY ZON E SELEC T ION (s elect zones ) 77 196 *BYPASSABLE ZON E SELEC TION (s elect zones ) 78 197 AU DIBLE BU R GLAR Y, SELEC T ZON ES (s elect zones ) 79 198 EN T R AN C E / EXIT Z ON E SELEC T ION (s elect zones ) 80 199 AU DIBLE FIR E, SELEC T ZON ES (24HR ) (s elect zones ) 81 200 24 HOU R AU DIBLE Z ON E SELEC T ION (s elect zones ) 82 201 SILEN T PAN IC , SELEC T ZON ES (24HR ) (s elect zones ) 83 202 C HIM E ZON E SELEC T ION (s elect zones ) Chim e Zones M ust be Burglary 84 203 DAY/N IGHT TROUBLE ZONE SELECTION (s elect zones ) Day / Night Zones M ust be Burglary 85 204 TR OU BLE R EPOR T ZON E SELEC TION (s elect zones ) 86 205 M ISC . SELEC TION S GR P 1 5=Test Tim er 7=Old Alarm , By pass Reporting Delay Tim e is in LOC 133 *Don't select Fire Zones for By passability [23456] Zones M ust be Burglary [2] [1] Report Code is in LOC 120 (SELEC T F U N C TION S) 1=N o End-of-Line R esistors 3=Account Takeov er Protection 5=Chim e Enable 7=Latched Fire Bell 2=C all Back Security 4=50 Hertz A/C 6=No Ex it Enunciation 8=User C ode #7 as Duress Code 87 206 M ISC . SELEC TION S GR P 2 [ 3,6 ] (SELEC T F U N C TION S) 1=Auto Bell Test 3=DTM F TouchTone Dialing 5=5-7 Second DOB Pulse Output 7=Use (1 & 3) as Sm oke Reset 2=Inhibit FC Annunciation 4=European R otary Dial 6=Disable Ringback 8="Inhibit Arm " Display BU R G BELL 88 207 208 4&6 7&9 *&# 1&3 4&6 7&9 *&# 1 2 3 4 5 6 7 8 KEYPAD PAIR S - BELL AC TIVATION 1 89 FIR E BELL 1&3 BYPASS GR OU P SELEC TION Zones m ust be in item 196 16 2 3 4 5 6 7 8 SEC 5: PROGRAMMING STEPS PROGRAMMING STEPS Enter a value from the list below to select the transmission format for each telephone number. 1 = Fast, 2300 Hz. handshake, 1800 Hz. data, 20 pps. 2 = Fast Extnd,2300Hz handshake,1800Hz data, 20pps. 3 = Slow, 1400 Hz. handshake, 1900 Hz. data, 10 pps. 4 = Slow Extnd 1400 Hz handshake,1900 Hz data,10 pps. 5 = SK 4 + 2, 1400 Hz handshake, 1900 Hz data, 10 pps. 6 = SK 4 + 2, 2300 Hz handshake, 1800 Hz data, 20 pps. 7-9 = (Unused) 10 = ScanPro Downloader 300 baud. 11 = Ademco Highspeed. Each of the "Steps" below correspond to the Item numbers used in the ScanPro Downloader software. The numbers following each of the steps are the EEPROM memory locations used in keypad programming. PHONE OPTIONS STEP 1 1-21 FIRST TELEPHONE NUMBER The 850 is capable of reporting to three different telephone numbers. Each number may be up to 20 digits in length (with a required blank digit at the end of each number). Also, two special functions may be used in conjunction with the telephone numbers: PANEL OPTIONS SPECIAL CHARACTERS The "*" and "#" can be programmed by entering either a HEXADECIMAL "C" (12) or "D" (13) respectively when required for specific telephone dialing applications. STEP 10 79 ANTI-JAM TIME (0-30 Seconds) To determine the Anti-Jam time for your central office, have someone dial the premises phone from another location. Instruct the caller to hang up immediately when the phone is picked up. The amount of time elapsed before dial tone is received is the anti jam time. Once this time has been determined, program the anti-jam to exceed the time measured above by three (3) seconds. DEFAULT = 10 SECOND DIAL TONE In installations where two dial tones are received (first for the internal line and second for the outside line) the system can be programmed to detect a second dial tone by entering a HEXADECIMAL “E” (14) between the two numbers. NOTE: Anti-Jam times vary from central office to central office. The default value of 20 seconds will work in most areas. DIALING PAUSE In areas where a dialing pause is required, a dialing pause digit HEXADECIMAL “F” (15) can be inserted anywhere within the number. Each dialing pause digit is approximately three seconds. STEP 11 80-83 PANEL PASSWORD This security code is required to enable the ScanPro Downloader computer to communicate with the panel. The ScanPro Downloader programming can not proceed unless the computer knows this password. This prevents other people with the software from accessing your panels but if you forget the password it will keep you out as well. Be sure that you know what password is in your panel and do not leave it at the FACTORY DEFAULT OF “1234”. STEP 2 22-42 SECOND TELEPHONE NUMBER Telephone number two can be used for Dual, Split or Backup reporting. See steps 68-70 for more reporting information. STEP 3 43-63 THIRD PHONE NUMBER The third telephone number is primarily used for Uploading/ Downloading or splitting reporting signals to a separate receiver. Report signals from the second telephone number will not roll over to the third telephone number. STEP 4 64-67 FIRST ACCOUNT NUMBER STEP 5 68-71 SECOND ACCOUNT NUMBER STEP 12-17 84-95 ZONE EVENT CODES (2 digit 1-9,AF) Code used to identify a particular zone transmission. The first digit of this code is the alarm code and will be transmitted for Alarm messages followed by the second digit which is the actual zone identifier. The zone identifier usually is the zone number. The first digit is REPLACED with the bypass, trouble, restore, status, or test cancel code to identify these other zone transmission. STEP 6 72-75 THIRD ACCOUNT NUMBER Three account numbers are assigned to telephone numbers 1, 2 and 3 respectively. Account numbers may be three or four digits in length and with a range of HEXADECIMAL 0-9, A-F. Ademco High Speed, SK4+2 and ScanPro reporting formats require a four digit account number. STEP STEP STEP STEP STEP STEP STEP NOTE: When using HEXADECIMAL account numbers be aware that some receivers will treat “0” as an “A” and others treat “10” as an “A”. STEP 7 76 1ST REPORTING FORMAT STEP 8 77 2ND REPORTING FORMAT STEP 9 78 3RD REPORTING FORMAT 12 13 14 15 16 17 18 84-85 86-87 88-89 90-91 92-93 94-95 96-99 ZONE 1 EVENT CODE Fac. Def. = 11 ZONE 2 EVENT CODE Fac. Def. = 12 ZONE 3 EVENT CODE Fac. Def. = 13 ZONE 4 EVENT CODE Fac. Def. = 14 ZONE 5 EVENT CODE Fac. Def. = 15 ZONE 6 EVENT CODE Fac. Def. = 16 (Reserved for Future Use) NOTE: Refer to locations 187-189 to assign zones to the phone number they are to call. 17 STEP 19-22 100-107 KEYPAD EMERGENCY CODES (Two-digit 1-9, A-F) Codes sent when the keypairs are activated. Reporting for these events is enabled in LOC 190-192. Local Alarm output options programmed in LOC 207. STEP 30 115 AC RESTORE CODE (One-digit 1-9, A-F) Code reported when AC power is reconnected. Reports to the same telephone number as the AC code. With two digit reporting this digit will be followed by 0. STEP 19 STEP 20 STEP 21 STEP 22 STEP 31 116 TEST CODE (One-digit 1-9, A-F) Code reported whenever a test signal is transmitted to the Central Station. Refer to Memory Locations 190-192 to enable this reporting feature and telephone number selection. With two digit reporting this digit will be followed by 0. Refer to Memory Locations 136-140 to set the reporting times. 100-101 102-103 104-105 106-107 KEYPAIR 1 KEYPAIR 2 KEYPAIR 3 KEYPAIR 4 EVENT CODES EVENT CODES EVENT CODES EVENT CODES STEP 23 108 DURESS CODE (One-digit 1-9, A-F) Codes sent when the Duress feature or User#7 code (if programmed) is activated. Reporting for these events is enabled in LOC 190-192. With second digit reporting the second digit will be the User Code ID. If opening reports are also transmitted, the normal opening report will follow the Duress report. STEP 32 117 UP/DOWNLOAD CODE (One-digit 1-9, AF) Code reported after a successful transmission between the computer and the system. Refer to Memory Locations 190192 to enable this reporting feature and telephone number selection. With two digit reporting this digit will be followed by 0. STEP 24 109 EVENT OPEN CODE (One-digit 1-9, A-F) Enter Reporting Code to represent an Open (Disarm Report). An Open report is sent when the system is disarmed. This code will be followed by the user ID#(1-8). Keyswitch ID# is "9" and Tel-Remote ID# is "F". Enabled in Loc. 190192. NOTE: The up/download code should only be sent to receivers 1 and 2 since this code will automatically be sent to the ScanPro during communications or programming. STEP 33 118 TAMPER CODE (One-digit 1-9, A-F) This code will be sent if the Invalid User Code Tamper feature is enabled in location 183 and implemented. When enabled, if more than 5 invalid user codes are entered within 30 seconds the system will generate this Tamper code. With two digit reporting this digit will be followed by 0. Conditional Opening is enabled if an Open code only is programmed without a Close code. This code will be generated when the system is disarmed after any alarm has occurred on the system. STEP 25 110 EVENT CLOSE CODE (One-digit 1-9, A-F) Enter Reporting Code to represent a Close (Arm) Report. A Close Report is sent after the programmed exit time expires. If there is no delay time programmed, the report will be immediate. This code will be followed by the user ID#(1-8). Keyswitch ID# is "9" and Tel-Remote ID# is "F". Enabled in Loc. 190-192. STEP 26 111 STEP 34 119 (Reserved for Future Use) STEP 35 120 TROUBLE CODE (One-digit 1-9, A-F) Code reported whenever a trouble condition is detected. Programming this report is identical to programming location 100. This report, when used in conjunction with extended, Silent Knight, Superfast, or Ademco will report Trouble by zone. Enabled in Loc. 190-192. (Reserved for Future Use) EXAMPLE: TROUBLE REPORT FOR ZONE 5 Trouble code = C Zone 5 Event code = 15 Trouble Report in SK 4+2 = C5 STEP 27 112 LOW BATTERY CODE (One-digit 1-9, A-F) Code reported when a low battery voltage is detected or no battery on system. Refer to Memory Locations 190-192 to enable this reporting feature and telephone number selection. With two digit reporting this digit will be followed by 0. This report, when used in conjunction with extended, Silent Knight, Superfast, or Ademco will report Trouble by zone. STEP 28 113 AC LOSS CODE (One-digit 1-9, A-F) Code reported when AC power is lost. Refer to Memory Locations 190-192 to enable this reporting feature and telephone number selection. With two digit reporting this digit will be followed by 0. STEP 36 121 ZONE RESTORAL CODE (One-digit 1-9, A-F) Code used to report a restoral of a zone (See Memory Location 194). Programming this report is identical to programming location 100. This report, when used in conjunction with extended, Silent Knight, Superfast, or Ademco will report Restoral by zone when both the zone is restored and the bell has been turned off or times out. 24hr zones restore immediately. STEP 29 114 LOW BATTERY RESTORE CODE (Onedigit 1-9, A-F) Code reported when adequate backup system power (battery) is detected. Reports to the same telephone number as the low battery code. With two digit reporting this digit will be followed by 0. 18 STEP 37 122 BYPASS CODE (One-digit 1-9, A-F) Code reported whenever the system is armed with a bypassed zone (See Memory Location 196). Programming this report is identical to programming location 100. This report, when used in conjunction with extended, Silent Knight, Superfast, or Ademco will report Bypass by zone. Force Arming with Tel-Remote will also trigger a Bypass Code. STEP 47 134 AC LOSS REPORT DELAY (1-15) Time in minutes that an AC Loss report will be delayed. If the condition is corrected during the delay time, the report will be aborted. The audible trouble indication is also delayed by this amount of time. Unprogrammed value equals zero (0), (maximum time = 15 minutes). If "15" is selected there will be NO Audible indication. STEP 38 123 "OLD ALARM" CODE (One-digit 1-9, A-F) Code reported to indicate that a previously reported zone is still violated. If the panel needs to send a second alarm message this feature will cause it to report the status message meaning that the previous alarm zone has not restored. STEP 48 135 FALSE ALARM SHUTDOWN COUNT The False Alarm shutdown count can be programmed to limit the number of times that a single zone can report to a central station receiver if that zone and ONLY THAT ZONE reports to the central station. The count can be programmed to limit the reports from 1 to 15. Programming a 0 will defeat the false alarm shutdown feature. Only alarm and trouble reports are counted. The feature works as follows: if the number of reports on a zone within a 2 to 3 hour period equals the shutdown count and ONLY THAT ZONE REPORTED DURING THIS TIME INTERVAL then that zone will not report until either 24 hours expires or the panel is disarmed. This report, when used in conjunction with extended, Silent Knight, or Ademco will report Status by zone. A “7” must be programmed in locations 190-191 to turn on the "Old Alarm" report for all formats except Ademco High Speed. STEP 39 124-125 (Reserved for Future Use) NOTE: If restorals are enabled the last restoral will be lost upon zone shutdown. STEP 40 126 FAST ZONE RESPONSE TIME The zones programmed in location 193 will use this programmed time for their activation time. The value programmed here is multiplied by 5msec. and then add 10msec. to that total. Maximum selectable time is 85msec with "15". STEP 49 136-140 TEST TIMER REPORTING TIME The test timer can be programmed to report the Test Code to any receiver. The timer can be programmed to report 24 hours from the last report or on a daily, weekly, monthly, or yearly cycle and at a predetermined time of day. Leave these locations blank to report 24 hrs. from the last report. If a predetermined time is desired, set the hour and minute in the same manner as setting the system time. Programming only the time will result in daily reports. Programming the day of week will result in the test report being transmitted on that weekday at the time programmed. Do not program a month or day for weekly reports. Programming a day of month will result in monthly reports and programming a month and day of month will yield a yearly report. For days of week 1=SUN 2=Mon 3=Tue 4=Wed 5=Thu 6=Fri 7=Sat. PROGRAMMABLE DELAYS STEP 41 127 (Reserved for Future Use) STEP 42 128 ENTRANCE DELAY TIME (1-15) Programmable from 10 to 150 seconds in 10 second increments. Unprogrammed value equals zero (0). DEFAULT=3 STEP 43 129 EXIT DELAY TIME (1-15) Programmable from 10 to 150 seconds in 10 second increments. Unprogrammed value equals zero (0). DEFAULT=3 STEP 44 130 - 131 (Reserved for Future Use) STEP 45 132 BELL SHUT OFF TIME (1-15) The length of time (in minutes) the bell will remain on when the automatic bell shut off feature is used. The value entered is multiplied by 1 (maximum time = 15 minutes). DEFAULT=6 STEP 46 133 ZONE REPORTING DELAY (1-15) Time in seconds the panel will wait before seizing the telephone line. If a silent zone restores prior to the delay expiring, the report will be aborted. If an audible alarm bell is shut off prior to the delay expiring the report will be aborted. The delay value is in increments of 10 seconds, up to 150 seconds maximum. Reporting zones to be delayed are selected in Loc. 195. 19 136 Month EXAMPLE: Test at 22:30 every day 137 138 139 = 22 140 = 30 W/Day Day Hour Minute 136 Month EXAMPLE: Test at 22:30 on Saturday 137=7 138 139 = 22 140 = 30 W/Day Day Hour Minute 136 Month EXAMPLE: Test at 22:30 the 20th of each month 137 138=20 139 = 22 140 = 30 W/Day Day Hour Minute 136 Month EXAMPLE: Test 24 hours after last signal sent 137 138 139 140 W/Day Day Hour Minute Note: Since this output is designed for low current needs, of approximately 150mA, its primary use is as the output for Smoke Power and is the DEFAULT setting. THIS NOTE APPLIES TO LOCATION 141 AND 142 NOTE: Dual Bell/Siren operation is programmed either by selecting assignable out #1 for Burglary and assignable out #2 for fire, or by leaving both selections blank. The Burg Bell/Siren and Fire Bell/Siren are connected as shown in the wiring diagram. (See Figure 1) 1 3 5 7 9 11 Audible Warning Strobe Light Arm/Disarm/Alarm Smoke Power Steady ArmDisarm State Steady Burglary Bell STEP 51 142 ASSIGNABLE OUTPUT 2 Output may be programmed to provide an "Open Collector Output" (-) at terminal 13 whenever the selected condition occurs. The positive terminal is 5 or 6. Program as shown above. Default=6 2 5-7 Second Pulse Output 4 Courtesy 6 Ready Trouble 8 Fire-Pulsate/Burg Steady 10 Steady Fire Bell 12-15 (Undefined) NOTE: If more than two outputs are required you can attach the DOB (Data Output Board) which provides eight additional relay driver outputs. When using the DOB module items 1-8 can be available at the same time. 1. Audible Warning This output remotes the keypad buzzer and produces the same patterns as the keypad. STEP 52 143 REPORTING ATTEMPTS The number of reporting attempts the system will make before going into a “FAIL TO COMMUNICATE” condition. The number of attempts a panel can make is limited by the telephone interface requirements. Refer to the compliance section for further information. A new report will re-initiated the attempt counter for all previous reporting attempts. 2. 5-7 Second Pulse Output This output will be active for approximately 5-7 seconds to activate latch relays, etc. 3. Strobe Light When the panel goes into alarm this output will energize and stay on until the panel is disarmed. 4. Courtesy This output follows the entrance exit delays. It is on during a delay period. NOTE: For AUSTEL APPROVED Installations the Maximum number of reporting attempts cannot exceed 3. 5. Arm/Disarm/Alarm This output follows the armed LED. It will mean armed when on, disarmed when off, and alarm memory when blinking. EXAMPLE: Reporting Attempts = 3. 1. System receives alarm on Zone 1. 2. System tries to communicate with the central station 3 times. 3. After the third attempt, the system enters “FAIL TO COMMUNICATE” condition. Communicator shuts down, keypad annunciates fault condition. 4. Zone 1 restores. Still no communications. 5. Zone 2 trips. Three attempts will be made to transmit Zone 1 and Zone 2 alarm. Only if both Zones obtain successful transmission will system exit Fail To Communicate condition. 6. Ready/Trouble This output will follow the ready LED. It means Ready when on, not ready when off, and trouble when blinking. 7. Smoke Power This output is used as the Smoke Reset available from the keypad. When active provides the ground for the circuit to the smoke detector power. This selection should only be used for Assignable Output #1. 8. Fire-Pulsate/Burglary Bell-Steady This output is the Single Bell output that gives two distinctive frequencies identifying between Fire and Burglary. This is also the "Single Bell Output" from the "Bell Output" (terminals 3 & 4). NOTE: The "Fail to Communicate" condition can be cleared by Entering and Exiting the Test mode. STEP 53 144 RING COUNT (0-15) The system may be programmed to automatically pickup and answer the telephone line after 1 to 15 rings. This function must be programmed if remote up/downloading is to be initiated by the computer calling the panel and the panel is to answer without the user entering a keypad sequence. If an answering machine is connected to the same phone line as the system, the system must be programmed for a minimum of 2 rings greater than the answering machine ring counter. A value of “0” will disable the ring detector so that the panel will not answer the phone. 9. Arm/Disarm This output follows the armed status of the panel. It will mean armed when on, disarmed when off. Output is ideal for Open/Close status indication. 10. Fire Bell This output will behave as the fire bell does. If you are in single bell operation the fire bell is pulsed and this output will pulse as well, reset by disarm. Activated by "10". 11. Burglar Bell This is a constant output activated by a burglary zone, reset by disarm. STEP 50 141 ASSIGNABLE OUTPUT 1 Output may be programmed to provide an "Open Collector Output" (-) at terminal 12 whenever the selected condition occurs. The positive terminal is 5 or 6. Program as shown above. Default=7 20 INSTALLER / USER ACCESS CODES Invert Bell Output is enabled by selecting an "8" in this location. As stated above the Bell Output will be inverted. STEP 54 145-148 INSTALLER CODE A four digit code used to provide access to the installer level of programming. Default value for the installer code is 7777. ZONE OPTIONS STEP 65 184 Reserved for Future Use STEP 55-63 149-180 USER ACCESS CODES Up to 8 user codes can be programmed for the system. Each access code must be four digits in length. The memory locations for the eight access codes are shown below. Default value for User 1 Access Code is 1111. STEP 66 185 DELAY GROUP ZONE SELECT (1-6) Select all delay burglar and associated follower zones for the delay group. A follower zone is enabled by assigning a zone to a zone delay group, without assigning that zone as an entry/exit zone in Location 198. STEP 55 STEP 57 STEP 59 STEP 61 STEP 67 186 149-152 157-160 165-168 173-176 USER 1 USER 3 USER 5 USER 7 STEP 56 STEP 58 STEP 60 STEP 62 153-156 161-164 169-172 177-180 USER 2 USER 4 USER 6 USER 8 Reserved for Future Use STEP 68-70 187-189 REPORTING ZONE SELECTION (16) This programming function allows the user the flexibility to assign any zone to report to any receiver. If a zone is selected to report to receiver 1 and the report is not acknowledged by the central station (after two attempts), the system will transmit that report to receiver 2 (if a telephone number is programmed for receiver 2). If the system is unsuccessful at receiver 2 (after 2 attempts), it will alternate the reporting attempts between the first and second receivers until acknowledged or the maximum number of attempts has been reached. Zones selected for only the second or third numbers will be transmitted to ONLY those receivers. STEP 63 181-182 NOT USED MISCELLANEOUS PANEL SELECTION GROUP 3 STEP 64 183 MISCELLANEOUS SELECTION GRP 3 1 Invert Output #1 2 Invert Output #2 3 Defeat Lockout 4 Dial Only With Dial Tone 5 (For Future Use) 6 Invalid User Code Tamper 7 Remote Phone Access 8 Invert the Bell Output You can invert the 2 assignable outputs and the Bell Output. The primary use for this feature is to interface a satellite siren with internal gel cell battery that uses positive voltage keeping the battery charged. An alarm is caused when voltage is removed. If the siren wire is cut, the siren will see no voltage and the alarm will sound. Select 1,2 or 8 to enable. STEP 68 STEP 69 STEP 70 Invert Output #1 is enabled by selecting a "1" in this location. In a non-activated condition the output sinks to ground. When active the ground connection is removed. 187 ZONES TO DIAL FIRST PHONE # 188 ZONES TO DIAL SECOND PHONE # 189 ZONES TO DIAL THIRD PHONE # STEP 71-73 190-192 AUXILIARY REPORT SELECTION (1-3,5,7) Selection of which auxiliary reports will report to which receiver. The reporting code for the desired auxiliary function must also be programmed. Use the following chart to select what reports are assigned to which receiver. 1 Emergency Codes, Duress 2 Open, Close, Station 3 Zone Trouble, AC, Low Battery, Upload, Tamper 4, 6, 8 Unused 5 Test Timer 7 Zone status, Bypass Invert Output #2 is enabled by selecting a "2" in this location. Works as Invert Output #1 above for Output #2. Defeat Lockout is enabled by selecting a "3" in this location. This feature allows you to arm the system while the E/E or Follower zones are violated. This feature is NOT TO BE USED with "Tel-Remote" option. Dial Only with Dial Tone is enabled by selecting a "4" in this location. Dial tone must be present for communication. STEP 71 190 AUXILIARY CODES TO DIAL 1ST PHONE # STEP 72 191 AUXILIARY CODES TO DIAL 2ND PHONE # STEP 73 192 AUXILIARY CODES TO DIAL 3RD PHONE # Invalid User Code Tamper is enabled by selecting a "6" in this location. When enabled, if more than 5 invalid user codes are entered within 30 seconds the system will generate an Invalid Code Tamper alarm, sending the Tamper code. As an Example: Sel #1 = 2, 7 Reports Open, Close, Station, Zone Status and Bypass Codes to Phone 1. Sel #2 = 1 Reports Emergency and Duress Codes on Phone 2. Remote Telephone Access. "Tel-Remote" is enabled by selecting a "7" in this location. When enabled the system status may be interrogated and/or changed remotely by telephone. This feature is NOT TO BE USED with "Defeat Lockout". NOTE: Auxiliary codes can be sent to more than one phone number, if desired. 21 STEP 82 201 SILENT ZONES (1-6) Select zones to be programmed for silent panic. Whether the panel is armed or disarmed, the system or keypad will not annunciate or display an alarm condition on a silent zone. When a zone is programmed with a reporting code and no zone type, the zone will be a silent zone with display at the keypad. ZONE CONFIGURATIONS STEP 74 193 FAST RESPONSE ZONES (1-6) Select zones which will use the Fast Zone Response Time programmed in location 126. STEP 75 194 RESTORE ZONES (1-6) Select zones which will report restorals. A restore is defined as a return to normal after a zone has been previously in alarm. If a burglary zone is tripped, a restore report will be transmitted when the zone is restored and the bell has silenced either with the system being disarmed or at time-out. 24-hour zones such as Fire, Audible Panic, Silent, or a Silent Panic will transmit the report directly after the zone restores. STEP 83 202 CHIME ZONES (1-6) Any combination of zones may be selected for chime. The keypad will briefly annunciate when a chime zone is violated (zone must be disarmed) and again when the zone restores. STEP 84 203 DAY/NIGHT ZONE (1-6) Burg zones may be selected to display trouble conditions. Fire zones are automatically enabled to display trouble. Burglary zones indicate trouble when violated while disarmed. STEP 76 195 REPORTING DELAY ZONES (1-6) Select the zones which will delay before dialing out to the receiver. If an alarm signal on a silent 24-hour delay zone restores prior to expiration of the delay time, the zone will not report out. But, 24-hour audible zones will latch until the system is disarmed. For burglary zones, the panel must be disarmed during the delay in order to abort the report. NOTE: These zones must be programmed for audible burglary as well in memory location 197. STEP 85 204 TROUBLE REPORTING ZONES (1-6) Fire and Burglary-day/night zones selected to report a trouble condition. Burglary day/night zones will report trouble when violated while disarmed. Fire zones report trouble when an open in a fire loop is detected. Reporting Code selected in Memory Location 101 will be reported. STEP 77 196 BYPASS ZONES (1-6) Select those zones allowed to be bypassed. A bypassed zone is a disabled zone when the system is armed. MISCELLANEOUS PANEL SELECTION GROUPS 1 &2 NOTE: It is strongly recommended that fire zones not be enabled for bypass. STEP 86 205 FUNCTION SELECT GROUP 1 Use the following chart to set the first system function group: 1 No EOL present 2 Call back security 3 Installer Privacy code 4 50 hertz AC 5 Chime Enabled 6 No Exit Annunciation 7 Latched fire bell 8 User #7 Duress Code STEP 78 197 AUDIBLE BURGLARY ZONES (1-6) Select zones to be programmed for audible burglary. These zones are on when armed and not bypassed. STEP 79 198 ENTRANCE/EXIT ZONES (1-6) Select zones to be programmed for Entrance/Exit delay. These zones must then be programmed into Location 185. 1) When selected, only closed circuit burglary zones can be used because the panel will consider a short on the zone to be the normal condition and a open to be alarm. 2) When Up/Downloading, the following sequence occurs: a. The Computer calls the remote system. b. The SP850 acknowledges the call and hangs up. c. The remote system then calls back the Computer (using the third telephone number) to perform the Up/Download operation. 3) When selected, the P1 jumper (located on the system circuit board) is no longer able to change the Installers access code it now changes user code #1. 4) Select this feature when the system is powered from 50Hz AC source (i.e., European installations). 5) Select this feature to enable chime operation. 6) Select this feature to defeat the exit annunciation. 7) When this feature is selected, the access code must be used to shut-off the fire bell. 8) User Code #7 used as Duress Code. This is the way to provide the Duress feature. NOTE: These zones must be programmed for audible burglary as well in location 197. STEP 80 199 AUDIBLE 24 HOUR FIRE ZONES (1-6) Select zones to be programmed for audible fire. Zones selected for audible fire are always armed. NOTE: It is strongly recommended that fire zones not be enabled for bypass. STEP 81 200 AUDIBLE 24 HOUR ZONES (1-6) Select zones to be programmed for audible alarm. Zones selected for audible alarm are always armed unless bypassed. 22 STEP 87 206 FUNCTION SELECT GROUP 2 1 Auto bell test 2 No F/C kypd trouble 3 DTMF tone dial 4 European rotary dial 5 5-7 sec. DOB output 6 Disable Ring Back 7 Smoke reset 8 Inhibit Arm Display STEP 89 208 BYPASS GROUP 1 If desired, bypassable zones can be grouped together to allow bypassing with a minimum of keystrokes. Program the desired zones. RESERVED PROGRAM LOCATIONS 1) Causes a short 2-3 second bell output when system is armed. 2) Disables Failure to Communicate annunciation at keypad. 3) When selected, enables Tone dialing. When this function is not programmed, the system defaults to rotary dialing. 4) Enable European rotary dialing (70 millisecond break and 30 millisecond make timing). If not selected, the system defaults to standard 60/40 make break rotary dialing. 5) Enables 5-7 second output on DOB board. 6) Disables Ring Back feature which acknowledges a successful signal transmission. 7) Select this digit to enable smoke reset from the keypad. To reset, press 1 and 3 key simultaneously. (WARNING Keypair [1&3] will not report when this is selected.) 8) Select to allow the LED keypad to "Blank Out" and/or the LCD keypad to only show the Ready state after the Exit time is over. Locations 209 through 216 are reserved for use by the control panel microprocessor. This listing is for reference use only. 209 RESERVED BELL STATUS, ETC. 210 NOT USED 211 RESERVED EXIT DELAY & INSTANT STATUS 212 RESERVED ZONE 1..6 ARM STATUS 213 RESERVED ZONE 1..6 ALARM MEMORY 214 NOT USED 215 RESERVED UNREPORTED ZONE ALARM EVENTS 216 ZONE 1..6 VIEW HISTORY STEP 88 207 EMERGENCY KEY PAIR BELL ENABLE (1-8) If programmed, each emergency key pair can activate one or both types of bell operation. In single bell operation, the Fire bell has priority. Use the following table to select type of operation. For silent operation leave these locations blank. Key pair 1 & 31 4&6 7&9 *&# Burglar 1 2 3 4 Fire 5 6 7 8 1 If Smoke Reset is selected in LOC 206, Emergency Pair [1&3] will not work for Burglary or Fire Outputs. 23 SEC 6: LIMITED WARRANTY WARRANTY AND LIABILITY LIMITATIONS AND DISCLAIMER LIMITED WARRANTY Sentrol, Inc., warrants to the purchaser that under normal use and service, its products will be free from defects in material and workmanship for twenty-four (24) months from the date of manufacture of the products. Sentrol Inc.s warranty obligation is limited to repairing or replacing (at Sentrol, Inc.s sole option) equipment which has been, during the warranty period and not more than thirty 30 days after discovery, reported to Sentrol, Inc., as defective in material or workmanship and is so found to be by Sentrol, Inc., upon inspection. For the purposes of this Warranty, Purchaser refers to wholesale purchaser, installer and retail purchaser. Retail purchaser must, however, in the case of defect, contact the person or entity who installed and maintains the product who in turn should contact Sentrol, Inc., in accordance with the terms of this Limited Warranty. Examination and repair or replacement of such equipment will, be performed at Sentrol, Incs. facilities located in Hickory, North Carolina, with no charge to purchaser for service time expended, except as otherwise stated in this Warranty Limitations and Disclaimer. Equipment to be examined, replaced or repaired at Sentrol, Inc.s facilities must be returned to Sentrol, Inc., by purchaser within the warranty period, insurance and transportation charges prepaid. Prior to the return of the equipment, wholesale purchasers or installers shall obtain a return authorization number from Sentrol, Inc.s Customer Service Department. Retail purchasers are to contact the person or entity who installed and maintains the product. Under no circumstance with Sentrol, Inc., be responsible for expenses or labor incurred in removing and reinstalling its products from the retail purchasers location. If examined equipment is found not to be defective or is not for some other reason within the warranty coverage, Sentrol, Inc.s service time expended will be charged to purchaser. Purchaser shall be responsible for all maintenance, service, replacing expendable parts, making minor adjustments and performing operating checks, all in accordance with procedures outlined in Sentrol Inc.s operation manual. This Warranty shall not apply to any product failure that results from purchasers failure to properly maintain, service, adjust, inspect and test the product in accordance with Sentrol, Inc.s operation manual. WARRANTY LIMITATION AND EXCLUSION The repair or replacement of any product under this Warranty Limitation and Disclaimer shall in no event extend the term of the warranty beyond the original term set forth herein. Sentrol, Inc., will have no further warranty obligation under this agreement if the equipment is subject to tampering, abuse, misuse, electronic disruption, negligence, accident, flood, fire, acts of God, improper installation, application or programming, improper maintenance or repair, alteration, repair or installation by an unauthorized installer or repair facility, improper storage, transportation or handling, or if purchaser fails to perform any of the procedures set forth in this manual, specifically, the equipment must have been installed in accordance with the instructions and operated in accordance with the instructions. In particular, the unit must be programmed for regular test and the tests must be conducted on a regular basis, but no less often than once per week. This Warranty does not apply to components or parts manufactured by any person or entity other than Sentrol, Inc. Any repair or replacement of product within this Warranty must be performed by Sentrol, Inc. DISCLAIMER OF WARRANTIES THE WARRANTY PRINTED ABOVE IS THE ONLY WARRANTY APPLICABLE TO THIS PURCHASE. ALL OTHER WARRANTIES, EXPRESS OR IMPLIED, INCLUDING, BUT NOT LIMITED TO, THE IMPLIED WARRANTY OF MERCHANTABILITY AND FITNESS FOR A PARTICULAR PURPOSE ARE DISCLAIMED. NO OTHER PERSON OR ENTITY HAS BEEN AUTHORIZED BY SENTROL, INC., TO MODIFY OR CHANGE THE TERMS OF THIS WARRANTY. ANY AFFIRMATION OF FACT OR PROMISE MADE TO THE PURCHASER WHICH RELATES TO THE GOODS SOLD UNDER THIS AGREEMENT SHALL NOT BE REGARDED AS A PART OF THE BASIS OF THE BARGAIN AND SHALL NOT BE DEEMED TO CREATE AN EXPRESS WARRANTY THAT THE GOODS SHALL CONFORM TO THE AFFIRMATION OR PROMISE. ANY DESCRIPTION OF THE GOODS SOLD UNDER THIS AGREEMENT SHALL NOT BE REGARDED AS A PART OF THE BASIS OF THE BARGAIN AND SHALL NOT BE DEEMED TO CREATE AN EXPRESS WARRANTY THAT SUCH GOOD SHALL CONFORM TO THE DESCRIPTION. SENTROL, INC., DOES NOT WARRANT THAT THE PRODUCT WILL MEET OR COMPLY WITH THE REQUIREMENTS OF ANY SAFETY CODE REGULATION, STATUTE OR ORDINANCE OF ANY STATE, MUNICIPALITY OR OTHER JURISDICTION. LIMITATION OF LIABILITY SENTROL, INC., DOES NOT, BY WAY OF THIS LIMITED WARRANTY OR IN ANY OTHER MANNER, WARRANT OR GUARANTEE THAT THIS PRODUCT WILL PREVENT PERSONAL INJURY OR PROPERTY LOSS. PURCHASER SHOULD TAKE ALL REASONABLE AND AVAILABLE PRECAUTIONS IN PROTECTING HIS OR HER SAFETY. IT IS UNDERSTOOD AND AGREED THAT SENTROL, INC.S LIABILITY WHETHER IN CONTRACT, IN TORT, UNDER ANY WARRANTY, IN NEGLIGENCE OR OTHERWISE, SHALL NOT EXCEED THE RETURN OF THE AMOUNT OF THE PURCHASE PRICE PAID BY PURCHASER AND UNDER NO CIRCUMSTANCES SHALL SENTROL, INC., BE LIABLE FOR SPECIAL, INDIRECT OR CONSEQUENTIAL DAMAGES. THE PRICE STATED FOR THE EQUIPMENT IS A CONSIDERATION IN LIMITING SENTROL, INC.S LIABILITY. NO ACTION, REGARDLESS OF FORM, ARISING UNDER THIS WARRANTY MAY BE BROUGHT BY PURCHASER MORE THAN ONE (1) YEAR AFTER THE CAUSE OF ACTION HAS ACCRUED. This Limited Warranty gives you specific legal rights and you may also have other rights which vary from state to state. Some states do not allow limitation on how long an implied warranty will last or the limitation or exclusion of incidental or consequential damages, so the above limitations or exclusion may not apply to you, if not allowed by law. Should purchaser have any questions with regards to this Warranty and Liability Limitations and Disclaimer they should contact Sentrol, Inc., 1510 Tate Boulevard, Hickory, North Carolina 28601, 1(800)-800-2626.