1
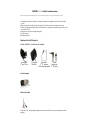
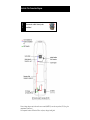
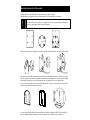
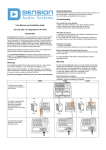
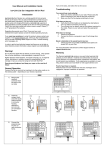
Installation Guide
for BMW
iceLink: Plus for BMW - Installation Guide
This instruction is provided for educational purpose only, we are not responsible for any damages ! Always seek professional help when in doubt !
1.Confirm that you have all Dension ice>Link parts and they are compatible with your vehicle and radio
system.
2.Make sure to have the radio security code in handy if the vehicle requires code upon loss of power.
3.Follow the hardware installation guides. If radio removal is required, proceed following the factory service
guide of the vehicle.
4.Configure the system [see configuration guide]
5.Verify operation
6.Read users manual
Dension ice>Link Plus parts:
iPod side CRADLE or CABLE (only one included):
iPod cradle
3rd and 4th Gen
iPod cradle
Mini iPod
Dock cable
3rd, 4th, mini and
Photo iPod compatible
Cable
Classic and
2nd Gen iPod
Ice>Link adapter
Vehicle side cable
Actual cable will vary depending on application! An extension cable may be part of the package for some
packages.
Ice>Link: Plus Connection Diagram
!
Disconnect the vehicle’s battery before
installation!
Factory changer harness may be located in center console (BMW X3), near the rear speakers (Z3, Z4) or glove
compartment (Land Rover).
For component location call Dension USA or see factory changer install guide.
Mounting the ice>Link: Plus cradle
Assemble the base of the iPod cradle with an optional vehicle specific adapter.
Optional adapter is not required, however recommended for easy and damage free installation.
!
NEVER install any object in the way of airbags! The force of an opening airbag can launch any
object in it’s path with sufficient force to kill someone!
Attach the cradle to the back with at least 2 screws. If holes do not align rotate the base until a match is found.
Insert the front of the cradle to the back piece, but do not force the cradle onto the base. The pin is keyed and
will only insert in one orientation. Align cradle orientation as desired. Tighten the set screw with the included
Allen wrench. Do not drive the set screw through the pin, only tighten the screw so it grabs the pin.
Once set, the cradle should not be forced to a different position. To adjust, first loosen the set screw, tilt and
rotate to realign, and then fasten the screw again.
A variety of spacers and rubber pads are included to provide the best support for the iPod. These are held in
place by a double sided tape, and may be removed by the end user if a thicker iPod is used later on.
Vehicle Specific Connectors
BMW_R17
Disconnect 3 pin and 6 pin plugs from rear of CD changer (if fitted).
Remove existing 17 pin plug from back of head unit. Attach 17 pin socket on
breakin/breakout harness to this plug. Attach new 17 pin plug to back of head unit. Insert
12-pin microfit connector to ice>Link:iPod interface.
Attach 10 pin CD audio connector to bottom left socket on rear of head unit. If the head
unit already had a connector in this socket with more than 4 wires, splice the cables on the
ice>Link:iPod 10 pin connector to the corresponding cables on the existing connector. If
the head unit had a connector in the bottom right socket on the rear of the head unit,
reattach this to the rear of the head unit.
BMW and Rover vehicles with satellite navigation have the head unit in the rear of the car
near the CD changer. You will need to install the ice>Link:iPod 12 pin microfit extension
cable in this type of vehicle.
Vehicles with DSP (typically E39 5 series) will require optional A/D convertor.
Black wire needs to be grounded.
BMW_R40
Disconnect 3 pin and 6 pin plugs from rear of CD changer (if fitted).
Remove existing quadlock plug from back of head unit. Attach quadlock socket on
breakin/breakout harness to this plug. Attach new quadlock plug to back of head unit.
Insert 12-pin microfit connector to ice>Link:iPod interface.
Attach 12 pin CD audio connector to bottom left socket on rear of head unit. If the head
unit already had a connector in this socket with more than 4 wires, splice the cables on the
ice>Link:iPod 12 pin connector to the corresponding cables on the existing connector. If
the head unit had a connector in the bottom right socket on the rear of the head unit,
reattach this to the rear of the head unit.
BMW and Rover vehicles with satellite navigation and all Range Rovers have the head unit
in the rear of the car near the CD changer. You will need to install the ice>Link:iPod 12
pin microfit extension cable in this type of vehicle.
Range Rover with digital audio output from the CD changer will require optional A/D
converter.
BMW_T &
BMW_T DSP
Attach the 3 and 6 pin sockets to corresponding plug to the factory changer harness. This is
only for vehicles with factory changer harness.
If DSP is present: Attach the 3 socket and coaxial cable plug located on the factory changer
harness to the DSP converted box. This is only for vehicles with factory changer harness
and premium audio with DSP connection.
Do not use the 3-pin connector with the brown wire in the middle.
BMW_SAT
Locate OEM BMW satellite module. Remove rubber cap from 10-pin connector located on
top of satellite module and insert Dension provided 10-pin ice>Link connector. Connect
12-pin microfit connector to 12-pin extension cable if required or to ice>Link adapter.
Only for OEM BMW satellite module.
Troubleshooting
If iPod does not charge 1. Check all connections.
2. Make sure that charge control is not turned off (see user’s manual pages 11 and 12).
3. Connect the iPod to a computer to see if it will charge from there.
If you can not hear music playing 1. Make sure CD changer, SAT mode, or AUX is selected on your radio; the correct key will depend on
your radio system and the installation type
2. Make sure that an album or playlist is selected on the iPod.
If you can not switch your radio to CD changer mode 1. Check cables to make sure everything is tight.
2. Remove the fuse of the radio, wait for 30 seconds, and then reinsert the fuse. This will reset your
radio and the interface. You may have to enter the radio security code, so please keep it handy.
3. Consult with your installer or contact your local Dension support center.
If you can not control the iPod from the radio 1. Make sure the firmware on your iPod is the most recent. For updates please visit
www.apple.com/ipod
2. Reset the iPod - hold the center button and the Menu buttons until iPod reboots.
(Resetting will not erase your music, it will only restart the operating system of the iPod.)
If iPod does not turn on 1. Verify that the iPod’s battery is not depleted by attempting to turn it on without connecting it to the
car.
2. Turn off both your car stereo, and the iPod before inserting it to the cradle. Power on your radio and
select the appropriate source.
If the music is distorted or the sound level is too low 1. Check and make sure all EQ and BASS boost options are turned OFF on your iPod.
2. Make sure the Gain control is adjusted properly on the ice>Link, located under ice>Link setup.
Why is the menu size small on the iPod photo?
1. iPod photo has a high resolution screen, and therefore everything appears smaller.
2. At the time of development, iPod photo specifications were not available. A future firmware upgrade
may enlarge menu size.
!
Please make sure that you connect the plug and the receptacle in the right orientation and that the
housing latches to ensure tight retention.
Incorrect
Correct
Disclaimer / FCC Information / Warranty and Support
Important Disclaimer, please read !
Driving is dangerous and requires concentration. Do not allow the Apple iPod to distract you from prevailing traffic conditions. If in
doubt, only operate the unit when stationary or ask a passenger to operate it for you.
Do not submerge or expose to water or other fluids. ice>Link is NOT water proof and it will be damaged by water.
You must properly insulate its casing if your installation environment may subject the unit to water, such as a convertible vehicle.
Keep away from children !
The ice>Link cradle can be broken, or disassembled, and components may become loose from vibration and heat. Small components
and packaging materials may become choking hazard when handled by children.
Unauthorized reproduction, or reverse engineering is strictly prohibited ! Intellectual property included is distributed under specific of
general agreement with respective vendor(s). No warranty, explicit or implied is stated, and neither Dension USA, nor any of its
distributors, dealers or vendors shall be liable for damages. IN NO EVENT SHALL DENSION USA'S LIABILITY EXCEED THE
PRICE PAID FOR THE PRODUCT FROM DIRECT, INDIRECT, SPECIAL, INCIDENTAL, OR CONSEQUENTIAL DAMAGES
RESULTING FROM THE USE OF THE PRODUCT, ITS ACCOMPANYING SOFTWARE, OR ITS DOCUMENTATION.
Dension ice>Link is a registered trademark of Dension Audio System LTD, and/or Dension USA, Inc. All other products are
registered and copyrighted by their respective owners.
FCC Instruction to the user
This equipment has been tested and found to comply with the limits for a class B digital device, pursuant to part 15 of the FCC Rules.
These limits are designed to provide reasonable protection against harmful interference in a residential installation. This equipment
generates, uses and can radiate radio frequency energy and if not installed and used in accordance with the instructions, may cause
harmful interference to radio or television reception, which can be determined by turning the equipment off and on, the user is
encouraged to try to correct the interference by one or more of the following measures:
o
Reorient or relocate the receiving antenna.
o
Increase the separation between the equipment and receiver.
o
Consult the dealer or an experienced radio/TV technician for help.
This equipment has been verified to comply with the limits for a class B computing device, pursuant to FCC Rules. In order to
maintain compliance with FCC regulations, shielded cables must be used with this equipment. Operation with non-approved
equipment or unshielded cables is likely to result in interference to radio and TV reception. The user is cautioned that changes and
modifications made to the equipment without the approval of manufacturer could void the user's authority to operate this equipment.
Warranty and Support
The Dension ice>Link Plus carries a one year limited warranty that protects you from defects in material and workmanship of
products sold by Dension USA or its authorized agents, distributors and dealers. We do not warrant any installation. If you experience
any problem or need help, please contact Dension USA support at www.densionusa.com , or by phone at (562)- 595-5143. To order
accessories, call us at (562) 595-5153.
Proof of purchase is required.
Warranty does not cover normal tear and wear, damages due to negligence, improper installation or operation.
End-User Install Certificate
Consumer
Installer
Name:
Address:
Name:
Address:
Phone:
Product:
Firmware Version:
Mark location of components here.
Customization Performed