1
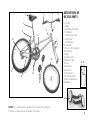
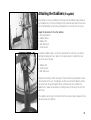
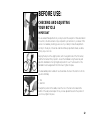
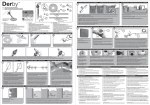
JUNIOR
ATB
OWNER’S MANUAL
& MAINTENANCE
GUIDE
3
2
4
5
1
6
6
17
13
7
16
8
7
10
15
12
14
11
9
DESCRIPTION OF
BICYCLE PARTS
1. Seat Post
2. Saddle
3. Front Brake Lever (right)
4. Handle Bars
5. Rear Brake Lever (left)
6. Brake Cables
7. Front Reflector
8. Brake Pads
9. Fork Protector (Packaging)
10.Front Wheel
11.Pedals
12.Pedal Arm (left)
13.Pedal Arm (right)
14.Chain
15.Rear Wheel
16.Rear Axle
17.Rear Reflector
18.Multi-sized Spanner
19.Allen (Hexagonal) Key
20.Stabilisers
18 19
20
NOTE: This is a general guide for assembly of all Universal Junior ATB Bicycles.
Therefore, not all parts pictured are available on all models.
1
CONTENTS
DESCRIPTION OF BICYCLE PARTS 1
CONTENTS
2
SAFETY
3
ASSEMBLY:
5
Unpacking Your Bicycle
Attaching the Stabilisers (if supplied)
Attaching the Handlebars
Attaching the Saddle
Attaching the Pedals
5
6
7
8
11
BEFORE USE:
12
Checking and Adjusting your Bicycle
User Precautions
Using your Bicycle
12
13
15
AFTER USE:
16
Maintenance
Replacement Parts / Spares
16
22
2
SAFETY
Good Cycling is Safe Cycling
When riding keep to the left of the road (in
United Kingdom).
• Know and observe all laws appertaining to bicycles (the Highway
Code).
• Always hold the handlebars and keep your feet on the pedals.
• Slow down at road junctions and look both ways before crossing.
• Give clear hand signals in good time to warn other road users of
your intentions.
• Give way to pedestrians and to motor vehicles.
• Watch out for vehicles pulling in or out of traffic and for doors
opening on parked cars.
• Always use bike paths or cycle tracks when available.
• Wet Weather and icy conditions can affect the efficiency of the
brakes. Therefore speeds should be reduced to a minimum and
water dispelled from the braking surfaces by applying the brakes well
in advance of anticipated stops.
• On unpaved roads or footpaths, take care to ride at a speed to suit
the conditions. Be particularly careful when riding on uneven
surfaces, loose sand and gravel. Watch out for pot holes.
• Do not ride more than two abreast. Ride in single file on busy or
narrow roads.
• Do not weave or swerve in and out of traffic.
• Do not hang anything over the handlebars, as this will impede the
steering of the bicycle.
• Do not hold onto another vehicle or cyclist.
• Do not ride too close behind another vehicle.
• IMPORTANT: Have a sounding device (i.e. a bell or horn) fitted
to our bicycle to warn others of your approach.
• Wear suitable clothing. This includes an approved helmet.
• If in doubt about the efficiency of your brakes, or the comfort of your
riding position, ask your dealer to make the necessary adjustments.
• If the handlebar grips become loose, ask your local service dealer to
secure them with a suitable adhesive or replace them. Do not ride
with loose hand grips.
Cycling at Night
• For your safety and protection, it is a legal requirement to have a
front white light and a rear red light, in addition to front, side and
pedal reflectors which must be
(a) Firmly secured in the correct position
(b) Clean at all times
(c) Clearly visible at all times
(d) Replaced if damaged
• Reduce speed when it is dark. Hazards are much harder to see.
• If possible, ride on roads and paths that are familiar to you. Terrain
that is unfamiliar may be dangerous at night.
• Whenever possible use well lit roads.
• It is a good idea to wear bright/reflective clothing and a helmet for
night time riding.
3
IMPORTANT
READY FOR THE ROAD
Few things equal the thrill of owning a brand new UNIVERSAL bicycle, especially a
handsome precision built, high quality machine like yours. We, its manufacturers are very
proud of it. It is the product of many years research and development and we are confident
that, with reasonable care and regular maintenance (see page 16) - oiling, cleaning, checking
and adjusting, it will give you many years of enjoyable cycling. In the pages which follow, we
describe (with the help of a few simple pictures and diagrams) how to enjoy your bicycle
and how to keep it in a safe operating condition, and ready for riding at all times.
WARNING
It is important to read this Owners Manual thoroughly, noting in particularly the assembly
and working instructions, safety checks and maintenance details. Failure to observe these
could expose the rider to risk of injury and may damage the bicycle.
4
ASSEMBLY
IMPORTANT
UNPACKING YOUR BICYCLE
Completely remove the staples from the carton and discard. Remove all components and
carefully examine the carton for any remaining loose parts. Identify all components
before starting to assemble. Keep all plastic bags out of the reach of children and dispose
of at once. Fully assemble the bicycle before discarding the carton.
5
Attaching the Stabilisers (if supplied)
5 4
Ensuring that your bicycle is standing on a flat surface, slide the stabiliser bracket, followed
by the stabiliser arm, onto the protruding end of the rear wheel axle. Attach the outer axle
nut by hand and tighten using the multi-sized spanner. Do not loosen the inner axle nut.
1
2
3
Repeat this procedure for the other stabiliser.
1. Multi-Sized Spanner
2. Stabiliser Wheel
3. Stabiliser Arm
4. Rear Wheel Axle
5. Outer Axle Nut
To adjust the stabiliser height, use the multi-sized spanner to loosen the outer axle nut,
and slide the stabiliser arm up or down into the desired position. Re-tighten the outer
axle nut to secure into place.
3
2
1
1. Stabiliser Arm
2. Outer Axle Nut
3. Rear Wheel Axle
Initially, when teaching a child to ride a bicycle, there should not be a great deal of side to
side movement of the cycle. The stabilisers should be set so that both stabilisers and the
rear wheel touch the ground together. When a child becomes more confident, the
stabiliser arms / wheels can be raised so increasing the amount the bicycle can rock from
side to side.
If the stabilisers are removed, it is important that the outer axle nuts are replaced onto the
rear axle and securely tightened.
6
ATTACHING THE HANDLE BARS
1. Expander Bolt
2. Wedge Nut
3. Head Tube
4. Handlebar Stem
1
4
Ensuring that the brake cables do not tangle and that the forks are facing forwards,
(curving away from the frame / bike) gently lower the handlebar stem into the headset /
head tube.
2
3
1. Handlebars
2. Allen Key (Hexagonal Key)
1
Ensuring that the handlebars are inserted beyond the minimum insertion mark, set the
handlebars at the required height and use the allen key to secure into place.
2
7
ATTACHING THE SADDLE
1
1. Saddle
2. Seat Post
3. Spanner
4. Seat Clamp Nut
5. Allen Key (Hexagonal Key)
4
3
2
Firmly push the narrow end of the seat post into the hole on the underside of the saddle,
and tighten using the spanner.
Insert the seat post (with saddle attached) into the main frame ensuring that it is inserted
beyond the minimum insert mark.
1
Fasten into place using the allen key to tighten the clamp bolt.
2
5
8
ATTACHING THE FRONT WHEEL
2
1. Fork
2. Fork Protector
1
Turn the cycle upside down so it is resting on its saddle and handlebars. Remove the fork
protector from the fork drop outs.
1. Fork
2. Front Brake Blocks
3. Pinch Bolt Nut
1
Using the multi-sized spanner, loosen the pinch bolt nut on the front brake to allow
enough room between the brake blocks for the front wheel to slide between. This can
also be accomplished by letting some air out of the front tyre and squeezing the tyre with
your fingers in between the brake blocks.
2
3
9
1. Axle Nut
2. Wheel Retention Washer
3. Fork
1
2
3
Remove the axle nuts and washers from the front wheel axle and firmly insert the wheel
between the fork so that it rests securely in place. Replace the wheel retention washers
and axle nuts making sure the retention washers are hooked into the locating holes in the
front dropouts (see picture and diagram). Ensure the front wheel is central in the forks
and it turns freely. Securely tighten both axle nuts.
Drop Out
Fork
Hub
Axle
Axle Nut
Wheel Retention
Washer
Using the multi-sized spanner, re-tighten the nut on the front brake to secure into position.
10
L
ATTACHING THE PEDALS
R
L - Left Pedal
R - Right Pedal
The right pedal arm is on the chain side.
The left pedal arm is on the opposite side.
The pedal marked R must be fitted to the right pedal arm.
The pedal marked L must be fitted to the left pedal Arm.
WARNING: Attempting to attach the wrong pedal into the pedal arm side may result in
damaging the thread.
Ensuring that you are inserting the correct pedal into the correct side, screw each pedal
by hand into the pedal arm.
The right pedal has a normal thread and screws on in a clockwise direction.
The left pedal has a left hand thread and screws in an anti-clockwise direction.
Ensure both pedals are securely tightened.
2
1
1. Multi -sized Spanner
2. Right Pedal Arm
3. Left Pedal Arm
4. Left Pedal
3
4
11
BEFORE USE:
CHECKING AND ADJUSTING
YOUR BICYCLE
IMPORTANT
You are advised that adjustments to your bicycle (with the exception of those described in
this section) should be carried out by a competent cycle mechanic or your dealer. If this
service is not available, providing you are sure of your ability to make the adjustments
correctly to the bicycle, it should be understood that any adjustments made, would be
entirely at your own risk.
Keeping the bicycle in the upright position, with one leg either side of the front wheel,
hold the front wheel firmly in position. Loosen the handlebars using the allen key and
adjust the handlebars to the right height and position for use. The mid-section of the
handlebars must be aligned with the front wheel. Tighten into place.
The ideal saddle position suitable for use should allow the toes of the rider to touch the
ground comfortably.
1. Nut
2. Seat Post
2
1
To adjust the position of the saddle, loosen the nut on the main unit situated at the
bottom of the seat post and adjust. Once you have adjusted the seat to the position of
your choice, tighten into place.
12
1. Brake
2. Brake Cable
3. Handlebars
3
Before riding the bicycle for the first time, ensure that the brakes are working.
Gently roll the bicycle backwards and forwards and test that each brake works individually.
1
2
To obtain the best performance from your bicycle, check the tyre pressure by squeezing
each tyre between your index and middle finger and thumb. The tyre should feel firm, if
necessary pump air into it. Refer to the manufacturers recommendations as shown on the
tyre sidewall.
Your Universal Bicycle is now ready for use.
13
USER PRECAUTIONS
Before Use Always Carry Out A Safety Check
(1) Ensure that all nuts and bolts are firmly fastened.
(2) Check that the front and rear wheels rotate smoothly, and there are no visible defects.
(3) Check for correct operation of both front and rear brakes.
(4) Check alignment of handlebar and saddle. Check for correct height and make sure
they are both secure.
(5) Check that all parts are assembled correctly and are not faulty.
• Ensure you are appropriately dressed.
• Never allow more than one rider to use your bicycle at one time.
• It is essential that you always look in the direction the bicycle is travelling and take care
to avoid pedestrians and unforeseen obstructions.
• When re-adjusting the handlebars or seat, pay particular attention to the minimum
insertion marks.
• Routine safety checks and regular maintenance must be carried out. Remember the
more frequently and harder a cycle is used, the more frequently maintenance checks
should be carried out.
• Always remember that the braking efficiency of a bicycle decreases in wet conditions.
WARNING: A hard impact or crash can put unusually high stresses and strains on
bicycle components. This may lead to premature failure and therefore loss of control.
Following a hard impact or crash carefully check your bicycle, or better still, take it to your
Universal Dealer for a thorough check.
ALWAYS REPLACE SUSPECT COMPONENTS.
14
USING THE BICYCLE
Ensure you are comfortably seated on the fully assembled and checked bicycle. You must
be able to touch the ground with both feet whilst seated on the saddle.
The best riding position is the one which gives you greatest comfort consistent with good
balance. No two people ride alike but the following hints should help you find the most
comfortable, safe and efficient position.
Correct saddle height is most important. This position can usually be determined by fully
extending the leg (when seated on the saddle) and placing your heel on the pedal with the
pedal at its lowest point. This allows for the most efficient use of the thigh muscles and
makes riding easy. The saddle should be horizontal or with the nose tilted slightly upwards.
The position of the handlebar should be set to allow a comfortable riding position.
Your weight should be balanced so that your hands rest lightly on the handlebars.
This prevents strain on the wrists and forearms when pedalling. If the angle of the
handlebar is adjusted, remember to re-tighten the handlebar securely.
15
AFTER USE
MAINTENANCE
1. Axle nut
A. Lock Nut
B. Cone
1
A
B
NOTE: It is recommended that your bicycle has a regular maintenance check every six
months carried out by your Universal Dealer to ensure that it is operating in perfect
running order.
Frequent inspections should be carried out to ensure that all nuts, bolts and hardware are
secure and that no parts are worn or damaged.
Bearing Adjustment: The cones of all bearings should be regularly checked to ensure
they are smooth and free from excessive play. If excessive side play occurs at the wheel
rim; loosen the axle nuts, loosen the cone lock nut “A” and adjust Cone “B” with the
multi-sized spanner. Tighten lock nut “A” and tighten the axle nut.
Brake: Ensure that the brakes operate smoothly without locking or grabbing when
applied. Make periodic checks for wear and tear. Worn brake blocks and damaged brake
cables MUST be replaced immediately. For the best results use the exact manufacturers
replacement parts.
NOTE: Hard braking greatly reduces the tyre and brake block life.
16
Calliper Brake: Brake callipers should function freely and release fully. If callipers bind we
recommend the following sequence of checks:
C
B
A
E
1. Make sure the brake lever and lever pivot operate smoothly. They should be clean
and lightly lubricated.
2. The inner brake cable must move freely within the outer brake cable. Inner brake
cables must be oiled or greased periodically.
3. Brake callipers should function freely. If the callipers are tight, adjustment of the brake
centre pivot bolt may be required. Using 2 suitable 10mm spanners, hold the inner
pivot nut (C) steady with one, and loosen the outer pivot nut (D) with the other.
Carefully turn the inner pivot nut anticlockwise (loosen) until the callipers do not bind
BUT ARE NOT LOOSE. Hold the inner nut (C) in this position and tighten the outer
nut (D) so that both nuts are locked together.
D
F
If the brake lever travel becomes excessive, loosen nut (A) and unsrew adjuster (B).
This will bring the brake blocks closer to the wheel rim. When adjusted, lock nut (A)
against the brake arm.
NOTE: Should one brake block (F) make contact with the wheel rim before the other,
the brake can be centralised. Using a hammer and a suitable punch, tap the return spring
(E) on the opposite side to the calliper/brake block that touches the rim first.
CHECK HERE
OIL
OIL
Chain: The chain should have approximately 10mm (3/8”) of vertical movement when
checked in the centre between the front and rear sprockets. To adjust the chain tension,
slightly loosen the rear axle nuts and either pull the rear wheel backwards if the chain is
too loose, or push it forwards if the chain is too tight. Before securely re-tightening the
rear axle nuts make sure that the chain is correctly tensioned and the rear wheel runs
centrally. Oil your chain sparingly once a month by revolving the pedal cranks and apply
to each link. Wipe away excess oil with a dry cloth.
Every 6 months you should fully remove your chain from the bicycle and clean
thoroughly using paraffin. Dry the chain with a clean lint free cloth and lubricate as
instructed. If your bicycle is exposed to sandy or dusty environments regularly, more
frequent cleaning may be required.
17
Cleaning: Your bicycle should be cleaned with warm soapy water (except the chain).
Rinse with clean water and dry with a soft clean cloth, afterwards oil the bicycle in the
appropriate areas.
On synthetic enamels use a good wax polish.
Handlebars: Adjust for comfort and a proper fit. Make sure that a minimum distance of
2.5” (65mm) is inserted into the headset. Securely fasten the handlebar bolt and
nut/expander bolt. Replace any worn grips.
Lubrication: To ensure that the bicycle remains in good working order, moving parts
should be regularly lubricated.
The front hub, rear hub and headset are lubricated prior to leaving the factory. Correct
further lubrication requires disassembly, cleaning and re-packing and should be done by a
qualified bicycle mechanic.
However, using a light oil or WD40 type lubricant, you may periodically oil the chain, rear
wheel sprocket, brake calliper pivots, front and rear wheel bushes, bottom bracket
bushes and headset bushes.
The calliper pivots can also be lightly oiled, but care must be taken to keep the lubricant
away from the brake blocks and wheel rims.
To avoid over lubricating, do not oil where lubricant is still evident from the previous
maintenance. Should you accidentally over lubricate, wipe clean any excess.
WARNING: Surplus oil can run down spokes and damage tyres.
NOTE: When storing your bicycle for prolonged periods, smear any chrome plating with
a light grease.
18
Punctures: Inner tube punctures can be caused by careless riding over sharp stones,
holes in the road or by hitting curb stones.
In the event of a puncture the tyre should be completely removed. With the inner tube
deflated, push the tyre to the centre of the rim. Carefully hook a tyre lever (not supplied
with the bicycle) under the edge of the tyre and gently lever the tyre bead over the edge
of the rim. Repeat this procedure with a second tyre lever positioned a few inches away
from the first one. It should now be possible to pull the complete side of the tyre off.
Push the valve back through the rim and remove the inner tube. Finally, remove the tyre.
Carefully check the inside of the tyre for sharp objects that may have caused the puncture
i.e. nails/ pins/ thorns ect. These must be removed.
Repair the inner tube using a puncture repair kit - follow the instructions supplied.
To replace the tyre, fit one side of the tyre back onto the rim. Push the valve through the
rim valve hole and feed the inner tube into the tyre. Make sure the inner tube is slightly
inflated and them ‘work’ the tyre back on to the rim using both thumbs.
Slowly inflate the tyre making sure it is sitting squarely and is sealed correctly on the rim.
When fully inflated replace the valve cap.
Saddle: Adjust for comfort and proper fit. Never allow the ‘minimum insertion’ mark to
show above the top of the seat tube.
Steering: The steering of your bicycle should be smooth and easy.
To adjust, loosen the top lock nut and carefully adjust the top bearing cone. Tighten the
lock nut whilst holding the bearing cone steady with the multi-sized spanner.
A tight headset will make steering difficult especially around corners, whereas
loose headset bearings will cause the front wheel to behave erratically. If you have any
doubt about the adjustment of the headset bearings, ask your universal dealer to make
the adjustment.
19
Tyres: To obtain the maximum life and full benefit from pneumatic tyres, ensure they are
inflated according to the pressure indicated on the tyre sidewall. Your tyres should be
inflated slowly, using a manual foot or hand pump fitted with a “Schrader” valve connector
and pressure gauge. Pressurised pumps should not be used.
Ensure the tyre is properly positioned onto the wheel rim as incorrect alignment can
cause chafing of the tyre against the frame or fork tubes.
Make sure that when purchasing replacement tyres you obtain the correct size. The tyre
size is found on the tyre sidewall.
Torque Settings: Recommended Torque settings for cycle components:
Torque
Description
Front Wheel Nut
Rear Wheel Nut
Handlebar Expander Bolt
Handlebar Clamp Bolt
Saddle Clamp
Seat Post Allen Bolt
Nm
22 - 25
25 - 29
15 - 17
16 - 18
16 - 18
9 - 12
Torque
Ibf.in
195 - 220
220 - 225
130 - 150
140 - 160
140 - 160
80 - 105
20
Location of Model Number
Model Identification
Sticker
Seat Tube (Frame)
Replacement Parts / Spares
Only use the correct replacement parts for brake blocks, tyres, tubes and bearings, ect.
Always consult your Universal Dealer.
To obtain replacement or spare parts, please write giving full details, including your name,
address and bicycle model number to:
Universal Cycles plc, Festival Leisure Park, Basildon, Essex, England, SS14 3WB.
Down Tube
(Frame)
Where possible, please return the damaged part for identification purposes.
Crank Arm
Thank you for purchasing this Universal bicycle it is a high quality product designed to give
years of trouble free service. For your convenience, we suggest you fill in the details
below and keep this manual in a safe place.
MODEL NAME
MODEL NUMBER
DATE OF PURCHASE
21
NOTES
22
Universal Cycles plc
Festival Leisure Park, Basildon, Essex, England SS14 3WB
T: 44(0)1268 247 000 F: 44(0)1268 247 047
E: [email protected]
www.universalcycles.plc.uk