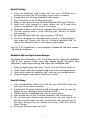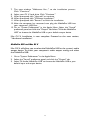
1
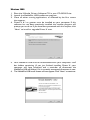
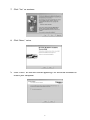
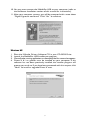
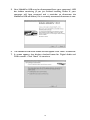
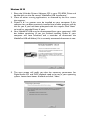
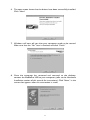
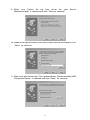
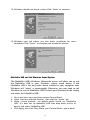
MobilePre USB
User’s Guide
Quick Start Guide
This Quick Start Guide is a very short, step-by-step guide to getting you
started right away at using your new M-Audio MobilePre USB.
Step 1: Run the Installer
Insert the included Install CD-ROM into your CD or DVD drive and
double-click the install program. Follow the onscreen instructions.
Depending on your operating system, you may be prompted to restart
your computer at the end of the installation procedure. If the installer
instructs you to restart, you must restart your computer.
Step 2: Connect the Audio Cables
A typical system using the MobilePre USB has its two outputs connected
to a mixer or a pair of powered speakers. Connect a Microphone to the
Channel 1 XLR Input on the rear panel of the MobilePre USB.
Step 3: Connect the USB Cable
Connect the supplied USB cable to an open USB port on your computer.
Step 4: Test your Installation
Set your computer’s output to play out of the MobilePre USB and play and
audio file to test your connections. Launch an audio recording program,
arm one of the channels, and try recording some audio from a microphone
connected to the MobilePre USB’s inputs.
Still need more info? The following pages will walk you through the setup
and use of your MobilePre USB, in much greater detail.
2
Introduction
Thank you for purchasing the MobilePre USB by M-Audio. MobilePre USB
is your audio upgrade for any PC or Macintosh computer*, utilizing the
convenience of your computer’s USB port—no tools, computer
disassembly, or power supply is needed; In fact, the MobilePre USB is also
class-compliant on Windows XP & Mac OS X 10.2.6 & higher, so no driver
installation is necessary—just Plug and Play.The MobilePre USB brings you
two high-quality line or microphone/instrument inputs and stereo outputs,
making it the perfect compact recording solution for any computer.
Please take the time to read this User Guide. It will tell you how to install
the MobilePre USB on your particular computer and instruct you on how
to get the most from your MobilePre USB audio interface.
* Must meet minimum system requirements
Package Contents
Your MobilePre USB was carefully packed at the factory, and the shipping
carton was designed to protect the unit during shipping. Please retain this
container in the unlikely event that you need to return your MobilePre
USB for service.
The following items are included with your MobilePre USB:
•
•
•
•
•
•
MobilePre USB audio interface
One (1) high-quality USB cable
M-Audio Driver CD (includes driver installation software)
Additional software installation CDs
This Product Manual
Warranty Card
Features of the MobilePre USB
•
•
•
•
•
•
•
•
Portable 16-bit/48kHz audio upgrade for laptops and desktops
Supports professional two-channel recording and playback
Supports common sampling frequencies (see Technical Spec section)
Extremely wide dynamic range and low signal-to-noise (see Technical
Spec section) for ultra-quiet, professional-quality recording
Analog 1/4” unbalanced outputs for powered speakers or stereo receiver
Completely USB-powered (no power supply required)
Class-compliancy on Windows XP & Mac OS X (10.2.6 & higher) systems
One-year warranty
3
System Requirements
The MobilePre USB has been designed to work with Windows 98SE, ME,
2000, or XP and Mac OS 9.2.2 or OS X 10.1.5 and Jaguar (10.2.2). Specific
requirements include:
Windows PC:
Minimum Required—
•
•
•
•
•
350 MHz Pentium II
64MB RAM
CD-ROM Drive
Native USB 1.1 Port, on motherboard
Windows® 98SE, 2000 (SP2), ME, or XP (SP1) Home or Pro (128 MB
RAM required for XP Pro)
Recommended—
•
•
•
•
700 MHz Pentium III
128MB RAM
DVD-ROM Drive
Windows 2000 (SP2) or XP (SP1) Home or Pro
Macintosh:
Minimum Required—
•
•
•
•
Apple Macintosh® G3, 300MHz*; Apple Macintosh® G4, 350MHz*
CD-ROM Drive
Available built-in USB port
Mac OS 9.2.2 or later with 128MB RAM; Mac OS X version 10.1.5,
10.2.6 or later with 256MB RAM
* CPU Accelerator cards not supported
Recommended—
•
•
•
•
Apple Macintosh® G4, 500MHz*
DVD-ROM Drive
Mac OS X version 10.1.5, 10.2.6 or later with 512MB RAM
Available built-in USB port
* CPU Accelerator cards not supported
4
Software Setup
Your MobilePre USB comes with driver software that allows it to
communicate with your computer’s operating system: Windows or Mac
OS. Please skip to your computer’s operating system in this section and
follow those instructions.
IMPORTANT NOTE: Your MobilePre USB provides a USB connector
which accepts the standard USB cable supplied with the unit. You
should install the software drivers, as described below, BEFORE
connecting the MobilePre USB to your computer. After installing the
included drivers, plug the “computer end” of the cable into your
computer’s USB port. When you are asked to connect your MobilePre
USB during the driver software installation, simply plug the “device
end” of the USB cable into your MobilePre USB (the “computer end”
and “device end” will be easily identifiable by their size and shape).
Windows XP
1. Place the M-Audio Drivers Software CD in your CD-ROM Drive.
2. Launch the MobilePre USB Installer.exe installation program.
3. The MobilePre USB install screen will appear. Click “Next” to continue.
4. Click “Continue Anyway” on the next screen.
5
5. The CD performance enhancements page will then appear. Click
“Next.”
6. The installation program will now prompt you of a successful hardware
installation. Click “Finish” and restart your computer.
7. After restarting your computer, Windows will tell you that your
hardware has not passed Windows Logo testing. Go ahead and click
“ContinueAnyway,” to finish the installation.
8. Please refer to the Hardware Installation section of this manual for
assistance in hooking up the MobilePre USB to your computer.
6
Windows 2000
1. Place the M-Audio Drivers Software CD in your CD-ROM Drive.
2. Launch the MobilePre USB Installer.exe program.
3. Close all other running applications, as directed by the first screen
that appears.
4. Direct X 8.1 or greater must be installed on your computer. If this
software has not been previously installed, the installer program will
prompt you to do so. If you have been presented with this request, click
“Next” to install or upgrade Direct X now.
5. Your MobilePre USB must be disconnected from your computer’s USB
bus, before continuing (if you just finished installing Direct X, your
computer will have restarted, and a reminder to disconnect the
MobilePre USB will follow). If it is currently connected, disconnect it now.
6. The MobilePre USB install screen will now appear.Click “Next” to continue.
7
7. Click “Yes” to continue.
8. Click “Next,” twice.
9. Click “Finish” on the next screen appearing.This will cause Windows to
restart your computer.
8
10. You may now connect the MobilePre USB to your computer (refer to
the Hardware Installation section of this manual for instructions).
11. After your computer restarts, you will be prompted with a note about
“Digital Signature not found.” Click “Yes” to continue.
Windows ME
1.
2.
3.
4.
Place the M-Audio Drivers Software CD in your CD-ROM Drive.
Launch the MobilePre USB Installer.exe program.
Close all other running applications,as directed by the first screen that appears.
Direct X 8.1 or greater must be installed on your computer. If this
software has not been previously installed, the installer program will
prompt you to do so. If you have been presented with this request, click
“Next” to install or upgrade Direct X now.
9
5. Your MobilePre USB must be disconnected from your computer’s USB
bus, before continuing (if you just finished installing Direct X, your
computer will have restarted, and a reminder to disconnect the
MobilePre USB will follow). If it is currently connected, disconnect it now.
6. The MobilePre USB install screen will now appear.Click “Next” to continue.
7. A screen appears that displays checked boxes for Digital Audio and
DMA transfer. Click “Next” to continue.
10
8. The installation program will inform you of a successful hardware
installation. Click “Next.
9. This next screen explains that your computer now needs to be
restarted. Make sure that the box labeled,“Yes…” is checked, then click
“Finish” to continue restarting.
NOTE: If you un-check the box labeled, “Yes…” you will again, with a
new screen, be prompted to restart. This is because DMA Mode has
been enabled.
10. You may now connect the MobilePre USB to your computer (refer to
the Hardware Installation section of this manual for instructions).
11. After your MobilePre USB has been connected and your computer has
finished restarting, installation will have been completed.
11
Windows 98 SE
1. Place the M-Audio Drivers Software CD in your CD-ROM Drive and
double-click on the file named “MobilePre USB Installer.exe”.
2. Close all other running applications, as directed by the first screen
that appears.
3. Direct X 8.1 or greater must be installed on your computer. If this
software has not been previously installed, the installer program will do
this for you. If you have been prompted with this request, click “Next”
to install or upgrade Direct X now.
4. Your MobilePre USB must be disconnected from your computer’s USB
bus, before continuing (if you just finished installing Direct X, your
computer will have restarted, and a reminder to disconnect the
MobilePre USB will follow). If it is currently connected, disconnect it now.
5. The next screen will notify you that the necessary parameters for
Digital Audio CD and DVD playback need to be set in your operating
system. Leave these boxes checked and click, “Next.”
12
6. The next screen shows that the drivers have been successfully installed.
Click “Next”
7. Windows will now tell you that your computer needs to be started.
Make sure that the “Yes” box is checked, and click “Finish.”
8. Once the computer has restarted and returned to the desktop,
connect the MobilePre USB to your computer (refer to the Hardware
Installation section of this manual for instructions). Click “Next,” in the
screen that appears after this connection is made.
13
9. Make sure “Search for the best driver for your device
(Recommended)” is selected and click “Next to continue.”
10. None of the option-boxes in the next screen need to be selected. Click
“Next,” to continue.
11. Make sure that the box for “The updated driver (Recommended) USB
Composite Device” is selected and click “Next,” to continue.
14
12. Windows should have found a driver. Click “Next,” to continue.
13. Windows now will inform you that driver installation has been
completed. Click “Finish,” to complete the installation process.
MobilePre USB and the Windows Sound System
The MobilePre USB’s Windows Multimedia drivers will allow you to use
the MobilePre USB as your Windows system sound device. If the
MobilePre USB is the only audio device installed in your computer, then
Windows will “select” it automatically. Otherwise, you may need to tell
Windows to use the MobilePre USB.To check your Windows Audio setting
and select the MobilePre USB:
1. Go to the Start menu, and then choose Control Panel.
2. Open “Sounds and Audio Devices,” then click the “Audio” tab.
3. Under “Sound playback,” the default device should say “MobilePre
USB.” If it does not say MobilePre USB, then drop down the list of
devices and select “MobilePre USB.”
4. Click Apply, then click Okay. Close your Control Panel—you’re done!
15
Mac OS 9 Setup
1. Insert the MobilePre USB Drivers CD into your CD-ROM drive.
AutoRun will open the CD and allow you to view its contents.
2. Double click the “M-Audio MobilePre USB Installer.”
3. Click "Continue" at the M-Powered Screen.
4. Read the "Instructions for using M-Audio MobilePre USB." Click "Continue."
5. Select your install location, or simply choose the OS 9 boot drive
(which is the default). Click "Install" to continue.
6. Installation requires a restart of the computer. Click "Continue" to restart.
7. The next prompt states a similar message. Click "Restart" to reboot
the computer.
8. Plug the MobilePre USB into your computer’s USB Port.
9. Once the computer has restarted, select "Sound" in "Control Panels,"
then select the "Output" tab. Click on "M-Audio MobilePre USB" to
choose the MobilePre USB as your default output device.
Mac OS 9.2.2 Installation is now complete. Proceed to the next section,
“Hardware Installation”.
MobilePre USB and Apple Sound Manager
The Apple Sound Manager in OS 9 will allow you to select the MobilePre
USB as the system’s audio input and output device. To check your
computer’s audio output setting and select the MobilePre USB:
1.
2.
3.
4.
Open the Apple menu, then select “Sound” from the Control Panels list.
Under Output, select the “MobilePre USB” from the list of available devices.
Under Input, select the “MobilePre USB” from the list of available devices.
Close the Apple Sound control panel.You’re done!
Mac OS X Setup
1. Insert the MobilePre USB Drivers CD into your CD-ROM Drive and
open the CD to view its contents.
2. Double click "M-Audio MobilePre USB Installer.dmg" file. An Icon will
appear on your desktop marked "MobilePre USB."
3. Double click the "MobilePre USB" icon on your desktop.
4. Now double click on the "M-Audio MobilePre USB Installer.mpkg."
5. You will need your Administrator Password for the next step. If the
password window does not open automatically, click the lock icon in
the lower left corner of the window that states, “Click The Lock To
Make Changes."
6. Enter your password and click "OK."
16
7. The next window "Welcomes You..." to the installation process.
Click "Continue."
8. Select your OS X hard drive. Click "Continue."
9. When prompted, click "Upgrade" to continue.
10. When prompted, click "Continue Installation."
11. When prompted, click "Restart" to finish the installation.
12. After the computer has restarted, now plug the MobilePre USB into
your computer’s USB Port.
13. Go to "System Preferences" in the Apple Menu. Select the "Sound"
preference panel, and click the "Output" tab. Select "M-Audio MobilePre
USB" to choose the MobilePre USB as your default output device.
Mac OS X Installation is now complete. Proceed to the next section,
“Hardware Installation”.
MobilePre USB and Mac OS X
Mac OS X will allow you to select the MobilePre USB as the system’s audio
output device. To check your computer’s audio output setting and select
the MobilePre USB:
1. Go to "System Preferences" in the Apple Menu.
2. Select the "Sound" preference panel, and click the "Output" tab.
3. Select "M-Audio MobilePre USB" to choose the MobilePre USB as your
default input and output device.
17
Hardware Setup
Front Panel Features
The front panel of the MobilePre USB houses features providing the
following functions:
1. Channel 1 Inst/Line Input Jack: This 1/4” balanced connector
2.
3.
4.
5.
6.
7.
8.
9.
accepts an instrument or line level signal for Channel 1 of the
MobilePre USB. This input is ideal for recording guitar, bass or
synthesizer. If you are recording a stereo line-level source, plug the left
channel into Line Input 1 (on the front panel of the MobilePre USB) and
the right channel into Line Input 2 (on the rear panel).
Channel 1 Gain Knob: This control knob regulates the level of
the signal going from the Channel 1 Mic or Line input to your
computer.
Channel 1 Level LEDs: These two LEDs show signal present and
clipping of Channel 1 of the MobilePre USB.You should adjust the Gain
control so that the signal present is on as much as possible but the Clip
LED does not come on.
Channel 2 Gain Knob: This control knob regulates the level of
the signal going from the Channel 2 Mic or Line input to your
computer.
Channel 2 Level Meter: These two LEDs show when input signal
into Channel 2 is present or clipping.You should adjust the Gain control
so that the signal present is as high as possible without lighting the the
Clip LED.
Headphone Output Jack: This 1/8” stereo jack plays back
outputs 1 and 2 through the Left and Right speakers of your
headphones.
Headphone Level Knob: This knob controls the level to the
Headphone Out
Phantom Power Switch: Press this switch button into the
In-position to send voltage to microphones which require phantom
power and are connected to XLR Mic Inputs 1 and 2.
Phantom Power Indicator: This LED lights when phantom
power is switched on.
18
10.
Power Indicator: This LED indicator lights when the
MobilePre USB is receiving power through its USB port.
Rear Panel Features
The rear panel of the MobilePre USB houses jacks providing the
following functions:
1. USB Jack: This jack connects the MobilePre USB to your computer,
using a USB 1.1 (or higher) connection.
2. Stereo Line Output Jack: This jack outputs the same signal as
3.
4.
5.
6.
the Outputs 1 & 2 jacks described below, through a 1/8” stereo jack for
easy connection to many devices such as multimedia speakers and
MiniDisc recorders.
Output 1 and 2 Jacks: These unbalanced 1/4” jacks output the
signal which is output from your computer and should be connected
to a pair of powered speakers, a mixer or a stereo receiver.
Stereo Mic Input Jack: This 1/8” stereo mini jack accepts a mic
level signal from stereo microphones with 1/8” outputs. These
microphones may be of either the stereo dynamic or self-powered
stereo condenser type. Microphone with XLR output connectors
should instead be connected to the XLR Inputs described below.
Channel 2 Inst/Line Input Jack: This 1/4” balanced connector
accepts an instrument or line level signal for Channel 2 of the
MobilePre USB. This input is ideal for recording guitar, bass or
synthesizer. If you are recording a stereo line-level source, plug the left
channel into Line Input 1 (on the front panel of the MobilePre USB) and
the right channel into Line Input 2 (on the rear panel).
XLR Mic Input Channel 1 & 2 Jacks: These balanced, XLR
inputs accept a mic level signal for recording into your computer.
19
USB Connection
The MobilePre USB communicates with your computer through a USB
port. It is also powered by the USB connection. Because of this, we
recommend that you plug the MobilePre USB into one of the built-in USB
ports on your computer, not through a keyboard connection or USB hub.
To connect your MobilePre USB, find the open jack of an unused USB port
on your computer and connect it to the MobilePre’s USB jack with the
included USB cable. This computers USB jacks will most often be located
on a rear panel and will probably be marked with a symbol looking
something like the one pictured here.
In Windows XP & Mac OS X (10.2.6 & higher), the MobilePre USB is
class-compliant, making driver installation optional—to begin using the
MobilePre USB, you may simply plug the unit into a USB port . However,
choosing to install the driver will allow the following added functionality:
Windows XP - Device Control Panel and ASIO support with low-latency drivers
Mac OSX - Device Control Panel and Direct Monitor control with low-latency drivers
NOTE: For easiest setup, you should install the software drivers on
the included CD-ROM before connecting the USB cable to your
computer. This procedure is explained in the section of this manual
titled “Software Installation.”
Control Panel Setup
Once setup is complete, you can control most aspects of the MobilePre
USB using its control panel.To launch the control panel in your operating
system, check the following instructions:
Windows: You should see an M-Audio logo “M” installed on the right
side of your Windows taskbar. Double click on this logo, to launch the MAudio MobilePre USB Control Panel.
Mac OS 9: Following the driver software installation in Mac OS 9 and
restarting, the MobilePre USB Control Panel will be placed in your Apple
Control Panels folder. Open your Applications folder and select “M-Audio
MobilePre USB Settings.” This will launch the M-Audio MobilePre USB
Control Panel. This panel can also be launched through the ASIO control
panels within your ASIO applications.
20
Mac OS X: Follow the driver software installation for Mac OS X and
restart. Launch the MobilePre USB Control Panel, which is found in the
bottom row of the OS X System Preferences panel.
or
The control panel has the following sets of controls:
USB Record
The USB Record section controls the level of the signal from the
microphone and instrument inputs to the recording software.
Volume: There is a volume fader for both input channels 1 and 2. In most
cases you should leave these controls turned all the way up.
Mute: This box, when checked, stops any input signal from reaching the
recording software.
Link: This button links channels 1 and 2, so that any changes made to one
will change the other.
Direct Monitor
This section controls the level of the hardware direct monitor. The
MobilePre USB provides an analog monitor path from the inputs to the
outputs.When signal is recorded into software, there is often a slight delay
before it reaches the outputs. This delay, called latency, is caused by the
processing required to convert and record audio.Any delay can distract the
artist being recorded, so the MobilePre USB provides this “Direct
Monitor” for use during recording.
Volume: These faders control the level of the direct monitor path. Set
the controls to find the right balance while recording.
Mute: This box, when checked, stops the direct monitor signal from
reaching the recording software.
21
Link: This button links channels 1 and 2, so that any changes made to one
slider will change the other.
Left Only: This box, when checked, sends only the left (Channel 1) input
to the direct monitor.This signal will be sent to both outputs.
See the “Using the MobilePre USB” section in this manual for more
information about using direct monitor.
Device Output
This section controls the levels of the MobilePre USB’s playback output.
The playback and Direct Monitor signals are mixed together, and the
Device Output level controls the playback volume sent from the
computer to outputs 1 and 2.
Volume: There is a volume fader for each output channel, 1 and 2. Use
these faders to control the playback level of the MobilePre USB.
Mute: This box, when checked, stops any signal from reaching the
MobilePre USB’s outputs.
Link: This button links channels 1 and 2, so that any changes made to one
slider will change the other.
Here is a summary of how all of these controls work together. The
M-Audio MobilePre USB Control Panel controls are organized into three
sets and these sets are named USB Record, Direct Monitor and Device
Output. The signal coming into the Channel 1 and 2 Mic and Inst/Line
inputs is routed in two directions, the first direction to the computer for
recording purposes. This signal can be turned down by using the USB
Record volume controls. The second direction is to the Direct Monitor,
allowing you to hear the signal without the delay caused by latency. By
balancing the Device Output and Direct Monitor levels, you can adjust
your monitor mix while recording.
Latency
This setting controls the amount of delay before the sound reaches the
output.This control is automatically set when the MobilePre USB control
panel is installed.You may try a setting lower than the this one, but if your
computer system is not fast enough you may experience brief audio drop
outs. Conversely, you may need to use a higher setting if you are using a
several soft synths at the same time. Experiment with different settings to
find the one that works best on your system and with your setup needs.
22
Optimize for Slower Systems: Only the Mac OS 9 version of the
Mobile Pre control panel has this checkbox. It should be left checked if
your computer’s processor is of G3 or slower speed.
Using the MobilePre USB
Now that we’ve finished connecting speakers and setting levels, you’re
probably interested in getting started. This chapter explains how to
connect microphones and speakers to the MobilePre USB, and will explain
some of the units typical applications.
MobilePre USB Inputs
There are 6 inputs on the MobilePre USB, which are broken up into
functional pairs for XLR, 1/4” Line Level and a Stereo 1/8”. All of these
inputs are merged into the same corresponding input channels on the
MobilePre USB.Any or all of these inputs can be used at any time, however
only 2 channels of audio will be recognized by your audio application.Your
software will record anything that is plugged into any of the MobilePre
USB’s inputs.
Microphone Inputs
The MobilePre USB has two microphone inputs, labeled Ch. 1 and Ch. 2.
These XLR inputs raise the gain of a microphone level signal to a line level
signal for recording. If your microphone does not have an XLR output, you
will need to purchase an adapter or impedance transformer or use the
Stereo Mic Input, explained below. You can control the level of the two
microphone inputs using the Channel 1 and Channel 2 gain controls on the
MobilePre USB’s front panel.
The 1/8” stereo input connects to the same channels as the 2 XLR
microphone inputs. It is provided for use with stereo dynamic
microphones or self-powered stereo condenser microphones with 1/8”
stereo outputs. Do not confuse this jack with similar looking jacks found
on consumer sound cards, which accept only mono microphone signals
that require a bias voltage to the microphone.
Phantom Power
The MobilePre USB provides phantom power for condenser microphones.
This 48 volt phantom power source can be switched on or off using the
front panel switch. An LED indicator lights when phantom power is
switched on and sending power to both microphone inputs.
23
Check the documentation that came with your microphone to see if you
need to switch on phantom power. As a rule, most FET condenser
microphones, such as the Groove Tubes GT57™, require phantom power.
Most tube condenser microphones, such as the Groove Tubes GT67™,
have their own power supply and don’t need phantom power. Dynamic
microphones, like the Shure SM57™, don’t need phantom power, and some
ribbon microphones can be damaged if you send phantom power. So if
you’re unsure, check the microphone’s manual or contact the manufacturer
or your M-Audio dealer.
Instrument/Line Inputs
Channels 1 and 2 have an Instrument/Line input as well as the microphone
input. If you want, you can plug one signal into the Channel 1 Mic input and
another signal into the Channel 1 Line input. However, these signals will be
mixed and both recorded on Channel 1, and you won’t have any control
over the balance between the two signals. A better solution in this case
would be to use the Channel 1 Mic input and the Channel 2 Line input.
The Instrument/Line input accepts an instrument level signal, such as an
electric guitar or bass, or a line level signal, like a synthesizer or drum
machine. The Channel 1 and Channel 2 Gain controls on the front panel
control the level of the Instrument/Line inputs. Adjust the gain control
while watching the meter in your digital recording software. If your
recording software doesn’t have an input meter, you can check the tiny
meter on the MobilePre USB’s front panel.
MobilePre USB Outputs
The rear panel of your MobilePre USB has two sets of outputs: a pair of
1/4” jacks (labeled Output 1 & 2) and a single 1/8” stereo jack (labeled
Stereo Line Output). Either of these outputs can connect to a set of
powered speakers for monitoring.You can also connect the outputs of the
MobilePre USB to a mixer or a stereo receiver.
Use whichever set of outputs fits the inputs of your monitor system, but
you should only connect one or the other. If your speakers or receiver
uses RCA jacks instead, you can purchase a converter, like the one pictured
here, at an electronics store such as Radio Shack.
White = Left
1/8" Stereo Mini Jack
(2) Female RCA Jacks
Red = Right
Note that the outputs of the MobilePre USB are Line Level. You can
connect these outputs directly to the inputs of powered speakers.
24
However, if your speakers are not self-powered then you will need to
connect the MobilePre USB’s outputs to the inputs of a power amplifier or
stereo receiver.You can then connect the power amp or receiver’s outputs
to the speakers.
Make sure that the speakers that you use near a CRT Computer Monitor
are shielded speakers. If your monitor begins to become discolored in one
of the corners, or if the image appears warped, move the speaker further
away to avoid damage to your monitor.
The Headphone Output contains the same signal as Outputs 1 and 2 on
the 1/8” stereo output connector. Use the level control to adjust the
headphone volume level.
Using Direct Monitor
This section will describe a typical recording session during which the
direct monitor feature is used. In this scenario, we assume that some
rhythm section tracks have already been recorded and that it is desired to
overdub some guitar to play along.
1. Plug a microphone or other source into one of the input channels.
2 Arm a channel in your computer recording software. Set the Gain on the
MobilePre USB’s front panel while monitoring the computer’s level meters.
3. Turn off the input monitor feature in your recording software.You may
also need to mute that channel or assign the output of that channel to
a non-existent output. The signal you’re recording in your audio
application needs to be prevented from reaching the MobilePre USB
outputs. If you do not stop this signal, you will be monitoring your signal
twice: You will first hear the direct monitored signal, and then the
software monitored signal (a few milliseconds after the direct signal).
4. Open the MobilePre USB control panel. Make sure that the Direct
Monitor channel is not muted.
5. Use the Direct Monitor fader to control the monitor level in the
outputs of the source that you’re recording.
6. Use the Device Output fader to control the level of the backing tracks
with which you are playing along.
If your recorded signal sounds flanged, “metallic,” or doubled, you’re
probably monitoring the signal twice, once through the direct monitor and
again through the monitor feature of the software, which is playing back
through the USB signal. Check the documentation that came with your
software to disable its monitor path.
25
Troubleshooting
The M-Audio.com website contains the latest troubleshooting information.
This should be your first stop for up-to-date information, the latest drivers,
FAQ files, and extensive how-to guides.You will also find information here
on contacting tech support via email and phone.
Here are some other quick troubleshooting tricks to try if you’re having
problems with the MobilePre USB:
•
•
•
When things don’t seems to be working properly, try restarting the
computer.This solves the majority of computer problems.
If you haven’t been able to get the unit to work at all, or if it stopped
working altogether, uninstall and reinstall the driver software.
If the unit stopped working when you installed a new program or a
system software update, check the M-Audio website for new drivers. If
there is a major new system software update that has just been
released, you may need to search for beta software drivers that
support the new system.
26
Technical Specifications
Hardware Features
Analog Inputs:
- Microphone & Instrument/Line: 2, In-to-USB &
USB-to-Analog Audio Stereo Out
- XLR Microphone: 2, Balanced w/ switchable Phantom Power (+48 V)
- 1/8" Microphone: Stereo
- Instrument/Line: 2, 1/4" Balanced, high-impedance
(for electric guitar & bass)
- Input Channel Gain Knob: +40 dB max
- Input Channel LEDs: Clip (Red) and Signal-Present (Green)
Analog Outputs:
- Unbalanced Outs: 2, 1/4” (-10 dBV nominal, +1.7 dBV max)
- Stereo Line Out: 1/8” Mini (-10 dBV nominal, +1.7 dBV max)
- Headphone Out: 1/8” Stereo Mini with Level Control knob
Power: USB (no transformer or batteries required)
Driver Features
Bit-Depth Supported: 16-bit, Input & Output
Hardware Direct Monitoring: Zero Latency w/ Software Level Control
(Stereo or Channel 1 Mono path, Software-set)
Record & Play Outputs and Direct Monitor (Thru) Levels:
Software-controlled (Mute & +12 to -50 dB, in 2 dB steps)
Master Output Volume Control:
Software-controlled (Mute & 0 to -62 dB, in 2 dB steps)
27
Audio Performance
Supported Sampling Frequencies (Hz): 8000, 9600, 11025, 12000, 16000,
22050, 24000, 32000, 44100 & 48000
Outputs, 1/4” & Stereo Line:
- Dynamic Range: 91 dB (typical, -60 dB input, A-weighted)
- S/N Ratio: 91 dB (typical, A-weighted)
- THD: -87 dB (typical)
Inputs, XLR Mic:
- Dynamic Range: 91 dB (typical, -60 dB input, A-weighted)
- Signal-to-Noise Ratio: 91 dB (typical, A-weighted)
- THD: -80 dB (typical)
Inputs, Inst/Line:
- Dynamic Range: 96 dB (typical, -60 dB input, A-weighted)
- Signal-to-Noise Ratio: 96 dB (typical, A-weighted)
- THD: -78 dB (typical)
Warranty Terms and Registration
Warranty Terms
M-Audio warrants products to be free from defects in materials and
workmanship, under normal use and provided that the product is owned
by the original, registered user.Visit www.m-audio.com/warranty for terms
and limitations applying to your specific product.
Warranty Registration
Thank you for registering your new M-Audio product. Doing so
immediately both entitles you to full warranty coverage and helps M-Audio
develop and manufacture the finest quality products available. Register
online at www.m-audio.com/register to receive FREE product updates and
for the chance to win M-Audio giveaways.
28
M-Audio USA
M-Audio Germany
5795 Martin Rd., Irwindale, CA 91706
Kuhallmand 34, D-74613 Ohringen, Germany
Technical Support
Technical Support
web:
www.m-audio.com/tech
e-mail:
[email protected]
tel (pro products):
(626) 633-9055
tel:
+49 (0)7941 - 9870030
tel (consumer products):
(626) 633-9066
fax:
+49 (0)7941 98 70070
fax (shipping):
(626) 633-9032
Sales
Sales
e-mail:
[email protected]
e-mail:
[email protected]
tel:
+49 (0)7941 98 7000
tel:
1-866-657-6434
fax:
+49 (0)7941 98 70070
fax:
(626) 633-9070
Web
www.m-audio.de
Web
www.m-audio.com
M-Audio U.K.
Floor 6, Gresham House, 53 Clarenden Road, Watford
WD17 1LA, United Kingdom
Technical Support
M-Audio Canada
1400 St-Jean Baptiste Ave. #150, Quebec City,
Quebec G2E 5B7, Canada
Technical Support
email:
[email protected]
e-mail:
[email protected]
phone:
(418) 872-0444
tel:(Mac support):
+44 (0)1765 650072
fax:
(418) 872-0034
tel: (PC support):
+44 (0)1309 671301
Sales
Sales
e-mail:
[email protected]
tel:
+44 (0)1923 204010
phone:
(866) 872-0444
fax:
+44 (0)1923 204039
fax:
(418) 872-0034
Web
www.maudio.co.uk
Web
www.m-audio.ca
M-Audio Japan
M-Audio France
Floor 6, Gresham House, 53 Clarenden Road, Watford
WD17 1LA, United Kingdom
アビッドテクノロジー株式会社 | エムオーディオ事業部
〒 460-0002 愛知県名古屋市中区丸の内 2-18-10
Renseignements Commerciaux
Avid Technology K.K.
2-18-10 Marunouchi, Naka-Ku, Nagoya, Japan 460-0002
tel :
0 810 001 105
カスタマーサポート(Technical Support)
e-mail :
[email protected]
e-mail :
[email protected]
(Macintosh 環境専用):
e-mail
[email protected]
Assistance Technique
PC :
0 0820 000 731
MAC :
0 0820 391 191
Assistance Technique
e-mail :
fax :
Site Web
[email protected]
[email protected]
+33 (0)01 72 72 90 52
www.m-audio.fr
tel :
052-218-0859
(10:00~12:00/13:00~17:00)
セールスに関するお問い合わせ(Sales)
e-mail:
[email protected]
tel:
052-218-3375
fax:
052-218-0875
Web
www.m-audio.jp
060628_MPre_UG_EN01