1
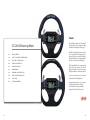
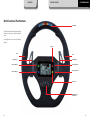
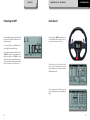
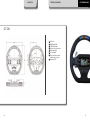
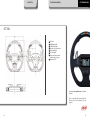
GT 320-350
STEERING WHEEL
USER GUIDE
AiM Srl.
Via Cavalcanti, 8
20063 Cernusco S/N (MI)
Italia
Tel. (+39) 02.9290571
Made in Italy
www.aim-sportline.com
Thanks
GT 320-350 Steering Wheel
02
04
GETTING STARTED
12
HOW TO CONFIGURE GT STEERING WHEEL
18
SHIFT LIGHTS CONFIGURATION
22
ALARMS CONFIGURATION
26
PAGE CONFIGURATION
30
ENGAGED GEAR
32
POWERING ON/OFF DATA RECALL
34
INTERACTION WITH SMARTYCAM
37
ACCESSORIES
38
TECHNICAL DRAWINGS
We would like to thank you for choosing GT
Steering Wheel, the new wheel showing
real time data sampled by EVO4 logger.
With GT Steering Wheel you can view values coming from the ECU, from accelerometers, as well as from the GPS built into
the EVO4, while also receiving information
from the on-board camera SmartyCam.
GT Steering Wheel also shows data coming
from your Engine Control Unit via ECU
Bridge, the interface module connecting
the ECU to AiM visors and steering wheels.
You can also activate up to four external
units from the GT Steering Wheel.
Its graphic display allows a more precise
and enjoyable visualization of data.
Size and make have been specifically
designed for GT and Touring cars use.
03
CHAPTER 1
GETTING STARTED
GT STEERING WHEEL
Multifunctional Pushbuttons
Shift Lights
The four buttons beside the Steering wheel
display can be used to activate external
units.
In the Appendix 1 you can see the related
wirings.
Display
Horn
Horn
Paddleshift ( - )
Paddleshift (+)
Function Button 1
Function Button 3
Function Button 2
Function Button 4
Alarms Leds
Multifunctional
Pushbuttons
04
05
CHAPTER 1
06
GETTING STARTED
GT STEERING WHEEL
07
CHAPTER 1
GETTING STARTED
GT STEERING WHEEL
How To install and Connect GT Steering Wheel
to EVO4 and ECU Bridge
1
GT Steering Wheel must be connected via
CAN bus to your EVO4 (by plugging the
CAN cable into the logger “EXP” port).
Its firmware version must be 43.05.02 or
newer.
08
The wheel can also be connected to your
ECU Bridge using its CAN connector.
Its firmware version must be 45.02.02.
09
CHAPTER 1
2
GETTING STARTED
GT STEERING WHEEL
4
If the firmware is out of date:
Please check the firmware version of your
EVO4.
Connect it to PC via USB, open the Race
Studio 2 software and press
‘Device Info’ button (1).
1
If the EVO4 firmware is older than
43.05.02, open aim-sportline.com and select Download>>Firmware and download the current version onto your
computer.
Then run the firmware update program by
following the included instructions.
3
Alternatively, with GT Steering wheel on,
SELECT MENU>>SYSTEM MANAGEMENT
>> DEVICE INFO (2).
10
2
3
11
CHAPTER 2
HOW TO CONFIGURE GT STEERING WHEEL
GT STEERING WHEEL
How to Configure GT Steering Wheel
1
GT Steering Wheel receives its configuration parameters from EVO4, so you must
configure EVO4 in order to make
GT Steering Wheel display your data
correctly.
12
Therefore, select GT Steering Wheel as the
display in EVO4 configuration.
GT Steering Wheel pages, shift lights and
alarms configuration is done using the Race
Studio 2 software.
13
CHAPTER 2
HOW TO CONFIGURE GT STEERING WHEEL
GT STEERING WHEEL
Pages Configuration
2
GT Steering Wheel is able to fully configure
up to nine pages, allowing you to view your
data in user definable and very customizable ways.
Select the “Pages” tab to enter the Pages
Configuration panel.
Custom pages are all disabled by default.
n Lap Time:
shows the lap time of the previous lap;
n Rolling Time:
shows the lap time for ten seconds, then
shows the rolling time;
n Predictive Time:
Shows a forecast of the current lap time;
n +/- Best Time
Shows a prediction of the current lap time
compared with the best lap of the session.
1
2
The first available page is:
RPM and lap time. (1) Here you can configure two channels and choose one of the different
Lap Time visualizations: (2)
14
15
CHAPTER 2
Eight Freely Configurable Pages.
You can add up to four fields per page,
defining also the short name that will
describe that field.
HOW TO CONFIGURE GT STEERING WHEEL
GT STEERING WHEEL
At the bottom of the list are the pages for Satellites and SmartyCam.
n Satellites
Satellites shows the level of GPS signal.
For the sake of precision, it is best to acquire
data from at least eight satellites.
n SmartyCam
SmartyCam status shows the status of the
camera, when connected to the system.
Of course, you can enable or disable each
of these pages, simply clicking on the
checkbox:
16
17
CHAPTER 3
SHIFT LIGHTS CONFIGURATION
GT STEERING WHEEL
Shift Lights Configuration
3
By selecting the “Advanced options”
function, you can more deeply configure
your Shift Light LEDs.
The available options are:
Click “Configure Shift Lights” to manage
the Shift Light LEDs.
The panel shown below appears and you
can manage the color of each LED and the
RPM threshold value at which it will turn on.
GT Steering wheel features ten LEDs, which
are symmetrically managed by the five cells
of the dedicated Race Studio window (see
below):
n The sequence mode of the shift lights:
you can choose to leave an individual shift
light LED ON or turn it OFF when the
following LED has been turned ON (1).
Shift Lights
1
18
19
CHAPTER 3
n The shift lights dependence upon the
gear position:
you can configure GT Steering Wheel to
have different Shift Light LED thresholds for
each gear position (2).
SHIFT LIGHTS CONFIGURATION
GT STEERING WHEEL
When you select this option you can set the
maximum number of gears (up to nine): the
view below appears.
2
20
21
CHAPTER 4
ALARMS CONFIGURATION
GT STEERING WHEEL
Alarms Configuration
4
Click on the “Add new alarm event” button
to add new alarms or click on the icon to
the right to manage existing alarms.
When you click on the “Add new alarm
event” button, the window below appears.
Here you can select the event the system
will check and the effect of that event.
1 – Fill in the DESCRIPTION field, so you can
easily identify the event in the future (1).
2 – Describe the Alarm: it can be a simple
event, for example “water temperature is
greater than 100 C°” (2)...
3 – ...or a combination of events, for
example: “water temperature is greater
than 100 C°” AND “Engine RPM is greater
than 6000” (1)
You can have G-Dash turn on the LED and
you can also select the LED color and the
LED behavior (solid or fast/slow blinking).
You can also define a text message (2)
4 – Then assign how a LED will respond
when the event (or events) occurs:
1
1
2
2
22
23
CHAPTER 4
You can add different events and define the
alarm as a combination of ALL the events
or ANY of them (1).
ALARMS CONFIGURATION
Finally, you will configure the duration of
the alarm (2) from four options:
Once the configurations are set, a summary
will appear.
n Until the condition is no longer met
n Until the data is downloaded
n Until the device is turned off
n Until a button is pushed
Any time you need to edit the settings, just
click the button and proceed.
GT STEERING WHEEL
1
2
24
25
CHAPTER 5
GT STEERING WHEEL
PAGE CONFIGURATION
Keyboard Configuration
1
As soon as you rev your car, the RPM and
Lap Time page is displayed: it shows RPM
and lap time (showing one of the four
modes explained above), together with
current lap number and the additional configurable channels.
2
Pressing
MENU>>DISPLAY SETUP>>PAGE
SETUP>>Page allows you to set up to
eight Custom Pages.
You decide where to show the desired variables (up to four on each page) from those
sampled by the ECU, the accelerometers
and the GPS values from EVO4.
3
GPS page: this shows the number of visible
satellites and their signal strength.
4
SmartyCam page: this shows the
on-board camera information, when
connected (see related chapter).
To choose the variable, select it when you
choose the ‘Sel’ menu item:
26
27
CHAPTER 5
By selecting “Menu” you can also:
1
n Set the Time/Date format.
GT STEERING WHEEL
PAGE CONFIGURATION
In addition to page setting, the “Display
setup” feature allows you to:
2
n Set the partial odometer and also track
the engine running time
(of up to four engines).
3
n Choose the displayed language and view
the device info (serial number and installed
firmware version) of both GT Steering
Wheel and EVO4 by selecting the “System
Management”.
4
n Enable/disable the backlight.
n Adjust display brightness as well as LED
intensity.
Set how long the lap time will be shown on
the display after crossing start/finish line.
Choose if the keyboard will always be
visible (‘locked’ mode) or hidden
(‘auto hidden’ mode).
By selecting the “Create New GPS Track”
item, the system stores the current GPS
location and will automatically calculate lap
times each time you cross that location.
28
29
CHAPTER 6
ENGAGED GEAR
GT STEERING WHEEL
Engaged Gear
Engaged gear information is provided by
EVO4 and automatically displayed in the
System Configuration panel if you choose:
Gear calibration may be restarted using the
keyboard by selecting
MENU>>SYSTEM MANAGEMENT>>
RESTART GEAR CALIBRATION.
- To set the gear:
- Using a potentiometer
- Via ECU connection
1
If you choose the “Calculated” mode, during the calculation GT Steering Wheel will
show this icon in the RPM and Lap Time
page
1
2
Once calculation is finished, the gear
number will appear.
2
30
31
CHAPTER 7
GT STEERING WHEEL
POWERING ON / OFF DATA RECALL
Powering On/Off
Data Recall
GT Steering Wheel is powered by EVO4 and
turns on and off with the EVO4 with no additional user input.
By pressing the “MEM” pushbutton you
can recall the data from the latest test sessions stored in memory (max. six).
As soon as EVO4 senses an RPM value, GT
Steering Wheel menu will change.
The configuration functions will then show;
“LIGHT” to quickly and conveniently backlight the display and “TRCK” to easily
create and store the current GPS location so
the system will automatically calculate lap
times each time you cross that location.
1
The first page of the data recall screen
shows a session summary: the best four
laps, total distance run, total time run, Max
RPM and Max Speed.
The second page shows all of the session
laps with lap times and speeds (Min and
Max).
32
33
CHAPTER 8
INTERACTION WITH SMARTYCAM
GT STEERING WHEEL
Interaction with SmartyCam HD
In GT Steering Wheel menu, the
SmartyCam page follows the GPS page:
The SmartyCam page can be found by
selecting
This page displays whether the SmartyCam
is currently recording (REC: ON).
Also displayed is the amount of memory
left on the memory card inserted in the
SmartyCam.
MENU>>DISPLAY SETUP>>PAGE
SETUP>>SMARTY
SmartyCam HD
34
35
CHAPTER 9
ACCESSORIES
Accessories Part Number
Paddleshifts Steering Wheel GT320
Part Number:
X07PADGT320
36
Paddleshifts Steering Wheel GT350
Part Number:
X07PADGT350
37
CHAPTER 10
TECHNICAL DRAWINGS
GT STEERING WHEEL
GT 320
n ⌀ 320 mm
n 4 RGB Alarm LEDS
n 10 RGB Shift Lights
n 4 buttons for external units
n Graphical Display
n Grey back light
n Carbon rim and premium
quality leather covering
n Waterproof IP67
38
39
CHAPTER 10
TECHNICAL DRAWINGS
GT STEERING WHEEL
GT 350
n ⌀ 350 mm
n 4 RGB Alarm LEDS
n 10 RGB Shift Lights
n 4 buttons for external units
n Graphical Display
n Grey back light
n Carbon rim and premium
quality leather covering
n Waterproof IP67
Our web site aim-sportline.com is constantly
updated.
Please, constantly check it and download
the last versions of the firmware of your
products.
40
41
CHAPTER 10
42
TECHNICAL DRAWINGS
GT STEERING WHEEL
43
CHAPTER 10
44
TECHNICAL DRAWINGS
GT STEERING WHEEL
45
Each steering wheel is individually hand
made by craftsmen who take extra care in
all of the details of the manufacturing
process, such as stuccoing to create room
for wires, leather punching and sewing the
Alcantara®, hot printing…
46
47