1
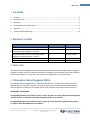
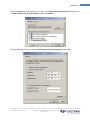
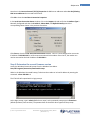
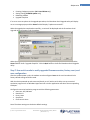
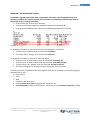
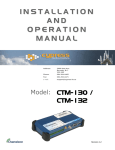
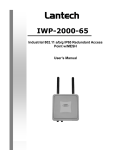
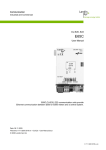
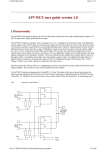
CHAMELEON
SERIAL UPGRADE
UTILITY NOTES
Model
Revision
Chameleon CTM-15X
Modem
1.4
3066 Beta Avenue Burnaby, B.C. V5G 4K4
Phone: 604.294.4465
Fax: 604.294.4471
[email protected]
0BContents
1 Contents
1
Contents .................................................................................................................................................. 2
2
Revision Control ...................................................................................................................................... 2
3
Overview ................................................................................................................................................. 2
4
Chameleon Serial Upgrade Utility ........................................................................................................... 2
5
Operation ................................................................................................................................................ 3
6
Technical Support/Warranty................................................................................................................. 11
2 Revision Control
Description
Revision
Date
Customer Release
1.0
26-January-2010
Updated for version 2.2 and updated steps for
verifying firmware upgrade is complete.
Emphasize important step in verifying firmware
upgrade is complete (Section 5, Step 7)
Updated for updated full factory reset command
Remove deprecated message
1.1
09-March-2010
1.2
24-March-2010
1.3
1.4
6-August-2010
8-February-2011
3 Overview
The Chameleon Serial Upgrade Utility was developed specifically to provide an upgrade path to upgrade
modems from older versions of firmware based on the Snapgear Linux distribution to the latest OpenWrt
based Linux distribution. In most cases, this need for this upgrade will be a rare occurrence.
4 Chameleon Serial Upgrade Utility
The Chameleon Serial Upgrade Utility is a Windows application for use with the Chameleon CTM-15X
series of cellular wireless data modems. It provides a mechanism for loading new embedded firmware
with new application features into a modem that is locally accessible via its Ethernet and serial ports.
IMPORTANT…PLEASE READ
For upgrading firmware prior to R1.3.X (ie, R1.2.0, R1.2.2) to R1.3.X, use the Chameleon Serial Upgrade
utility version 2.0, as described in this document and available on our website
For upgrading firmware prior to R1.3.X (ie, R1.2.0, R1.2.2) use the Chameleon Upgrade utility version
1.2, which can be downloaded from our website.
© 2011 Cypress Solutions
Chameleon Serial Upgrade Utility Notes
(Revision 1.4)
2
4BOperation
For upgrading firmware from R1.3.X to other versions of R1.3.X, use the modem’s embedded Web page
(CTM Config | Upgrade) or the upgradefw command.
Requirements:
• Physical/local access to the CTM-15X modem to be upgraded
• CTM-15X firmware version R1.1.29_2 and above
• Chameleon Serial Upgrade version 2.0 and above
• PC with both serial port and Ethernet jacks
• A Windows Telnet client (installed by default on most PCs; may need to be installed on others)
• Windows 98, 2000, XP , Vista, 7
Installation:
Open the zip file and extract the ChameleonSerialUpgrade.exe file to a directory of your choice. The
Chameleon Serial Upgrade Utility is an executable file which is run simply by double clicking on the file
name.
5 Operation
Before performing this upgrade, disable all firewall software on your PC. DO NOT remove power from the
modem during this upgrade process.
Step 1: Download the firmware image file from the Cypress Solutions website
From the Cypress Solutions website, select and download the appropriate file for your modem, and save
the <CTM15n_Rn_n_n.bin> upgrade file to a directory of your choice.
Step 2: Connect Ethernet and serial ports of the modem to the PC
Connect the Ethernet ports of the modem and the PC directly via an Ethernet cable. Also, connect the
serial ports of the modem and the PC directly via a serial cable.
Step 3: Set up the PC to use a static IP for its LAN connection to the modem
Upon connecting the modem’s Ethernet port to your PC’s Ethernet port, Windows will display a notice in
the notification area of the Windows taskbar.
In the Windows taskbar notification area, right-click on the LAN connection icon and select Status.
© 2011 Cypress Solutions
Chameleon Serial Upgrade Utility Notes
(Revision 1.4)
3
4BOperation
On some PCs, the Local Area Connection (or similarly named connection) has not been configured to
show an icon in the Windows taskbar. If this is the case, you can access the connection from the Windows
Start Menu.
For Windows 98, 2000, or XP navigate to Start/Control Panel (Classic View)/Network Connections and
right-click on the Local Area Connection corresponding to the Ethernet port connected to the modem.
For Windows Vista, or 7 navigate to Start/Control Panel (Classic View)/Network and Sharing Center and
click on Status for the Local Area Connection corresponding to the Ethernet port connected to the
modem.
Under the General tab, select Properties.
© 2011 Cypress Solutions
Chameleon Serial Upgrade Utility Notes
(Revision 1.4)
4
4BOperation
Under the General tab, scroll down the list of items, select Internet Protocol (TCP/IP) (Windows Vista , or
7: Internet Protocol version 4 (TCP/IPv4)) and click on Properties.
Enter the following information into the Internet Protocol (TCP/IP) Properties and click OK.
© 2011 Cypress Solutions
Chameleon Serial Upgrade Utility Notes
(Revision 1.4)
5
4BOperation
Note that in the Internet Protocol (TCP/IP) Properties the DNS server addresses under Use the following
DNS server addresses do not need to be filled in.
Click OK to close the Local Area Connection Properties.
In the Local Area Connection Status window, click on the Support tab and verify that the Address Type is
Manually Configured and that the IP address, Subnet Mask, and Default Gateway match the
corresponding values shown in the previous screenshot.
Click Close to close the Local Area Connection Status window. Your PC is now configured to use a static
IP address of 192.168.1.20 for its Ethernet connection with the modem. From the PC, the modem can
now be accessed at the local IP address of 192.168.1.1.
Step 4: Determine the current firmware version
Access the Windows Command Prompt from the Windows Start Menu:
Start/All Programs/Accessories/Command Prompt
When in the Windows Command Prompt, Telnet into the modem at its local IP address by entering the
command: telnet 192.168.1.1
The CTM-15X will respond with its login prompt.
At the login prompt, type in admin (default user name). At the password prompt type in Chameleon
(default password, case sensitive). The password will not be visible when typed into the prompt.
© 2011 Cypress Solutions
Chameleon Serial Upgrade Utility Notes
(Revision 1.4)
6
4BOperation
A # prompt (R1.2.X and below) or / # prompt (R1.3.X and above) will be displayed indicating you now
have access to the device command line interface. At the prompt, to determine the modem’s current
firmware version by entering the following command: cmd ver
To end the local Telnet session, type exit at the prompt.
Step 5: Configure and run the Chameleon Serial Upgrade Utility
Run the Chameleon Serial Upgrade Utility.
In the PC’s IP Address field enter 192.168.1.20 (default).
In the Modem’s IP Address field enter 192.168.1.1 (default).
Select the proper Serial Port Settings. Note that the baud rate refers to that configured in the RedBoot
boot loader (default baud rate is 115200).
© 2011 Cypress Solutions
Chameleon Serial Upgrade Utility Notes
(Revision 1.4)
7
4BOperation
Select the RedBoot Config options based on the following table:
Old
New
FIS Update
FCONFIG Update
R1.2.X and below
R1.3.X and above
Checked
Checked
R1.3.X and above
R1.2.X and below
Checked
Checked
R1.2.X and below
R1.2.X and below
Unchecked
Unchecked
R1.3.X and above
R1.3.X and above
Unchecked
Unchecked
Select the firmware image file to use for the upgrade:
1. Type the path and filename in the space provided, or
2. Click the Browse button to bring up a dialog to select the firmware image (.BIN) file
The Status field near the bottom of the tool will give you feedback on the firmware upgrade progress.
Click the Start button. Click the button once only. When the Chameleon Serial Upgrade utility is ready
waiting for the next step, the Serial Port Settings will display “CONNECTED” and the Status field will
display "Entering into download mode".
Step 6: Power cycle the modem to begin the firmware upgrade
Power cycle the CTM-15X modem to begin the upgrade process.
Power cycling the modem can be done in one of two ways:
• Physically disconnect and reconnect the power cable.
• As described in Step 4, open a Telnet session to the modem and enter the command:
cmd pwrmode 2
After the power cycle, the Telnet session will disconnect.
When the Chameleon Serial Upgrade Utility has detected the power cycle, the Status field will display
“Waiting For RedBoot prompt”. Then, the Chameleon Serial Upgrade Utility will return one or more
of the following messages in the Status field (some messages are only shown when FIS Update
or FCONFIG Update options are checked):
•
•
•
•
•
•
•
•
•
•
•
•
•
•
Setting IP
Unlocking flash
Initializing fis partition (FIS Update only)
Creating unused1/zImageTmp partition (FIS Update only)
Creating unused2/ramdiskTmp partition (FIS Update only)
Creating config partition (FIS Update only)
Creating Flash partition (FIS Update only)
Creating nvsnf partition (FIS Update only)
Loading zImage file
Uploading zImage [x] Bytes
Creating zImage partition
Loading rootfs/ramdisk file
Uploading rootfs/ramdisk [x] Bytes
Creating rootfs/ramdisk partition
© 2011 Cypress Solutions
Chameleon Serial Upgrade Utility Notes
(Revision 1.4)
8
4BOperation
•
•
•
•
Creating FreeSpace partition (R1.2.X and below only)
Setting fconfig (FCONFIG Update only)
Rebooting modem
Upgrade complete
If an error occurs anywhere in the upgrade procedure, the Chameleon Serial Upgrade utility will display
an error message pop-up and the Status field will display “Update unsuccessful”.
When the upgrade has completed successfully, a notice will be displayed and the Chameleon Serial
Upgrade utility will power cycle the modem.
When the upgrade process is complete, the Serial Port Settings will display “DISCONNECTED” and the
Status field will show “Upgrade complete”. Click the Quit button to close the Chameleon Serial Upgrade
utility.
Step 7: Use serial console to verify upgraded firmware version, factory reset, and
save configuration
After the modem power cycles, the modem must be configured once via the serial console with the
factory default settings and then saved.
With the device powered up and connected directly to a PC with a serial cable, start up a terminal
emulation program such as Windows HyperTerminal or similar application and select the corresponding
COM port.
Configure the terminal emulation program with the following parameters:
• Data rate: 115,200 baud
• Data bits: 8
• Parity: None
• Stop bits: 1
• Flow control: None
Note: The above settings are the device default settings
© 2011 Cypress Solutions
Chameleon Serial Upgrade Utility Notes
(Revision 1.4)
9
4BOperation
IMPORTANT - PLEASE PERFORM THIS STEP
For firmware upgrades from R1.2.X to R1.3.X and above, the modem must be left powered on for 5
minutes to complete the firmware upgrade. After 5 minutes, the following verification steps must be
done before factory resetting the modem:
• Press the Enter key to return the / # prompt.
• Verify that the firmware upgrade is complete by entering the command: df
• In the output of the df command, verify that the following highlighted line is present:
To verify the upgraded firmware version, enter the command: cmd ver
For upgrades to firmware versions below R1.3.0.1705 including R1.1.X and R1.2.X:
• To factory reset a modem, enter the command: cmd factory
• To save the factory settings, enter the command cmd save
For upgrades to firmware versions R1.3.0.1705 and above:
• To factory reset an EVDO modem, enter the command: cmd factory full
• To factory reset an HSPA+ modem, enter the command: cmd factory full gsm
• To factory reset a wi-fi modem, enter the command: cmd factory full wifi
• The factory settings will be saved at the end of each of the above commands.
You have successfully completed the firmware upgrade. Now, you can reconfigure your modem using any
method of your choice:
• Serial console
• Telnet
• Web
• SSH (R1.3.X and above only)
• ULCP Download Script Files message (R1.3.X and above only)
• cmd confupgrade issued from serial console, Telnet, SSH, or ULCP Download Script Files message
© 2011 Cypress Solutions
Chameleon Serial Upgrade Utility Notes
(Revision 1.4)
10
5BTechnical Support/Warranty
6 Technical Support/Warranty
Cypress Solutions Service
Support Group
1.877.985.2878 or 604.294.4465
9.00am to 5.00pm PST
[email protected]
© 2011 Cypress Solutions
Chameleon Serial Upgrade Utility Notes
(Revision 1.4)
11