1
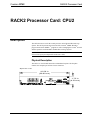
CNX Control Processor Card
Crestron CPU2
Physical View - Top and Side
5.33 in
(13.54 cm)
4.73 in
(12.01 cm)
Industry Compliance
As of the date of manufacture, this unit has been tested and found to comply with
specifications for CE marking.
NOTE: This device complies with part 15 of the FCC rules. Operation is subject to
the following two conditions: (1) this device may not cause harmful interference, and
(2) this device must accept any interference received, including interference that may
cause undesired operation.
CPU2 Installation or Replacement
When shipped, the RACK2 Card Cage System has the CPU2 installed. The
following procedure can be used to install (or re-install) or replace the CPU2. Items
required to install or replace the CPU2 are already attached to the unit. The only tool
required is a grounding strap.
CAUTION: The CPU2 contains electrostatic sensitive devices (ESD); observe
precautions for handling ESDs to avoid damaging the card.
2 • RACK2 Processor Card: CPU2
1.
Disconnect power from the control system then disconnect the
COMPUTER and NET connectors.
2.
If applicable, loosen the thumbscrews of the CPU2 being replaced and
pull outward to remove the card.
3.
Align the CPU2 to be installed with the card guides of the double-sized
CPU slot and slide the card into position.
4.
Firmly press both ends of the CPU2 faceplate to seat the card into the
control system connector.
5.
Tighten the thumbscrews finger-tight to secure the CPU2 to the control
system.
Installation Guide – DOC. 5961