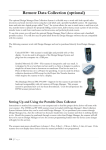
1
HT580 User Reference Guide
Version 1.0
HT580 User Reference Guide
Unitech Electronic CO. LTD
NOTICE
1. Li-Ion Battery Pack
The HT580 Portable Terminal and the Li-Ion Battery Pack are packaged separately.
You will have to install the Battery Pack when you receive your terminal. Please
ensure that the Li-Ion Battery Pack is properly installed and fully charged prior to
initial use of the HT580.
2. USB Driver Installation
The HT580’s USB driver is located on the CD included in this package. To activate
USB, please install the driver first.
HT580 User Reference Guide
Unitech Electronic CO. LTD
Content
Chapter 1: Introduction
1.1
1.2
1.3
1.4
1.5
1.6
1.7
1.8
1.9
1.10
1.11
1.12
Overview. . . . . . . . . . . . . . . . . . . . . . . . . . . . . . . . . . . . . . . . . . . . . . . . . . . . . . . . 4
Support. . . . . . . . . . . . . . . . . . . . . . . . . . . . . . . . . . . . . . . . . . . . . . . . . . . . . . . . . 4
Features. . . . . . . . . . . . . . . . . . . . . . . . . . . . . . . . . . . . . . . . . . . . . . . . . . . . . . . . 5
Technical Specifications. . . . . . . . . . . . . . . . . . . . . . . . . . . . . . . . . . . . . . . . . . . 5
Product Illustration. . . . . . . . . . . . . . . . . . . . . . . . . . . . . . . . . . . . . . . . . . . . . . . 6
Battery Storage & Safety Precautions. . . . . . . . . . . . . . . . . . . . . . . . . . . . . . . . 7
Communication Cradle . . . . . . . . . . . . . . . . . . . . . . . . . . . . . . . . . . . . . . . . . . . . 8
HT580 Communication with the Host . . . . . . . . . . . . . . . . . . . . . . . . . . . . . . . . 9
Interface Port . . . . . . . . . . . . . . . . . . . . . . . . . . . . . . . . . . . . . . . . . . . . . . . . . . . . 9
Pin Assignment. . . . . . . . . . . . . . . . . . . . . . . . . . . . . . . . . . . . . . . . . . . . . . . . . . 9
Keypad. . . . . . . . . . . . . . . . . . . . . . . . . . . . . . . . . . . . . . . . . . . . . . . . . . . . . . . . 10
Barcode Scanning Spetrum . . . . . . . . . . . . . . . . . . . . . . . . . . . . . . . . . . . . . . . 10
Chapter 2: Operating the HT580
2.1 2.1.1 2.1.2 2.1.3 2.1.4 2.2 2.3 Setting System. . . . . . . . . . . . . . . . . . . . . . . . . . . . . . . . . . . . . . . . . . . . . . . . . .
DATE & TIME. . . . . . . . . . . . . . . . . . . . . . . . . . . . . . . . . . . . . . . . . . . . . . . . . . .
DEVICE . . . . . . . . . . . . . . . . . . . . . . . . . . . . . . . . . . . . . . . . . . . . . . . . . . . . . . . .
MODEM INIT . . . . . . . . . . . . . . . . . . . . . . . . . . . . . . . . . . . . . . . . . . . . . . . . . . . .
SUPERVISOR . . . . . . . . . . . . . . . . . . . . . . . . . . . . . . . . . . . . . . . . . . . . . . . . . . .
FORMCACHING . . . . . . . . . . . . . . . . . . . . . . . . . . . . . . . . . . . . . . . . . . . . . . . . .
RUN APG580 . . . . . . . . . . . . . . . . . . . . . . . . . . . . . . . . . . . . . . . . . . . . . . . . . . .
11
11
11
12
12
12
12
HT580 User Reference Guide
Unitech Electronic CO. LTD
Chapter 1: Introduction
1.1 Overview
Thank you for choosing the HT580 from Unitech Electronic Co. Ltd. This Portable Data Collection
Terminal is one of the most user-friendly handheld terminals on the market - perfect for small retailers.
Developed under the C language, the HT580’s proprietary Operating System is capable of helping
you develop and run application programs specifically designed by you for your own unique business.
Weighing only 150g (5.3 oz), the light weight of the HT580 is ideal for the long work days typical in a
retail environment. Despite its light weight, the HT580 is unusually robust - capable of sustaining 1.2
meter (4 foot) drops to a concrete floor.
We believe the HT580 will more than satisfy your own unique retail requirements. The HT580 standard package includes the HT580 terminal, communication cradle, adaptor, USB & RS232 Y cable,
holster, and strap. Additionally, two alternative types of communication/charging cradles - RS232 and
Modem - are offered as options.
1.2 Support
Unitech has professional support teams around the world to answer your questions or any related
technical issues. Should equipment problems occur, please contact one of our regional service centers
for a quick response. Our six regional service centers and their contact information can be found on
the websites provided below:
UTC (China) http://www.ute.com.cn
APAC (Taipei, Taiwan) http://www.unitech-adc.com
UTJ (Japan) http://www.unitech-japan.co.jp
UTA (North and South America) http://www.unitech-adc.com
UTI (Netherlands, UK) http://www.unitech-europe.nl
HT580 User Reference Guide
Unitech Electronic CO. LTD
1.3 Features
HT580 includes the following features:
Operating System: Proprietary
Memory: 1MB
Display: 128 x 64 pixels
Keypad: 18-key keypad
Data Capture: CCD
Communication: Bluetooth / RS232 / USB
1.4 Technical Specifications
Model
HT580
Dimensions
123mm x 55mm x 25mm (4.8” x 2.2” x 1.0”)
Weight
150g (5.3 oz)
Drop Specification
1.2M (4 foot) free drop to concrete floor
Display
128 x 64 pixels; 16 x 8 characters or 12 x 4 characters
Battery
One 3.7V 600mAH Li-Ion battery
Environmental Sealing
IP42
Operation Temperature
0°~50°C (32°~122° F)
Storage Temperature
-20°~70°C (-4°~158° F)
Humidity
5% to 95% RH; not condensed
Electrostatic Discharge (ESD)
4 KV contact discharge
8 KV air discharge
Back-Lit Display
Yes
Keypad
18 alphanumeric keys including one scan trigger
CPU
ST UPSD3354DV
Operating System
Proprietary (C Language)
Memory
1 MB for main program and data storage
Application Development
EZ Job
Communication
RS232 / USB1.1 / Bluetooth / Modem
Battery Life
Up to 8 hours
Symbologies
China Postal Code, Codabar, Code 32, Code 39, Code 93, Code
128, Interleaved 2 of 5, MSI, UPC/EAN
Buzzer
Yes, over 75 dB
One LED
Reading (green color)
HT580 User Reference Guide
Unitech Electronic CO. LTD
1.5 Product Illustrations
This section is designed to familiarize you with the HT580 and its cradle. For detailed explanations
on some of the functions, please refer to subsequent chapters.
Figure 1: HT580 Front View
Figure 2: HT580 Back View
Figure 3: HT580 Top View
Figure 4: HT580 Bottom View
Figure 5: HT580 Battery Position
Figure 7: Modem Cradle Back View
Figure 6: HT580 Charging/Communication
Cradle, Featuring 2 Types of Communication:
RS232 and modem
Figure 8: RS232 Cradle Back View
HT580 User Reference Guide
Unitech Electronic CO. LTD
Top
Bottom
Figure 9: HT580 Communication/Charging Cable
Figure 10: HT580 Li-Ion Battery
1.6 Battery Storage and Safety Precautions
Batteries should be stored at normal room temperature. Avoid placing them in any situation where explosion or damage could possibly occur. The Li-Ion batteries may lose their charge if not used for several months due to back up and internal resistance. If this happens, we suggest recharging prior to use.
Remove Main Battery
To remove the main battery, press down on the release button while pushing out the cover on the unit.
We suggest that the battery not be removed, if possible.
Charging
When starting to operate the HT580, the main battery must be fully charged before the first use. The
HT580 is equipped with a 3.7V 600mAH Lithium-Ion battery. It takes 8 hours to fully charge the main
battery when empty. We suggest users recharge the battery regularly after long hours of use.
This icon shown in the menu indicates the current battery capacity status.
There are 2 ways to charge the main battery:
1. Mount the unit in the cradle and connect the power adaptor between the back of the cradle and
any power outlet.
2. Or, use the standard USB cable and connect it to your PC’s USB port.
HT580 User Reference Guide
Unitech Electronic CO. LTD
1.7 Communication Cradle
The HT580’s battery can be charged by placing the HT580 into its charging/communication cradle part number: 5000-601558 (RS232) / 5000-601557 (Modem)
Positioning Terminal Into Cradle
1. Figure A - Proper Position
Figure A shows the proper way to insert
your terminal while using the cradle to
transmit data or to charge.
Please note that the connector in the
bottom of the cradle may be damaged
if you use excessive force to insert the
terminal.
Front View
2. Figure B - Improper Position
Figure B shows the improper way to
insert the terminal into the cradle.
Do not insert the terminal into the cradle
incorrectly. It will not function properly
and damage can occur.
Back View
HT580 User Reference Guide
Unitech Electronic CO. LTD
Communication Cradle LED Icons
This LED light (Red) shows the power status of the cradle itself. An Illuminated light indicates
the cradle is charging. To identify if the terminal is fully charged, it may be necessary to check the
terminal LCD.
This LED light (Green) shows transmission status of the cradle itself. An Illuminated light indicates
that data is in transmission.
1.8 HT580 Communication with the Host
USB client 1.1 connection through cable
RS232/Modem Cradle Communication
1.9 Interface Port
The HT580 communicates via the RS232 communication port located on the bottom of the unit.
You can connect the HT580 directly via the communication cable to your PC’s RS232 port for data
transfer, or connect via the cradle.
1.10 Pin Assignment
Pin
1
2
3
4
5
6
Name
US-POWER
GND
DC-IN
USB DP
CTS
RTS
Pin
7
8
9
10
11
12
Name
DSR
GND
DTR
TXD
RXD
USB DP
HT580 User Reference Guide
Unitech Electronic CO. LTD
1.11 Keypad
The HT580 keypad consists of 18 rubber keys and one power key; the keypad is configured into three different
modes: Numeric mode, Command mode, and Alphabetic mode.
The keypad is configured in Numeric mode by default, Command mode when the light green CMD key is
selected, or Alphabetic mode when the blue ALPHA key is selected.
Keypad Description
[
] To power on the unit press the power key.
The power key is on top right corner of the cover.
[ESC]
Returns you back to the previous menu.
[MENU]
Press [MENU] to scroll items you require.
[SCAN]
Press [SCAN] to trigger scanning function or to perform
as the [ENTER] key while in [SETTING] mode.
[C]
Press [C] to delete.
[ENTER] Press [ENTER] to save changes or to go to the next page.
[ALPHA] Press [ALPHA] to switch to Alphabet.
Any alphabetical character (printed in blue) can be activated with the ALPHA key.
[CMD]
Press [CMD] to perform delimiters such as “#”, “$” etc.
Any delimiter (printed in green) can be activated with the CMD key.
1.12 Barcode Scanning Spectrum
10
HT580 User Reference Guide
Unitech Electronic CO. LTD
Chapter 2: Operating the HT580
After powering on the HT580, you will see the Main Menu as below:
HT580 V1.06
1. SETTING
2. FORMCACHING
3. RUN APG580
2.1 Setting System
Press [1] or [MENU] to enter “SETTING” category. There you will see the following four options:
1. DATE & TIME, 2. DEVICE, 3. MODEM INIT, 4. SUPERVISOR
2.1.1DATE & TIME:
Press [1] or [MENU] to enter the DATE & TIME category to set the correct date and time. The
page will appear as it is shown below:
YYYY-MM-DD
2000-01-08
HH-MM-SS
05:50:35
Press numeric keys to input correct date and time. Once complete, press [ENTER] to save the
revised settings. To return to the previous menu, press [ESC].
2.1.2DEVICE
When you select device setting, you will be able to see three settings as shown below:
1. BACKLIGHT
2. SCANNER
3. AUTORUN
2.1.2- 1 < BACKLIGHT >
Press [1] or [scan] to enter <BACKLIGHT> mode and to press [ESC] to go back to the device
setting mode.
< BACKLIGHT > selection: press [MENU] to scroll down on your preferred mode of backlight
duration as ON 10 SECS / ON 20 SECS / ON 30 SECS / ON 60 SECS / Always OFF. Once you
select the preference for backlight duration, press [ENTER] to complete the setting.
Note: Selecting “ON 10 SECS“ means that backlight remains active for 10 seconds. The default
may be reset if you press any key while the backlight is active.
11
HT580 User Reference Guide
Unitech Electronic CO. LTD
2.1.2- 2 < SCANNER >
Press [2] or [scan] to enter <SCANNER> mode. Press [ESC] to return to the device setting mode.
< SCANNER > selection: ON NORMAL/ON FLASH/OFF. Selecting your preference and press [ENTER]
to complete the setting.
2.1.2- 3 < AUTORUN>
Press [3] or [scan] to enter <AUTORUN> mode. Press [ESC] to go return to the device setting mode.
<AUTORUN> automatically runs the selected program once you change the default. AUTORUN default
is set up on <OFF> mode. Three programs can be selected: < FORMCACHING>, <APG580>, and <OFF>.
Once you define the selected program, the program will automatically activate when you restart the unit.
The main menu will run in the program.
2.1.3 < MODEM INIT >
To perform modem command, plug in the modem and it will be automatically initiated. To execute <MODEM
INIT>, press [3] or [scan] to enter this mode. Press [ESC] to go back to the previous menu.
2.1.4 < SUPERVISOR >
When entering into <SUPERVISOR> mode, you will be required to input your password.
For password and detail reference, please refer to the Technical Binder.
Press [4] or [scan] to enter <SUPERVISOR> mode setting. Press [ESC] to go back to the previous menu.
2.2
FORMCACHING
In the main menu, there is FORMCACHING to be performed while scanning.
In the default setting for FORMCACHING, you will see “Item” as defined in field 1 and “Qty” as defined in
field 2. To change the default of the field, go to “FORM” under “SUPERVISOR” in the mode category. To
start <FORMCACHING>, press [2] or [scan] to enter and press [ESC] to go back to the previous menu.
2.3
RUN APG580
To run on “APG580”, please refer to the technical binder for detailed instructions.
12