1
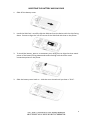
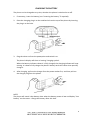
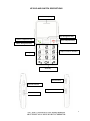
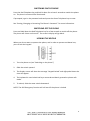
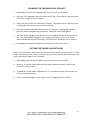
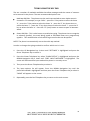
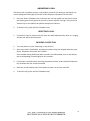
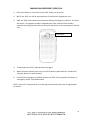
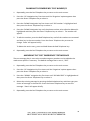
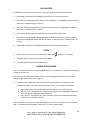
COTA MOBILE PHONE USER GUIDE September 2011 This User Guide has been written to help you get the most from your COTA Mobile Phone. It provides set-by-step instructions for most of the main features and functions of the phone. The Manufacturer’s User Manual that came with the phone also provides instructions for other functions and should therefore be read in conjunction with this User Guide. This User Guide is available to print from www.cotamembership.org.au. 1 COTA MOBILE PHONE USER GUIDE – CONTENTS GETTING STARTED............................................................................................................PAGE 3 SIM CARD INFORMATION................................................................................. ...............................4 INSERTING BATTERY AND SIM CARD ...............................................................................................5 CHARGING THE BATTERY .................................................................................................................6 KEYPAD AND SWITCH DESCRIPTIONS ..............................................................................................7 SWITCHING ON/OFF ........................................................................................................................9 SETTINGS ................................................................................................................................11 CHANGING THE TIME/DATE .....................................................................................................12/13 CHANGING VOLUMES ....................................................................................................................14 TYPING ...........................................................................................................................................15 MAKING AND RECEIVING CALLS ..............................................................................................16 USING PHONE BOOK .................................................................................................................18-20 SPEED DIAL .....................................................................................................................................21 CALL DIVERT ...................................................................................................................................22 TEXT MESSAGING ...................................................................................................................23 “SOS EMERGENCY SWITCH .....................................................................................................28 OTHER FUNCTIONS .................................................................................................................33 FM RADIO ......................................................................................................................................34 EVENT REMINDERS ........................................................................................................................35 CALCULATOR/TORCH/HANDSFREE.................................................................................................36 NUMBER ANNOUNCER ..................................................................................................................37 2 GETTING STARTED 3 SIM CARD INFORMATION A SIM card is necessary to make and receive calls on a mobile phone. The SIM card connects the mobile phone to the mobile phone network. When you get a SIM card it is for a particular phone carrier such as Telstra, Optus and Vodaphone. The COTA Mobile Phone is a 2G/GSM mobile phone and is unlocked. This means it can be used with any SIM card, from any phone carrier, as long as it is compatible with a 2G/GSM mobile phone. If you already have a SIM Card and want to keep using it in the COTA Mobile Phone, please first confirm with your carrier that your SIM Card is compatible with a 2G/GSM mobile phone. If it is, you can use your SIM Card in the COTA Mobile Phone and retain your phone number and any information saved on your SIM Card, such as your Contacts. You can also purchase a new SIM card to put in the COTA Mobile Phone, as long as it is compatible with a 2G/GSM mobile phone. The COTA Mobile Phone may also work with a "Next G" or "3G” SIM card. Again, check with the provider who will confirm whether their Next G or 3G SIM cards are compatible with the COTA Mobile Phone. 2G/GSM isn’t inferior to Next G/3G, nor will 2G/GSM become obsolete or disappear. 2G/GSM is the technology that underpins most of the world's mobile phone networks. The Next G/3G network enables mobile phones to perform many enhanced features such as internet surfing and video calling - which the COTA Mobile Phone doesn’t have. SIM Cards can be bought from phone shops such as Crazy Johns or All Phones or directly from the phone carrier retailers such as Telstra, Optus and Vodaphone. There are two options to purchase a SIM card, pre-paid or post paid. You need to select a SIM Card that will suit your mobile phone usage. 4 INSERTING THE BATTERY AND SIM CARD 1. Slide off the battery cover. 2. Install the SIM Card - carefully slide the SIM card into the device with the chip facing down. Ensure to align the 'cut off' corner of the SIM Card with that on the phone. 3. To install the battery, place it in the battery slot, being sure to align the three metal points of the battery facing downwards and matching with the three metal connection points on the phone. 3. Slide the battery cover back on - slide the cover closed until you hear a “Click”. 5 CHARGING THE BATTERY The phone can be charged at any time, whether the phone is switched on or off. 1. If necessary, insert the battery (see “Inserting the battery” if required). 2. Place the charging plug in to the smallest hole on the top of the phone by inserting the plug in to the hole. 3. Plug the other end into the powerpoint and switch it on. The phone's display will show a 'moving' charging symbol. When the battery indicator shows it is fully charged, the charging indicator will stop moving. It is best to fully charge the phone's battery each time rather than partially charge it. 4. After charging, pull out the charger from the power outlet first, and then pull out the charger plug from the phone. NOTE: The phone will sound a low battery alert when the battery power is low and display “low battery” on the screen. Charge the battery after this alert. 6 KEYPAD AND SWITCH DESCRIPTIONS Screen Display Up Navigation Key Green Telephone Key Red Telephone Key Down Navigation Key Alpha-numeric Buttons Keypad Zero Key Torch Switch Pad Volume Switch Key Pad Lock Switch Radio Switch 7 NAME Green Telephone Key Red Telephone Key Up Key Navigation Key Down Key Alpha-numeric Key Pad Zero Key Volume Key Radio Switch Torch Switch Key Pad Lock Switch SOS Emergency Call Switch FUNCTION Press to make calls after dialling the number. Press to answer in-coming calls. Press to enter the call record list. Confirm a menu selection when it appears on the screen. Turn the phone on - press for several seconds. Turn the phone off - press for several seconds. Cancel any selection made from the menu. Press to view the menu options. Press to scroll up the menu items. Press to move the cursor upwards. Press to enter the Phonebook. Press to scroll down the menu items. Press to move the cursor downwards. Numbers 0 - 9. Symbols * and #. Alpha keys. Hold down for silent mode activation. To deactivate, hold Zero key again. Press the volume key“+” to turn up the volume; Press the volume key “-” to turn down the volume. Can be used during a call and whilst listening to the radio. Slide up to turn on the radio. Slide down to turn off the radio. Slide up to turn on the torch. Slide down to turn off the torch. Slide up to lock the keypad. Slide down to unlock the keypad. Slide down to activate and call the pre-set emergency phone numbers. Slide up to end calling the emergency numbers, to cancel any false alarms and to reactivate the SOS Switch. SOS Switch NOTE: Keep the SOS Switch in the up position when not in an emergency situation. 8 SWITCHING ON THE PHONE Press the Red Telephone key and hold it down for at least 3 seconds to switch the phone on. The phone's screen will be illuminated. If prompted, type in the password code and press the Green Telephone key to enter. See “Setting, Changing or Removing The Phone’s Password ” for more information. SWITCHING OFF THE PHONE Press and hold down the Red Telephone key for a few seconds to switch off the phone. The phone will chime and turn off. The screen's display will go blank. LOCKING THE KEYPAD When you do not want to operate the phone, and in order to prevent accidental use, you can lock the keypad. 1. Turn the phone on (see “Switching on the phone”) 2. Slide the switch upward. 3. The display screen will show the message "Keypad locked" and asymbol above the time will appear. 4. The keyboard is now locked and keys cannot be accidently pressed or phone calls made. 5. To unlock, slide the same switch downward. NOTE: The SOS Emergency function will still work if the phone is locked. 9 ACTIVATING THE PHONE’S PASSWORD You can set up your phone so that it requires a password to be entered when it is switched on. This may prevent unauthorised use. If the phone is switched off, you will be prompted to enter the password when the phone is turned on again. 1. Repeatedly press the Red Telephone key to return to the main screen. 2. Press the ‘UP’ Navigation key four times until “Settings” is highlighted and then press the Green Telephone key to select it. 3. Press the ‘DOWN’ Navigation key twice until “SECURITY SETUP” is highlighted and then press the Green Telephone key to select it. 4. Press the ‘DOWN’ Navigation key once until “PHONE LOCK” is highlighted and then press the Green Telephone to select it. 5. Enter in the password (the default is 1122) and press the Green Telephone key to confirm. CHANGING THE PHONE’S PASSWORD 1. If you want to change the password, from the home screen you need to press the UP key 4 times to “SETTINGS”, press the Green Telephone Key. Scroll down “SECURITY SETUP”. 2. Scroll down again 4 times to “CHANGE PASSWORD” and scroll down twice to “PHONE PASSWORD”. 3. Press the green telephone key and input the old password then the new one twice. The screen will then say “PASSWORD CHANGED”. 4. If password is activated, you need to input correct password code each time you power up your phone. 5. If this function is deactivated, password is not necessary on power up. 10 SETTINGS 11 CHANGING THE TIME The phone stores the current date and time. It will need to be initially set and at times changed for example when travelling or for daylight savings. If the battery is drained, the date and time setting will have to be reset. The time can either be saved in 24-hour or 12-hour am/pm format. 1. Repeatedly press the Red Telephone key to return to the main screen. 2. Press the ‘UP’ navigation key four times until “Settings” is highlighted, then press the Green Telephone key to select it. 3. Press the Green Telephone key to select 'Phone setup' when highlighted. 4. Press the Green Telephone key to select 'Time and date' when highlighted. 5. Press the Green Telephone key to select 'Set time /date' when highlighted. 6. Use the keypad to enter the time. Simple type the current time using the '24 hour clock' method. For example, if it is 10:20am simply enter '1020’. If it is 10:20pm, then enter '2220'. Press the Green Telephone key to save the change. 'Done' will appear briefly. 7. Repeatedly press the Red Telephone key to return to the main screen. To change the time format, press the DOWN Navigation key until 'Set format' is highlighted. Press the '6' number on the key pad to select either '12' (12 hour format) or '24' ( 24 hour format). When selected, press the Green Telephone key to save the change. 'Done' will appear briefly. 12 CHANGING THE DATE The phone stores the current date and is displayed on the main screen. 1. Repeatedly press the Red Telephone key to return to the main screen. 2. Press the ‘UP’ navigation key four times until “Settings” is highlighted and then press the Green Telephone key to select it. 3. Press the Green Telephone key to select 'Phone setup' when highlighted. 4. Press the Green Telephone key to select 'Time and date' when highlighted. 5. Press the Green Telephone key to select 'Set time /date' when highlighted. 6. Press the ‘DOWN’ navigation, the date will appear. Type the date in the format YYYY/MM/DD. 7. Press the Green Telephone key to save the change. 'Done' will appear briefly. 8. Repeatedly press the Red Telephone key to return to the main screen. CHANGING THE USER PROFILE User profiles are different settings for the phone based on where you are, for example in a meeting or outdoors etc. The user profiles are: General – recommended for everyday use Meeting – when low volume settings are required Outdoor – when loud volume settings are required Indoor – recommended for use inside Headset – to be activated when the ear piece is plugged in These profiles allow you to quickly and easily change the settings of the phone. 1. Press the ‘UP’ Navigation key three times until it says “User Profiles” and then press the Green Telephone key to select it. 2. The current profile is indicated by the Arrow on the left hand side of the option. 3. Press the DOWN Navigation key to select the profile you wish to modify and press the Green Telephone key to select it. 4. Scroll down to “CUSTOMIZE” if you wish to edit any of the settings for the profile. 5. Repeatedly press the Red Telephone key to return to the main screen. 13 CHANGING THE INCOMING CALL VOLUME 1. Repeatedly press the Red Telephone key to return to the main screen. 2. Press the ‘UP’ Navigation key three times until it says “User Profiles” and then press the Green Telephone key to select it. 3. Select the User Profile you would like to change. The profile that is currently in use in the profile with the Arrow on the left hand side. 4. Press the ‘DOWN’ Navigation key once until 'Customize' is highlighted and then press the Green Telephone key to select it. 'Ringtone' will be highlighted. 5. Press the Green Telephone key and the current ringtone volume will be heard. Use the “UP” and “DOWN” Navigation key to adjust the volume to suit your needs. When the desired volume is achieved, press the Green Telephone key to select it. 6. Repeatedly press the Red Telephone key to return to the main screen. PUTTING THE PHONE IN SILENT MODE There are times when it would be inconvenient for the phone to ring out loud. In silent mode, the phone will still receive incoming calls, but the ring tone won't be heard. The screen will light up when a call is received. 1. Repeatedly press the Red Telephone key to return to the main screen. 2. Hold the “0” button (zero) down until the phone vibrates and says “Silent mode activated” on the screen. 3. To deactivate silent mode, hold down the “0” (zero) button again until screen says, “General mode activated”. 4. This can also be changed in User Profiles (see “Changing the User Profile”) 14 TYPING USING THE KEY PAD The are a number of methods available that allow messages and the names of contacts to be entered in the phone. The two recommended options are: Multitap ABC/abc: The phone uses the multi-tap method to enter alpha-numeric characters. For example, to type 'Hello' - press the '4' key twice to select the letter 'h' - press the '3' key twice to select the letter 'e' - press the '5' key three times to select the letter 'l' - press the '5' key three times to select the letter 'l' - press the '6' key to select the letter 'o'. Press the “0” (zero) button to create a space in between words Smart ABC/abc : This is also known as predictive typing. The phone tries to recognise in advance (predict), the word being typed as individual letters are progressively typed in. This method takes a little while to get used to but can be quicker. NOTE: The phone is automatically set to the multi-tap method. In order to change the typing method or confirm which one is in use: 1. Press the UP Navigation key 4 times until “SETTINGS” is highlighted and press the Green Telephone key to select it. 2. Press the Green Telephone key when “PHONE SETUP” is highlighted and press the DOWN Navigation key 3 times until “PREF. INPUT METHODS” is highlighted. The screen will indicate what input method the phone is currently set to. 3. Then press the Green Telephone key to select it. 4. The input options list will appear. Press the DOWN Navigation key until the preferred method is highlighted and then press the Green Telephone key to select it. "DONE" will appear on the screen. 5. Repeatedly press the Red Telephone key to return to the main screen. 15 MAKING AND RECEIVING CALLS 16 ANSWERING A CALL The phone will ring when you get a call (and/or vibrate if this setting is activated), the screen background will light up and the screen displays information of the caller. 1. Press the Green Telephone key to answer the call and speak into the phone. Place the display part of the phone to your ear to listen and talk. During a call, press the Volume key on the side of the phone to adjust the volume. 2. To end the call, press the Red Telephone key. REJECTING A CALL 1. If you don’t want to answer the call, press the Red Telephone Key when it is ringing and the call will be disconnected. MAKING A VOICE CALL 1. Turn the phone on (see “Switching on the phone”) 2. Enter area code, if applicable, and phone number using the keypad and then press Green Telephone key to dial the number. If the number being dialled has been stored in the Phonebook, then it will display the corresponding name assigned to this number. 3. If you make a mistake when entering the phone number, press the Red Telephone key to delete the last numeral entered. 4. Place the screen display part of the phone to your ear to listen and talk. 5. To end the call, press the Red Telephone key. 17 ADD AN ENTRY TO THE PHONE BOOK You can store phone numbers under a person’s name so you don’t have to remember their phone number each time. These can be saved to the phone itself or on to the SIM Card. 1. Repeatedly press the Red Telephone key to return to the main screen. 2. Press the “UP" Navigation key once and “PhoneBook” menu will appear. 3. Press the Green Telephone key to go into “PhoneBook” menu. 4. Press the “DOWN” Navigation key twice until “Add New contact” is highlighted and press the Green Telephone key to select it. 5. When '1 To SIM' appears, press the Green Telephone key to save the contact to the SIM card. 6. To save it to the phone, press the "Down" Navigation key until '2 To phone' appears and press the Green Telephone key. 7. When 'Name' appears and is highlighted, press the Green Telephone to select it. 8. Type in the name of the person who has the phone number you are saving, using the typing input method you have selected. If you make a mistake at any time, press the Red Telephone key to delete the character you just entered, or press and hold it to delete the whole word. 9. When finished, press the Green Telephone key to save the name and then again when 'Done' appears and is highlighted. 10. Press the 'Down' Navigation key until 'Number' is highlighted - note, the word 'Number' will be blanked out. 11. Enter in the phone number using the numeric keypad then press the Green Telephone key to save it. 12. When prompted to 'Save?', press the Green Telephone key to save. 13. Repeatedly press the Red Telephone key to return to the main screen. 18 FIND OR SEARCH AN ENTRY IN THE PHONE BOOK 1. Repeatedly press the Red Telephone key to return to the main screen. 2. Press the “UP” navigation key once until you see the “PhoneBook” menu. 3. Press the Green Telephone key to go into PhoneBook. 4. Press the “DOWN” Navigation key once until 'Search contact' is highlighted, then press the Green Telephone key. 5. Using the multi-tap method, type the first three letters of the name to be edited, then press the Green Telephone key. Then when 'Search' is highlighted, press the Green Telephone key. The phone will display all names in your Phonebook that start with these three letters. Use the 'Up' or 'Down' Navigation keys to highlight the name you wish to edit, then press the Green Telephone key. 6. Press the Green Telephone key when on the name to select it. 7. A list of Options will be listed, with 'Call' being the first. Pressing the Green Telephone key will call that person. 8. Pressing the “DOWN” Navigation key will provide other options to perform using the phone book entry such as Text (send a message), View, Edit and Delete. 19 CHANGE AN ENTRY IN THE PHONE BOOK You might need to change the names and numbers stored in the Phonebook. 1. Repeatedly press the Red Telephone key to return to the main screen. 2. Press the “UP” Navigation key once until you see the “PhoneBook” menu. 3. Press the Green Telephone key to go into PhoneBook. 4. Press the “DOWN” Navigation key once until 'Search contact' is highlighted, then press the Green Telephone key. 6. Using the multi-tap method, type the first three letters of the name to be edited, then press the Green Telephone key. When 'Search' is highlighted, press the Green Telephone key again. 7. The phone will display all names in the Phonebook that start with these three letters. Use the 'UP' or 'DOWN' Navigation key repeatedly to highlight the name you wish to edit, then press the Green Telephone key. A list of options will appear. 8. Press the “DOWN” Navigation key four times until 'Edit' is highlighted, then make the edits the same way as loading a new contact. 9. When prompted to 'Save?' press the Green Telephone key. 10. Repeatedly press the Red Telephone key to return to the main screen. DELETE AN ENTRY FROM THE PHONEBOOK You may need to remove names and numbers from the PhoneBook. 1. Repeatedly press the Red Telephone key to return to the main screen. 2. Press the “UP” Navigation key once then press the Green Telephone key to go into Phonebook. 3. Find the name to be deleted by searching in the Phonebook (see Phone Book Searching) 4. Once found, press the Green Telephone key to select the name to be deleted. 5. Press the “DOWN” Navigation key four times until 'Delete' is highlighted. 6. Press the Green Telephone key. 7. When prompted with the word "Delete", press the Green Telephone key to delete the name. "Deleted" will briefly appear on the screen. 20 SETTING UP SPEED DIAL NUMBERS The phone has the ability to store 11 regularly called phone numbers in a speed dial format, so that you can dial the number with the press of one key only. You can only add numbers that are in the phone’s Phonebook. See “Add an entry to the Phone Book”. 1. Repeatedly press the Red Telephone key to return to the main screen. 2. Press the “UP” Navigation key once until “PHONEBOOK” is highlighted and press the Green Telephone key. 3. Press the “UP” Navigation key once until “SPEED DIAL” is highlighted and press the Green Telephone key again until “STATUS ON” appears. 4. Press the “UP” Navigation key once until 'Set number' is highlighted and then press the Green Telephone key to select it. 5. You will see the first entry highlighted. It will start with the number '2' and say <Empty>. The '2' corresponds to that number on the keypad (the number two in this case) to which a speed dial will be assigned. The key pad numbers that can be assigned a speed dial are the numbers 2 - 9 as well as the '#' key and the '*' key. 6. Press the Green Telephone key and “EDIT” will be highlighted. Press the Green Telephone key again to edit. 7. Press the “DOWN” Navigation key to find the entry in the Phonebook that you wish to link to speed dial and then press the Green Telephone key to assign it to the number 2 on the key pad. 'Saved' will appear on the screen briefly. 8. To add another names to the speed dial, press the DOWN Navigation key and '3 <Empty> will be highlighted. Repeat the process. To dial a speed dial number, press and hold that number of the key pad that has the number assigned which you want to call. For example, if you set up the '2' key as a speed dial for a person called Tony, when you press and hold down the '2' key for 3 seconds it will dial Tony’s number from your Phonebook. 21 SETTING UP CALL DIVERT You can set your phone up to divert to another number if it is busy, switched off or if it rings out. Most people divert calls to voicemail so the caller can leave a voice message for them. Contact the service provider that provided your SIM card to find out the your voice mail phone number. Note there may be fees for using voicemail – obtain this information from the provider of your SIM card. 1. Repeatedly press the Red Telephone key to return to the main screen. 2. Press the ‘UP’ Navigation key seven times until it says “Call Centre” and then press the Green Telephone key to select it. 3. Press the ‘DOWN’ Navigation key once until “Call settings” is highlighted and then press the Green Telephone key to select it. 4. Press the ‘DOWN’ Navigation key twice until “Call Divert” is highlighted and then press the Green Telephone key to select it. A list of divert options will be displayed. 5. Press the ‘DOWN’ Navigation key until the preferred divert option is highlighted and then press the Green Telephone key to select it. 6. Press the press the Green Telephone key when “Activate” is highlighted. Two options will then be presented: a) b) 'To new number' and 'To voice mail'. Highlight the preferred option using the "DOWN Navigation key. 7. Enter the phone number to divert calls to. If the diversion is 'To voice mail', you’ll need to get this number from your network provider 8. Press the Green Telephone key to confirm the diversion. 9. Press the Red Telephone key any time you wish to cancel the operation. 10. Repeatedly press the Red Telephone key to return to the main screen. 22 TEXT MESSAGING 23 OPENING AND READING A NEW TEXT MESSAGE Text messages are also called SMS. They are a great tool to use for relaying quick messages to anyone that has a mobile phone number. By default, SMS' are stored on the SIM card. 1. If you have received an SMS, the phone will vibrate, sound a chime and the screen will display the words "message from [phone number]" or the sender’s name if they are stored in the Phonebook. 2. To read the message immediately, press the Green Telephone key and the screen will display the date and time the message was received and the actual message. To defer reading the message, press the Red Telephone key. An envelope symbol will remain on the screen until you read the new message. See “Opening an existing text message”. Press the Green Telephone key again and a list of options will be displayed - REPLY: to reply to the sender of the message - DELETE: delete the message that you’ve just read - FORWARD: to send the message on to another mobile number - COPY TO PHONE: to store another copy of the message on the phone’s memory, as well as the SIM card - MOVE TO PHONE: to store the current copy of the message on the phone’s memory, instead of the SIM card - DELETE ALL: delete all of the messages in the phone’s inbox - COPY ALL: copy all of the messages in the phone’s inbox - MOVE ALL: move all of the messages in the phone’s inbox 3. Press the ‘DOWN’ Navigation key until the preferred option is highlighted and then press the Green Telephone key to select it. 4. If you wish to reply to the message immediately, see “Replying to a text message”. 5. If you don’t wish to reply immediately to the message, when you’ve finished reading, press the Red Telephone key twice to return to the main screen. 24 REPLYING TO A TEXT MESSAGE To reply to an SMS that you have received. 1. After opening and reading the message, press the Green Telephone key to enter the options menu. The 'Reply' option will be highlighted, press the Green Telephone key to select it. 2. Type out the message you would like to send and press the Green Telephone key. 3. The word 'DONE' will be highlighted, then press the Green Telephone key to send your message. 4. 'Sent' will appear on the screen. 5. Repeatedly press the Red Telephone key to return to the main screen. OPENING AN EXISTING TEXT MESSAGE 1. Repeatedly press the Red Telephone key to return to the main screen. 2. Push the “UP” Navigation key six times until the “Messages” appears, then press the Green Telephone key to select it. 3. Press the “DOWN” navigation key once until it says “INBOX”- it will advise how many message have been received. Press the Green Telephone key to select it. 4. Press the ‘DOWN’ Navigation key until you see the message you want to view. 5. Press the Green Telephone key to select the message you wish to read. You can use the “DOWN” Navigation key to scroll down the screen to read the entire message. 6. Press the Green Telephone key and a list of options will appear. 7. Press the ‘DOWN’ Navigation key until you see the option you wish to use is highlighted. Press the Green Telephone key to select it and proceed accordingly. 8. Repeatedly press the Red Telephone key to return to the main screen. 25 WRITING AND SENDING A TEXT MESSAGE 1. Repeatedly press the Red Telephone key to return to the main screen. 2. Push the 'UP' Navigation key six times until the “Messages” appears, then press the Green Telephone key to select it. 3. 'Write message' will be highlighted, press the Green Telephone key to select it. 4. Type your message using the multi-tap method. For example, to type 'Hello' - press the '4' key twice to select the letter 'h' - press the '3' key twice to select the letter 'e' - press the '5' key three times to select the letter 'l' - press the '5' key three times to select the letter 'l' - press the '6' key to select the letter 'o'. Press the “0” button to create a space when you need one. 5. When you’ve finished your message, press the Green Telephone key. The word ‘Done' will be highlighted, then press the Green Telephone key. 6. A list of 'Send options' will appear. Press the "DOWN" Navigation key until the preferred option is highlighted, for example 'Send only'. Then press the Green Telephone key to select the option you want. 7. Enter the phone number by either using the numeric keypad, or pressing the Green Telephone key and scrolling using the Navigation key to choose a name/number from your Phonebook. Use the Green Telephone key to select the number. 8. When you’ve finished your message, press the Green Telephone key to 'Send' your message. 'Sent' will appear on the screen. 9. Repeatedly press the Red Telephone key to return to the main screen. MESSAGE TEMPLATES A template is a starting point for sending a message. Templates allow the sending of a text message without having to type it out every time. If you send similar messages often, templates can be edited and stored for when you need to use them in future. 1. Follow the procedure of how to type a text message. When 'Write message' is highlighted, press Green Telephone key twice and a list of options will appear. Press the ‘DOWN’ Navigation key until 'Use Template' is highlighted. 2. Press the ‘DOWN’ Navigation key again until the required template to use is highlighted, then press Green Telephone key to select it. The message will be displayed. 3. Press the Green Telephone key and the word 'Done' will be highlighted, then press the Green Telephone key. 26 4. A list of 'Send options' will appear. Select the one you want by pressing the Green Telephone key, for example, 'Send only'. 5. Enter the phone number by either using the numeric keypad, or pressing the Green Telephone key and using the Navigation keys to choose a name/number from your Phonebook. Use the Green Telephone key to select the number. 6. When you’ve finished your message, press the Green Telephone key to 'Send' your message. 'Sent' will appear on the screen. 7. Repeatedly press the Red Telephone key to return to the main screen. EDITING TEMPLATES A maximum of ten templates can be stored in the phone. A new template can be added by either editing one of the default templates or replacing a template. 1. Repeatedly press the Red Telephone key to return to the main screen. 2. Press the “UP” Navigation key 6 times to “Messages” and press the Green Telephone key to select it. 3. Press the ‘DOWN’ Navigation key 3 times until 'Templates' is highlighted and press the Green Telephone key to select it. The list of templates will appear. 4. Press the ‘DOWN’ Navigation key until the template you wish to edit is highlighted, then press the Green Telephone key to select it. A list of options will appear. 5. Press the ‘DOWN’ Navigation key until the preferred option is highlighted. 6. Once the template has been edited accordingly, press the Green Telephone key and then 'Save' will be highlighted. Press the Green Telephone key again. 7. Press the Green Telephone key once more when 'save?' appears on the screen. 'Saved' will appear briefly. 8. Repeatedly press the Red Telephone key to return to the main screen. 27 “SOS” EMERGENCY SWITCH 28 A unique feature of the COTA Mobile Phone is the 'SOS' switch, on the back of the phone. You can pre-programme/assign to the 'SOS' switch, up to five phone numbers of trusted people. These can be a mobile phone number or a land line. When you are in emergency and need help from others, when you slide the ‘SOS’ switch down, the assigned phone numbers will be called in sequence. You don't need to dial the phone numbers yourself. If the first number called is not answered, the next assigned phone numbers will be called. “000” is the default phone number assigned to the ‘SOS’ switch if no other phone numbers are assigned to it. If for any reason, the phone does not have a SIM card in it, you can still use the SOS function to call “000”. If you assign your own phone number/s to the ‘SOS’ switch, then "000" will be automatically removed and so, will need to be manually assigned should you wish "000" to be one of the numbers assigned to the ‘SOS’ switch. When the ‘SOS’ switch is activated, the phone will also send a text message to the assigned numbers, if it is a mobile phone number. The default message is “SOS”, but this can be edited to suit. When activated, the phone will also sound a loud alarm. This alerts other people in the area and is an alert if the ‘SOS’ switch is accidentally activated. Because the ‘SOS’ switch is a function of the mobile phone, you can feel safer when you leave home because you don’t have to remain within a certain distance of a base unit for the ‘SOS’ function to work. And, there are no monitoring plans to set up or monitoring fees to pay for the ‘SOS’ function to work. 29 SETTING UP THE ‘SOS’ EMERGENCY FUNCTION 1. Repeatedly press the Red Telephone key to return to the main screen. 2. Press the 'UP' Navigation key five times until the 'Organizer' option appears, then press the Green Telephone key to select it. 3. Press the ‘DOWN’ Navigation key four times until 'SOS number' is highlighted and then press the Green Telephone key to select it. 4. You will see the first entry. It will start with the number '1' and say <Empty>. 5. Press the Green Telephone key and then input the telephone number to assign. 6. Press the Green Telephone key to confirm - the message 'Done' will appear. 7. This will be the first number the Phone will call when the 'SOS' switch is activated. 8. Press the 'DOWN' navigation key to assign another number to the number '2' option and so on, for up to five numbers. 9. Enter the phone number, and then press the Green Telephone key to save it. 10. Repeatedly press the Red Telephone key to return to the main screen. If you need to change an emergency number, see the “Editing Emergency Numbers” procedure. 30 MAKING AN EMERGENCY (SOS) CALL 1. Ensure the Phone is turned on for the 'SOS' feature to be active. 2. NOTE: the 'SOS' can still be activated even if the Phone's keypad lock is on. 3. Slide the 'SOS' switch down to activate the dialing of emergency numbers. An alarm will sound. All assigned numbers assigned to the 'SOS' switch will be called in sequence according to how they are stored in the phone. A text message will also be sent. SOS Switch 4. To deactivate the 'SOS', slide the switch up again. 5. When someone answers your call, you will be able to speak with the "hands-free" using the phone’s in-built speaker. 6. If none of the emergency numbers answer the "SOS" call, the phone will remain in ‘emergency mode’, until deactivated. NOTE: If the call is connected to an answering machine/voicemail, that is registered as an answer. 31 CHANGING THE EMERGENCY ‘SOS’ NUMBER/S 1. Repeatedly press the Red Telephone key to return to the main screen. 2. Press the 'UP' Navigation key five times until the 'Organizer' option appears then press the Green Telephone key to select it. 3. Press the ‘DOWN’ Navigation key four times until 'SOS number' is highlighted and then press the Green Telephone key to select it. 4. Press the ‘DOWN’ Navigation key until the phone number to be edited or deleted is highlighted and then press the Green Telephone key to select it. The number will appear. 5. To edit the number, press the Red Telephone key until all the numbers are removed and then key in the new number. Press the Green Telephone key to save the change. 'Done' will appear briefly. To delete the entire entry, press and hold down the Red Telephone key. 6. Repeatedly press the Red Telephone key to return to the main screen. AMENDING THE “SOS” EMERGENCY TEXT MESSAGE The text message that is sent to the stored emergency numbers can be edited to be made more specific if necessary. The default message that is sent is, “SOS”. 1. Repeatedly press the Red Telephone key to return to the main screen. 2. Press the 'UP' Navigation Key five times until the 'Organizer' option appears then press the Green Telephone key to select it. 3. Press the “DOWN” navigation key five times until 'SOS MSG EDIT' is highlighted and then press the Green Telephone key to select it. 4. Delete the existing message by pressing the Red telephone key and then type your choice of message in the text box. Press the Green Telephone key to save the message. 'Done' will appear briefly. 5. Repeatedly press the Red Telephone key to return to the main screen. 32 OTHER FUNCTIONS 33 FM RADIO No antenna is required for radio reception. Radio broadcasts can be heard either through the included earpiece if connected, or from the speaker of cell phone. The quality of listening is related to the signal quality at your location. 1. Turn on radio by sliding up the switch on the left hand side of the phone. 2. Turn off radio by sliding down the switch on the left hand side of the phone. Volume Switch Radio Switch 3. Tune the radio by pressing the ‘UP’ or ‘DOWN’ Navigation key. The phone will automatically scroll to the next available station each time the Navigation key is pushed. 4. To adjust the volume when listening, press volume key “+” and “-“ on the side of the phone. 5. To use the earpiece, plug it in on the top of the phone. The sound will no longer come through the loud speaker, but through the earphones. 6. To stop using the earpiece, unplug from the top of the phone, then sound will then come through the loud speaker again. 7. Stop listening by sliding the radio button on the side of the phone into the down position. 34 SETTING UP EVENT REMINDERS The phone can be set up to provide reminders of important events such as birthdays, anniversaries and anytime you need reminding. 1. Repeatedly press the Red Telephone key to return to the main screen. 2. Press the ‘UP’ Navigation key 5 times until it says “Organizer” and then press the Green Telephone Key to select it. 3. “Tasks” will be highlighted, press the Green Telephone key to enter a new reminder. 4. Press the Green Telephone Key to select "add". A list of options will be provided. 5. Choose desired event option; date, call or anniversary, then press the Green Telephone key. The date will be highlighted. 6. Type the date of the event, using the date format: YYYY/MM/DD then press the ‘DOWN’ navigation key to enter the time. 7. Type in the time with the numeric key pad then press the ‘DOWN’ Navigation key. 8. Press the Green Telephone key, a text box will appear. Type in the event description. Once finished typing, press the Green Telephone key and then again when “Done” is highlighted. 9. You can now attach an alarm to the event. Press the ‘DOWN’ Navigation key and then the number '6' on the key pad to select 'on' or the number '4' on the key pad to select 'off'. 10. Press the Red Telephone key when 'Done' is highlighted. 11. Press the Green Telephone key, to save the event. 12. Repeatedly press the Red Telephone key to return to the main screen. When the alarm sounds to remind you of the event, press the "DOWN" Navigation key to read the reminder message. 35 CALCULATOR An added function on the phone just in case you require it when out and about. 1. Repeatedly press the Red Telephone key to return to the main screen. 2. Press the ‘UP’ Navigation key 5 times until “Organizer” is highlighted and then press the Green Telephone Key to select it. 3. Press the ‘DOWN’ Navigation key 3 times until 'Calculator' is highlighted and press the Green Telephone key to select it. 4. Use the key pad to type the numbers you want to add, subtract etc. 5. Press the ‘UP’ and ‘DOWN’ Navigation keys to select the formula, you will see the selection is highlighted at the top of the screen. Press the Green Telephone key to select it. 6. Repeatedly press the Red Telephone key to return to the main screen. TORCH 1. Slide the button on the side of the phone, with the 2. The torch light shines from the top of the phone. 3. To switch off, slide the button downward. image on it, upwards. HANDS-FREE SPEAKER You can speak and listen to other people whilst on a phone call, without holding the phone up to your ear. This function can only be activated once you are speaking to another person - after having rung them or they have rung you. 1. To activate the hands-free speaker the 'One Key Max Volume' setting must be initially activated - this only needs to be done once. To activate this function: a. Repeatedly press the Red Telephone key to return to the main screen. b. Press the ‘UP’ Navigation key 5 times until “Organizer” is highlighted and then press the Green Telephone Key to select it. c. Press the ‘UP’ Navigation key once, and then press the Green telephone key until the 'On' option is selected. When you are on a call, to activate loud speaker, press the “0” (zero) button on the key pad. To deactivate loud speaker, press the “0” (zero) button again. 36 COTA MOBILE PHONE KEY PAD NUMBER ANNOUNCER You can set the phone to announce numbers as you press them on the numeric key pad. 1. Ensure you are at the main display screen. Press the Red Telephone key repeatedly to get back to this screen that shows the time. 2. Press the ‘UP’ 5 times until it says “organizer” and then press the Green Telephone key to select it. 3. Press the ‘UP’ 4 times until it says “Number Voice” and then press the Green Telephone key to select whether the function is on or off. Repeatedly press the Red Telephone key to return to the main screen. 37