1
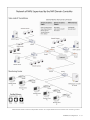
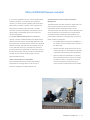
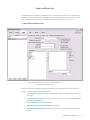
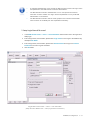
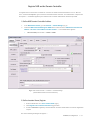
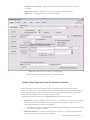
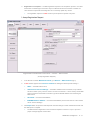
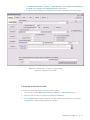
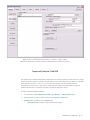
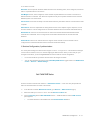
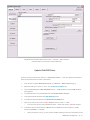
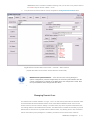
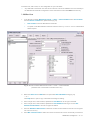
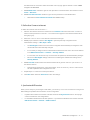
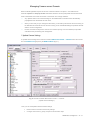
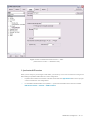
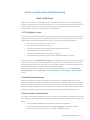
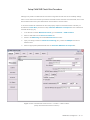
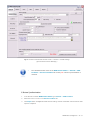
DETEXI Network Video Management System
6.2
EXPAND YOUR CONCEPTS OF SECURITY
DETEXI NVR Domain Controller
CORE COMPONENT FOR MULTI-SITE CONNECTIVITY
DETEXI NVR Domain Controller
allows to control remotely NVR
domain — a network of NVRs
that are logically attached to the
main NVR — NVR Domain
Controller.
USER GUIDE
June 2010
Canada ON, Toronto, www.detexi.com
DETEXI Network Video Management System
EXPAND YOUR CONCEPTS OF SECURITY
DETEXI NVR Domain Controller ..................................................... 3
DETEXI NVR Domain Model .........................................................................3
What is DETEXI NVR Domain Controller?................................................5
Setup DETEXI NVR Domain ..........................................................................6
How to Setup NVR Domain?.........................................................................................6
Exclusive Master User .....................................................................................................7
1. Setup Exclusive Master User.............................................................................................7
2. Setup Login Name & Password .......................................................................................8
Register NVR on the Domain Controller ..................................................................9
1. Define NVR Domain Controller Address.......................................................................9
2. Define Location Name, Register......................................................................................9
Accept / Reject Registration on the Domain Controller ................................. 10
1. Accept Registration Request............................................................................................11
2. Reject Registration Request .............................................................................................12
Ports Required to Be Open ........................................................................................ 12
Unregister Child NVR ................................................................................................... 12
1. Unregister on NVR ...............................................................................................................12
2. Unregister on Domain Controller...................................................................................13
Temporarily Inactive Child NVR ............................................................................... 14
Centralized Control and Management....................................................15
What is the Role of NVR Domain Controller? ...................................................... 15
System Health and Status .......................................................................................... 16
1. Monitor Service.....................................................................................................................16
2. Other NVR Services..............................................................................................................16
3. Runtime Configuration, Synchronization ....................................................................17
Get Child NVR Status.................................................................................................... 17
Update Child NVR Status ............................................................................................ 18
Managing Domain Users ............................................................................................ 19
1. Add New User........................................................................................................................20
2. Define User Cameras to Interact .....................................................................................21
3. Synchronize NVR Location................................................................................................21
Managing Cameras across Domain........................................................................ 22
6.2
1. Update Camera Settings....................................................................................................22
2. Synchronize Updates..........................................................................................................23
Event Management (Tasks) ....................................................................................... 23
1. Update Tasks .........................................................................................................................23
2. Synchronize NVR Location................................................................................................24
Domain Configuration Health Monitoring ............................................25
What Can Be Done? ...................................................................................................... 25
1. DETEXI Reliability System..................................................................................................25
2. Child NVR Health Monitoring...........................................................................................25
3. Domain Database Synchronization ...............................................................................25
Setup Child NVR Check Alive Procedure .............................................................. 26
Domain Database Synchronization........................................................................ 27
1. If the Connection Is Temporarily Broken......................................................................27
2. Synchronization Failure Message...................................................................................27
3. Restore Synchronization....................................................................................................28
DETEXI Basic Configuration
ii - 31
DETEXI NVR Domain Controller
DETEXI NVR Domain Model
The DETEXI Network Video Management system gives
NVR Domain Controller learns everything about the NVR’s
users the ability to monitor and record video and audio
in the NVR network and their group of cameras, whereas
over an IP (Internet Protocol based) computer network.
each particular NVR is responsible for its group of cameras
DETEXI security installation can scale from small business
and carries the task of recording, touring and alarming
use to enterprise level security operations. To address
functions. Without this, managing larger numbers of NVRs
scalability and reliability and taking a cue from existing
would be cumbersome.
computer network topologies, a NEW, exciting approach to
Whether you have several sites or a single site with
digital video surveillance management and control has
hundreds of cameras, you can now plan a security
been developed — NVR Domain Model.
management strategy. You can create a set of NVRs by
With a number of cameras sending information over a long
period of time, the only way to deal adequately with the
dividing cameras by groups, and assigning each group to a
corresponding NVR.
shear volume of files is to share the load over a distributed
DETEXI NVR Domain Controller is the core component for
NVR network (domain) consisting of several NVRs that are
multi-site connectivity. It is indispensable solution for
logically attached to the main NVR — DETEXI NVR
complex distributed environments and monitoring centers.
Domain Controller that allows to control several NVRs
remotely considering them as one powerful NVR.
DETEXI Basic Configuration
3 - 31
DETEXI NVR domain model is indispensable solution for complex distributed environments and monitoring centers.
DETEXI Basic Configuration
4 - 31
What is DETEXI NVR Domain Controller?
If you security installation has two or more DETEXI NVRs
Centralized User Access Control and Camera
in different locations or a single site with hundreds of
Management
cameras, you should explore upgrading with the DETEXI
The NVR Domain Controller maintains a single Users List
NVR Domain Controller module in order to organize the
with security information for all domain users and
NVR domain consisting of the main NVR — Domain
authenticates all Remote DETEXI Clients’ access.
Controller and several child NVRs. This will allow you to
The NVR Domain Controller allows users to administer and
get advantage of centralized user access control and
control all cameras in the domain from a single Domain
camera management.
Controller interface considering all child NVRs as one
The central administration point of the distributed
powerful NVR. Without this, managing larger numbers of
network or domain of DETEXI NVRs is the DETEXI NVR
NVRs would be cumbersome.
Domain Controller software. Any DETEXI NVR that holds
y
The NVR Domain Controller and child NVRs in
the NVR Domain Controller license could become the NVR
the domain must be connected to the Internet or
Domain Controller. The NVR Domain Controller connects
the same LAN.
to any child NVR if they are connected to the Internet or
the same LAN and the passwords are known and ensures
y
cameras (though it is not forbidden) but provides
that all communication with the recorders is authenticated,
and that the user has the specified rights to access
particular NVR resources.
Domain Controller usually doesn’t have its own
centralized user provisioning and management.
y
When an employee (administrator or operator)
leaves, deleting their account does not change
Video is Recorded on the Child NVRs
any other accounts, or the profile to which the
Each particular NVR from the domain (child NVR) is
account was assigned. Having this type of
responsible for recording video from its own set of
control prevents unauthorized access to NVRs.
cameras configured in the NVR Cameras List.
DETEXI Basic Configuration
5 - 31
Setup DETEXI NVR Domain
How to Setup NVR Domain?
Weather you want to centralize user access control and camera management for existing IP surveillance
system, or configure a new security installation consisting of several NVRs that are logically attached to
the NVR Domain Controller, there are several steps to follow.
1. Setup Exclusive Master Users
Before a secure connection between the NVRs and the NVR Domain Controller could be established at
least one user in every NVR and in the Domain Controller must be set as an Exclusive Master User
that will manage exclusive connection rights in the domain.
y
The NVR administrator must provide the NVR exclusive master user l o g i n n a m e and
p a s s wo r d to the NVR Domain Controller administrator.
y
The NVR Domain Controller administrator in turn must provide the Domain Controller exclusive
master user l o g i n n a m e and p a s s wo r d to every child NVR administrator.
2. Register NVR on the Domain Controller
To register NVR on the Domain Controller as a member of domain network (child NVR) the NVR
exclusive master user should send a request to get connected to the NVR Domain Controller.
y
The authorization of request will be required — credentials supplied by the NVR Domain Controller
administrator should be provided.
3. Domain Controller Accepts (Rejects) the Registration Request
Subsequently the NVR Domain Controller administrator — e x c l u s i v e m a s t e r u s e r — can accept or
reject the registration request from the NVR; or delay the decision and keep the NVR and Domain
Controller logical connection in a N E W m o d e when the Domain Controller can "see" the NVR
components and settings but can not remotely update any of them.
If the registration request is accepted — the NVR Domain Controller will import and keep up-to-date
information about the remote (child) NVR cameras’ settings. Updating the NVR settings from the
Domain Controller will be allowed. The NVR and the NVR Domain Controller will s t a y l o g i c a l l y
c o n n e c t e d until the NVR or Domain Controller administrator requests to unregister.
If the NVR registration request is rejected — a logical connection between the NVR and Domain
Controller won’t be established.
y
The registration request in a N E W m o d e may be accepted or rejected at any time.
y
On the Domain Controller side the a u t h o r i z a t i o n also will be required — credentials supplied by
the NVR administrator should be provided.
DETEXI Basic Configuration
6 - 31
Exclusive Master User
The NVR Domain Controller and child NVRs must be connected to the Internet or the same LAN. To
establish logical connection between child NVRs and the NVR Domain Controller at least one user in
every child NVR and in the Domain Controller must be set as E x c l u s i v e M a s t e r U s e r .
1. Setup Exclusive Master User
Fig 1. NVR Control Center — Users — User Information
(Setup Exclusive Master User.)
As far as the purpose of creating the Exclusive Master Users is establishing the connections in the
domain — just a few parameters should be setup.
1.
In the NVR Control Center — Users click Add button below the Users List to create a new
user (Fig 1).
2.
In the User Information click the button next to the l o g i n n a m e field to enter Login Name,
Full Name and Password.
3.
Enter the Number of Active Users equal 1.
4.
Enter Max connection time equal 9999 (no time limit).
5.
Check Exclusive Master User checkbox to give the user exclusive connection rights in the
domain.
DETEXI Basic Configuration
7 - 31
9
A child NVR administrator must provide the NVR exclusive master user login name
and password to the NVR Domain Controller administrator.
9
The NVR Domain Controller administrator in turn must provide the Domain
Controller exclusive master user login name and password to every child NVR
administrator in the domain.
9
The NVR Domain Controller has the same graphical user interface named NVR
Control Center as the NVRs just with expanded functionality.
2. Setup Login Name & Password
1.
In the NVR Control Center — Users — User Information click the button next to the login name
field (Fig 2).
2.
Enter a single word, case-sensitive, alphanumeric Login name to use to login to the NVR and any
descriptive Full Name.
3.
Enter a single word, case-sensitive, alphanumeric User Password and re-type it to Confirm
Password to be sure it is typed as desired.
4.
Click OK button.
Fig 2. NVR Control Center — Users — User Information
(Setup Exclusive Master User — Setup Login Name & Password.)
DETEXI Basic Configuration
8 - 31
Register NVR on the Domain Controller
To register NVR on the Domain Controller as a member of domain network the NVR E x c l u s i v e M a s t e r
U s e r should send request to get connected to the NVR Domain Controller. The authorization of request will
be required — credentials supplied by the NVR Domain Controller administrator should be provided.
1. Define NVR Domain Controller Address
1.
In the NVR Control Center go to the General — Global Settings (Fig 3).
2.
Under the NVR Controller Settings for HOST at the bottom enter the NVR Domain Controller IP
address or IP name in the Address and Port number — more fields/buttons appears.
9
Recommended port numbers — 60000 or 60001
Fig 3. NVR Control Center — General — Global Settings
(Define NVR Domain Controller Address.)
2. Define Location Name, Register
1.
Enter the NVR name in to This Location Name (Fig 4).
2.
Click Register site on Domain Controller toggle button.
3.
Provide credentials supplied by the NVR Domain Controller administrator to send the registration
request.
One of the following messages will appear —
DETEXI Basic Configuration
9 - 31
9
Registration not complete — registration request is waiting to be accepted by the Domain
Controller;
9
Registration rejected — registration request is rejected by the Domain Controller;
9
Registered — registration request is successfully completed.
Fig 4. NVR Control Center — General — Global Settings
(Define NVR Domain Controller Address — Provide Credentials.)
Accept / Reject Registration on the Domain Controller
When a registration request from the NVR is received, the NVR Domain Controller administrator
( e x c l u s i v e m a s t e r u s e r ) can accept or reject the request or delay a decision and keep the NVR and
Domain Controller logical connection in a N E W mode when the Domain Controller can "see" the NVR
components and settings but can not remotely update any of them.
An appropriate message will appear on the NVR-requester and the Domain Controller:
1.
Registered — the NVR registration request is accepted — the NVR Domain Controller will import and
keep up-to-date information about the remote (child) NVR cameras settings. Updating the NVR
settings from the Domain Controller will be allowed.
9
2.
The NVR and Domain Controller will stay logically connected until the NVR or Domain Controller
administrator requests to unregister.
Registration Rejected — the NVR registration request is rejected — a logical connection between
the NVR and Domain Controller won’t be established.
DETEXI Basic Configuration 10 - 31
3.
Registration not Complete — the NVR registration request is not accepted or rejected — the NVR
and Domain Controller logical connection stays in a NEW mode when the Domain Controller can
"see" the NVR components and settings but can not remotely update any of them.
9
The registration request in a NEW mode may be accepted or rejected at any time.
1. Accept Registration Request
Fig 5. Domain Controller NVR Control Center — General — NVR Locations
(Accept Registration Requeat.)
1.
In the Domain Controller NVR Control Center go to General — NVR Locations (Fig 5).
2.
A NEW location appears in the Servers Locations list defining the NVR-requester settings —
3.
9
Name — the NVR location name;
9
Camera Server Connect Settings — the NVR IP Address and Port number, Proxy Address
and Port number if proxy server is used to connect to the Internet — will be used by the DETEXI
Client connected to the Domain Controller to get the child NVR address when searching the
NVR archive.
9
Host Name — the NVR name/address;
9
INTERNET Name or Address — the NVR name/address (must be the same as in the Camera
Server Connect Settings).
Click Import button to import the NVR-requester cameras settings. Provide credentials and wait until
the data import is complete.
9
The NVR becomes registered on the successful completion of the d a t a i m p o r t process —
proper messages appear on both sides.
DETEXI Basic Configuration
11 - 31
9
Connection settings can be changed. Click Save button to save changes.
9
The authorization will be required — credentials supplied by the NVR administrator
should be provided.
9
The NVR Domain Controller has the same graphical user interface named NVR
Control Center as the NVRs just with expanded functionality.
2. Reject Registration Request
1.
In the Domain Controller NVR Control Center go to General — NVR Locations (Fig 5).
2.
A NEW location appears in the Servers Locations list defining the NVR-requester settings —
3.
Click Unregister button. Provide credentials. The NEW NVR location will be deleted from the Servers
Locations list.
9
The NVR becomes unregistered — proper messages appear on both sides.
Ports Required to Be Open
What ports are required to be open for the DETEXI NVR operation?
For the full DETEXI NVR functionality administrator should open the necessary ports. NVR by default uses
the following TCP ports —
20, 21, 23
2080
60000, 60001
65235
9
If PortMapper service is used, all TCP ports being used by the service, should be
open.
Unregister Child NVR
Registered NVR and the NVR Domain Controller will stay logically connected until a request to unregister is
received. Request to unregister child NVR to exclude it from the domain network can be initiated on the
NVR or on the NVR Domain Controller side.
1. Unregister on NVR
To unregister on the child NVR side (Fig 6):
DETEXI Basic Configuration
12 - 31
1.
In the NVR Control Center — General — Global Settings under the NVR Controller Settings
2.
Provide credentials supplied by the NVR Domain Controller administrator to send the request.
for HOST click Unregister site on Domain Controller toggle button.
Fig 6. NVR Control Center — General — Global Settings
(Request to unregister on Child NVR.)
2. Unregister on Domain Controller
To unregister a specific child NVR on the NVR Domain Controller —
1.
In the Domain Controller NVR Control Center go to General — NVR Locations (Fig 7).
2.
Select the NVR you want to unregister in the Servers Locations list.
3.
Click Unregister button. Provide credentials. The NVR location will be deleted from the Servers
Locations list — proper messages appear on both sides.
DETEXI Basic Configuration
13 - 31
Fig 7. Domain Controller NVR Control Center — General — NVR Locations
(Request to Unregister on Domain Controller. Make Child NVR Temporarily Inactive)
Temporarily Inactive Child NVR
The NVR Domain Controller allows users to administer and control all cameras in the domain from a single
Domain Controller interface considering all child NVRs as one powerful NVR. You can make any child NVR
in the domain t e m p o r a r i l y i n a c t i v e if you know for a fact that the site is temporarily down for
maintenance or other issues. In this case the system will NOT initiate unnecessary tasks for a known
problem and will return to monitoring only after you make the NVR active again.
To make child NVR temporarily inactive:
1.
In the Domain Controller NVR Control Center go to General — NVR Locations (Fig 7).
2.
Select the NVR you want to make inactive from the Servers Locations list.
3.
Check Inactive checkbox next to the Name field.
9
Uncheck Inactive checkbox to make the NVR active again.
DETEXI Basic Configuration
14 - 31
Centralized Control and Management
What is the Role of NVR Domain Controller?
Setting up DETEXI NVR domain — the network of DETEXI NVRs managed by the NVR Domain Controller
— allows centralized user access control and camera management while each particular NVR is
responsible for recording video from its own set of cameras configured in the NVR Cameras List.
1. Get/Update NVR Status
From the Domain Controller system administrators can verify the operational status of all network
video recorders in the domain, check weather the necessary services has been turned on to support
specific features and functionality, update the status and launch NVR health monitoring procedure.
2. Child NVR Health Monitoring
Although every NVR in the NVR Domain Controller configuration should have its own reliability
settings there is a new intercommunication layer between the NVR Domain Controller and a child
NVR, which could also fail and therefore the system administrator must be able to check its status. To
be aware weather all child NVRs are alive and properly respond to the domain controller you should
launch Check Alive procedure to setup Task when NVR does not respond for each child NVR in the
NVR domain.
3. Managing Domain Users
The NVR Domain Controller maintains a single users list with security information for all domain users
and authenticates all Remote DETEXI Clients’ access. When Remote DETEXI Clients connect to
domain resources such as cameras, settings or recorded video, they will be required to authenticate
with user settings defined in the NVR Domain Controller
4. Managing Cameras across Domain
When the DETEXI NVR registration request to become a domain member is accepted — the NVR
Domain Controller imports and keeps up-to-date information about the remote (child) NVR cameras.
That allows users to administer and control all cameras in the domain from a single interface.
5. Event Management
Tasks The DETEXI NVR can be configured to respond to events all the time or at certain set times.
The system response configuration is based on the NVR Task Execution Engine. When an event is
triggered, some of the common responses can be configured. The NVR Domain Controller allows
users to administer and control all tasks configured in the domain from a single interface
DETEXI Basic Configuration
15 - 31
System Health and Status
A background service in Windows, DETEXI NVR will start automatically upon system start-up and continue
running even after the user logs out. The underlying structure of the DETEXI NVR software consists of
many individual services, which allow execute and organize all the tasks it is responsible for.
From the Domain Controller user interface — NVR Control Center — system administrators can perform
system health and status checks. Here users can verify the operational status of all network video
recorders in the domain, check weather the necessary services has been turned on to support specific
features and functionality, update the status, launch NVR health monitoring procedure and other.
y
Restart Windows on a child NVR Server
y
Stop/Restart any DETEXI NVR in the domain
y
View running/stopped services
y
Turn on/off a service
y
Enable/disable service monitoring
y
Synchronize running services with new configuration
Knowing the responsibility of each DETEXI NVR service is important. This allows users to make sure the
necessary services for the given application are running and controlled properly, while unnecessary
services are turned off to preserve system resources.
1. Monitor Service
Monitor service is an internal service to start/stop other DETEXI NVR services. It is also responsible for
monitoring the health and status of all NVR services.
9
It is recommended that the Monitor service be active at all times.
9
System will check status only for the components checked as monitored.
9
If, for some reason, the user stops a service and it is selected to be monitored, it will be restarted by
the Monitor service in approximately 30 seconds.
9
During the system tuning you may need to disable restarting a service by the Monitor service.
2. Other NVR Services
Server service authenticates remote users connected to the NVR through the Remote DETEXI Clients. It is
also responsible for tracking statistics about the remote user’s connections.
Recorder service records information and images from each video input into the NVR archive, according to
the configured schedules, preferences, alarms and events.
FTP Server service receives images from cameras via FTP and writes them into the NVR archive. It also
raises an alarm when such images are received from a camera, and can also be used for FTP notification
of IP address changes from the camera to the NVR.
Check Drive service monitors the condition of the storage path and device to confirm existence and
available space for new video being recorded to the archive.
Check Alive service monitors if camera is online and video inputs are active.
Check Alarm service monitors the hard inputs of connected video devices, and raises alarms when
defined changes are seen on such inputs.
Tour service moves PTZ cameras through a predefined series of locations according to defined schedules
DETEXI Basic Configuration
16 - 31
or on alarms or events.
Get Shots service captures still shots related to alarms from streaming video, when configured, and stores
them in a special location in the archive.
Port Mapper service, when configured, routes network requests between two network connections on
different subnets or networks. This allows for separate security and corporate networks across which the
DETEXI system can communicate.
Port Listener service has the ability to monitor alarms raised by local alarm devices connected to the NVR
computer.
Alarm Server service is responsible for raising alarms via the Text-to-Speech engine, telephone, e-mail
and other mediums. This is configured as an Automatic Windows Service and starts at Windows startup.
Remote Server service is an internal service for intercommunications between linked NVR Domain
Controller and child NVRs. This is configured as an automatic Windows Service and will start with
Windows.
Socket Server service is an internal service to support remote TCP/IP access to the NVR. This is
configured as an automatic Windows service and starts at Windows startup.
3. Runtime Configuration, Synchronization
For most system settings, the NVR services support r u n t i m e c o n f i g u r a t i o n . This means that changes
can be made to cameras, users, etc. without stopping the NVR services. When you are ready for your
changes to take effect, you should synchronize the services with the current configuration.
9
It is recommended to synchronize services when all changes are made.
9
You can also start/stop the services using Start/Stop NVR Service toggle button in the NVR Control
Center — General — Global Settings.
Get Child NVR Status
From the Domain Controller user interface — NVR Control Center — users can verify the operational
status of all network video recorders in the domain.
4.
In the Domain Controller NVR Control Center go to General — NVR Locations (Fig 8).
5.
Select the NVR by its l o c a t i o n n a m e from the Servers Locations list.
6.
On the Controlling tab click Get NVR Status button — additional buttons and the NVR services
panel appears.
9
To restart Windows on the NVR Server click Restart Remote OS button.
DETEXI Basic Configuration
17 - 31
Fig 8. Domain Controller NVR Control Center — General — NVR Locations
(Get NVR Status in the Domain. Restart Windows.)
Update Child NVR Status
From the Domain Controller user interface — NVR Control Center — users can update the operational
status of all network video recorders in the domain.
1.
In the Domain Controller NVR Control Center go to General — NVR Locations (Fig 9).
2.
Select the NVR by its l o c a t i o n n a m e from the Servers Locations list.
3.
On the Controlling tab click Get NVR Status button — additional buttons and the NVR services
panel appears.
4.
To restart Windows on the child NVR Server click Restart Remote OS button.
5.
To stop the selected child NVR click Stop Remotely button.
6.
To restart the selected child NVR click Restart Remote NVR button.
7.
Click on any service name to turn it red to stop the service or black — to run.
9
8.
The color of the service name indicates its status — black while running, red while stopped.
To make the service monitored by the Monitor service check the service checkbox to enable
monitoring, uncheck — to disable.
9
During the system t u n i n g you may need to disable restarting a service by the Monitor service;
DETEXI Basic Configuration
18 - 31
uncheck the service checkbox to disable monitoring, than you can click on any service name to
turn it red to stop the service or black — to run.
9.
To synchronize the services with the current configuration click Synchronize Location button.
Fig 9. Domain Controller NVR Control Center — General — NVR Locations
(Update NVR Status in the Domain. Restart Windows. Restart NVR.)
9
NVR Services Synchronization — if the services were running during the
system configuration (runtime configuration) the services synchronization with the
current configuration is required on the NVRs where the changes were made. After
the synchronization these changes will take effect.
9
Managing Domain Users
The NVR Domain Controller maintains a s i n g l e u s e r s l i s t with security information for all domain users
and authenticates all Remote DETEXI Clients’ access. When Remote DETEXI Clients connect to the
domain resources such as cameras, settings or recorded video, they will be required to authenticate with
user settings defined in the NVR Domain Controller. The NVR Domain Controller has the ability to provide
different lists of cameras from any NVR location to different users, only allowing users to see and interact
with the cameras they have privileges for. In addition, permissions such as PTZ control, maximum
DETEXI Basic Configuration
19 - 31
connection time, task control, etc. are configurable on a per-user basis.
9
Any child NVR in the domain can have its own users list. This is not forbidden but is not necessary in
the NVR Domain Controller configuration. These users have access to this NVR resources only.
1. Add New User
1.
In the Domain Controller NVR Control Center — Users — User Information select This Location
from the Servers Locations list, update the list (Fig 10).
9
This Location means the NVR Domain Controller.
9
To update a child NVR individual users list select the N V R b y l o c a t i o n n a m e . Authentication
will be required.
Fig 10. Domain Controller NVR Control Center — Users — User Information
(Add New User to the Domain Controller Users List.)
2.
Below the Users List click Add button to open blank User Information dialog (Fig 10);
— or —
Click Dup button to open a copy of selected user settings for editing.
3.
Enter a single word, case-sensitive, alphanumeric User Name to use to login to the NVR.
4.
Enter a single word, case-sensitive, alphanumeric User Password and re-type it to the User
Password Confirmation to be sure it is typed as desired.
5.
Enter the Number of Active Users to define the number of Client instances the user can be signed
into s i m u l t a n e o u s l y.
6.
Enter Max connection time to define the number of minutes user can be continuously connected to
DETEXI Basic Configuration
20 - 31
the NVR before the connection will be terminated. User may login again if desired. A value of 9999
designates no time limit.
7.
Check Master User checkbox to give the user permission to terminate other user sessions from the
Client — Get Users.
8.
Check Can Search Archive checkbox to give the user permission to view NVR archive.
9
Remember that User Cameras to Interact also must be setup.
2. Define User Cameras to Interact
To define the cameras user has access to —
1.
With the user selected choose the camera from the Cameras List at the left and click ">" button to
add the camera permission to the user — the camera name appears in the selected cameras list at
the right (Fig 10).
2.
Select the c a m e r a n a m e in the selected cameras list at the right.
3.
Check proper checkbox under the User Rights to pass the previously configured camera
authentication settings — Adm, Oper or User.
4.
9
The User Rights chosen for the first camera configured will automatically be assigned to each
camera after that unless manually changed.
9
It is necessary to assign the level of authentication allowed from this user to the camera defined
in the NVR Control Center — Cameras — Security & Alarm.
9
In most cases, the camera has only one username and password, with administrative privileges.
9
Be sure that User Rights settings make sense considering the authentication settings in the
Security & Alarm.
Check Can PTZ checkbox below the selected cameras list to give the user P T Z p e r m i s s i o n on
the selected camera.
9
PTZ permission is defined on a per-camera basis, and is e n a b l e d b y d e f a u l t if the camera
has PTZ capabilities when assigned to the user.
5.
Repeat steps 1-4 to add more camera permissions.
6.
Click Save button below the Users List to save user settings.
3. Synchronize NVR Location
When you are ready for your changes to take effect, you should s yn c h r o n i z e the services running on the
NVR holding the updated users list with the current configuration.
9
If updates were made to the Domain Controller Users list click Synchronize button in the top right
corner to activate the new configurations.
9
If a child NVR individual Users list was updated — synchronize the NVR from the Domain Controller
NVR Control Center — General — NVR Locations.
DETEXI Basic Configuration
21 - 31
Managing Cameras across Domain
When the NVR registration request to become a domain member is accepted — the NVR Domain
Controller imports and keeps up-to-date information about the remote (child) NVR cameras that allows
users to administer and control all cameras in the domain from a single interface.
9
Any updates made in the cameras settings on the NVR Domain Controller will be automatically
propagated to the child NVRs and vise versa.
9
When you are ready for your changes to take effect, you should synchronize the services running on
the NVR Domain Controller and the services running on the child NVR holding the updated cameras
with the current configuration.
9
Domain Controller usually doesn’t have its own cameras (though it is not forbidden) but provides
centralized user provisioning and management.
1. Update Camera Settings
To update camera settings in the Domain Controller NVR Control Center — Cameras select the camera
from the Cameras List grouped by the NVR Locations (Fig 11).
Fig 11. Domain Controller NVR Control Center — Cameras
(Update Camera Settings.)
Then you can view/update selected camera settings:
y
Define camera connection and security settings
y
Configure camera tours, groups, sequences and location maps
DETEXI Basic Configuration
22 - 31
y
Setup camera recording instructions including alarms and motion detection
y
Configure camera Inputs/Outputs etc.
For the detailed instructions, refer to the DETEXI NVR — Managing Cameras manual.
9
This Location means the NVR Domain Controller.
9
The NVR Domain Controller has the same graphical user interface named NVR
Control Center as the NVRs just with expanded functionality.
9
2. Synchronize Updates
When you are ready for your changes to take effect:
1.
Synchronize the services running on the NVR Domain Controller with the current configuration by
clicking Synchronize button in the top right corner of the Domain Controller NVR Control Center.
2.
Synchronize the services running on the child NVR holding the updated cameras with the current
configuration in the Domain Controller NVR Control Center — General — NVR Locations.
Event Management (Tasks)
The DETEXI NVR can be configured to respond to events all the time or at certain set times. The system
response configuration is based on the NVR Task Execution Engine. When the event is triggered, some
of the common responses can be configured. The NVR Domain Controller allows users to administer and
control all tasks configured in the domain from a single interface.
9
The NVR Domain Controller and every child NVR in the domain have their peculiar tasks applicable
to them.
1. Update Tasks
In the Domain Controller NVR Control Center — Tasks select a location from the Servers Locations list
(Fig 12). Then you can add new or view/update the selected NVR task —
y
Define a new task
y
Add/update a c t i o n / n o t i f i c a t i o n to the task
y
Create c o m p o s i t e task
y
View task u s a g e i n f o
y
Configure task triggers etc.
For the detailed instructions, refer to the DETEXI NVR — Event Management manual.
DETEXI Basic Configuration
23 - 31
Fig 12. Domain Controller NVR Control Center — Tasks
(Select Server Location — Add/Select Task.)
2. Synchronize NVR Location
When you are ready for your changes to take effect, you should s yn c h r o n i z e the services running on the
NVR holding the updated TASKS with the current configuration.
9
If updates were made to the Domain Controller Users tasks click Synchronize button in the top right
corner to activate the new configurations.
9
If a child NVR individual tasks were updated — synchronize the NVR from the Domain Controller
NVR Control Center — General — NVR Locations.
DETEXI Basic Configuration
24 - 31
Domain Configuration Health Monitoring
What Can Be Done?
What can be done to ensure the DETEXI domain configuration health? First of all, the reliability settings
should be configured for each NVR in the domain. Then — be aware weather all child NVRs are alive and
properly respond to the domain controller. And finally, the domain database held by the NVR Domain
Controller should always be synchronized with the child NVRs data.
1. DETEXI Reliability System
IP-surveillance system reliability minimizes the risk of system failure and associated down-time, therefore a
designated person or persons should be aware of the DETEXI system status at any given time. There are
several areas that should be checked to insure that you have a healthy and functioning system —
y
Is the NVR running at all (power is OFF or ON)
y
Are all selected NVR components running
y
Are all cameras with an active schedule functioning and being recorded
y
Is there enough space to make a recording
y
Are there enough system resources to make a recording
y
Is the NVR Domain Controller network and all it’s child NVRs healthy and running
To address the issue the DETEXI Reliability System is embedded into the software. Every NVR, including
NVR Domain Controller in the domain configuration should have its own reliability settings. In this case if
something happens to the system, hardware or one of the NVR components, certain task assigned to this
event automatically informs the system administrator about the problem.
For the detailed instructions on how to setup the system health monitoring, refer to the DETEXI NVR —
Reliability System and the DETEXI NVR — Event Management — Task Triggers — System Health
manual.
2. Child NVR Health Monitoring
Although every NVR in the domain configuration should have its own reliability settings there is a new
intercommunication layer between the NVR Domain Controller and a child NVR, which could also fail and
therefore the system administrator must be able to check its status. To be aware weather all child NVRs
are alive and properly respond to the domain controller you should launch Check Alive procedure to setup
Task when NVR does not respond for each child NVR in the domain controller NVR Control Center.
3. Domain Database Synchronization
The NVR Domain Controller supports the d o m a i n d a t a b a s e synchronization automatically, but it can be
lost if during the system configuration the connection between a child NVR and the Domain Controller was
broken.
y
The synchronization must be restored when the connection is established.
y
The DETEXI NVR domain continues to work in full configuration even if the connection
between any child NVR and the Domain Controller is temporarily broken.
DETEXI Basic Configuration
25 - 31
Setup Child NVR Check Alive Procedure
Although every NVR in the NVR Domain Controller configuration should have its own reliability settings
there is a new intercommunication layer between the NVR Domain Controller and a child NVR, which could
also fail and therefore the system administrator must be able to check its status.
To be aware weather all child NVRs are alive and properly respond to the NVR Domain Controller you
should launch Check Alive procedure to setup Task when NVR does not respond for each child NVR in
the NVR domain (Fig 14).
1.
In the Domain Controller NVR Control Center go to the General — NVR Locations.
2.
Select a child NVR from the Servers Locations list.
3.
Switch to the Monitoring tab and check Check Alive check box.
4.
Input your setting to define an Interval for monitoring (sec), number of Attempts and interval
between them.
5.
Select an appropriate predefined task from the Task when NVR does not respond list.
Fig 14. Domain Controller NVR Control Center — General — NVR Locations
(Setup Child NVR Check Alive Procedure.)
DETEXI Basic Configuration
26 - 31
9
Recommended Settings — Interval for monitoring (sec) — 300, Attempts —
3, Each (in sec)— 60
9
If you know for a fact that the site is t e m p o r a r i l y d o w n for maintenance or
other issues, simply uncheck the Check Alive check box. In this case the
system will NOT initiate unnecessary tasks for a known problem and will return
to monitoring only after you check the box again.
9
Domain Database Synchronization
When a registration request from a child NVR is accepted — the NVR Domain Controller imports the NVR
cameras settings to the d o m a i n d a t a b a s e held on the NVR Domain Controller. After that the domain
database will be s y n c h r o n i z e d a u t o m a t i c a l l y — any updates made in the cameras settings on the
NVR Domain Controller will be automatically propagated to the child NVRs and vise versa. However, the
s y n c h r o n i z a t i o n c o u l d b e l o s t if the connection between a child NVR and the domain controller is
temporary broken.
1. If the Connection Is Temporarily Broken
Notice that the DETEXI NVR domain continues to work in full configuration even if the connection
between a child NVR and the domain controller is temporarily broken. However, the updates for the domain
database at that time will be rejected; while the updates for a child NVR data from its own NVR Control
Center will be still allowed. If a child NVR cameras settings were updated during a connection failure the
synchronization with the domain database will be lost. However, child NVR users list is used by this NVR
only and its updating can not cause a synchronization failure.
y
The synchronization must be restored when the connection is established.
y
To synchronize the domain database with the child NVR updated settings the NVR data should
be imported to the domain database.
y
The Domain Controller users list, its own cameras and tasks could be updated at any
circumstances.
2. Synchronization Failure Message
If a child NVR cameras settings were updated during a connection failure the synchronization with the
domain database will be lost. The synchronization must be restored when the connection is established by
importing the child NVR updated settings.
y
The synch failure message will appear in the child NVR Control Center — General — Global
Settings under the NVR Controller Settings for HOST at the bottom.
y
The message will also appear in the Domain Controller NVR Control Center — General — NVR
Locations.
DETEXI Basic Configuration
27 - 31
Fig 15. Domain Controller NVR Control Center — General — Global Settings
(Synchronization Failure Message.)
9
The child NVR location name in the NVR Control Center — General — NVR
Locations — Servers Locations list will stay red until the synchronization is
restored.
3. Restore Synchronization
1.
In the Domain Controller NVR Control Center go to General — NVR Locations.
2.
Select the N V R l o c a t i o n in the Servers Locations list.
3.
Click Import button to import the NVR cameras settings. Provide credentials and wait until the data
import is completed.
DETEXI Basic Configuration
28 - 31
Fig 16. Domain Controller NVR Control Center — General — NVR Locations
(Import Data from Failed Child NVR.)
DETEXI Basic Configuration
29 - 31