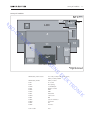
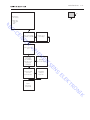
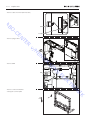
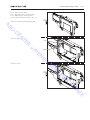
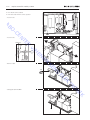
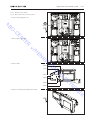
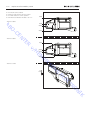
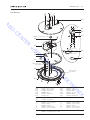
1
BeoCenter 6 – 26 Type 9280 - 9286 O AB Service Manual English German, French, Italian, Spanish, Danish and Dutch versions are available in the Retail System R TE N E -C H v/ EN S EN KS RI T EK EL IK N RO This Service Manual must be returned with the defective parts/back-up suitcase ! CONTENTS Survey of modules ..................................................................... 1.1 How to service ........................................................................... 1.2 Fault flow chart ......................................................................... 2.1 Geometry adjustments . ............................................................. 3.4 E -C O AB Adjustments and Repair tips ...................................................... 3.1 Picture adjustments ................................................................... 3.5 ServiceTool . ............................................................................... 3.7 N TE Final check after repair . ............................................................. 3.9 Service mode ............................................................................. 4.1 R Replacement of modules ........................................................... 5.1 H v/ Specification guidelines for service use ....................................... 6.1 EN Type survey ................................................................................ 6.5 Video Input formats ................................................................... 6.6 RI Wiring diagram . ........................................................................ 7.1 KS Available parts ........................................................................... 8.1 S EN T EK EL IK N RO Survey of modules 1. Survey of modules NTC 88* LCD E -C O AB 8 37* 990* 85* 59 4 5 TE N R 11 51 H v/ 7 EN 10 61* 6 RI 63 32* 1 KS 64 S EN *Optional T EK EL Incl. PCB1, PCB4, PCB5, PCB6, PCB7, PCB51, PCB63, PCB64 PCB21, PCB22 PC Sound Decoupling Sound Output IR/Autocontrast DSM DAB Masterlink Camcorder BtB System modulator Powerlink FM Interface LCD + PCB8 LCD IK N RO 999 Module, Main chassis 990 Module, DVB-S PCB7 PCB8 PCB10 PCB11 PCB32 PCB37 PCB51 PCB59 PCB61 PCB63 PCB64 PCB85 PCB88 1. How to service How to service Strategy The television is to be serviced in the customer’s home. The static-protective field service kit must always be used when the product is disassembled or modules are being handled. O AB Service Tool ServiceTool is required in several service situations, e.g. update of software. When it is necessary to replace module 999 main chassis, use ServiceTool to read out settings in the microprocessor. These must be transferred to the new microprocessor to maintain customer settings, production settings and pin code data. In cases where it is not possible to read out the info in the microprocessor, a new pre-programmed microprocessor can be ordered in Bang & Olufsen Retail system. Refer to ServiceTool for full description of features and operation. R TE N E -C The repair involves replacement of the chassis, module(s) or LCD panel, which are supplied in the back-up suitcase. The replaced modules must be returned for repair at Bang & Olufsen, Module Repair Department. Fault description and error codes must be returned with the replaced parts. Use the Module Repair form or the form in the Retail Order System, Exchange Module. H v/ EN RI EN KS Please note: When the main chassis is replaced, check software versions and update if necessarry, by means of ServiceTool. Preparations before service S Fault description and error codes must be returned with the replaced parts. Use the Module Repair form or the form in the Retail Order System, Exchange Module. T EK EL Fault explanation and demonstration Before troubleshooting is initiated, let the customer demonstrate the fault, if possible. Error code RO The error code contains data that may be used for repairing the module(s) and must be returned with the module(s). N Handling the error code. Take a note of the error code, for example on the Module repair form. Use the error code when trouble shooting. Return the error code, either on the Module Repair form or in the Retail system. Before returning the television to the customer, clear the error code. IK 1. 2. 3. 4. How to service 1. Recommended tools for service E -C O AB B&O ServiceTool Service stand Integrated Living – Test DVD Ruler for geometry check/adjustment White gloves Soft lint-free cloth ML-tester B&O programmer – ML kit must be installed Handling and cleaning N Static electricity R TE STATIC ELECTRICITY MAY DESTROY THE PRODUCT Static-protective field service kit. A static-protective field service kit must always be used when the product is disassembled or modules are being handled. Follow the instructions in the guide and use the ESD-mat for both old and new modules. H v/ ESD Static electricity may damage the television. EN Please note: When mains voltage on the product is required, remove the connection between the product and the ESD-mat. RI Symbol of safety components EN KS The chassis or modules must always be connected to the static-protective field service kit or placed in an ESD-proof bag. S When replacing components with this symbol, the same type has to be used, also the same values for ohm and watt. The new component is to be mounted in the same way as the replaced one. T EK EL Lithium battery IK N RO WARNING Short-circuit and overcharging of some types of lithium batteries may result in a violent explosion. Transport and handling The product must not be placed on the contrast screen. It is recommended to use the product cover when transporting the television. The product cover can be ordered. 1. How to service Mounting or dismounting the Service stand Place the television on the rear cover and mount the Service stand. See illustrations page 5.5. Cleaning Please refer to the chapter “Final check after repair” or the User’s guides. R TE N E -C O AB H v/ EN S EN KS RI T EK EL IK N RO How to service 1. PIN-code The TV has a 4 digit PIN-code, of the user´s own choice, which must be entered if the TV has been disconnected from the mains for 15-30 min. If the PIN-code is activated, and the TV has been without mains for 15-30 min., the user will be asked to enter the 4 digit PIN-code when the TV is switched on. O AB Before the TV is handed in to service it is a good idea to ask the customer to deactivate the PIN-code. The PIN-code is activated when the TV is shipped from Bang & Olufsen. E -C Refer to the user guide for further information. PIN-code active prior to service Service code R TE N If the PIN-code is not deactivated prior to service you must use the Service code to unlock the product. Entering the Service code The service code unlocks the product, but does not affect the pin-code setting gives you 12 hours service time H v/ - - EN RI 1. When the product asks for PIN-CODE press and hold l for 3 seconds. 2. The Master code menu appears. 3. Enter the Service code: 1 1 1 1 1. EN KS Important notice concerning Service time The service time is active as long as the product is connected to the mains, including Standby. S To obtain maximum service time: Only connect the product to the mains while you are performing actual service on the product. T EK EL When the service time is expired, the product can only be unlocked by entering the PIN-code or the Master code. Registration of the modules N - RO - The modules will be registered to the product in the following situations: the product has been connected to the mains for more than 12 hours, including Standby time. the PIN-code is activated or deactivated. IK PIN-code deactivated by customer prior to service With the PIN-code deactivated prior to service you must be aware of the modules will be registered to the product in the following situations : - the product has been connected to the mains for more than 12 hours, including Standby time. - the PIN-code is activated or deactivated. The registration of modules in the product can only be changed at Bang & Olufsen. 1. How to service Activate the PIN-code Select the TV SETUP menu. Press l twice and then STOP to bring up the PINCODE SETUP menu. Enter the 4 digit Pin-code. Re-enter the code to confirm it and press GO. If you want to change or delete the PIN-code, enter the correct PIN-code and press GO. It is now possible to change the PIN-code or delete the PIN-code. O AB Enter the PIN-code E -C If the PIN-code is activated and the TV is disconnected from the mains for more than15-30 minutes, a PINCODE menu appears as soon as the TV is switched on. Enter the PIN-code, and the TV starts again. If the PIN-code has been forgotten R TE N If the PIN-code has been forgotten the only way to unlock the TV again is by entering a 5 digit Master-code. The Master-code is ordered by sending a request either via the Retail System or on the Master-code formula. If non of these options are available please contact Bang & Olufsen. When the TV prompts for a PIN-code, press and hold l down to bring up the MASTERCODE menu. Enter the Master-code and press GO. This will deactivate the PIN-code and reactivate the TV. H v/ EN TV locked by PIN-code The TV is locked by PIN-code when: RI - KS The PIN-code is activated and the mains is disconnected for more than 15- 30 minutes. EN The TV is unlocked when the PIN-code is entered. S The PIN-code counter is set to 5 attempts within 3 hours. When a wrong PIN-code has been entered 5 times within 3 hours, the television cannot receive any commands for a period of 3 hours. After this period the PIN-code counter is reset. The TV must be in standby mode to activate the timer. T EK EL IK N RO Fault flow chart 2. Fault flow chart R TE N E -C O AB H v/ Fault No startup / PCB11 ....................................................................................... 2.2 No startup / Option 0 .................................................................................... 2.3 No startup / NTC ........................................................................................... 2.4 Masterlink . ................................................................................................... 2.5 Camcorder .................................................................................................... 2.6 No picture ..................................................................................................... 2.8 No colours .................................................................................................. 2.11 Noise in picture ........................................................................................... 2.12 Geometry ................................................................................................... 2.13 Teletext ....................................................................................................... 2.13 Autocontrast . ............................................................................................. 2.13 No sound in internal speakers ..................................................................... 2.14 Bad or missing surround sound ..................................................................... 2.15 FM .............................................................................................................. 2.16 DAB ............................................................................................................ 2.18 DVB-S ......................................................................................................... 2.20 Stand .......................................................................................................... 2.21 BtB ............................................................................................................. 2.22 EN S EN KS RI T EK EL IK N RO 2. Fault flow chart No Fault sympton: - No start up - Standby light = No light Yes O AB Possible causes: - Missing mains supply - defect Beo4 - Blown fuse in PCB4 Power supply - PCB11 IR/Autocontrast defect - Faults in main Chassis E -C Note Ground = Chassis, heat sinks and metal covers (Except on the HOT-side of the power supply) Confirm the Mains supply is connected and applied N Connect Mains supply R TE Mains is applied -------Mains supply applied H v/ Fuse on PCB4 OK? -------Fuse on PCB4 EN Replace Main chassis (module 999) -------Fault in the TV Replace fuse on PCB4 TV OK? -------Fuse on PCB4 RI Replace Main chassis (module 999) Replace Main chassis (module 999) T EK EL Replace PCB11/ IR/Autocontrast S EN KS Confirm 5V DC on PCB10, P33, Pin 1 IK N RO Fault flow chart 2. No Fault symptom: - No start up - Standby light = red Yes Press TV on Beo4 OSD displays “WAIT” -------PIN-code locked Set the television in OPTION 1 Does Standby led blink one time? -------Option 0 = IR receiver is disabled R TE H v/ TV OK? -------IR receiver is enabled EN Replace Main chassis (module 999) -------Main chassis defect RI Check Beo4 on another product Press TV on Beo4 Replace the batteries in Beo4 KS Confirm approx. 0.6V AC on PCB 10 P33 pin 3 with a multimeter while pressing TV on Beo4 (A short signal) (Look at the bar-graph) Check Cable W6 Note PCB10 P33 pin3! By pressing Menu on Beo4, it is possible to measure a good signal (approx. 1.7V AC) RO Confirm the same signal on PCB1 P9 pin 1 Replace PCB11 IR/Autocontrast T EK EL Try a new Beo4 TV OK? -------Beo4 Beo4 defect S TV OK? -------Beo4 EN Other product responds correctly -------Beo4 Reconnect cable IK N Replace Main Chassis PCB10 P33 measuringspoints 5 3 1 Ensure that the television is in Standby mode -------The TV is locked for 3 hours since last PIN-code was entered 6 4 2 N E -C O AB Possible causes: - PIN-code locked - Option 0 - IR/Autocontrast defect - Main chassis defect - Beo4 / Remote control defect 2. Fault flow chart No Fault symptom: - No start up - Standby light = blinking red/green Yes E -C O AB Possible causes: - NTC defect - Cable W09 to NTC defect - Main chassis, module 999 defect Check cable W09 between NTC module and PCB4, SMPS -------Cable connection OK? Replace NTC module Replace cable W09 Product OK? -------NTC module R TE N Product OK? Replace Main chassis (module 999) H v/ EN S EN KS RI T EK EL IK N RO Fault flow chart 2. No Fault symptom: - ML error Masterlink error chart ML error codes ML error TU ML pulled up TD ML pulled down CI Configuration impossible ?? Other error NH No hardware O AB Possible causes: - Masterlink module defect - Main chassis defect - ML connection defect - ML cable defect - Incorrect option setup Yes Clear the error codes -------TV self diagnosis ML error = ? -------See error chart ML error = NH -------No hardware R TE N E -C Make a record of the last ML error Confirm Masterlink PCB is connected correctly -------OK connection H v/ Fault may be located in either the ML installation or the TV Turn ON the TV ML error = ? -------See error chart S T EK EL Make a record of the last ML error ML = … -------Fault in ML installation EN KS RI Disconnect the ML cable -------TV as stand alone EN Turn OFF the TV Turn OFF the TV Masterlink OK? Re-establish the ML connection Fault may be located in the Link product Replace Main chassis (module 999) IK N Check ML connection Re-establish and configure the ML setup one product at a time (Repeat until ML setup is complete) RO Replace Masterlink (PCB51) Disconnect all ML cables in the ML setup Use the ML tester or a new cable Connections OK? -------ML cables and installation Re-establish the connection 2. Fault flow chart No Fault symtom - Camcorder, no sound / and no picture Yes E -C O AB Possible cause - Connection to camcorder - PCB59, Camcorder defect - Main chassis defect If possible, check camcorder on another product No picture See next page R TE N Sound OK H v/ Check connection between TV and the camcorder Re-establish connection Connection OK? EN Check internal wire connections W6 & W21 Picture OK? -------Camcorder detector defect Connections OK? -------Internal connections Re-establish connection EN KS RI Select “CAMCORD” on Beo4 Fault may be located in any of the PCBs Replace Main chassis (module 999) Replace Camcorder (PCB59) S Replace Main chassis (module 999) T EK EL IK N RO Camcorder defect Fault flow chart 2. No Yes Picture OK E -C O AB No sound From previous page Press SPEAKER 1 on Beo4 Sound problem Sound output Refer to “No sound in internal speakers” R TE N Sound OK? -------Activate internal speakers Sound on TV channels? -------PCB10, sound output H v/ Check connections between TV and the camcorder Re-establish connection EN RI Replace PCB59, Camcorder -------Defect signal path Replace Main chassis (module 999) -------Unknown fault in Main chassis T EK EL Replace PCB10, sound output -------Defect CAM line amplifier S EN KS Fault may be located in any of the PCBs IK N RO 2. Fault flow chart No Fault symptom - No picture - Standby led = green Yes E -C O AB Possible causes - No back light - Fault in Video path - LCD defect - Defect connection Press TV on Beo4 See next page R TE N OSD on display -------Video path to LCD Check if “DECODER ON” in “TV MANUAL TUNING” H v/ Snow on picture? -------Video path EN Picture OK? S Re-establish connection EN Check antenna connection KS RI Set “DECODER OFF” in “TV MANUAL TUNING” Perform a manual TV tuning IK N RO Picture OK? Replace Main chassis (module 999) T EK EL Picture OK? Fault flow chart 2. No Yes O AB Backlight active? Visual through ribbons in back cover -------LCD active From previous page No Backlight See next page! R TE N E -C Connect ServiceTool to TV H v/ Communication between ServiceTool and TV OK? -------Scaler PCB + ML connection EN Re-establish connection Connection OK? Picture OK? Replace Main chassis (module 999) T EK EL Check W12 RGB connection S EN KS RI Activate a test picture in the scaler “TEST MENU” - “TEST PATTERNS” Picture OK? -------Video path scaler to LCD IK N RO 2.10 Fault flow chart No Yes O AB No Backlight Check Power supply to PCB8, Decoupling P135 pin 1-5; +24V pin 6-10; GND Replace Main chassis (module 999) Check W11 connection 4P116 & 8P135 Re-establish connection R TE N E -C Check power supply Backlight from Power supply P116 pin 1-5; +24V pin 6-10; GND Check power supply from power supply PCB to scaler PCB4 P113 pin 1, 3, 5; GND pin 2, 4, 6; +14V Check power supply on Display inverter at W18 pin 1-5; +24V pin 6-10; GND both supplies OK? Check connection W10, between 4P113 & 5P118 H v/ Check power supply on scaler PCB5 P118 pin 1, 3, 5; GND pin 2, 4, 6; + 14V Replace Main chassis (module 999) EN RI S EN KS Reconnect cable W10 RO Check connection W12, CTRL signals to scaler PCB T EK EL Visual check of connection W16 from scaler to LCD, connected at LCD Re-establish connection N LCD defect IK Fault may be located in either Main chassis or in LCD panel Replace Main chassis (module 999) Fault flow chart 2.11 No Fault symptom - No colour(s) Yes Check colour settings in OPTIONS - PICTURE Restore correct colour settings R TE N E -C O AB Possible cause - Video path - Scaler - LCD H v/ Connect ServiceTool to TV EN RI LCD fault -------Fault in scaler output Connection OK? Picture OK? IK N RO Replace Main chassis (module 999) T EK EL Re-establish connection S Check W12 RGB connection EN KS Activate a test picture in the scaler “TEST MENU TEST PATTERNS” Red, Blue, Green Colours OK? -------LCD tested 2.12 Fault flow chart No Fault symptom - Noise in picture - TV only Possible cause - Poor antenna reception - Incorrect tuning - Fine tuning active - Defect Main chassis - Tuner adjustment incorrect - IF adjust or Tuner takeover Yes E -C O AB Noise problem on single TV channel All TV channels have noise in picture R TE N Picture OK? Replace Main chassis (module 999) Check antenna connection H v/ Check channel tuning & fine tuning Re-establish connection EN RI Tuner/IF adjustment EN KS S In TV SERVICE MENU Confirm correct values for Tuner takeover & IF adjust T EK EL IK N RO Replace Main chassis (module 999) Transfer correct values Fault flow chart 2.13 No Fault symptom - Poor geometry Yes Possible cause - Main chassis defect - Geometry adjustment incorrect - LCD defect E -C O AB The TV must be turned ON for minimum 20 minutes before geometry can be adjusted... R TE N Take a note of the settings in GEMOETRY ADJUST LCD H v/ Insert default values Picture OK? Replace Main chassis (module 999) EN Replace Main chassis (module 999) S EN Possible cause - Main chassis defect KS RI Fault symptom - No teletext T EK EL Fault symptom - No auto contrast Replace Main chassis (module 999) IK N Check voltage on PCB10 P33 pin 2 & 4 App. 7.5V with sensor covered 7.2V with full light on RO Possible cause - Defect auto contrast - Defect Main chassis Replace IR/Autocontrast (PCB11) 2.14 Fault flow chart No Fault symptom - No sound in internal speakers Possible cause: - Speaker setup - Defect PCB10, Sound output - Defect cable W06 or W08 - Defect module 999, Main chassis - PCB4, Main power supply defect Yes E -C O AB Press SPEAKER 1 on Beo4 Are both left/right without sound? Find channel in “speakertable” and measure speaker(s) OK? Measure direct on the speaker terminals Speaker OK? Replace defect speaker R TE N Sound OK? -------Activate internal speakers H v/ Replace speakerbox internal connection EN RI Replace Sound output (PCB10) Replace Main chassis (module 999) IK N RO Replace Sound output (PCB10) Replace Main chassis (module 999) T EK EL Replace Camcorder (PCB59) Reconnect P32 on PCB10 Check voltage on PCB4 P21 pin1 & 3 +21V Pcb4 P2 pin2&4 -21V S Disconnect P32 on PCB10 Sound OK? EN KS Camcorder mute active? Fault flow chart 2.15 No Fault symptom - Bad or missing surround sound Yes E -C O AB Possible cause - Bad configuration - Defect PCB32, DSM board - Defect Module 999, Main chassis - Defect cable W13 Correct settings R TE N Confirm settings in MENU - OPTIONS SOUND - SPEAKER TYPE. Is front and rear set to the correct loudspeaker? Confirm 14V on PCB32, P12, pin5 H v/ Is it possible to read out AC3 SW version in SERVICE MENU MONITOR SERVICE MENU - SOUND ADJUSTMENT? Visually inspect cable W13 Cable OK? Replace cable W13 EN RI Replace PCB32 DSM board Replace Main chassis (module 999) Replace Main chassis (module 999) Replace Main chassis (module 999) S EN KS Replace PCB32, DSM board T EK EL IK N RO 2.16 Fault flow chart No Fault symptom - Bad or missing FM sound Possible cause - Aerial connection - PCB85, FM module defect - Cable W32 defect - PCB88, Interface defect - Main chassis defect Yes E -C O AB Press RADIO on Beo4 H v/ Noise on all stations? Perform a new auto tuning Press MENU - TUNING - AUTOTUNING R TE N Note: This command delete existing programs! Noise on single channel? EN Reconnect cable RI Check aerial connection? Make sure that the station is in range? S EN KS Replace FM tuner, PCB85 T EK EL Check cable W32 Reconnect cable W32 IK N Silence on some stations RO Silence on all stations? Scrolling text line is functional Fault flow chart 2.17 No Yes E -C O AB Hum in loudspeakers? R TE N No RDS in the scrolling text line Reconnect cable W32 H v/ Check cable W32 EN Confirm 14V on PCB85 P106 pin4 Replace PCB88, interface module Confirm 14V on PCB1 P14 pin 1 or 2 Replace Main Chassis (module 999) T EK EL IK N RO Replace PCB85, Tuner module Replace cable W30 S EN KS Confirm 14V on PCB88 P14 pin 1 or 2 RI Confirm 5V on PCB85 P106 pin5 2.18 Fault flow chart No Fault symptom - Bad or missing DAB sound Possible cause - Aerial connection - PCB37, DAB module defect - Cable W21, W24 or W102 defect - PCB88, interface defect - Main chassis defect - DAB antenna defect Yes E -C O AB Press RADIO on Beo4 R TE N RI Confirm 5V on PCB37 P101 pin17-19 Confirm 8V on PCB88 P107 pin5 Replace PCB37, DAB module Replace PCB88, Interface module Replace Main chassis (module 999) S T EK EL Note: This command delete existing programs! IK N RO Replace PCB37 DAB module EN KS Perforn a new auto tuning Press MENU-TUNINGAUTOTUNING Problem solved? EN Go to Service Menu Is it possible to read SW version of DAB module in RADIO INFORMATION sub menu? Go to next page H v/ No available DAB stations? Fault flow chart 2.19 No Yes O AB Stations available but noisy? From previous page Check aerial connection OK? Reconnect aerial R TE N E -C Go to SERVICE MENU Is there a good level in SIGNAL QUALITY in RADIO INFORMATION sub menu? H v/ Replace PCB37, DAB module Check cable W102 Reconnect W102 EN RI S EN KS Replace PCB37, DAB module T EK EL Replace PCB88, Interface module IK N RO 2.20 Fault flow chart Fault symptom - Bad or missing function of DVB-S module Possible cause - Defect connection to the LNB on the satellite dish - Defect DVB-S module - Defect cable W108, W28, W27, W26 Yes Before RESET TO DEFAULT is made or module 990 is replaced, try to save customer settings to a PC O AB Further description can be found in ServiceTool E -C Turn TV into standby and on again two times Is it possible to find any kind of satellite signal? R TE N Press DTV on Beo4 Is it possible to find any kind of satellite signal? No Note: By means of ServiceTool it is possible to: - Download customer settings to a PC - Upload customer settings to DVB-S module - Upload application software to DVB-S module Reconnect cable to the LNB on the satellite dish Press DTV and GREEN on Beo4. Choose SETUP - INSTALLATION and then press 0 0 GO Choose MODULE INFO. Is it possible to read out SW version? Go to TV SERVICE MENU MONITOR INFORMATION H v/ Check cable to the LNB on the satellite dish OK? EN Is it possible to read out the following software and hardware versions? RI Step back and go to RESET TO DEFAULT (this is only on DVB-S) Press GO, and make the installtion of DVB-S S Replace Main chassis (Module 999) Visually inspect connections between P401 and P25 on module 990 and PCB1 AV board Replace DVB-S (Module 990) IK N RO Confirm DC supply to module 990 14V on P25 pin9 or 10 or 14V on PCB1 P14 pin1 or 2 T EK EL Connection OK? EN Visually inspect connections on the flexible PCB between P403 and 404 on module 990 KS If the above procedure does not help, carry on with the following IC 505 DVB FEB SW 1.3 IC 201 DVB SW m 0.0.0.0 IC 201 DVB SW v 0.0.0.0 IC 201 DVB HW m 0.0.0.0 IC 201 DVB HW v 0.0.0.0 Fault flow chart 2.21 No Fault symptom - No function in stand Yes O AB Possible cause - Defect connection to stand - Defect stand - Defect main chassis - Stand not detected 3 1 4 E -C 5 Turn TV OFF an remove mains inlet Wait min. 2 min. Connect mains inlet -------Reinstall the stand 3 1 4 2 5 R TE N Press MENU on Beo4 -------Stand menu OK? -------Stand is detected 2 Check connection to stand Connection OK? -------Connection to stand H v/ Turn TV ON Press MENU on Beo4 -------Stand menu OK? -------Stand is detected EN KS RI Read Error code in Service Menu -------ST 03? Fault located in the Main Chassis EN Read Error code in Service Menu -------ST 01, 02, 04, 05? -------Calibration error Reestablish connection Stand OK? Replace Stand -------Stand OK? Replace Main Chassis (Module 999) IK N Connect mains inlet -------Reinstall the stand Reestablish connection -------Stand OK? RO Wait min. 2 min Check connection to stand -------Connection OK? -------Connection to stand T EK EL Turn TV OFF and remove mains inlet S Measure supply and Turn left/right control voltage -------M1P43 Pin5; +14 V Pin2; Turn left Pin3; Turn right Pin1; GND -------Error in reading stand position from the stand Note: Turn left and turn right is “low” when activated. Othervise 5V Replace Main chassis (Module 999) 2.22 Fault flow chart No Fault symptom - Bad or missing function on BtB module (Hotel Menu System) Possible cause - Hotel room box - Defect connection - Defect Main chassis - Defect cable - Defect DC supply Yes E -C O AB Note! If possible, disconnect mains to both hotel room box and BeoCenter. Wait one minute and connect mains again. This is done to reset all modules R TE N If possible, try to press MENU on Beo4 to activate Hotel menu Within 5 seconds, press MENU - 0 - 0 GO once more to enter service menu and find BtB Information. Choose BtB OFF to avoid the system switching back to Hotel menu again H v/ If the Module is in use, for instance in a hotel setup, it is necessary to press MENU - 0 - 0 - GO on Beo4 to disable Hotel Menu If the Module is in use, for instance in a hotel setup, it is necessary to press MENU - 0 - 0 GO on Beo4 to disable Hotel Menu Remove jumper and place it again. This should reset the module Replace PCB61 (BtB module) Note! When mains is off, wait about one minute before switching it on again For first time hotel setup it may be necessary to wait up to 10 minutes IK Note! At the hotel there must be a “test facility” making it possible to connect the equipment to the hotel box, testing the complete system. Otherwise it has to be tested in a room N Replace Main chassis (module 999) Note! Enter service menu and find BtB information. Choose BtB ON to activate Hotel menu again When this is done the system should be turned OFF and ON again RO Reconnect cable After replacing PCB61, BtB module: T EK EL Note! For future use it is intended to use ServiceTool to flash update this module At this moment contact Bang & Olufsen S Replace PCB61 (BtB module) Replace Main chassis (module 999) EN Confirm DC supply to the module (See wiring diagram TV = 5V Confirm DC supply to the module (See wiring diagram TV = 5V) KS Check cables from Hotel room box to TV Correct jumper settings RI Read out software version. Is it correct EN Within 5 seconds, press MENU - 0 - 0 GO once more to enter service menu and find BtB Information. Choose BtB OFF to avoid the system switching back to Hotel menu again Confirm jumper settings on PCB61 (BtB module) P014 It should be placed between pin1 & 2 (5V setting) Adjustments and Repair tips 3. Adjustments and Repair tips R TE N E -C O AB H v/ Adjustments described ...................................................................... 3.2 Purpose of Adjustments . ................................................................... 3.2 General considerations ...................................................................... 3.2 Access to Service Mode ..................................................................... 3.3 Adjust Tuner takeover, IF adjust and FM sound adjust ........................ 3.3 Stand (Only TV with motorised stand) ................................................ 3.3 Geometry adjustment ........................................................................ 3.4 Geometry specifications . ................................................................... 3.4 Format 1 - 16:9 Panorama ................................................................. 3.4 Format 1 - 15:9 ................................................................................. 3.4 Format 1 - 4:3 ................................................................................... 3.5 Format 2 - 16:9 Letterbox .................................................................. 3.5 Format 3 - Real 16:9 .......................................................................... 3.5 Picture adjustments ........................................................................... 3.5 ServiceTool ........................................................................................ 3.7 Considerations before connecting ServiceTool to the product . .......... 3.7 Contents in ServiceTool . .................................................................... 3.7 ServiceTool functions ......................................................................... 3.7 Ignore mode . .................................................................................... 3.8 Replacement of PCB6 Main microcomputer ....................................... 3.8 Testing a Main microcomputer PCB6 . ................................................ 3.8 Heat regulation . ................................................................................ 3.9 Final check after repair . ..................................................................... 3.9 Insulation test .................................................................................... 3.9 Monitor information .......................................................................... 3.9 Customer setup ............................................................................... 3.10 Clean the product . .......................................................................... 3.10 PIN-code . ........................................................................................ 3.10 EN S EN KS RI T EK EL IK N RO 3. Adjustments and Repair tips Adjustments Adjustments described O AB Stand adjustment (if motorised stand connected). Tuner take over, IF adjustment & FM sound adjustment. Geometry check. Picture check. Sound adjustment, no adjustment possible. Purpose of Adjustments The content in the adjustment instructions are the following: Contains text and illustrations if needed. The correct sequence for adjusting the product. The correct procedure for the adjustment. - Illustrations of: Geometry measuring points. General considerations R TE N E -C - - - Correct adjustment of all parameters can only be obtained by using special test signals and equipment for light measurement. Factory settings will give the best result. Customer picture set up, brilliance, contrast and colour are obtained in the TV SETUP – OPTIONS – PICTURE. H v/ - RI Picture adjustments EN - - Measurements EN KS Brightness, contrast and colour can only be adjusted in the MENU – OPTIONS – PICTURE. The SERVICE MENU does not give this opportunity. S All measurements concerning the geometry are measured with the contrast screen mounted. Measurements are performed with a ruler, or by counting pixels. For the best result, measurements are performed in a straight angle to the LCD panel, e.g. you see into the reflection of your own eye. T EK EL RO The television must be turned on for minimum 20 minutes before measurements may be started. This is due to the back light that first is at 90% level after 20 minutes. Preparations before check and adjustment 1. Turn the television on. 2. The television must warn up for minium 20 minutes before adjustment may be performed. The back-light reaches 90% efficiency after app. 20 minutes. 3. Select the correct test picture. 4. Set the television in the correct FORMAT. It is recommended to use the ServiceTool to down load the settings. IK N The test signal is applied to the V.TAPE input, SCART connector, unless other is specified. Adjustments and Repair tips 3. Adjustment sequence 1. 2. 3. 4. Tuner take over, IF adjust and FM Sound adjust. Stand, if connected. Geometry check and adjustment if necessary. Picture check and adjustment if necessary. O AB Access to Service Mode Select a SETUP menu. Beo4: Press 0 0 GO within 3 seconds. E -C Select ordinary menu operation to leave Service Mode. Operation in Service Mode. R TE N Beo4 GO m p l n EXIT H v/ Activity - Selects the sub menu to the menu line where the cursor is placed - Stores the selected values and returns to the SERVICE MENU - Deletes error codes in the MONITOR INFORMATION menu and returns to the SERVICE MENU Moves the cursor up and returns to the previous menu Moves the cursor down and selects a sub menu in special occations Selects new values in the menus and selects a sub menu in special occations Removes the menus EN A - Enter SETUP, select SERVICEMODE with 0, 0, GO. Press the button combination within 3 seconds. Highlight TV-TUNER, select with GO. Change the settings by means of l and n until they match the values on the label. Then press GO to store the settings. Exit Service Mode. S EN TSUJDA FI TSUJDA DNUOS MF REVOEKAT RENUT nettirw eb ot sah seulav woleb ehT :MORPEE dlo eht otni KS RI Adjust Tuner takeover, IF adjust and FM sound adjust - The values (A) written on the label placed on PCB1, have to be written into the EEPROM (6IC6). T EK EL IK Adjustment procedure N RO Stand (Only TV with motorised stand) The scope of this adjustment is to determine the center position. The adjustment must be performed in the following situations: -��������������������������������������������������� The motorised stand is connected to the television. -����������������������������������� The main chassis has been replaced. -������������������������������������������������ The Main microcomputer (PCB6) has been replaced. 1. Enter the SERVICE MENU and select STAND. 2. Press GO, when CALIBRATION OK is displayed, the center position of the motorised stand is found. 3. Adjustments and Repair tips Geometry adjustment Geometry adjustment is normaly not necessary. The geometry may be checked. It is recomended to use a tv test generator, but to verify the different formats the Integrated Living test DVD can be used. Geometry formats is shown below. O AB E -C It is possible to adjust the size and position in the SERVICE MENU - MONITOR SERVICE MENU - GEOMETRY ADJUSTMENTS. Geometry is adjusted in FORMAT 1 and the values for all other picture formats are calculated. N The picture format 4:3 must be enabled in SERVICE MENU - TELETEXT & FORMAT ADJUST. R TE Geometry Adjustment procedure 1. Check the geometry specifications in FORMAT 1. FORMAT 1, 16:9 Panorama FORMAT 1, 15:9 FORMAT 1, 4:3 FORMAT 2, 16:9 Letterbox FORMAT 3, 16:9 - use the 16:9 testpicture. 2. Insert/adjust the default factory values in SERVICE MENU - MONITOR SERVICE MENU- GEOMETRY ADJUST LCD if necessary. H v/ EN RI EN KS Geometry default factory values: HOR SIZE 980 VERT SIZE 548 HOR POSITION105 VERT POSITION 9 S Remember to disable picture format 4:3. Format 1 16:9 Panorama T EK EL Geometry specifications IK N RO Format 1 15:9 Adjustments and Repair tips 3. Format 1 4:3 E -C O AB Format 2 16:9 Letterbox R TE N H v/ EN Format 3 Real 16:9 S EN KS RI T EK EL Picture adjustments Correct adjustment of all parameters can only be obtained by using special test signals and equipment for light measurement. Adjustment of the specific parameters are not described. Picture setting (TV – MENU – OPTIONS – PICTURE) RO Brightness Contrast Colour Middle position (32) Middle position (32) Middle position (32) 1.�������������������������� Check the picture quality. 2.���������������������������������������������������������� If adjustment is necessary, insert default factory values. 3.���������������������������� Confirm the picture quality. IK N Picture adjustments 3. Adjustments and Repair tips Default factory values R TE N E -C O AB Default factory 7 19 32 26 26 26 4 4 0 2 210 400 210 400 210 400 H v/ HOP Picture menu HOP settings Brilliance Colour Contrast Red Drive Green Drive Blue Drive Black Offset R Black Offset G Soft Clip PWL ADC Adjustments R Offset R Coarse G Offset G Coarse B Offset B Coarse EN Picture Offsets Brightness Colour Contrast Scaler Contrast Sensor Contrast T EK EL 19 21 20 142 128 128 124 100 19 14 2 IK N RO Display White Point Display R Display G Display B Display Grey Point Display R Display G Blue Stretch S Scaler Menu 2 EN KS RI Scaler Menu 1 Actual value Adjustments and Repair tips 3. ServiceTool Considerations before connecting ServiceTool to the product - Disconnect the product from the Mains supply. - Follow the instructions described in ServiceTool. O AB Contents in ServiceTool E -C - - - ServiceTool will contain the complete information concerning: How to connect ServiceTool to the product. List of functions handled by ServiceTool. Instruction for using the functions. ServiceTool functions N Read out Type no., Item no., Serial no, Software versions, Error codes and Service counters. DAB variant. - Picture adjustments and Geometry adjustments – Possible to upload settings from a laptop, and to adjust and store new settings. Setting of DAB frequency bands. R TE - Adjustment possibilities H v/ EN Saving files Software programming EN KS RI It is possible to save text files with info and values from the SERVICE MENU. The files will be saved in a default folder (Saved/BeoCenter 6_26) in the folder where ServiceTool is installed. AP software (microprocessor H8). IOP software (microprocessor H8). M2 application. STB-C tables. EEPROM backup/restore (customer settings). Download customer settings from DVB-S module to a PC. Upload customer settings to DVB-S module. Upload application software to DVB-S module. - Possible to activate the internal test generator in BeoCenter 6. - ServiceTool does not contain: Description of access and connection to internal connectors inside the product. T EK EL IK N RO Test pictures S - - - - - - - - 3. Adjustments and Repair tips Ignore mode This will start the product directly in service mode, regardless of the error. Thereby it may be possible to read out e.g. error codes. R TE N E -C O AB - - - WARNING ! This mode will start the product directly up in Service Mode, and can be used if it will not start normally. To set the product into Ignore mode, carry on with the following: set the product into standby set the product in Service position short circuit two soldering dots on PCB1 AV as shown below, and at the same time power on the product H v/ EN KS RI PCB6 S EN T EK EL RO Replacement of Main microcomputer PCB6 - If replacing only the Main microcomputer PCB6, it is necessary to read out existing settings and flash these back into a new PCB6 - If both EEPROM and AV board (Chassis) are defect (e.g. caused by a lightning stroke), a preprogrammed Main microcomputer can be ordered separately by contacting Bang & Olufsen. IK N Testing a Main microcomputer PCB6 It is possible to use a PCB6 Main microcomputer from a similar type of product for test purpose, but the serial no. and other important adjusting settings will not match the product correctly. Therefore it is important to replace the original PCB6 after a test. The software programable microcomputer version (flash of both APPLICATION and EEPROM software) can be recognized by having no IC sockets on the PCB. Another way to identify if a product has the flash version module, is to check if ServiceTool has APP software flash menus for the specific product. Adjustments and Repair tips 3. Heat regulation In heat regulation, the temperature sensors on the screen and chassis are tested, and the fan are tested to ensure they are working. The sensors and fan are connected using plugs that can fail or that the assembler can forget to attach. O AB If the test detects that a screen or chassis sensor is disconnected or short-circuited, the status display shows “SENSOR ERROR” for approximately 2 minutes. This happens only once, and lasts until the power is disconnected from the device. E -C If the test detects that the fan are not running (no tacho pulser), the status display shows “FAN ERROR” for approximately 2 minutes. This happens only once, and lasts until the power is disconnected from the device. N Final check after repair R TE The final check after repair, describes the activities that are needed to ensure the product will be returned in perfect condition to the customer. H v/ - - - - - The contents is: AC leakage test. Check product information. Restore the setup and check connections, picture and sound. Final cleaning of the product. PIN-code setting. EN Insulation test RI S EN KS Each set must be insulation tested after having been dismantled. Make the test when the set has been reassembled and is ready to be returned to the customer. Flashovers must not occur during the testing procedure! Make the insulation test as follows: Short-circuit the two pins of the mains plug and connect them to one of the terminals of the insulation tester. Connect the other terminal to ground on the aerial socket. T EK EL NOTE! To avoid damaging the set it is essential that both terminals of the insulation tester have good contact. Slowly turn the voltage control of the insulation tester until a voltage of 1.5 kV and max. 10mA is obtained. Maintain that voltage for one second, then slowly turn it down again. 1. 2. 3. 4. 5. Procedure Enter Service menu – monitor service menu – monitor information check the serial number is correct check option setting is correct clear the error code select error code and press GO IK - - - The scope of this check is, to ensure the following: The product has maintained the correct identity. Is set to correct option. The error code register is cleared. N RO Monitor information 3.10 Adjustments and Repair tips Customer setup Remember to inform the customer of any changed that has been made in the user setup, due to procedures in the Service Manual, such as Connections, Sound, Picture, etc. Restore the product to the customer setup. O AB TV SETUP - OPTIONS E -C Connections, such as DVD, STB, VTR Sound, such as external speakers Picture Clock Clean the product R TE N Check all sources are working correctly - Check that picture and sound on all sources are working correctly. - Check the teletext are working correctly. EN Contrast screen H v/ Never user alcohol or other solvents to clean any part of the television. Use a soft, lint-free cloth to clean the surfaces of the television. To avoid soiling the speaker cover when you clean the television screen or the LCD, we recommend that you remove the speaker cover beforehand. RI Use white gloves to avoid smudging the contrast screen. KS EN To clean the contrast screen or the LCD, use a mild window cleaning fluid. To retain the optimum performance of the screen, make sure that no streaks or traces of the cleaning fluid are left on the screen or the LCD. S Cabinet surfaces Speaker cover cleaning instructions Please refer to the user guide. T EK EL Wipe dust off the surfaces using a dry, soft cloth. Remove grease stains or persistent dirt with a soft, lint-free, firmly wrung cloth, dipped in a solution of water containing only a few drops of mild detergent, such as washing-up liquid. RO N PIN-code IK Please refer to the user guide for further information about the use of PIN-code. Information to the customer The PIN-code must be activated by the customer. Service mode 4. Service mode R TE N E -C O AB H v/ Customer Service Menu ................................................................................ 4.2 Status info sub menu .................................................................................... 4.2 Adjustments sub menu ................................................................................. 4.2 Service mode in general ................................................................................ 4.3 Access to service menu ................................................................................. 4.3 Deactivating service mode . ........................................................................... 4.3 Option programming .................................................................................... 4.3 Navigation .................................................................................................... 4.4 Service menu ................................................................................................ 4.4 Monitor service menu ................................................................................... 4.4 Monitor information ..................................................................................... 4.4 IC information .............................................................................................. 4.5 Service counters ............................................................................................ 4.6 Picture adjustments ....................................................................................... 4.6 M2 INFORMATION Sub Menu ..................................................................... 4.10 BUSINESS TO BUSINESS extra service menu ................................................. 4.12 Ignore Mode ............................................................................................... 4.12 Error Codes ................................................................................................. 4.12 IIC bus error ................................................................................................ 4.13 DF Data failure ............................................................................................ 4.14 POR1 Power on reset failure 1 ................................................................... 4.14 POR2 Power on reset failure 2 ................................................................... 4.14 PDD Power down detected failure ............................................................. 4.14 CI Address configuration impossible .......................................................... 4.14 TD ML data pulled down . ......................................................................... 4.14 TU ML data pulled up ............................................................................... 4.14 TI Transmission impossible ......................................................................... 4.14 TD Data link tied down ............................................................................. 4.14 ST-01 Calibration error too few positions . ................................................. 4.14 ST-02 Calibration error too many positions ................................................. 4.14 ST-03 Calibration error EEPROM ................................................................ 4.14 ST-04 Calibration error transducer ............................................................. 4.14 ST-05 Calibration error position ................................................................. 4.14 Service Menu (illustration) ........................................................................... 4.15 EN S EN KS RI T EK EL IK N RO 4. Service mode CUSTOMER SERVICE MENU The menu can be accesed by pressing RED + GO on “Options” field. Customer service menu is ment for users instead of regular Service menu. Customer service menu includes two submenus. STATUS INFO SUB MENU R TE N E -C O AB If you select Status info, the following is presented: Type number indicates country variant and the main group for the type approval. Item number; the device’s componentry and colours are described by means of the number. The parameters for this include sat/stand/front glass/colour/code converter/country variant. The type number can be derived from an item number. Serial number (individual number), a unique number for this type of device. Current option setup. SW version for application processor (indicated by PROM IC and module numbers). SW version for AP BOOT. Indicates bootloader software version. SW version for IOP (indicated by IC and module numbers). SW version for M2 controller. SW version for STB controller’s table. The table is for the STB that it can control (indicated by the IC and module numbers). SW version for DSM controller. H v/ ADJUSTMENTS SUB MENU EN CUSTOMER SERVICE MENU TYPE NO. ITEM NO. SERIAL NO. 9280 1717650 00084215 OPTION SETTING AP SW AP BOOT IOP SW M2 SW STB TABLE DSM SW 2 9.20 1.0 22.0 9.20 3.6 2.3 T EK EL ADJUSTMENTS STATUS INFO S STATUS INFO EN KS RI In Adjustments menu the user/technician can change some sound and format settings: Theese values are the same as in the Service Menu. AVC – Automatic Volume Control, possible to enable or disable (ON/OFF). WSS Status. Auto Format – possible to enable or disable. Format 4:3 – possible to set on or off. SOUND AVC ON FORMAT WSS STATUS DETECT ON AUTO FORMAT ENABLED FORMAT 4:3 ON IK N RO ADJUSTMENTS Service mode 4. Service mode in general The Menu Overview appendix provides an overview of the menus as they appear in the Software. The menu items are generally self-explanatory so you can gain a general overview by studying this page closely. In addition to the menus, there is a little extra functionality that comes under service mode, which is described in the following subsections. O AB Access to service menu E -C The service menu must be activated while the setup menu is displayed. From this initial state, the service menu is activated in one of the following ways: - Beo4: the service menu is activated by pressing 0 0 GO within 3 s. - On the device: if the device is switched on, activation of the service switch (ignore mode switch) will cause the service menu to be displayed. When you exit the service menu (standard menu operation), the device is normal. You cannot exit ignore mode until the device is switched off. R TE N Deactivating service mode Option programming H v/ Option programming can only be carried out using a Beo4. Device BC1, BV1, MX4200, MX8000, BV6, BV3, BV7, BC6 The IR receiver of the TV is disconnected. BC1, BV1, MX4200, MX8000, BV6, BV3, BV7, BC6 The TV and the Audio system (BeoLink system) are placed in the same room. BC1, BV1, MX4200, MX8000, BV6, BV3, BV7, BC6 The TV and the Audio system (BeoLink system) are placed in different rooms. BC1, BV1, MX4200, MX8000, BV6, BV3, BV7, BC6 Two TV’s in the same room and the TV’s are not linked together. BC1, BV1, MX4200, MX8000, BV6, BV3, BV7, BC6 The TV and the Audio system (BeoLink system) are placed in the same link room. BC1, BV1, MX4200, MX8000, BV6, BV3, BV7, BC6 The TV is the only product in the link room. EN Option 0 1 2 3 4 5 6 S EN KS RI T EK EL IK N RO 4. Service mode Navigation Possible actions MENU GO m p l n STOP Digit EXIT Select menus - selects the submenu that a cursor is on - accepts a menu, which results in values entered being saved (in NVMEM) and the menu being exited - activates functions, for example start/stop DVD - deletes incorrect registrations in the monitor information menu and exits the menu Moves the cursor bar up Returns to the previous menu when the cursor bar is at the top. Modified data is not saved Moves the cursor bar down Selects a submenu in some cases Modifies data Modifies data No interpretation Modifies data Removes the menus R TE N E -C O AB Beo4 H v/ Service menu EN This menu is used to select the device area in which service is to be carried out/ information is to be sought. The contents of the menu depend on the sources installed. RI Monitor service menu Monitor information IK - N - - - - RO - - - T EK EL - - If you select monitor information, the following is presented: SW version for application processor (indicated by PROM IC and module numbers). SW version for IOP (indicated by IC and module numbers). SW version for STB controller (indicated by IC and module numbers). SW version for STB controller’s table. The table is for the STB that it can control (indicated by the IC and module numbers). Type number indicates country variant and the main group for the type approval. Item number; the device’s componentry and colours are described by means of the number. The parameters for this include stand/front glass/colour/code converter/ country variant. The type number can be derived from an item number. Serial number (individual number), a unique number for this type of device. PIN-code status. The status indicates whether the master code was entered correctly (STORED/NOT STORED). Current option setup. Last 5 TV errors (for example IIC bus errors), indicating the month and date. Last ML/SL error. In a product without physical ML HW, this status is NH (= No Hardware). See the section on ML error codes. Last AVL status/error; this status describes the AVL link’s state in products with two AVL links (1 in each scart connector). Therefore there are two values for them. The first value is for AVL in the VTAPE connector and the second value is for AVL in the AV connector. The values can be seen in the section on AVL error codes. S - - - - EN KS Here you have access to the monitor’s underlying service menus. Service mode 4. - Notation for indicating the SW version: nn ICmmm SW x.yy nn is the module number on which the IC is mounted mmm is the part list number for IC x.yy is the SW version number O AB The last 5 TV errors are printed as error codes and displayed with the month/date (four digits) from the system clock’s time at the time of the error. The last error is printed at the top. IC information R TE N E -C V.TAPE AVL and AV AVL errors are always output with the text LAST in front of the error code. Error codes are described in a later section. Error codes for ML/SL are shown in a later section. Error registrations are deleted when the menu is exited with GO. Error registrations are not deleted when the menu is exited with m STEP UP. H v/ The menu shows the revision numbers for the ICs fitted. Direct numbers from the ICs’ registers are shown, and this information must therefore be compared with the data sheets. Information is shown on megatext, MSP, HIP, HOP and image improvement IC. The numbers shown are a direct printout from the ICs’ registers, and further identification of the IC must therefore be seen in the appropriate data sheet. Output notation: MSP aabbccdd HIP ee PICTP ff HOP times EN EN KS RI S All numbers are in hexadecimal notation. aa: MSP hardware version code [00-FF] bb: MSP major revision code [00-FF] cc : MSP product code [00-0A] dd: MSP ROM version code [00-FF] ee: TV input processor IC version indication [00-0F] (4 identification bits directly from the IC’s status registers) ff: Image improvement IC [00-07] (3 identification bits directly from the IC’s status registers) times: TV display processor [00-0F] (4 identification bits directly from the IC’s status registers) hh: Megatext version code (firmware version) T EK EL IK N RO 4. Service mode Service counters The following service counters are presented in the menu: Comments Monitor switched on without high voltage Number of times the device has received mains voltage Monitor switched on without high voltage Number of times the device is switched on (both audio and audio/ video mode) Time the radio has been switched on Number of times the radio has been switched on R TE N E -C O AB Picture adjustments Service counter Unit Audio mode time 0-99999 days Boot counter 0-99999 times Audio/video mode time0-99999 days On/off 0-99999*10 times Radio 0-99999 days Radio on 0-99999*10 times H v/ It is possible to adjust the picture parameters as listed in sub menus below: HOP PICTURE MENU ADC ADJUSTMENTS SCALER MENU 1 SCALER MENU 2 SCALER TEST MENU FEATURE BOX MENU EN RI Each parameter value is saved automatically after adjustment. KS HOP PICTURE SUB MENU S EN In this menu, the following settings can be made: BRILLIANCE from 0-63 COLOUR from 0-63 CONTRAST from 0-63 G OFFSET G COARSE from 0-511 from 0-63 B OFFSET B COARSE from 0-511 from 0-63 IK In this menu, the following settings can be made: R OFFSET from 0-511 R COARSE from 0-63 N ADC ADJUSTMENT SUB MENU RO from 0-63 from 0-63 from 0-63 from 0-15 from 0-15 from 0-3 from 0-15 T EK EL RED-DRIVE GREEN-DRIVE BLUE-DRIVE BLACK OFFSET R BLACK OFFSET G SOFT CLIP PWL Service mode 4. SCALER SUB MENU 1 When you edit data, the lower half of the menu and the Current Value parameters disappear. This is in order to allow more of the screen to be shown, providing a better basis for adjustment. R TE N E -C O AB You can adjust the five parameters at the top, categorised as “Picture Offsets” and you can set the BACKLIGHT STARTUP. BACKLIGHT STARTUP can be switched off in this menu in order to carry out panel luminance characteristics measurements without the corrections performed by the Backlight Startup Sequence. The values under “Current Values” show the user’s settings. They cannot be changed. BRIGHTNESS from 0-255 COLOUR from 0-255 CONTRAST from 0-255 SCALER CONTRAST from 0-255 SENSOR CONTRAST from 0-255 BACKLIGHT STARTUP [ON, OFF] H v/ EN CURRENT VALUES: BRIGHTNESS COLOUR CONTRAST SCALER CONTRAST TINT KS RI SCALER SUB MENU 2 RED, GREEN and BLUE LOOKUP TABLE cannot be selected, instead LCD PANEL is used. EN S On LCD PANEL field panel type can be selected. Each panel type has specific LUT (Lookup Table). The lookup table contains colour saturation values for various intensities of red, green and blue in the picture. Possibilities are: 32-L01, 32-L03, 32-L14, 40-L01, 23-L01, 23-L02, 26-L01. 2 LCD panel 26-L01 ADAPTIVE BACKLIGHT ON/OFF IK Blue stretch N [0,1] [0,1] RO DISPLAY R DISPLAY G T EK EL DISPLAY WHITE POINT: DISPLAY R from 0-255 DISPLAY G from 0-255 DISPLAY B from 0-255 LOOKUP TABLE SELECTION: LUT RED [ 0, 1, 2] LUT GREEN [ 0, 1, 2] LUT BLUE [ 0, 1, 2] In BeoCenter 6-26, 26-L01 have to be choosen Is default ON 4. Service mode SCALER TEST SUB MENU O AB This menu contains no parameters, but provides feedback about whether the LCD display is overheated, and whether DVI has been detected. The Test Patterns item also opens a submenu where you can show test pictures for investigating possible dead points on the screen. In the Test Patterns menu, the interactions are as follows: The up/down arrow switches between the two colour screens – when they are on, and also when you scroll between them in the Test Patterns menu. Use GO or WIND or REWIND to activate and deactivate the colour screens. E -C SCALER STATUS: DISP OVERHEATED DVI DETECTED [LOW, HIGH] [NO, YES] WHITE GREY 25% GREY 50% GREY 75% BLACK RED GREEN BLUE YELLOW MAGENTA CYAN R TE N TEST PATTERNS H v/ EN KS RI GEOMETRY ADJUSTMENTS LCD S EN There are only four parameters for adjusting the size and position on the screen. HOR SIZE from 0-2000 VERT SIZE from 0,2,4..2000 HOR POSITION from 0-2000 VERT POSITION from 0-2000 Note that V.Size is special in that it can only accept even values. T EK EL SOUND ADJUSTMENTS MENU [ON-OFF] AC3 SW: shows the version of the software IK MAX VOLUME LIMIT: MAX VALUE: between 65 and 90 N FACTORY SETTINGS: AVC RO AVC (= Automatic Volume Control) can be switched off in this menu in order to carry out sound measurements without the corrections performed by the AVC function. It is possible to set the maximum volume. Service mode 4. TELETEXT ADJUSTMENTS Sub Menu O AB Some TV broadcasters transmit a picture format identification, enabling the TV to switch to the proper format automatically when WSS DETECT is ON if there is WSS codes in the signal. BROADCAST ONLY: Only switching on signal from the TV tuner. DETECT ON: Switching on signals from all sources TV tuner, DVD playback, and AV sockets. DETECT OFF: Used under certain conditions, e.g. a poor signal-to-noise ratio, the detection may fail, which may entail faulty swithing. R TE N E -C The following adjustments can be made: WSS STATUS DETECT ON / OFF / BROADCAST ONLY TEXT LANGUAGE: B&O LANGUAGE 0 0-6 AUTO FORMAT ENABLED / DISABLED 4:3 ON/OFF H v/ 0 1 2 3 4 5 6 Selecting “B&O LANGUAGE” makes it possible to choose among 7 different teletext character sets. English, German, Swedish, Italian, French, Portuguese, Slovak Polish, German, Swedish, Italian, French, Croatian, Slovak, Rumanian English, German, Swedish, Italian, French, Portuguese, Turkish English, Russian, Estonian, Czech, German, Lithuanian, Ukrainian English, German, Swedish, Italian, French, Portuguese, Turkish, Greek English, Arabic, French English, Hebrew, Arabic EN RI S EN KS If language 3 to 6 are choosen it is not possible to receive teletext level 2.5 d/r/c/s characters. If language 3 to 6 are choosen it is not possible to make animation in the programme list in teletext mode. If auto format is enabled the picture is automatically adjusted to the best picture format - automatic picture format optimization (Black Bar Detection). If the function is disabled the format optimization must be done manually with Beo4. T EK EL When the 4:3 function is set to ON it is possible to use the 4:3 format in ´Format1´. IK N RO 4.10 Service mode M2 INFORMATION Sub Menu This menu contains information about software versions for the teletext processor. STB TIMER 1 and 2 : It is possible to adjust the delay to an Set Top Box connected. This is because certain Set Top Boxes has a long start-up time. As this may affect a timer recording it is possible to alter the start-up time between 0 and 255 seconds. HW STATUS: For factory use. O AB RESET TO DEFAULT - - - - - - - - - - - - - - - - - - - - - - - - - - Following parameters are affected, when the device is resat: Option is programmed to 2 if FM module is present, else option 1 AV1 and AV2 are configured as “NONE” PL speakers are configured as “NONE” Volume preset is configured to default Max volume is configured to default Bass, treble and balance are configured to default Loudness is set to “NO” AVC is enabled Brightness, contrast and color adjustments are configured to default Movie mode is enabled Comb filter is enabled Stored TV and Radio programs are deleted Modulator frequency is configured to default Stored program groups are deleted Stand is configured to default position WUT data is deleted The clock is configured to synchronise to program 1 Autoformat is enabled WSS is enabled Default format for 4:3 signals is set to 16:9 pan Format 5 (4:3) is set to ENABLED Production counters stops Power down functionality is enabled Menu language is configured to English Internal Radio is ENABLED if FM module is present First install menu will be shown next time the device is powered up R TE N E -C WARNING The reset to default command is activated directly when the menu is highlighted. If the menu item “RESET TO DEFAULT” is selected, the text “PLEASE WAIT” is displayed until the above functionality has been carried out. While the text “PLEASE WAIT” is displayed, you must NOT carry out source selection and you must not press EXIT or STANDBY. H v/ EN S EN KS RI T EK EL N RO TV SERVICE MENU IK In this menu, it is possible to change the MF variant (i.e. activate/deactivate different tuner systems) and change band limits and constants. AFC can be set on/off in order to allow IF ADJUST adjustment. AFC off is remembered only until power down. When the system is selected, the band limits and constants are NOT changed. Frequencies are in MHz. TUNER TAKEOVER adjusts the tuner’s agc. The value range is 0-63. When replacing Service mode 4.11 E -C O AB main chassis there is a label with a value, that must be entered here. IF ADJUST adjusts Pll tuning. The value range is 0-127. AFC STATUS shows the current afc status. 4 values can be displayed. O/H = outside high I/H = inside high I/L = inside low O/L = outside low The afc status value is updated when the menu is opened and subsequently approximately 4 times per second. FM SOUND ADJUST is used to adjust sound FM s/n on the TV tuner. The value range is 0-63. MODULATOR SYSTEM is used to change which modulator system is used for link rooms. B/G or I are possible systems. R TE N RADIO SERVICE MENU H v/ - - - The FM radio and DAB radio SW versions are displayed. Testmode can be activated and deactivated. With testmode ON, the following takes place: Testmode ON stops the Update routine. Testmode ON sets the fm wide filter. Testmode ON sets the search level to First Stop. This means that, in test mode, it will find more weak stations than otherwise. Testmode ON removes 20 dB attenuation of strong stations. - EN KS RI If DAB module is present, two extra fields are accessible: Frequency table (possible to choose between “DAB EU”, “DAB CA” and “DAB KOREA”). Bands (possible to choose between “BAND 3”, “L BAND” and “BAND 3&L”). If DAB module is not present, the fields are grayed out. S EN If DAB module is present and DAB station is playing, six extra fields are visible: Frequency – frequency of current DAB channel Viterbi – Value => 0 = a good signal is available Channel – channel name (for ex. 13F) Signal quality – Value => 0 = a good signal is available Sound - mono or stereo Bitrate – bitrate in KB/S T EK EL STAND ADJUSTMENT IK N RO If the Main microcomputer (PCB6) needs to be changed or the chassis replaced on the product, the stand’s centre position must be set up. This is done in this menu by activating the menu item. When you press p, the calibration function is activated. When you press m, you return to the previous menu without the function being activated. 4.12 Service mode BUSINESS TO BUSINESS extra service menu When a BtB module is detected, an extra field will appear in the first service menu: BUSINESS TO BUSINESS. If BtB ENABLED is set to YES and you press GO on Beo4, the TV will switch off automatically, because it enters BtB (Hotel) mode, where the STBC controls the TV. O AB STBC POWER ON shows which power the STBC is running on: 5 Volt standby or 14V. E -C BtB IN FLASH shows whether or not the STBC module is in flash mode. This is for future use. Ignore Mode R TE N H v/ Error Codes In the case of a fatal component failure, the unit cannot be powered on. To service a unit despite such a failure, the unit must be put into a state where the failure is ignored. This state is called ignore mode, and is further described in “Adjustment and Repair tips”. EN The TV is able to detect certain types of error and display them on the screen. The five latest TV errors are shown as error codes and displayed with the month/ date (four digits) as provided by the system clock. The most recent error is displayed at the top. As the TV has no hardware clock the displayed month/date will not be correct, but can be used to see if more errors have occurred at the same date. RI S EN KS The following TV error types can be displayed: . . . . No error registered DF Data failure POR1 Power on reset failure 1 POR2 Power on reset failure 2 PDD Power down detected failure DPF DiSEqC power fail. XX-YZ (XX = IIC address Y = IIC bus 1 or bus 2 Z = any IIC bus segment A/B/C/D) T EK EL IK AVL error codes from the V.TAPE and AV sockets . . . . No error registered TI Transmission impossible TD Data link tied down N RO ML error codes are for detection of errors in the Master Link system. . . . . No error registered CI Address configuration impossible TD ML data pulled down TU ML data pulled up ?? Other undefinable error possibilities NH No Hardware. There is no Master Link PCB in the TV Service mode 4.13 Motorized stand error codes ST-01 Calibration error too few positions ST-02 Calibration error too many positions ST-03 Calibration error EEPROM ST-04 Calibration error transducer ST-05 Calibration error position O AB After repair of an error that has triggered the display of an error code, the error code has to be deleted. This is done by pressing GO in the MONITOR INFORMATION menu E -C IIC bus error An IIC bus error means that the communication on the bus fails when the microcomputer tries to communicate with the address in question. R TE N H v/ Error code PCB 8A1 401 84 32 6E 21 80 64 801 841 881 A21 C01 88 64 CA1 681 22 85 C6 85 C4 85 8C 85 A0 85 EA 37 40 88 EN S EN KS RI Function Colour decoder & IF (HIP) Video processor (HOP) DSM DVBS portexpander Power Link Sound IC Tuner (NEU) Sound IC Tuner (EUM) Sound IC Tuner (MUL) Real-time clock TV tuner PL Sound IC Modulator IC Code converter (M2) FM RDS IC FM Tuner IC FM PLL IC FM Stereo Decoder FM EEPROM DAB IC Switch IC FM / DAB On modes IIC Bus AV 2 V 2 AV1 AV1 AV 2 V 2 V 2 V 2 SAV1 V 2 AV 2 V 2 V1 AV1 AV1 AV1 AV1 AV1 AV 2 AV1 T EK EL In most cases this means that the addressed IC is defective but the defect could also be in one of the components surrounding the IC or in other components on the bus. Adresses in connection with IIC bus errors: On modes: IK N RO S - Standby mode A - Audio mode V - Video mode 4.14 Service mode DF Data failure If an error occurs in the Main microcomputer (PCB6) that prevents output of geometry data to the TV set, the microcomputer will replace the missing data with default data stored in the EPROM (6IC3) module 999. POR1 Power on reset failure 1 Reset or update failure of module 999 during start up. O AB POR2 Power on reset failure 2 Reset or update failure of module 999 during start up. E -C PDD Power down detected failure Power down failure detected on module 999. R TE N CI Address configuration impossible Error during address configuration. No address has been allocated because an excessive number of units has been connected to the Master Link. - Disconnect all units from the link and reconnect them again one at a time. H v/ TD ML data pulled down The link is pulled down (Low). This error can occur in the form of a physical short circuit in the link. In the link drivers, or in the ML master/source circuit module 51 in the TV. EN TU ML data pulled up TI Transmission impossible EN KS RI The link is pulled up (High). This error can occur in the form of a physical short circuit in the link. In the link drivers, or in the ML master/source circuit module 51 in the TV. It is not possible to send data to pin 8 on the V.TAPE or AV socket, probably because of noise. S TD Data link tied down T EK EL The data link connection to pin 8 on the V.TAPE or AV socket is short circuited to ground. ST-01 Calibration error too few positions Not enough positions are read during Stand calibration. The Stand may be blocked. ST-03 Calibration error EEPROM ST-04 Calibration error transducer An invalid position is read from the transducer. ST-05 Calibration error position Several readings from the transducer with the Stand in the same position. IK Failure when the Stand offset should be stored in the EEPROM. N RO ST-02 Calibration error too many positions Too many positions are read during Stand calibration. Service Menu 4.15 4.15 Service Menu 4.15 AB Service Menu O SERVICE MENU E -C MONITOR TV-TUNER MONITOR SERVICE MENU MONITOR INFORMATION MONITOR INFORMATION 06 IC3 06 IC2 IC INFORMATION VARIANT SERVICE COUNTERS TYPE NO. ITEM NO. SERIAL NO. MASTERCODE PICTURE ADJUSTMENTS RADIO GEOMETRY ADJUSTMENTS STAND TE N M2 INFORMATION RESET TO DEFAULT R TV SERVICE MENU KS RI EN H v/ B/G L M D/K I IC INFORMATION AFC LOW TUN RANGE HIGH TUN RANGE LOWER BAND LIMIT UPPER BAND LIMIT ON OFF OFF OFF OFF ON 45 860 170 450 VHF-1 CONSTANT VHF-2 CONSTANT UHF CONSTANT 161 141 47 TUNER TAKEOVER IF ADJUST AFC STATUS FM SOUND ADJUST MODULATOR SYSTEM CN SOUND 23 59 O/H 29 B/G OFF MSP HIP PICTP HOP AUDIO (DAYS) BOOT COUNTER VIDEO (DAYS) ON (T*10) PICTURE ADJUSTMENTS HOP PICTURE MENU ADC ADJUSTMENTS SCALER MENU 1 SCALER MENU 2 SCALER TEST MENU S EN 1.0 1.9-3 OFF DAB EU BAND 3&L 239.200 11 13F 7 STEREO 128KB/S GEOMETRY ADJUST LCD HOR SIZE VERT SIZE 980 548 HOR POSITION VERT POSITION 105 12 SOUND ADJUSTMENTS EK EL LEFT: TREBLE BASS ON TR 0 HW STATUS ACQF9 ACQLP4 0 0 ON MAX VOLUME LIMIT: MAX VALUE 70 AC 3 SW 02.30a RED DRIVE GREEN DRIVE BLUE DRIVE 20 20 20 BLACK OFFSET R BLACK OFFSET G SOFT CLIP PWL 6 9 0 2 ADC ADJUSTMENTS R OFFSET R COARSE 265 400 G OFFSET G COARSE 265 400 B OFFSET B COARSE 265 400 SCALER MENU 1 PICTURE OFFSETS BRIGHTNESS COLOUR CONTRAST SCALER CONTRAST SENSOR CONTRAST 19 21 20 146 128 BACKLIGHT STARTUP ON CURRENT VALUES: BRIGHTNESS COLOUR CONTAST BACKLIGHT TINT 32 50 40 30 31 DISPLAY WHITE POINT: DISPLAY R 128 DISPLAY G 128 DISPLAY B 110 LOOKUP TABLE SELECTION RED TABLE 128 GREEN TABLE 128 BLUE TABLE 128 DISPLAY GREY POINT: DISPLAY R 16 DISPLAY G 16 BLUE STRETCH 2 LCD PANEL 26-L01 ADAPTIVE BACKLIGHT ON SCALER TEST MENU TEST PATTERNS SCALER STATUS: DISPLAY TEMP DVI DETECTED NOMAL NO TELETEXT ADJUSTMENTS IK N STB TIMER 9 9 AVC O 09.20b 07.92t 9 16 35 FACTORY SETTINGS 5V NO 5.59g Unknown B301 M2 M2 BOOT 9 9 RIGHT: TREBLE BASS BUSINESS TO BUSINESS M2 INFORMATION HOP PICTURE MENU HOP SETTINGS: BRILLIANCE COLOUR CONTRAST SCALER MENU 2 CENTER POSITION STBC POWER ON B2B IN FLASH B2B AP SW B2B M-STB ID TV DRV 00011 0 5 0 10 RADIO (DAYS) 0 RADIO ON (T*10) 7 STAND ADJUSTMENT B2B ENABLED B2B SETTINGS B2B TEST 02170A48 09 00 0C SERVICE COUNTERS RADIO SERVICE MENU FM SW DAB SW TESTMODE FREQUENCY TABLE BANDS FREQUENCY VITERBI CHANNEL SIGNAL QUALITY SOUND BITRATE 2 ERROR: TV 0731 8F-1 TV 0728 3A-2B TV .... .... TV .... .... TV .... .... V.MEM AVL LAST .... AV AVL LAST .... TELETEXT & FORMAT ADJUST. TUNER SYSTEM 9280 XXXXXXX 12345678 STORED OPTION SETTING SOUND ADJUSTMENTS BUSINESS TO BUSINESS AP SW 9.2 IOP SW22.0 STB TABLE 3.6 BC6 26 WSS STATUS DETECT ON TEXT LANGUAGE: B&O LANGUAGE 0 AUTO FORMAT ENABLED 4:3 ON PICTURE ADJUSTMENT PHASE VALUE 0 4.16 4.16 4.16 E -C O AB R TE N KS RI EN H v/ S EN TR EK EL IK N O Replacement of modules 5. Replacement of modules Modules that can be replaced R TE N E -C O AB BeoCenter 6-26 Mounting servicestands . ................... 5.5 BeoCenter 6-26 in service position . ............................ 5.6 Main chassis in service position ................................... 5.7 Replace contrast screen .............................................. 5.8 Replace 999 Module, Main chassis ............................. 5.9 Replace LCD ............................................................. 5.13 Replace PCB6, Microprocessor module ..................... 5.15 Replace PCB7, PC Sound .......................................... 5.16 Replace PCB8, Decoupling module ........................... 5.17 Replace PCB10, Sound output module ..................... 5.18 Replace PCB11, IR/Autocontrast module ................... 5.19 Replace PCB21, DVB-S . ............................................ 5.20 Replace PCB32, DSM module ................................... 5.22 Replace PCB37, DAB module .................................... 5.23 H v/ Replace PCB51, Masterlink module . ......................... Replace PCB59, Camcorder module . ........................ Replace PCB61, BtB module ..................................... Replace PCB63, System modulator ........................... Replace PCB64, Powerlink module . .......................... Replace PCB85, FM tuner module . ........................... Replace PCB88, Interface module ............................. EN KS RI 5.24 5.25 5.26 5.27 5.28 5.29 5.30 S EN Warning – Discharge the power supply before dismantling The power supply must be discharged before dismantling and/or replacement of LCD, any modules or PCB’s. There is a major risk of damaging the LCD when the connection between the LCD and the Main chassis is disconnected and the power supply has not been discharged. Short-circuit C707 on PCB4, SMPS as shown. If not, you will damage the LCD panel! T EK EL C7 07 + l C + l IK N 100 Ohm 7 RO 70 Purpose of replacement of modules Short instructions for replacement of the available modules, with reference to additional illustrations: - The correct sequence for replacing modules. - Text and illustrations. - Reference to adjustment. Modules that do not require any special procedure may be shown as only illustrations. 5. Replacement of 999 Module, Main chassis Replacement of 999 Module, Main chassis Power supply must be discharged! For detailed dismantling instructions, please refer to illustrations on page 5.9. Notice All modules must be placed on the ESD-mat or in an ESD-proof bag. O AB Replace 999 Module R TE N E -C IC SOCKET 1. Set the product in service position. 2. Discharge the power supply. 3. Connect ESD-mat. 4. Disconnect cables and modules from the Main chassis. 5. Remove the Main chassis and place it on the ESD-mat. 6. Insert the new Main chassis in the product. 7. Transfer customer settings, production settings and PIN-code data to the new chassis, by means of ServiceTool. 8. Remount modules and reconnect cables to the Main chassis. 9. Reconnect remaining cables. H v/ The product is now ready for adjustment. EN 10. Disconnect ESD-mat. 11. Connect mains. 12. Turn on the product. RI Enter TV Service menu 13. Transfer the values for Tuner Taker Over, IF adjust and FM Sound adjust. EN Check picture and geometry KS Enter Monitor Service menu S 14. Check picture quality. If picture quality is not OK, set ADC Adjustments, Scaler menu 1 & Scaler menu 2 data to default. T EK EL If picture quality still is not OK, perform the complete Picture adjustment. Check picture quality again. If picture quality is not OK, contact Bang & Olufsen. RO 15. Geometry check. If the geometry is not OK, set Geometry adjustment data to default. IK N 16. Finish service. See chapter “Final check after repair”. Replacement of PCB8, Decoupling 5. Replacement of PCB8, Decoupling Power supply must be discharged! For detailed dismantling instructions, please refer to illustrations on page 5.17. Notice All modules must be placed on the ESD-mat or in an ESD-proof bag. O AB Replace PCB8, Decoupling R TE N E -C 1. Set the product in Service position. 2. Discharge power supply. 3. Connect ESD-mat. 4. Disconnect cables connected to PCB8. 5. Remove the PCB8, and place it on the ESD-mat. 6. Insert the new PCB8 in the product. 7. Reconnect cables to PCB8. The product is now ready for adjustment. H v/ 8. Disconnect ESD-mat. 9. Connect mains. 10. Turn on the product. Check picture and geometry EN Enter Monitor Service menu RI KS 11. Check picture quality. If picture quality is not OK, set ADC Adjustments, Scaler menu 1 & Scaler menu 2 data to default. EN If picture quality still is not OK, perform the complete Picture adjustment. Check picture quality again. S If picture quality is not OK, contact Bang & Olufsen. T EK EL 12. Geometry check. If the geometry is not OK, set Geometry adjustment data to default. Confirm geometry is OK. If geometry not OK, refer to “Adjustment”. IK N RO 13. Finish service. See chapter “Final check after repair”. 5. Replacement of LCD Replacement of LCD Power supply must be discharged! For detailed dismantling instructions, please refer to illustrations on page 5.13. Notice All modules must be placed on the ESD-mat or in an ESD-proof bag. O AB Replace LCD display The product is now ready for adjustment. R TE N E -C 1. Set the product in service position. 2. Discharge power supply. 3. Connect ESD-mat. 4. Disconnect cables connected to the LCD display. 5. Remove the LCD display, and place it on the ESD-mat. 6. Insert the new LCD display in the television. 7. Reconnect cables to the Main chassis. Check picture and geometry EN Enter Monitor Service menu H v/ 8. Disconnect ESD-mat. 9. Connect mains. 10. Turn on the product. RI KS 11. Check picture quality. If picture quality is not OK, set ADC Adjustments, Scaler menu 1 & Scaler menu 2 data to default. EN If picture quality still is not OK, perform the complete Picture adjustment. Check picture quality again. S If picture quality is not OK, contact Bang & Olufsen. T EK EL 12. Geometry check. If the geometry is not OK, set Geometry adjustment data to default. Confirm geometry is OK. If geometry not OK, refer to “Adjustment”. IK N RO 13. Finish service. See chapter “Final check after repair”. BeoCenter 6-26 mounting servicestand 5. - Remove socket cover E -C O AB R TE N - Remove all cables H v/ EN EN KS RI - Remove speaker cover ➁ T EK EL ➀ S ➀ ➁ IK N Correct mounted! RO - Mount servicestands as shown 5. BeoCenter 6-26 in service position + 5.5 Mount servicestands - Remove fastning element O AB 2x TX10 E -C R TE N - Remove contrast screen H v/ EN - Remove screws Also a screw on the back! S 12x TX20 EN KS RI Caution! when remounting T EK EL 1x TX20 RO - Pull off rear cover IK N ESD PCB xx ESD-Mat Main chassis in service position 5. + 5.5 Mount servicestands + 5.6 BeoCenter 6-26 in service position - Remove screws on right side 2x TX10 E -C O AB R TE N - Remove screws and remove bracket 10x H v/ TX10 EN Remove plug on PCB7 7P135 IK N RO Open chassis 90° T EK EL 2x TX20 S EN KS RI - Remove screws on chassis 5. Replace contrast screen + 5.5 Mount servicestands - Remove screws O AB 2x TX10 E -C R TE N - Lift and pull off contrast screen H v/ EN S EN KS RI Caution! when remounting T EK EL IK N RO Replace Main chassis 5. Connect ServiceTool to the product and if possible download customer setttings to a PC. + 5.5 Mount servicestands + 5.6 BeoCenter 6-26 in service position + 5.7 Main chassis in service position + 5.21 Remove DVB-S, if mounted 04P116 O AB 04P143 Remove cables from PCB4 04P174 04P021 E -C R TE N - Remove FAN 5x H v/ TX10 EN S EN KS RI - Remove cables from PCB88 (if mounted) 88P105 88P107 T EK EL 88P14 IK 1x TX10 N RO - Move FM module to the right (if mounted) 5.10 Replace Main chassis - Remove LCD shield 2x TX8 H v/ EN R TE N E -C O AB - Remove LCD plugs KS RI - Remove plug from scaler S EN T EK EL 5P123 RO - Remove cover IK N 3x TX10 Replace Main chassis 5.11 - Remove FM aerial (if mounted) Correct placement E -C O AB -Remove aerial cables for DAB (if mounted) ➁ R TE N ➀ H v/ 1x TX10 EN 1P44 T EK EL GND S EN KS RI - Remove plugs shown (1P44 - only if DSM module is mounted) RO - Remove screws on scaler module IK N 4x TX10 5.12 Replace Main chassis - Remove plug from PCB10 10P28 E -C O AB N - Lift up chassis and remove it together with scaler module R TE Lock scaler on chassis H v/ EN S EN KS RI - Transfer customer settings, production settings and PIN-code data to the new chassis, by means of ServiceTool. 00 nd 32 ou e ar w ft p So cku u te ba en a M pd A U RD 1. H . . . . 2. . .. 3. . . 4 oS T EK EL Be I/O RO - Important information! Old chassis New chassis IK N ! If DSM module is mounted, transfer the Powerlink module from the new chassis to the old chassis, and mount 2 new covers for the powerlink holes ! Replace LCD + 5.5 Mount servicestands + 5.6 BeoCenter 6-26 in service position + 5.7 Main chassis in service position 5.13 5x TX10 Remove FAN O AB 1P143 E -C R TE N - Remove LCD shield H v/ 2x TX8 EN S EN KS RI - Remove LCD plugs T EK EL RO - Remove screws on scaler module and pull out scaler IK N 4x TX10 5.14 Replace LCD - Remove cables from LCD (behind scaler) O AB GND E -C To PCB8 R TE N - Remove plug for NTC H v/ 04P174 EN KS RI - Remove GND S EN GND T EK EL RO 8x TX10 IK N - Remove screws and washers - Gently pull out LCD panel Replace PCB6, Microprocessor module 5.15 + 5.5 Mount servicestands + 5.6 BeoCenter 6-26 in service position - Lift PCB upwards to release lock Connect ESD to PCB6! PCB xx ESD-Mat E -C O AB ESD R TE N - Tilt as shown H v/ EN KS RI - Pull PCB downwards S EN T EK EL RO - Remove cables from PCB6 IK N Correct mounting of cable! � ☺ 5.16 Replace PC Sound module, PCB7 + 5.5 Mount service stands + 5.6 BeoCenter 6-26 in service position - Remove cable 7P133 R TE N E -C O AB - Remove screws 4x TX10 H v/ EN S EN Release snaplock KS RI - Remove cover T EK EL IK N RO Replace Decoupling module, PCB8 5.17 + 5.5 Mount service stands + 5.6 BeoCenter 6-26 in service position + 5.7 Main chassis in service position 8P138 - Remove cables 8P136 O AB 8P135 E -C 8P137 R TE N - Release snaplock and pull out PCB8 H v/ EN S EN KS RI T EK EL IK N RO 5.18 Replace Sound output modules, PCB10 + 5.5 Mount servicestands + 5.6 BeoCenter 6-26 in service position + 5.7 Main chassis in service position - illu 1-2 - Placement Attention! O AB ESD PCB xx PCB10 ESD-Mat E -C N - Remove plugs as illustrated 10P45 TE 10P31 PCB10 R 10P30 H v/ 10P33 EN 10P28 RI 10P32 S 1x TX10 EN KS - Remove screw T EK EL RO - Pull out PCB10 IK N PCB10 Replace IR/Autocontrast module, PCB11 5.19 + 5.5 Mount service stands + 5.6 BeoCenter 6-26 in service position + 5.7 Main chassis in service position - Placement of IR/Autocontrast module, PCB11 O AB PCB11 E -C TE N - Pull out IR/Autocontrast module as shown 1 1 R H v/ EN - Pull out as shown S EN KS RI 2 T EK EL RO - Pull out PCB11 from housing and remove cable IK N 11P51 5.20 Replace DVB-S module, PCB21 + 5.5 Mount service stands + 5.6 BeoCenter 6-26 in service position + 5.7 Main chassis in service position 3x - Remove cover TX10 E -C O AB R TE N - Remove aerial cable H v/ EN KS RI - Remove plugs shown S EN T EK EL 32P410 D-SUB RO - Remove plugs shown IK N 4P143 1P33 1P14 Replace DVB-S module, PCB21 5.21 - Remove fan 5x TX10 E -C O AB R TE N - Remove screw 1x H v/ TX20 EN S EN KS RI - Release snap lock and slide out T EK EL “Snap lock” IK N RO 5.22 Replace DSM module, PCB32 + 5.5 Mount service stands + 5.6 BeoCenter 6-26 in service position + 5.7 Main chassis in service position - Remove plugs 32P410 O AB 32P12 D-SUB R TE N E -C - Remove screws H v/ 4x TX10 EN KS RI - Remove screws on backside T EK EL IK N RO - Remove DSM module from bracket S EN 2x TX10 Replace DAB module, PCB37 5.23 + 5.5 Mount service stands + 5.6 BeoCenter 6-26 in service position + 5.7 Main chassis in service position + 5.28 Remove FM tuner module - illu 1 - 2 1x TX10 - Remove screw and pull off FM tuner PCB E -C O AB N - Remove cables R TE 37PB H v/ 37P101 EN S 3x TX10 EN KS RI - Remove screws T EK EL IK N RO 5.24 Replace Masterlink module, PCB51 + 5.5 Mount service stands + 5.6 BeoCenter 6-26 in service position - Placement of PCB51 - Remove as shown R TE N E -C O AB PCB51 H v/ PCB51 EN S EN KS RI T EK EL IK N RO Replace Camcorder module, PCB59 5.25 + 5.5 Mount service stands + 5.6 BeoCenter 6-26 in service position 59P50 - Remove cable E -C O AB TE N - Remove screws 2x R TX10 H v/ EN S EN KS RI T EK EL IK N RO 5.26 Replace BtB module, PCB61 + 5.5 Mount service stands + 5.6 BeoCenter 6-26 in service position - Take note of cable placement - Remove cables from PCB61 R TE N E -C O AB - Remove screws H v/ 2x TX10 EN S EN KS RI - Pull out PCB61 T EK EL IK N RO Replace System modulator module, PCB63 5.27 + 5.5 Mount service stands + 5.6 BeoCenter 6-26 in service position + 5.7 Main chassis in service position 3x - Remove cover TX10 E -C O AB R TE N - Remove PC sound module H v/ 4x TX10 EN 63P300 S EN KS RI - Remove plug PC B6 3 T EK EL RO - Remove screw on backside of chassis 1x TX10 IK N Remove modulator 5.28 Replace Powerlink module, PCB64 + 5.5 Mount service stands + 5.6 BeoCenter 6-26 in service position - Loosen locks TE N E -C O AB - Loosen locks Warning! H v/ � � � � ☺ R � EN 1P62 S EN KS RI - Remove cable T EK EL IK N RO - Gently pull down PCB64 Replace FM tuner module, PCB85 5.29 + 5.5 Mount service stands + 5.6 BeoCenter 6-26 in service position - Remove aerial plug and screw O AB 85P100 1x TX10 E -C R TE N - Slide module to the right H v/ EN KS RI - Remove cables 85P103 S EN 88PT2 88P105 88P107 - Remove screw and pull off FM tuner module IK N RO 85P106 T EK EL 88P14 1x TX10 5.30 Replace Interface module, PCB88 + 5.5 Mount service stands + 5.6 BeoCenter 6-26 in service position + 5.7 Main chassis in service position + 5.28 Remove FM tuner module - illu 1 - 2 88PT2 - Remove cables 88P14 O AB 88P105 88P107 TE N E -C - Remove cables 88PT1 R H v/ 88P106 88P105 EN 88P101 1x S TX10 EN KS RI - Remove screws T EK EL IK N RO Specification guidelines for service use 6. Automatic Picture Control Luminance Transient Improvement Digital Noise Reduction Green Enhancement Adaptive Noise Reduction Colour Transient Improvement Adaptive Luminance Peaking Blue Strech Adaptive Black H v/ EN Options R TE Vision Clear N E -C O AB SPECIFICATION GUIDELINES FOR SERVICE USE BeoCenter 6 – 26 CTV system *See type survey Colour variants Profile and speaker cover: silver, dark grey, black, red, blue LCD 26” 16:9 TFT LCD Resolution1366 x 768 pixels Display colours16.7 mio. (true) Luminance of white (center of screen) Typical 500 cd/m2 Contrast ratio (center of screen) Typical 1200:1 Response time Typical 6 msec. Viewing angle Typical 88 degrees (both vertical and horizontal) Contrast screen Anti-reflex coated and high glare LCD panel Picture Formats Format 1: 16:9 Panorama 15:9 B&O optimum + soft scroll 4:3 Format 2: 16:9 Letterbox + Soft Scroll Format 3: 16:9 for unik 16:9 Automatic format optimization via “Black Bar Detection” 16:9 detection on both scart connectors 0, 1, 2, 4, 5 , 6 RI S EN KS Operation Beo4 remote control (included) Menu languages English, Danish, Dutch, Spanish, Swedish, German, French, Italian PIN-code protection With pin-code or disabled Tuning Autotune, program move and automatic naming Tuner range 45 - 860 MHz: VHF, S-band, Hyper-band, UHF No. of TV programmes 99, auto naming 8 Program Groups Teletext Teletext level 2½, approx. 2000 pages 17 teletext character sets in 7 groups Wide Screen Signalling (WSS) VPT (Video Programming by Teletext) 9 memory pages per program 17 teletext languages in 7 groups A2 + NICAM T EK EL Stereo decoders RO IK N Speakers 1 x 4” woofer per channel and 1 x ¾” tweeter per channel Impedance Woofer 8 W and tweeter 8 W Power amplifiers 2 units Frequency range 65 - 20000 Hz Max. sound pressure level 95 dB Cabinet principle/Net. Volume Bass Reflex / 2 litres per side Bass equalizer ABL Protection of loudspeaker units against mechanical damage and automatic dynamic reduction of bass signal Magnetic shielded No Stand turning function ±37 degrees, remote operated System modulator System B or G according to setup 471.71 - 855.25 MHz (in 1 MHz step), Dual side band 6. Specification guidelines for service use N E -C O AB Dolby® Digital Decoder Optional Decoding capabilities Dolby® Digital 5.1 channel decoding Dolby® Pro-Logic decoding of two channel Dolby® Digital Dolby® Pro-Logic decoding of two channel PCM Dolby® Pro-Logic decoding of two analogue channels (Lt/Rt) Automatic format detection (Dolby® Digital, DTS and PCM) Calibration 3 channel tone control & loudness (L/C/R) Bass management, Delay management Sound modes (Speaker 1 - 5) Sound mode 1 : Stereo center speakers (Subwoofer muted) Sound mode 2 : Stereo in L/R speakers, Subwoofer is active Sound mode 3 : Dolby® 3 stereo Sound mode 4 : Dual stereo, stereo in L/R front & rear speakers, Subwoofer is active Sound mode 5 : Dolby® digital, Dolby® Pro-logic, DTS Sound modes Speaker 1: Stereo Internal speakers Connections External BeoLab loudspeakers R TE 2 x Power Link 5 x Power Link (If Optional DSM module is installed) 2 x SPDIF (If Optional DSM module is installed) H v/ DVB-S (Optional) Media Satellite Frequency range 950 MHz to 2150 MHz IF Bandwidth 45 MHz ODU control DiSEqC 1.0 or DC & Tone control 14/18Volt and 22KHz ±4KHz/ 0.6Vpp ±0.2V Decoder Video MPEG2, MP, ML Audio MPEG1, 2-channel audio decoder, layer 1 & 2 MPEG2, 2-channel audio decoder, layer 2 AC3 to SPDIF loop SPDIF sample rates 48kHz or 44.1kHz Number of slots 2 PCMCIA (Common Interface only) Support for Viaccess, Conax, MediaGuard (Aston), CryptoWorks EN EN KS RI Built-in (controls one STB) Controlling boxes with Beo4: Supported boxes: See list at Bang & Olufsen Retail System (via internet) S T EK EL 87.5 - 108.0 MHz (Variant EU/US) Name, RadioText, Clock are supported Mono > 68 dB, typ. 70 dB – Stereo > 62 dB, typ. 65 dB Mono and stereo 30- 15 kHz, ±2 dB 75 W 99 Timer functionality Timer Recording in Recorder- Primary (AV1) TEXT Timer Record Programming (VPT) Timer Play Programming (incl. all stand-by) Timer Play Execution Wake up timer (WUT) Show Clock IK Number of stations that can be stored (both FM and DAB) N DAB (optional) Receiving band174 – 240 MHz (Band III) 1452 – 1492 MHz (Band L) Decoding up to 256 kbit/s Signal/Noise ratio (1KHz)100 dB Frequency response15-20000 Hz ±1 dB Aerial Impedance Typ. 75 W RO Set-top Box Controller RADIO FM Receiving band RDS Signal/Noise ratio (1KHz) Frequency response Antenna impedance Specification guidelines for service use Dimensions W x H x D/Weight 71 x 58 x 18 cm + stand /23 kg Mains Voltage EU 220 - 240 V +10 / -15% 50 - 60 Hz Power consumption Typical: 116 watt/Stand-by: 1 watt 6. O AB CONNECTIONS R TE H v/ EN Pin 1 Pin 2 Pin 3 Pin 4-8 Pin 9 Pin 10 Pin 11 Pin 12 Pin 13 Pin 14 Pin 15 Pin 16 Data- -0.4V ±0.1V Data+ +0.4V ±0.1V ML sense N.C. ATI transmit ATI receive -supply voltage -7V to -15V (in St By -3V to -15V) +supply voltage +7V to +15V (in St By +3V to +15V) Audio -L 1V Bal, Rin 2.2MW, Rout 75W Audio +L 1V Bal, Rin 2.2MW, Rout 75W Audio -R 1V Bal, Rin 2.2MW, Rout 75W Audio +R 1V Bal, Rin 2.2MW, Rout 75W Pin 1 Pin 2 Pin 3 Pin 4 Pin 5 Pin 6 Pin 7 Pin 8 PL ON => 2.5V, OFF =< 0.5V Signal GND Audio L out 0V - 6.5V RMS PL speaker ON => 2.5V, OFF =< 0.5V Audio R out 0V - 6.5V RMS Data: High >3.5V, Low <0.8V Data GND Not used KS RI POWER LINK N E -C MASTER LINK S EN V.TAPE & AV Pin 1 Audio R out 1V RMS 150 W Pin 2 Audio R in 1V RMS 40 kW Pin 3 Audio L out 1V RMS 150 W Pin 4 Audio GND Pin 5 Blue GND Pin 6 Audio L in 1V RMS 40 kW Pin 7 Blue in 0.7 Vpp 75 W Pin 8 Play voltage: Logic 0 = 0V to 2V Logic 1 = 9.5V to 12V (4:3 info) 5V to 7V = 16:9 info V.TAPE Data in/out AVL Data out 2 Way on V.TAPE and 1way on AV Pin 9 Green GND Pin 10 Not used Pin 11 Green in 0.7 Vpp 75 W Pin 12 Not used Pin 13 Red GND Pin 14 Blanking GND Pin 15 Red in 0.7 Vpp 75 W – is also used for C in Pin 16 Blanking in Logic 0 = 0V to 0.4V Logic 1 = 1V to 3V R in 75 W Pin 17 Video out GND Pin 18 Video in GND Pin 19 Composite video out 1 Vpp 75 W Pin 20 Composite video in 1 Vpp 75 W – is also used for Y in Pin 21 Shield T EK EL IK N RO 6. Specification guidelines for service use Composite video in 1Vpp 75 W (RCA) Audio In Audio L & R in 0.2V - 2 V RMS >10 kW Phono (RCA) PHONES Mini jack Ø 3.5 mm 8 - 32 W Set-top box (PUC) output Mini jack Ø 3.5 mm (supports one STB) O AB VIDEO TV Input 1 x aerial 75 W FM input1 x 75 W aerial male E -C DAB input (optional)1 x F-connector DVB-S Input (Optional) N 4 2 5 pole DIN connector Pin 1 GND Pin 2 Turn Left 0V when activated, othervise 5V Pin 3 Turn Right 0V when activated, othervise 5V Pin 4 Stand Position feedback 0 - 5V pulses Pin 5 14V supply EN T EK EL IK N RO 9 17 S 16 24 EN C4 C3 Data 2 Data 2 + Data 2/4 shield Data 4 Data 4 + DDC Clock DDC Data Analog vert. sync Data 1 Data 1 + Data 1/3 shield Data 3 Data 3 + + 5V GND Hot plug detect Data 0 Data 0 + Data 0/5 shield Data 5 Data 5 + Clock shield Clock + Clock Analog red Analog green Analog blue Analog hor. sync. Analog GND KS DVI-I plug Pin 1 Pin 2 Pin 3 Pin 4 Pin 5 Pin 6 Pin 7 Pin 8 Pin 9 Pin 10 Pin 11 Pin 12 Pin 13 Pin 14 Pin 15 Pin 16 Pin 17 Pin 18 Pin 19 Pin 20 Pin 21 Pin 22 Pin 23 Pin 24 C1 C2 C3 C4 C5 RI DVI-I (For connection of e.g. a PC DVI and VGA C2 C1 8 1 3 H v/ 5 1 R Motorised stand operation 75 W aerial male. Output to RF Link amplifier TE LINK TV OUT 1 x F-connector Type survey 6. Component Video (YPbPr) Y1 x phono (green) Pb1 x phono (blue) Pr1 x phono (red) O AB 9 pole D-Sub male at TV rear part 1 6 (Only if optional DVB-S module is installed) Pin 1 NC Pin 2 RXD TXD 1 5Pin 3 Pin 4 DTR (NC) Pin 5 GND 6 Pin9 6 DSR (NC) Pin 7 RTS Pin 8 CTS Pin 9 RI (NC) 5 TE N E -C 9 Subject to change without notice R H v/ EN 9280 Austria, Belgium, Croatia, Denmark, Faroe Islands, Finland, Germany, Greece, Greenland, Holland, Iceland, India, Indonesia, Israel, Italy, Kuwait, Liechtenstein, Luxembourg, Malaysia, Nigeria, Norway, Oman, Pakistan, Portugal, Singapore, Slovenia, Spain, Sweden, Thailand, Turkey, United Arab Emirates Bahrain, Egypt, France, Lebanon, Qatar, Saudi Arabia, Switzerland Botswana, Ireland, South Africa, United Kingdom Hong Kong Australia, New Zealand Azerbaijan, Bulgaria, Czech Repub., Hungary, Kazakhstan, Latvia, Lithuania, Morocco, Poland, Romania, Russia, Serbia, Slovak Rep., Ukraine, Uzbekistan China S NEU Basic Video variant EN Type BeoCenter Market 6-26” KS RI Type survey B/G Active Video system B/G T EK EL 9282 HK AUS EEU 9286 9283 9284 CH 9285 B/G/L/L'/I B/G/L/L'/I/D/K I B/G/L/D/K/M/I IK GB B/G/L/L'/I/D/K N 9281 RO FGB B/G B/G/L/L'/I/D/K B/G/L/D/K/M/I D/K/M/I B/G B/G/D/K D/K/M/I Modification to other TV systems either by means of chassis exchange, or change the setting in the TV Service menu. 6. Video Input formats with HD-Ready function Video Input formats Name of Video Input Format (UseCase) Vert. Freq. Composite Video 50 Hz No. of lines + scan “active” (“total”) 576i (625i) 288p (312/313p) 59.94 Hz O AB 480i (525i) 240p (262/263p) YC 50 Hz 576i (625i) E -C 288p (312/313p) 59.94 Hz 480i (525i) 240p (262/263p) N RGB-Y 50 Hz 288p (312/313p) 59,94 Hz R TE 240p (262/263p) 50 Hz 576p (625p) 59.94 Hz 720p (750p) 1080i (1125i) 480p (525p) 60 Hz 60 Hz 720p (750p) 1080i (1125i) 480p Aspect Ratio1 Source Resolution2 (full frame) Pixel Clock3 Display Format Mode 4:3 16:9 4:3 16:9 4:3 16:9 4:3 16:9 4:3 16:9 4:3 16:9 4:3 16:9 4:3 16:9 4:3 16:9 4:3 16:9 4:3 16:9 4:3 16:9 4:3 16:9 720 x 576 13.5 MHz (luminance) TV 4:3 16:9 4:3 16:9 RI VGA 480i (525i) H v/ YPbPr 576i (625i) EN 576p 600p 768p 4:3 KS 16:9 TMDS DVI 60 Hz 720p 1080i 480p 576p 600p 720p 768p 720 x 240 720 x 576 720 x 288 720 x 480 720 x 240 720 x 576 4:3 16:9 4:3 16:9 4:3 16:9 720 x 288 720 x 480 720 x 240 720 x 576 27 MHz 1280 x 720 1920 x 1080 720 x 480 74.25 MHz 1280 x 720 1920 x 1080 640 x 480 848 x 480 1024 x 576 800 x 600 1024 x 768 1360 x 768 1280 x 720 74.25 MHz 720 x 576 1280 x 720 1920 x 1080 720 x 480 27 MHz 25.2 MHz 31.49 MHz 46.99 MHz 40 MHz 65 MHz 84.7 MHz 74.25 MHz 74.48 MHz 27 MHz 1280 x 720 1920 x 1080 640 x 480 848 x 480 1024 x 576 800 x 600 1280 x 720 1024 x 768 1360 x 768 PC TV 74.25 MHz 27 MHz 74.25 MHz 25.2 MHz 31.49 MHz 46.99 MHz 40 MHz 74.48 MHz 65 MHz 84.7 (82.0) MHz PC IK N RO 4:3 16:9 4:3 16:9 13.5 MHz T EK EL 59.94 / 60 Hz 720p 1080i 480p 720 x 480 S GTF Generalized Timing Formula 50 Hz 720p 720p (GTF) 576p 720 x 288 EN CVBS-576i-4:3 CVBS-576i-16:9 CVBS-288p-4:3 CVBS-288p-16:9 CVBS-480i-4:3 CVBS-480i-16:9 CVBS-240p-4:3 CVBS-240p-16:9 YC-576i-4:3 YC-576i-16:9 YC-288p-4:3 YC-288p-16:9 YC-480i-4:3 YC-480i-16:9 YC-240p-4:3 YC-240p-16:9 RGBY-576i-4:3 RGBY-576i-16:9 RGBY-288p-4:3 RGBY-288p-16:9 RGBY-480i-4:3 RGBY-480i-16:9 RGBY-240p-4:3 RGBY-240p-16:9 YPbPr-576p-4:3 YPbPr-576p-16:9 YPbPr-720@50p YPbPr-1080@50i YPbPr-480p-4:3 YPbPr-480p-16:9 YPbPr-720@60p YPbPr-1080@60i RGBHV-480p-4:3 RGBHV-480p-16:9 RGBHV-576p-16:9 RGBHV-600p-4:3 RGBHV-768-4:3 RGBHV-768-16:9 RGBHV-720@60p (HDTV) RGBHV-720@60p (GTF) DVI-576p-4:3 DVI-576p-16:9 DVI-720@50p DVI-1080@50i DVI-480p-4:3 DVI-480p-16:9 DVI-720@60p DVI-1080@60i DVI-480p-4:3-sqr.pix. DVI-480p-16:9-sqr.pix. DVI-576p-16:9 DVI-600p-4:3 DVI-720@60p (GTF) DVI-768-4:3 DVI-768-16:9 Type of signal Wiring diagram 7.1 Wiring diagram 7.1 AB W66 E -C O W75 TE N NOT USED Wiring diagram 7.1 1/2 SYSTEM MODULATOR R H v/ INVERTER SHIELD 6277980 WHEN FM ONLY 6278130 WHEN FM AND DAB KS RI EN W300 NOTE ! S EN TR EK EL IK N O IR_RECEIVER_BtB 2/2 SYSTEM MODULATOR 8.1 Available parts 8.1 AB Available parts BeoCenter 6 – 26 9032 9033 1 9025 2 1 9010 4 4 Incl. pos. no. 9009, 9010, 9012, 2, 3, 4 ,5 6 1 6 1 4 14 1 85 4 5 14 14 14 1 14 9016 1 6 1 4 6 9017 1 5 61 1 10 64 9 1 W300 1 63 1 9 9 9039 1 1 9 9021 10 10 9 9018 1 1 9023 11 10 10 10 2 1 1 9 9022 9 9042 9 9043 11 IK N 2 9 9041 O 9 9021 1 TR 10 9040 EK EL 10 9038 9018 1 10 2 9036 1 1 11 1 9037 S 1 1 1 1 2 1 9 9044 1 1 9 1 1 8 9 9 5 1 1 9014 9 7 1 999 10 8 1 1 EN 9 9020 1 9035 1 9030 9031 9 9 1 W200 9029 7 9022 1 1 1 9 1 1 9 1 1 1 1 9 9018 1 1 990 KS 9 9019 8 9034 1 Incl. pos. nos. 9018, 9019, 9020, 1, 9, 10, 11 9018 9013 1 RI EN 6 1 1 59 14 14 6 7 1 88 12 1 32 1 9028 37 1 1 1 H v/ 6 13 1 9027 14 1 13 2 15 1 R 9012 51 1 9015 1 3 1 1 1 2 3 1 12 1 TE N 4 1 1 9026 2 6 1 2 1 E -C 9009 Available parts Incl. pos. no. 9025 9024 O 9008 9011 8.1 Incl. pos. nos. 9037 -> 9044 9045 Available parts BeoCenter 6 – 26 R TE N E -C O AB Cable rack Shield NTC PCB LCD panel incl. pos. nos. 9009, 9010, 9012, 2, 3, 4, 5 Gasket f/LCD, set Contrast screen Speaker cover, silver Speaker cover, dark grey Speaker cover, black Speaker cover, red Speaker cover, blue Holder f/DAB Profile, silver Profile, dark grey Profile, black Profile, red Profile, blue Main frame, incl. pos. nos. 9018, 9019, 9020, 1, 9, 10, 11, W103 and spring f/grill Spring f/grill Bracket Lock Chassis bracket W200 W300 Lead f/IR Receiver Mains lead w/filter EU Mains lead GB Mains lead AUS Mains lead CHK H v/ 9008 3151338 9009 3162229 9010 8001992 9011 8200184 9012 3340305 9013 3451485 9014 3344010 3344013 3344014 3344012 3344011 9015 3151918 9016 3320827 3320886 3320892 3320890 3320891 9017 3321025 2816190 9018 3151766 9019 2810336 9020 3151218 EN 6270870 6100325 6100404 6100248 6100037 8003172 PCB7, PC Sound KS 8Module Tweeter Bass Holder f/PCB11 Fan incl. pos. no. 9025 Rubber bushing Holder Holder Holder f/BtB Nut Mini jack Nut Ground connection Cover f/socket panel Bracket Blind plug Holder f/PCB63 Cover f/DVB-S Plate f/DVB-S Cover f/stand Cover f/connector panel Cover f/camcorder Hinge Cover f/DVI Cover f/DSM Back cover incl. pos. nos. 9037 -> 9044, 1 RI 7Module 9021 8480388 9022 8480338 9023 3151783 9024 8400018 9025 3907001 9026 3151232 9027 3151229 9028 3151670 9029 2380143 9030 8008922 9031 2380145 9032 3160367 9033 3160338 9034 2576027 9035 3341105 9036 3151878 9037 3160333 9038 3151026 9039 3160332 9040 3160330 9041 3160334 9042 2810020 9043 3160331 9044 3151822 9045 3431498 8.2 8003171 PCB8, Decoupling 10Module 8001991 PCB10, Sound Output EN 11Module 8003041 PCB11, IR/Autocontrast S 32Module 8000910 PCB32, DSM 51Module 8000882 PCB51, Masterlink 59Module 8001996 PCB59, Camcorder 61Module 8003120 PCB61, BtB T EK EL 37Module 8002046 PCB37, DAB 64Module 8000921 PCB64, Powerlink 990Module8053041 DVB-S chassis 999Module 8053160 8053161 8053162 symbol of safety component IK 88Module 8003086 PCB88, Interface N 85Module 8003085 PCB85, FM RO 63Module 8003035 PCB63, System modulator Main chassis consist of PCB1, PCB4, PCB5, PCB6, PCB7, PCB51, PCB63, PCB64 Main chassis, system B/G Main chassis, system B/G/M/I/D/K/L Main chassis, system B/G/L/L’/I/D/K 8.3 Available parts Survey of screws and washers E -C O AB 1 2 3 4 5 6 7 8 9 10 11 12 13 14 15 Wire bundles 2013137 2038117 2930092 3907004 3907005 3031074 2930022 3031064 2019021 2930178 2934162 2034004 2625003 2052011 2013190 Screw 3 x 10mm Screw 3 x 4mm Adaptor Rubber bushing Damper Bracket Bushing Washer Screw 4 x 12mm Bushing Insert Screw 4 x 10mm Washer Screw 3 x 10mm Screw 3 x 8mm TE N See wiring diagram page 7.1. The part no. is printed on the diagram above the wire bundle, as shown. P32 10 6277741 W14 > > < < < < SOUND OUTPUT R H v/ 59 CAMCORDER 3395308 Back-up suitcase, system B/G 3395309 Back-up suitcase, system B/G/M/I/D/K/L 3395310 Back-up suitcase, system B/G/L/L’/I/D/K EN Back-up suitcase P50 RI Parts not shown ServiceTool 3375055 3375397 3375151 Accessories Available documentation See Retail Ordering System IR blaster f/extended sources Galvanic isolator ML-tester B&O programmer Integrated Living - Test DVD Product cover Service stand S EN KS 8330352 8039004 8053404 8053368 3665155 3375079 3375038 1220800 DAB kit 8720044 DAB antenna T EK EL P.I.T. box ServiceTool - download from Retail System/BeoWise Cable kit for ServiceTool, complete USB - RS232 bridge IK N RO Available parts 8.4 Packing 9301 E -C O AB 9302 R TE N H v/ EN S EN KS RI T EK EL 9301 9302 3393000 Packing, complete 3393003 Outer carton, complete IK N RO 8.5 Available parts Base 4090 9501 9501 O AB 9506 9503 9504 9506 R TE N E -C 9505 9503 H v/ 9504 EN 2576361 2058069 3103414 3103418 3103101 Spacer Screw 4 x 25mm Cover f/screw Foot Alu. foot KS RI 9501 9503 9504 9505 9506 3390664 Cable cover 3504730 Guide 3392400 Packing, complete S EN T EK EL IK N RO Available parts 8.6 Table stand 4092 9510 1 9511 O AB 9521 1 Incl. pos. no. 1 Incl. pos. nos. 9517, 9518, 15 E -C 9513 TE N 9514 2 2 9516 9518 4 5 Incl. pos. no. 9520 9519 EN 9514 3 4 H v/ 9515 R 3 5 RI 9517 9520 KS W94 S EN 15 9517 2950111 9518 2950050 9519 3459470 9520 2576017 9521 2950116 1 2 3 2015001 Screw 4 x 12mm 3341008 Plug 2830030 Needle 3390011 Set of accessories 3504771 Guide 3396253 3392050 2777038 2777037 4 5 15 IK 6270113 Extension cable 5pole DIN male-female N W94 Foam - order 2 pcs. Outer carton Handle Handle, plate Cover Conduit Cover plate incl. pos. no. 9520 Scratch shield Aluminium tube, incl. pos. nos. 9517, 9518, RO Plate Tilt mechanism, incl. pos. no 1 Stopper, black Arm Bracket Stopper, white T EK EL 9510 3459468 9511 3130349 9513 3010058 9514 3151416 9515 3151142 9516 3010057 See page 8.8 2058077 Screw 5 x 20 mm 2058076 Screw 8 x 45mm 2015001 Screw 4 x 12mm 8.7 Available parts Floor stand 4098 9510 1 1 9511 Incl. pos. no. 1 O AB 9525 Incl. pos. nos. 9510, 9518, 15 E -C 9513 2 4 9515 3 5 9518 H v/ 2 9516 5 4 R 3 TE N 9514 Incl. pos. no. 9520 9519 EN 9514 RI KS W94 9520 S EN T EK EL See page 8.8 15 9518 2950050 9519 3459470 9520 2576017 9525 2950135 6270113 Extension cable 5pole DIN male-female 1 2 3 2015001 Screw 4 x 12mm 3341008 Plug 2830030 Needle 3390012 Set of accessories 3504771 Guide 3396254 3392052 2777038 2777037 4 5 15 2058077 Screw 5 x 20mm 2058076 Screw 8 x 45mm 2015001 Screw 4 x 12mm IK W94 Foam - order 2 pcs. Outer carton Handle Handle, plate Conduit Cover plate incl. pos. no. 9520 Scratch shield Aluminium tube, incl. pos. nos. 9510, 9518, 15 N Plate Tilt mechanism, incl. pos. no. 1 Stopper, black Arm Bracket Stopper, white RO 9510 3459468 9511 3130349 9513 3010058 9514 3151416 9515 3151142 9516 3010057 Available parts Turnable unit 8.8 11 11 11 11 11 11 11 9551 12 O AB 6 6 6 13 7 7 W75 E -C 9532 9533 9536 N W66 R TE 8 9 8 PC B 10 9530 10 10 H v/ 9534 B PC 9537 EN 9538 15 15 9535 15 Barrierta grease L55/3 25gr. - 3984049 EN KS RI 9539 8 9 9 9550 S 14 T EK EL 9531 Full synthetic grease 50gr. - 3984057 14 14 14 W66 W75 6270109 Wire DIN 5 pole 6277038 Ground wire 6 7 8 9 10 2033001 2622110 2930074 2938306 2013156 3984049 Barrierta grease L55/3 - 25gr. 3984057 Full synthetic grease - 50gr. Screw 7 x 3.5mm Washer Bushing Rubber bushing Screw 2.5 x 8mm 9536 9537 9538 9539 9550 9551 3114496 2900016 3947709 2700256 3454208 3153045 House Bearing Wafer Sprocket Bottom Bracket f/wire 11 12 13 14 15 2019020 2058074 2625003 2058079 2038137 Screw 4 x 10mm Screw 5 x 12mm Washer Screw 6 x 25mm Screw 3 x 6mm IK Gear, complete Bag w/6 x foot Cover f/motor Motor PCB f/motor Belt N 2755011 3390662 3114003 8400004 8052028 2732156 RO 9530 9531 9532 9533 9534 9535 8.9 Available parts Wall Bracket 4093 9510 1 9511 1 Incl. pos. no. 1 O AB 9540 9513 E -C 9514 5 N 2 3 4 2 4 3 5 R TE 9515 15 9513 H v/ 15 15 15 9514 9541 9542 EN EN KS RI 9543 9544 S 9545 T EK EL 16 16 3459468 3130349 3010058 3151416 3151142 2950119 2620004 2620003 3031021 3151819 3452035 Plate Tilt mechanism, incl. pos. no. 1 Stopper, black Arm Bracket Alu. tube Friction disc, upper Friction disc, lower Mounting bracket Wall bracket Plate 1 2 3 4 2015001 3341008 2830030 3390012 Screw 4 x 12mm Plug Needle Screw f/TV 3390010 Bag w/2 x screews f/TV, cable cover, hexagon spanner 3504775 Guide 3396256 Foam packing - order 2 pcs. 3392054 Outer carton 2058076 Screw 8 x 45mm 2015001 Screw 4 x 12mm 2043016 Screw 4 x 10mm IK N 5 15 16 RO 9510 9511 9513 9514 9515 9540 9541 9542 9543 9544 9545 R TE N E -C O AB H v/ EN S EN KS RI T EK EL IK N RO R TE N E -C O AB H v/ EN S EN KS RI T EK EL IK N RO Bang & Olufsen DK-7600 Struer Denmark Phone +45 96 84 11 22* Fax +45 97 85 39 11 3538043 10-06