1
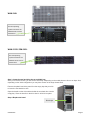
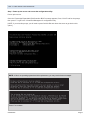
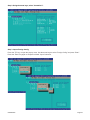
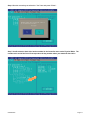
HARD DRIVE INSTALLATION AND CONTENT ACTIVATION GUIDE Server Model Numbers T-420, T-400X, RM-400X, RM-640, RM-640X, RM-126X, WAN-880X, WAN-1240, WAN-1212X TABLE OF CONTENTS Hard Drive Installation and Content Activation Guide............................................................................................... 1 Table of Contents ................................................................................................................................................................. 1 Before You Begin: ................................................................................................................................................................. 2 Backing Up Data and Media.................................................................................................................................................. 3 Installing a Hard Drive .......................................................................................................................................................... 5 Part 1: Seat the Hard Drive ....................................................................................................................................................... 5 Part 2: Hard Drive Configuration .............................................................................................................................................. 9 Activating a Content Package or Add-On Package .............................................................................................................. 13 Adding a New Content Drive or CreationStation Drive to SAFARI Montage ........................................................................ 15 Part 1: Installing the Hard Drive ............................................................................................................................................. 15 Part 2: Confirming the New Content Drive or CreationStation Drive Installation ................................................................... 16 Part 3: Upgrading the SAFARI Montage software .................................................................................................................. 18 Part 4: Activating the New Content Package or CreationStation Add-On Package ................................................................ 19 Restoring Backup to a Different SAFARI Montage Server (DRIVE SWAP) ............................................................................ 22 Part 1: Upgrading the SAFARI Montage software ................................................................................................................. 22 Part 2: Backing Up Data and Media....................................................................................................................................... 22 Part 3: Installing the SAFARI Montage Server ........................................................................................................................ 22 Part 4: Activating Content Packages and Add-Ons ................................................................................................................. 22 Part 5: Restoring Data and Media from Backup ..................................................................................................................... 22 Part 6: Mapping Playlist Items ................................................................................................................................................ 23 Part 7: Test the System ........................................................................................................................................................... 24 Upgrading or Replacing Operating System Hard Drive ........................................................................................................ 24 Part 1: Upgrading the SAFARI Montage software ................................................................................................................. 24 Part 2: Backing Up Data and Media....................................................................................................................................... 24 G1250V01D Page 1 Part 3: Installing operating system hard drive ....................................................................................................................... 24 Part 4: Activating Content Packages and Add-Ons ................................................................................................................. 24 Part 5: Restoring Data and Media from Backup ..................................................................................................................... 24 Part 6: Mapping Playlist Items ................................................................................................................................................ 25 Part 7: Test the System ........................................................................................................................................................... 26 Troubleshooting ................................................................................................................................................................. 26 Server will not boot ................................................................................................................................................................. 26 General Problems .................................................................................................................................................................... 26 Appendix ............................................................................................................................................................................ 27 Single OS Drive Upgrade for WAN-1240 ................................................................................................................................. 27 BEFORE YOU BEGIN: • It’s important that you follow the steps outlined in this manual for optimal performance of your SAFARI Montage system. • We recommend that you perform a backup of your SAFARI Montage system prior to installing your new hard drive. See page 3 “Backing Up Data and Media” for more details. • We recommend that you allow internet access in order to activate and assign the content. • Prior to upgrading, we recommend that you refer to the system requirements found online at http://www.safarimontage.com/support. • Check the packing slip and confirm that you have the correct hard drives and, if necessary, software update DVD. • Please note that the images and screenshots in this guide may differ slightly depending on your version of SAFARI Montage. • Additional support can be found online at http://www.safarimontage.com/support. G1250V01D Page 2 BACKING UP DATA AND MEDIA We recommend that you back up your data and files regularly using the SAFARI Montage Data Recovery tool found in Admin Data Recovery. Instructions for SAFARI Montage Data Recovery can be found in the Help section under “Backup and Data Recovery Guide” in the “Administrator Guide”. Prior to backup, we recommend that you take note of your network, LDAP and time server settings, as well as any personalized login screen or CreationStation™ images and logos. This data may be necessary when configuring a new server or restoring your existing server. The network, LDAP and time server settings can be found in the Admin Settings section. Please copy these settings into a text document if necessary and save. The CreationStation logo graphic can be found in the Admin section under Configure CreationStation. Please save this image from the web page so it can be uploaded again if necessary. G1250V01D Page 3 Login screen logo graphics can be found in the Admin section under Settings Login Screen. Please save the images in the uploaded images list on the web page so they can be uploaded again if necessary. The SAFARI Montage Data Recovery interface can be found in the Admin Data Recovery section. Instructions for SAFARI Montage Data Recovery can be found in the Help section under “Backup and Data Recovery Guide” in the “Administrator Guide”. IMPORTANT! If CreationStation is installed, you should set the “Data Only” drop-down to “No”. G1250V01D Page 4 INSTALLING A HARD DRIVE PART 1: SEAT THE HARD DRIVE Operating System Drives Only: IMPORTANT: If you are replacing operating system hard drives, this is the sequence you should follow: 1. 2. 3. 4. 5. 6. Power down the server. Remove the operating system hard drives from the server. Remove the remaining content or CreationStation hard drives, but be prepared to reseat them. Seat the new operating system drives as shown in Steps 1 through 3 below. Power on the server. Configure the operating system hard drives as shown on Page 9 “Hard Drive Configuration”. If you are adding more drives, you do not have to exit the Configuration Utility to reboot until all the drives have been added. 7. Reseat the remaining content or CreationStation hard drives, wait until they appear in the configuration utility and configure as shown on Page 9 “Hard Drive Configuration”. For T-420, T-400X, RM-400X, RM-640 and RM-640X: The operating system is on one hard drive. This drive is placed in the bay labeled 0. For WAN-880X: The operating system is on two hard drives in a RAID array. The two hard drives that make up the RAID are located in the bays labeled 0 and 1. For WAN-1240: The operating system is on two hard drives in a RAID array. The two hard drives that make up the RAID are located in the bays labeled 8 and 9. If you received a single hard drive to replace a malfunctioning hard drive in the RAID array, you will need to know which drive needs to be removed. The “Virtual Disk Management” screen will report a missing disk if you are running with only one functioning drive in the RAID array. There will be a green light above the functioning drive. Please look for the lights above each bay as well as any status or error messages that may be visible on the display on the front panel. G1250V01D Page 5 If you received two hard drives for the operating system, they will be paired prior to shipment and will need to be installed and configured. Remove the original RAID pair in bays 0 and 1 (WAN-880X) or 8 and 9 (WAN1240) and insert the new operating system hard drives and power up the system. NOTE: If you are replacing a hard drive, remove the original hard drive and install the new drive in accordance with the instructions in this section. • Store the original hard drive in a safe place until you are certain that the new hard drive is properly installed and the configuration is correct. • Once you have confirmed the installation and configuration are accurate, you should return the original hard drive to SAFARI Montage if so directed or discard or reformat the original hard drive for use outside of the SAFARI Montage system. • Both the original hard drive and the new drive remain the property of the purchaser of those drives. Note, however, that the applicable warranty that accompanies the drives (and any corresponding extended warranty or service agreement) is voided when the drives are altered or used in any way outside of the SAFARI Montage system, including without limitation any reformatting, duplication or installation in another server. NOTE: If this is a WAN Manager with Expansion Server environment, you will need to install and configure the new hard drive in each server in your environment. We recommend that all servers in the environment be powered down during the upgrade. Install the hard drive and update the software, if necessary, on the WAN Manager/Expansion Controller first. The Expansion Servers should have the hard drive installed while they are powered down, as well. Once the WAN Manager/Expansion Controller is available, you can power up the Expansion Servers. If the software was updated on the Expansion Controller, it will be pushed to the Expansion Servers as they become available on the network. Step 1: Power down the SAFARI Montage server. Step 2: Remove Bezel from the server. G1250V01D Page 6 T-420 / T400X: Front Bezel Release Switch The operating system hard drive is in the top bay labeled 0. RM-440X / RM-640 / RM-640X: The operating system hard drive is in the top left bay labeled 0. WAN-880X: The two operating system hard drives are labeled 0 and 1 and are located here G1250V01D Page 7 WAN-1240: The two operating system hard drives are labeled 8 and 9 and are located here WAN-1212X / RM-126X: The two operating system hard drives are labeled 0 and 1 and are located here Step 3: Insert the new hard drive into an available bay. After you remove the bezel, you will see the drive bays. Depending on the model there are four to ten bays. Also, depending on the initial configuration you may have several of the bays already filled. Remove the plastic hard drive panel from the empty bay that you wish to insert the new hard drive into. Open the handle on the drive sled and slide the new hard drive into the empty bay. Close the handle on the drive sled. It will click into place. Step 4: Replace the bezel. Drive bays G1250V01D Page 8 PART 2: HARD DRIVE CONFIGURATION Step 1: Power up the server and access the configuration utility. Power up the server. Once the “Poweredge Expandable Raid Controller BIOS” message appears, Press “Ctrl+R” wait for the prompt, then press “C” to get to the “Virtual Disk Management” configuration utility. [NOTE: If you miss this prompt, you will need to press Ctrl+Alt+Del and reboot the server to get back to this option.] NOTE: If this is an operating system hard drive replacement, you may receive these messages: Press ‘C’ to continue. G1250V01D Page 9 Step 2: Using the arrow keys, select “Controller 0”. Step 3: Import Foreign Config. Press the “F2” key, to open the pop-up menu. Use the arrow keys to select “Foreign Config” and press “Enter”. Press the “Enter” key again to accept the default “Import” selection. G1250V01D Page 10 Step 4: Use the arrow keys to select the “Yes” box and press “Enter“. Step 5: Confirm that the hard drive has been added in the Controller menu under Physical Disks. The number at the end of the line will correspond to the bay number where you seated the hard drive. G1250V01D Page 11 NOTE: If you are replacing the operating system drives in a WAN-880x or WAN-1240 server, you will see both hard drives listed under Virtual Disk 0. If you are only replacing one drive in a RAID array pair (WAN-880x and WAN-1240 servers only), we recommend waiting until the RAID has been rebuilt before exiting the configuration utility. Step 6: Exit the configuration utility. Press the “Esc” key to exit the configuration utility. Select the “OK” box using the arrow keys and press “Enter”. You will be prompted to reboot by pressing the CTL-ALT-Delete key combination. G1250V01D Page 12 ACTIVATING A CONTENT PACKAGE OR ADD-ON PACKAGE NOTE: We recommend that you allow internet access in order to activate and assign the content. You can confirm internet connectivity by using Ping tool accessed using the “Ping” tab in the Admin Settings Tools menu. If you are unable to connect your SAFARI Montage server to the internet, you will have to use the manual activation process. Details on this process can be found on the SAFARI Montage website at http://www.safarimontage.com/support/support.aspx?type=manual. NOTE: If your server is running a version of the SAFARI Montage software that is less than version 3.3.1, you will need to contact a support representative at 800.782.7230 to request a content package activation software patch prior to activating your new content. Step 1: Log in to your SAFARI Montage Interface as an administrator. Select “Settings” from the left navigation and then choose “Activate All Content & Add-ons”. This method of activation requires internet connectivity. For servers not connected to the internet, manual activation is available as an option. Details on this process can be found on the SAFARI Montage website at http://www.safarimontage.com/support/support.aspx?type=manual. G1250V01D Page 13 Step 2: Assign new content to schools. If you are activating and assigning on a standalone server, assign packages to the school using the “Schools Management” page found in Admin Settings School. In a single school environment, the new packages may be auto-assigned to the default school. If you are in a WAN Manager environment, assign packages to schools using the “Schools Management” page found in Admin WAN Manager Schools. G1250V01D Page 14 ADDING A NEW CONTENT DRIVE OR CREATIONSTATION DRIVE TO SAFARI MONTAGE PART 1: INSTALLING THE HARD DRIVE Step 1: Install the hard drive as shown on page 5 “Installing a Hard Drive”. NOTE: If you are installing more than one hard drive, install them all as shown on Page 5 “Installing a Hard Drive”. NOTE: Content packages that are being replaced or upgraded should be unassigned from schools and deactivated prior to the removal of the hard drive that contains those packages. G1250V01D Page 15 PART 2: CONFIRMING THE NEW CONTENT DRIVE OR CREATIONSTATION DRIVE INSTALLATION Step 1: Access the Advanced Menu from the SAFARI Montage Console Menu. Enter “3” at the prompt and press “Enter”. Step 2: Access the System Information Menu from the SAFARI Montage Advanced Console Menu. Enter “1” at the prompt and press “Enter”. G1250V01D Page 16 Step 3: Access the Available Packages list from the SAFARI Montage System Information Console Menu. Enter “1” at the prompt and press “Enter”. Step 4: Confirm that the new content package or CreationStation is listed. NOTE: If this is a WAN Manager Expansion Controller, you can move on to Part 3: Upgrading the SAFARI Montage Software, if necessary. While the Expansion Controller is updating, you can install the new hard drives in the Expansion Servers (see Page 5). Leave the Expansion Servers powered down and offline until the Expansion Controller has completed the software update. G1250V01D Page 17 PART 3: UPGRADING THE SAFARI MONTAGE SOFTWARE If you received a software upgrade to your SAFARI Montage system, please follow the instructions for running the software upgrade once your hard drive has been installed. Instructions for installing the software upgrade can be found at http://www.safarimontage.com/support. NOTE: If this is a WAN Manager with Expansion Server environment, wait until the Expansion Controller reports that all the servers have been updated to the new version. When the software is updated on the Expansion Controller, it is pushed to the Expansion Servers as they become available on the network. NOTE: If this is a WAN Manager Parent Server with WAN Manager Child Servers in the environment, the updates can be manually pushed to the children using the “Remote Update” features found in Admin WAN Manager Child Servers. You can choose “Remote update all servers” or check the “Remote Update” checkbox for each individual WAN Manager Child Server for more granular control over how the update is distributed. G1250V01D Page 18 PART 4: ACTIVATING THE NEW CONTENT PACKAGE OR CREATIONSTATION ADD-ON PACKAGE NOTE: If this is a WAN Manager with Expansion Server environment, you must synchronize the new packages on the Expansion Servers with the Expansion Controller as follows: Step 1: Access SAFARI Montage in a web browser and log in. Step 2: Click on the “Map Volumes” link on the “System Volumes” page in the Admin Tools menu. This will trigger a process that loads data for the new packages into the system database. The process is complete when you a see the word “Complete” at the bottom of the “Volumes Map Log” that is displayed on the screen. G1250V01D Page 19 Step 3: Expand the Content Packages list under each Volume to confirm that the new packages are available for activation. G1250V01D Page 20 Follow the instructions found on page 13 “Activating a Content Package or Add-On Package”. NOTE: If this is a WAN Manager with Expansion Server environment, check the “Expansion Servers” page found in Admin Expansion Server Expansion Servers to note when the servers have reached 100% Synchronization. V G1250V01D Page 21 RESTORING BACKUP TO A DIFFERENT SAFARI MONTAGE SERVER (DRIVE SWAP) The following sections explain how to transition to a different or new SAFARI Montage server. PART 1: UPGRADING THE SAFARI MONTAGE SOFTWARE If you received a software upgrade to your SAFARI Montage system, please follow the instructions for installing the software upgrade prior to performing the backup. Instructions for installing the software upgrade can be found at http://www.safarimontage.com/support. PART 2: BACKING UP DATA AND MEDIA Before you integrate a new server into your network, you must first perform a backup of all the files that are unique to your existing system, including playlists and user information. These can be found on page 3 “Backing Up Data and Media”. PART 3: INSTALLING THE SAFARI MONTAGE SERVER Install the new server by following the instructions found in the Installation Guide that is included with your new server. PART 4: ACTIVATING CONTENT PACKAGES AND ADD-ONS If your content packages and add-ons have not been pre-activated, you will need to activate your content packages and add-ons. Follow the instructions found on page 13 “Activating a Content Package or Add-On Package”. PART 5: RESTORING DATA AND MEDIA FROM BACKUP Instructions for SAFARI Montage Data Recovery can be found in the Help section under “Backup and Data Recovery Guide” in the “Administrator Guide”. Once the data has been restored, there may be some custom settings that need to be reset and some custom files that need to be re-uploaded. These include: • LDAP Configuration • Time Server settings • CreationStation Logo • Personalized Login Screen images If you find that you need to access data off the previous SAFARI Montage server, you can bring the new server down and temporarily bring the previous server back on the network so you can save that data. Once you have the data you need, power down and disconnect the previous server from the network and reconnect the new server. G1250V01D Page 22 If you are upgrading your SAFARI Montage system, you may have received upgraded content packages. After the restore, you may notice blank lines on the “Schools Management” page. You should un-assign these packages from your school and assign the new packages if necessary. PART 6: MAPPING PLAYLIST ITEMS Existing playlists will need to be mapped to the new content packages. Click on the “Map Playlist Items” link in the Tools menu found in Admin Tools System Volumes. G1250V01D Page 23 PART 7: TEST THE SYSTEM Once all the steps have been completed, test your new server to confirm that users can play media and all restored data is in place. If your new server is not functioning properly, please review this documentation and also see the “Troubleshooting” section on page 26. UPGRADING OR REPLACING OPERATING SYSTEM HARD DRIVE The following sections explain how to upgrade or replace the operating system for your SAFARI Montage server. PART 1: UPGRADING THE SAFARI MONTAGE SOFTWARE If you received a software upgrade to your SAFARI Montage system, please follow the instructions for installing the software upgrade prior to performing the backup. Instructions for installing the software upgrade can be found at http://www.safarimontage.com/support. PART 2: BACKING UP DATA AND MEDIA Before you integrate a new server into your network, you must first perform a backup of all the files that are unique to your existing system, including playlists and user information. These can be found on page 3 “Backing Up Data and Media”. PART 3: INSTALLING OPERATING SYSTEM HARD DRIVE Install the operating system hard drive as shown on page 5 “Installing a Hard Drive”. If this is a WAN-880x or WAN-1240 server, you may need to replace two hard drives. PART 4: ACTIVATING CONTENT PACKAGES AND ADD-ONS If your content packages and add-ons have not been pre-activated, you will need to activate your content packages and add-ons. Follow the instructions found on page 13 “Activating a Content Package or Add-On Package”. PART 5: RESTORING DATA AND MEDIA FROM BACKUP Instructions for SAFARI Montage Data Recovery can be found in the Help section under “Backup and Data Recovery Guide” in the “Administrator Guide”. Once the data has been restored, there may be some custom settings that need to be reset and some custom files that need to be re-uploaded. These include: • LDAP Configuration • Time Server settings • CreationStation Logo • Personalized Login Screen images G1250V01D Page 24 If you are also adding or changing the content hard drives in your SAFARI Montage system, you may have received upgraded content packages. After the restore, you may notice blank lines on the “Schools Management” page. You should un-assign these packages from your school and assign the new packages if necessary. PART 6: MAPPING PLAYLIST ITEMS Existing playlists will need to be mapped to the new content packages. Click on the “Map Playlist Items” link in the Tools menu found in Admin Tools System Volumes. G1250V01D Page 25 PART 7: TEST THE SYSTEM Once all the steps have been completed, test your new server to confirm that users can play media and all restored data is in place. If your new server is not functioning properly, please review “Troubleshooting” section below. TROUBLESHOOTING SERVER WILL NOT BOOT If you have replaced hard drives in the system and the server will not boot, the following steps can help you troubleshoot the situation: 1. Power down using the power button on the server. 2. Confirm that the hard drives are seated securely in the bay. 3. Power up the server. 4. If there is an error in the hard drive configuration, you may see the message “PXE-MOF : Exiting Broadcom PXE ROM” followed by a blinking cursor. If the reboot process hangs here, you will need to reconfigure the Virtual Disks in the Raid Configuration Utility as shown on page 5 “Installing a Hard Drive”, so that the boot drives are configured under Virtual Disk 0. GENERAL PROBLEMS If you are having difficulties with the installation, there are some things you can do before calling for technical support. These include: • Power down and confirm that the hard drive is seated properly. • Review the documentation and confirm that you have completed all the necessary steps. If you have difficulties with installation and you need further information, please call a support representative at 800.782.7230. When calling, please have both your server's serial number and service tag number available. Your serial number can be found in the Help About section of the SAFARI Montage application and on the outside of your server, and your service tag number can be found on the back of the server. G1250V01D Page 26 APPENDIX This section contains additional information for installations that are outside the scope of a normal hard drive installation. SINGLE OS DRIVE UPGRADE FOR WAN-1240 This applies to customers who received one (1) upgrade OS drive but have two (2) mirrored OS drives in the system. Once the upgrade process is complete, there will be one (1) of the two (2) originally mirrored OS drives left over. This remaining OS drive should be retained for recovery purposes; however, once normal operation is confirmed, this remaining drive may be recycled. During the OS drive upgrade, one (1) of the two (2) original drives will serve as the emergency recovery drive. To perform a single OS drive upgrade, perform the following: 1. Back up the SAFARI Montage server per the steps found on page 3 of this guide. 2. Remove both OS drives from bays 8 and 9 and them OS Drive 1 and OS Drive 2 respectively. Set these two drives aside. 3. Remove any remaining drives and label them according to the bay removed from. Set these drives aside. 4. Install the received upgrade OS drive in to bay 8 of the server, per the instructions given in Step 3, on page 8. 5. Power on the server and at the BIOS banner press <Ctrl><R> to enter the Virtual Disk Management tool. Import a Foreign Configuration a. Highlight Controller 0 using the arrow keys. b. Press <F2> to display the available options. c. Press the <↓> and highlight Foreign Config. d. Press the <→> and highlight Import. e. Press <Enter>. f. G1250V01D Import is complete. Page 27 6. Install the original OS drive, labeled OS Drive 1, into Bay 9 of the server. Wait for the drive to be recognized by the Virtual Disk Management tool. Clear a Foreign Configuration a. Select Foreign Configuration View, from the top navigation, using the arrow keys. b. Press <F2> to display the available options. c. Press the <↓> and highlight Clear. d. Press <Enter>. e. Clear is complete. Create a Global Hot Spare a. Select PD Mgmt, from the top navigation, using the arrow keys. This screen lists the physical disks in the server. b. Press the <↓> and highlight physical disk 09. c. Press <F2> to display the available options. d. Press the <↓> and highlight Make Global HS. e. Press <Enter>. f. Global Hot Spare complete. 7. Install the remaining drives removed in Step 3 into their respective drive bays. Wait for the drives to be recognized by the Virtual Disk Management tool. Import a Foreign Configuration a. Select Foreign Configuration View, from the top navigation, using the arrow keys. b. Press <F2> to display the available options. c. Press the <↓> and highlight Import. d. Press <Enter>. e. Import is complete. 8. Exit the Virtual Disk Management Tool by press <ESC>, selecting Yes and pressing <Enter>. 9. Press <Ctrl><Alt><Del> when instructed to reboot the server with the new configuration. 10. Configure the Network Settings of the SAFARI Montage Server and test by accessing the SAFARI Montage web interface using the assigned network address. 11. Restore the SAFARI Montage system from the backup created in Step 1. 12. Store the remaining original OS drive, OS Drive 2, in case a system recovery is needed. G1250V01D Page 28