1
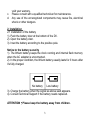
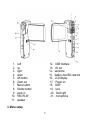
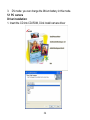
DV5470 User Manual Package Contents: Manual Camera Pouch Installation CD Earbuds AV Cable CONTENTS 1. NOTICE....................................................................2 2. SETUP .....................................................................3 2.1 BATTERY INSTALLATION ...........................................3 2.2 MEMORY CARD .......................................................4 2.3 CONFIGURATION & INSTALLATION .............................4 3. MENU SETUP..........................................................5 4. BASIC FUNCTIONS...............................................10 4.1 VIDEO MODE ........................................................10 4.2 CAMERA MODE .....................................................12 4.3 PLAYBACK ...........................................................18 4.4 MUSIC .................................................................20 4.5 PHOTO PREVIEW ..................................................21 4.6 RECORD (VOICE RECORDING) ................................23 5. USB MODE ............................................................23 6. TECHNICAL PARAMETERS:...............................364 1 Thank you for purchasing the Argus DV5470 Digital Video Camera 1. Notice Carefully rotate the LCD, Damage will be caused by over rotating. a. Open LCD and push it to 90 0 against the body b. Start to capture or play with LCD at the appropriate angle. LCD and lens maintenance: a. Direct sunlight may cause the damage of the LCD. b. Only clean the lens and LCD screen with a soft cloth. Caution: a. Do not store the camera in temperatures above 100 . b. Keep the DV Camera away from moisture. Getting the camera wet will damage it and void the warranry. c. Condensation may appear with sudden changes in temperature. Take care to not leave the camera in extreme temperatures. Copyright Infringement: TV programs, DVD programs and, movies are protected by copyright; unauthorized copying may result in infringement. Maintenance and components a. Do not try to repair your DV camera by yourself. b. Opening the cover of the Camera may cause electrical shock and will 2 void your warrany. c. Please consult with a qualified technician for maintenance. d. Any use of the unrecognized components may cause fire, electrical shock or other dangers. 2. Installation 2.1 installation of the battery 1). Push the battery door at the bottom of the DV. 2). Open the battery door. 3). Inset the battery according to the positive pole. Notice to the battery security 1). The lithium battery keeps the clock running and internal flash memory when the AC adapter is unconnected. 2). In the proper condition, the lithium battery usually lasts for 3 hours after it’s fully charged. No battery Low battery 3). Charge the battery when the signal as above said appears. 4). Consult Technical Support if the battery needs replaced. ATTENTION:Please keep the battery away from children. 3 2.2 Memory card 1)Open the battery cover of the DV. 2)Insert the card with the reverse side against the positive side of DV. 3)Close the battery cover. Attention: keep the card in “unlock” status. All data will be deleted if you format the memory card, please backup the file before format. The memory cards available to the product: 1)Standard SD card(8MB—1G) 2)Memory sticks with 3V or 3.3v(8M—1G) 3)SD card with 5v is not available. 4) The product may not identify the nonstandard memory sticks or the SD card formatted in other products, please format it by this product before use. 2.3. Configuration & installation 4 1. 2. 3. 4. 5. 6. 7. 8. 9. 10. 11. Left up right down OK button Zoom out Menu button Shutter button zoom in REC/PLAY speaker 12. USB interface 13. AV out 14. earphone 15. battery door/SD card slot 16. LCD display 17. Power on 18. DISP 19. lens 20. flash light 21. microphone 3. Menu setup 5 How to enter menu setup 1). POWER on; 2). Press “REC/PLAY” button,Push the 5way button left/right to select “setup” icon. 3). Press the “OK” button to enter “setup” menu. 3.1 Flicker frequency Set the light frequency according to different countries: 1). Power on and press “REC/PLAY” button to enter “Setup” menu; 2). Press the 5way button to select “flicker frequency” icon, then press the “OK” button to enter; 3). Press the 5way button up/down to select “60HZ” or “50HZ”; 4). Press the “OK” button to select the right frequency. 5). Press “REC/PLAY” or “MENU” button to return to the main menu. 3.2 Time Please set the time (date / time) before recording, since it will show on the image or video automatically. 1)Power on and press “REC/PLAY” button to enter “Setup” menu; 2)Push the 5way button left/right to select “time” 3)Press the “OK” button to confirm and enter the time setup; 4)Push the 5way button right/left to select minute, hour, day, month and year, push 5way button up/down to modify them; 5) Press “REC/PLAY” or “MENU” button to return to the main menu. 6 3.3 Beep 1)Power on and press “REC/PLAY” button to enter “Setup” menu; 2)Push the 5way button left/right to select “Beep”; 3)Press the “OK” button to enter the beep setup, select “on” or “off”; 4)Press “REC/PLAY” or “MENU” button to return to the main menu. 3.4 Memory card format 1. Set the memory card in “UNLOCK” status; 2. Insert the memory card into the card slot and power on; 3. Press “REC/PLAY” button to enter “SETUP” menu; 3. push the 5way button left/right to select “format”; 4. Press the “OK” button to confirm, then press 5way button up/down to select “Yes” to start formatting; 5. Formatting may lasts 2 – 3 minutes, then return to the submenu automatically; 7:Press “REC/PLAY” or “MENU” button to return to the main menu. 3.5 Media select The Internal flash of this model is 128MB, external card is optional. You can choose to save in the internal flash or external card. 1)Power on and press “REC/PLAY” button to enter “Setup” menu; 2)Push the 5way button up/down to select “media select” icon; 7 3)Press the “OK” button to enter media selecting setup, both internal flash and external card can be selected; 4)Push the 5way button up/down to select “internal flash” or “external card”, press the “OK” button to confirm and return to the submenu, 5)Press “REC/PLAY” or “MENU” button to return to the main menu. Note: the default setting is “External card” when the memory card is inserted; otherwise, the default setting is “internal flash”. 3.6 Default setting 1). Power on and press “REC/PLAY” button to enter “Setup” menu; 2). Push the 5way button to select “default setting”; 3). Press the “OK” button to enter default setting setup 4). Push the 5way button up/down to select “yes” or “no”, then press the “OK” button to confirm and return to the submenu. 5). Press “REC/PLAY” or “MENU” button to return to the main menu. Note: all settings of the submenu will restore to the default setting when you select “Yes”. 3.7 Language 1)Power on and press “REC/PLAY” button to enter “Setup” menu; 2)Push the 5way button left/right to select "language" ; 3)Press the “OK” button to confirm and enter the language setting; 8 4)Push the 5way button up/down to select the language you prefer, then press the “OK” button to confirm and return to the submenu 5)Press “REC/PLAY” or “MENU” button to return to the main menu. 3.8 Power save (Auto power off) You can set the auto power off time to save the battery; 1). Power on and press “REC/PLAY” button to enter “Setup” menu; 2). Push the 5way button left/right to select “power save” ; 3). Press the “OK” button to confirm and enter “power save” setting; 4). Push the 5way button to confirm and enter, you can select “none”, “60s”, “2min”, press the “OK” button to confirm and return to the submenu. 5). Press “REC/PLAY” or “MENU” button to return to the main menu. Note: auto power off can not be performed when “none” is selected. 3.9 TV mode 1). Power on and press “REC/PLAY” button to enter “Setup” menu; 2). Push the 5way button left/right to select “TV mode”; 3). Press the “OK” button to confirm and enter the TV mode setting; 4). Push the 5way button up/down to select “NTSC” or “PAL”, then press the “OK” button to confirm and return to the submenu; 5). Press “REC/PLAY” or “MENU” button to return to the main menu. 3.10 Logo display 1). Power on and press “REC/PLAY” button to enter “Setup” menu; 2). Push the 5way button left/right to select “logo display”; 9 3). Press the “OK” button to confirm and enter the logo display setting, select “open” or “close”; 4). Push the 5orientation key upwards or downwards to select “on” or “off”, press the “OK” button to confirm and return to the submenu, 5). Press “REC/PLAY” or “MENU” button to return to the main menu. 3.11 Brightness 1). Power on and press “REC/PLAY” button to enter “Setup” menu; 2). Push the 5way button left/right to select “brightness”; 3). Press the “OK” button to enter the brightness setting; 4). Push the 5way button left/right select the brightness level you prefer, then press the “OK” button to confirm and return to the submenu; 5). Press “REC/PLAY” or “MENU” button to return to the main menu. 4. Basic functions There are 6 basic functions of this product: V Camera, camera, video, mp3, JPEG, record. 4.1. Video mode 1). Power on and enter video mode automatically; 2). Press the “shutter” button to start video clip; 3). Press the “shutter” button again to end video clip. Notice: The video clip time depends on the memory capacity. In the video mode, Press “MENU” button to enter the submenu to set the resolution, frame rate, audio and white balance. 10 a. Resolution 1. In the video mode, press the “MENU” button to enter the submenu: 2. Push the 5way button to left/right to select “resolution”: 3. Press the “OK” button to confirm and select the resolution: “640*480” or “320*240”; 4. Push the 5way button up/down to select the resolution you prefer 5. Press the “OK” button to confirm and return to the submenu of video mode; 6. Press the “MENU” button to return to the video mode; b. Frame rate 1. In the video mode, press the “MENU” button to enter the submenu; 2. Push the 5way button to left/right to select “frame rate”; 3. Press the “OK” button to confirm and enter the setting of frame rate: “30fps” or “15fps” 4. Push the 5way button up/down to select the frame rate you prefer; 5. Press the “OK” button to confirm and return to the submenu of video mode; 6. Press “MENU” button to return to the video mode; Notice: the higher the frame rate, the shorter the video clip time, and the frame rate also affects the video quality. c. Audio Voice recording is performed if you select audio function in the video mode; 11 1. In the video mode, press the “MENU” button to enter submenu; 2. Push the 5way button left/right to select “Audio”; 3. Press the “OK” button to confirm and enter audio setting “on” or “off”; 4. Push the 5way button up/down to select “on”; 5. Press the “OK” button to confirm and return to the submenu of video mode; 6. Press the “MENU” button to return to the video mode; d. White balance Proper white balance can help to obtain the optimized the video clip. 1. In the video mode, press the “MENU” button to enter the submenu; 2. Push the 5way button left/right to select “white balance”; 3. Press the “OK” button to confirm, white balance option: “auto”, “daylight”, “Tungsten”, “fluoresce” and “cloudy”; 4. Push the 5way button up/down to select the white balance you prefer; 5. Press the “OK” button to confirm and return to the submenu of video mode; 6. Press the “MENU” button to return to the video mode. 4.2. Camera mode 1. Power on and enter the Camera mode; 2. Press “REC/PLAY” button to enter the main menu; 3. Push 5way button left/right to select “Camera”; 4. Press the “OK” button to enter Camera mode; 5. Press the “shutter” button to start capture Notice: 12 1. Press the “shutter” button slightly to start capture; 2. Do not open the battery door to take out the battery or SD card during the image saving status. Otherwise, it may cause the image lost or damaged. 4.2.1 Digital zoom How to use digital zoom? 1. Press “T” or “W” button to adjust the digital zoom in “camera” mode; 2. Press the “Shutter” button to start capturing. Notice: To zoom in more, the lower quality of the image. In order to obtain the optimized effect, you can adjust in the submenu under the Camera mode: capture mode, date stamp, flash mode, scenery, EV, quality, resolution, white balance, color and quick preview. a. Capture mode You can select “single”, “sequence (continuous capture)”, “10s timer”, “20s timer” in camera mode. 1. In the Camera mode, Press the “menu” button to enter the submenu; 2. Push the 5way button to left/right to select “capture mode”; 3. Press the “OK” button to confirm and select “single”, “sequence”, “10s 13 timer”, “20s timer”; 4. Push the 5way button up/down to select; 5. Press the “OK” button to confirm and return to the submenu of Camera mode. Notice: the maximum shooting is 3 images when in “sequence” mode. b. Date stamp 1. You can set the minute, hour, day, month and year firstly in the “time” mode of the “setup” menu; 2. Press the “REC/PLAY” button to return to the main menu; 3. Press the “menu” button to enter the submenu in camera mode; 4. Push the 5way button left/right to select “date stamp”; 5. Press the “OK” button to confirm, select “on” or “off”; 6. If you set it to “ON”, the time will be displayed at the right corner in each image. c. Flash mode Auto: Automatically turn on/off according to the light 14 Force on: Force on the flash Force off: Force off the flash Flash setting: 1. In Camera mode, press the “MENU” button to enter the submenu; 2. Push the 5way button left/right, select “flash mode”; 3. Press the “OK” button to confirm, set flash by “force on”, “auto”, “force off” ; 4. Push the 5way button up/down to select the flash mode; 5. Press the “OK” button to confirm and return to the submenu of Camera, Notice: The flash distance is approximately 1.8 – 2.5 M. d. Scenery Scenery setting helps to reach the optimized effect in different scenery. 1. In Camera mode, press the “MENU” button to enter the submenu; 2. Push the 5way button left/right to select “scenery”; 3. Press the “OK” button to confirm and select “auto”, “scenery”, “night scene”; 4. Push the 5way button up/down to select the scenery you prefer; 5. Press the “OK” button to confirm and return to the submenu of Camera e. Exposure compensation (EV) 15 EV can be set to 2.0 when the light is insufficient. 1. In Camera mode, press the “MENU” button to enter the submenu; 2. Push the 5way button left/right to select “EV”; 3. Press the “OK” button to confirm; 4. Push the 5way button up/down to adjust exposure compensation from 0 – 2.0; 5. Press “REC/PLAY” button to return to the main menu; 6. Push the 5way button left/right to select camera mode, press the “OK” button to confirm and start capturing according to the new EV. f. Image quality 1. In Camera mode, press the “MENU” button to enter the submenu; 2. Push the 5way button left/right to select “quality”; 3. Press the ”OK” button to confirm and select “supper”, “fine” or “normal”; 4. Push the 5way button up/down to select the quality; 5. Press the “OK” button to confirm and return to the submenu of Camera. g. Resolution The resolution of the image can be as follows: 3648X2736, 2592x1944, 2048x1536, 1600x1200, 1280x960, 640x480 1. In Camera mode, press the “MENU” button to enter the submenu; 2. Push the 5way button left/right to select “resolution”; 3. Press the “OK” button to confirm; 4. Push the 5way button up/down to select the resolution you prefer; 5. Press the “OK” button to confirm and return to the submenu of 16 Camera; 6. Press the “MENU” button to return to the camera mode. h. White balance Proper white balance can help to obtain the optimized image effect. 1. In the camera mode, press the “MENU” button to enter the submenu; 2. Push the 5way button left/right to select “white balance”; 3. Press the “OK” button to confirm, white balance option: “auto”, “daylight”, “Tungsten”, “fluoresce” and “cloudy”; 4. Push the 5way button up/down to select the white balance you prefer; 5. Press the “OK” button to confirm and return to the submenu of camera mode; 6. Press the “MENU” button to return to the camera mode. I. Color You can select your favorite background color. 1. In Camera mode, press the “MENU” button to enter the submenu; 2. Push the 5way button left/right to select “color”; 3. Press the “OK” button to confirm, 4. Push the 5way button up/down to select the color you prefer: “Normal”, “Sepia”, “B & W”; 5. Press the “OK” button to confirm and return to the submenu of Camera; 6. Press “MENU” key can return to the Camera mode. j. Quick preview In Camera mode you can quick preview the latest image you capture. 1. In Camera mode, press “MENU” button to enter the submenu; 17 2. Push the 5way button to select “quick preview”; 3. Press the “OK” button to confirm and select “on” or “off”; 4. Push the 5way button upwards to select “on”; 5. Press the “OK” button to confirm and return to the submenu of Camera; 6. Press the “MENU” button to return to the Camera mode; 7. Press the “OK” button to confirm and quick preview the previous image. . 4.3. Playback You can playback the video clip in the “Playback” mode. 1. Power on and enter video mode automatically; 2. Press the “REC/PLAY” button to enter the main menu; 3. Push the 5way button left/right to select the “playback” mode; 4. Press the “OK” button to confirm and enter the “playback” mode; 5. Press the “OK” button to play the video clips; 6. Press the “OK” button again to stop playing; 7. Push the 5way button upwards to play the previous clip, push downwards to play the next clip. Note: 1. This product is only available for AVI format on video playback mode; 2. The downloaded movie should be renamed; the file name should be “PICT” and followed by 4 numbers. For example, to download the movie named <I love this game> from your computer: (1) Rename the movie as the file name of <PICT0050> in your computer and do not use the same name; 18 (2) Copy the file <PICT0050> into the DCIM file folder of this product; (3) Disconnect the USB cable; the movie can be played in “playback” mode. In “playback” mode, press the “menu” button to enter the submenu of delete, thumbnail, set logo, rotate, print, lock, crop and slide show. Remarks: Rotate, print, crop and slide show function is not available in video playback mode. a. Delete clip You can enter the submenu of playback mode to delete the video clip. 1. In “playback” mode, press the “menu” button to enter the submenu; 2. Push the 5way button to left/right to select “delete”; 3. Press the “OK” button to confirm and Push the 5way button up/down to select “delete current” or “delete all”; 4. Press the “OK” button to confirm and select “yes” or “no”; 5. Select “yes” by the 5way button and press the “OK” button to confirm. b. Thumbnail You can view the video clip quickly in thumbnail mode. 1. Under video mode, press the “menu” button to enter the submenu; 2. Select “thumbnail” by pushing the 5way button left/right; 3. Press the “OK” button to confirm to preview all thumbnails; 4. You can preview each video by pushing the 5way button; 5. When you select one video clip, press the “OK” button to preview full screen video clip. 19 C. set logo: Same operation as the “logo display” (see page 11). d. Lock: The lock function can ensure you to protect the video clips or images; 1. Under “playback” mode, press the “menu” button to enter the submenu; 2. Select “lock” by push the 5way button left/right to select “lock”; 3. Press the “OK” button to confirm, you can select “lock current”, “lock all”, “unlock current” and “unlock all”; 4. Push the 5way button up/down to select “lock current” or “lock all”; 5.Press the “OK” button to confirm and return to the submenu of playback Note: please select “unlock current” or “unlock all” when you want to unlock the video clip. 4.4 Music You can play songs on “MUSIC” mode 1. Download the songs from PC to “mp3” folder of this product; 2. Power on and press “REC/PLAY” button to enter the main menu; 3. Push the 5way button left/right to select “MUSIC” mode; 4. Press the OK button to confirm and enter the music mode; 5. Press the 5way button to select the songs you prefer; 6. Press the “OK” button to play the songs; 7. Press the “OK” button again to stop the playing; 8. Push the 5way button up/down to select next song; 9. Push the 5way button left/right to adjust the volume. 20 4.5.Photo preview You can preview the photo in “Photo” mode. 1. Power on and press the “REC/PLAY” button to enter the main menu; 2. Push the 5way button left/right to select “photo” mode; 3. Press the “OK” button to confirm and enter “photo” mode; 4. Push the 5way button up/down to preview the images. In the “photo” mode, press the “menu” button to enter the submenu to select “delete”, “thumbnail”, “set logo”, “rotate”, “print”, “lock”, “crop” and “slide show”. a. Delete image 1. In the “Photo” mode, press the “MENU” button to enter the submenu; 2. Push the 5way button left/right to select “delete”; 3. Press the “OK” button to confirm and select “delete current” or “delete all”; 4. Press the “OK” button to confirm and Push the 5way button up/down to select “delete current” or “delete all”; 5. Press the “OK” button to confirm and select “yes” or “no”; 6. Select “yes” by the 5way button and press the “OK” button to confirm. b. Thumbnails You can view the photos quickly in thumbnail mode. 6. Under video mode, press the “menu” button to enter the submenu; 7. Select “thumbnail” by pushing the 5way button left/right; 8. Press the “OK” button to confirm to preview all thumbnails; 9. You can preview each image by pushing the 5way button; 21 10. When you select one image, press the “OK” button to preview full screen image. c. Play logo Same operation as the “logo display” (see page 11). d. Rotate 1. In “Photo” mode, press the “MENU” button to enter the submenu; 2. Push the 5way button left/right to select “rotate”; 3. Press the “OK” button to confirm and select the “photo” mode; 4. Push the 5way button up/down to rotate the photo; 5. Press the “OK” button to save the image after rotating, the setting is completed. e. Lock 1. In “Photo” mode, press the “MENU” button to enter the submenu; 2. Push the 5way button left/right to select “lock”; 3. Press the “OK” button to confirm and select “lock current”,” lock all”, “unlock current” or “unlock all”; 4. Push the 5way button up/down to select, 5. Press the “OK” button to confirm and return to the submenu of photo mode, the setting is completed. Note: please select “unlock current” or “unlock all” when you want to unlock the photo. f. Crop 1. In the “photo” mode, select the image need to be cropped, press the “MENU” button to enter the submenu; 22 2. Push the 5way button left/right to select “crop”; 3. Press the “OK” button to confirm 4. Push the 5way button up/down/left/right to move the frame in the image to be cropped properly; 5. Press the “OK” button to crop and save. g. Slide show 1. In “Photo” mode, press the “MENU” button to enter the submenu; 2. Push the 5way button left/right to select “slide show”; 3. Press the “OK” button to confirm and select the image 4. Press the “OK” button again begins to display the images in slide show mode; 5. Press the “OK” button to end the slide show; 6. Push the 5way button to the left to quit the slide show mode. 4.6. Record (voice recording) 1. Power on and press “REC/PLAY” button to enter “Setup” menu; 2. Push the 5way button left/right to select “record” mode; 3. Press shutter to begin voice recording; 4. Press shutter again to stop recording. Notice: the time of recording depends on the memory capacity. 5. USB mode You can select different working modes when the product connects to PC. 1. PC CAMERA mode: You can use this product as a web cam in this mode; 2. Mass Storage mode: you can use this product as a removable device in this mode 23 3. DV mode: you can charge the lithium battery in this mode. 5.1 PC camera Driver installation: 1. Insert the CD into CDROM, Click install camera driver 24 25 26 Connect the camera with PC by USB cable, Power on the DV, then push 5way button to select “PC CAMERA”; 27 An interface “Found new hardware Wizard” appears, select “Yes, this time only”, then click “next”; Select “install the software automatically (Recommended)”, click “next”; 28 If “hardware installation” interface appears, click “Continue Anyway” ; 29 30 If the following interface appears, click “cancel”; 31 An interface “Found new hardware Wizard” appears, select “Yes, this time only”, then click “next”; Select “install the software automatically (Recommended)”, click “next”; 32 If “hardware installation” interface appears, click “Continue Anyway”; 33 The installation is finished and now you can use the pc camera function; 34 2. How to use PCCAM function 1. Connect this product to PC by USB cable; 2. Power on and select “PC Camera” mode; 3. Press the “OK” button to confirm; 1. Double click the icon “my computer” on the desktop of PC 2. Double click the icon “ ” Then you can start to use the pccam function 5.2 Removable Storage device Select the USB mode to “Mass Storage”, this product will be a removable storage device. Download files from this product to your PC: 1. Connect this product with PC by USB cable; 2. Power on and select “Mass Storage”; 3. Press the “OK” button to confirm; 4. Double click icon “my computer” on desktop; 5. Double click icon “removable disk”; 6. Double click “DCIM” folder; 7. Copy the file from the folder to your PC. 35 Notice: Do not open the battery door to take out the battery or SD card when you download files, or else, it may cause damage of the file. 6. Technical parameters: Sensor Resolution Medium Format 5 mega pixels CMOS 3648X2736, 2592x1944, 2048x1536, 1600x1200, 1280x960, 640x480 SD card compatible(8 MB – 1GB) MP3/Jpeg / AVI / Wav Single, continuous [(1280X960) 3 frames ] Shooting mode 10s and 20s timing shooting Movie: Shutter speed Digital zoom White balance Electronic shutter:1/4 ~ 1/1800 s 4x auto, daylight, incandescent, fluorescent, cloudy; Exposure control Auto Exposure +2.0-2.0, Flash mode Force on, auto, force off 36 ISO Auto PCCamera 640x480 Color Normal, brown, B/W PC connecting USB Video output NTSC/PAL Displayer Power 3.0" TFT color LCD, ,resolution :640X240 Lithium battery 3.7V/800mAH OSD language English, Focus F = 7.36mm Aperture F = 3.2 Focus range 1.5m to infinite Auto shutoff Operation French, German, Spanish, Italian, none,60Sec、2Min Microsoft Windows 98SE, ME, 2000, XP, Vista If you need help, please contact Argus Camera Company Technical Support Email – [email protected] TollFree – 8885527487 37