1
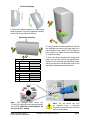
Vertical mounting
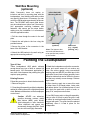
5.Adjust the cabinet position by rotating and
tilting as desired. Then firmly tighten the locking
screw with the provided hex wrench.
Horizontal mounting
6.Using a small slot-blade screwdriver (like the
one provided) you can pry the logo plate out a
few millimeters, then rotate it 90° and press it
back in place so it reads correctly for horizontal
or vertical mounting.
Horizontal Mount Maximum Aiming Angle
DS5
DS8
A
8°
8°
B
20°
11°
C
64°
59°
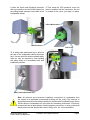
7.Once you have connected the wiring (next
page), you can also remove the logo plate for
access to the recessed tap-adjustment screw
which you can use to set the power level for the
individual loudspeaker as shown below.
Vertical Mount Maximum Aiming Angle
DS5
DS8
A
39°
39°
B
39°
39°
C
31°
33°
Note: This enlarged label shows the
70-volt/100-volt and 8-ohm power tap settings
for the DS8. With 100-volt distribution, do
not use the N.C. setting.
Distributed Design Series
Surface Mount Loudspeakers
Note: The tap switch can only
be adjusted using a flat-blade
screwdriver such as the one provided
with the loudspeaker.
Installation and Operation Manual Page 8