1
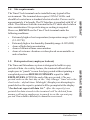
Time and Attendance System
The Time Clock terminal is designed to record employee’s arrival and departure
times. For ease and efficiency in using the Time C lock terminal, it is
recommended that the system be used with the PC interface software (included
with 50' interface cable) which requires an IBM® compatible PC. (See Minimum
system requirements, 1.2). The system may also be used as a stand-alone
terminal and may be connected directly to an IBM® compatible printer to print
reports. (Note: printer cable not included.) Two supervisor's badges are supplied
for setup in this mode of operation.
This manual is a confidential proprietary document solely for the use of
Acroprint Time Recorder customers. Material in this manual is subject to change
without notice and does not represent an obligation on the part of Acroprint
Time Recorder. No part of this manual may be reproduced or transmitted in any
form by any means without the express written permission of Acroprint Time
Recorder.
Acroprint Time Recorder and the Acroprint logo are registered trademarks of
Acroprint Time Recorder Company. IBM is the registered trademark of
International Business Machines. Microsoft, Windows, Windows ‘95, Windows
'98, and Windows NT are registered trademarks of Microsoft Corporation. Other
product names mentioned in this manual may be trademarks of their respective
companies and are hereby acknowledged.
FCC Radio Frequency Interference Statement (USA):
This equipment has been tested and found to comply with the limits for a Class A
digital device, pursuant to part 15 of FCC Rules. These limits are designed to
provide reasonable protection against harmful interference to radio
communications. Operation of this equipment in a residential area is likely to
cause harmful interference in which case the user will be required to correct the
interference at his or her own expense.
Warning: Changes or modifications to this unit not expressly approved by the
party responsible for compliance could void user’s warranty and authority to
operate this equipment.
Time and Attendance System User’s Manual
Acroprint Time Recorder Company
5640 Departure Drive
Raleigh, North Carolina 27616
IN USA 800.334.7190 919.872.5800
e-mail: [email protected]
Fax: 919.850.0720
www.acroprint.com
2
Table of contents
1. Introduction ................................................................................ 5
1.1
1.2
1.3
1.4
1.5
1.6
Product overview .................................................................................. 5
Minimum system requirements ............................................................. 6
Employee punch capacity ..................................................................... 6
Site requirements .................................................................................. 7
Data protection (employee lockout) ..................................................... 7
Unpacking and inspection .................................................................... 8
2. Installing Time & Attendance PC software .............................. 9
2.1
PC Software for Windows 95/98/NT/2000 workstations installations ... 9
3. Terminal installation ................................................................ 11
3.1
3.2
3.3
3.4
3.5
3.6
3.7
Electrical connections ......................................................................... 11
Terminal mounting .............................................................................. 11
Connecting Time Clock terminal to IBM compatible PC ..................... 11
Printer connections (Stand-alone Operation or with Additional
Printer) ............................................................................................... 12
3.4.1 Parallel printer connection ....................................................... 12
3.4.2 Serial printer connection (Stand-alone Operation Only) ........ 12
Connecting the power cord and securing the access door ................. 13
Establishing communications between terminal and PC ..................... 13
Time and date ..................................................................................... 14
4. Setup ......................................................................................... 15
4.1
4.2
Factory settings .................................................................................. 16
Clock rules .......................................................................................... 16
4.2.1 Pay period ................................................................................ 16
4.2.2 Next period start date ............................................................... 16
4.2.3 Max time on clock .................................................................... 16
4.2.4 Daily overtime after .................................................................. 17
4.2.5 Weekly overtime after .............................................................. 17
4.2.6 7th Day Overtime ..................................................................... 17
4.2.7 Pay interval round .................................................................... 17
4.2.8 Click on “More...” button for second screen in setup. ............ 17
4.2.9 Daylight savings time .............................................................. 18
4.2.10 Time Clock terminal printer type .............................................. 18
4.2.11 Date format .............................................................................. 18
4.2.12 Time totals format .................................................................... 18
4.2.13 Time of day format ................................................................... 18
4.2.14 Day change offset .................................................................... 18
5. Shift rules ................................................................................. 19
5.1
5.2
5.3
5.4
Shifts ................................................................................................... 19
Shift number ....................................................................................... 19
Shift start time ..................................................................................... 19
Shift round start .................................................................................. 19
Table of contents
3
5.5
5.6
5.7
5.8
5.9
5.10
5.11
5.12
5.13
5.14
5.15
Shift grace start ................................................................................... 19
Shift dock start .................................................................................... 20
Shift stop time ..................................................................................... 20
Shift round stop .................................................................................. 20
Shift grace stop ................................................................................... 20
Shift dock stop .................................................................................... 20
Lunch rules enable .............................................................................. 21
Lunch start time .................................................................................. 21
Lunch end ........................................................................................... 21
Lunch duration ................................................................................... 21
Auto lunch deduct after ..................................................................... 21
6. Entering employees into system ............................................. 22
6.1
6.2
6.3
6.4
Name ................................................................................................... 22
Badge .................................................................................................. 22
Number ............................................................................................... 22
Shift (can be used as departments) ..................................................... 22
7. Supervisor’s badges ................................................................. 23
7.1
Supervisors ......................................................................................... 23
8. Editing punches ........................................................................ 24
8.1
Punch editing ...................................................................................... 24
9. Reports ..................................................................................... 25
9.1
9.2
9.3
9.4
9.5
9.6
Print, view, archive (save to disk) ....................................................... 25
Time card report .................................................................................. 27
Hours summary report ........................................................................ 28
Employee profile report ....................................................................... 29
Clock rules report ................................................................................ 30
Who's in, who's out report .................................................................. 31
10. Save to disk, archiving, & exporting .................................... 32
10.1 Save to disk ........................................................................................ 32
10.2 Exporting ............................................................................................. 32
11. Bell schedule .......................................................................... 33
12. Programming terminal without software ............................... 34
12.1 Introduction ........................................................................................ 34
12.2 Supervisor’s menu map ....................................................................... 35
12.3 Terminal diagnostics ........................................................................... 39
Appendix A — Error messages at PC monitor ........................... 40
Appendix B — Error messages at terminal ............................... 44
Appendix C — FAQ’S ................................................................. 50
Appendix D — Support agreement ............................................. 54
Appendix E — Companion products ........................................... 55
4
Table of contents
1. Introduction
1.1
Product overview
The “Time and Attendance System of tomorrow”
The Time and Attendance system is designed for small businesses to
make payroll processing easy and accurate. This microprocessor based
clock uses magnetically encoded badges to record employee times. The
system can handle up to 120 employees. (See 1.3 Employee punch
capacity.) The terminal may be connected directly to an IBM®
compatible printer to print reports or used with the PC Interface
supplied with the system.
The system eliminates the need to buy, prepare, distribute, and calculate
employee time cards. No more need to store and save bulky time cards
for years to meet government regulations. Employee time cards can be
saved on 3½" floppy disk and easily stored for future reference.
Each employee is assigned an Identification Badge. The employee
“swipes” the badge in the terminal when arriving and departing work,
the same as punching “IN” and “OUT” on a time clock. The Time
Clock terminal needs to be set only once. The system offers battery
backup in case of power failures, Auto Month, Date, Year advance, and
Automatic Daylight Savings changes.
At each swipe the employee sees his or her daily and pay period
totals on the terminal display. The system can handle Weekly, BiWeekly, Semi-Monthly, and Monthly payroll periods. The system
calculates employee’s hours worked based on your company's pay
policies. Regular and overtime hours are totaled fast and accurately,
eliminating costly payroll errors. Employee hours can be exported to
payroll packages, accepting ASCII file output, for generating payroll
checks.
It is recommended that the Time Clock terminal be used with the
included PC Interface. The PC Interface for Windows® allows for easy
setup of clock rules and employee data, editing employee punches,
reviewing reports at the PC monitor, exporting to payroll
packages, and a signal control program. (Signal not included.) The
Introduction
5
PC Software offers On-line Help for quick assistance and
answers to your questions.
IMPORTANT
1.2
•
•
•
•
•
Minimum system requirements
IBM PC compatible computer, Pentium or higher processor
with a minimum of 4 MB of RAM
Microsoft Windows 95, Windows 98, Windows 2000 or
Windows NT Workstations
1 MB available hard disk space
3.5" floppy disk drive
Available serial port
1.3 Employee punch capacity
The system can handle up to 120 employees. It has a capacity of
storing over 21,000 transactions (employee punches). The chart
below is a guide to the maximum* number of punches allowed when
120 EMPLOYEES are assigned on the clock.
PAY
PERIOD
Weekly (7)
Biweekly (14)
Semimonthly (16)
Monthly (31)
EMPLOYEE
MAX PUNCHES
PER PAY PERIOD
84
112
128
144
EMPLOYEE
MAX PUNCHES
PER DAY
12
8
8
4
*Maximum punches are based on employees punching everyday of
the pay period. Additional daily punches may apply if not punching
each day of the pay period.
NOTE: The maximum number of punches for any employee,
regardless of the configuration, is 240 punches per pay
period.
6
Introduction
1.4
Site requirements
•
•
•
•
•
1.5
IMPORTANT
The Time Clock terminal can be installed in any typical office
environment. The terminal does require 120VAC 60 Hz. and
should be located near a standard electrical outlet. Power cord is
approximately 6' in length. The PC Interface is supplied with 50' of
cable. The distance from the terminal to the PC must also be taken
into consideration. No special wiring or cooling is required.
However, DO NOT use the Time Clock terminal under the
following conditions:
Extremely high or low temperature (temperature range: 0-50°C
(32-122°F))
Extremely high or low humidity (humidity range: 0-90% RH)
Areas of high dust concentration
Areas of chemical fume concentration
Areas of extreme vibration or when placed on an unstable or
unlevel surface
Data protection (employee lockout)
The Time and Attendance system is designed to hold two pay
periods of data. As a safety feature, the terminal will not allow
employees to “punch” in on a third pay period without printing a
completed previous HOURS SUMMARY report for ALL
EMPLOYEES AFTER the end of the pay period. (The pay
period ends on the last day at the “day change” time set in the
clock rules – default time: Midnight.) Employees attempting to
punch before the report is printed will be prompted at the display
“Locked out report old data 1st.” After the report(s) are
printed the data stored in the terminal will be deleted from
memory allowing employees to punch in on the current pay
period. Once data is deleted, it cannot be recovered.
IMPORTANT! READ ME!
Introduction
7
1.6
Unpacking and inspection
Open the shipping carton and carefully remove the contents. Inspect the
Time Clock terminal and accessories for damage. Report any damage
or shortages to the company from which the unit was purchased.
IMPORTANT: Complete the registration card and return it to
Acroprint to ensure warranty registration.
A
MON
:59 10-99
5-
8:20
1
4
7
2
5
8
0
3
6
9
AR
CLE
MENU
MENU
ER
ENT
Power
Cable
Time Clock Terminal
User
Manual
0001
Identification Badge 0001
CROPRINT
Identification
Badge 0001
Supervisor Badge
CROPRINT
Identification
Badge 0001
Supervisor Badge
CROPRINT
Identification
Badge 0001
Supervisor Badge
CROPRINT
Supervisor Badge
CROPRINT
Identification
Badge 0001
Supervisor Badge
CROPRINT
0001
Identification
SupervisorBadge
Badge
CROPRINT
Identification
Badge 0001
Supervisor Badge
CROPRINT
Identification
Badge 0001
Supervisor Badge
CROPRINT
0001
Identification
SupervisorBadge
Badge
Supervisor Badge
CROPRINT
CROPRINT
Identification
Badge
Supervisor Badge
CROPRINT
Supervisor
2 Supervisor
Badges
Badge
Employee
Badges
4 Screws
Time & Attendance Software
50' of modular cable
DB9 Connector
NOTE: Please keep all the packing
materials so they may be used should you
wish to transport the system in the future. They
are specifically designed to protect your
product during shipment.
8
Introduction
2. Installing Time & Attendance PC software
2.1
PC Software for Windows 95/98/NT/2000 workstations
installations
1. Start Windows.
2. Choose Start > Settings > Control Panel.
3. Double-click the Add/Remove Programs Properties option.
4. At the dialog screen choose the Install/Uninstall tab.
Installing Time and Attendance PC software
9
5. Click Install. At the dialog screen titled “Install Program from
Floppy Disk or CD-ROM” insert the 3½" Time and Attendance PC
Software floppy disk into the drive and click Next. Follow the onscreen instructions.
6. Command line: A:\Setup.exe, Click “Finish”
7. Default directory: C:\TSIF, click “OK” if you don’t want to
change.
8. When setup has installed the software, click on “OK.”
9. The “Read me” file may be printed, read at the monitor, or
closed.
10 Installing Time and Attendance PC software
3. Terminal installation
3.1
Electrical connections
Wiring connections for power, PC
interface or printer (stand-alone
mode) and mounting bracket can be
located by removing the terminal's
access door.
Access Door
3.2
Terminal mounting
The Time Clock terminal is supplied with a reversible bracket on back
of the unit for desk or wall mounting. The unit is shipped with the
bracket in the desk mounting position. With the access door removed,
you are able to remove the bracket. Reverse the bracket and secure the
bracket to the wall with the four screws. Recommended distance from
floor to top of bracket is 54". The bracket has molded wire routing slots
and a center hub for securing wires using nylon ties. After the bracket is
fastened to the wall, mount the terminal on to the bracket. Complete
wiring connections and replace the access door.
3.3
Connecting Time Clock terminal to IBM compatible PC
1. Make sure power is off at both
the Time Clock terminal and
the PC, and the access door
on the terminal is removed.
2. Using the cable supplied with
the terminal (50'), connect the
RJ-11 modular connector to
the RS-232 port on the lower
left corner.
3. Connect the other end of the
RJ-11 to the 9-pin adaptor
ND
WA
RS
485
RS
232
9V
Terminal installation 11
supplied with the system. If your computer has a 25-pin serial port
you will need a 9-pin to 25-pin adaptor available at most computer
stores.
4. Connect the adaptor to
the RS-232 serial port
located on the rear of
your computer.
5. Replace the access door
on the terminal.
3.4
Printer connections (Stand-alone Operation or with
Additional Printer)
The Time Clock terminal may be connected directly to an IBM® PC
compatible printer. Reports can be printed without a PC.
3.4.1 Parallel printer connection
The terminal can accommodate a standard parallel printer
cable available at most computer stores. The cable requires
a 25-pin connector (to Time Clock terminal) on one end and
a 36-pin Centronics type connector (to printer) on the other
end.
3.4.2 Serial printer connection (Stand-alone Operation Only)
The serial printer cable is unique due to the phone jack
interface to the RS 232 port. Contact Acroprint to order this
cable.
12 Terminal installation
3.5
Connecting the power cord and securing the access door
Plug in the power cord coming from the wall mount transformer into the
Time Clock terminal. To reattach the access door and secure the unit to
the reversible bracket, screw on the lower front panel of the unit to
tighten the access door.
Power
Cord
Access Door
3.6
Establishing communications between terminal and PC
In most cases the software will automatically locate the PC serial port.
If the software does not locate the serial communications port:
1. From the PC, start the Time and Attendance program.
2. Select the communications icon; then select the correct
communications port and baud rate.
READ THIS!
NOTE: The baud rate on the PC must match the baud rate set
on the Time Clock terminal. Default setting on the
terminal is 9600. The baud rate may be changed at the
terminal by using the Supervisor’s badge (see section
12. Manually programming the terminal).
Terminal installation 13
3.7 Time and date
Select the Time and Date icon from the main menu. To set time you
may scroll up/down or you may enter the time in the AM/PM format.
Set month, date, and year, and click on “OK.” With correct
communications established the time and date will be sent to the
Time Clock terminal.
14 Terminal installation
4. Setup
Setup is the set of instructions telling the Time and Attendance system
how to calculate employee’s hours. These “Clock Rules” along with the
“Shift Rules” will be used to calculate employee’s time worked.
The Time and Attendance Software for Windows® provides on-line
reference to assist you in setting up your Time and Attendance systems to
correctly calculate your employee hours worked. Help may be accessed
from any screen by “clicking” on the Help Button
or selecting Help at the main menu and then choosing Contents.
Clicking on the Search button at top allows you to select a subject
or search for help by a word.
If you require additional assistance you may contact Acroprint Time
Recorder. When you call you should be at your computer and have
the product documentation. Telephone support 1-800-334-7190
To assist us in answering your questions or resolving your problem
please have the following information available:
Record serial numbers here for future reference.
•
Terminal Serial Number (Available on outside of packing box or on
the back of the terminal under bracket)
_______________________ (6 digits with 2 alpha characters)
•
PC software interface version (Available on outside of packing box,
disk label, or through the Help screen by selecting About.
_______________________ PC Interface version
_______________________ Serial Number
•
Current settings. (Run the “Clock Rules” report – see Section 9.5.)
•
Description of what happened when the problem occurred and what
you did to correct the problem
•
Exact wording of any message(s) that appeared on the PC
monitor or the terminal display
Terminal functions may be tested using one of the Supervisor Badges
supplied with the system. See Section 12.3, Terminal diagnostics for
testing terminal functions.
Setup 15
HINT: PRINT THIS REPORT
FOR FILE COPY
4.1
The Clock Rules report initially contains the default factory
settings on the Time Clock terminal. It is recommended
that you print this report. To Print: select the report icon;
under reports select Clock Rules and under report output,
print manager. Click on print. Review settings and pencil
in settings that fit your work schedule(s). To return to
factory settings, enter changes at the PC or reinitialize the
terminal using the Supervisor’s badge (see Section 12,
Programming the terminal manually). Caution: Reinitializing
the terminal will remove all punches and employee profiles,
and reset all selections, including date and time, to default
settings.
4.2
HINT: USE ON-LINE HELP SCREENS TO ANSWER
QUESTIONS AND TO ASSIST IN PROGRAMMING
Factory settings
Clock rules
Select the Setup icon from the menu:
16 Setup
4.2.1 Pay period
The length of time during which time worked
totals will accumulate for a time card. Select
and click on type of pay period.
4.2.2 Next period start date
The date the NEXT pay period will start.
Select date. Caution: Changing date after
pay period could result in lockout.
4.2.3 Max time on clock
The system assumes the employee has missed a
punch after the maximum time on clock has
been exceeded. Select time with arrow keys.
After “Max Time” has been reached, the system
will automatically “punch out” the employee.
4.2.4 Daily overtime after
The amount of time worked in a day, after which, overtime
will begin to accumulate. Note: Leave at the default setting,
24 hours if you pay overtime based on a weekly setting only
(i.e. 40 hours). Daily overtime may be set to 2 levels (i.e.
8:00 and 12:00). Click on time window to change time.
4.2.5 Weekly overtime after
The amount of time worked in a week, after which, overtime
will begin to accumulate. Note: Weekly overtime does not
apply to semimonthly or monthly pay periods. Weekly
overtime may be set to 2 levels (i.e. 40:00 and 48:00). Click
on time window to change time.
4.2.6 7th Day Overtime
When this feature is enabled, all hours worked on the
seventh consecutive worked day will be promoted to the
next highest pay level provided that the seven consecutive
days start at the beginning of the first or second week of the
weekly or biweekly pay period. This feature does not affect
weekly overtime calculations and will not override weekly
overtime thresholds. The default setting for this feature is
disabled.
4.2.7 Pay interval round
Increment of time used to calculate time worked totals as if
the punch occurred at the interval division selected.
Selecting 1 minute calculates employee time on a minute to
minute basis. Options include 1, 5, 6, 10 or 15 minute
increments.
4.2.8 Click on “More...” button for second screen in setup.
Setup 17
4.2.9 Daylight savings time
If enabled, the system will automatically assign the first
Sunday in April and the last Sunday in October as beginning
and ending dates of daylight savings. This will occur each
year without resetting. Time change will occur at 2:00 AM
on these dates. Dates may be changed in countries where
dates may be different. If not enabled, automatic daylight
change will not occur.
4.2.10 Time Clock terminal printer type
Used in the stand-alone mode when the terminal is to be
connected directly to a printer to print reports. Options
include None, Serial or Parallel. When using the PC
interface select type, “None.” May be used to print reports
from terminal when using interface.
4.2.11 Date format
Select one of six date formats: (i.e. DDMMYY = 2 digit
date, month, year).
4.2.12 Time totals format
You may select employees total hours to print in Minutes
(half past the hour “30”) or Hundredths ( half past the hour
“.50”).
4.2.13 Time of day format
You may select hours to print in the AM/PM format (5:00
PM) or in the military format (5:00 PM will print “17:00”).
4.2.14 Day change offset
The time a new day begins. Default is set at midnight. Day
change can be moved forward or backward of midnight so
time worked can be credited to the day intended.
18 Setup
5. Shift rules
Shift Rules defines shift start time, stop time, lunch periods, round, grace
and dock times. Employees worked time will be calculated based on
the “Clock Rules” and the rules of the “Shift” the employee is assigned.
The Time and Attendance system allows for 12 shifts or different
schedules. Note: When using “Round,” “Grace,” and “Dock” features
actual punched time will always be shown on time card. Features are
used for hours worked calculations.
5.1
Shifts
At the main menu, select the “Shift” icon.
5.2
Shift number
Select the number you wish to assign to the shift. You may choose
between 1 and 12 shifts. Click on box to enable shift rules.
5.3
Shift start time
The time of day employees would normally start work. To select
time scroll up/down or enter in either the AM/PM format (5:00
PM) or military format (17:00).
5.4
Shift round start
The minutes before the start time during which employee punches
will be treated as if they occurred exactly on the start time. A 15
minute round would allow an employee punch at 7:45 AM to be
treated as an 8:00 AM punch for the purpose of calculation.
5.5
Shift grace start
The minutes after the start time during which the employee
punches are treated as if they occurred exactly on the start time. A
3 minute grace would allow an employee punch at 8:03 to be
treated as a 8:00 AM punch for the purpose of calculation.
Shift rules 19
5.6
Shift dock start
The minutes the employee will lose from time work totals if
punched in after the “Start Time” plus Grace, if used. (i.e. 8:00
AM start, 3 minute grace, 15 minute dock, employee punch at
8:04 AM would be treated as a 8:15 punch.)
5.7
Shift stop time
The time of day the employee would normally stop work. To
select time, scroll up/down or enter in either the AM/PM
format (5:00 PM) or military format (17:00).
5.8
Shift round stop
The minutes after the stop time during which employee
punches are treated as they occurred exactly on the stop time.
A 15 minute round would allow an employee punch at 5:15
PM to be treated as a 5:00 PM punch.
5.9
Shift grace stop
The minutes before the stop time which employee punches
are treated as if they occurred exactly on the stop time.
Caution: A 3 minute Grace on a 5:00 PM stop time would
allow employees to punch out at 4:57 PM and be treated as a
5:00 PM punch.
5.10 Shift dock stop
The minimum minutes the employee will lose from time
worked totals if punching before the stop time (minus grace).
Without a shift grace stop assigned a 15 minute dock on a 5:00
PM stop time would allow an employee punch at 4:58 to be
treated as a 4:45 PM punch.
20 Shift rules
5.11 Lunch rules enable
Click on button to set lunch rules.
5.12 Lunch start time
The earliest time of day an employee can punch out for lunch.
5.13 Lunch end
The latest time of day at which an employee should punch
back in from lunch.
5.14 Lunch duration
The number of minutes for lunch which will be subtracted
from time worked totals. If the Lunch Duration is 60 minutes
and employee punches out at 12:01 PM and punches back in
at 12:55 PM (54 minutes) one hour will be deducted for
lunch.
5.15 Auto lunch deduct after
Automatic Lunch deduct — Enter the number of hours and
minutes following an IN punch that the system will deduct
for lunch. The lunch duration will then be subtracted from the
time worked totals. An employee IN punch at 8:00 AM and
an Auto After setting of 6 hours will allow the system to
assume the employee has taken lunch and will deduct a lunch
duration at 2:00 PM.
Shift rules 21
6. Entering employees into system
From the main menu select “Employee Profiles” icon. To enter an
employee, click on “Insert.”
6.1
Name
At the “Insert Employee” screen enter employee’s name.
Employee name field has 21 characters including spaces.
Note: Enter employee’s last name first if reports are to be
sorted by last name.
6.2
Badge
Enter 4 digit badge number (see Badge) assigned to
employee.
6.3
Number
You may enter up to a 9 digit employee number (not
required).
6.4
Shift (can be used as departments)
Enter Shift number assigned. (Note: Employee time totals will
be calculated based on these shift rules.)
Hint: Shifts can also be used to define department numbers.
(Shift 1 could be used as department 1, assigning employees to
a department called shifts for reporting.)
22 Entering employees into system
7. Supervisor’s badges
Supervisor’s badges are used to access setup information and
reports at the Time Clock terminal. The system includes two
Supervisor’s badges. Supervisor’s badges will not allow access to
the “Punch Editing,” the “Bell” program or “Data Export” features.
These can only be accessed through the PC Interface software. Up to
10 employee badges may be designated “Supervisor Badge.”
Employee badge(s) assigned as a supervisor badge may not be used
as an employee badge. Once an employee badge designated as a
supervisor badge has been deleted, it may be used as an employee
badge. To assign additional supervisor badges, follow the
procedure described below.
7.1
Supervisors
To designate an employee badge as a supervisor’s badge or to
delete the employee badge from supervisor status click on the
“Supervisors” icon in the main menu. To add a supervisor
badge click on “Insert” and assign the employee badge
number you want to be a supervisor. To delete an employee
badge from supervisor status, click on the badge number and
then click on the “Delete” button. You will be prompted “Are
you sure?” “Yes” will delete the badge.
Supervisor’s badges 23
8. Editing punches
The Time and Attendance system allows you to edit employee
punches in the current or the previous pay periods. Punches may be
added or deleted. Employees who missed “punching” times can be
added so that the system will calculate total hours worked. Punches
outside of the shift parameter will be noted with an exclamation
mark (!). The “Punch Editor” screen also allows you to edit totals in
“Regular” and “Overtime” categories. Clicking on the “Details”
button in the punch editor will show the system calculations of hours
worked.
8.1
Punch editing
At the main menu, click on “Punch Editing.” In the “Punch
Editor” screen select the employee to edit. Click on the Pay
Period (current or previous). To add a “punch,” click on
“Insert.” Enter time in either AM/PM format (5:00 PM) or
military format (17:00). Enter date as needed. Next to punch
the word “Inserted” will appear. To “Delete” a punch, select
the punch and click on “Delete.” If the punch was an
employee “swiped” punch the word “Deleted” will appear
next to the punch. If the punch was “Inserted,” it may be
deleted without a notation.
24 Editing punches
9. Reports
9.1
Print, view, archive (save to disk)
There are five (5) standard reports available from the Time and
Attendance system. To print reports, select the “Report” icon from the
main menu:
1. Select the report you wish to print or view at the PC monitor:
Hours Summary
Time Card
Who’s In, Who’s Out
Employee Profiles
Clock Rules
NOTE: The Time and Attendance system is designed to hold two
pay periods of data. A completed Hours Summary report
for all employees must be printed after the end of the pay
period. Failure to do so will result in employees attempting
to punch in on a third pay period being locked out of the
clock. This is a safety feature to avoid loss or tampering of
unreported data.
2. Select Report Output
1. Time Clock Printer (This is the printer connected directly to
the terminal for stand-alone operation.)
2. Print Manager (To print reports selected from printer
connected to the PC)
3. PC screen (If you wish to view report on PC monitor, does
not print)
4. ASCII File save report to floppy disk (Archive to disk-save
information) You will asked to name file and destination
drive. May require floppy disk.
3. Employees: Select: All, Individual Employees, or Individual shift
(select shift number)
Reports 25
4. Select Pay Period: Current or Previous
5. Sort By: Allows you to select reports sorted by Name, Badge
Number, Employee Number or by Shift.
6. Click on the button in the upper right hand corner of the report
screen to:
Report Output
Button
Time Clock Printer
“Send”
Print Manager
“Print”
PC Screen
“View”
ASCII File
“Create”
26 Reports
9.2 Time card report
The Time Card report is a listing by employee of all IN-OUT
punches along with hours worked totals. This may be for the
current or previous pay period. The report may be for one
employee, employees on a specific shift, or for all employees.
When a Time Card report has punch times with an “!” exclamation
mark beside them, this indicates that the punch is either too early
or too late to conform to shift or lunch rules that were enabled. If
the words “TIME CHANGE” are printed underneath a punch in
time, that indicates the real time clock in the Time C lock terminal
was changed while that person was punched in. (Note: A Daylight
Savings Time adjustment will cause this if someone is on the clock
at 2:00 a.m.) The word “missed,” followed by “*” asterisks, will
appear in the place of a punch out time if “MAX TIME ON
CLOCK” has been exceeded. Note that the asterisks will also
appear beside the totals and summaries of any employees who have
missed a punch.
TIME CARDS : SELECTED EMPLOYEES
2/15/01
10:46 AM
PAGE
1
============================================================================
ADAMS, LINDA
#000000121
SHIFT-01
PAY PERIOD ENDING -
2/11/01
T
I
M
E
PUNCH
DATE
TIME
IN/OUT
HOURS
DAY TOTAL WEEK TOTAL
-------- ------------ --------- ------ ----------- ----------- ----------MON FEB 5
8:00AM IN
MON FEB 5
12:00PM
OUT
4:00
MON FEB 5
1:00PM
IN
MON FEB 5
5:00PM ___OUT
4:00
MON
8:00
TUE FEB 6
7:45AM IN
TUE FEB 6
12:45PM
OUT
5:00
TUE FEB 6
1:15PM
IN
TUE FEB 6
4:15PM ___OUT
3:00
TUE
8:00
WED FEB 7
8:00AM IN
WED FEB 7
12:30PM
OUT
4:30
WED FEB 7
1:30PM
IN
WED FEB 7
5:00PM ___OUT
3:30
WED
8:00
THU FEB 8
7:30AM IN
THU FEB 8
12:00PM
OUT
4:30
THU FEB 8
12:30PM
IN
THU FEB 8
4:00PM ___OUT
3:30
THU
8:00
FRI FEB 9
8:00AM IN
FRI FEB 9
11:30AM
OUT
3:30
FRI FEB 9
12:30PM
IN
FRI FEB 9
5:00PM ___OUT
4:30
FRI
8:00
40:00 REG
0:00 OT1
0:00 OT2
------------------------------------------------------------------------PAY PERIOD:
REGULAR
FIRST LEVEL OVERTIME
SECOND LEVEL OVERTIME
C
A
R
D
S
2
/
1
5
/
0
1
1
0
:
4
6
A
M
HOURS
(+/-)EDITS
TOTAL
ADJUSTED
----------- ----------- ----------- ----------40:00
40:00 ________REG
0:00
0:00 ________OT1
0:00
0:00 ________OT2
SUPERVISOR:__________________________ EMPLOYEE:___________________________
ADAMS, LINDA
TIME CARD STATUS:
COMPLETE
.................. END TIME CARDS:SELECTED EMPLOYEES...........................
Reports 27
IMPORTANT: PRINTING A PREVIOUS HOURS REPORT FOR ALL EMPLOYEES AFTER
PAY PERIOD ENDS AND BEFORE EMPLOYEE PUNCH “IN” NEW PAY PERIOD WILL
PREVENT “LOCKOUT.”
9.3
Hours summary report
The Hours Summary report list hours worked
totals by regular and overtime hours. This may be
for an individual employee, a specific shift, or all
employees; for the current or previous pay
period. If an employee has a missed punch, the
HOURS SUMMARY TOTAL will be noted with
an * .
28 Reports
HOURS SUMMARY : ALL EMPLOYEES
2/15/01
9:44 AM
PAGE
1
============================================================================
PAY PERIOD ENDING:
2/11/01
H
O
U
R
S
NAME
----------------ADAMS, LINDA
ELLIS, STEVEN
JOHNSON, JAMES
JONES, CAROL
MARTIN, LARRY
SMITH, ROBERT
TAYLOR, ROBERT
NUMBER
BADGE SHIFT REGULAR
OVERTIME 1 OVERTIME 2
--------- ----- ----- ---------- ---------- ---------000000121 0005
01
40:00
0:00
0:00
000000176 0015
02
40:00
0:00
0:00
000000160 0017
03
40:00
1:00
0:00
000000207 0006
02
40:00
0:00
0:00
000000213 0011
01 * 32:00
0:00
0:00
000000189 0032
01
40:00
2:00
0:00
000000151 0023
03
40:00
0:00
0:00
THOMAS, KATHERI
TUCKER, DONALD
WEBSTER, BETTY
WILLIAMS, MARTI
WILSON, MELVIN
000000100
000000202
000000175
000000110
000000182
0002
0016
0003
0007
0012
PAY PERIOD TOTAL HOURS:
PAY PERIOD STATUS:
01
03
01
01
02
*
32:00
40:00
40:00
36:00
40:00
0:00
0:00
0:00
0:00
0:00
0:00
0:00
0:00
0:00
0:00
S
U
M
M
A
R
Y
REGULAR
OVERTIME 1 OVERTIME 2
---------- ---------- ---------* 460:00
3:00
0:00
2
/
1
5
/
0
1
COMPLETE
9
:
4
4
TOTAL EMPLOYEES: 12/12
A
M
.................. END HOURS SUMMARY:ALL EMPLOYEES.............................
9.4
Employee profile report
The Employee Profile report lists All employees who have been
programmed into the system with their assigned employee number,
badge number and shift number.
EMP PROFILES : ALL EMPLOYEES
2/15/01
9:30 AM
PAGE
1
============================================================================
E
M
P
EMPLOYEES:
NAME
----------------ADAMS, LINDA
ELLIS, STEVEN
JOHNSON, JAMES
JONES, CAROL
MARTIN, LARRY
SMITH, ROBERT
TAYLOR, ROBERT
THOMAS, KATHERI
TUCKER, DONALD
WEBSTER, BETTY
WILLIAMS, MARTI
WILSON, MELVIN
P
R
O
F
I
L
E
S
NUMBER
BADGE SHIFT
--------- ----- ----000000121 0005
01
000000176 0015
02
000000160 0017
03
000000207 0006
02
000000213 0011
01
000000189 0032
01
000000151 0023
03
000000100 0002
01
000000202 0016
03
000000175 0003
01
000000110 0007
01
000000182 0012
02
2
/
1
5
/
0
1
TOTAL EMPLOYEES: 12/12
SYSTEM INFORMATION:
LAST CHANGE:
SOFTWARE REVISION:
2/10/99
12:07 PM
TSW - VERSION
3.00
9
:
3
0
A
M
.................. END EMP PROFILES:ALL EMPLOYEES..............................
Reports 29
9.5
Clock rules report
The Clock Rules report lists ALL of the programmed setup, shift,
and lunch rules.
CLOCK RULES
2/15/01
12:24 PM
PAGE
1
============================================================================
CLOCK RULES:
C
L
O
C
K
MAX TIME ON CLOCK
PAY INTERVAL-ROUND
PAY PERIOD
NEXT PAY PERIOD START DATE
DAY CHANGE TIME
FIRST DAILY OVERTIME AFTER
FIRST WEEKLY OVERTIME AFTER
SECOND DAILY OVERTIME AFTER
SECOND WEEKLY OVERTIME AFTER
7TH DAY OVERTIME
DST START DATE
DST END DATE
PRINTER
COM PORT BAUD RATE
12:00 HOURS
01 MINUTES
WEEKLY
2/19/01
12:00 AM
24:00 HOURS
40:00 HOURS
24:00 HOURS
168:00 HOURS
DISABLED
4/04/01
10/28/01
PARALLEL
9600
R
U
L
E
S
SUPERVISOR BADGES:
NO SUPERVISOR BADGES ASSIGNED
2
/
1
5
/
0
1
SHIFT RULES:
SHIFT 1
SHIFT 2
SHIFT 3
---------------- ---------------- ---------------SHIFT RULES
DISABLED
DISABLED
DISABLED
START TIME
ROUND
GRACE
DOCK
STOP TIME
ROUND
GRACE
DOCK
LUNCH RULES
DISABLED
DISABLED
DISABLED
START TIME
STOP TIME
DURATION
AUTO AFTER
-------------------------------------------------------------------------
1
2
:
2
4
CLOCK RULES
2/15/01
12:24 PM
PAGE
2
============================================================================
C
L
O
C
K
SHIFT RULES:(CONT.)
P
M
SHIFT 4
SHIFT 5
SHIFT 6
---------------- ---------------- ---------------SHIFT RULES
DISABLED
DISABLED
DISABLED
LUNCH RULES
DISABLED
DISABLED
DISABLED
------------------------------------------------------------------------SHIFT 7
SHIFT 8
SHIFT 9
---------------- ---------------- ---------------SHIFT RULES
DISABLED
DISABLED
DISABLED
LUNCH RULES
DISABLED
DISABLED
DISABLED
-------------------------------------------------------------------------
R
U
L
E
S
SHIFT 10
SHIFT 11
SHIFT 12
---------------- ---------------- ---------------SHIFT RULES
DISABLED
DISABLED
DISABLED
LUNCH RULES
DISABLED
DISABLED
DISABLED
-------------------------------------------------------------------------
2
/
1
5
/
0
1
1
2
:
2
4
BELL SCHEDULE:
TIME
DURATION SUN MON TUE WED THU FRI SAT
---------- ---------- --- --- --- --- --- --- --SYSTEM INFORMATION:
LAST CHANGE:
SOFTWARE REVISION:
2/11/99
P
M
12:11 PM
TSW - VERSION
3.00
.................. END CLOCK RULES.............................................
30 Reports
9.6
Who's in, who's out report
The Who’s In, Who’s Out report lists all employees or a specific shift
of names by who is punched IN or punched OUT.
IN/OUT : SELECTED EMPLOYEES
2/15/01
8:22 AM
PAGE
1
============================================================================
SHIFT 1:
I
N
/
O
U
T
IN
-----------------------ADAMS, LINDA
MARTIN, LARRY
SMITH, ROBERT
WILLIAMS, MARTI
OUT
-----------------------THOMAS, KATHERI
WEBSTER, BETTY
IN
-----------------------ELLIS, STEVEN
OUT
-----------------------JONES, CAROL
WILSON, MELVIN
IN
------------------------
OUT
-----------------------JOHNSON, JAMES
TAYLOR, ROBERT
TUCKER, DONALD
SHIFT 2:
2
/
1
5
/
0
1
SHIFT 3:
TOTAL EMPLOYEES: 12/12
5 IN
7 OUT
8
:
2
2
A
M
.................. END IN/OUT:SELECTED EMPLOYEES...............................
Reports 31
10. Save to disk, archiving, & exporting
The Time and Attendance system allows you to save pay period
data to disk eliminating the need to keep hard copies. A generic
ASCII export file can be created to export to other programs.
(Check with your computer support consultant.) Export files for
selected national payroll processors have been included. Check
with one of these companies in your area for pricing and
information about their services.
READ THIS!
10.1 Save to disk
To save payroll data on disk select the “Reports” icon
from the main menu. Select the Report you wish to
save. Under “Report Output” select ASCII File. Then
select Employees, Pay Period, and Sort By
preference. Click on “Create.” At the “Save As”
screen enter a File Name and select a drive. Click on
“OK.”
10.2 Exporting
To export data click on the “Export” icon at the main menu.
At the “Data Export” screen select output format. Choosing
one of the national payroll processors will put data in the
format required by that processor. If you select the generic
ASCII file you must determine the format needed at the
import program. (Check with your computer support
consultant.) Next select the current or previous pay period.
Click on the “Group Selection” required. Click on the
“Export” button.
32 Save to disk, archiving, & exporting
11. Bell schedule
The Time and Attendance system includes a signal schedule
allowing for 24 program signal times, with individual durations
from .1 to 25.5 seconds, and individual day of the week selection.
An optional external signal buzzer is available for office
environments. See Appendix D.
Optional bells/horns may require relay box. Call Acroprint for
details.
Bell schedule 33
12. Programming terminal without software
12.1 Introduction
The Time Clock terminal is primarily self-prompting to
supervisors. The Main Menu is activated by swiping a
Supervisor Badge. The headings for each group on the next
four pages are the choices which appear in the Main Menu.
The menu key (either up or down) is used to reach the menu
subject desired. Pressing ENTER opens the specific task
menu. The following Supervisor's Menu Map shows menus
and choices available.
All branches in the menu can be reached by simply using the
ARROW and ENTER keys. The CLEAR key will move
you to the previous menu.
A prompt for further input may appear after a function has
been selected. The ARROW keys can still be used, but the
Time Clock terminal provides the convenience of a numerical
pad. If prompted for a Badge Number or to select an
employee, the option of swiping the badge may be used.
After a critical function or data has been entered, an
>ENTER TO CONFIRM< prompt is used to protect against
unwanted entries. Typically, the Time C lock terminal will
display the programmed data on the bottom line of the display
as the selections are being scrolled through on the top line.
The data programmed into the Time Clock terminal can be
reviewed in this fashion. If there are any doubts about what
has been programmed, simply print the appropriate report.
HINT: PROGRAM TERMINAL AT PC USING SOFTWARE
AND CABLE SUPPLIED BEFORE USING AS
STAND-ALONE TERMINAL.
34
Programming the Time C lock terminal manually
12.2 Supervisor’s menu map
MAIN MENU
TEST FEATURES
REPORTS
SELECT A TASK
ADD/EDIT EMPLOYEE
BADGE READER TEST
EDIT TIME TOTALS
DISPLAY TEST
EDIT SHIFT RULES
KEYBOARD TEST
SUPERVISOR CARDS
AUDIO TEST
TIME AND DATE
PRINTER TEST
SETUP
BELL TEST
TEST FEATURES
REPORTS
SELECT A REPORT
HOURS SUMMARY
TIME CARDS
WHO’S IN, WHO’S OUT
EMPLOYEE PROFILES
CLOCK RULES
}
}
SELECT REPORT FILTER
ALL EMPLOYEES
INDIVIDUAL SHIFT
SELECT A SHIFT
INDIVIDUAL EMPLOYEE
SELECT AN EMPLOYEE
SELECT REPORT FILTER
ALL EMPLOYEES
INDIVIDUAL SHIFT
SELECT A SHIFT
SELECT PAY PERIOD
CURRENT
PREVIOUS
INDIVIDUAL EMPLOYEE
SELECT AN EMPLOYEE
REPORT SUBMITTED
Programming the Time Clock terminal manually 35
ADD/EDIT EMPLOYEE
SELECT A TASK
ENTER BADGE NUMBER
ADD AN EMPLOYEE
EMPLOYEE NAME
SELECT AN EMPLOYEE
EDIT AN EMPLOYEE
{EMPLOYEE NAME}
EMPLOYEE NUMBER
SHIFT NUMBER
DELETE AN EMPLOYEE
SELECT AN EMPLOYEE
{EMPLOYEE NAME}
EDIT TIME TOTALS
SELECT AN EMPLOYEE
CURRENT REGULAR HRS
CURRENT OVERTIME 1
CURRENT OVERTIME 2
PREVIOUS REGULAR HRS
PREVIOUS OVERTIME 1
PREVIOUS OVERTIME 2
SUPERVISOR CARDS
SELECT A TASK
ADD SUPERVISOR BADGE
DELETE A SUPERVISOR
}
ENTER BADGE NUMBER
36 Programming the Time C lock terminal manually
EDIT SHIFT RULES
SELECT A SHIFT
SHIFT RULES = DISABLED
SHIFT RULES = ENABLED
SHIFT START TIME
SHIFT START ROUND
SHIFT START GRACE
SHIFT START DOCK
SHIFT STOP TIME
SHIFT STOP ROUND
SHIFT STOP GRACE
SHIFT STOP DOCK
SHIFT LUNCH RULES = DISABLED
SHIFT LUNCH RULES = ENABLED
LUNCH WINDOW BEGIN
LUNCH WINDOW END
LUNCH DURATION
AUTO LUNCH AFTER
TIME AND DATE
SELECT A TASK
SET THE TIME
ENTER TIME OF DAY
SET THE DATE
TIME FORMAT
12 HOUR
24 HOUR
DATE FORMAT
DAY MONTH YEAR
DAY YEAR MONTH
MONTH DAY YEAR
MONTH YEAR DAY
YEAR DAY MONTH
YEAR MONTH DAY
TIME TOTALS FORMAT
MINUTES
HUNDREDTHS
Programming the Time Clock terminal manually 37
SETUP
MAX TIME ON CLOCK
ENTER ELAPSED TIME
PAY INTERVAL ROUND
SELECT PAY INTERVAL
1 MINUTE(S)
5 MINUTE(S)
6 MINUTE(S)
10 MINUTE(S)
15 MINUTE(S)
PAY PERIOD LENGTH
SELECT PAY PERIOD
WEEK PAY PERIOD
TWO WEEK PAY PERIOD
SEMIMONTHLY PERIOD
MONTHLY PAY PERIOD
PAY PERIOD START
DAY CHANGE OFFSET
ENTER TIME OFFSET
OVERTIME RULES
1ST DAILY OT AFTER
1ST WEEKLY OT AFTER
2ND DAILY OT AFTER
2ND WEEKLY OT AFTER
7TH DAY OVERTIME
DISABLED
DAYLIGHT SAVINGS
ENABLED
DAYLIGHT SAVE START
DAYLIGHT SAVINGS END
DISABLED
SETUP PRINTER
SELECT PRINTER TYPE
PARALLEL
SERIAL
NONE
COMM PORT BAUD RATE
SELECT BAUD RATE
19200
38400
300
600
1200
2400
4800
9600
REMOVE ALL PUNCHES
REINITIALIZE SYSTEM
38 Programming the Time C lock terminal manually
12.3 Terminal diagnostics
The Time Clock terminal has a self-testing feature. The badge
reader, display, keyboard audio, printer and bell program can
be tested using a Supervisor’s badge. At the terminal:
1)
2)
3)
4)
5)
Swipe the Supervisor badge.
Scroll up/down to “Test Features.”
Press ENTER.
Scroll menu to select test
Press ENTER and proceed as instructed.
TEST DESCRIPTIONS
Badge reader:
Display:
Audio:
Printer:
Bell:
IMPORTANT
Keyboard:
This test will display the badge
number that is swiped through the
slot. This test may help identify a
defective badge.
The display will scroll through the
various characters.
The display will show which key is
being pushed. Press clear twice to end
the test.
The internal speaker will beep at
graduated frequencies for this test.
Outputs a patterned character string to
the printer.
This test will ring a connected bell or
buzzer (see Companion products) to
ensure it is working properly. NOTE:
Setting a bell schedule is only
possible using the PC Interface
Program.
Programming the Time Clock terminal manually 39
Appendix A — Error messages at PC monitor
Error:
A change has occurred in the Primary database.....
Reason: Database changed since PC last communicated with the
terminal. Punches may have occurred or supervisor
changes may have been made at the terminal. New data
must be reloaded at the PC. Unsaved changes made at PC
will be discarded.
Error:
A Field Validation Error Has Occurred on Field: <Field
Name>
Reason: Invalid value entered in the field indicated. Reenter data
according to the rules applied to the indicated field.
Error:
A Report Error Has Occurred.
Reason: An error occurred while attempting to execute a report.
Check printer and printer connections.
Error:
Cannot Export Data - The following employee has an
incomplete time card: <Name> <Badge Number>.
Reason: Incomplete time card data. Correct all missing punches
and make sure all employees have completed pay period.
Error:
Cannot insert punch. Punch is <before/after> pay period
<start/end> date.
Reason: Attempted to insert punch outside of pay period
parameters. Correct punch Date, Time or Pay Period.
40 Appendix A — Error messages at PC monitor
Error:
Error Messages regarding:
<Clearing> <Cummunicating> <Deleting> <Inserting>
<Loading> <Marking> <Updating>
<Clock Terminal not responding>
Reason: Error occurred in communication between the PC and
terminal:
1) Try again.
2) Check connections between PC and terminal.
3) Insure communications cable does not exceed
recommended length, in specifications, located away
from other wiring and is not coiled.
4) Try lowering baud rate. (This must be done at both
the PC and the terminal.)
Error:
Error <Creating> <Opening> File: <File Name>
Reason: Check and reenter valid file name.
Error:
Next Pay Period Date exceeds limit of Pay Period length.
Reason: Specified Start of Next Pay Period beyond parameters.
Reenter valid date.
Error:
No employees have been <Define> <Selected>
Reason: An attempt to execute an employee based report without
employee(s) being <defined> or <selected>. Define or
select employees and try again.
Error:
Unable to initialize the connection to Print Manager.
Reason: The PC interface was unable to open the Windows
default printer. Check printer settings using the Windows
Print Manager and check hardware printer port settings.
Appendix A — Error messages at PC monitor 41
Error:
Unable to open <any> COM port <n>.
Reason: PC interface unable to open a COM port. Check
hardware settings and connections.
Error:
Unable to start a timer.
Reason: Windows unable to initiate a timer. Close some programs
and try again.
Error:
Clock Terminal not responding.
Reason: Terminal did not respond to a communication packet sent
by the PC.
1) Check all connections between terminal and PC.
Make sure terminal is powered up. Check baud rate is
the same at PC and terminal.
2) Make sure communication cable is the recommended
length and to specifications. Check that cable is not
coiled or running through switches, over fluorescent
lights or other sources of electromagnetic noise.
3) Try a slower baud rate. Terminal baud rate can be
accessed using the Supervisor’s badge. Then change
baud rate in the PC program to match the terminal.
4) Check for IRQ (Interrupt request line) conflicts on the
PC. Make sure the number assigned to the
Time C lock terminal COM port is not the same used
on other ports.
NOTE: If you are uncertain about changing system settings,
please consult a computer technician. Acroprint
DOES NOT support operating system software and
provides this information only for your convenience.
42 Appendix A — Error messages at PC monitor
To check if an IRQ conflict on the COM port supporting the Time
C lock terminal exists on your computer you can run a Resource
Summary Report:
Windows 95: a) Under “My Computer” icon click on “Control
Panel”
b) Click on the “System” icon.
c) Click on tab “Device Manager.”
d) Click on “Print,” “OK.”
e) Click on “OK” again to exit.
The Resource Summary Report contains an IRQ Usage Summary. If
the port attached to the Time Clock terminal uses the same IRQ as
another device this could cause a problem. The Device Manager can
be used to change a device’s configuration:
*
*
*
*
Identify a free IRQ setting and assign the device to that setting.
Disable the conflicting device to determine if it is causing a
problem.
Rearrange settings used by another device or devices to free a
setting needed by the device with the conflict.
Change jumpers on your hardware to match the new settings.
NOTE: If the device uses hardware jumpers or switches to change
settings and you use Device Manager to change the
settings, you must also change the settings on the
hardware. Device Manager does not change hardware
settings.
Windows 3.xx While Windows 3.xx does not include Device
Manager, it does allow you to change settings at
each COM port. Access to Setup for Ports is
obtained through the Control Panel. No two devices
can use the same IRQ setting. If necessary, change
COM port to a nonconflicting IRQ setting.
Appendix A — Error messages at PC monitor 43
Appendix B — Error messages at terminal
These are error messages you may encounter while using the clock.
BADGE OUT OF RANGE
The badge number is not 1-9999 or one of the three special supervisor
badges.
BADGE READER TEST
INVALID DATA
Errant badge read during badge reader test.
CAN’T COMPLETE TASK
1. Response when database failed to remove all punches.
2. Record verification prior to deleting an employee failed. Simply
try again.
3. Database access problem.
4. An attempt was made to modify a setting to an invalid value.
CAN’T COMPLETE TASK
BADGE NOT FOUND
The badge number is not entered on the clock.
CAN’T COMPLETE TASK
BADGE NOT ON FILE
The badge number is not entered on the clock as either an employee, or a
supervisor.
CAN’T COMPLETE TASK
DATE OUT OF RANGE
The pay period start date must be beyond the current date and time set on
the clock and it must be within one pay period’s duration from the
current time and date.
CAN’T COMPLETE TASK
EMPLOYEE FOUND
Attempting to add a supervisor or employee badge to the clock that is
already programmed as an employee’s badge.
44 Appendix B — Error messages at Time C lock terminal
CAN’T COMPLETE TASK
INVALID BADGE
Attempting to add/delete a supervisor or employee badge that is outside
of the acceptable badge number range (1-9999).
CAN’T COMPLETE TASK
INVALID DATE
1. An invalid date was entered by the users. An example of an
invalid date is Feb. 30, 1997.
2. When manually entering daylight savings time thresholds, the
dates must be beyond the current date and time and it must be
within 400 days of the current date and time.
CAN’T COMPLETE TASK
INVALID DAY
For monthly pay periods, the pay period start day must be between 1-28.
For semimonthly pay periods, the two pay period start days must be
between 1-28. The second day must be greater than the first.
CAN’T COMPLETE TASK
INVALID ELAPSED TIME
1. Max time on the clock, lunch after, and daily overtime thresholds
must be in the range of 0-5999 minutes.
2. Weekly overtime thresholds must be in the range of 0-29,999
minutes.
3. Edit time totals must be in the range of -29,999 to 29,999
minutes.
4. A shift round, grace or dock value is out of range.
5. A lunch duration is out of range.
CAN’T COMPLETE TASK
INVALID NAME
The employee’s name contains characters that are not capital letters,
spaces, periods or commas.
Appendix B — Error messages at Time C lock terminal 45
CAN’T COMPLETE TASK
INVALID NUMBER
Attempting to add an employee number to the clock that is outside of the
acceptable range (0-999999999).
CAN’T COMPLETE TASK
INVALID SHIFT
Attempting to set a shift number that is outside of the acceptable range
(1-12).
CAN’T COMPLETE TASK
INVALID TIME
An invalid time of day was entered by the users. An example of an
invalid time is 25:00:00.
CAN’T COMPLETE TASK
MEMORY FULL
Employee cannot clock in/out. The memory is full. Reporting previous
pay period data will not correct the problem, because the old pay period
is not old enough to dump or is already empty.
CAN’T COMPLETE TASK
NO EMPLOYEES DEFINED
1. Edit employee, delete employee, or edit time totals selected
when there are no employees on clock.
2. Submitting a report for individual employees when there are no
employees on the clock.
CAN’T COMPLETE TASK
NO SUPERVISOR BADGES
Delete supervisor selected when there are no user programmed
supervisor badges on the clock.
CAN’T COMPLETE TASK
REPORT IN PROGRESS
Attempted to change a setting on the clock while a report was in
progress.
46 Appendix B — Error messages at Time C lock terminal
CAN’T COMPLETE TASK
SELECT_PRINTER_TYPE
Generating a report when printer type is none.
CAN’T COMPLETE TASK
SUPERVISOR FOUND
Attempting to add a supervisor or employee badge to the clock that is
already programmed as a supervisor’s badge.
CAN’T COMPLETE TASK
TOO MANY WAITING
Attempted to submit a report when the report queue is full. Wait for
some of the reports to finish printing, then try again.
CAN’T COMPLETE TASK
TRY AGAIN PLEASE
Database access errors while attempting a transaction.
CRYSTAL/RTC TEST
FAIL:HANDSHAKE/INT
The real time clock and the crystal are tested by comparing them against
each other. This indicates a failure in the test.
DATA MAY BE CORRUPT
PRESS A KEY
This is caused by a power failure while writing to the database. Print all
reports if possible. Reinitialize the system if required.
DATABASE ACCESS ERROR
An internal database access error occurred.
LOCKED OUT
REPORT OLD DATA 1ST
Employee cannot clock in. The pay periods need to roll over first. Before
they can roll over, the data in the previous pay period must be printed. See
Section 9.3. Hours summary report. Printing report will allow employee(s)
to clock in.
Appendix B — Error messages at Time C lock terminal 47
MEMORY FULL
REPORT OLD DATA 1ST
Employee cannot clock in/out. Reporting previous pay period will allow
the clock to dump that data and free up memory.
PC COMM ERROR
DEVICE=SERIAL
An error occurred when passing information between the PC and the
Time Clock terminal.
RAM MEMORY TEST
FAIL:DATA
A data error occurred during the RAM test.
ROM MEMORY TEST
FAIL:DATA
A data error occurred during the EPROM test.
REPORT OUTPUT ERROR
DEVICE= PARALLEL
An error was detected while printing to the parallel port.
REPORT OUTPUT ERROR
DEVICE= SERIAL
An error was detected while printing to the serial port.
REPORT TIMEOUT ERROR
No activity was detected on the port for an extended period of time.
TRY AGAIN PLEASE
Errant badge read.
TRY AGAIN PLEASE
FAIL:DATA
Database access failure when attempting to validate a badge.
48 Appendix B — Error messages at Time C lock terminal
UNRECOVERABLE ERROR
PRESS A KEY
Catastrophic database error notification. The system will perform a
system initialization.
Appendix B — Error messages at Time C lock terminal 49
Appendix C — FA Q ’S
FAQ’S — Frequently Asked Questions
GENERAL INFORMATION
1. Q. What happens if one of my employees forgets to punch out?
A. The word “Missed” will appear in place of the out punch on the
time card. When time is determined it may then be added to the
employee time card under editing in the PC software. The word
“Inserted” will now appear on the time card and the totals will
automatically update. Asterisks (*) will also appear on the
Hours Summary report denoting a missed punch.
2. Q. Is the Time Clock terminal year 2000 compatible?
A. Yes!
3. Q. How do my employees know they are punched “in” without a
time card?
A. The Time Clock terminal displays the employee name, type of
punch (In or Out) and hours worked at each swipe (punch) of
the employee’s badge.
4. Q. How is overtime handled on a semimonthly or monthly pay
period?
A. Daily overtime limits can be set on semimonthly or monthly pay
periods. Weekly OT does not apply to semimonthly or monthly
pay periods.
5. Q. I live in Arizona and we do not change to daylight savings time.
Will the Time Clock terminal automatically change the time?
A. No, the feature may be disabled if not required.
50 Appendix C — FAQ’S
6. Q. What is the total number of Supervisors I can assign?
A. You may have a total of 10 Supervisors. The System includes
two Supervisor’s badges. However, you can use employees
badges and assign them as Supervisor badges. These badges
cannot be used as employee badges while assigned as
Supervisor.
BADGES
1. Q. Can I use my present employee badge?
A. Time Clock terminal badges are magnetic encoded on ABA,
track 2, with four significant digits. If existing badges are
encoded the same, the badges should work. The terminal will
read only the last four digits of your current badges (i.e.
#0006563). Range: 0001 to 9999.
2. Q. Can I order badges numbered from 150 to 200?
A. Extra badges are available in standard packs: Nos. 26-50,
Nos. 51 to 100, and Nos. 101 to 151. Special badges may be
ordered. Check with customer service for pricing and availability.
SAVE TO DISK, ARCHIVING AND EXPORTING
1. Q. Can I archive or save data to disk?
A. Yes. Saving data on disk avoids the need to keep hard copies.
From the Time and Attendance PC software select the “Reports” icon from the menu. Under “Report Output” select
“ASCII File” and click on “Create.” At the “Save As” screen
name report and select drive. Click on “OK.”
Appendix C — FAQ’S 51
2. Q. Can I use other payroll packages and export data for payroll?
A. Yes. Using the generic ASCII output, data may be exported to
other software accepting ASCII files. (The Time and
Attendance PC software is required.) See procedure above.
3. Q. The Time and Attendance software allows for export to national
payroll processors (Time Plus, ADP, Paychex’s Paylink). How
do these services work?
A. The end user must contact these companies in their local area
for pricing and information about the service. (The Time and
Attendance PC software is required to export.)
CONNECTIONS
1. Q. I want to connect the Time Clock terminal directly to a printer.
What type of printer do I need?
A. The Time Clock terminal can support a serial or parallel printer.
The parallel printer should be a IBM-PC or a PC compatible
printer. The printer cable (not included with system) is a
standard parallel printer cable with a 25-pin connector and a
36-pin Centronics-type connector. For serial cable information
contact Acroprint.
2. Q. Can I use two terminals with the software?
A. No. The software supports only one terminal and is not
designed for a LAN environment.
52 Appendix C — FAQ’S
3. Q. The Time Clock terminal comes with 50' of cable to connect to
my computer. Can I get a longer cable?
A. Acroprint offers an optional 100 feet low impedance cable. This
cable is terminated at both ends and inspected to assure proper
operation. User supplied cable may result in communication
problems. User's cable is not supported by Acroprint's help
desk.
TROUBLESHOOTING
1. Q. My employees cannot punch in; the display reads “Locked out
report old data 1st.”
A. Run a previous hour summary report for all employees.
2. Q. My employees cannot punch in; the display reads “Memory Full
Report Old Data 1st.” I deleted hours and employees and it still
won’t allow employees to punch.
A. Hours Summary report MUST be run. Deleting employees and
data does not remove records from this file.
3. Q. When I try to print reports, I get the message “No printer
response.”
A. Check that the printer is configured to communicate with the
terminal; cable is secured at both ends; printer is “on line.”
4. Q. I can’t delete an employee. I keep getting the message “Can’t
complete task, employee punches on clock.”
A. You must wait until there are no employee punches on the clock
(normally two complete pay periods).
Appendix C — FAQ’S 53
Appendix D — Support agreement
Acroprint offers a hassle-free support agreement for your peace of
mind. You can call our support department for more details and pricing
on this support plan.
Wi t hout Support
Agreement
Wi t h Support Agreement
Unlimited telephone support
After 30 days calls are billed per
incident
Free software and version
upgrades
You must purchase software
upgrades
We repair or exchange clock at
NO CHARGE PRIORITY
STATUS!
After warranty period, you will
be charged for parts and labor
to repair unit
54 Appendix D — Support agreement
Appendix E — Companion products
Contact the Acroprint distributor from which you purchased this
product to see if companion products are offered.
You may purchase directly from Acroprint using your Visa or
MasterCard. Sorry no COD’s.
Description/Illustration
Part Number
40 Pocket Badge Rack (Plastic)
81-0117-000
2 - 12 Pocket Badge Racks (Plastic)
81-0116-003
Head Cleaning Badges
10 cleaning badges
14-0111-002
Extra Magnetic Identification Badges
25 badges encoded 26-50
50 badges encoded 51-100
50 badges encoded 101-150
14-0122-002
14-0113-002
14-0113-003
External Buzzer (85 dB @ 1')
01-0122-000
NOTE: This device is fully powered
by the Time Clock terminal, no other
connections required; however,
the PC Interface Software is
necessary to program signal times.
Ideal for quiet office.
Battery Back-Up (UPS)
74-0105-000
Allows terminal to operate
without AC power for up to
six hours.
13" L x 3½" W x 6" H
Not for PC - Terminal Only
Special 100' Communications Cable
For connecting terminal to PC
(Caution: this is a special cable for use with
the Time & Attendance system)
DB9
DB25
72-0176-000
72-0176-002
Appendix E — Companion products 55
5640 Departure Drive • Raleigh, NC 27616
Phone: 919.872.5800 • IN USA 800.334.7190
Fax: 919.850.0720
www.acroprint.com
Microsoft® Windows™, Windows®95, Windows 98, Windows 2000 or Windows NT
are registered trademarks of Microsoft Corp., IBM® is a registered trademark of
International Business Machines.Time+Plus® is a registered trademark of
Time+Plus® Inc., ADP® is a registered trademark of Automatic Data Processing,
Inc., Paylink is a registered trademark of PayChex. All other trademarks are the
property of their respective holders.
P/N 06-0250-000 Rev. A