1
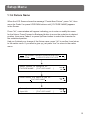
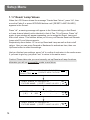
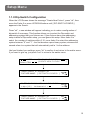
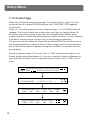
User Instruction
Web site: www.highlite.nl
E-mail: [email protected]
Contents
Introduction ......................................... 1
Safety Rules ....................................................... 1
Notice Information .............................................. 2
Specifications ...................................... 3
Getting Acquainted ............................. 4
Principle Features .............................................. 4
Basic Control Parts ............................................ 5
Setup Menu Field ................................ 7
1. Internal Library ............................................. 7
1.1 Create New Fixture ................................... 7
1.1.1 Total DMX Channel ........................... 8
1.1.2 LCD Effect Label ............................... 9
1.1.3 Internal Patch ...................................10
1.1.4 Pan/ Tilt Patch ................................. 11
1.1.5 Hard/ Soft Cross ..............................12
1.1.6 Fixture Name .................................. 13
1.1.7 Reset/ Lamp Values ........................ 14
1.1.8 Dip-Switch Configuration ................ 15
1.1.9 Control Type ................................... 16
1.1.10 Dimmer Patch ............................... 18
1.2 Edit Existing Fixture ................................ 19
1.3 Delete Fixture ......................................... 20
2. Patch ............................................................ 22
2.1 Fixture Patch ........................................... 23
2.2 Parcan Patch .......................................... 24
2.3 Strobe Patch ........................................... 24
2.4 Smoke Patch .......................................... 25
Contents
3. MIDI Channel ........................................................... 25
4. Strobe Type ............................................................. 26
5. Gooseneck Dimmer ................................................ 26
6. View Free Memory .................................................. 27
7. Send Data File ......................................................... 27
8.Load Data File .......................................................... 29
9. Update Software ..................................................... 30
10. Save to Card .......................... ............................... 31
11. Load from Card ..................................................... 32
Record ........................................................ 34
1. Record Shows ......................................................... 30
1.1 Active Effects .................................................... 35
1.2 Edit Steps ......................................................... 36
1.3 Step's Time ....................................................... 37
2. Record Chases ....................................................... 38
3. Record Scenes ....................................................... 39
Playback ..................................................... 41
Strobes Control .......................................... 42
Manual Fixtures .......................................... 43
Utility Facilities ........................................... 44
Times ........................................................................... 44
Copy ............................................................................. 45
Reset ........................................................................... 4 6
Lamp ............................................................................ 46
MIDI Implementation .................................. 47
Appendix A- Fixture Library ...................... 48
Introduction
Welcome!
You made the right decision by choosing this sophisticated and intelligent
product. Every unit has been thoroughly tested and carefully packed before
shipment. Unpack the shipping carton carefully, saving the carton and all
packing materials for possible later use.
Check carefully for sure your product is not damaged and all accessories not
missing. If your product appears to be damaged or missing, please do not use
it and contact your local distributor immediately.
Please read this manual carefully and thoroughly, as it gives important
information regarding safety, use and maintenance. Keep this manual with the
unit for possible future reference.
Safety Rules
To reduce the risk of electrical shock or fire, do not expose this unit to
rain or moisture.
Do not spill water or other liquids into or on to your unit.
Be sure that the local power outlet matches that of the required voltage
for your unit.
Do not attempt to operate this unit if the power cord has been damaged.
Turn off immediately in the event of malfunction.
Should you notice smoke or an unusual smell coming from the equipment,
please discontinue using it and disconnect from the power immediately.
Do not open the unit - there are no user serviceable parts inside.
Do not dismantle or modify the unit, as this voids all warranties.
Do not attempt repairs. Repairs by unqualified people could cause damage
or faulty operation. Contact your local authorized service center.
1
Introduction
Notice Information
Keep dry
This product is not waterproof, and may malfunction if exposed to high levels of
humidity. Rusting of the internal mechanism can cause irreparable damage.
Do not drop
This product may malfunction if subjected to strong shocks or vibration.
Keep away from strong magnetic fields
Do not use or place this device in vicinity of equipment that generates strong
electromagnetic radiation or magnetic fields. Strong static charges or the magnetic
fields produces by equipment such as radio transmitters could interfere with the
display or affect the product's internal circuitry.
Cleaning
Due to fog residue, smoke, and dust cleaning the exterior of the case may become
necessary. Use normal glass cleaner and soft cloth to wipe down the outside casing.
CF cards
Memory card may become hot during use. Observe due caution when removing
memory cards from this device.
Attention! Use recommended 32 M Compact Flash Card only.
The console requires a CF card for its exclusive use, otherwise data error may
occur when you use the CF card for other consoles.
Copyright Notice
No part of the manual included with this product may be reproduced, transmitted,
transcribed, stored in a retrieval system, or translated into any language in any form,
by any means, without authorized written permission.
2
Specification
Model:
Light Desk Pro
Power Requirement:
AC 230V/ AC 120V
Housing:
Sheet metal with epoxy powder finish
LCD:
2x40 characters
DMX Channels
512 max., Configurable for intelligent
fixtures, traditional pars and DMX strobes
Inputs/Outputs
DMX OUT:
3-pin Neutrik chassis connector
MIDI IN/THRU/OUT:
Standard 5-pin DIN connector
RS-232 Port:
DB9 connector
Audio IN:
1/4" unbalanced stereo jack
Audio trigger:
Built-in microphone or line in
Overall Dimensions:
650x400x115mm
Weight:
Optional Accessory:
Approx. 8.3 Kg
Memory Card:
ScanDisk 32 MB Compact Flash Card
DJ Lamp:
USB connector, 5V/1W gooseneck light
3
Getting acquainted
Principle Features
512 DMX channe ls (24 channe ls for par s, 8 channe ls for st robes
and up to 36 channe ls per fixt ur e)
20 pr eset Strobe pr ogr am s & 48 pr ogr am mabl e scenes
48 freel y pr ogr am mabl e show s for the fixt ur es, each with a
maxi mum of 48 st eps
48 freel y pr ogr am mabl e chases for the par s, each with a
maxi mum of 48 st eps
Int er nal Li br ar y is edi tabl e for up to 256 fixt ur es
Fr ee access of CF car d( 32M B) to exchange the dat a files,
incl udi ng the libr ar y, mem or y and set up
Th e dat a files can be dow nl oade d or upl oade d to a PC
Th e sof twar e can be upda ted with new ver si ons
Audi o input and bui lt-in micr opho ne for musi c sync. Fu nct ions
USB socket for DJ lam p( 5V, 1W )
Joyst ick for Pan/ Tilt adj ust ment of fixt ur es
Blackout & gr and mast er
Two LC D di spl ays, 40x2 char act er s each & two 4- di gi t LE D di spl ay
Fo ur 3- pi n fem al e XLR socket s for 512 DMX channe ls out put
MIDI In/ Th ru/ Out connect or s
4
Getting acquainted
Basic Control Parts
Fixture & Numbers 1-16
The Fixture and Number 1-16 buttons are used to select patched fixtures for
programming or manual control. Also, they can be used to make a group of fixtures
by pressing several numbers 1-16 buttons while holding down the Fixture button.
Joystick
This joystick is used for control of Pan or Tilt movement for the fixtures.
Pan/Tilt
The Pan button turns on/off Pan movement of the joystick, and
the Tilt button turns on/off Tilt movement of the joystick.
Setup
Press this button to access Setup menu.
Record
Press this button to access Record mode.
Cursor (Up/ Down/ Forward/ Backward)
Up/ Down buttons are used for adjustments of the active items. Meanwhile,
Forward/ Backward buttons are used to select the active item by moving from
field to field in the bottom line of the Screen display.
Effect Faders (1-6)
These six faders are used for effects adjustment in the Screen display directly
above each fader.
OK(
)& ESC (
) buttons
Press "ok" to confirm your settings or access its subordinate. Likewise, press "esc"
to cancel your settings or return to the previous menu.
Channel Faders (1-12)
These 12 faders, in combination with the Channel button, can be used to control the
24 individual channels of the lightings
5
Getting acquainted
Basic Control Parts
Flash 1-12
These 12 buttons are used to bring an individual channel to full intensity. They also are
used in combination with the Flash Page button, to select the scene or the step number
of the chases or shows. "Latch" can be enabled when the buttons are pressed down for
2 seconds.
Flash Page
In combination with the Flash buttons, this button is used to page through pages 1-4
of 12 scenes, 12 steps of the chases or shows.
Channel Bank
This button is used to select the channels between two bank, the first 1-12 channels,
and the second 13-24 channels.
Dimmer Master Fader
This fader is used to control the overall fader output of two banks of
channels(1-12/13-24).
Grand Master Fader
This fader is used to determine maximum output of all dimmer faders.
Preset Faders (1-8)
These 8 faders are used to control the dimmer level of the preset respectively.
Blackout
When pressed, all levels will go to zero. (The flashing LED above the button will
indicate this). Press again, all levels will return.
Audio Button
This button is used to enable or disable audio synchronized control of the selected
scenes, chases, shows and the strobe programs.
6
Setup Menu
First, make sure this console is in Fixture control mode by observing the Fixture LED
indicator and LCD Screen on upper-right. The Fixture LED indicator will be lit and
the LCD Screen will show the message "Select Fixture".
Press the Setup button to activate Setup mode. A yellow LED above the button will
blink briefly and the overhead LCD Screen will show the message "Configuration &
Setup Menu" indicating you're in Setup menu.
The Setup menu contains 11 submenus, namely Internal Library, Patch, MIDI Channel,
Strobe Type, Gooseneck Dimmer, View Free Memory, Send Data File, Load Data File,
Update Software, Save to Card and Load from Card.
1. Internal Library
Press the Setup button to access Setup menu. Move the Fader 4 or press the
Up/Down buttons until the LCD Screen shows [ Internal Library ] in the bottom line.
SELECT
CONFIGURATION & SETUP MENU
[ INTERNAL LIBRARY
esc
] ok
Press "ok"
INTERNAL LIBRARY CONFIGURATION
[ CREATE NEW FIXTURE
Select ITEM
]
Press "ok" to access setting menu, which consists of three(3) options,
including Create New Fixture, Edit Existing Fixture and Delete Fixture.
Hereinafter we will give step-by-step instructions.
1.1 Create New Fixture
Move the Fader 5 or press UP/DOWN buttons until the message [ CREATE NEW
FIXTURE ] appears in the Screen.
INTERNAL LIBRARY CONFIGURATION
[ CREATE NEW FIXTURE
Select ITEM
]
7
Setup Menu
Press "ok", a new window will appear indicating you that can start to establish the
configuration for the newly-added fixture. This menu allows you to add a fixture
and its attributes into the fixture library(The library can hold a maximum of 255
types of fixtures). There are ten(10) options in Create New Fixture, namely
Total DMX Channel, LCD Effect Label, Internal Patch, Pan/ Tilt Patch,
Hard/ Soft Cross, Fixture Name, Reset/ Lamp Values, Dip-Switch Configuration,
Control Type and Dimmer Patch.
1.1.1 Total DMX Channel
When the LCD Screen shows the message "Create New Fixture", press "ok", then
move the Fader 5 or press UP/DOWN buttons until [ TOTAL DMX CHANNEL]
appears in the Screen.
Press "ok", a new window will appear telling you to determine how many channels
your new fixture will use. Move the Fader 5 or cursor Up/Down button to select a value
within 1-36, then press "ok" to confirm your setting and return to the earlier menu.
INTERNAL LIBRARY CONFIGURATION
[ CREATE NEW FIXTURE
Select ITEM
]
Select feature to configure for
esc
FIXTURE NAME - [ TOTAL DMX CHANNEL ] ok
Total channels occupied on dmx
FIXTURE NAME [1 ]
esc
ok
Select feature to configure for
esc
FIXTURE NAME - [ TOTAL DMX CHANNEL ] ok
8
Setup Menu
1.1.2 LCD Effect Label
When the LCD Screen shows the message "Create New Fixture", press "ok", then
move the Fader 5 or press UP/DOWN buttons until [ LCD EFFECT LABEL]
appears in the Screen.
INTERNAL LIBRARY CONFIGURATION
[ CREATE NEW FIXTURE
Select ITEM
]
Select feature to configure for
FIXTURE NAME - [ LCD EFFECT LABEL ]
esc
ok
Enter number of lcd pages
FIXTURE NAME [2 ]
esc
ok
Enter the string for effects
more
P1
Enter the string for effects
more
P2
Press "ok", a new window will appear telling you to enter a value within 1-5 for the
amount of pages required to view all lighting effects on the Screen. Move the
Fader 5r or cursor Up/Down button to select a value within 1-5, then press "ok" to
confirm or "esc" to exit.
Press "ok", a new window will appear prompting you to enter a string of effects - a
definition list of the commands required by the fixture to be written on the Screen,
for each page. Each page contains 6 strings of effect, and each string consists of
a maximum of 6 characters. Press Cursor Up/Down to call in string effects from
built-in. If you need some special effects, you'll have to make a new one yourself.
Press Forward or Backward button to pass from letter to letter, then move
Fader 1 to enter the character one by one. This console has a embedded
dictionary, you can move the Fader 1 to scroll through all characters available.
9
Setup Menu
Once you've completed the effects label of the 1st page, press "ok" to go on with the
2nd page. Repeat the procedures stated in the above paragraph.
Had you finished all effects label, please press "esc" to return to the earlier menu.
The storage is automatic.
1.1.3 Internal Patch
When the LCD Screen shows the message "Create New Fixture", press "ok", then
move the Fader 5 or press UP/DOWN buttons until [ INTERNAL PATCH] appears
in the Screen.
Press "ok", a warning message will appear in the Screen telling you not to
reuse a channel for two or more effects. Press "ok" again, the effect strings
previously created in menu 1.1.2 LCD Effect Label will reappear.
This function allows you to give an assignment of fixture channels according to
fixture profile. Move the respective faders 1-6 to select appropriate channel number
for the function effects in the Screen directly above these faders 1-6. Also you can
press Forward or Backward to pass from effect to effect, then use Up/Down button
to select the desired channel number for the underlined effect.
Press "ok" to go on with channel assignment if there is more than one page.
Had you finished all channels assignment, press "esc" to return to the earlier
menu. The storage is automatic.
INTERN AL LI BRAR Y CO NFI GU RATI ON
[ CREA TE NEW FI XTURE
Sel ec t ITEM
Select feature to configure for
FIXTURE NAME - [ INTERNAL PATCH ]
]
esc
ok
COLOR GOBOS G. ROT PRISM SHUTT DIMMR
[ -- ]
------
FOCUS SPEC
[ -- ]
--
10
------
------
------
------
P1
P2
Setup Menu
1.1.4 Pan/ Tilt Patch
When the LCD Screen shows the message "Create New Fixture", press "ok", then
move the Fader 5 or press UP/DOWN buttons until [ PAN/TILTL PATCH] appears
in the Screen.
Press "ok", a warning message will appear in the Screen telling you that every
Pan and Tilt channel should be solely reserved. Press "ok" again, a new window
will appear requesting you to assign the Pan(X) or Tilt(Y) movement of the fixture.
Most fixtures allow both 8- and 16-bit control, some only 8-bit. In 16-bit mode, the
Pan movement requires two channels, namely high(H) and low(L) position, so does
the Tilt movement. In 8-bit mode, just one channel is used for Pan or Tilt, so only
high position is set.
Move the respective faders 1-4 to select proper channel numbers for Pan coarse,
Pan fine, Tilt coarse and Tile fine movement of the fixture. Also you can press
Forward or Backward to activate an item, then use Up/Down button to select the
channel number for the item.
Had you finished all channels assignment, press"ok" or "esc" to return to the
earlier menu. The storage is automatic.
Caution! Please take note you must assign the Pan or Tilt movement of the fixture
correctly, otherwise you will not successfully create a new fixture.
INTERN AL LI BRAR Y CO NFI GU RATI ON
[ CREA TE NEW FI XTURE
Sel ec t ITEM
Se lec t fea tur e to con figu re for
FI XTURE NAME - [ PAN/ TI LT PATCH
X(PAN)
H[ -- ] L --
H --
Y(TILT)
L --
]
]
esc
ok
PAN/ TILT
OUTPUT
esc
ok
Se lec t fea tur e to con figu re for
FI XTURE NAME - [ PAN/ TI LT PATCH
]
esc
ok
11
Setup Menu
1.1.5 Hard/ Soft Cross
When the LCD Screen shows the message "Create New Fixture", press "ok", then
move the Fader 5 or press UP/DOWN buttons until [ HARD/SOFT CROSS]
appears in the Screen.
Press "ok", the effect strings previously created in menu 1.1.2 LCD Effect Label will
reappear. This function allows you to determine how a fixture channel will obtain its
desired setting. This may be "Hard", i.e. Taking place with no-fadetime, or "Soft", i.e.
Taking place with fadetime. Respectively move faders 1-6 to select "Hard" or "Soft"
for the function effects in the Screen directly above these faders 1-6. Also you can
press Forward or Backward to pass from effect to effect, then use Up/Down button
to select "Hard" or "Soft" for the underlined effect.
Press "ok" to go on if there is more than one page. Had you finished all settings,
press "esc" to return to the earlier menu. The storage is automatic.
INTERNAL LIBRARY CONFIGURATION
[ CREATE NEW FIXTURE
Select ITEM
Select feature to configure for
FIXTURE NAME - [ HARD/SOFT CROSS
]
]
esc
ok
COLOR GOBOS G. ROT PRISM SHUTT DIMMR
[HARD] HARD HARD HARD HARD HARD
FOCUS SPEC
[ -- ]
--
12
------
------
------
------
P1
P2
Setup Menu
1.1.6 Fixture Name
When the LCD Screen shows the message "Create New Fixture", press "ok", then
move the Fader 5 or press UP/DOWN buttons until [ FIXTURE NAME] appears
in the Screen.
Press "ok", a new window will appear indicating you to enter or modify the name
for the fixture. Press Forward or Backward button to move the underline to desired
position, then move Fader 4 or press Up/Down button to select the character for
the underlined position.
Had you finished your change of the fixture name, press "ok" to confirm it and return
to the earlier menu. If you want to give up, just press "esc" to return to the earlier
menu.
INTERNAL LIBRARY CONFIGURATION
[ CREATE NEW FIXTURE
Select ITEM
Select feature to configure for
FIXTURE NAME - [ FIXTURE NAME
]
Enter/ modify the name of the fix.:
FIXTURE NAME
Select feature to configure for
Ypoc 250
- [ FIXTURE NAME
]
esc
ok
esc
ok
]
esc
ok
13
Setup Menu
1.1.7 Reset/ Lamp Values
When the LCD Screen shows the message "Create New Fixture", press "ok", then
move the Fader 5 or press UP/DOWN buttons until [ RESET/ LAMP VALUES]
appears in the Screen.
Press "ok", a warning message will appear in the Screen telling you that Reset
or Lamp channel should not be identical to that of Pan, Tilt or Dimmer. Press "ok"
again, a new window will appear requesting you to assign the Reset, Lamp and
their on/off values. This function allows you to carry out Remote Reset and Remote
Lamp on/off if your fixture supports.
Respectively move faders 1-6 to set up Reset and Lamp as well as their on/off
values. Also you can press Forward or Backward to activate an item, then use
Up/Down button to select the settings.
Had you finished your settings, press "ok" to confirm it and return to the earlier menu.
If you want to give up, just press "esc" to return to the earlier menu.
Caution! Please take note you must correctly set up Reset and Lamp functions,
otherwise you will not successfully create a new fixture.
INTERNAL LIBRARY CONFIGURATION
[ CREATE NEW FIXTURE
Select ITEM
]
Select feature to configure for
esc
FIXTURE NAME - [ RESET/ LAMP VALUES ] ok
RESET
[ 12 ]
OFF
0
ON
255
LAMP OFF
---
ON
--
esc
ok
Select feature to configure for
esc
FIXTURE NAME - [ RESET/ LAMP VALUES ] ok
14
Setup Menu
1.1.8 Dip-Switch Configuration
When the LCD Screen shows the message "Create New Fixture", press "ok", then
move the Fader 5 or press UP/DOWN buttons until [ DIP-SWITCH CONFIG.]
appears in the Screen.
Press "ok", a new window will appear indicating you to make a configuration of
dip-switch if necessary. This function allows you to select the Dip-switch and
addressing system that your fixtures use. If your fixtures have new addressing
setup instead of Dip-switch setup, you can ignore this setup. Move fader 2 to
select the number of switches within 5-10, move fader 5 to select the addressing
system between "0" and "1" - the first denotes a pure binary system, whereas the
second refers to a system that will automatically add a 1 to the address.
Had you finished your settings, press "ok" to confirm it and return to the earlier menu.
If you want to give up, just press "esc" to return to the earlier menu.
INTERNAL LIBRARY CONFIGURATION
[ CREATE NEW FIXTURE
Select ITEM
]
Select feature to configure for
esc
FIXTURE NAME - [ DIP-SWITCH CONFIG. ] ok
ENTER THE DIP-SWITCH CONFIGURATION esc
n.dip = [ 10 ] 1st channel = 1 =
ok
Select feature to configure for
esc
FIXTURE NAME - [ DIP-SWITCH CONFIG. ] ok
15
Setup Menu
1.1.9 Control Type
When the LCD Screen shows the message "Create New Fixture", press "ok", then
move the Fader 5 or press UP/DOWN buttons until [ CONTROL TYPE] appears
in the Screen.
Press "ok", the effect strings previously created in menu 1.1.2 LCD Effect Label will
reappear. This function allows you to select the control type for lighting effects. It's
well known many fixtures have continuous color and gobo wheel rotation, which
enables operators to obtain interesting projection effects. However, it is more important
to be able to directly jump to a certain color or effect during programming.
The types of control available are Linear(LIN) and Tabset(TAB): the first allows you to
use programmed fader to adjust the fixture channel proportionally, the second allows
you to use Up/Down button to abruptly change the condition in accordance with the
pre-set tabset.
Move the repective faders 1-6 to select "LIN" or "TAB" for the function effects in the
Screen directly above these faders 1-6. Also you can press Forward or Backward to
pass from effect to effect, then use Up/Down button to select "LIN" or "TAB" for the
effect.
INTERNAL LIBRARY CONFIGURATION
[ CREATE NEW FIXTURE
Select ITEM
Select feature to configure for
FIXTURE NAME - [ CONTROL TYPE
16
]
]
esc
ok
COLOR GOBOS G. ROT PRISM SHUTT DIMMR
[ LIN ]
LIN
LIN
LIN
LIN
LIN
P1
COLOR GOBOS G. ROT PRISM SHUTT
[ TAB ]
LIN
LIN
LIN
LIN
P1
Setup Menu
As described in the above paragraph, "TAB" allows you to use Up/Down button
to jump to certain condition in accordance with the pre-set tabset. To establish a
tabset, please follow the below procedures:
a. Press the function button directly below the function effect in the LCD Screen,
a new window will appear:
PAGE_1
EFFECT_1
TOT.Pset
[ 1 ]
Pset
1
VALUE
0
esc
ok
Where "TOT.Pset" is the amount of tabulation values, "Pset" is the ordinal number
of tabulation values and "VALUE" is the assignation.
b. Move the Fader 3 to determine how many tabulation values you wish to use.
This value ranges from 1-50. Once the amount of tabulation values is decided,
move the Fader 5 to select the number for "Pset" and the Fader 6 to select the
value within 0-255 for "VALUE".
PAGE_1
EFFECT_1
TOT.Pset
[ 5 ]
Pset
1
VALUE
0
esc
ok
PAGE_1
EFFECT_1
TOT.Pset
[ 5 ]
Pset
2
VALUE
25
esc
ok
PAGE_1
EFFECT_1
TOT.Pset
[ 5 ]
Pset
3
VALUE
99
esc
ok
PAGE_1
EFFECT_1
TOT.Pset
[ 5 ]
Pset
4
VALUE
101
esc
ok
PAGE_1
EFFECT_1
TOT.Pset
[ 5 ]
Pset
5
VALUE
250
esc
ok
c. Repeat moving Fader 5 and Fader 6 until all tabulation values have been
assigned. Had you finished the whole tabulation, press "ok" to confirm it and
return to the earlier menu. If you want to give up, just press "esc" to return to
the earlier menu.
COLOR GOBOS G. ROT PRISM SHUTT
[ TAB ]
LIN
LIN
LIN
LIN
P1
17
Setup Menu
Press "ok" to go on with your setup with control type if there is more than one page.
Had you finished your settings, press "esc" to return to the earlier menu. The storage
is automatic.
1.1.10 Dimmer Patch
When the LCD Screen shows the message "Create New Fixture", press "ok", then
move the Fader 5 or press UP/DOWN buttons until [ DIMMER PATCH ] appears
in the Screen.
Press "ok", a warning message will appear in the Screen telling you that the Dimmer
channel should not be identical to that of Pan, Tilt, Reset or Lamp. Press "ok" again,
a new window will appear indicating you to assign the Dimmer channel.
Move the Fader 5 to select a value for the dimmer channel according your fixture profile.
Had you finished your settings, press "ok" to confirm it and return to the earlier menu.
If you want to give up, just press "esc" to return to the earlier menu.
INTERNAL LIBRARY CONFIGURATION
[ CREATE NEW FIXTURE
Select ITEM
Select feature to configure for
FIXTURE NAME - [ DIMMER PATCH
Enter dimmer channel
FIXTURE NAME -
esc
ok
esc
ok
[ 10 ]
Select feature to configure for
FIXTURE NAME - [ DIMMER PATCH
18
]
]
]
esc
ok
Setup Menu
1.2 Edit Existing Fixture
Press the Setup button to access Setup menu. Move the Fader 4 or press the
Up/Down buttons until the message[ Internal Library ] appears in the Screen.
Press "ok", a new window will appear. Move Fader 5 or press Up/Down button until
the message [ EDIT EXISTING FIXTURE ] appears in the Screen.
Press "ok", a new window will appear indicating you to select the fixture you wish to
edit. This menu allows you to modify the attributes of fixtures already in the library.
Move the Fader 4 or Up/Down button to select desired fixture from the library.
Once the fixture is selected, press "ok", a new window will appear indicating that
you can start to modify the attributes of this fixture.
Please refer to menu 1.1 and its submenus for instructions of configuration of fixture.
SELECT
CONFIGURATION & SETUP MENU
[ INTERNAL LIBRARY
esc
] ok
INTERNAL LIBRARY CONFIGURATION
[ EDIT EXISTING FIXTURE
Select ITEM
Select fixture to config. in libr.
[ Ypoc 250
]
Select feature to configure for
FIXTURE NAME - [ DIMMER PATCH
]
esc
ok
]
esc
ok
19
Setup Menu
1.3 Delete Fixture
Press the Setup button to access Setup menu. Move the Fader 4 or press the
Up/Down buttons until the message[ Internal Library ] appears in the Screen.
Press "ok", a new window will appear. Move Fader 5 or press Up/Down button until
the message [ DELETE FIXTURE ] appears in the Screen.
Press "ok", a new window will appear indicating you to select the fixture you wish to
delete. This menu allows you to delete unwanted fixtures from the library.
Move the Fader 4 or Up/Down button to select desired fixture. Once the fixture is
selected, press "ok", a warning message will appear asking whether you are sure
to delete this fixture.
Press "ok" (yes) to confirm this deletion. This fixture will be deleted from the library
successfully when it returns to the earlier menu. If the fixture is currently used in the
Patch, you won't delete this fixture and a prompt will appear in the Screen. You can
press "esc" to cancel this deletion and have a new try. Press F6 button directly below
"no" in the Screen to leave this menu without deleting this fixture.
SELECT
CONFIGURATION & SETUP MENU
[ INTERNAL LIBRARY
esc
] ok
INTERNAL LIBRARY CONFIGURATION
[ DELETE FIXTURE
]
Select ITEM
Select fixture to erase from libr.
[ Shark 150
]
Shark 150 - SELECTED!
Do you want to erase it?
esc
ok
quit
no yes
INTERNAL LIBRARY CONFIGURATION
[ DELETE FIXTURE
]
Select ITEM
20
Setup Menu
Helpful - About error messages
If there is any mistake or omission during internal library configuration, a prompt
will appear in the Screen:
C O N F I G U R AT I O N M I S H M A S H !
Do you want to exit or retry?
retry
exit
If you have changed the attributes of a existed fixture, when you leave this menu
A message like this will appear:
FIXTURE NAME - ALREADY EXIST!
Do you want to replace it?
quit
no yes
Press "ok" to confirm your modifications, "esc" to cancel your modification and retry
or "no" to abort this setup without modifying the attributes of the fixture and return
to the earlier menu.
The library can contain a maximum of 256 fixtures. When there are 256 fixture in the
library and you try to add a new one, a reminder message will appear:
ALL LIBRARY HAVE BEEN USED!
esc
ok
If you want to delete the fixture that has been patched, a reminder message will appear.
THIS FIXTURE IS CURRENTLY USED IN
PATCH!
esc
ok
When there is no fixture in the library and you try to delete a fixture , a reminder
message will appear.
NO FIXTURE!
esc
ok
21
Setup Menu
2. Patch
Press the Setup button to access Setup menu. Move the Fader 4 or press the
Up/Down buttons until the message [ PATCH ] appears in the Screen.
SELECT
CONFIGURATION & SETUP MENU
[ PATCH
]
esc
ok
Press "ok", a new window will appear indicating you to select "ON" or "OFF" for
"DMX CHANNEL AUTO PATCH". This menu allows you to select automatic
or manual patch. Move Fader 5 or press Up/Down button to select "ON" or "OFF",
namely automatic or manual patch.
When "ON" is selected(Automatic patch is active), up to 16 patched fixtures will be
automatically addressed within 1-479, DMX addresses 480-503(12 channel faders:
1-12/13-24) will be addressed to the Par-lights consecutively, and DMX addresses
504-511 will be automatically allocated to 4 strobes, consequently, DMX address
512 will be left for the Fog machine. When "OFF" is selected(Manual patch is active,
you can allocate DMX addresses at your discretion.
Had you changed the patch mode, press "ok", a new window will appear asking
for your conformation. If you are sure, press "ok"(yes) to confirm your selection and
access the settingl menu. Press "esc"(quit) to cancel it and retry. "no" will abort this
setting and return to the earlier menu.
DMX CHANNEL AUTO PATCH
SELECT
[ ON
]
D M X C H A N N E L A U T O PAT C H - O N
Do you want to change it?
esc
ok
quit
no yes
Press "ok" to access the settingl menu, a new window will appear indicating
you to select the unit type you wish to patch. Whether you are in Automatic or Manual
patch mode, there are four(4) unit types, namely the Fixture, Parcan, Strobe and
Fog Machine.
Move Fader 5 or press Up/Down button until desired unit appears in the Screen.
Please read the following paragraphs to learn more.
22
Setup Menu
2.1 Fixture Patch
Move the Fader 5 or press Up/Down buttons until the message [ FIXTURE
PATCH ] appears in the Screen.
Press "ok" to access the setting menu, a new window will appear. This menu allows
you to establish a patch of up to 16 fixtures. Move the Fader 1 to select fixture
number within 1-16, then move the Fader 2 to select your desired fixture from the
library for the selected number. Repeat this step until you've completed this patch.
Also you can use Forward/Backward button to pass from fixture number to type,
then press Up/Down button to select the number or type.
When you are in Automatic patch mode, all patched fixtures will be automatically
addressed within 1-479, thus you may save a great deal of pain. When you are in
Manual patch mode, please calculate the DMX channels carefully so that you can
establish a proper patch.
To remove a fixture from this patch, you just need to press the function button
directly below the Fader 5.
When you have finished this patch, you can press "ok" or "esc" to return to the
earlier menu. The storage is automatic.
Select
Fix.
[1]
DMX CHANNEL AUTO PATCH- ON
[ FIXTURE PATCH
TYPE
esc
ok
1 - - cod - - 10
DEL
Fix.
TYPE
1 [ Ypoc 250
Select
FROM
TO
]
]
FROM
TO
DEL
1
14
1 - - cod - - 10
DMX CHANNEL AUTO PATCH- ON
[ FIXTURE PATCH
]
esc
ok
23
Setup Menu
2.2 Parcan Patch
Move the Fader 5 or press Up/Down buttons until the message [ PAR PATCH ]
appears in the Screen. Press "ok" to access the setting menu, a new window will
appear. This menu allows you to address 24 Par-lights consecutively.
When you are in Automatic patch mode, DMX addresses 480-503, i.e. 12 channel
faders 1-12/13-24 will be automatically addressed to the Par-lights.
When you are in Manual patch mode, please calculate the DMX channels carefully
to address properly.
Move the Fader 2 or press Up/Down button to select the starting DMX address,
24 consecutive addresses will be automatically given. Press "ok" to confirm your
setting, either you can press "esc" to give up and return to the earlier menu.
Select
DMX CHANNEL AUTO PATCH- ON
[ PAR PATCH
]
esc
ok
PAR DMX CHANNEL
FROM [ 480 ] TO 503
esc
ok
2.3 Strobe Patch
Move the Fader 5 or press Up/Down buttons until the message [ STROBE PATCH ]
appears in the Screen. Press "ok" to access the setting menu, a new window will
appear. This menu allows you to address 4 Strobes with two(2) channels each.
When you are in Automatic patch mode, DMX addresses 504-511 will be automatically
addressed to the Strobes. When you are in Manual patch mode, please calculate the
DMX channels carefully to address properly.
Move the Fader 2 or press Up/Down button to select the starting DMX address, 4
strobes will be automatically addressed. Press "ok" to confirm your setting, either you
can press "esc" to give up and return to the earlier menu.
Select
DMX CHANNEL AUTO PATCH- ON
[ STROBE PATCH
STROBE DMX CHANNEL
FROM [ 504 ] TO 511
24
]
esc
ok
esc
ok
Setup Menu
2.4 Smoke Patch
Move the Fader 5 or press Up/Down buttons until the message [ SMOKE PATCH ]
appears in the Screen. Press "ok" to access the setting menu, a new window will
appear. This menu allows you to address the Fog Machine, i.e. Smoke..
When you are in Automatic patch mode, DMX address 512 will be automatically
addressed to the Smoke. When you are in Manual patch mode, please calculate the
DMX channels carefully to address properly.
Move the Fader 2 or press Up/Down button to select the proper DMX address for
the Smoke. Press "ok" to confirm your setting, either you can press "esc" to give up
and return to the earlier menu.
Select
DMX CHANNEL AUTO PATCH- ON
[ SMOKE PATCH
]
SMOKE DMX CHANNEL
FROM [ 512 ] TO 512
esc
ok
esc
ok
3. MIDI Channel
Press the Setup button to access Setup menu. Move the Fader 4 or press the
Up/Down buttons until the message [ MIDI CHANNEL ] appears in the Screen.
Press "ok" to access setting menu, a new window will appear indicating you to
select the MIDI channel in accordance with that of MIDI device or sequencer.
This function allows you to use a MIDI device or sequencer to operate this
console. Move Fader 4 or press Up/Down button to select a value within 1-16.
Press "ok" to confirm your setting or you can press "esc" to give up and return
to the earlier menu.
SELECT
CONFIGURATION & SETUP MENU
[ MIDI CHANNEL
MIDI CHANNEL
[ 16 ]
esc
] ok
esc
ok
25
Setup Menu
4. Strobe Type
Press the Setup button to access Setup menu. Move the Fader 4 or press the
Up/Down buttons until the message [ STROBE TYPE ] appears in the Screen.
Press "ok" to access setting menu, a new window will appear. This function
allows you to select the strobe between SPQ-2 and SP-1500/SP-750/SP-200H,
which you can control using this console. Move Fader 4 or press Up/Down button
to select desired strobe type. Press "ok" to confirm your setting or you can press
"esc" to give up and return to the earlier menu.
Attention! You may have to do some extra setup on your strobes to adapt to this
console. As for the SPQ-2, make sure that you switch Dip-switches 1 & 2 on and
the rests off. As for the other strobes, please be sure they are in DMX pack mode.
SELECT
CONFIGURATION & SETUP MENU
esc
[ STROBE TYPE
] ok
[
STROBE TYPE
SPQ-2
]
esc
ok
5. Gooseneck Dimmer
Press the Setup button to access Setup menu. Move the Fader 4 or press the
Up/Down buttons until [ GOOSENECK DIMMER ] appears in the Screen.
Press "ok" to access setting menu, a new window will appear. This function
allows you to adjust the light intensity for the DJ work light(sold separately).
Move Fader 4 or press Up/Down button to select a value within 0-16. "0" will
give zero intensity(fully off), and "16" will give 100% intensity(fully on).
Press "ok" to confirm your setting or you can press "esc" to give up and return
to the earlier menu.
SELECT
26
CONFIGURATION & SETUP MENU
[ GOOSENECK DIMMER ]
esc
ok
GOOSENECK DIMMER
[ 1 ]
esc
ok
Setup Menu
6. View Free Memory
Press the Setup button to access Setup menu. Move the Fader 4 or press the
Up/Down buttons until [ VIEW FREE MEMORY ] appears in the Screen.
Press "ok", a new window will appear telling you how many data files there are
and how much memory space is available for the fixture library.
Press "ok" or "esc" to return to the earlier menu.
SELECT
CONFIGURATION & SETUP MENU
esc
[ VIEW FREE MEMORY
] ok
FREE MEMORY: FIXTURE LIB: 122
SHOW: 48 CHASE: 48 SCENE: 48
esc
ok
7. Send Data File
Press the Setup button to access Setup menu. Move the Fader 4 or press the
Up/Down buttons until [ SEND DATA FILE ] appears in the Screen.
Press "ok" to access setting menu, a new window will appear indicating you to
select desired data file to make a backup in your PC. This function allow you to
make a backup of the Fixture Library, Memory or Setup in your PC via RS-232
port. Before you can start sending the data file, please make sure you've
established the communication between this console and your PC successfully
and window configuration has been completed properly.
Please read the following paragraphs to learn how to set up RS-232 connection
and window configuration.
Help - RS-232 connection and window Configuration
To connect to a PC, you will need a serial lap link cable available at any computer
store. A standard RS-232 cable will not work. Connect the RS-232 port on Light
Desk Pro to one of the Serial " com" ports on your PC.
27
Setup Menu
You will need a PC running Windows 95/ 98 or higher to connect to Light Desk Pro.
Windows comes with an accessory called Hyper Terminal that can communicate with
Light Desk Pro via one of the "COM" ports on your PC. Determine which of your "COM"
ports is available. COM 1 is generally used for the mouse so it is always advisable to
connect your Light Desk Pro to COM 2 on your PC.
You must first configure Hyper Terminal to work with Light Desk Pro. Start the Hyper
Terminal program by clicking on "Start" in Windows then "Programs" then "Accessories"
then "Hyper Terminal" then "Hypertrm". If for some reasons Hyper Terminal is not installed
on your version of Windows, install it from your Windows CD. Go to the control panel,
select Add/Remove Programs, select Windows Setup, and then select Communication.
Follow the instructions to complete the installation.
Once the Hyper Terminal Program is getting started, you will be asked to choose a name
and an icon. Name it Light Desk Pro then pick any icon then click OK. Go to the next
dialog box "Connect to" and choose "Direct to COM 2" . Ignore the telephone number
and other settings in this box then click OK. In the next dialog box, set bits per second
to 38400, data bits to 8, parity to none, stop bits to 1, flow control to none, then click OK.
You will access Hyper Terminal desktop. Click File menu in the upper left corner of the
desktop, then "Properties", then select the "settings" tab. From the settings tab click
"ASCII Setup". In the next dialog box, leave all settings deselect, then OK. Close Hyper
Terminal and you will be prompted to save this Hyper Terminal setup. Click YES to save
it then you will have a program labeled "Light Desk Pro.ht". You may want to make a
shortcut on your desktop if you plan to use your PC with Light Desk Pro often. From
this point on, whenever necessary, you can just click Light Desk Pro.ht icon to invoke
the Light Desk Pro Hyper Terminal configuration quickly.
Once configured, you can use Hyper Terminal to send the Light Desk Pro data file
and save it on your hard disk. Connect to your PC as described hereinbefore. Next
call the version of Hyper Terminal that you created for Light Desk Pro. Click on
"Transfer" on the top menu bar and select "Capture Text". A dialog box will appear
allowing you to select a folder and name for the data file you send. Use a name like
"Light Desk Prolib.txt". Be sure to give a new file name that is not available in this
folder, because the data sent from Light Desk Pro will not be overwritten the old
and instead be added to the existed file. Click "Start" and Hyper Terminal is now
ready to receive the file from Light Desk Pro.
28
Setup Menu
Go to the menu setting on Light Desk Pro, move the Fader 4 or press Up/Down
button until desired data name appears in the Screen. Press "ok" to start sending
the file, a waiting prompt message will appear in the Screen.
SELECT
CONFIGURATION & SETUP MENU
[ SEND DATA FILE
]
Send data file to PC port
Select
[ LIBRARY
Sending LIBRARY file to PC port
Please wait ......
LIBRARY SEND COMPLETED!
]
esc
ok
esc
ok
exit
esc
ok
It is always advisable not to discontinue the communication while you are sending
the file. When the transmission is over, a complete message will appear in the
Screen. Press "ok" or "esc" to return to the earlier menu.
After transmission, you can either close Hyper Terminal or return to the "capture
text" pull down menu and select "stop", the file will be automatically saved.
8. Load Data File
Press the Setup button to access Setup menu. Move the Fader 4 or press the
Up/Down buttons until [ LOAD DATA FILE ] appears in the Screen.
Press "ok" to access setting menu, a new window will appear indicating you to
select desired data file you wish to download from your PC. This function allow
you to download the new Library, Memory or Setup from your PC to overwrite
old Library, Memory or Setup stored in your console. Before you can start
29
Setup Menu
downloading the data file, please make sure you've established the communication
between this console and your PC successfully and Windows configuration has been
completed properly.
Please refer to menu 7 on page for instructions of RS-232 connection and Windows
configuration.
Call the version of Hyper Terminal that you previously created for Light Desk Pro.
Click on "Transfer" on the top menu bar and select "Send Text File". A dialog box
will appear allowing you to select the text file. Find the drive and folder, select the
file and click on "Open". Hyper Terminal will begin to transmit the file. When the
downloading is over, a receiving prompt message will appear in the Screen.
SELE CT
CONFIGURATION & SETUP MENU
esc
[ LO AD DATA FILE
] ok
Load data file to PC port
Select
[ LIBRARY
]
Loading LIBRARY file from PC port
Please wait ......
LIBRARY RECEIVE COMPLETED!
esc
ok
exit
esc
ok
Press "ok" or "esc" to return to the earlier menu. If there is something wrong , an error
message will appear. appear in the LCD. Check your connections and try again.
9. Update Software
Press the Setup button to access Setup menu. Move the Fader 4 or press the
Up/Down buttons until the message [ UPDATE SOFTWARE ]. appears in the Screen.
SELECT
30
CONFIGURATION & SETUP MENU
[ UPDATE SOFTWARE
esc
] ok
Setup Menu
Press "ok" to access setting menu, a waiting message will appear indicating that
this console is ready to receive the software.
Updating software
Please wait ......
exit
Turn to your PC and call the version of Hyper Terminal that you created for Light
Desk Pro. Click on "Transfer" on the top menu bar and select "Send Text File". A
dialog box will appear allowing you to select the text file we provide (We will provide
you the higher version software in Text type file). Find the drive and folder where
the file is located, select the file and click on "Open". Hyper Terminal will begin to
transmit the file. It will take you two minutes to complete this software updating.
If the software has been updated successfully, your Light Desk Pro will reboot
its system and get started with its procedures. If there is something wrong, an error
message will appear, please check the connection and try again.
10. Save to Card
Press the Setup button to access Setup menu. Move the Fader 4 or press the
Up/Down buttons until the message [ SAVE TO CARD ] appears in the Screen.
Please insert your Scandisk 32 MB Compact Flash card first before you can
access this menu. Press "ok", a new window will appear allowing you to select
and name the sector which will be used to format your CF card preliminarily.
Move Fader 3 to select the sector within 1-15, then use Forward button together
with Fader 5 to name this sector.
Press "ok" to access setting menu, A new window will appear indicating you to
select the file category you wish to make a backup.
This menu allows you to make a backup of the Library, Memory or Setup using CF
card. Move Fader 4 or press Up/Down button until wanted file category appears in
the Screen.
31
Setup Menu
Press "ok" to start backup, a waiting message will appear until this backup is complete.
Subsequently, a complete message will appear, you can press "ok" or "esc" to return
to the earlier menu. If the CF card is not inserted or improperly inserted, the message
"no card" will appear in the Screen.
SELECT
CONFIGURATION & SETUP MENU
esc
[ SAVE TO CARD
] ok
Select
SAVE TO CARD MENU
[ 1 ]
---------------------
esc
ok
Select
SAVE TO CARD MENU
[ 1 ]
FCC-2-Lib
esc
ok
Save data from Console to Card
Select
[ LIBRARY
]
esc
ok
Save LIBRARY from Console to Card
Please wait ......
SAVE LIBRARY COMPLETED!
esc
ok
NO CARD!
PLEASE INSERT CARD AND RETRY.
esc
ok
11. Load From Card
Press the Setup button to access Setup menu. Move the Fader 4 or press the
Up/Down buttons until [ LOAD FROM CARD ] appears in the Screen. Press "ok"
to read this CF card, a new window will appear allowing you to learn the message
of the sector and its name . Move Fader 3 to select the sector within 1-15.
Press "ok" to access setting menu, a new window will appear allowing you to select
the Library, Memory or Setup to restore your console. Move Fader 3 or press Up/
Down button to select the Library, Memory or Setup, press "ok" to start reading
this CF card.
32
Setup Menu
The old file will be overwritten by the new file from the CF card when you have
successfully read in this CF card.
Load data from Card to Console
Select
[ LIBRARY
]
esc
ok
Load LIBRARY from Card to Console
Please wait ......
LOAD LIBRARY COMPLETED!
esc
ok
If the CF card is not inserted or improperly inserted, the message "no card"
will appear in the Screen.
NO CARD!
PLEASE INSERT CARD AND RETRY.
esc
ok
The CF card, that you use to load the Library, Memory or Setup, should be
written by this console before. Otherwise, you won't read in this CF card
successfully, accordingly causing data read error.
CARD DATA ERROR! PLEASE INSERT ANOTHER
CARD AND RETRY.
esc
ok
Press "ok" or "esc" to return to the earlier menu when you have successfully read
in the CF card.
LOAD LIBRARY COMPLETED!
esc
ok
33
Record
This console allows you to record up to 48 shows, chases and scenes. This Section
details the procedures of recording the scene, chase and show. To access the Record
mode, just press the Record button causing its LED to blink briefly, a new window will
appear. To exit the Record mode, press the Record button causing its LED to go out,
or press "esc" until the Record LED goes out.
Select what you want to record
esc
ok
1. Record Shows
Press the Record button to cause its LED to blink briefly, a new window will appear,
telling you to select the show, chase or scene you wish to record.
Select what you want to record
esc
ok
Press the Show button to access the edit menu, its LED will be lit, and a new
window will appear, indicating you to select the show you wish to edit.
Select page and show number
esc
Select the show number using Flash 1-12 together with the Flash page button,
a new window will appear.
SHOW
01
STEPS
[ -- ]
esc
edit
Move the Fader 2 or press Up/Down button to select the number of the step within
1-48. Press ok ("edit") button to access setting menu. This menu has three(3)
options, namely Active Effects, Edit Steps and Step's Time. The following paragraphs
will detail these options respectively.
EDIT MENU
[ ACTIVE EFFECTS ]
34
esc
ok
Record
1.1 Active Effects
Move the Fader 4 or press UP/DOWN button until the message [ACTIVE EFFECTS]
appears in the Screen. Press "ok" to access this setting menu. This menu allows you
to determine which fixture(s) is used by the show, which channel(effect) is active
and which one is not.
EDIT MENU
[ ACTIVE EFFECTS ]
esc
ok
You will have to select fixture(s) first if no fixture has been selected for the show.
Press the Fixture 1-16 to select the fixture, the LED above the fixture number will
blink briefly and the fixture's effects will appear in the Screen.
SELECT FIXTURE
Select active fixtures/effects
You may select several fixtures at a time, however, only the latest one, whose LED
blinks, is active for the show. Meanwhile, a group of several fixtures can be active
for the show. Several fixtures with the same effects can make up a group. Press
and hold down the Fixture button, and in the meantime press the Fixture 1-16 to
select several similar fixtures to make a group following selecting the group number
by pressing the Fader 1-6 button. The group number is indicated by the lit LED
above the button, and the LEDs of the fixtures in the group will blink simultaneously.
Please take note of selecting the similar fixtures for one group, or a prompt message
will appear indicating you to have a try again.
Different fixture: no effect controls
Select active fixtures/effects
The fixture's effects will appear in the Screen once the fixture is selected. You can
press the Fader 1-6 directly below the effects in the Screen or Pan/Tilt button to
enable or disable these effects. The LEDs corresponding to these effects are lit
when these effects are enabled, whereas the LEDs are off when these effects are
disabled.
Press "ok" to continue your setting if there is more than one page of effects.
When you have finished these settings, please press "ok" or "esc" to return to
the earlier menu.
35
Record
IMPORTANT! This console complies with LTP (Latest Takes Priority) principle,
as a result, if a fixture is used by more than one show, the latest activated show will
surely become the first consideration.
1.2 Edit Steps
Move the Fader 4 or press UP/DOWN button until the message [EDIT STEPS]
appears in the Screen. Press "ok" to access this setting men, the fixture(s) you
selected for the show will be enabled and its effects will appear in the Screen.
This menu allows you to create or modify the steps which make up the show.
EDIT MENU
[ EDIT STEPS ]
esc
ok
COLOR GOBOS G.ROT PRISM SHUTT DIMMR
0
120
0
0
0
255
0
999
Move the Faders 1-6 and use the joystick to control the adjustment of the enabled
fixture(s). If this adjustment is satisfactory, press and hold down the Store button,
a message "Select destination step" will appear in the Screen.
Select destination step
In the meantime, press Flash 1-12 together with Flash page to select the step
number where you wish to store this step. Proceed in this way for each step required.
You can also directly access and call a step required to be edited. Press and hold
down the Step button, a message "Select step to edit" will appear in the Screen.
Select step to edit
36
Record
Meanwhile press Flash 1-12 together with page to select the step you
wish to edit. The step will be available immediately. Modify and store the step
in accordance with the editing procedure hereinbefore.
When the procedure is finished, press "esc" button to return to the setting menu.
1.3 Step's Time
Move the Fader 4 or press UP/DOWN button until the message [STEP'S TIME]
appears in the Screen. Press "ok" to access this setting men, a new window will
appear. This menu allows you to set the standing time and crossfade of each
step in a Show.
EDIT MENU
[ STEP'S TIME ]
SHOW
- 1 -
STEP
[ 2 ]
CROSS%
50
TIME
2S
esc
ok
ok
Move the Fader 2 to select the step number(STEP), then move the Fader 4 to
select the standing time of the step(TIME) within 0 second to one minute and 39.9
seconds(1M39.9S), in the end move the Fader 3 to select the crossfade
(CROSS%), i.e. percentage of the standing time, within 0-100%.
Proceed in this way for each step required.
It's possible to set several steps at a time with the same setup. Press and hold down
the Step button, meanwhile select several steps(indicated by the lit LEDs) using the
Flash 1-12 buttons together with page button. A message will appear in the
Screen.
SHOW
- 1 -
STEP
[ GR ]
CROSS%
TIME
***
******
ok
Set the values as the way described hereinbefore. Press "ok" to return to the
setting menu.
37
Record
When you have finished editing the show, press the Show or Record button to leave
the edit menu. A prompt message will appear in the Screen. You can also press "esc"
until the same message appears. Please remember to press the Enter button to store
your setting definitively when you leave the edit menu. If you want to leave this menu
without modifying this show, you can press the Fader 6 button below the "ESC".
Press the Esc button to re-enter this menu for another try.
quit
Show 01 will be update !
Press ENTER to store
< ESC >
2. Record Chases
This console allows you t o record up to 48 chases of conventional lights. Press the
Record button to cause its LED to blink briefly, a new window will appear, telling you
to select the show, chase or scene you wish to record.
Select what you want to record
esc
ok
Press the Chase button to access edit chase menu, its LED will be lit, and a new
window will appear, indicating you to select the chase you wish to edit.
Select page and chase number
esc
Select the chase number using Flash 1-12 together with the Flash page button,
a new window will appear, meanwhile the message "step 1" will appear in the
centered Segment Display.
CHASE
- 1 -
STEP
[ 5 ]
CROSS%
50
TIME
2S
esc
ok
This menu allows you to determine how many steps constitute this chase, set the
duration time(i.e. chase rate) and crossfade for the chase, and create or modify
the steps which make up the chase.
38
Record
Move the Fader 2 to select the value within 1-48 for the amount of step, then move
the Fader 5 to select the duration time(TIME) within 0 second to one minute and
39.9 seconds(1M39.9S), and move the Fader 4 to select the crossfade (CROSS%,
i.e. percentage of the duration time, within 0-100%.
Now we can start editing the step for the chase. The chase has a maximum of 48
steps, and each step consists of up to 24 channels. Use the Channel faders 1-12
together with the Channel bank button to create a desired lighting setup(scene),
then press the Store button to save the scene as the 1st step of the chase. The
Segment Display shows "step 2", indicating you are ready to edit the 2nd step.
Carry on the 2nd step and the rest steps until all steps are completed.
You can also directly access and call a step required to be edited. Press and hold
down the Step button, meanwhile press the Flash 1-12 together with the Page
to select the step that will be indicated by the Segment Display. Proceed in the way
stated in the above paragraph to edit and save the step.
Press "ok" to save the attributes - the amount of the steps, standing time,
crossfade, etc. and return to the earlier menu. Press "esc" to leave this menu
without changing these attributes.
Press the Record or Chase button causing Chase LED to go out, you will leave the
record chase menu.
3. Record Scenes
This console allows you t o record up to 48 scenes of conventional lights. Press the
Record button to cause its LED to blink briefly, a new window will appear, telling you
to select the show, chase or scene you wish to record.
Select what you want to record
esc
ok
Press the Scene button to access edit scene menu, its LED will be lit, and a new
window will appear, indicating you to select the scene you wish to edit.
Select page and scene number
esc
39
Record
Select the scene number using Flash 1-12 together with the Flash page button, a
new window will appear.
SCENE
- 1 -
[
TIME
3S ]
esc
ok
This menu allows you to create or modify a scene consisting of up to 24 channels,
and set the fade-time(TIME) for the scene. Use the Channel faders 1-12 together
with the Channel bank button to create a desired lighting setup, then press the
Store button to save it permanently as a scene.
On the other hand, move the Fader 2 or press Up/Down button to select the fade-time
within 0 to one minute and 39.9 seconds(1M39.9S). Press "ok" to save your new fadetime and return to the earlier menu, then you can start editing another scene or more.
Press "esc" to leave this menu without changing the fade-time of the scene.
Proceed in this way until all 48 scenes have been finished.
Press the Record or Scene button causing the Scene LED to go out, you will leave
the Record scene menu.
40
Playback
This section details the operations that can be performed when you have finished
recording the shows, chases and scenes.
The LCD Screen on the upper left is very useful during the playback of scenes,
chases or shows. There are the following messages available in the Screen:
Message display
Function Description
En01
To indicate you to start or suspend the playback
Ch01
To indicate you to scroll through all 48 shows,
chases and scenes
Go01 - Go48
To play the selected show, chase or scene
Pu01 - Pu48
To suspend the show, chase or scene being played
SH01 - SH48
Shows 1-48
CA01 - CA48
Chase 1-48
SC01 - SC48
Scene 1-48
The Choose buttons can be used to select "choose" or "enter" mode. If you select
"choose"mode, the message "Ch01" will appear in the bottom line of the Screen.
Press the Go or Pause button to scroll to the show/chase/scene you wish to play.
Once you have select the show/chase/scene, press the Choose button to select
"enter" mode until the message "En01" appears in the bottom line of the Screen.
Press the Go button to play the show/chase/scene, meanwhile you can press the
Audio button to synchronize them with audio beat. Press the Pause button to
suspend the playing, then repeatedly tapping of Pause button will play the show
or chase step by step.
During th playback, you can move the Preset faders 1-8 to control the dimming
level of the show/chase/scene. To call off the playing, press the Choose to return
to "enter" mode.
This console allows you to have 32 presets(shows/chases/scenes) allocated for
Preset pages 1-4, 8 presets per page. Such a layout of presets offers a great
convenience when you want to play several presets at a time. A maximum of 4
shows, 4 chases and 4 scenes can be played simultaneously.
Please take note that one show/chase/scene can not be played in two presets
or more.
41
Strobes Control
This console exclusively allocates 8 DMX channels for the control of the strobes.
There are 20 built-in programs you can select for the chase of up to 4 strobe lights.
The Menu button can be used to access the Program, Speed or Dimmer menu.
Press the Menu button until the message " Pr" appears in the Segment Display.
Use the UP/DOWN buttons to select programs 1-19 or autocycling-program.
Press the Menu button until the message " SP" appears in the Segment Display.
Use the UP/DOWN buttons to select the speed within 1-99 for the current program.
A value of 01 will give you the slowest speed and 99 will give the fastest speed.
Press the Menu button until the message " di" appears in the Segment Display.
Use the UP/DOWN buttons to select the intensity within 1-99 for the program.
A value 01 gives the lowest output and 99 gives full intensity.
The Full On button is used to bring the overall output to full intensity. This function is
enabled when the Full On button is pressed down, and disabled when set free.
Press the Stand By button to activate Stand By mode. Press again to deactivate
this function.
The Full on function takes priority of Stand by if both are active.
42
Manual Fixtures
In addition to 48 shows, this console also allows you to control the fixtures
manually whenever the Fixture LED is lit. Up to 16 patched fixtures are readily
on call, giving you a great flexibility to get to desired effects whether the fixtures
are being used by the shows or not.
When the Fixture LED is lit, press the Fixtures 1-16 button to select what you want
to control manually. The LED above the Fixture number will blink briefly if the
patched fixture is active for manual control, and the message of channel effects
patched for the fixture will appear in the LCD Screen located on the top right.
Move the Faders1-6 to manual control the effects displayed in the Screen.
Meanwhile the joystick can be used to control the two X(Pan) or Y(Tilt) movements
if the Pan or Tile is active(indicated by the lit LEDs).Press the "ok" button to scroll
to the next page if there is more than one page. The fader 1-6 buttons can be
used to call the tabulating values if you've set up the tabulations during the setup
of menu 1.1.9 Control Type.
COLOR GOBOS G.ROT PRISM SHUTT DIMMR
0
120
0
0
0
255
0
999
If the fixture is being used by a show, the rest channels not having handled by the
manual control will still be subject to the show. If you want to call off the manual
control over the fixture to restore the manually-affected channels, you can press
either of the Setup and Record button.
Group of fixtures is useful if there are several similar fixtures, which you want to
control at a time, in the patch. Press and hold down the Fixture button, the
message of 6 group code will appear in the Screen. Press the Faders 1-6 button
below the group code display to select a group, the LED will be lit to indicate the
group code. Press the Fixtures 1-16 button to select the fixtures, their LEDs will
blink simultaneously. If the fixtures use the same channel effects, these effect
string will appear in the Screen indicating this group has been established
successfully. If the fixtures' effects are different, a message "different fixture: no
effect control" will appear in the Screen.
Once you've created the groups of fixtures, you can call the group by pressing
the Faders 1-6 button while holding down the Fixture button.
43
Utility Facilities
Times
The Times button is used to set a multiplying factor for the playing speed of the
shows, chases or scenes. When the Fixture LED is lit and the message "SELECT
FIXTURE" appears in the Screen, press the TIMES button to access the times
menu, its LED will blink briefly and a new window will appear.
SELECT SHOW
*01*
SPEED%
[ 25 ]
esc
ok
This function allows you to multiply the playing speed within 25-400% for the shows,
chases or scenes. As a result, you can greatly enhance or attenuate the playing
speed of the presets.
Press the Show button, the shows being played will appear in the Screen. Press the
Faders 1-4 button or Forward/Backward button to select the show, which is indicated
by the marking "* *" . Move the Fader 5 or press Up/Down button to set the SPEED%
within 25-400%. After all, the ultimate playing speed complies with the limit of 1 minute
and 39.9 seconds(99.9 seconds).
Proceed in this way to continue the setup of speed% for the chases or scenes.
Additionally, the Flash 1-12 buttons can be used together with the Flash page button
to directly call a certain step of the active show or chase with the mark "* *".
Press the TIMES button again to leave this menu, its LED will go out.
44
Utility Facilities
Copy
When the Fixture LED is lit and the message "SELECT FIXTURE" appears in the
Screen, press the COPY button to access the copy menu, its LED will blink briefly
and a new window will appear.
COPY OBJECT FROM
Show
[1]
TO
2
esc
ok
This function allows you to make a copy between two shows, chases or scenes.
The Show, Chase or Scene button can be used to make a copy of the show,
chase or scene. Press the Show button, move the Fader 3 to select the source
show you wish to have a copy, then move the Fader 4 to select the target show
you wish to place this copy. After your selections, press "ok", a prompt message
will appear telling you the target show will be updated.
Show 02 will be updated!
Press ENTER to store
quit
<ESC>
Press the ENTER button to save and leave this menu. Press the Fader 6 button
<ESC> to leave this menu without having a copy. Press the "esc"(quit) button to
cancel this copy and have another try.
Every time you finish a copy successfully, it will automatically leave this menu.
Press the COPY button to have a new copy. Repeat the same procedure stated
in the above paragraph for every copy required.
45
Utility Controls
Reset
This function allows you to send the reset command to your fixtures. Press the Reset
button to access the reset menu, its LED will be lit and a new window will appear in
the Screen.
PUSH FIXTURE'S KEYS TO SEND RESET
esc
ok
Press the Fixtures 1-16 button for several seconds until the fixture starts resetting.
The time you keep pressing for depends on the fixture's performance. Please
remember you should have assigned the reset channel and its values of On/Off
first before you can carry out this function.
Lamp
This function allows you to switch on or off the fixture lamp. Press the Lamp button
to access the Lamp menu, its LED will be lit and a new window will appear.
SWITCH LAMPS BY HOLDING DOWN KEYS
esc
ok
All the lamps are set to "on" by default when this console is turned on. Press the
Fixtures 1-16 button for five(5) seconds, its LED will go out, accordingly the fixture
lamp will be switched off. To switch on the fixture lamp, you'll have to press the
Fixtures 1-16 button for five(5) seconds again until its LED is lit.
Please remember you should have assigned the lamp channel and its values of
On/Off first before you can carry out this function.
46
MIDI Implementation
MIDI Implementation
To activate MIDI operation, you must first select a MIDI channel identical to that of the
MIDI keyboard or sequencer.
The Light Desk Pro will send and receive MIDI program changes according to the
following table:
NOTE
FUNCTION
0-47(00H-2FH)
SHOW 01-48
48-95(30H-5FH)
CHASE 01-48
96-115(60H-73H)
SCENE 01-20
116-125(74H-7DH)
STROBE PROGRAM 01-10
126(7EH)
SMOKE
127(7FH)
BLACKOUT
47
APPENDIX A - FIXTURE LIBRARY
The following is the list of "built in" lighting fixtures in the Light
Desk Pro fixture library. Please refer to your fixtures' user manuals
for fixture profiles.
American
American
American
American
DJ Arcbeam 150
DJ Might y Scan
DJ Pocket Scan
DJ Star Tec H150
Elation Joy 150
Elation Joy 300
GLP Max 250
GLP Patend Light 1200 HMI
GLP Patend Light Basi c
GLP Star tec- 1200 I
GLP Ypoc 250
Coemar CF 1200 Hard Edge
Coemar CF 7 Wash Zoom
Coemar Ispot 150
Coemar Icyc 250
Coemar Ispot 575 DMX EB
Coemar Micro/ Mini Ultra Scan
Coemar MM 1200 DX
Coemar MM 1200 Zoom
Coemar NAT1200
Coemar PC 1000 and 1200
Coemar Prospot LX
Coemar Prowash LX
Coemar Sam urai
Coemar Super CYC
Abst ract Futurescan 2CE
Abst ract Futurescan 3CE
Abst ract Galact ic Moon 2CE
Mar tin Acr obat
Mar tin CX2
Mar tin CX4
Mar tin Dest royer
Mar tin Ext erior 200
Mar tin Ext erior 600
Mar tin Ext erior 600 Compact
Mar tin Mac 250 Mode 4
Mar tin Mac 300 Mode 4
Mar tin Mac 500 Mode 4
Mar tin Mac 600 Mode 4
Mar tin Mac 600 Nt Mode 4
Mar tin Mac 1200 Mode 4
Mar tin Minimac Profile
Mar tin Minimac Wash
Mar tin MX-1, MX-4
Mar tin PAL 1200 Mode 4
Mar tin PAL 1200 FX Mode 4
Mar tin QFX150
Mar tin Robocol or Pro 400
Mar tin Roboscan 812
Mar tin Roboscan Pro 918
Mar tin Wizard
Studi o Due City Beam
Studi o Due City Color
Studi o Due Giant / Giant Color
Studi o Due Mini City
Studi o Due Shar k 150
Studi o Due Stratos
Studi o Due Stratos CMY
To be continued, PTO.
48
APPENDIX A - FIXTURE LIBRARY
Clay Paky
Clay Paky
Clay Paky
Clay Paky
Clay Paky
Clay Paky
Clay Paky
Clay Paky
Clay Paky
Clay Paky
Clay Paky
High End
High End
High End
High End
High End
High End
High End
High End
High End
High End
High End
High End
Atomic 3000
Color 1000 DMX
Color 1200 DMX
Color 3000 DMX
Color 575 DMX
Cpcol or 150
Golden Color
Golden Scan
Golden Scan HPE
Golden Spot
Stage Scan DMX
Cyber light Mode 1
Cyber light Mode 2
Cyber light Mode 3
EC -1
EC -2
ES-1
Studi o Beam
Studi o Color 250
Studi o Color 575
Studi o Spot 250
Technobeam 18 Channel Mode
Technobeam -I(with iris)
Futurelight
Futurelight
Futurelight
Futurelight
Futurelight
Futurelight
Futurelight
Futurelight
Futurelight
MH-640
MH-660
MH-840
SC- 240
SC- 470
SC- 570
SC- 780
SC- 940
SC- 980
Elite Ser vo Color 250
Elite Ser vo Color 575
Elite Ser vo Spot 250
PSL Aut oscan plus
PSL Omniscan HQI 150
PSL Omni scan MSD 250
PSL Rotoscan
Varilite AR5
Varilite AR500
Varilite VL1
Varilite VL5
Varilite VL6
Varilite VLM
Work Blade 250
FAL Primoscan
FAL Super cleve rscan
SGM Colorlab 250
SGM Galileo 1200
SGM Galileo 2
SGM Galileo 2-250
SGM Galileo 3
SGM Galileo 4
SGM Giotto Spot 1200
SGM Giotto Spot 400
SGM Giotto Wash 1200
SGM Newton
SGM Victor y 250
SGM Victor y II 250
Sagi tter Infinity
Sagi tter Prince
49
Memos
Memos
Light Desk Pro User Manual
24-004-0974
Rev 2.0 May 2004
Light Desk Pro User Instruction