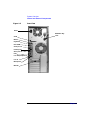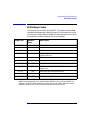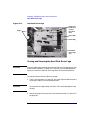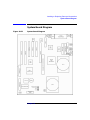
1
Technical Reference Manual
HP x4000 Workstation
E0601
Manufacturing Part Number: A6068-IE001
© Copyright 2001 Hewlett-Packard Company
Notice
The information contained in this document is subject to change without notice.
Hewlett-Packard makes no warranty of any kind with regard to this material,
including, but not limited to, the implied warranties of merchantability and fitness for
a particular purpose.
Hewlett-Packard shall not be liable for errors contained herein or for incidental or
consequential damages in connection with the furnishing, performance, or use of this
material.
Hewlett-Packard assumes no responsibility for the use or reliability of its software on
equipment that is not furnished by Hewlett-Packard.
This document contains proprietary information that is protected by copyright. All
rights are reserved. No part of this document may be photocopied, reproduced, or
translated to another language without the prior written consent of Hewlett-Packard
Company.
Adaptec® is a registered trademark of Adaptec, Inc.
Adobe and Acrobat are trademarks of Adobe Systems Incorporated.
NVIDIA™, GeForce2 GTS™ and Quattro2 MXR™ are registered trademarks or
trademarks of NVIDIA Corporation.
Matrox® is a registered trademark of Matrox Electronic Systems Ltd.
Microsoft®, Windows® and MS-DOS® are registered trademarks of the Microsoft
Corporation.
Windows NT® is a registered trademark of Microsoft Corporation.
Pentium® and AGPset™ are trademarks of Intel Corporation.
WOL™ (Wake on LAN) is a trademark of IBM.
2
Contents
1. System Overview
Overview . . . . . . . . . . . . . . . . . . . . . . . . . . . . . . . . . . . . . . . . . . . . . . . . . .12
HP x4000 Workstation Feature Set . . . . . . . . . . . . . . . . . . . . . . . . . . . . .13
Internal and External Components . . . . . . . . . . . . . . . . . . . . . . . . . . . . .18
HP x4000 Control Panel . . . . . . . . . . . . . . . . . . . . . . . . . . . . . . . . . . . . . .21
Internal Features. . . . . . . . . . . . . . . . . . . . . . . . . . . . . . . . . . . . . . . . . . . .23
Documentation. . . . . . . . . . . . . . . . . . . . . . . . . . . . . . . . . . . . . . . . . . . . . .24
HP Web Site Contents . . . . . . . . . . . . . . . . . . . . . . . . . . . . . . . . . . . . . .24
2. System Board
Overview . . . . . . . . . . . . . . . . . . . . . . . . . . . . . . . . . . . . . . . . . . . . . . . . . .26
System Board Component Layout . . . . . . . . . . . . . . . . . . . . . . . . . . . . . .27
System Board Switches . . . . . . . . . . . . . . . . . . . . . . . . . . . . . . . . . . . . .28
Architectural Diagram . . . . . . . . . . . . . . . . . . . . . . . . . . . . . . . . . . . . . .28
System Chipset . . . . . . . . . . . . . . . . . . . . . . . . . . . . . . . . . . . . . . . . . . . . .30
Memory Controller Hub (Intel 860). . . . . . . . . . . . . . . . . . . . . . . . . . . .30
PCI 64-bit Hub (Intel 82086) . . . . . . . . . . . . . . . . . . . . . . . . . . . . . . . . .30
Interface Controller Hub (Intel 82801BA) . . . . . . . . . . . . . . . . . . . . . .30
Super I/O Chip (National PC87366) . . . . . . . . . . . . . . . . . . . . . . . . . . .31
LAN Chip (Intel 82550) . . . . . . . . . . . . . . . . . . . . . . . . . . . . . . . . . . . . .31
SCSI Controller Chip (LSI SYM43C1010R) . . . . . . . . . . . . . . . . . . . . .32
Audio Chip (Analog Devices AD 1885) . . . . . . . . . . . . . . . . . . . . . . . . .33
Hardware Management Controller Chips. . . . . . . . . . . . . . . . . . . . . . .33
Clocks . . . . . . . . . . . . . . . . . . . . . . . . . . . . . . . . . . . . . . . . . . . . . . . . . . .34
Expansion Card Slots . . . . . . . . . . . . . . . . . . . . . . . . . . . . . . . . . . . . . . . .35
Peripheral Component Interconnect (PCI) Slots . . . . . . . . . . . . . . . . .35
Accelerated Graphics Port (AGP) Slot. . . . . . . . . . . . . . . . . . . . . . . . . .36
3
Contents
3. System Memory and Processors
Overview . . . . . . . . . . . . . . . . . . . . . . . . . . . . . . . . . . . . . . . . . . . . . . . . . . 38
System Memory . . . . . . . . . . . . . . . . . . . . . . . . . . . . . . . . . . . . . . . . . . . . 39
Rambus . . . . . . . . . . . . . . . . . . . . . . . . . . . . . . . . . . . . . . . . . . . . . . . . . 39
Eight-RIMM MEC. . . . . . . . . . . . . . . . . . . . . . . . . . . . . . . . . . . . . . . . . 39
Processor . . . . . . . . . . . . . . . . . . . . . . . . . . . . . . . . . . . . . . . . . . . . . . . . . . 41
4. System BIOS and Resources
Overview . . . . . . . . . . . . . . . . . . . . . . . . . . . . . . . . . . . . . . . . . . . . . . . . . . 44
System BIOS . . . . . . . . . . . . . . . . . . . . . . . . . . . . . . . . . . . . . . . . . . . . . .
BIOS Identification . . . . . . . . . . . . . . . . . . . . . . . . . . . . . . . . . . . . . . . .
Updating the System BIOS and Firmware . . . . . . . . . . . . . . . . . . . . .
Restoring BIOS Default Settings . . . . . . . . . . . . . . . . . . . . . . . . . . . . .
Clearing the CMOS. . . . . . . . . . . . . . . . . . . . . . . . . . . . . . . . . . . . . . . .
Recovering the BIOS from the Boot Block. . . . . . . . . . . . . . . . . . . . . .
45
45
46
46
46
47
HP Setup Program . . . . . . . . . . . . . . . . . . . . . . . . . . . . . . . . . . . . . . . . . .
Starting the HP Setup Program. . . . . . . . . . . . . . . . . . . . . . . . . . . . . .
Main Menu . . . . . . . . . . . . . . . . . . . . . . . . . . . . . . . . . . . . . . . . . . . . . .
Advanced Menu. . . . . . . . . . . . . . . . . . . . . . . . . . . . . . . . . . . . . . . . . . .
Security Menu . . . . . . . . . . . . . . . . . . . . . . . . . . . . . . . . . . . . . . . . . . . .
IPMI Menu . . . . . . . . . . . . . . . . . . . . . . . . . . . . . . . . . . . . . . . . . . . . . .
Power Menu. . . . . . . . . . . . . . . . . . . . . . . . . . . . . . . . . . . . . . . . . . . . . .
Boot Menu . . . . . . . . . . . . . . . . . . . . . . . . . . . . . . . . . . . . . . . . . . . . . . .
49
49
51
52
55
56
57
57
BIOS Beep Codes . . . . . . . . . . . . . . . . . . . . . . . . . . . . . . . . . . . . . . . . . . . 59
System Resources . . . . . . . . . . . . . . . . . . . . . . . . . . . . . . . . . . . . . . . . . . .
PCI IRQ Lines . . . . . . . . . . . . . . . . . . . . . . . . . . . . . . . . . . . . . . . . . . . .
IRQ Routing. . . . . . . . . . . . . . . . . . . . . . . . . . . . . . . . . . . . . . . . . . . . . .
Interrupt Controllers . . . . . . . . . . . . . . . . . . . . . . . . . . . . . . . . . . . . . .
System Memory Map . . . . . . . . . . . . . . . . . . . . . . . . . . . . . . . . . . . . . .
4
60
60
61
63
65
Contents
I/O Port Map (I/O Addresses Used by the System). . . . . . . . . . . . . . . .65
DMA Channel Controllers . . . . . . . . . . . . . . . . . . . . . . . . . . . . . . . . . . .67
5. Hardware Management (Monitoring and Reporting)
Overview . . . . . . . . . . . . . . . . . . . . . . . . . . . . . . . . . . . . . . . . . . . . . . . . . .70
General Firmware Information. . . . . . . . . . . . . . . . . . . . . . . . . . . . . . . . .71
Date/Time Initialization. . . . . . . . . . . . . . . . . . . . . . . . . . . . . . . . . . . . .71
SEEPROM Organization . . . . . . . . . . . . . . . . . . . . . . . . . . . . . . . . . . . .71
Hardware Monitoring . . . . . . . . . . . . . . . . . . . . . . . . . . . . . . . . . . . . . . . .72
Built-in Self Test (BIST) . . . . . . . . . . . . . . . . . . . . . . . . . . . . . . . . . . . .72
Sensor Scan. . . . . . . . . . . . . . . . . . . . . . . . . . . . . . . . . . . . . . . . . . . . . . .72
Fan Control . . . . . . . . . . . . . . . . . . . . . . . . . . . . . . . . . . . . . . . . . . . . . . .75
Sense Power State . . . . . . . . . . . . . . . . . . . . . . . . . . . . . . . . . . . . . . . . .75
Chassis Intrusion . . . . . . . . . . . . . . . . . . . . . . . . . . . . . . . . . . . . . . . . . .76
Pre-boot Device Test . . . . . . . . . . . . . . . . . . . . . . . . . . . . . . . . . . . . . . . .76
PCI/AGP Power . . . . . . . . . . . . . . . . . . . . . . . . . . . . . . . . . . . . . . . . . . .76
Reporting . . . . . . . . . . . . . . . . . . . . . . . . . . . . . . . . . . . . . . . . . . . . . . . . . .77
Event Logging. . . . . . . . . . . . . . . . . . . . . . . . . . . . . . . . . . . . . . . . . . . . .77
Sensor Report Using IPMI. . . . . . . . . . . . . . . . . . . . . . . . . . . . . . . . . . .77
System Event Log (SEL) . . . . . . . . . . . . . . . . . . . . . . . . . . . . . . . . . . . .77
Power Status LED . . . . . . . . . . . . . . . . . . . . . . . . . . . . . . . . . . . . . . . . .77
Diag LEDs. . . . . . . . . . . . . . . . . . . . . . . . . . . . . . . . . . . . . . . . . . . . . . . .78
Firmware Failure Handling . . . . . . . . . . . . . . . . . . . . . . . . . . . . . . . . . .78
BIOS is Running OK . . . . . . . . . . . . . . . . . . . . . . . . . . . . . . . . . . . . . . .78
IPMI Platform Event Trap. . . . . . . . . . . . . . . . . . . . . . . . . . . . . . . . . . .78
Security . . . . . . . . . . . . . . . . . . . . . . . . . . . . . . . . . . . . . . . . . . . . . . . . . . .79
Lock Status Panel. . . . . . . . . . . . . . . . . . . . . . . . . . . . . . . . . . . . . . . . . .79
BIOS Configuration Tokens . . . . . . . . . . . . . . . . . . . . . . . . . . . . . . . . . .79
6. Power Specifications
5
Contents
Power Delivery . . . . . . . . . . . . . . . . . . . . . . . . . . . . . . . . . . . . . . . . . . . . . 82
Power Supply . . . . . . . . . . . . . . . . . . . . . . . . . . . . . . . . . . . . . . . . . . . . . .
Power Supply Specifications. . . . . . . . . . . . . . . . . . . . . . . . . . . . . . . . .
Resetting the Power Supply . . . . . . . . . . . . . . . . . . . . . . . . . . . . . . . . .
Power Consumption and Cooling . . . . . . . . . . . . . . . . . . . . . . . . . . . . .
86
87
88
88
Power Saving and Ergonometry . . . . . . . . . . . . . . . . . . . . . . . . . . . . . . . 89
Using Power Management . . . . . . . . . . . . . . . . . . . . . . . . . . . . . . . . . . 89
Power Saving Modes and Resume Events . . . . . . . . . . . . . . . . . . . . . . 90
7. Connector Pin-Outs
Expansion Slots . . . . . . . . . . . . . . . . . . . . . . . . . . . . . . . . . . . . . . . . . . . . 94
Peripheral Component Interconnect (PCI) Slots. . . . . . . . . . . . . . . . . 94
Accelerated Graphics Port (AGP) Slot . . . . . . . . . . . . . . . . . . . . . . . . 102
System Board Connectors . . . . . . . . . . . . . . . . . . . . . . . . . . . . . . . . . . .
Floppy Disk Drive Connector . . . . . . . . . . . . . . . . . . . . . . . . . . . . . . .
IDE/ATA 100 Connectors . . . . . . . . . . . . . . . . . . . . . . . . . . . . . . . . . .
SCSI Connectors . . . . . . . . . . . . . . . . . . . . . . . . . . . . . . . . . . . . . . . . .
Parallel Port Connector. . . . . . . . . . . . . . . . . . . . . . . . . . . . . . . . . . . .
Serial Port Connectors . . . . . . . . . . . . . . . . . . . . . . . . . . . . . . . . . . . .
Keyboard and Mouse Connector . . . . . . . . . . . . . . . . . . . . . . . . . . . .
Universal Serial Bus Connectors . . . . . . . . . . . . . . . . . . . . . . . . . . . .
Front Panel Connector . . . . . . . . . . . . . . . . . . . . . . . . . . . . . . . . . . . .
ATX Power Connector . . . . . . . . . . . . . . . . . . . . . . . . . . . . . . . . . . . . .
LAN Connector . . . . . . . . . . . . . . . . . . . . . . . . . . . . . . . . . . . . . . . . . .
Audio Connector . . . . . . . . . . . . . . . . . . . . . . . . . . . . . . . . . . . . . . . . .
CD Audio In Connector. . . . . . . . . . . . . . . . . . . . . . . . . . . . . . . . . . . .
Microphone Connector . . . . . . . . . . . . . . . . . . . . . . . . . . . . . . . . . . . .
System Speaker Connector. . . . . . . . . . . . . . . . . . . . . . . . . . . . . . . . .
Processor Fan Connectors. . . . . . . . . . . . . . . . . . . . . . . . . . . . . . . . . .
Chassis Fan Connectors . . . . . . . . . . . . . . . . . . . . . . . . . . . . . . . . . . .
6
105
106
107
109
111
112
113
113
114
115
116
116
117
117
118
118
118
Contents
Chassis Intrusion Connector . . . . . . . . . . . . . . . . . . . . . . . . . . . . . . . .119
8. Mechanical Specifications
System Fans and Air Flow . . . . . . . . . . . . . . . . . . . . . . . . . . . . . . . . . . .122
Physical Specifications . . . . . . . . . . . . . . . . . . . . . . . . . . . . . . . . . . . . . .123
Environmental Specifications . . . . . . . . . . . . . . . . . . . . . . . . . . . . . . . . .124
9. Hardware Components
Overview . . . . . . . . . . . . . . . . . . . . . . . . . . . . . . . . . . . . . . . . . . . . . . . . .126
Graphics Cards . . . . . . . . . . . . . . . . . . . . . . . . . . . . . . . . . . . . . . . . . . . .127
Matrox Millennium G450 Graphics Card . . . . . . . . . . . . . . . . . . . . . .127
nVIDIA Quadro2 MXR . . . . . . . . . . . . . . . . . . . . . . . . . . . . . . . . . . . .131
nVIDIA Quadro2 Pro . . . . . . . . . . . . . . . . . . . . . . . . . . . . . . . . . . . . . .132
Fire GL2 and Fire GL4. . . . . . . . . . . . . . . . . . . . . . . . . . . . . . . . . . . . .133
Mass Storage Devices . . . . . . . . . . . . . . . . . . . . . . . . . . . . . . . . . . . . . . .136
Flexible Disk Drives . . . . . . . . . . . . . . . . . . . . . . . . . . . . . . . . . . . . . . .136
Hard Disk Drives . . . . . . . . . . . . . . . . . . . . . . . . . . . . . . . . . . . . . . . . .136
Optical Drives . . . . . . . . . . . . . . . . . . . . . . . . . . . . . . . . . . . . . . . . . . . .140
Rear Panel Connectors . . . . . . . . . . . . . . . . . . . . . . . . . . . . . . . . . . . . . .144
10. Installing or Replacing Parts and Accessories
Overview . . . . . . . . . . . . . . . . . . . . . . . . . . . . . . . . . . . . . . . . . . . . . . . . .146
Cover and Front Bezel. . . . . . . . . . . . . . . . . . . . . . . . . . . . . . . . . . . . . . .147
Removing the Left Side Cover . . . . . . . . . . . . . . . . . . . . . . . . . . . . . . .147
Removing the Front Bezel . . . . . . . . . . . . . . . . . . . . . . . . . . . . . . . . . .149
Replacing the Cover and Front Bezel . . . . . . . . . . . . . . . . . . . . . . . . .150
Hard Disk Drive Cage . . . . . . . . . . . . . . . . . . . . . . . . . . . . . . . . . . . . . . .151
Opening the Hard Disk Drive Cage . . . . . . . . . . . . . . . . . . . . . . . . . .151
7
Contents
Closing and Securing the Hard Disk Drive Cage . . . . . . . . . . . . . . . 152
Chassis Beam Assembly . . . . . . . . . . . . . . . . . . . . . . . . . . . . . . . . . . . . 154
Removing the Chassis Beam Assembly . . . . . . . . . . . . . . . . . . . . . . . 154
Installing the Chassis Beam Assembly . . . . . . . . . . . . . . . . . . . . . . . 155
Memory Expander Card (MEC). . . . . . . . . . . . . . . . . . . . . . . . . . . . . . . 157
Removing the MEC . . . . . . . . . . . . . . . . . . . . . . . . . . . . . . . . . . . . . . . 157
Installing the MEC . . . . . . . . . . . . . . . . . . . . . . . . . . . . . . . . . . . . . . . 158
System Memory . . . . . . . . . . . . . . . . . . . . . . . . . . . . . . . . . . . . . . . . . . . 159
Upgrading Memory on the 8-RIMM MEC . . . . . . . . . . . . . . . . . . . . . 159
Installing Memory. . . . . . . . . . . . . . . . . . . . . . . . . . . . . . . . . . . . . . . . 161
Graphics Card. . . . . . . . . . . . . . . . . . . . . . . . . . . . . . . . . . . . . . . . . . . . . 164
Removing a Graphics Card. . . . . . . . . . . . . . . . . . . . . . . . . . . . . . . . . 164
Installing a Graphics Card . . . . . . . . . . . . . . . . . . . . . . . . . . . . . . . . . 165
SCSI Hard Drive . . . . . . . . . . . . . . . . . . . . . . . . . . . . . . . . . . . . . . . . . .
Removing a SCSI Hard Disk Drive . . . . . . . . . . . . . . . . . . . . . . . . . .
Setting SCSI IDs for a New Hard Disk Drive . . . . . . . . . . . . . . . . . .
Installing a SCSI Hard Disk Drive . . . . . . . . . . . . . . . . . . . . . . . . . .
169
170
171
172
CD-ROM, CD-RW or DVD . . . . . . . . . . . . . . . . . . . . . . . . . . . . . . . . . . .
Determining IDE Connections . . . . . . . . . . . . . . . . . . . . . . . . . . . . . .
Removing a CD-ROM, CD-RW, or DVD. . . . . . . . . . . . . . . . . . . . . . .
Installing a CD-ROM, CD-RW or DVD . . . . . . . . . . . . . . . . . . . . . . .
Load the Software Applications for Your CD-RW . . . . . . . . . . . . . . .
173
174
174
175
176
Processor . . . . . . . . . . . . . . . . . . . . . . . . . . . . . . . . . . . . . . . . . . . . . . . . .
Removing a Processor . . . . . . . . . . . . . . . . . . . . . . . . . . . . . . . . . . . . .
Installing a Processor . . . . . . . . . . . . . . . . . . . . . . . . . . . . . . . . . . . . .
Updating Your Operating System . . . . . . . . . . . . . . . . . . . . . . . . . . .
177
177
179
181
Floppy Disk Drive . . . . . . . . . . . . . . . . . . . . . . . . . . . . . . . . . . . . . . . . . 182
Removing the Floppy Disk Drive . . . . . . . . . . . . . . . . . . . . . . . . . . . . 182
Installing the Floppy Disk Drive . . . . . . . . . . . . . . . . . . . . . . . . . . . . 183
8
Contents
Power Supply . . . . . . . . . . . . . . . . . . . . . . . . . . . . . . . . . . . . . . . . . . . . . .184
Removing the Power Supply Unit . . . . . . . . . . . . . . . . . . . . . . . . . . . .184
Installing the Power Supply Unit . . . . . . . . . . . . . . . . . . . . . . . . . . . .185
System Board . . . . . . . . . . . . . . . . . . . . . . . . . . . . . . . . . . . . . . . . . . . . .186
Removing the System Board . . . . . . . . . . . . . . . . . . . . . . . . . . . . . . . .186
Installing the New System Board . . . . . . . . . . . . . . . . . . . . . . . . . . . .188
System Board Switches . . . . . . . . . . . . . . . . . . . . . . . . . . . . . . . . . . . . . .191
System Fan. . . . . . . . . . . . . . . . . . . . . . . . . . . . . . . . . . . . . . . . . . . . . . . .192
Removing the System Fan . . . . . . . . . . . . . . . . . . . . . . . . . . . . . . . . . .192
Installing the System Fan . . . . . . . . . . . . . . . . . . . . . . . . . . . . . . . . . .193
Fan and Speaker Assembly . . . . . . . . . . . . . . . . . . . . . . . . . . . . . . . . . . .194
Removing the Fan and Speaker Assembly . . . . . . . . . . . . . . . . . . . . .194
Installing the Fan and Speaker Assembly . . . . . . . . . . . . . . . . . . . . .195
Hard Disk Drive Fan . . . . . . . . . . . . . . . . . . . . . . . . . . . . . . . . . . . . . . . .197
Removing the Hard Disk Drive Fan . . . . . . . . . . . . . . . . . . . . . . . . . .197
Installing the Hard Disk Drive Fan . . . . . . . . . . . . . . . . . . . . . . . . . .198
Battery . . . . . . . . . . . . . . . . . . . . . . . . . . . . . . . . . . . . . . . . . . . . . . . . . . .199
Replacing the System Battery . . . . . . . . . . . . . . . . . . . . . . . . . . . . . . .199
System Board Diagram . . . . . . . . . . . . . . . . . . . . . . . . . . . . . . . . . . . . . .201
11. Troubleshooting
Overview . . . . . . . . . . . . . . . . . . . . . . . . . . . . . . . . . . . . . . . . . . . . . . . . .204
Solving Hardware Problems . . . . . . . . . . . . . . . . . . . . . . . . . . . . . . . . . .205
Workstation Does Not Start Properly . . . . . . . . . . . . . . . . . . . . . . . . .205
Keyboard Doesn’t Work . . . . . . . . . . . . . . . . . . . . . . . . . . . . . . . . . . . .206
Monitor Doesn’t Work . . . . . . . . . . . . . . . . . . . . . . . . . . . . . . . . . . . . .206
Mouse Doesn’t Work . . . . . . . . . . . . . . . . . . . . . . . . . . . . . . . . . . . . . . .207
Audio Doesn’t Work . . . . . . . . . . . . . . . . . . . . . . . . . . . . . . . . . . . . . . .207
9
Contents
Power LED is Flashing . . . . . . . . . . . . . . . . . . . . . . . . . . . . . . . . . . . .
Hard Disk Drive Problems . . . . . . . . . . . . . . . . . . . . . . . . . . . . . . . . .
Hard Disk Drive Activity LED Doesn’t Work . . . . . . . . . . . . . . . . . .
CD-ROM, DVD or CD-RW Drive Doesn’t Work. . . . . . . . . . . . . . . . .
CD-RW Won’t Allow Recording . . . . . . . . . . . . . . . . . . . . . . . . . . . . .
DVD Drive Doesn’t Play DVD Video . . . . . . . . . . . . . . . . . . . . . . . . .
You Forgot Your Password . . . . . . . . . . . . . . . . . . . . . . . . . . . . . . . . .
207
208
209
209
209
210
210
Understanding the Diag LEDs . . . . . . . . . . . . . . . . . . . . . . . . . . . . . . . 212
Setting and Removing System Passwords . . . . . . . . . . . . . . . . . . . . . . 224
Setting Passwords . . . . . . . . . . . . . . . . . . . . . . . . . . . . . . . . . . . . . . . . 224
Removing Passwords. . . . . . . . . . . . . . . . . . . . . . . . . . . . . . . . . . . . . . 224
Using e-Diag Tools for Hardware Problems . . . . . . . . . . . . . . . . . . . . . 225
Starting e-Diag Tools from the Hard Drive’s Utility Partition
(Recommended Method)225
Starting e-Diag Tools from the HP Workstation Recovery CD-ROM 226
Recovering or Reconfiguring Windows 2000 or Windows NT . . . . . . . 227
Preparing to Recover Windows NT or Windows 2000. . . . . . . . . . . . 228
Performing a Full Recovery of Windows NT or Windows 2000 . . . . 229
12. Contacting Support
Online Support for Troubleshooting . . . . . . . . . . . . . . . . . . . . . . . . . . . 232
Documentation Set Overview . . . . . . . . . . . . . . . . . . . . . . . . . . . . . . . . 233
Hewlett-Packard Support and Information Services . . . . . . . . . . . . . . 234
Collecting Information Before Contacting HP Support . . . . . . . . . . 234
HP Customer Care Center Phone Numbers . . . . . . . . . . . . . . . . . . . . . 237
10
1
System Overview
Chapter 1
11
System Overview
Overview
Overview
This manual provides detailed system specifications for the HP x4000
Workstation.
This chapter:
• Introduces the system’s internal and external features
• Lists the system’s specifications and characteristic data
• Provides a summary of the available documentation
12
Chapter 1
System Overview
HP x4000 Workstation Feature Set
HP x4000 Workstation Feature Set
The following table provides an overview of the x4000 Workstation
feature set.
Feature
Description
System Board
• Eight-layer extended ATX form-factor
• Single-sided
• Four power/ground layers
• Four signal layers
Processor(s)
Intel dp Xeon processors:
• 1.5 GHz, 1.7 GHz, or higher with a quad-pumped 100MHz
Front side bus
• Netburst Microarchitecture with 20-stage instruction pipeline
Chipset
Intel 860 chipset, including:
• Memory Controller Hub (MCH)
• Interface Controller Hub (ICH2)
• PCI 64-bit Hublink (P64H)
Memory Controller
Hub (MCH)
Provides the interface between the front side bus, memory, AGP,
hublink A, and hublink B. It supports:
• One or two Intel Xeon processor(s)
• Dual Rambus channels capable of supporting PC800 RIMMs
• AGP Pro 110 4X graphics with 1.5 V signaling
• 8-bit, 133 MB/s hublink A to ICH2, which bridges to the 33
MHz PCI bus
• 16-bit, 266 MB/s hublink B to P64H, which bridges to the 66
MHz PCI bus
Chapter 1
13
System Overview
HP x4000 Workstation Feature Set
Feature
Description
Rambus Memory on
Memory Expander
Card (MEC)
Plugs into the system board and supports:
• 400 MHz operation delivering up to 3.2 GB/s memory
bandwidth using two expansion channels operating in lock step
• Up to 8 PC800 RIMMs (see “Upgrading Memory on the
8-RIMM MEC” on page 159 for memory loading instructions)
P64H Hub to 64-bit
PCI module
Supports 64-bit, 66 MHz PCI bus containing:
• Two 64-bit, Two PCI connectors 66 MHz PCI connectors
• On-board SCSI controller
Interface Controller
Hub
ICH2 Hublink to I/O controller modules supports:
• Three 32-bit, 33 MHz PCI connectors
• Two external USB ports
• Two ATA 100 IDE controllers
• One firmware hub interface
• One AC97 audio interface
BIOS
Based on Phoenix core, including 4 MB flash.
Accessory Card Slots
• One AGP Pro 110 4X connector
• Three 5V, 33 MHz, 32-bit Peripheral Component Interconnect
(PCI) connectors
• Two 3.3V, 66 MHz, 64-bit PCI connectors
LAN Port
The Intel 82550 10/100BaseT LAN port interfaces to the system
via the 33 MHz, 32-bit PCI bus. Wake on LAN is supported.
On-board SCSI
Controller Chip
The LSI SYM43C1010R has two Ultra 160 SCSI controllers to
support two internal wide connectors:
• Ribbon cable up to SCSI drives
• Ribbon cable to external SCSI connector
14
Chapter 1
System Overview
HP x4000 Workstation Feature Set
Feature
Description
Super I/O Chip
The Nation PC87366 chip supports:
• Two 9-pin, RS-232 serial ports
• One ECP/EPP parallel port
• One IDE floppy controller
• PS2 Keyboard
• PS2 Mouse
IDE/ATA Controllers
Primary and secondary IDE controllers upport DMA transfers for
up to four devices.
Hardware
Management
Controller
Qlogic Zircon Lite micro-controller with Winbond W83782D
auxiliary chip
• Monitors systems components via the SMBUS.
• Reports errors to the Diag LED lights on the control panel.
Operating System
All models come preloaded with Windows 2000 Professional, and
include Windows 2000 and NT 4.0 recovery and installation
CD-ROMs.
Mass Storage
Seven bays, supporting:
• Two front-access, 3 .5inch, 1 inch floppy drive bays (one factory
installed drive)
• Three front-access, 5.25 -inch half-height drive bays (up to 2
factory installed optical drives, not for use with hard disk
drives)
• Two internal 3.5-inch, 1-inch height hard disk drive bays (up to
2 factory installed drives).
Optical Drives
Models include one or two of the following:
• IDE 48X CD-ROM
• 12X CD-RW
• 12X DVD
Chapter 1
15
System Overview
HP x4000 Workstation Feature Set
Feature
Description
Audio
On-board audio is provided by an Analog Devices AD1885 CODEC
(AC97) and supports three rear panel jacks for:
• Headphone/Line out (output) on the rear panel
• Line-in (input) on the rear panel
• Microphone (input) on the rear panel
• CDROM (input) on the system board
• Internal speaker (output) on the system board
System Board
Connectors (Internal)
16
•
•
•
•
•
•
•
•
•
•
•
•
•
CD audio in
System speaker
Front panel
2 CPU fans
3 Chassis fans
Chassis intrusion
IDE floppy controller
2 IDE controllers (primary and secondary)
2 ATX Power
AGP Pro 110 4X (graphics)
3 PCI 32-bit
2 PCI 64-bit
2 SCSI (both are internal wide connectors on the system board,
but one has a ribbon cable attached to an external SCSI
connector on the rear panel)
Chapter 1
System Overview
HP x4000 Workstation Feature Set
Feature
Description
Rear Panel
Connectors
(External)
• SCSI Ultra Wide
• PS2 Mouse
• PS2 Keyboard
• 25-pin parallel
• 9-pin serial (two, buffered)
• Dual USB connectors
• LAN
• Audio:
— Input Line jack (3.5 mm)
— Output Line jack (3.5 mm)
— Microphone jack (3.5 mm)
Chapter 1
17
System Overview
Internal and External Components
Internal and External Components
Figure 1-1, Figure 1-2, and Figure 1-3 and show the front, side, and rear
views of the HP x4000 Workstation.
Figure 1-1
Front View
Front access bays:
- three 5 1/4-inch drive bays
(used for optical drives)
- two 3 1/2-inch bays,
including a 1.44MB floppy
disk drive
Control Panel
18
Chapter 1
System Overview
Internal and External Components
Figure 1-2
Side View with Cover Removed
Power Supply
Spare mounting
rails:
- Narrow green
rails for 5.25-inch
Rear Chassis
Fan
- Wide black rails
for 3.5-inch
Chassis Beam
Assembly
Hard Disk Drive
Cage (holds two
hard disk
drives)
Chapter 1
19
System Overview
Internal and External Components
Figure 1-3
Rear View
Power
HP Master Key
Lock
SCSI
Mouse
Keyboard
Dual USB
Serial port A
Parallel port
Serial port B
LAN
Line Out(headphone)
Line In
Microphone
Monitor
20
Chapter 1
System Overview
HP x4000 Control Panel
HP x4000 Control Panel
The Workstation’s control panel shown in Figure 1-4 has the following
features:
• Power On/Off button: Press to start the Workstation. You can wake
the Workstation from Hibernate or Stand By mode by pressing this
button for less than four seconds. For more information about these
modes, see “Using Power Management” on page 89.
CAUTION
Always power off through the operating system. Do not power off
using the power button or reset button except during extreme
circumstances when the system will not shut down through the
operating system. Using the power button or reset button to power
down may cause you to lose unsaved data from open applications.
In the event that the operating system has hung and will not shut
down, pressing the power button for five seconds is equivalent to
pulling the power plug.
• Power LED:
— Solid green indicates system on.
— Solid yellow indicates the Workstation is in Stand By or Hibernate
mode. See “Power Saving and Ergonometry” on page 89.
— Flashing yellow, flashing red, or solid red indicates a system error.
See “Understanding the Diag LEDs” on page 212.
• Reset button: Press to reinitialize all the hardware without cycling
power to the system. Avoid general use of this button because file
damage may occur.
• Hard Disk Activity LED: Flickers when your hard disk is being
accessed.
• Network Activity LED: Flickers when network activity is taking place
This occurs even when the Workstation is in a power-off state,
provided Wake-on-LAN is not enabled and both the network and
power cables are plugged in.
Chapter 1
21
System Overview
HP x4000 Control Panel
• Diag LEDs: These four LEDs can be off, green, yellow, or red. The
color pattern lets you diagnose problems with your Workstation. For
more information, see “Understanding the Diag LEDs” on page 212.
Figure 1-4
Control Panel
Power On/Off
and Power LED
Hard Disk
Activity LED
Network
Activity LED
Reset Button
Diag LEDs
22
Chapter 1
System Overview
Internal Features
Internal Features
The core architecture of the HP x4000 Workstation consists of:
• Intel 860 Memory Controller Hub (MCH)
• Input/Output Controller Hub (ICH2)
• PCI 64-bit Hub (P64H)
• 400 MHz (quad-pumped and 100MHz) front side bus and dp Xeon
processors
• 400 MHz Rambus (PC800)
• AGP Pro 110 4X
For information about...
Refer to...
System board components
Chapter 2
Memory Expander Card (MEC)
Chapter 3
Hardware management (monitoring and reporting)
Chapter 5
Mechanical specifications
Chapter 8
Graphics cards
Chapter 9
Power supply and power requirements
Chapter 6
Mass storage devices
Chapter 9
System HP BIOS
Chapter 4
Tests and error messages
Chapter 11
Connector pin-outs and sockets
Chapter 7
Installing or replacing parts and accessories
Chapter 10
Troubleshooting
Chapter 11
Contacting support
Chapter 12
Chapter 1
23
System Overview
Documentation
Documentation
The following table lists the documentation available for the HP x4000
Workstation. The printed documents were packaged with your
Workstation. Some of the documents are available in PDF format at
www.hp.com/workstations/support.
Title
Printed?
Part Numbers
HP x4000 Workstation
Installation Poster
Yes and
web
A6068-90001
HP x4000 Workstation
Getting Started Guide
Yes and
web
A6068-90000
HP x4000 Workstation
Technical Reference
Manual
No
web accessible only
HP x4000 Workstation
Service Handbook
No
web accessible only
HP Web Site Contents
You can obtain additional online support documentation, BIOS upgrades,
and drivers from www.hp.com/workstations/support.
24
Chapter 1
2
System Board
Chapter 2
25
System Board
Overview
Overview
The following sections describe the system board:
• “System Board Component Layout” on page 27
• “System Chipset” on page 30
• “Expansion Card Slots” on page 35
Figure 2-1 shows the x4000 Workstation system board:
Figure 2-1
x4000 Workstation System Board
Internal SCSI
External SCSI
CPU 0 Socket
MEC Connector
Up to six accessory
cards can be
installed:
Two 64-bit PCI slots
CPU 1 Socket
Three 32-bit PCI slots
One AGP Pro 110 4X
slot (graphics)
Primary IDE Controller
Secondary IDE Controller
Floppy Disk Drive Controller
26
Chapter 2
System Board
System Board Component Layout
System Board Component Layout
Figure 2-2 shows where the chips and connectors reside on the system
board.
Figure 2-2
System Board Diagram
Chapter 2
27
System Board
System Board Component Layout
System Board Switches
The system board includes a 4-pole DIP switch (shown in Figure 2-2),
which lets you configure BIOS functions. Because the switches are read
only at system start up, you must change the switch positions when the
Workstation is shut down.
Switch
Function
Default
Comment
1
Clear BIOS
password
Off
Clears both Administrator and User
passwords, if they have been set.
2
Boot block
recovery
Off
Forces a boot block recovery from a
bootable BIOS flash disk in the floppy
disk drive.
3
Clear CMOS
Off
Reset CMOS settings to BIOS defaults.
You can also do this with the F9 key in
the Setup program as described in
“Clearing the CMOS” on page 46.
4
Enable safe mode
Off
Force processors to run at 800 MHz. This
can be used as a troubleshooting tool or
to correct a problem after adding a
second processor. Before using this, flash
the BIOS as described at
www.hp.com/workstations/support. Use
this switch as a last resort. If it gets the
system running, replace the processors.
If the problem persists, replace the
system board.
Architectural Diagram
Figure 2-3 enumerates the x4000 system board features:
1. One or two dp Xeon processors
2. Intel 860 memory controller hub (MCH)
3. Memory expansion card
4. Intel 82806 PCI 64-bit Hub (P64H) connected to 16-bit Hublink B
5. Intel 82801BA interface controller hub (ICH2) connected to 8-bit
Hublink A
28
Chapter 2
System Board
System Board Component Layout
6. Two 3.3V, 66 MHz, 64-bit PCI slots
7. Three 5V, 33 MHz, 32-bit PCI slots
8. One 1.5 V signaling level AGP Pro 110 4X slot
9. National PC87366 Super I/P with connections to:
-floppy device
-two 9-pin RS232 connectors serial ports
-25-pin ECP/EPP parallel port
-PS2 mouse
-PS2 keyboard
10. Analog Devices AD1885 Codec (AC97) audio
11. Intel 82550 10/100 LAN port
12. LSI SYM53C1010R two Ultra160 SCSI controller
13. Zircon Lite hardware management controller
14. Winbond W83782D hardware monitoring ASIC
Figure 2-3
System Board Architectural Diagram
Chapter 2
29
System Board
System Chipset
System Chipset
Memory Controller Hub (Intel 860)
The MCH supports:
• The 400 MHz (quad-pumped 100MHz) front side bus for up to two
Intel dp Xeon processors
• Two Rambus channels with up to 8 PC800 ECC RIMMs total
• An Accelerated Graphics Port, AGP Pro 110 4x with 1.5V signaling
only.
• Two source-synchronous, enhanced, Hublink buses:
— Hublink A is an 8-bit, 133 MB/s connection to the ICH2
— Hublink B is a 16-bit, 266 MB/s bus to the P64H
PCI 64-bit Hub (Intel 82086)
P64H provides the interface to the 64-bit, 66 MHz PCI bus with
embedded SCSI controller chip and two 3.3 V PCI slots.
When 33 MHz cards are present, the P64H detects this condition and
lowers the bus frequency to 33 MHz. Only 3.3 V cards can be used.
Interface Controller Hub (Intel 82801BA)
The ICH2 is the interface to:
• a 32-bit, 33 MHz PCI bus with embedded LAN and three 5 V PCI
slots
• Two ATA100 IDE Controllers, which support DMA transfers rates for
up to four devices
The IDE/ATA interface on the x4000 is provided primarily for use
with optical devices
30
Chapter 2
System Board
System Chipset
NOTE
The x4000 Workstation is optimized for use with SCSI hard disk
drives. IDE hard disk drives are not tested or recommended in the
x4000.
• Two external USB ports which are USB 1.1 compliant ports with
over-current protection and support for wake up from S1 (sleep) state
(USB mouse and keyboard are not supported).
• Audio
• Super I/0
• SMBUS
Super I/O Chip (National PC87366)
The Super I/O provides the interface to:
• Two serial ports (A and B). The serial port interface voltage levels are
established by DS14185A communication port interface chips.
• One EPP parallel port
• Floppy disk drive
• PS2 Keyboard
• PS2 Mouse
LAN Chip (Intel 82550)
The LAN chip:
• Is 10/100 Base T
• Is IEEE 802.3 compliant
• Is on the 33 MHz, 32-bit PCI bus
• Supports Wake-on-LAN via the PME# signal
• Stores configuration information on attached SEEPROM chip
Chapter 2
31
System Board
System Chipset
SCSI Controller Chip (LSI SYM43C1010R)
The SCSI chip is a 64 bit/66 MHz PCI DMA bus master device. It
includes 2 Ultra160 SCSI controllers, each with it's own independent
channel. One channel is connected via ribbon cable to up to two internal
SCSI devices. The other channel is routed to a back-panel connector to
support external devices
SCSI features:
• Double Transition (DT) clocking. DT Clocking permits data transfer
up to 160 MB/s on each channel, for a total of 320 MB/s
• Cyclic Redundancy Check (CRC). CRC improves the integrity of the
SCSI data transmission through enhanced detection of
communication errors. This is augmented with Asynchronous
Information Protection to provide complete end-to-end protection of
the SCSI I/O.
• Domain Validation. SureLink Domain Validation automatically tests
and adjusts the SCSI transfer rate to ensure data integrity at the
fastest speed.
• LVD and Single-ended (SE) transfers. If an SE device is connected,
the channel it is connected to operates as an SE bus.
• PCI 2.2 compliant
32
Chapter 2
System Board
System Chipset
Audio Chip (Analog Devices AD 1885)
The on-board audio is provided by an Analog Devices AD1885 CODEC
(AC97). The audio connections are:
•
•
•
•
•
headphone/lineout output (external)
line-in input (external)
microphone input (external)
CD-ROM input (internal)
internal speaker output (internal)
The output to the internal speaker is amplified via an LM4871 audio
amplifier to provide the power level needed by the speaker.
A voltage regulator is used to provide a clean +5 volt supply for the
CODEC's analog section, the internal speaker amplifier, and the
microphone bias supply.
The jacksense1 input of the CODEC is used to switch the audio output
from the internal speaker to the headphone/lineout jack when a cable is
plugged in the jack (this includes the keyboard's audio pass-through
cable).
Voltage dividers are provided on the line-in and CD-ROM inputs to meet
PC99 specification requirements.
Hardware Management Controller Chips
The x4000 Workstation is monitored and managed by two chips on the
SMBUS;
• The Qlogic Zircon Lite micro-controller drives the Diag LEDs and the
Power Button LED on the control panel.
• The Winbond WB782D ASIC monitors voltage levels and control fans.
• The SMBUS is a low frequency bus that communicates system state
and error information among integrated circuits..
Chapter 2
33
System Board
System Chipset
Clocks
Table 2-1 describes the clocks used in the x4000 Workstation.
Table 2-1
Clocks
Name
Description
System
A CK00-compliant clock synthesizer in a single
CKx_SKS clock chip creates the main system clocks
using a 14.318 MHz parallel mode crystal reference.
Memory
Two Direct Rambus Clock Generator (DRCG) chips
provide the clocks for the expansion channels to the
Memory Expansion Card (MEC). Using the 50 MHz
reference clock provided by the system clock
generator, each DRCG produces the 400 MHz
differential clock needed by the memory expansion
channel. The Memory Controller Hub (MCH)
provides two pairs of feedback signals to the DRCGs
to keep the Host and RDRAM clocks aligned.
Real Time
Clock (RTC)
A 32.768 KHz parallel mode crystal is the reference
for the ICH2 real-time clock circuitry.
Audio
A 24.576 MHz parallel mode crystal is the reference
for the Audio Codec.
Local Area
Network (LAN)
A 25 MHz parallel mode crystal provides a
frequency reference for the 82550’s internal
oscillator.
SCSI
A 40 MHz oscillator provides the SCSI controller
SCLK.
Zircon
A 10 MHz oscillator clocks the Zircon chip.
34
Chapter 2
System Board
Expansion Card Slots
Expansion Card Slots
The x4000 expansion card slots are described in the following sections:
• “Peripheral Component Interconnect (PCI) Slots” on page 35
• “Accelerated Graphics Port (AGP) Slot” on page 36
• “System Memory and Processors” on page 37
Peripheral Component Interconnect (PCI) Slots
The x4000 system board has five PCI slots available:
• Three 5 V, 33 MHz, 32-bit slots
• Two 3.3 V, 66 MHz, 64-bit slots
NOTE
Cards requiring 5 V must go in the 32-bit slots. Cards requiring 3.3 V
must go in the 64-bit slots. Universal cards, which use either voltage,
can be placed in either slot, but can only function at 66 MHz in the
64-bit slots.
The total power consumption across all used PCI slots depends on what
type of AGP graphics card is installed. When there is an AGP Pro 50
card, the maximum is 80W total across all PCI slots. When there is an
AGP Pro 110 card, the maximum is 45W. The power consumption must
comply with the electrical specifications of the PCI 2.2 specification.
Table 7-1 on page 94 describes the PCI 33 MHz, 32-bit connector. Table
7-2 on page 97 describes the PCI 66 MHz, 64-bit connector.
Chapter 2
35
System Board
Expansion Card Slots
Accelerated Graphics Port (AGP) Slot
The 1.5 V, AGP Pro 110 4X slot provides graphics performance for
high-end graphics cards, combining AGP 4X bandwidth (data transfer
rates as fast as 1056 MB/sec) with the ability to accept high-end graphics
cards drawing up to 110 W of power.
To accommodate AGP Pro cards, the AGP Pro 110 4X slot connector is
wider than the standard AGP 4X connector. To meet the increased power
requirements of AGP Pro graphics cards, additional pins are present at
both ends of the connector.
An AGP Pro card may draw power either from the existing part of the
AGP Pro 110 4X connector, the extended part, or a combination of the
two. In all cases, the maximum power that an AGP Pro card may draw is
limited to 110 W in the Workstation models. Power on the existing part
of the connector is delivered on 5.0 V and 3.3 V rails. Power on the
extension is delivered on the 12 V and 3.3 V rails.
You can use either standard AGP graphics cards or AGP Pro graphics
cards that draw less than 110 W of power. Power is provided through
3.3 V, 5 V, or 12 V power rails.
CAUTION
Do not use AGP Pro cards that draw more than 110 W or 3.3 V.
The AGP Pro 110 4X slot is backward compatible with both AGP 1x and
2.x modes (using 1.5 V signalling) and AGP 4x mode (where 1.5 V
signalling is necessary).
Table 7-3 on page 102 describes the AGP Pro 110 4X connector.
36
Chapter 2
3
System Memory and Processors
Chapter 3
37
System Memory and Processors
Overview
Overview
This chapter contains information on the x4000:
• “System Memory” on page 39
• “Processor” on page 41
38
Chapter 3
System Memory and Processors
System Memory
System Memory
The main memory for the x4000 Workstation is not located on the system
board. Instead, a Memory Expander Card (MEC) plugs into the system
board and contains up to eight memory modules. PC800 Rambus In-Line
Memory Modules (RIMMs) with Error Correction Code (ECC) are
installed on the MEC in pairs.
Rambus
The layout of RDRAM channels on the MEC follows Rambus
recommendations that minimize trace noise. This puts pair members
diagonal to each other on the MEC. RDRAM achieves high speed
transmission through a combination of techniques:
• dense packaging
• high quality transmission lines
• topology
The MEC RIMMs must be loaded in a specific order. Memory loading
rules are explained in “Upgrading Memory on the 8-RIMM MEC” on
page 159.
Each direct RDRAM channel contains two RIMM slots and is terminated
at the end opposite from the memory controller. If only one RIMM is in
the channel then the other slot must be filled with a Continuity RIMM
(CRIMM) in order to allow a continuous path from the controller,
through both slots, to the hard-wired terminator at the other end.
Eight-RIMM MEC
The eight-RIMM MEC can have the voltage refulator hardwaired on the
MEC or it may have the removable module (VRM). The MEC shown in
Figure 3-1 has a VRM slot.
Chapter 3
39
System Memory and Processors
System Memory
Figure 3-1
x4000 8-RIMM Memory Expander Card
2A (J6)
1A (J5)
4B (J4)
3B (J3)
4A (J8)
2B (J2)
3A (J7)
1B (J1)
The eight-RIMM MEC uses two memory repeater hubs for RDRAM
(MRH-R). Each MRH-R supports two Direct RDRAM channels with two
RIMMs per channel. The Memory Controller Hub (MCH) interfaces to
the MEC using an expansion channel for each MRH-R. The MEC
supports 400 MHz operation delivering up to 3.2 GB/s memory
bandwidth using two expansion channels operating in lock step. The
expansion channel is a super set of the Direct RDRAM channel using an
additional two Rambus Signaling Levels (RSL) to communicate channel
and control information from the MCH to the MRH-R. The RDRAM
memory interface can achieve greater than 95% use of the maximum
bandwidth.
40
Chapter 3
System Memory and Processors
Processor
Processor
The x4000 supports up to two Intel dp Xeon processors on a 400 MHz
front side bus (quad-pumped 100 MHz frequency). Xeon processor
features include:
• L1 and L2 cache on die
• L2 is 256 KB 8-way set associative
• NetBurst MicroArchitecture with 20-stage instruction pipeline
Chapter 3
41
System Memory and Processors
Processor
42
Chapter 3
4
System BIOS and Resources
Chapter 4
43
System BIOS and Resources
Overview
Overview
This chapter contains information on:
• “System BIOS” on page 45
• “HP Setup Program” on page 49
• “BIOS Beep Codes” on page 59
• “System Resources” on page 60
44
Chapter 4
System BIOS and Resources
System BIOS
System BIOS
The HP x4000 Workstation BIOS is based on a Phoenix BIOS and is
compliant with:
•
•
•
•
•
•
•
ACPI 1.0
PCI 2.2
PnP 1.0a
DMI 2.0
WFM 2.0
MPS 1.4
PC 99 (fast boot)
The BIOS supports:
•
•
•
•
•
•
•
•
up to six processor microcodes
boot block recovery mode
administrator and user passwords
configuration summary screen
setup program
temporary boot priority
fast boot
POST routines
The system ROM contains the Power-On Self-Test (POST) routines and
the BIOS: the system BIOS, video BIOS, and low-option ROM. This
chapter gives an overview of the following:
• Menu-driven Setup with context-sensitive help.
• POST routines, which are a sequence of tests the computer performs
to ensure that the system is functioning correctly
BIOS Identification
The system BIOS is identified by the version number XX.YM.mm, where:
• XX is a two-letter code indicating the system
• Y is a one-letter code indicating the HP entity
• M is the major BIOS version
• mm is the minor BIOS version
Chapter 4
45
System BIOS and Resources
System BIOS
Updating the System BIOS and Firmware
You can download the latest system BIOS and firmware for the HP
x4000 workstations from HP’s Web site at
www.hp.com/workstations/support
Instructions for downloading and updating the BIOS and firmware are
posted on the download site and are included as a text file in the
downloadable file.
CAUTION
Don’t turn off the computer until the system BIOS and firmware update
procedure has completed. Otherwise, irrecoverable damage to the ROM
might occur. If the power fails during the BIOS fash you may be able to
restore the previous BIOS from the boot black. See “Recovering the BIOS
from the Boot Block” on page
Restoring BIOS Default Settings
BIOS and configuration issues may cause suspected hardware errors. If
the BIOS settings are wrong, perform the following steps to restore the
BIOS to its default setting:
1. To access the Setup program, press F2 while the initial HP logo
displays immediately after restarting the workstation.
2. Press F9 to load the default settings from the Setup program.
3. In the main menu, set the Reset Configuration Data to Yes.
NOTE
Take note of the current settings in the system setup utility before
you make any modifications to the BIOS.
Clearing the CMOS
To clear the CMOS:
1. Turn off the Workstation, disconnect the power cord and all cables,
then remove the cover.
46
Chapter 4
System BIOS and Resources
System BIOS
2. Set system board switch 3 to ON. See “System Board Switches” on
page 28.
3. Replace the cover, and reconnect the power cord and display cable.
4. Restart the Workstation. A message similar to the following
appears:
“Configuration has been cleared, switch "Clear
Configuration" to OFF position before rebooting.”
5. Turn off the Workstation, disconnect the power cord and display
cables, and remove the cover. (You must press the power button for 5
seconds to get the system to power down.)
6. Set system board switch 3 to OFF.
7. Replace the cover, and reconnect the power cord and data cables.
8. Turn on the Workstation.
9. When prompted, press F2 to run Setup. See “Starting the HP Setup
Program” on page 49 for more information about the Setup program.
10. Press F9. The system automatically downloads and saves the CMOS
default values.
11. Exit Setup and save the new configuration.
Recovering the BIOS from the Boot Block
If you can’t ue the standard BIOS flash, the BIOS could be corrupted and
unable to boot. You may be able to recover the BIOS from the BOot Block
on the system board..
1. Obtain a bootable DOS floppy disk.
2. Copy the BIOS files onto the floppy disk. For information about how
to download the system BIOS, see “Updating the System BIOS and
Firmware” on page 46.
3. Create (or edit) the autoexec.bat file, which should contain the
following line of text:
“phlash16 /c /mode=3 /s <BIOS filename>.wph”
(Rename the BIOS filename with the filename on the floppy disk.)
4. Turn off the Workstation, disconnect the power cord, and remove the
cover.
Chapter 4
47
System BIOS and Resources
System BIOS
5. Set switch 2 on the system board to ON. See “System Board Switches”
on page 28.
6. Insert the floppy disk into the floppy disk drive.
7. Reconnect the power cord, and turn on the Workstation.
8. The workstation boots from the floppy disk, then flashes the BIOS.
During the flash process, the screen remains blank. When you hear
one long beep, the recovery process is finished.
9. Turn off the Workstation. Remove the floppy disk from the drive.
Remove the power cord and display cables, and remove the cover. (You
must press the pwoer buttong for 5 seconds to get the system to power
down.)
10. Set switch 2 back to OFF.
11. Replace the cover, reconnect the power cord, and reboot the
Workstation.
48
Chapter 4
System BIOS and Resources
HP Setup Program
HP Setup Program
The HP Setup program lets you configure your Workstation. You can:
• set up the system Administrator and User passwords
• change the system boot order
• solve configuration problems
HP recommends you note any changes you make to the system setup for
later reference.
Starting the HP Setup Program
To start the Setup program:
1. Start your Workstation. If your Workstation is already up, shut it
down and restart.
2. Press F2 while F2 Setup is displayed at the bottom of the screen.
If you fail to press F2 in time and the start-up process continues, you
must allow your system to finish booting up, then restart your
Workstation and go through the POST again.
The opening screen of the Workstation’s Setup program is displayed:
• A band along the bottom of the screen gives instructions on using the
keyboard-driven menus:
—
—
—
—
—
—
—
F1: Help
F7/F8: Change value
F9: Return to system configuration to default
F10: Return to previous value
Up/Down arrow keys: Highlight an item or menu
Enter: Select an item or menu
Esc: Exit
Chapter 4
49
System BIOS and Resources
HP Setup Program
• A band along the top displays the menus. For more information on the
menus, see:
—
—
—
—
—
—
50
“Main Menu” on page 51
“Advanced Menu” on page 52
“Security Menu” on page 55
“IPMI Menu” on page 56
“Boot Menu” on page 57
“Power Menu” on page 57
Chapter 4
System BIOS and Resources
HP Setup Program
Main Menu
Table 4-1 describes the functions available in the Setup program Main
menu.
Table 4-1
Main Menu
Field
Description
BIOS Version
This field is view-only. It displays your current BIOS
version. You can compare this to the most recent
available BIOS located at
www.hp.com/workstations/support.
Operating
System
This field indicates the currently selected operating
system. The BIOS needs this information to
understand how to handle Plug-and-Play
configuration and Quick Boot. If you are using
different operating systems and don’t want to modify
this field every time you run a different one, select
the default Other option.
Reset
Configuration
Data
When you reset configuration data, the BIOS
dynamically reallocates resources (IRQs, I/O,
memory) to cards and motherboard devices at the
next boot. It then sets this field back to No. You
would not select Yes and choose to reset your
configuration data unless you were having problems
with your Workstation.
System Time
The system time format is based on a 24-hour clock.
Numlock at
Power-On
Use this field to specify whether the number keys on
the number keypad are enabled when your computer
starts. Otherwise, the number keypad keys act as
cursor control keys.
System Date
The system date format is mm/dd/yyyy.
Chapter 4
51
System BIOS and Resources
HP Setup Program
Advanced Menu
Table 4-2 describes the submenus available in the Setup program
Advanced menu.
Table 4-2
Advanced Menu
Field
Description
Processors
Displays the type and the speed of the processor(s)
you have in your Workstation. You can change your
processor speed in the Processor Speed field by
selecting a value from the drop down menu. Your
processor cannot run any faster than what is
displayed in the Current Type field. If you leave
Processor Speed set to the default of Auto, the
processor speed is automatically detected. Use a
fixed frequency for troubleshooting only.
Chipset
Memory Error Checking: You can choose between
ECC and Disabled. ECC scrubbing checks for and
corrects errors at the source to prevent them from
reoccurring. Change this field to Disabled if you want
to find errors, but don’t want them corrected.
ECC Error Type: When an ECC error occurs, it
generates an interrupt. In this field, you can select
the type of interrupt you want reported: NMI
(Non-Maskable), SMI (System Management), SCI,
(System Control), or None.
SERR signal condition: In this field, you can select
the type of ECC error condition that triggers a
critical system error (SERR#). Normally, only Multiple
bit (unrecoverable) errors should be able to trigger
SERR#. But you can also choose Single bit, None, or
Both.
Floppy Disk
Drive
Contains the floppy disk drive type and controller
fields. If you choose to disable your floppy disk drive,
you must also disable your floppy disk controller.
IDE Devices
Lets you configure the settings for the IDE controller
and any attached IDE devices.
52
Chapter 4
System BIOS and Resources
HP Setup Program
Table 4-2
Advanced Menu
Field
Description
Integrated
SCSI
Controller
Lets you configure the settings for the SCSI
controller and any attached SCSI devices.
Integrated SCSI: The integrated SCSI ASIC has two
controllers and this enables or disables both at the
same time. You cannot disable just one SCSI
controller.
Option ROM Scan: Enable this option if the SCSI
device is used to boot the operating system. If too
many option ROMs are enabled, some may not load
due to insufficient available shadow memory. Always
disable any that aren’t needed.
Enable Master: The BIOS normally leaves Bus
Mastering disabled, and the Operating System
enables it when starting. Set this field to Enabled if
you have a bus-mastering device and the device
driver cannot enable bus mastering by itself.
Latency Timer: This field sets the minimum
guaranteed time slice allotted for bus master,
expressed in PCI bus clock cycles. The bigger the
value, the greater the share of the bus to the device.
Integrated
Network
Interface
Lets you configure the settings for the integrated
10/100BT network interface. These fields are
identical to the Integrated SCSI Controller fields
listed above.
Integrated
USB
Lets you configure the settings for the integrated
USB interface. These fields are identical to the
Integrated SCSI Controller fields listed above except
there is no Option ROM Scan.
Chapter 4
53
System BIOS and Resources
HP Setup Program
Table 4-2
Advanced Menu
Field
Description
Integrated I/O
Ports
Lets you configure both the integrated serial and
parallel ports.
Serial port A, Serial port B, or Parallel Port: These
fields contain three choices. Auto lets the BIOS or a
PnP OS configure the port. Enabled lets you set each
resource. Disabled leaves the port disabled by the
BIOS, but a PnP OS can still enable it.
Parallel Port Mode: You can set the parallel port
mode to Output only, Bi-directional, EPP, or ECP.
Integrated
Audio
Lets you configure the integrated PCI audio
controller. These fields are identical to the Integrated
SCSI Controller fields listed above except there is no
Option ROM Scan.
AGP Pro 110
4X Slot
(Graphics)
Lets you configure your AGP Pro 110 4X slot. The
first two fields describe the installed graphics card.
The Enable Master and Latency Timer fields are
described in the Integrated SCSI Controller entry
above.
Graphics Aperture: This field contains a pull-down
menu that lets you choose the size of the graphics
aperture for the AGP video device.
PCI Device
Slot #
54
Lets you configure a PCI device plugged into the
specified slot. The first two fields describe the
installed PCI card. The next three fields are identical
to the Integrated SCSI Controller fields listed above.
Chapter 4
System BIOS and Resources
HP Setup Program
Security Menu
Table 4-3 describes the fields available in the Setup program Security
menu.
Table 4-3
Security Menu
Field
Description
Administrator
Password
This field is view-only. It tells you whether there is
an Administrator password set.
Set
Administrator
Password
This password prevents unauthorized access to this
your Workstations Setup program. This password
can also be used to start the computer when the
power-on password is Enabled. You must set an
administrator password before you can set a user
password.
Clear All
Passwords
Selecting this field and pressing Enter clears both the
User and Administrator passwords.
User
Password
This field is view-only. It tells you whether there is a
User password set.
Set User
Password
If an administrator password has been set, you can
enter this field to set a user password. The User
password prevents unauthorized access to this your
Workstations Setup program. This password can also
be used to start the computer when the power-on
password is Enabled.
Power-On
Password
If Enabled, you must enter a password before the
Workstation boots. You can only enable this field if
an administrator password has been set.
Start from
Floppy
If Disabled, unauthorized use of the floppy disk drive
to start the computer is prevented. (The drive is still
available for reading and writing data.)
Start from
CD-ROM
If Disabled, unauthorized use of the CD-ROM to start
the computer is prevented. (The drive is still
available for reading data.)
Chapter 4
55
System BIOS and Resources
HP Setup Program
Table 4-3
Security Menu
Field
Description
Start from
Hard Disk
Drive
If Disabled, unauthorized use of the hard disk drive
to start the computer is prevented. (The drive is still
available for reading and writing data.)
Write on
Floppy Disks
If Locked, users are prevented from copying
information to a diskette.
Locked Setup
Configuration
If Locked, a Plug-and-Play operating system cannot
change the BIOS configuration settings.
Hard Disk
Boot Sector
If Locked, the boot sector on the hard disk drive is
protected against viruses.
IPMI Menu
This menu contains one field that lets you choose to force the BIOS to
clear the System Event log.
56
Chapter 4
System BIOS and Resources
HP Setup Program
Power Menu
Table 4-4 describes the functions available in the Setup program Power
menu.
Table 4-4
Power Menu
Field
Description
Remote
Power-On
Lets you enable remote power-on (wake-up) from
devices and operating systems that support this
feature.
After Power
Failure
If you experience a power failure, the setting for this
field determines the state the Workstation returns to
when power is restored. Power On turns the
Workstation back on. Stay Off leaves the Workstation
off and disables remote power-on. Last State restores
the state the Workstation was in when the power
failed.
Boot Menu
Table 4-5 describes the functions available in the Setup program Boot
menu.
Table 4-5
Boot Menu
Field
Description
QuickBoot
Mode
QuickBoot involves skipping some
Power-On-Self-Test (POST) tasks, such as floppy
seek test and memory check. Howevery QAuickBoot
cannot skip ECC initialization.
If a chassis-intrusion was detected, an invalid CMOS
checksum was encountered, or there was a CMOS
battery failure, a full POST is performed regardless
of this setting. (CMOS is volatile memory powered by
a battery that contains data needed by the BIOS.)
Display
Option ROM
Messages
Chapter 4
Allows the POST screen to display the Option ROM
messages. You should enable it when you install an
accessory board.
57
System BIOS and Resources
HP Setup Program
Table 4-5
Boot Menu
Field
Description
Preferred
Video
If you have two video cards, this field allows you to
choose which one to use during boot.
Boot Device
Priority
Lets you select the device boot order.
58
Chapter 4
System BIOS and Resources
BIOS Beep Codes
BIOS Beep Codes
If a terminal error occurs during POST, the system issues a beep
code before attempting to display the error in the upper left corner
of the screen. Beep codes are useful for identifying the error when
the system is unable to display the error message.
Beep Code
Numeric
Code
Description
1-2-2-3
16h
BIOS ROM checksum failure
1
B4h
one short beep before boot
1-3-1-1
20h
DRAM refresh test failure
1-2
98h
Video configuration failure or option ROMs
checksum failure
1-3-1-3
22h
8742 Keyboard controller test failure
1-3-3-1
28h
Memory initialization failure
1-3-4-1
2Ch
RAM failure on address line xxxxa
1-3-4-3
2Eh
RAM failure on data bits xxxx1 of low byte of
memory bus
2-1-2-3
46h
ROM copyright notice check failure
2-2-3-1
58h
Unexpected interrupts test failure
4-4-2-4
F7
Crisis Recovery Failure
a. If the BIOS detects error 2C or 2E (base 512K RAM error), it displays an
additional word-bitmap (xxxx) indicating the address line or bits that failed. For
example, “2C 0002” means address line 1 (bit one set) has failed. “2E 1020” means
data bits 12 and 5 (bits 12 and 5 set) have failed in the lower 16 bits.
Chapter 4
59
System BIOS and Resources
System Resources
System Resources
System resources consist of:
• “PCI IRQ Lines” on page 60
• “IRQ Routing” on page 61
• “System Memory Map” on page 65
• “I/O Port Map (I/O Addresses Used by the System)” on page 65
• “DMA Channel Controllers” on page 67
• “Interrupt Controllers” on page 63
PCI IRQ Lines
PCI devices generate IRQs using up to four PCI IRQ lines (INTA#,
INTB#, INTC#, and INTD#).
PCI interrupts can be shared; several devices can use the same
interrupt. However, optimal system performance is reached when
minimizing the sharing of interrupts. Refer to “Interrupt Controllers” on
page 63 for a table of the PCI device interrupts.
60
Chapter 4
System BIOS and Resources
System Resources
IRQ Routing
Figure 4-1 shows the IRQ graphical representation. Table 4-6 describes
the routing shown in Figure 4-1.
Figure 4-1
IRQ Diagram
Chapter 4
61
System BIOS and Resources
System Resources
Table 4-6
IRQ Routing Table
Device
Interrupt
ICH2 IRQ
AGP
A
A
AGP
B
B
PCI Slot 1
A
B
PCI Slot 1
B
C
P64H IRQ
PCI Slot 1
C
D
PCI Slot 1
D
E
PCI Slot 2
A
C
PCI Slot 2
B
D
PCI Slot 2
C
E
PCI Slot 2
D
F
PCI Slot 3
A
D
PCI Slot 3
B
E
PCI Slot 3
C
F
PCI Slot 3
D
G
PCI Slot 4
A
6
PCI Slot 4
B
7
PCI Slot 4
C
8
PCI Slot 4
D
9
PCI Slot 5
A
2
PCI Slot 5
B
3
PCI Slot 5
C
4
PCI Slot 5
D
5
P64H BT_INTR#
G
62
Chapter 4
System BIOS and Resources
System Resources
Table 4-6
IRQ Routing Table
Device
Interrupt
ICH2 IRQ
82550 LAN
A
F
53C1010R
A
H
53C1010R
B
D
(All)
H
Zircon
P64H IRQ
Interrupt Controllers
The system’s interrupt controller is equivalent in function to two 82C59
interrupt controllers. The following table shows how the interrupts are
connected to the APIC controller. The IRQs are numbered sequentially,
starting with the master controller and followed by the slave (both of
82C59 type).
I/O APIC Input
IRQ
INTIN0
ICH
INTIN1
IRQ1
Super I/O keyboard controller
INTIN2
IRQ0
ICH system timer
INTIN3
IRQ3
Super I/O - Used by serial port if enabled
INTIN4
IRQ4
Super I/O - Used by serial port if enabled
INTIN5
IRQ5
Free if not used for parallel port or audio
INTIN6
IRQ6
Super I/O - floppy disk controller
INTIN7
IRQ7
Super I/O - LPT1
INTIN8
IRQ8
ICH - RTC
INTIN9
IRQ9
Available for PCI devices
INTIN10
IRQ10
Available for PCI devices
INTIN11
IRQ11
Available for PCI devices
INTIN12
IRQ12
Super I/O - mouse
INTIN13
IRQ13
Coprocessor
INTIN14
IRQ14
ICH - Integrated IDE Controller
(primary)
Chapter 4
IRQ Description
63
System BIOS and Resources
System Resources
I/O APIC Input
IRQ
IRQ Description
INTIN15
IRQ15
ICH - Integrated IDE Controller
(secondary)
INTIN16
PCINTA
INTIN17
PCINTB
INTIN18
PCINTC
INTIN19
PCINTD
INTIN20
TFPC IRQ
INTIN21
SCI IRQ
INTIN22
not
connected
INTIN23
ICH SMI
(not used)
Three major interrupt modes are available:
• PIC mode: This mode uses only legacy interrupt controllers, so the
system can support only one processor. You can select this mode when
you install Windows NT.
• Virtual wire mode: This mode, which is implemented using the
82C59 interrupt and the I/O APIC controller, is used during boot
time. The virtual wire mode allows the transition to the symmetric
I/O mode. In the virtual wire mode, only one processor executes
operations.
• Symmetric I/O mode: This mode is implemented using the I/O
APIC controller and allows for multiple processor operations.
NOTE
In PIC mode and virtual wire mode, PCI interrupts are routed to the INT
line. In symmetric I/O mode, PCI interrupts are routed to the I/O APIC
controllers and forwarded over an APIC bus to the processors.
64
Chapter 4
System BIOS and Resources
System Resources
System Memory Map
Reserved memory that accessory boards use must reside in the area from
C8000h to EFFFFh.
0000 0000 - 0000 03FF
Real-mode IDT
0000 0400 - 0000 04FF
BIOS data area
0000 0500 - 0009 FC00
Used by operating system
0009 FC00 - 0009 FFFF
Extended BIOS data area
000A_0000 000B_FFFF
Video RAM or SMRAM (not visible
unless in SMM)
000C 0000 - 000C 7FFF
Video ROM (VGA ROM)
000C 8000 - 000F FFFF
Adapter ROM, RAM,
memory-mapped registers, BIOS
000E 0000-000F FFFF
128KB BIOS (Flash/Shadow)
0001 0000-000F FFFF
Memory (1MB to 16MB)
0010 0000-001F FFFF
Memory (16MB to 32MB)
0020 0000-003F FFFF
Memory (32MB to 64MB)
0040 0000-007F FFFF
Memory (64MB to 128MB)
0080 0000-FFFF FFFF
Memory (128MB to 4GB)
FECO 0000
I/O APIC
FEEO 0000
Local APIC (each CPU)
FFF8 0000-FFFF FFFF
512KB BIOS (Flash)
I/O Port Map (I/O Addresses Used by the System1)
You access peripheral devices, accessory devices, and system controllers
through the system I/O space, which isn’t located in system memory
space. The 64 KB of addressable I/O space comprises 8-bit and 16-bit
registers (called I/O ports) located in the various system components.
When you install an accessory board, ensure that the selected I/O
1. If configured.
Chapter 4
65
System BIOS and Resources
System Resources
address space is in the free area of the space reserved for accessory
boards (100h to 3FFh).
Default Values for
I/O Address Ports
Function
0000 - 0CF7
0020 - 0021
002E - 002F
0040 - 0043
0060, 0064
0061
0070
0070 - 0071
0080
0081 - 0083, 008F
0092
00A0 - 00A1
00C0 - 00DF
00F0 - 00FF
0170 - 0177
01F0 - 01F7
0278 - 027F
02E8 - 02EF
02F8 - 02FF
0372 - 0377
DMA controller 1
Master interrupt controller (8259)
Super I/O
Timer 1
Keyboard controller (reset, slow A20)
Port B (speaker, NMI status, and control)
Bit 7: NMI mask register
RTC and CMOS
Manufacturing port (POST card)
DMA low page register
PS/2 reset and Fast A20
Slave interrupt controller
DMA controller 2
Coprocessor error
Free (IDE secondary channel)
IDE primary channel
LPT 2
Serial port 4 (COM4)
Serial port 2 (COM2)
Free (IDE secondary channel, secondary
floppy disk drive)
LPT1
VGA
COM3
Floppy disk drive controller
IDE primary channel
Floppy disk drive controller
COM1
Interrupt edge/level control
LPT1 ECP
PCI configuration space
0378 - 037F
03B0 - 03DF
03E8 - 03EF
03F0 - 03F5
03F6
03F7
03F8 - 03FF
04D0 - 04D1
0778 - 077F
0CF8 - 0CFF
66
Chapter 4
System BIOS and Resources
System Resources
Default Values for
I/O Address Ports
Function
C000 -
Power management I/O space and ACPI
registers
SMBus I/O space
C100 - C10F
DMA Channel Controllers
The system permits only I/O-to-memory and memory-to-I/O transfers.
The hardware configuration doesn’t allow I/O-to-I/O or
memory-to-memory transfers.
The system controller supports seven DMA channels, each with a page
register that extends the channel’s addressing range to 16MB.
The following table shows how the system allocates DMA channels.
DMA controller
Channel
Function
DMA 0
Free
DMA 1
Free if not used for parallel port in Setup
DMA 2
Floppy disk drive controller
DMA 3
Free if not used for parallel port in Setup
DMA 4
Used to cascade DMA channels 0-3
DMA 5
Free
DMA 6
Free
DMA 7
Free
Chapter 4
67
System BIOS and Resources
System Resources
68
Chapter 4
5
Hardware Management
(Monitoring and Reporting)
Chapter 5
69
Hardware Management (Monitoring and Reporting)
Overview
Overview
This chapter contains the following topics:
• “General Firmware Information” on page 71
• “Hardware Monitoring” on page 72
• “Reporting” on page 77
• “Security” on page 79
70
Chapter 5
Hardware Management (Monitoring and Reporting)
General Firmware Information
General Firmware Information
Firmware processing is provided by QLogic's Zircon Lite chip and an
auxiliary Winbond chip. The firmware implements industry standard
IPMI Specification 1.0 with the following extensions:
• BIOS configuration tokens
• Additional hardware control
• BIOS security
KCS 1 and BT protocols are supported. Only KCS 1 is used during BIOS
POST. BT is supported at run-time (after the operating system boots).
Date/Time Initialization
The Zircon Lite's date and time is initialized after each power-on by the
BIOS. This enables accurate logging of timestamp information for events
in the SEL.
SEEPROM Organization
There are three Atmel SEEPROMs attached to the main SMBUS for
information storage. These contain the SEL, FRU, and HP NBA Tokens.
The FRU stores the product model, serial number, and other chassis and
system board information.
Chapter 5
71
Hardware Management (Monitoring and Reporting)
Hardware Monitoring
Hardware Monitoring
Built-in Self Test (BIST)
Zircon Lite does a BIST after resetting and displays the result on the
Diag LEDs (see “Understanding the Diag LEDs” on page 212) if an error
occurs. The following items are checked:
• Accessibility of SEL device
• Accessibility of FRU device
• Accessibility of SDR Repository (read only)
• Viability of Hardware Management Controller (HMC) firmware
(firmware corrupt)
• HMC hardware problem (general HMC failure)
Sensor Scan
Voltages, temperatures, fan tachometers, processor-related items, and
chassis intrusion are scanned.
Voltages
Pin 10 of Winbond W83782D is be used as a 2.5 V reference. This voltage
is used to calibrate all of the voltage readings in Table 5-1.
Table 5-1
Voltage Scan
Sensor
#
Sensor
ID
Signal
Approx.
Upper
Limit
Zircon Winbond Description
Pin
Pin
20h
+12VIO
+12VIO 10.7V
12V
13.2V
9
21h
+3.3VSB 3.3VSB 3.05V
3.3V
3.55V
22h
+2.5V
2.5V
2.7V
2.5V
72
Approx. Mid
Lower
Limit
2.3V
7
-
12V Supply for
non-VRM
35
3.3V Standby
-
2.5V RDRAM
Supply
Chapter 5
Hardware Management (Monitoring and Reporting)
Hardware Monitoring
Table 5-1
Voltage Scan
Sensor
#
Sensor
ID
Signal
Approx. Mid
Lower
Limit
Approx.
Upper
Limit
Zircon Winbond Description
Pin
Pin
23h
VDDQ
VDDQ
1.4V
1.5V
1.6V
5
-
AGP Termination
Voltage
24h
+1.8VSB SB1_8
1.65V
1.8V
1.95V
4
-
1.8V Standby
25h
+1.8V
P1_8V
1.65V
1.8V
1.95V
3
-
1.8V Supply
26h
VCC_
CORE
VCC_
CORE
1.1V
1.65V 1.9V
-
36
Processor Core
Voltage
27h
+3.3V
+3_3V
3.05V
3.3V
3.55V
-
34
3.3V Supply
28h
+5V
+5V
4.15V
5V
5.6V
-
33
5V Supply
29h
+12V
+12V
13.7V
12V
12.95V -
32
12V Supply
2Ah
-12V
-12V
-11.15V -12V
-10.3V
-
31
-12V Supply
2Bh
VBAT
VBAT
2.7V
3.2V
3.6V
-
30
Battery Voltage
2Ch
+5VSB
5VSB
4.65V
5V
5.35V
-
29
5V Standby
Temperatures
Table 5-2
Temperature Scan
Sensor
#
Sensor
ID
Signal Lower Mid
Limit
Upper Zircon Winbond Description
Limit Pin
Pin
42h
EXT
TEMP
EXT1_
TEMP
38C
2C
Chapter 5
28C
-
Pin 40
Ambient air temp
73
Hardware Management (Monitoring and Reporting)
Hardware Monitoring
Fan Speed and Control
Fan tach speeds are given in revolutions per second. Multiply by 60 for
rpm.
Table 5-3
Fan and Speed Control Scan
Sensor
#
Sensor
ID
51h
CPU0FA P1FAN 15
NTACH TACH
65
120
-
Pin 20
Fan #1: Processor
1 fan tach
52h
CPU1FA P2FAN 15
NTACH TACH
65
120
-
Pin 19
Fan #2: Processor
2 fan tach
53h
SYSFAN FAN1T 10
TACH
ACH
29
60
-
Pin 18
Fan #3: System
fan tach
54h
PCIFAN FAN4T 10
TACH
ACH
31
60
GPIO 0 -
Fan #4: PCI fan
tach
55h
HDDFA
NTACH
28
80
GPIO 1 -
Fan #5: HDD fan
tach
56h
PSUFAN FANM
TACH
51
100
GPIO 3 -
Fan #6: Power
supply fan tach
61h
CPU0FA WP1FA NCTRL NCTL
-
-
-
Pin 23
Fan #1: Processor
1 fan ctrl
62h
CPU1FA WP2FA NCTRL NCTL
-
-
-
Pin 11
Fan #2: Processor
2 fan ctrl
63h
SYSFAN WFAN1 PWM
23CTL
-
-
-
Pin 10
Fan #3: System
fan PWM (&
unused spare fan
PWM)
64h
PCIFAN FAN4C PWM
TL
-
-
GPIO21 -
HDDFA
NPWM
-
65h
Signal Lower Mid
Limit
FAN5T 15
ACH
10
FAN5C TL
74
Upper Zircon Winbond Description
Limit Pin
Pin
PWM1
-
GPIO20 PWM0
Fan #4: PCI fan
PWM
Fan #5: HDD fan
PWM
Chapter 5
Hardware Management (Monitoring and Reporting)
Hardware Monitoring
Additional Sensors
The SDR for Processor 0 includes three separate functions:
• presence detect
• IERR
• processor voltage mismatch
Table 5-4
Additional Sensor Scans
Sensor Sensor ID
#
Signal
70h
CPU0
PRESENT
71h
Sensor
Type
Zircon
Pin
Winbon Description
d Pin
SKTOCC_0_L Processor
GPIO23
-
Processor 0
Presence/Absence
CPU1
PRESENT
SKTOCC_1_L Processor
GPIO24
-
Processor 1
Presence/Absence
72h
CPU0IERR
IERR#
Processor
GPIO27
-
Processor 0 IERR
73h
CPU
MISMATCH
VID_ERROR# Processor
GPIO28
-
Processor Voltage
Mismatch
80h
CHASSIS
OPEN
INTRU#
-
C_OPEN General Chassis
Intrusion
Chassis
Intrusion
Fan Control
Individual fan speed is controlled by the HMC, based on temperature
and configuration information. This allows fans to run slower in most
circumstances, thus making the machine quieter.
Sense Power State
Zircon senses power state using signal pins from the ICH2.
This is used for fan control and indicating power state on the status
LED.
Chapter 5
75
Hardware Management (Monitoring and Reporting)
Hardware Monitoring
Chassis Intrusion
Chassis intrusion is detected via the Winbond W83782D C_OPEN pin.
There is an SDR (sensor data record) for the chassis intrusion event.
If the hardware indicates an intrusion, the HMC clears the hardware
latch in the Winbond, logs the event in the System Event Log (SEL),
which is non-volatile storage, and sets the state of the NBA token for
chassis intrusion based on the current chassis intrusion status.
The BIOS queries the NBA token to determine if it should display a
chassis intrusion message. It then clears the chassis intrusion status in
the NBA token.
Applications such as TopTools query for a chassis intrusion event by
searching the SEL.
Pre-boot Device Test
The HMC detects presence of processors. The BIOS detects presence of
memory and memory errors. If it is a condition that prevents the BIOS
from completing POST, it notifies the HMC so that the HMC can display
error LEDs on the front panel.
PCI/AGP Power
The BIOS detects presence and power consumption of PCI/AGP devices
plugged in the system. It then passes this information on to the HMC, to
detect overpower situations and to know whether it's possible to turn off
the PCI fan to make the system quieter.
76
Chapter 5
Hardware Management (Monitoring and Reporting)
Reporting
Reporting
Event Logging
Hardware monitoring errors, detected by the Hardware Management
Controller, are logged to the SEL (System Event Log). External agents,
such as the BIOS, can ask the Hardware Management Controller to log
errors on their behalf.
Sensor Report Using IPMI
Sensor information is available using the standard IPMI command, Get
The optional Sensor Device commands are not supported
by the HMC firmware. Dynamic setting of sensor thresholds is not
supported.
Sensor Reading.
System Event Log (SEL)
Events are logged in the SEL using the standard SEL Event Record
format as defined in the IPMI spec, section 19.1. OEM SEL records are
also supported. The following SEL device commands are supported as
specified in section 18.1 of the IPMI spec:
• Get SEL Info
• Get SEL Entry
• Add SEL Entry
• Clear SEL
• Get SEL Time
• Set SEL Time
• Reserve SEL
Power Status LED
The Power Status LED indicates the state of the system. See “HP x4000
Control Panel” on page 21. Error info has priority over power state info,
when the computer is on.
Chapter 5
77
Hardware Management (Monitoring and Reporting)
Reporting
Diag LEDs
When a sensor indicates an error, the corresponding LED is turned on.
See “Understanding the Diag LEDs” on page 212.
In general, auto re-arm is used for sensors. That is, if a sensor threshold
has been exceeded and the error is displayed on the LEDs, once the
sensor drops below the threshold, the sensor is automatically re-armed
so that if its reading rises up above the threshold again, it triggers
another error. Each of these errors is also logged in the SEL.
Firmware Failure Handling
The boot code checks for a valid firmware runtime image and displays a
Diag LED code if it is not valid.
BIOS is Running OK
The HMC detects if the BIOS is running OK and displays a Diag LED
code if the BIOS does not provide a message.
IPMI Platform Event Trap
The firmware sends a platform event as an SNMP trap, using IPMI
Platform Event Trap Specification version 1.0.
78
Chapter 5
Hardware Management (Monitoring and Reporting)
Security
Security
Lock Status Panel
The HMC can lock out the front panel, when necessary, to prevent the
user from pressing the power button or the reset button at an
inopportune time (while the firmware flash update is in process). The
BIOS also has this capability. This is because there are two separate
flash update utilities: one to update the BIOS flash device, and another
to update the HMC flash device. The BIOS and firmware flash utilities
utilities are packaged together in the BIOS/firmware flash update
package at www.hp.com/workstations/support.
BIOS Configuration Tokens
Some CMOS tokens are backed up to NVRAM (serial eeprom). They can
be modified by TopTools, and the BIOS is in charge of synchronization.
Once the system has booted, a valid password must be entered to access
tokens, provided that passwords have been set in the Setup program.
User and administrator passwords give different rights.
Chapter 5
79
Hardware Management (Monitoring and Reporting)
Security
80
Chapter 5
6
Power Specifications
Chapter 6
81
Power Specifications
Power Delivery
Power Delivery
Figure 6-1 shows a block diagram of the overall power generation. Table
6-1 has a description of the signals given in Figure 6-1.
Figure 6-1
Power Generation Diagram
82
Chapter 6
Power Specifications
Power Delivery
Table 6-1
Power Signal Description
Supply
Description
12 VDIG
Supplies power to the dc-to-dc converter that delivers
power to the processor(s).
12 VIO
Supplies power to:
•
•
•
•
•
-12 V
fans
hard disk drive(s)
floppy disk drive
PCI slots
AGP Pro 110 4X
Supplies power to:
• AGP Pro 110 4X
• PCI
• serial port
3.3 V
Supplies power to:
•
•
•
•
•
•
•
5V
Supplies power to:
•
•
•
•
•
•
Chapter 6
Memory Expander Card (MEC)
Peripheral Component Interconnect (PCI) slots
Accelerated Graphics Port (AGP Pro 110 4X)
Intel 860 chip set
audio
SCSI
1.5 circuit
hard disk drive(s)
floppy disk drive
PCI slots
AGP Pro 110 4X
1.8 V switching regulator circuit
MEC 2.5 V Voltage Regulator Module (VRM)
83
Power Specifications
Power Delivery
Table 6-1
Power Signal Description
Supply
Description
5 V Standby
Supplies power to:
•
•
•
•
•
•
•
•
•
•
VCC_CORE
Diag LEDs
Network activity LED
Hard disk drive activity LED
Power LED
Local Area Network (LAN) connector
Universal Serial Bus (USB) connector
PS2KB
Winbond WB782D hardware monitoring ASIC
3.3 VSB
SB1_8V
The exact processor voltage is determined by VID
bits from the processor(s).
In a dual-processor system, the processors share a
power plane. A single VCC_CORE is generated by a
+12 VDIG to VCC_CORE dc-to-dc converter that is
placed on the system board. This is called VR down.
The maximum current each processor can draw is
57 A.
1.5 V
This 1.5 V supply is generated from a three terminal
regulator on the system board. The current is limited
to 5 A.
1.8 V
This supply is used for the Intel 860 Memory
Controller Hub, the P64H, and the MEC. It is
generated by a switching dc-to-dc converter. the
output voltage is 1.8 V and the output current is
limited to 15 A.
A separate 1.8 V power supply is used for the ICH2.
This 1.8 V supply is generated from a three terminal
linear regulator which limits the output current to
1 A.
2.5 V
84
This supply is generated by a voltage regulator on
the Memory Expander Card (MEC).
Chapter 6
Power Specifications
Power Delivery
Table 6-1
Power Signal Description
Supply
Description
3.3 V Standby
This supply is derived from the 5 VSB with a 1 A
three terminal regulator. It is used by the LAN and
the Intel 860 ICH2.
1.8 V Standby
This supply is derived from the 5 VSB with a 1 A
three terminal regulator. It is used by the Intel 860
ICH2.
Chapter 6
85
Power Specifications
Power Supply
Power Supply
Table 6-2 shows the voltage and current specifications for the power
supplies. Total continuous output power does not exceed 465W.
Table 6-2
Voltage and Current Specification
+3.3 V
+5 V
+12 VDIG
+12 VIO
-12 V
+5 VSB
3.14 V
4.5 V
11.4 V
11.4 V
-10.8 V
4.75 V
3.46 V
5.25 V
12.6 V
12.6 V
-13.2 V
5.25 V
40 A
27 A
22 A
17 A
-0.55 A
1.5 A
4.0 A
1.0 A
0.0 A
1.0 A
0.0 A
0.0 A
Voltage: Max
Min
Current: Max
Min
86
Chapter 6
Power Specifications
Power Supply
Power Supply Specifications
Parameter
Maximum
PCI Slots
Maximum for AGP Pro 110 4X Slot
Connector
Extension
Total
100 V, 5 A
120 V, 4.2 A
—
—
—
—
200 V, 2.5 A to
240 V, 2.1 A
—
—
—
—
Input
frequency
50 to 60 Hz
—
—
—
—
Available
power
465 W
80W
45W
AGP Pro 50, 50W
AGP Pro 110, 110W
Max current at 12 Aa
+12 VIO
0.5 A
1A
9.2 A
10.2 A
Max current at 22 A
+12 VCPU
—
—
—
—
Max current at 0.55 A
-12 V
0.1 A
—
—
—
Max current at 40 Aa
+3.3 V
7.6 A
6A
7.6 A
13.6 A
Max current at 27 Aa
+5 V
5A
Input voltage
and current
Total Rating
2A
Max current at 2 A
+5 V stdby
a. The system can draw a maximum of 110 W from the AGP Pro 110 4X slot. Total
combined output power on +3.3 V and +5 V shall not exceed 250 W. Total combined
output current on +12 VCPU and +12 VIO shall not exceed 27.6 A nominal.
Chapter 6
87
Power Specifications
Power Supply
Resetting the Power Supply
If an overload triggers the power supply’s overload protection, all power
is immediately cut. To reset the power supply unit:
1. Disconnect the power cord.
2. Determine what caused the overload, and fix the problem.
3. Reconnect the power cord, and reboot the workstation.
When you power down the Workstation through the operating system,
power consumption falls below the low power consumption (refer to the
table on page 88), but doesn't reach zero. This on/off feature extends the
power supply's lifetime.
Power Consumption and Cooling
The power consumption and acoustics listed in the following table are
valid for a typical maximum configuration:
• two processors
• 768 MB memory
• two hard disk drives
• DVD ROM
• 3.5-inch floppy disk drive
• graphics card
All information in this section is based on primary power consumptions.
Input power consumption (approximate
values)
230V/50Hz and
115V/60Hz
• Typical operating mode
360 W
1228.4 Btu/ha
• Standby mode (Windows 2000 only)
150 W
511.8 Btu/h
• Hibernate mode (Windows 2000 only)
< 11 W
< 37.33 Btu/h
a. 1 W = 3.4121Btu/h
88
Chapter 6
Power Specifications
Power Saving and Ergonometry
Power Saving and Ergonometry
Depending on the operating system, the following power management
modes are available:
• Full on (S0)
• Standby (S1)
• Hibernate (S4)
• Full off (S5)
NOTE
Windows NT 4.0 does not support S1 or S4.
Using Power Management
Power management lets you reduce the Workstation’s overall power
consumption by slowing down the Workstation’s activity when it is idle.
Operating systems differ in their power management capabilities. In
Windows 2000, you can select from two power management modes:
• Stand By (S1) is a low power state where the processor is shut off, but
memory remains powered. Waking up the Workstation from Stand By
mode is faster than from Hibernate mode because the RAM contents
do not need to be restored. However, when the Workstation is in
Stand By mode, it consumes more power than Hibernate mode
because the memory remains powered.
• Hibernate (S4) makes the machine look and behave like it is off
except that it remembers the state it was in before hibernation and
can be awakened without a full operating system boot. This is
because the operating system copies the RAM contents out to a
special location on the hard disk before entering hibernation.
You must enable Hibernate mode through Power Options in the
Control Panel before it can be a shut down option.
Chapter 6
89
Power Specifications
Power Saving and Ergonometry
To change your power management settings in Windows 2000:
1. Select Start > Settings > Control Panel.
2. Double click on Power Options.
For more information on changing your power options, refer to your
Windows 2000 documentation.
Power Saving Modes and Resume Events
Full On
(S0)
Standby
(S1)
Hibernate
(S4)
Full Off
(S5)
Processor
Normal
speed
Halted
Off
Off
Display
On
Blanked
Off
Off
Hard Disk
Drive
Normal
speed
Halted
Off
Off
Active Power
Planes
VCC
VCCAux
VCC
VCCAux
VCCAux
VCCAux
Power
Consumption
< 500 W
< 150 W
< 11 W
< 11 W
Resume
Events
Power button,
LANa,
Modem,
USB,
Real Time
Clockb,
Keyboard
Power button,
LAN,
Modem,
Scheduler,
Keyboard
Power
button
Resume
Delay
10 - 20
seconds
BIOS boot
delay
Regular
boot
delay
a. Wake-on-LAN is generated by a PME# signal. PME initialization is
compliant with PCI Power Management 1.1. Specification chapter 8.8.
b. The RealTIme Clock wake-up can be used, provided you have software
that can configure it.
90
Chapter 6
Power Specifications
Power Saving and Ergonometry
Chapter 6
91
Power Specifications
Power Saving and Ergonometry
92
Chapter 6
7
Connector Pin-Outs
Chapter 7
93
Connector Pin-Outs
Expansion Slots
Expansion Slots
Peripheral Component Interconnect (PCI) Slots
Table 7-1 describes the PCI 33 MHz, 32-bit connector. Table 7-2 describes
the PCI 66 MHz, 64-bit connector.
Table 7-1
PCI 33 MHz, 32-bit Connector
Signal
Signal
Pin
Pin
Slot #1
(J4B1)
Slot #2
(J3B1)
Slot #3
(J2B2)
Slot #1
(J4B1)
Slot #2
(J3B1)
A1
PTRST#
A32
AD16
A2
+12VIO
A33
+3_3V
A3
PTMS
A34
FRAME#
A4
PTDI
A35
GND
A5
+5V
A36
TRDY#
A37
GND
A38
STOP#
A6
PIRQB#
A37
A7
PIRQD#
A38
GND
STOP#
A8
+5V
A39
+3_3V
A9
NC
A40
NC
A10
+5V
A41
NC
A11
NC
A42
NC
A12
GND
A43
PAR
A13
GND
A44
AD15
A14
3.3VSB
A45
+3_3V
A15
1PCIRST#
A46
AD13
94
Slot #3
9J2B2)
Chapter 7
Connector Pin-Outs
Expansion Slots
Table 7-1
PCI 33 MHz, 32-bit Connector
Signal
Signal
Pin
Pin
Slot #1
(J4B1)
A16
A17
Slot #2
(J3B1)
Slot #3
(J2B2)
+5V
PGNT1#
A48
GND
Slot #1
(J4B1)
Slot #2
(J3B1)
A47
AD11
A48
GND
A18
GND
A49
AD9
A19
PCIPME#
A50
Key
A20
AD30
A51
Key
A21
+3_3V
A52
CBE0#
A22
AD28
A53
+3_3V
A23
AD26
A54
AD6
A24
GND
A55
AD4
A25
AD24
A56
GND
A57
AD2
A26
AD26R
A57
AD2
A27
+3_3V
A58
AD0
A28
AD22
A59
+5V
A29
AD20
A60
A30
GND
A61
+5V
A31
AD18
A62
+5V
B1
-12V
B32
AD17
B2
PTCK
B33
CBE2#
B3
GND
B34
GND
B4
NC
B35
IRDY#
B5
+5V
B36
+3_3V
Chapter 7
REQ64B#
REQ64C#
Slot #3
9J2B2)
REQ64A#
95
Connector Pin-Outs
Expansion Slots
Table 7-1
PCI 33 MHz, 32-bit Connector
Signal
Signal
Pin
Pin
Slot #1
(J4B1)
B6
Slot #2
(J3B1)
Slot #3
(J2B2)
+5V
Slot #1
(J4B1)
Slot #2
(J3B1)
B37
DEVSEL#
B7
PIRQC#
B38
GND
B38
GND
B8
PIRQE#
B39
PLOCK#
B39
PLOCK#
B9
PRSNTB1#
B40
PERR#
B40
PERR#
B41
+3_3V
B42
SERR#
B10
B11
NC
PRSNTB1#
B40
PERR#
B12
GND
B43
+3_3V
B13
GND
B44
CBE1#
B14
NC
B45
AD14
B15
GND
B46
GND
B47
AD12
B48
AD10
B49
GND
B16
PCLK_S1
B17
B18
B47
AD12
GND
PREQ1#
B49
GND
B19
+5V
B50
B20
AD31
B51
B21
AD29
B52
AD8
B22
GND
B53
AD7
B23
AD27
B54
+3_3V
B24
AD25
B55
AD5
B25
+3_3V
B56
AD3
B26
CBE3#
B57
GND
96
Slot #3
9J2B2)
Chapter 7
Connector Pin-Outs
Expansion Slots
Table 7-1
PCI 33 MHz, 32-bit Connector
Signal
Signal
Pin
Pin
Slot #1
(J4B1)
Slot #2
(J3B1)
Slot #3
(J2B2)
Slot #1
(J4B1)
Slot #2
(J3B1)
B27
AD23
B58
AD1
B28
GND
B59
+5V
B29
AD21
B60
B30
AD19
B61
+5V
B31
+3_3V
B62
+5V
Table 7-2
ACK64B#
ADK64C#
Slot #3
9J2B2)
ADK64A#
PCI 66 MHz, 64-bit Connector
Signal
Signal
Pin
Pin
Slot #1
(J4B1)
Slot #2
(J3B1)
Slot #1
(J4B1)
Slot #2
(J3B1)
A1
P64TRST#
A48
GND
A2
+12VIO
A49
P64AD9
A3
P64TMS
A50
NC
A4
P64TDI
A51
A5
+5V
A52
P64CBE0#
A6
P64IRQ6#
P64IRQ2#
A53
+3_3V
A7
P64IRQ8#
P64IRQ4#
A54
P64AD6
A8
+5V
A55
P64AD4
A9
NC
A56
GND
A10
+3_3V
A57
P64AD2
A11
NC
A58
P64AD0
A12
Key
A59
+3_3V
Chapter 7
97
Connector Pin-Outs
Expansion Slots
Table 7-2
PCI 66 MHz, 64-bit Connector
Signal
Signal
Pin
Pin
Slot #1
(J4B1)
Slot #2
(J3B1)
A13
Slot #1
(J4B1)
A60
P64REQ64#
+5V
A14
3.3VSB
A61
A15
P64RST#
A62
A17
P64AD21R
P64AD20R
Slot #2
(J3B1)
A63
GND
A18
GND
A64
P64CBE7#
A19
P64PME#
A65
P64CBE5#
A20
P64AD30
A66
+3_3V
A21
+3_3V
A67
P64PAR64
A22
P64AD28
A68
P64AD62
A23
P64AD26
A69
GND
A24
GND
A70
P64AD60
A25
P64AD24
A71
P64AD58
A72
GND
A26
P64AD21R
P64AD20R
A27
+3_3V
A73
P64AD56
A28
P64AD22
A74
P64AD54
A29
P64AD20
A75
+3_3V
A30
GND
A76
P64AD52
A31
P64AD18
A77
P64AD50
A32
P64AD16
A78
GND
A33
+3_3V
A79
P64AD48
A34
P64FRAME#
A80
P64AD46
98
Chapter 7
Connector Pin-Outs
Expansion Slots
Table 7-2
PCI 66 MHz, 64-bit Connector
Signal
Signal
Pin
Pin
Slot #1
(J4B1)
Slot #2
(J3B1)
Slot #1
(J4B1)
Slot #2
(J3B1)
A35
GND
A81
GND
A36
P64TRDY#
A82
P64AD44
A37
GND
A83
P64AD42
A38
P64STOP#
A84
+3_3V
A39
+3_3V
A85
P64AD40
A40
NC
A86
P64AD38
A87
GND
A41
A42
GND
A88
P64AD36
A43
P64PAR
A89
P64AD34
A44
P64AD15
A90
GND
A45
+3_3V
A91
P64AD32
A47
P64AD11
A92
NC
B1
-12V
B48
P64AD10
B2
P64TCH
B49
P64M66EN
B3
GND
B50
GND
B4
NC
B51
B5
+5V
B52
P64AD8
B53
P64AD7
B6
B7
P64IRQ7#
P64IRQ3#
B54
+3_3V
B8
P64IRQ9#
P64IRQ5#
B55
P64AD5
B9
PCI5A
PCI4A
A56
P64AD3
Chapter 7
99
Connector Pin-Outs
Expansion Slots
Table 7-2
PCI 66 MHz, 64-bit Connector
Signal
Signal
Pin
Pin
Slot #1
(J4B1)
Slot #2
(J3B1)
B10
B11
B12
NC
PCI5B
PCI4B
Key
B13
Slot #1
(J4B1)
B57
GND
B58
P64AD1
B59
+3_3V
B60
P64ACK64#
+5V
B14
NC
B61
B15
GND
B62
B16
B17
B18
P64CLK_S5
P64CLK_S4
GND
P64REQ2#
P64REQ1#
Slot #2
(J3B1)
B63
NC
B64
GND
B65
P64CBE6#
B19
+3_3V
B66
P64CBE5#
B20
P64AD31
B67
GND
B21
P64AD29
B68
P64AD63
B22
GND
B69
P64AD61
B23
P64AD27
B70
+3_3V
B24
P64AD25
B71
P64AD59
B25
+3_3V
B72
P64AD57
B26
P64CBE3#
B73
GND
B27
P64AD23
B74
P64AD55
B28
GND
B75
P64AD53
B29
P64AD21
B76
GND
B30
P64AD19
B77
P64AD51
100
Chapter 7
Connector Pin-Outs
Expansion Slots
Table 7-2
PCI 66 MHz, 64-bit Connector
Signal
Signal
Pin
Pin
Slot #1
(J4B1)
Slot #2
(J3B1)
Slot #1
(J4B1)
Slot #2
(J3B1)
B31
+3_3V
B78
P64AD49
B32
P64AD17
B79
+3_3V
B33
P64CBE2#
B80
P64AD47
B34
GND
B81
P64AD45
B35
P64IRDY#
B82
GND
B36
+3_3V
B83
P64AD43
B37
P64DEVSEL#
B84
P64AD41
B38
GND
B85
GND
B39
P64LOCK#
B86
P64AD39
B40
P64PERR#
B87
P64AD37
B41
+3_3V
B88
+3_3V
B42
P64SERR#
B89
P64AD35
B43
+3_3V
B90
P64AD33
B44
P64CBE1#
B91
GND
B45
P64AD14
B92
NC
B46
GND
B93
B47
P64AD12
A94
Chapter 7
GND
101
Connector Pin-Outs
Expansion Slots
Accelerated Graphics Port (AGP) Slot
Table 7-3 describes the AGP Pro 110 4X connector.
Table 7-3
AGP Pro 110 4X Connector
Pin
Signal
Pin
Signal
A1
+12VIO
A34
VDDQ
A2
NC
A35
AGP_AD22
A3
NC
A36
AGP_AD20
A4
USBAGP-
A37
GND
A5
GND
A38
AGP_AD18
A6
PIRQA#
A39
AGP_AD16
A7
1PCIRST#
A40
VDDQ
A8
GGNT_L
A41
AGP_FRAME_L
A9
+3_3
A42
A10
AGP_ST_1
A43
A11
NC
A44
A12
AGP_PIPE_L
A45
A13
GND
A46
AGP_TRDY_L
A14
AGP_WBF_L
A47
AGP_STOP_L
A15
AGP_SBA1
A48
AGPPME#
A16
+3_3
A49
GND
A17
AGP_SBA3
A50
AGP_PAR
A18
AGP_SBSTB_L
A51
AGP_AD15
A19
GND
A52
VDDQ
A20
AGP_SBA5
A53
AGP_AD13
A21
AGP_SBA7
A54
AGP_AD11
102
Chapter 7
Connector Pin-Outs
Expansion Slots
Table 7-3
AGP Pro 110 4X Connector
Pin
Signal
Pin
Signal
A22
NC
A55
GND
A23
GND
A56
AGP_AD9
A24
NC
A57
AGP_C_BE_L0
A25
+3_3
A58
VDDQ
A26
AGP_AD30
A59
AGP_ADSTB0_L
A27
AGPP_AD28
A60
AGP_AD6
A28
+3_3
A61
GND
A29
AGP_AD26
A62
AGP_AD4
A30
AGP_AD24
A63
AGP_AD2
A31
GND
A64
VDDQ
A32
AGP_ADSTB1_L
A65
AGP_AD0
A33
AGP_C_BE_L3
A66
NC
B1
OC-2
B34
VDDQ
B2
+5V
B35
AGP_AD21
B3
+5V
B36
AGP_AD19
B4
USBAGP+
B37
GND
B5
GND
B38
AGP_AD17
B6
PIRQB#
B39
AGP_C_BE_L2
B7
CLK66_AGP
B40
VDDQ
B8
GREQ_L
B41
AGP_IRDY_L
B9
+3_3V
B42
B10
AGP_ST_0
B43
B11
AGP_ST_2
B44
Chapter 7
103
Connector Pin-Outs
Expansion Slots
Table 7-3
AGP Pro 110 4X Connector
Pin
Signal
Pin
B12
AGP_RBF_L
B45
B13
GND
B46
AGP_DEVSEL_L
B14
NC
B47
VDDQ
B15
AGP_SBA0
B48
GPERR_L
B16
+3_3V
B49
GND
B17
AGP_SBA2
B50
AGP_SERR_L
B18
AGP_SBSTB
B51
AGP_C_BE_L1
B19
GND
B52
VDDQ
B20
AGP_SBA4
B53
AGP_AD14
B21
AGP_SBA6
B54
AGP_AD12
B22
NC
B55
GND
B23
GND
B56
AGP_AD10
B24
3.3VSB
B57
AGP_AD8
B25
+3.3V
B58
VDDQ
B26
AGP_AD31
B59
AGP_ADSTB0
B27
AGP_AD29
B60
AGP_AD7
B28
+3.3V
B61
GND
B29
AGP_AD27
B62
AGP_AD5
B30
AGP_AD25
B63
AGP_AD3
B31
GND
B64
VDDQ
B32
AGP_ADSTB1
B65
AGP_AD1
B33
AGP_AD23
B66
VREF_MCH_TO_AGP
104
Signal
Chapter 7
Connector Pin-Outs
System Board Connectors
System Board Connectors
Figure 2-1 on page 26 shows the position of all the connectors on the
system board. The pin-outs for these connectors are described in the
following topics:
• “Floppy Disk Drive Connector” on page 106
• “IDE/ATA 100 Connectors” on page 107
• “SCSI Connectors” on page 109
• “Parallel Port Connector” on page 111
• “Serial Port Connectors” on page 112
• “Keyboard and Mouse Connector” on page 113
• “Universal Serial Bus Connectors” on page 113
• “Front Panel Connector” on page 114
• “ATX Power Connector” on page 115
• “LAN Connector” on page 116
• “Audio Connector” on page 116
• “CD Audio In Connector” on page 117
• “Microphone Connector” on page 117
• “System Speaker Connector” on page 118
• “Processor Fan Connectors” on page 118
• “Chassis Fan Connectors” on page 118
• “Chassis Intrusion Connector” on page 119
Chapter 7
105
Connector Pin-Outs
System Board Connectors
Floppy Disk Drive Connector
Table 7-4 describes the floppy disk drive connector.
Table 7-4
Floppy Disk Drive Connector
Pin
Signal
Pin
Signal
1
GND
18
FDIR#
2
DRVEN0
19
GND
3
GND
20
STEP#
4
NC
21
GND
5
Key
22
WDATA#
6
DRATE0
23
GND
7
GND
24
WGATE#
8
INDEX#
25
GND
9
GND
26
TRK0#
10
MTR0#
27
GND
11
GND
28
WPROT#
12
DS1#
29
GND
13
GND
30
RDATA#
14
DS0#
21
GND
15
GND
32
HDSEL#
16
MTR1#
33
GND
17
GND
34
DSKCHG#
106
Chapter 7
Connector Pin-Outs
System Board Connectors
IDE/ATA 100 Connectors
Table 7-5 describes the connectors.
Table 7-5
IDE/ATA Primary and Secondary Connectors
Pin
Signal
Primary (J8C1)
Secondary (J8C2)
1
3PCIRST#
3PCIRST#
2
GND
GND
3
PDD7
SDD7
4
PDD8
SDD8
5
PDD6
SDD6
6
PDD9
SDD9
7
PDD5
SDD5
8
PDD10
SDD10
9
PDD4
SDD4
10
PDD11
SDD11
11
PDD3
SDD3
12
PDD12
SDD12
13
PDD2
SDD2
14
PDD13
SDD13
15
PDD1
SDD1
16
PDD14
SDD14
17
PDD0
SDD0
18
PDD15
SDD15
19
GND
GND
20
Key
Key
Chapter 7
107
Connector Pin-Outs
System Board Connectors
Table 7-5
IDE/ATA Primary and Secondary Connectors
Pin
Signal
Primary (J8C1)
Secondary (J8C2)
21
PDDREQ
SDDREQ
22
GND
GND
23
PDIOW#
SDIOW#
24
GND
GND
25
PDIOR#
SDIOR#
26
GND
GND
27
PDIORDY
SDIORDY
28
PRIIDE1
SECIDE1
29
PDDACK#
SDDACK#
30
GND
GND
31
IRQ14
IRQ14
32
NC
NC
33
PDA1
SDA1
34
PRIIDE2
SECIDE2
35
PDA0
SDA0
36
PDA2
SDA2
37
CS1P#
CS1S#
38
CS3P#
CS3S#
39
IDEAP#
IDEAP#
40
GND
GND
108
Chapter 7
Connector Pin-Outs
System Board Connectors
SCSI Connectors
Table 7-6 describes the SCSI internal and external connectors.
Table 7-6
SCSI Connector
Pin
Signal
Pin
Internal (SC1)
External (SC2)
1
LVSCDBP12
LVSCDAP12
2
LVSCDBP13
3
Signal
Internal (SC1)
External (SC2)
35
LVSCDBM12
LVSCDAM12
LVSCDAP13
36
LVSCDBM13
LVSCDAM13
LVSCDBP14
LVSCDAP14
37
LVSCDBM14
LVSCDAM14
4
LVSCDBP15
LVSCDAP15
38
LVSCDBM15
LVSCDAM15
5
LVSCDBPHP
LVSCDAPHP
39
LVSCDBM0
LVSCDAM0
6
LVSCDBP0
LVSCDAP0
40
LVSCDBPHM
LVSCDAPHM
7
LVSCDBP1
LVSCDAP1
41
LVSCDBM1
LVSCDAM1
8
LVSCDBP2
LVSCDAP2
42
LVSCDBM2
LVSCDAM2
9
LVSCDBP3
LVSCDAP3
43
LVSCDBM3
LVSCDAM3
10
LVSCDBP4
LVSCDAP4
44
LVSCDBM4
LVSCDAM4
11
LVSCDBP5
LVSCDAP5
45
LVSCDBM5
LVSCDAM5
12
LVSCDBP6
LVSCDAP6
46
LVSCDBM6
LVSCDAM6
13
LVSCDBP7
LVSCDAP7
47
LVSCDBM7
LVSCDAM7
14
LVSCDBPLP
LVSCDAPLP
48
LVSCDBPLM
LVSCDAPLM
15
GND
GND
49
GND
GND
16
DIFFSENSEB
DIFFSENSEA
50
GND
GND
17
LVTRMPWRB
LVTRMPWR
51
LVTRMPWRB
LVTRMPWR
18
LVTRMPWRB
LVTRMPWR
52
LVTRMPWRB
LVTRMPWR
19
NC
NC
53
NC
NC
20
GND
GND
54
GND
GND
Chapter 7
109
Connector Pin-Outs
System Board Connectors
Table 7-6
SCSI Connector
Pin
Signal
Pin
Internal (SC1)
External (SC2)
21
LVATNBP
LVATNAP
22
GND
23
Signal
Internal (SC1)
External (SC2)
55
LVATNBM
LVATNAM
GND
56
GND
GND
LVBSYBP
LVBSYAP
57
LVBSYBM
LVBSYAM
24
LVACKBP
LVACKAP
58
LVACKBM
LVACKAM
25
LVRSTBP
LVRSTAP
59
LVRSTBM
LVRSTAM
26
LVMSGBP
LVMSGAP
60
LVMSGBM
LVMSGAM
27
LVSELBP
LVSELAP
61
LVSELBM
LVSELAM
28
LVCDBP
LVCDAP
62
LVCDBM
LVCDAM
29
VREQBP
VREQAP
63
LVREQBM
LVREQAM
30
LVIOBP
LVIOAP
64
LVIOBM
LVIOAM
31
LVSCDBP8
LVSCDAP8
65
LVSCDBM8
LVSCDAM8
32
LVSCDBP9
LVSCDAP9
66
LVSCDBM9
LVSCDAM9
33
LVSCDBP10
LVSCDAP10
67
LVSCDBM10
LVSCDAM10
34
LVSCDBP11
LVSCDAP11
68
LVSCDBM11
LVSCDAM11
110
Chapter 7
Connector Pin-Outs
System Board Connectors
Parallel Port Connector
Table 7-7 describes the parallel connector.
Table 7-7
Parallel Port Connector
Pin
Signal
Pin
Signal
1
LPSTB#
14
LPAUTFD#
2
LPD0
15
LPERROR#
3
LPD1
16
LPINIT#
4
LPD2
17
LPSLIN#
5
LPD3
18
GND
6
LPD4
19
GND
7
LPD5
20
GND
8
LPD6
21
GND
9
LPD7
22
GND
10
LPACK#
23
GND
11
LPBUSY
24
GND
12
LPPE
25
GND
13
LPSLCT
Chapter 7
111
Connector Pin-Outs
System Board Connectors
Serial Port Connectors
Table 7-8 describes the serial connector.
Table 7-8
Serial Port Connectors
Pin
Signal
Port A (J16)
Port B (J18)
1
SP1-1
SP2-1
2
SP1-2
SP2-2
3
SP1-3
SP2-3
4
SP1-4
SP2-4
5
GND
GND
6
SP1-6
SP2-6
7
SP1-7
SP2-7
8
SP1-8
SP2-8
9
SP1-9
SP2-9
10
GND
GND
11
GND
GND
112
Chapter 7
Connector Pin-Outs
System Board Connectors
Keyboard and Mouse Connector
Table 7-9 describes the keyboard and mouse connectors.
Table 7-9
Keyboard and Mouse Connector
Pin
Signal
Pin
Signal
1
KBDATOUT
10
KBAUXPWR
2
NC
11
AUXCLKOUT
3
GND
12
NC
4
KBAUXPWR
13
GND
5
KBCLKOUT
14
GND
6
NC
15
GND
7
AUXDATOUT
16
GND
8
NC
17
GND
9
GND
Universal Serial Bus Connectors
Table 7-10 describes the USB connector.
Table 7-10
Universe Serial Bus Connector
Pin
Signal
Pin
Signal
1
USBE5VOUT
7
EXTUSBP1+
2
EXTUSBP0-
8
GND
3
EXTUSBP0+
9
GND
4
GND
10
GND
5
USBE5VOUT
11
GND
6
EXTUSBP1-
12
GND
Chapter 7
113
Connector Pin-Outs
System Board Connectors
Front Panel Connector
Table 7-11 describes the front panel connector.
Table 7-11
Front Panel Connector
Pin
Signal
Pin
Signal
1
FPHDPWR
16
+5V
2
LEDGRN_ZIRCON
17
SPKDRV
3
HDLED
18
BUZZER
4
LEDYEL_ZIRCON
19
LED0RED
5
GND
20
LED0GRN
6
FPPWBTN#
21
LED1RED
7
RSTBTN#
22
LED1GRN
8
GND
23
LED2RED
9
+5V
24
LED2GRN
10
NC
25
LED3RED
11
IRRX
26
LED3GRN
12
GND
27
5VSB
13
GND
28
LANLED#
14
NC
29
SMBUS_DATA
15
IRTX
30
SMBUS_CLK
114
Chapter 7
Connector Pin-Outs
System Board Connectors
ATX Power Connector
Table 7-12 and Table 7-13 describe the ATX power connectors.
Table 7-12
ATX Power #1 Connector (J9C2)
Pin
Signal
Pin
Signal
1
+3_3V
13
+3_3V
2
+3_3V
14
+3_3V
3
+3_3V
15
GND
4
GND
16
GND
5
GND
17
+5V
6
+5V
18
+5V
7
5VSBOUT
19
+5V
8
GND
20
-12V
9
GND
21
+12VIO
10
GND
22
+12VIO
11
PWRGD0
23
PSON#
12
NC
24
FANM
Table 7-13
ATX Power #2 Connector (J9J1)
Pin
Signal
Pin
Signal
1
+12VDIG
5
GND
2
+12VDIG
6
GND
3
+12VDIG
7
GND
4
NC
8
NC
Chapter 7
115
Connector Pin-Outs
System Board Connectors
LAN Connector
Table 7-14 describes the LAN connector.
Table 7-14
LAN Connector
Pin
Signal
Pin
Signal
1
GND
7
L2???
2
L2TDP
8
L2ACTIVITY
3
L2TDN
9
L2SPEED2
4
L2RDP
10
L2SPEEDLED
5
L2RDN
11
GND
6
L2TXCTR
12
Audio Connector
Table 7-15 describes the audio connector.
Table 7-15
Line In/Out Audio Connector (A1)
116
Pin
Signal
Pin
Signal
1
GND
7
NC
2
AC97P20
8
3
AC97P19
9
4
JS1
21
GND
5
GND
22
AC97P8
6
NC
23
AC97P9
Chapter 7
Connector Pin-Outs
System Board Connectors
CD Audio In Connector
Table 7-16 describes the CD Audio In connector.
Table 7-16
CD Audio In Connector (J21)
Pin
Signal
1
AC97P1
2
CD_GND
3
CD_GND
4
AC97P2
Microphone Connector
Table 7-17 describes the microphone connector.
Table 7-17
Microphone Connector (J22)
Pin
Signal
1
GND
2
AC97P7
3
AC97P6
10
AC97P7
11
GND
Chapter 7
117
Connector Pin-Outs
System Board Connectors
System Speaker Connector
Table 7-18 describes the system speaker connector.
Table 7-18
System Speaker Connector (J23)
Pin
Signal
1
VO1
2
GNDA_AUDIO
3
NC
4
VO2
Processor Fan Connectors
Table 7-19 describes the processor fan connector.
Table 7-19
Processor Fan Connectors
Pin
Signal
Processor 0 (J32)
Processor 1 (J33)
1
GND
GND
2
P1FAN1
P2FAN1
3
P1FANTACH
P2FANTACH
Chassis Fan Connectors
Table 7-20 describes the chassis fan connector.
Table 7-20
Chassis Fan Connectors
Pin
Signal
Rear System
Fan (J34)
PCI Fan (J35)
Hard Disk Drive
Fan (J37)
1
GND
GND
GND
2
FAN1S1
FAN4S1
FAN5S1
118
Chapter 7
Connector Pin-Outs
System Board Connectors
Table 7-20
Chassis Fan Connectors
Pin
Signal
Rear System
Fan (J34)
PCI Fan (J35)
Hard Disk Drive
Fan (J37)
FAN1TACH
FAN4TACH
FAN5TACH
3
Chassis Intrusion Connector
Table 7-21 describes the chassis intrusion connector.
Table 7-21
Chassis Intrusion Connector (J59)
Pin
Signal
1
CHASSIS_CBL#
2
NC
3
GND
4
INTRU#
Chapter 7
119
Connector Pin-Outs
System Board Connectors
120
Chapter 7
8
Mechanical Specifications
Chapter 8
121
Mechanical Specifications
System Fans and Air Flow
System Fans and Air Flow
The x4000 Workstation x4000 includes five fans:
• one turbo-cooler heat sink fan for each of the processors
• one system fan at the back of the chassis
• a PCI fan (in a speaker/fan assembly)
• a hard drive fan
Figure 8-1 shows the system air flow.
Figure 8-1
Air Flow Diagram
92 mm Fan
(Power Supply)
120 mm Fan
(System
Exhaust)
60 mm Fan
(Disks)
92 mm Fan
(PCI /
Graphics)
122
Chapter 8
Mechanical Specifications
Physical Specifications
Physical Specifications
Table 8-1
x4000 Physical Characteristics
Weight
Minimum configuration: 40.20 lb. (18.24 kg)
Maximum configuration: 45.40 lb. (20.60 kg)
Dimensions
Width: 8.22in. (20.90 cm)
Height: 19.02in. (48.30 cm)
Depth: 18.62in. (47.3 cm)
Footprint
153.06 sq in (988.57 sq cm)
Power Supply:
Input voltage
90 - 250 VAC
Input frequency
50/60 Hz
Maximum output power 465 W
Max avg input power
Chapter 8
500 W
123
Mechanical Specifications
Environmental Specifications
Environmental Specifications
Environmental Specifications (System Processing Unit with
Hard Disk)
Storage Humidity
90% (relative, non-condensing)
Operating Humidity
15% to 80% (relative, non-condensing)
Storage Temperature
-40o C (-40o F) to 70o C (158o F)
Operating Temperature
5o C (41o F) to 35o C (95o F)
Altitude
• Operating: 0 to 10,000 ft. (3100m)
• Non-operating: 0 to 15,000 ft.
(4500m)
Shock
• Operating: Maximum 20 G at less
than 3 ms (1/2 sine)
• Non-operating: Maximum 80 G at
less than 3 ms (1/2 sine)
Vibration
• Operating Random: Maximum
0.21 G (RMS)
• Operating Swept-Sine: Maximum
0.5 G (0 - Peak)
• Non-Operating Random: Maximum
2.09 G (RMS)
Acoustics
• +5 to +25 degrees C: Less than 5.0
Bels (sound power)
• +25 to +35 degrees C: Less than 5.5
Bels (sound power)
Operating temperature and humidity ranges may vary depending on the
installed mass storage devices. High humidity levels can cause improper
disk operation. Low humidity levels can aggravate static electricity
problems and cause excessive wear of the disk surface.
124
Chapter 8
9
Hardware Components
Chapter 9
125
Hardware Components
Overview
Overview
This chapter describes:
• Graphics cards
• Network cards
• SCSI adapter cards
• Mass storage devices
• Connectors and sockets
• The rear panel
126
Chapter 9
Hardware Components
Graphics Cards
Graphics Cards
HP x4000 Workstation models provide installation and factory support
for the following graphics cards:
• Matrox Millennium G450 (for more information than is presented
below, see http://www.matrox.com/mga/home.htm)
• NVIDIA Quadro2 MXR and Quadro2 Pro (for more information, see
http://www.nvidia.com/Products.nsf)
• ATI Fire GL2 or Fire GL4 (for more information, see
http://www.ati.com)
Matrox Millennium G450 Graphics Card
Figure 9-1 shows the Matrox Millennium G450 graphics card.
Figure 9-1
Matrox Millennium G450 Graphics Card
VGA Port 1
VGA Port 2
The Matrox Millennium G450 Dual Head AGP graphics card is powered
by the 256-bit DualBus Matrox G450 chip and has:
• 16 MB of DDR video memory (non-upgradeable)
• Matrox DualHead technology for connecting two monitors
• PowerDesk desktop manager:
Chapter 9
127
Hardware Components
Graphics Cards
— Easy multiple resolutions support
— Simple dialog box positioning
— Effortless multiple-window management
• TV output (composite video and S-video, NTSC and PAL) via an
optional cable from Matrox which connects to the second VGA port in
place of a monitor
• Full AGP 2X/AGP 4X support (up to 1GB/sec bandwidth)
• 360 MHz main RAMDAC and 230MHz secondary RAMDAC
• Support for all VESA standards:
— VBE 2.0 (Super VGA modes)
— DPMS energy saving
— DDC2B support for Plug and Play (PnP) detection of monitor
• Support for true 32-bit color (16.7 million colors) at resolutions up to
2048 x 1536 on the main display
• Support for monitors with 16/10 aspect ratio, at resolutions up to
1920 x 1200 on the main display
3D Features
• VCQ2 or Vibrant Color Quality2
• Supports 32-bit Z buffering for exceptional rendering precision
• Environment-mapped bump mapping for more realistic 3D images
• Stencil buffering
• Bilinear, trilinear, and anisotropic filtering
• Single, double, and triple buffering
• Texture mapping
• MIP mapping
• Gouraud shading
• Alpha blending, anti-aliasing, fogging, specular highlighting
NOTE
If you use only one monitor, you must use Port 1. If you connect a second
monitor, the driver detects it during startup. This means that you must
connect both monitors to the graphics card before startup.
128
Chapter 9
Hardware Components
Graphics Cards
If the driver detects only one monitor, only the mono head settings are
available in the driver configuration screens.
Available Video Resolutions
The number of supported colors is limited by the graphics device and the
video memory. The resolution/color/refresh-rate combination is limited
by a combination of the display driver, the graphics device, and the video
memory. If the resolution/refresh-rate combination is set higher than the
display can support, you risk damaging the display.
The following table summarizes the maximum supported resolutions.
Maximum Display Resolution
Aspect Ratio
Main Display
Second Display
Traditional
4:3/5:4 aspect ratio
2048 x 1536
1600 x 1200
Wide screen
16:9/16:10 aspect ratio
1920 x 1200
1600 x 1024
The maximum refresh rates are always attainable with 8-bit or 16-bit
color. They may not be attainable with 24-bit or 32-bit color and the
highest refresh rates.
Chapter 9
129
Hardware Components
Graphics Cards
The following table summarizes the maximum supported refresh rates.
Maximum Refresh Rates (Hz)
Aspect Ratio
Resolution
Main Display
(360MHz
RAMDAC)
Second Display
(230MHz
RAMDAC)
Traditional
4:3/5:4 aspect ratio
640 x 480
200
200
800 x 600
200
200
1024 x 768
160
160
1152 x 864
140
150
1280 x 1024
120
120
1600 x 1200
100
85
1800 x 1440
85
—
1920 x 1440
85
—
2048 x 1536
85
—
856 x 480
200
200
1280 x 720
160
140
1600 x 1024
120
90
1920 x 1080
110
—
1920 x 1200
100
—
Wide screen
16:9/16:10
aspect ratio
Limitations
• The second display supports only 16-bit and 32-bit color.
• 3D acceleration is available only when you use 16-bit and 32-bit color.
NOTE
For complete information on the Matrox graphics cards, see
http://www.matrox.com/mga/home.htm
130
Chapter 9
Hardware Components
Graphics Cards
nVIDIA Quadro2 MXR
Figure 9-2 shows the nVIDIA Quadro2 MXR graphics card.
Figure 9-2
nVIDIA Quadro2 MXR Graphics Card
Actual graphics
card may differ
from the one
shown
The NVIDIA Quadro2 MXR graphics card’s main features include:
• TwinView architecture, supporting:
— single DVI-I (digital LCD)
— single VGA (analog CRT)
— one analog and one digital display (This is configurable from the
twin view control panel.)
• AGP 4X with fast writes
• 350 MHz RAMDAC (for primary display only)
• Digital Vibrance Control (DVC) for accurate color adjustment giving
bright, accurate colors in all conditions
• High-performance hardware anti-aliasing for smoother edges
3D Features
• Second-generation transform and lighting engines dedicated
graphics-specific GPU frees your workstation’s main processor for
other tasks and provides faster transform and lighting processing
• nVIDIA shading rasterizer provides natural visual properties such as
cloud, smoke, water, textiles, and plastic to images
• 32 MB unified frame buffer allows the use of high-resolution 32bpp
textures
Chapter 9
131
Hardware Components
Graphics Cards
• 32-bit Z/Stencil buffer eliminates polygon-popping problems in
high-polygon 3D imaging
nVIDIA Quadro2 Pro
Figure 9-3 shows the nVIDIA Quadro2 Pro graphics card.
This card only supports one monitor:
• Analog (VGA-Dsub connector)
• LCD (DVI-D connector)
The nVIDIA Quadro2 Pro graphics card’s main features include:
• Hardware anti-aliased line engine
• 6.4 GB/sec bandwidth enabling work in fully textured mode while
achieving real-time frame rates
• 64 MB unified frame buffer providing ample room for high resolution,
32bpp textures
• 1.0 G pixels/sec rendering power
• 31 M triangles/sec geometry processing power
Figure 9-3
nVIDIA Quadro2 Pro Graphics Card
132
Chapter 9
Hardware Components
Graphics Cards
NOTE
For complete information on nVIDIA graphics cards, see
http://www.nvidia.com/Products.nsf
Fire GL2 and Fire GL4
Figure 9-4 shows the Fire GL2 graphics card.
Figure 9-4
Fire GL2 Graphics Card
The ATI Fire GL graphics cards’ main features include:
Controller
IBM Chipset: RC 1000 256-bit Graphics Rasterizer and GT1000
hardware geometry engine with integrated features including:
•
•
•
•
•
•
•
VGA Controller
2D/3D Raster Engine and dual Texture Unit
8-bit Double Buffered Overlays
Video Overlay Unit
2 DMA / BLIT Units
Polygon Setup Processor
300 MHz / 30-bit Palette DAC, including four color lookup tables and
gamma correction table
• 256-bit Rasterizer and DDR memory interface
Chapter 9
133
Hardware Components
Graphics Cards
Resolution
• True color resolution up to 1920 x 1200, double-buffered and 24-bit,
Z-buffered
• Full scene anti-aliasing and dual displays (Fire GL4 only)
3D Performance
• 27 million (29 million for Fire GL4) Triangles/second, G-Shaded,
Z-buffered, non-Textured
• 31 million (33 million for Fire GL4) Anti-Aliased Vectors/second
• 410 million (512 million for Fire GL4) Pixels/second fill rate,
G-Shaded, Z-buffered, non-Textured
• 200 million (250 million for Fire GL4) Pixels/second Trilinear Texture
fill rate (Mip-mapped)
Professional 3D Rendering
•
•
•
•
•
•
•
•
•
•
•
Full OpenGL 1.1 ICD with 1.2 functional extensions
3D Acceleration w/ Texture Environments
Single-pass bump mapping and hardware 3D textures
Gouraud shading
Bilinear and trilinear MIP-mapping
Alpha blending
Fogging and depth cueing
Anti-aliased lines and sorted polygons
Scissoring and stippling
Overlay and stencil buffer
Z-buffering
Hardware geometry acceleration
• 100% OpenGL geometry pipeline
• Full geometry transform processing
• Full lighting calculations for 16 sources, including directional,
positional and spot
• Gamma Corrected Anti-Aliased Lines
• Back Face Culling
• Occlusion Culling
• Linked Queues
Broadcast Video
• Bilinear scaling (up/down)
• YUV-RGB converter for video and textures
134
Chapter 9
Hardware Components
Graphics Cards
• Supports 422 YUV & RGB Pixels
• Two Triple Buffered, Video Overlays
NOTE
For complete information on FireGL graphics cards, see
http://www.ati.com
Chapter 9
135
Hardware Components
Mass Storage Devices
Mass Storage Devices
You can find HP product numbers and replacement part numbers for
mass storage devices in the x4000 Service Handbook on HP’s Web site at
www.hp.com/workstations/support.
Flexible Disk Drives
The front-access shelf has a 3.5-inch, 1.44 MB flexible disk drive.
Hard Disk Drives
Table 9-1 lists the 3.5-inch (1-inch high) SCSI hard disk drives that may
be supplied with the HP x4000 Workstation.
Table 9-1
SCSI Hard Disk Drives
Quantum
Atlas 10K II
SCSI (10 krpm)
Quantum
Atlas 10K II
SCSI (10 krpm)
Capacity
18.4 GB
36.7 GB
Interface
Ultra160 SCSI
Ultra160 SCSI
External peak transfer
rate
160MB/sec
160MB/sec
Average seek time
(read)
4.7 ms
4.7 ms
Internal data rate
(MB/sec)
280 MB/sec min. to
478 MB/sec max.
280 MB/sec min. to
478 MB/sec max.
Number of discs/heads
3/6
5/10
Buffer size
8 MB
8 MB
136
Chapter 9
Hardware Components
Mass Storage Devices
Setting SCSI IDs for a Quantum Atlas Hard Disk Drive
You must assign an unused SCSI ID to your hard disk drive. SCSI IDs
range from 0 to 15 for wide 16-bit SCSI.
Table 9-2
SCSI ID Settings
SCSI ID
Used By
0
First SCSI hard drive
1
Optional second SCSI hard drive
2-6
Unused
7
SCSI controller
8 - 15
Unused
To set the SCSI ID:
1. Assign an unused SCSI ID. See Table 9-2:
• If you are adding a SCSI hard drive to your system, consider
setting the new hard drive SCSI ID to 1. However, if you have
other SCSI devices connected externally, or have changed the
SCSI ID of the currently installed hard drive, remember this SCSI
ID must be unique.
• If you are replacing a SCSI hard drive, you can use the SCSI ID
number of the current hard drive for the replacement hard drive.
2. Using the jumpers provided, set the SCSI ID on the 28-pin jumper
block located on the bottom of the hard disk drive. See Figure 9-5.
CAUTION
Do not use the 12-pin jumper block next to the power connector.
Chapter 9
137
Hardware Components
Mass Storage Devices
Figure 9-5
28-Pin Jumper Block
28-Pin Jumper
Block
When viewed from
the top side, pin 1 is
on the bottom row,
closest to the edge
of the drive.
2
8
18
28
1
7
17
27
2
8
18
28
1
7
17
27
2
8
18
28
1
7
17
27
SCSI ID = 0
SCSI ID = 1
Horizontal jumpers on
the bottom row have no
effect. This is a good
way to store unused
jumpers.
Terminating Resistor.
Do not remove.
SCSI ID = 11
138
Chapter 9
Hardware Components
Mass Storage Devices
Table 9-3
Jumper Locations for Hard Drive SCSI ID Settings
SCSI ID
Jumper the following pins when indicated:
Pins 1 - 2
Pins 3 - 4
Pins 5 - 6
Pins 7 - 8
0
1
Jumper
2
Jumper
3
Jumper
4
Jumper
5
Jumper
6
Jumper
Jumper
7
Jumper
Jumper
Jumper
8
Jumper
9
Jumper
10
Jumper
Jumper
11
Jumper
Jumper
12
Jumper
Jumper
13
Jumper
Jumper
14
Jumper
Jumper
Jumper
15
Jumper
Jumper
Jumper
Chapter 9
Jumper
Jumper
Jumper
Jumper
Jumper
Jumper
139
Hardware Components
Mass Storage Devices
Optical Drives
IDE 48X CD-ROM Drive
The x4000 Workstation may have a 48X IDE CD-ROM drive, which
features:
• ATAPI commands
• Audio CD playback capability
It can play any standard audio CD or CD-ROM conforming to optical
and mechanical standards as specified in the Red, Yellow, Green, and
Orange Book.
• Application disk type
• CD-ROM data disk (Mode 1 and Mode 2)
• Photo-CD Multisession
• Mixed-mode CD-ROM (data and audio)
• CD-ROM XA, CD-I, CD-Extra, CD-R, CD-RW
Description
Data capacity
650 MB
Data transfer rate
Sustained transfer rate (1X=150 KB/sec) Outerside:
7,200 KB/sec
Burst transfer rate:
PIO mode 4 - 16.6 MB/sec maximum
Single Word DMA Mode 2 - 8.3 MB/sec maximum
Multi Word DMA Mode 2 - 16.6 MB/sec maximum
Buffer memory size
Access time
128 KB
Average stroke (1 / 3) 110 ms
Full stroke 180 ms
Rotational speed
2,048 bytes (Mode 1)
2,336 bytes (Mode 2)
Interface
ATAPI
Power requirements
5 V, 1.2 A
12 V, 0.8 A
140
Chapter 9
Hardware Components
Mass Storage Devices
8X Video IDE DVD-ROM Drive
The x4000 Workstation may have a DVD-ROM drive that features
standard audio CD and CD-ROM playback. It can play any standard
audio CD or CD-ROM conforming to optical and mechanical standards as
specified in the Red, Yellow, Green, and Orange Book. The DVD-ROM
drive is DVD video capable, when you install the DVD-video software
(not included with the HP x4000 Workstation).
Description
Data capacity
650 MB
Data transfer rate
Sustained transfer rate (1X = 150 KB/sec);
Outerside: 7,200 KB/sec
Burst transfer rate:
PIO mode 4 - 16.6 MB/sec maximum
Single Word DMA Mode 2 - 8.3 MB/sec maximum
Multi Word DMA Mode 2 - 16.6 MB/sec maximum
Buffer memory size
128 KB
Access time
Average stroke (1 / 3) 110 ms
Full stroke 180 ms
Rotational speed
2,048 bytes (Mode 1)
2,336 bytes (Mode 2)
Interface
ATAPI
Power requirements
5 V, 1.2 A
12 V, 0.8 A
Chapter 9
141
Hardware Components
Mass Storage Devices
12X IDE CD-Writer Plus Drive
The x4000 Workstation may have a 12X IDE CD-RW drive that features:
• Support for ATAPI commands
• Audio CD playback capability
It can play any standard audio CD or CD-ROM conforming to optical
and mechanical standards as specified in the Red, Yellow, Green, and
Orange Book.
• Support for recording both CD-R and CD-RW optical media ( you
must install CD-RW software to use this feature, a CD-RW software
installation CD is provided when a CD-RW accessory is order for the
HP x4000 Workstation.
Description
Data capacity
650 MB or up to 74 minutes of audio per disc
547 MB in CD-UDF data format
Performance
Typical: 110 ms (random, 1/3 access including latency)
Maximum: 130 ms (random, 1/3 access including
latency)
Data transfer rate:
Read: Up to 32X (1X = 150KB/sec)
Write: 12X (CD-R); 8X (CD-RW)
Burst transfer rate
16.67 MB/sec
Spin-up time
3.2 seconds (disk high speed to stop)
Spin-down time
2.5 seconds (disk high speed to stop)
Corrected error rate
ECC On (max. 32X): 1 block/1012 bits
ECC Off (max. 32X): 1 block/109 bits
Data Buffer Capacity
2 MB
Write methods
- Track at once
- Session at once
- Disc at once
Format and EEC
standard
Red, Yellow, Orange, Green books
142
- Variable packet writing
- Fixed packet writing
- Multisession
Chapter 9
Hardware Components
Mass Storage Devices
Description
MTBF
120,000 POH
Interface
E-IDE and ATAPI
Chapter 9
143
Hardware Components
Rear Panel Connectors
Rear Panel Connectors
Figure 9-6 shows the rear panel of the x4000 Workstation.
Figure 9-6
x4000 Rear Panel
Power
HP Master Key
Lock
SCSI
Mouse
Keyboard
Dual USB
Serial port A
Parallel port
Serial port B
LAN
Line Out
(headphone)
Line In
Microphone
Monitor
The connector pin descriptions are given in Chapter 7 for:
•
•
•
•
•
•
SCSI
Keyboard and Mouse
USB
Serial
LAN
Parallel
144
Chapter 9
10
Installing or Replacing Parts
and Accessories
Chapter 10
143
Installing or Replacing Parts and Accessories
Overview
Overview
This chapter explains how to install and remove the following
accessories:
• “Cover and Front Bezel” on page 145
• “Hard Disk Drive Cage” on page 149
• “Chassis Beam Assembly” on page 152
• “Memory Expander Card (MEC)” on page 155
• “System Memory” on page 157
• “Graphics Card” on page 162
• “SCSI Hard Drive” on page 167
• “CD-ROM, CD-RW or DVD” on page 171
• “Processor” on page 175
NOTE
Check your configuration every time you install, remove, or upgrade an
accessory. For instructions on how to check your configuration using the
HP Setup program, refer to the Getting Started Guide that came with
your x4000 Workstation, or the HP x4000 Workstation Technical
Reference Guide located at www.hp.com/workstations/support.
144
Chapter 10
Installing or Replacing Parts and Accessories
Cover and Front Bezel
Cover and Front Bezel
Removing the Left Side Cover
WARNING
For your safety, never remove the Workstation cover without
first disconnecting the power cord from the power outlet and
removing any connection to a telecommunications network. If a
Power Protection Device is fitted to your Workstation, you must
shut down your computer through the operating system, then
remove the power cord before removing the Workstation’s cover.
Remove the Power Protection Device cables before any servicing
operation. Always replace the cover before switching the
Workstation on again.
To remove the cover (Figure 10-1):
1. Turn off the display and shut down the Workstation. Disconnect all
power cables and any LAN or telecommunications cables.
2. If necessary, unlock the cover on the back of the Workstation.
3. Unscrew the two thumb screws located at the back of the Workstation
until they release. You may need to use a T15 Torx driver. The thumb
screws do not need to be completely removed to remove the cover.
4. Standing at the back of the Workstation, slide the cover towards you,
tilt it open, then lift it off.
Chapter 10
145
Installing or Replacing Parts and Accessories
Cover and Front Bezel
Figure 10-1
Removing the Cover
4
3
2
146
Chapter 10
Installing or Replacing Parts and Accessories
Cover and Front Bezel
Removing the Front Bezel
You only need to remove the front bezel when you are adding or removing
devices in the 5.25-inch or 3.5-inch front drive bays.
To remove the bezel:
1. Gently lift the four plastic tabs starting with the bottom tab and
working your way to the top.
2. Rotate the bezel off the Workstation chassis.
Figure 10-2
Removing the bezel
Plastic Tabs
Chapter 10
147
Installing or Replacing Parts and Accessories
Cover and Front Bezel
Replacing the Cover and Front Bezel
To replace the cover and front bezel:
1. Ensure that all internal cables are properly connected and safely
routed.
2. If necessary, replace the front bezel:
a. Align the plastic quarter rounds on the inside of the bezel with the
sheet metal sockets on the right side of the chassis.
b. Rotate the bezel into position and verify that the plastic tabs on
the left side of the bezel click into position on the Workstation
chassis.
The bezel should be flush against the Workstation.
3. Standing at the back of the Workstation, lower the cover onto the
chassis (aligning the guide rail on the bottom inside edge of the cover
with the bottom edge of the Workstation chassis).
4. Shut the cover ensuring that the guides on the top of the cover slide
into the rails at the top of the chassis.
5. Slide the cover forward, then tighten the two thumbscrews.
6. If required, lock the cover using the key provided.
148
Chapter 10
Installing or Replacing Parts and Accessories
Hard Disk Drive Cage
Hard Disk Drive Cage
Opening the Hard Disk Drive Cage
To open the cage (Figure 10-3):
1. Disconnect the SCSI cable(s) and power cable(s) from the hard disk
drive(s).
CAUTION
Do not rotate the cage before you disconnect the cables.
2. Remove and retain the two torx screws that hold the cage closed as
shown in Figure 10-3.
3. Pull the cage toward you until you hear the hard disk drive cage clip
catch the cage.
WARNING
Confirm the clip has latched the cage in the open position.
Injury could be result if the cage falls.
Chapter 10
149
Installing or Replacing Parts and Accessories
Hard Disk Drive Cage
Figure 10-3
Hard Disk Drive Cage
Screws for
installing a
second
hard disk
drive
Step 2
Upper Bay
Lower Bay
Hard Disk
Drive Cage
Clip
Closing and Securing the Hard Disk Drive Cage
CAUTION
Clear all cables from the area where the hard disk drive cage rests on the
chassis beam assembly. If cables are in the way, you may damage them
when you move the hard disk drive cage back into the closed position.
To close and secure the hard disk drive cage:
1. Push in the clip shown in Figure 10-3 on page 150 and rotate the hard
drive cage carefully into the closed position.
CAUTION
Do not allow the cage to drop into place. This could damage the hard
drive(s).
2. Fasten the cage with two screws in the locations shown in Figure 10-3
on page 150.
150
Chapter 10
Installing or Replacing Parts and Accessories
Hard Disk Drive Cage
3. If it is not already attached, connect the SCSI cable to the system
board internal SCSI connector as shown in Figure 10-4.
Figure 10-4
Internal SCSI Connector and Cable
SCSI cable
connected to
internal SCSI
Connector
External SCSI
connector
4. Connect the SCSI cable to the hard disk drive(s):
a. Attach the SCSI connector farthest from the system board to the
hard drive in the upper bay.
b. Attach the remaining SCSI connector to the hard drive in the
lower bay.
5. Connect the power supply cable(s) to the hard disk drive(s):
a. Connect the power supply cable labeled P3 to the hard disk drive
in the upper bay.
b. Attach the power supply cable labeled P4 to the hard disk drive in
the lower bay.
Chapter 10
151
Installing or Replacing Parts and Accessories
Chassis Beam Assembly
Chassis Beam Assembly
Before you can access many of the components inside your Workstation,
you must remove the chassis beam assembly.
Removing the Chassis Beam Assembly
To remove the chassis beam assembly:
1. Open the hard disk drive cage (see page 149).
2. Remove the screw that holds the chassis beam assembly in place.
3. Carefully rotate the chassis beam assembly off the chassis.
Figure 10-5
Chassis Beam Assembly
Step 2
152
Chapter 10
Installing or Replacing Parts and Accessories
Chassis Beam Assembly
Installing the Chassis Beam Assembly
To install the chassis beam assembly:
1. Hook the chassis beam assembly to the left side of the chassis and
rotate it down over the MEC and the graphics card making sure the
MEC and graphics card retainer clips are centered on the cards as
shown in Figure 10-6 and Figure 10-7.
CAUTION
Make sure the retaining clips slide easily over the cards, or the clips
may put undue pressure on the card connectors.
2. Replace the screw that holds the chassis beam assembly in place.
Figure 10-6
MEC Retainer Clip
Retaining clip
on MEC.
Chapter 10
153
Installing or Replacing Parts and Accessories
Chassis Beam Assembly
3. If your graphics card does not have a separate graphics card retainer
beam, you must secure the graphics card by engaging the Universal
Retainer piece (see Figure 10-7).
NOTE
Figure 10-7
Not all systems use the chassis beam assembly Universal Retainer
piece to hold the graphics card in place. Your system may use a
separate graphics card retainer beam (see Figure 10-14).
Secure the Universal Retainer Piece
Graphics Card
154
Chapter 10
Installing or Replacing Parts and Accessories
Memory Expander Card (MEC)
Memory Expander Card (MEC)
Removing the MEC
To remove the MEC:
1. Turn off the display and shut down the Workstation. Disconnect all
power cables and any LAN or telecommunications cables.
2. Remove the Workstation’s cover (see page 145).
3. To ease installation, place the Workstation on its side with the system
board facing upwards.
4. Rotate the hard disk drive cage to the open position (see page 149).
5. Remove the chassis beam assembly (see page 152).
6. Remove retaining screw that holds the MEC in place and gently
remove the MEC from the chassis as shown in Figure 10-8.
CAUTION
You must remove the MEC to install RIMMs. The MEC card guides
are not strong enough to bear the force of the RIMMs being inserted.
Chapter 10
155
Installing or Replacing Parts and Accessories
Memory Expander Card (MEC)
Figure 10-8
Removing the MEC
Installing the MEC
To install the MEC:
1. Replace the MEC, making sure it is fully seated, and tighten the
retaining screw.
2. Replace the chassis beam assembly (see page 153).
3. Close and secure the hard disk drive cage (see page 150).
4. Replace the Workstation cover (see page 148).
5. Reconnect all power cables and any LAN or telecommunications
cables.
156
Chapter 10
Installing or Replacing Parts and Accessories
System Memory
System Memory
NOTE
Use only HP RIMMs specifically designed for your Workstation model. To
find out about available accessories for your Workstation, go to
www.hp.com/workstations/support.
Upgrading Memory on the 8-RIMM MEC
The memory for the HP x4000 Workstation is located on a Memory
Expander Card (shown in Figure 10-9 on page 158), which plugs into the
system board.
There are two memory banks (RDRAM channels):
• Bank I includes sockets 1B (J1), 2B (J2), 1A (J5), and 2A (J6).
• Bank II includes sockets 3B (J3), 4B (J4), 3A (J7), and 4A (J8).
This allows for a total of 8 RIMMs.
You must adhere to the following rules when loading memory:
• RIMMs must be loaded in matched pairs. Matching RIMMs have the
same RDRAM size, speed and Mbit technology.
• Each RDRAM bank (channel) must be either completely empty or
completely filled as shown in Figure 10-10. Therefore, if only one pair
of RIMMs is installed in a bank, then the remaining sockets in the
bank must contain continuity modules (CRIMMs) to ensure
continuity.
NOTE
All Workstations (unless they already have 8 RIMMs) ship with a pair of
CRIMMs in case they are needed in future memory configurations.
CRIMMS may be stored in an unused memory bank.
Chapter 10
157
Installing or Replacing Parts and Accessories
System Memory
Figure 10-9
x4000 Memory Expander Card (MEC)
2A (J6)
1A (J5)
4B (J4)
3B (J3)
4A (J8)
2B (J2)
3A (J7)
1B (J1)
Memory Bank I consists of:
RIMM pair 1: 1A (J5) and 1B (J1)
RIMM pair 2: 2A (J6) and 2B (J2)
Memory Bank II consists of:
RIMM pair 3: 3A (J7) and 3B (J3)
RIMM pair 4: 4A (J8) and 4B (J4)
If a memory bank only contains 1 pair of RIMMs, the remaining
2 connectors must contain CRIMMs to ensure continuity.
158
Chapter 10
Installing or Replacing Parts and Accessories
System Memory
Figure 10-10
Replacing or Upgrading Memory
1 Pair of RIMMs
2 Pairs of RIMMs
CRIMM
RIMM 1A
RIMM 2A
RIMM 1A
CRIMM
RIMM 1B
RIMM 2B
RIMM 1B
P1 - edge
P1 - edge
3 Pairs of RIMMs
Memory
Bank I
4 Pairs of RIMMs
RIMM 2A
RIMM 1A
CRIMM
RIMM 3B
RIMM 2A
RIMM 4B
RIMM 1A
RIMM 3B
CRIMM
RIMM 3A
RIMM 2B
RIMM 1B
RIMM 4A
RIMM 3A
RIMM 2B
P1 - edge
Memory
Bank II
RIMM 1B
P1 - edge
Note: RIMM 1A and 1B are a matched pair, 2A and 2B are a matched pair,
3A and 3B are a matched pair, and 4A and 4B are a matched pair.
Installing Memory
1. Before turning off your Workstation, check the current amount of
installed memory. Refer to your operating system documentation for
instructions on finding this information.
2. Turn off the display and shut down the Workstation. Disconnect all
power cables and any LAN or telecommunications cables.
3. Remove the Workstation’s cover (see page 145).
4. To ease installation, place the Workstation on its side with the system
board facing upwards.
Chapter 10
159
Installing or Replacing Parts and Accessories
System Memory
5. Rotate the hard disk drive cage to the open position (see page 149).
6. Remove the chassis beam assembly (see page 152).
7. Remove the Memory Expander Card (MEC) (see page 155).
CAUTION
You must remove the MEC to install RIMMs (and CRIMMs). The
MEC card guides are not strong enough to bear the force of the
RIMMs being inserted.
8. Install the RIMMs (and CRIMMs if required) on the MEC according
to Figure 10-10.
a. If you are installing additional RIMMs, you may need to remove
the CRIMMs. Open the retaining clips by pushing down on them,
and remove the CRIMM from the socket. See Figure 10-11 on
page 161.
b. If you are replacing existing RIMMs, open the retaining clips by
pushing down on them, and remove the existing RIMMs from
their sockets.
NOTE
Always store any removed RIMMs and CRIMMs in a safe place for
future use. CRIMMs may be stored in an empty memory bank if one
is available.
c. Install your new RIMMs or CRIMMs, ensuring that the two
notches on the bottom edge are aligned with those of the socket.
With the two retaining clips open, press the RIMM fully into the
socket until the retaining clips click into position. You can also
close the retaining clips by hand to ensure that the RIMM is
correctly inserted.
160
Chapter 10
Installing or Replacing Parts and Accessories
System Memory
Figure 10-11 Inserting RIMMs and CRIMMs
MEC Voltage
Regulator Module
(not on all MECs)
Retaining Clip
fully engaged
9. Replace the MEC (see page 156).
10. Replace the chassis beam assembly (see page 153).
11. Close and secure the hard disk drive cage (see page 150).
12. Replace the Workstation cover (see page 148).
13. Reconnect all power cables and any LAN or telecommunications
cables.
14. Start the Workstation and check the Summary Screen by pressing
Esc when prompted to verify the new configuration. The Summary
Screen displays the amount of memory.
Chapter 10
161
Installing or Replacing Parts and Accessories
Graphics Card
Graphics Card
Removing a Graphics Card
NOTE
You can uninstall the driver for the old graphics card before installing a
new graphics card. This keeps you from getting a warning when the old
driver tries to load in the operating system.
To remove a graphics card:
1. Turn off the display and shut down the Workstation. Disconnect all
power cables and any LAN or telecommunications cables.
2. Remove the Workstation’s cover (see page 145).
3. Remove any cables connected to the graphics card on the rear panel.
4. To ease installation, place the Workstation on its side with the system
board facing upwards.
5. Rotate the hard disk drive cage to the open position (see page 149).
6. Remove the chassis beam assembly (see page 152).
7. Before removing the graphics card:
• If your graphics card came with a separate graphics retainer beam
as shown in Figure 10-14 on page 164:
a. Remove the screw that attaches the graphics card and the
graphics retainer beam to the rear slot panel.
b. Remove the full-length graphics card retaining screw.
• If your graphics card did not come with a separate graphics
retainer beam, remove the retaining screw as shown in Figure
10-12 on page 163.
8. Carefully pull out the card.
9. Store the card in a static bag.
162
Chapter 10
Installing or Replacing Parts and Accessories
Graphics Card
Figure 10-12
Removing the Graphics Card Retaining Screw
Installing a Graphics Card
To install a graphics card:
1. If you are replacing an existing card, remove the current card (see
page 162).
2. Unscrew and remove the rear slot panel that corresponds AGP Pro
110 4X connector. The screw you removed is used to retain the
graphics card.
NOTE
If you are installing a full-length graphics card, you must remove the
graphics board retaining screw near the front of the chassis as shown
in Figure 10-13.
Chapter 10
163
Installing or Replacing Parts and Accessories
Graphics Card
Figure 10-13
Full-Length Graphics Card Retaining Screw
Full-Length
Graphics Card
Retaining Screw
3. Align the new card carefully and slide it into position. Press it firmly
into the slot.
4. Secure your graphics card:
• If your graphics card came with a separate graphics retainer
beam:
a. Remove both of the universal retainer pieces from the chassis
beam assembly shown in Figure 10-15 and store these in a safe
place for future use.
b. Using the screw that you removed from the rear slot panel and
the graphics card retaining screw shown in Figure 10-13,
attach the graphics retainer beam as shown in Figure 10-14.
Figure 10-14 Graphics Card Retainer Beam
This screw
attaches the
retainer beam to
the rear panel
slot.
Full-Length
Graphics
Card
Retaining
Screw
164
Chapter 10
Installing or Replacing Parts and Accessories
Graphics Card
• If your graphics card did not come with a separate graphics
retainer beam, you must use the retainer clip on the chassis beam
assembly to secure your graphics card. The retainer clip holds the
graphics card securely in the AGP Pro 110 4X slot:
a. Use the screw you removed the rear slot panel to attach the
graphics card to the chassis.
b. There are two universal retainer clips on the chassis beam
assembly (see Figure 10-15). The longer clip (A) is used for
shallower graphics cards. The shorter clip (B) is used for
deeper graphics cards. Remove the retainer clip you don’t need.
c. Move the remaining retainer clip to the center position shown
in Figure 10-15. If your graphics card is too shallow for the clip
to hold it tightly in this position, return it to the other arm.
Figure 10-15 Retainer Pieces on the Chassis Beam Assembly
Remove the
unused retainer
clip and move the
required retainer
clip to the center
position.
The retainer clip
keeps the graphics
board seated on
the system board
when the chassis
beam assembly is
installed.
Center Position
Retainer Clip A
Retainer Clip B
5. Replace the chassis beam assembly (see page 153).
If your graphics card has a retainer beam, once the chassis beam
assembly is in place it looks like Figure 10-16.
Chapter 10
165
Installing or Replacing Parts and Accessories
Graphics Card
Figure 10-16
Graphics Card Retainer Beam and Chassis Beam Assembly
Chassis Beam
Assembly
Graphics Card
Retainer Beam
6. Close and secure the hard disk drive cage (see page 150).
7. Replace the Workstation cover (see page 148).
8. Reconnect all power cables and any LAN or telecommunications
cables.
166
Chapter 10
Installing or Replacing Parts and Accessories
SCSI Hard Drive
SCSI Hard Drive
CAUTION
Back up your files before you install a hard disk drive.
Your Workstation has on-board SCSI capability. You can connect up to
two internal SCSI hard disk drives.
Figure 10-17 shows the internal and external SCSI connectors on the
system board.
Figure 10-17
SCSI System Board Connectors
Internal SCSI
connector
External SCSI
connector
Chapter 10
167
Installing or Replacing Parts and Accessories
SCSI Hard Drive
Removing a SCSI Hard Disk Drive
To remove the SCSI hard disk drive:
1. Turn off the display and shut down the Workstation. Disconnect all
power cables and any LAN or telecommunications cables.
2. Remove the Workstation’s cover (see page 145).
3. Open the hard disk drive cage (see page 149).
4. Remove the hard disk drive from the cage by removing the four torx
screws that hold the drive in place as shown in Figure 10-18.
Figure 10-18
Removing the Hard Disk Drive
Screws for
installing a
second
hard disk
drive
Upper Bay
Lower Bay
These 4 screws
(2 front, 2 back)
hold one hard
drive in place.
168
Chapter 10
Installing or Replacing Parts and Accessories
SCSI Hard Drive
Setting SCSI IDs for a New Hard Disk Drive
You must assign an unused SCSI ID to your hard disk drive. SCSI IDs
range from 0 to 15 for wide 16-bit SCSI.
SCSI ID 0 is used by the first SCSI hard disk drive. SCSI ID 7 is reserved
for the integrated SCSI controller (see Table 10-1). You should assign an
unused SCSI ID to the second SCSI hard disk drive (SCSI ID 1 is
recommended).
Table 10-1
SCSI ID Settings
SCSI ID
Used By
0
First SCSI hard drive
1
Optional second SCSI hard drive
2-6
Unused
7
SCSI controller
8 - 15
Unused
The SCSI ID is configured with jumpers on the SCSI hard disk drive.
Refer to the information label on the hard disk drive, or “Hard Disk
Drives” on page 134, for additional details on setting the SCSI ID.
Chapter 10
169
Installing or Replacing Parts and Accessories
SCSI Hard Drive
Installing a SCSI Hard Disk Drive
CAUTION
Before proceeding with this section, make sure you have set the SCSI ID
for your hard disk drive (see page 169). Devices that are incorrectly
configured cause the Workstation to behave unpredictably.
Take care when handling the hard disk drive during installation. A
one-quarter inch drop can damage it.
To install one or two hard disk drives:
1. Turn off the display and shut down the Workstation. Disconnect all
power cables and any LAN or telecommunications cables.
2. Remove the Workstation’s cover (see page 145).
3. Open the hard disk drive cage (see page 149).
4. Install the hard disk drive(s) in the cage using the screws provided on
the hard disk drive cage as shown in Figure 10-18 on page 168:
a. If you only have one hard drive, install it in the bottom bay.
b. If required, install a second hard drive in the top bay.
c. Align the screw holes on each hard drive with the openings in the
hard disk drive cage.
d. Fasten each hard disk drive to the cage with four screws, two on
each side of the cage. The screws for installing the new drive are
attached to the hard disk drive cage.
5. Close and secure the hard disk drive cage (see page 150).
6. Replace the Workstation cover (see page 148).
7. Reconnect all power cables and any LAN or telecommunications
cables.
8. Start the Workstation and check the Summary Screen by pressing
Esc when prompted to verify the new configuration.
170
Chapter 10
Installing or Replacing Parts and Accessories
CD-ROM, CD-RW or DVD
CD-ROM, CD-RW or DVD
The CD-ROM, CD-RW and DVD are IDE devices.
An IDE cable is shown in Figure 10-19.
Figure 10-19
IDE Data Cable
Connects to
system board
IDE controller
Connects to Slave
IDE device
Red stripe
indicates Pin 1
Connects to
Master IDE device
Chapter 10
171
Installing or Replacing Parts and Accessories
CD-ROM, CD-RW or DVD
Determining IDE Connections
The following table explains which data connectors to use when you
install IDE devices. All the IDE devices are jumpered Cable Select at the
factory. This means that Master and Slave configurations are determined
by the device position on the IDE cable:
•
The device attached to the connector closest to the system board is
the Slave.
• The device attached to the connector farthest from the system board
is the Master.
IDE Drive Cabling Suggestions
(always use the secondary IDE controller)
1 CD-ROM drive
Master
1 CD-RW drive
Master
1 DVD drive
Master
1 CD-ROM drive
1 CD-RW drive
Master
Slave
1 CD-ROM drive
1 DVD drive
Master
Slave
1 DVD drive
1 CD-RW drive
Master
Slave
Removing a CD-ROM, CD-RW, or DVD
To remove an optical device:
1. Turn off the display and shut down the Workstation. Disconnect all
power cables and any LAN or telecommunications cables.
2. Remove the Workstation’s cover and front bezel (see page 145) for
instructions).
3. Disconnect the power, data, and audio cables from the old drive.
4. Remove the drive by pressing the two front rail clips inward and
sliding the drive out the front of the chassis.
5. Remove the guide rails by gently prying them off the drive. These
guide rails are required for the new drive.
172
Chapter 10
Installing or Replacing Parts and Accessories
CD-ROM, CD-RW or DVD
Figure 10-20
Removing the Old Drive
Step 4
Step 3
Installing a CD-ROM, CD-RW or DVD
To install an optical device:
1. Turn off the display and shut down the Workstation. Disconnect all
power cables and any LAN or telecommunications cables.
2. Remove the Workstation’s cover and front bezel (see page 145) for
instructions).
3. Remove the 5.25-inch metal filler plate from the chassis of the
Workstation by using your finger to pull the plate from the chassis.
4. Add the guide rails to the new drive. Refer to the sticker on the
Workstation chassis for the correct rails for your drive. Insert the
guide rails in the two holes located at the bottom of the drive. The
guide rails are not side-specific.
5. Align the guide rails on both sides of the drive with the internal shelf
guides, then slide the drive until it clicks into position. You should put
your Master device in the top bay and your Slave device in the lower
bay. For more information on Master/Slave configuration, see page
172.
6. Connect the power, data, and audio cables to the rear of the new
drive.
7. Remove the plastic cover piece from the Workstation’s bezel that
corresponds to your new drive before attaching the bezel and front
cover (see page 148).
8. Reconnect all the power and telecommunications cables.
Chapter 10
173
Installing or Replacing Parts and Accessories
CD-ROM, CD-RW or DVD
NOTE
If you installed a CD-RW, you must install the software that came with
the drive before you can write to the device.
The CD-ROM driver is pre-loaded and is used by the CD-ROM, CD-RW,
and DVD to read standard CD-ROM format media.
Load the Software Applications for Your CD-RW
If you have a CD-RW in your Workstation, you must install the Direct
CD and Easy CD Creator applications located on the Applications
CD-ROM before you can use the write/re-write functionality of the drive.
To install these applications:
1. Put the Applications CD-ROM in your CD-RW drive. Installation
begins automatically.
2. When the installation window appears, a dialog box appears asking
you to select your language. Select the language you wish to install.
3. Select one of these choices and follow the on-screen directions for
installation:
• Easy CD Creator
• Direct CD
4. When the installation wizard returns, you must restart your system
before installation is complete. To restart your system:
a. Select Exit.
b. Remove the Applications CD-ROM and click Yes to restart your
system.
NOTE
Repeat these instructions to install the second application. You must
restart your system between each installation in order for both
applications to install correctly.
If you do not install either Easy CD Creator and Direct CD, you can only
use the CD-RW drive’s read functionality.
174
Chapter 10
Installing or Replacing Parts and Accessories
Processor
Processor
The x4000 Workstation can have two processors. The processors must be
identical.
CAUTION
If you are upgrading your current processor, you must update the BIOS.
The latest BIOS is located at www.hp.com/workstations/support.
If you are adding a second processor, you must update your operating
system (see “Updating Your Operating System” on page 179).
Removing a Processor
CAUTION
Before removing your processor, turn on the Workstation and let it run
for 3 to 5 minutes. This warms up the processor and makes it easier to
detach the heatsink. Be very careful when removing the heatsink. If your
processor turbo cooler fan is not operating, the heatsink may be very hot.
Under normal circumstances, the turbo cooler fan is operational and a
slight twist of the heatsink should release it from the processor.
To remove a processor:
1. Turn off the display and shut down the Workstation. Disconnect all
power cables and any LAN or telecommunications cables.
2. Remove the Workstation’s cover (see page 145).
3. Place the Workstation on its side for better access.
4. Open the hard disk drive cage (see page 149).
5. Remove the Chassis Beam Assembly as shown in Figure 10-5 on
page 152.
6. Remove the MEC card (see page 162).
7. Remove the heatsink power connector from the system board.
Chapter 10
175
Installing or Replacing Parts and Accessories
Processor
8. Remove the two heatsink clips by pressing the release lever on the
clips. Then lift off the heatsink. There is a thermal interface material
between the heatsink and the processor. This may cause the processor
to stick to the heatsink.
Figure 10-21
Removing a Processor
Step 8
Step 10
9. Remove the thermal interface material from the heatsink and discard
it. You can leave any residue that remains on the heatsink. This does
not impair the heat transfer.
10. Open the Zero Insertion Force (ZIF) lever, located at the side of the
processor socket, until it is in the vertical position (depending on the
socket design, the handle may need to go past vertical), then carefully
lift out the processor. To avoid bending the processor pins, keep the
processor perfectly flat when removing it.
11. Store the processor in an anti-static bag (such as the one provided
with the replacement processor).
12. If you are permanently removing a second processor, you must update
your operating system (see page 179). You should also store the
heatsink and clips in a safe place.
176
Chapter 10
Installing or Replacing Parts and Accessories
Processor
Installing a Processor
To install a processor:
1. Turn off the display and shut down the Workstation. Disconnect all
power cables and any LAN or telecommunications cables.
2. Remove the Workstation’s cover (see page 145).
3. Place the Workstation on its side for better access.
4. Open the hard disk drive cage (see page 149).
5. Remove the Chassis Beam Assembly (see page 152).
6. Remove the MEC card (see page 162).
7. Ensure the processor is correctly oriented by matching the notches on
the processor to the notches on the ZIF socket. Then carefully lower
the new processor into place. When the processor is fully inserted,
close the ZIF lever.
CAUTION
Be extremely careful when you insert the processor. If you bend one of
the pins, it will not go into the socket.
Figure 10-22
Inserting a Processor
Step 9
Step 7
8. Affix the new thermal interface material, provided with the new
processor, to the top of the processor.
9. Attach the heatsink to the processor. Use the retaining clips to attach
the heatsink. For easier installation, partially attach both clips by
hooking one end of the side slot in each clip. Press down on the
remaining ends of both clips until they click into place.
Chapter 10
177
Installing or Replacing Parts and Accessories
Processor
10. Connect the heatsink turbo fan power connector to the system board.
The fan connectors are labeled CPU0 and CPU1 on the system board.
11. Replace the MEC card.
12. Replace the Chassis Beam Assembly (see page 153).
13. Close and secure the hard disk drive cage (see page 150).
14. Replace the Workstation’s cover (see page 148).
15. Reconnect all the power and telecommunications cables.
16. Update your operating system (see page 179).
178
Chapter 10
Installing or Replacing Parts and Accessories
Processor
Updating Your Operating System
If you are adding a second processor to your Workstation (or removing a
processor), you must update your operating system to reflect these
changes.
Windows 2000
To update your operating system in Windows 2000:
1. Go to the Control Panel by selecting Start > Settings > Control Panel.
2. Select the System icon.
3. In the Hardware tab, select Device Manager.
4. Expand the Computer branch. The type of support that you currently
have is displayed:
• ACPI UniProcessoor PC
• ACPI MultiProcessor PC
To change the type of support, double click on this icon to bring up the
ACPI PC properties.
5. In the Driver tab, select Update Driver. The Upgrade Device Driver
Wizard appears and you must select Next to continue.
6. Choose to display a list of all the known drivers and click Next.
7. When all the drivers are located, click the radio button to show all
hardware of this device class, select one of the following and click Next
to install the new driver:
• ACPI MultiProcessor PC if you have added a second processor.
• ACPI UniProcessoor PC if you have removed your second processor.
Windows NT
To update your operating system in Windows NT, use the HP
DualExpress utility which is posted at www.hp.com/workstations/support.
Chapter 10
179
Installing or Replacing Parts and Accessories
Floppy Disk Drive
Floppy Disk Drive
Removing the Floppy Disk Drive
1. Turn off the display and shut down the Workstation. Disconnect all
power cables and any LAN or telecommunications cables.
2. Remove the Workstation’s cover and front bezel (refer to “Cover and
Front Bezel” on page 145 for these instructions).
3. Disconnect the power and data cables from the old drive.
4. Remove the drive by pressing the two front rail clips inward and
sliding the drive out the front of the chassis.
5. Remove the two guide rails by gently prying them off the drive. These
guide rails are required for the new drive.
Figure 10-23
Removing the Floppy Disk Drive
3
4
180
Chapter 10
Installing or Replacing Parts and Accessories
Floppy Disk Drive
Installing the Floppy Disk Drive
1. Add the guide rails to the new drive. Insert the guide rail labeled “L”
on the left-hand side (cable connectors facing towards you and
positioned at the top), and the guide rail “R” on the right-hand side of
the floppy disk drive.
2. Align the guide rails on both sides of the drive with the internal shelf
guides, then slide the drive until it clicks into position.
3. Connect the power and floppy data cables to the new drive. The
connectors are shaped to go in one way only.
4. Replace the front bezel and Workstation’s cover (refer to “Replacing
the Cover and Front Bezel” on page 148).
5. Reconnect all the power and telecommunications cables.
Chapter 10
181
Installing or Replacing Parts and Accessories
Power Supply
Power Supply
WARNING
Hewlett-Packard does not support power supply upgrades. This
information is provided to help you replace a defective power
supply unit. For your safety, only use a power supply provided by
HP support services.
Removing the Power Supply Unit
1. Turn off the display and shut down the Workstation. Disconnect all
power cables and any LAN or telecommunications cables.
2. Remove the Workstation’s cover (refer to “Removing the Left Side
Cover” on page 145 for instructions).
3. Place your Workstation on its side with the system board facing
upwards.
4. Remove all internal power supply connectors.
5. Remove the three screws located on the rear of the chassis that secure
the power supply unit in position.
6. Remove the screw located inside the Workstation at the top of the
power supply unit.
7. Push the supply unit forward until it is clear of the guide rail and
remove it from the chassis.
182
Chapter 10
Installing or Replacing Parts and Accessories
Power Supply
Figure 10-24
Removing the Power Supply Unit
7
6
5
Installing the Power Supply Unit
To install the power supply unit:
1. Insert the new power supply unit.
2. Secure it to the back and top of the chassis using the four screws you
previously removed.
3. Reconnect all internal power supply connectors.
4. Return the Workstation to its upright position.
5. Replace the Workstation’s cover (refer to “Replacing the Cover and
Front Bezel” on page 148).
6. Reconnect all the power and telecommunications cables.
Chapter 10
183
Installing or Replacing Parts and Accessories
System Board
System Board
Removing the System Board
1. Turn off the display and shut down the Workstation. Disconnect all
power cables and any LAN or telecommunications cables.
2. Remove the Workstation’s cover and bezel as described in “Cover and
Front Bezel” on page 145.
3. To ease removal of the system board, slide the floppy disk drive at
least partially out the front of the chassis as described in “Removing
the Floppy Disk Drive” on page 180.
4. Place your Workstation on its side with the system board facing
upwards.
5. Open the hard disk drive cage as described in “Opening the Hard
Disk Drive Cage” on page 149.
6. Remove the Workstation chassis beam assembly as described in
“Removing the Chassis Beam Assembly” on page 152.
7. Remove the Memory Expander Card (MEC), the graphics card, and
any other accessory cards you may have added to your system. See
“Removing a Graphics Card” on page 162.
8. Remove the system fan. See “Removing the Fan” on page 190.
9. Disconnect any cables attached to the system board.
10. Remove the processor(s) and heatsink(s) from the system board. See
“Removing a Processor” on page 175.
11. Remove the two screws that fasten the system board to the chassis as
shown in Figure 10-25.
184
Chapter 10
Installing or Replacing Parts and Accessories
System Board
Figure 10-25
System Board Assembly Screws
System Board
Assembly Screw
System Board
Assembly Screw
(fold external
SCSI cable
down over the
system board to
access)
12. Unscrew, but do not remove, the three pull-back screws shown in
Figure 10-26.
Figure 10-26
Pull-Back Screws and SCSI Hex Screws
SCSI Hex Screws
Pull-Back Screws
13. Remove the screws that attach the external SCSI connector to the
rear panel as shown in Figure 10-26.
14. Remove the system board, being careful not to damage the
Workstation's cables and rear panel connectors.
Chapter 10
185
Installing or Replacing Parts and Accessories
System Board
Installing the New System Board
1. Clear all cables from the area where the system board will sit.
2. Align the hooks with their corresponding sockets as shown in Figure
10-27, and insert the system board. Ensure that all hooks are
correctly positioned. Check that the rear panel connectors are
correctly aligned in their sockets.
CAUTION
If you have problems getting the hooks to seat properly, don't force
them. There there may be cable that has crept under the system
board.
When inserting the system board, be careful not to damage or bend
the metal hooks on the rear connector EMI shield. If the shield is
damaged it can be very difficult to install the system board correctly.
Figure 10-27
Inserting the System Board
Align the hooks with the
corresponding sockets.
3. Tighten the pull-back screws as shown in figure 10-26, that attach the
external SCSI connector to the rear panel as shown in Figure 10-26
on page 185. These screws pull the system board to the rear of the
chassis and ensure proper alignment with the rear connectors.
186
Chapter 10
Installing or Replacing Parts and Accessories
System Board
4. Replace the external SCSI connector in the I/O bulkhead and tighten
the hex screws as shown in Figure 10-26 on page 185.
5. Replace the system board assembly screws shown in Figure 10-25 on
page 185.
6. Replace the processor(s) and heatsink(s) as described in “Installing a
Processor” on page 177.
7. Reconnect any cables you disconnected from the system board. The
cables that need to be reconnected for a factory-configured system
are:
•
•
•
•
•
•
•
•
•
•
2 system power
3 chassis fan (rear system, hard disk drive, PCI)
processor turbocooler fan (two, if dual processor system)
tamper detect
speaker
CD audio
front control panel
floppy
IDE for optical
internal SCSI (external SCSI is part of the system board
assembly)
To find out the positions of system board connectors, refer to “System
Board Diagram” on page 198 or to the label located on the inside of
the cover.
8. Replace the system fan as described in “Installing the System Fan” on
page 191.
9. Replace the MEC, graphics card, and any accessory cards as
described in “Installing a Graphics Card” on page 163.
10. Compare the system board switches to the information given in
“System Board Switches” on page 189.
11. Replace the chassis beam assembly as described in “Installing the
Chassis Beam Assembly” on page 153.
12. Close and secure the hard disk drive cage as described in “Closing
and Securing the Hard Disk Drive Cage” on page 150.
13. Return the Workstation to its upright position.
14. Slide the floppy disk drive back in to place as described in “Installing
the Floppy Disk Drive” on page 181.
Chapter 10
187
Installing or Replacing Parts and Accessories
System Board
15. Replace the Workstation’s cover and bezel as described in “Cover and
Front Bezel” on page 145.
16. Connect all the power and telecommunications cables.
17. After installing the system board, you need to update your BIOS.
NOTE
The latest BIOS and firmware for your Workstation are available from:
www.hp.com/workstations/support.
188
Chapter 10
Installing or Replacing Parts and Accessories
System Board Switches
System Board Switches
There are four system board switches used for configuration, numbered
from 1 to 4. See “System Board Diagram” on page 198 for the location of
these switches.
Switch
Default
Description
1
OFF
Clear BIOS Password
2
OFF
Boot Block Recovery Mode
3
OFF
Clear CMOS. Reset CMOS setting to BIOS
defaults.
4
OFF
Safe Mode Enable. Forces processors to run
at 800 MHz.
Chapter 10
189
Installing or Replacing Parts and Accessories
System Fan
System Fan
Removing the System Fan
1. Turn off the display and shut down the Workstation. Disconnect all
power cables and any LAN or telecommunications cables.
2. Remove the Workstation’s cover (refer to page 145 for instructions).
3. Holding the fan with one hand, use a screwdriver to gently push the
retaining clips in, then slide the fan up and out of the chassis.
Figure 10-28
Removing the Fan
3
3
4
4. Disconnect the fan connector from the system board.
190
Chapter 10
Installing or Replacing Parts and Accessories
System Fan
Installing the System Fan
NOTE
Ensure that all cables are clear of the fan and will not easily come into
contact with the fan during normal use or following transportation.
1. The fan unit can only be installed in one way. The distance between
the two retaining clips is shorter at the top than the bottom. Align the
fan clips with their corresponding holes.
2. Gently push the fan downwards until it clicks into place.
3. Connect the fan connector to the system board.
4. Replace the Workstation’s cover (refer to page 148). Reconnect all the
power and telecommunications cables.
Chapter 10
191
Installing or Replacing Parts and Accessories
Fan and Speaker Assembly
Fan and Speaker Assembly
Removing the Fan and Speaker Assembly
1. Turn off the display and shut down the Workstation. Disconnect all
power cables and any LAN or telecommunications cables.
2. Remove the Workstation’s cover as described in “Removing the Left
Side Cover” on page 145.
3. Remove the bezel as described in “Removing the Front Bezel” on
page 147.
4. Place the Workstation on its side with the system board facing
upwards.
5. Open the hard disk drive cage as described in “Opening the Hard
Disk Drive Cage” on page 149.
6. Remove the chassis beam assembly as described in “Removing the
Chassis Beam Assembly” on page 152.
7. Remove the MEC. Remove the separate graphics retainer beam and
full length PCI or graphics cards if installed.
8. Remove the fan and speaker cables from the system board.
9. On the front of the chassis, remove the screw holding the fan and
speaker assembly in place as shown in Figure 10-29 on page 192.
192
Chapter 10
Installing or Replacing Parts and Accessories
Fan and Speaker Assembly
Figure 10-29
Removing the Fan and Speaker Assembly
Remove this
screw.
Press these
clips.
10. Unclip the two clips on the front of the chassis.
11. Slide the fan and speaker assembly towards the rear of the
Workstation until it is clear of the chassis, then remove it from the
Workstation.
Installing the Fan and Speaker Assembly
1. Ensure all cables are clear of the assembly, then carefully move the
fan and speaker assembly towards the front of the chassis.
2. Align the clips and guide pins with their appropriate sockets and
slide the assembly forward to secure it into place.
3. Replace the screw on the front of the chassis as shown in Figure 10-29
on page 192.
4. Connect the fan and speaker cables to their connectors located on the
system board. See Figure 10-32 on page 198.
5. Insert any PCI and graphics cards. Install the separate graphics
retainer beam. Insert the MEC..
6. Replace the chassis beam assembly as described in “Installing the
Chassis Beam Assembly” on page 153.
7. Close and secure the hard disk drive cage as described in “Closing
and Securing the Hard Disk Drive Cage” on page 150.
Chapter 10
193
Installing or Replacing Parts and Accessories
Fan and Speaker Assembly
8. Return the Workstation to its upright position.
9. Replace the cover and bezel as described in “Replacing the Cover and
Front Bezel” on page 148.
10. Reconnect all power and LAN cables.
194
Chapter 10
Installing or Replacing Parts and Accessories
Hard Disk Drive Fan
Hard Disk Drive Fan
Removing the Hard Disk Drive Fan
To remove the hard disk drive fan:
1. Turn off the display and shut down the Workstation. Disconnect all
power cables and any LAN or telecommunications cables.
2. Remove the Workstation’s cover as described in “Removing the Left
Side Cover” on page 145.
3. Place your Workstation on its side with the system board facing
upwards.
4. Open the hard disk drive cage as described in “Opening the Hard
Disk Drive Cage” on page 149.
NOTE
The hard disk drive fan is located behind the hard disk drive cage.
5. Disconnect the hard disk drive fan’s power cable from the system
board.
6. Remove the two screws that mount the hard disk drive fan to the
chassis as shown in “Removing the Fan and Speaker Assembly” on
page 192.
Chapter 10
195
Installing or Replacing Parts and Accessories
Hard Disk Drive Fan
Figure 10-30
Removing the Hard Disk Drive Fan
Remove
these two
screws.
Installing the Hard Disk Drive Fan
To install the hard disk drive fan:
1. Attach the new hard disk drive fan to the chassis using the two
screws you removed previously.
2. Connect the hard disk drive fan power cable to the system board. For
the connector location, see “System Board Diagram” on page 198.
3. Close and secure the hard disk drive cage as described in “Closing
and Securing the Hard Disk Drive Cage” on page 150.
4. Return the Workstation to its upright position.
5. Replace the Workstation’s cover as described in “Replacing the Cover
and Front Bezel” on page 148.
6. Reconnect all power and LAN cables.
196
Chapter 10
Installing or Replacing Parts and Accessories
Battery
Battery
WARNING
There is a danger of explosion if the battery is incorrectly
installed. For your safety, never attempt to recharge,
disassemble, or burn the old battery. Replace the battery only
with the same or equivalent type recommended by the
manufacturer. The battery is a lithium battery which does not
contain heavy metals. Nevertheless, in order to protect the
environment, do not dispose of batteries in household waste.
Please return used batteries to the shop from which you bought
them, or to the dealer from whom you purchased your
Workstation, or to HP, so that they can be either recycled or
disposed of in an environmentally sound way. Returned
batteries will be accepted free of charge.
Replacing the System Battery
If your Workstation repeatedly loses its configuration settings, you
should consider changing the battery. Replace it with a CR2032 coin type
manganese/lithium battery, available from most Workstation stores.
To change the battery:
1. Turn off the display and shut down the Workstation. Disconnect all
power cables and any LAN or telecommunications cables.
2. Remove the Workstation’s cover as described in “Removing the Left
Side Cover” on page 145.
3. Remove the old battery by sliding it from under the retaining clip(s).
Chapter 10
197
Installing or Replacing Parts and Accessories
Battery
Figure 10-31
Replacing the Battery
4. Place the new battery in the battery holder and ensure that it is
properly seated. Ensure that the clip holds the battery firmly in place.
5. Replace the Workstation’s cover as described in “Replacing the Cover
and Front Bezel” on page 148.
6. Reconnect all cables and power cords.
7. Run the Setup program to configure the Workstation.
198
Chapter 10
Installing or Replacing Parts and Accessories
System Board Diagram
System Board Diagram
Figure 10-32
System Board Diagram
Chapter 10
199
Installing or Replacing Parts and Accessories
System Board Diagram
200
Chapter 10
11
Troubleshooting
Chapter 11
203
Troubleshooting
Overview
Overview
The following sections contain information to help you get your
Workstation up and running in the unlikely event that you experience a
problem:
• “Solving Hardware Problems” on page 205
• “Understanding the Diag LEDs” on page 212
• “Setting and Removing System Passwords” on page 224
• “Using e-Diag Tools for Hardware Problems” on page 225
• “Recovering or Reconfiguring Windows 2000 or Windows NT” on
page 227
204
Chapter 11
Troubleshooting
Solving Hardware Problems
Solving Hardware Problems
The following topics describe specific hardware errors that may occur.
Workstation Does Not Start Properly
Display is Blank
If your display is blank after you turn on your Workstation, check that:
• The Workstation and monitor are turned on. (The power lights should
be illuminated.)
• Both the Workstation and monitor power cords are firmly connected
and plugged in.
• The outlet power is functioning.
• The monitor is firmly connected to the graphics card connection and
the graphics card is firmly seated on the system board. (Reseating the
graphics card requires opening the Workstation.)
• The monitor’s contrast and brightness settings are set correctly.
A POST Error Message is Displayed
The Power-on-Self-Test (POST) can detect both an error and a change to
the configuration. In either case, a code and short description is
displayed. Depending on the message, one or more choices are displayed:
• Press F1 to ignore the message and continue.
• Press F2 to run the Setup program and correct a system configuration
error.
• Press Enter to see more details about the message. After viewing
these details, you are returned to the original POST display screen.
Chapter 11
205
Troubleshooting
Solving Hardware Problems
Added a Second Processor
If you have added a second processor and the system won't boot:
1. Turn off the display and shut down the Workstation. Disconnect all
power cables and any LAN or telecommunications cables.
2. Remove the Workstation’s cover.
3. Set system board switch 4 to ON (see “System Board Switches” on
page 28).
4. If the system boots, enter the setup program by pressing F2 and go to
the advanced menu (see “Advanced Menu” on page 52) to check the
processor speed setting. If it is set to Auto, your processors may have
different frequencies. This is not supported.
Keyboard Doesn’t Work
If your keyboard does not work as expected:
• Ensure that all the keyboard cables are firmly connected.
• Ensure the keyboard is connected to the keyboard connector rather
than the mouse connector on the rear panel of the Workstation.
• Ensure you are using a PS2 keyboard rather than a USB keyboard.
• Replace the keyboard with a known working unit to ensure the
keyboard itself is not defective.
Monitor Doesn’t Work
If the display is blank, refer to “Display is Blank” on page 205.
If the display works properly during the Power-on-Self-Test (POST), but
goes blank when Windows starts, the display settings in the operating
system may not be compatible with your monitor. To correct this, restart
your Workstation in VGA mode:
• Windows NT: Enter VGA mode when prompted during start-up.
• Windows 2000: When prompted, press F8 and start the Workstation
in VGA mode.
After the Workstation is up and running, change the display settings in
the control panel (Start > Settings > Control Panel). Refer to your operating
system documentation for more information.
206
Chapter 11
Troubleshooting
Solving Hardware Problems
Mouse Doesn’t Work
If your mouse does not work as expected:
• Ensure that the mouse cable is firmly connected.
• Ensure that the mouse is connected to the mouse connector rather
than the keyboard connector on the rear panel of your Workstation.
• Ensure you are using the correct driver. The driver for the HP
enhanced mouse is provided with all Windows preloaded systems as
well as on the HP Workstation Recovery CD-ROMs. However, drivers
are constantly being updated. You can download the latest driver
from the HP web site (www.hp.com/workstations/support).
• Clean the mouse ball with a dry, lint-free cloth if the cursor moves
sporadically.
• Replace the mouse with a known working unit to ensure the mouse
itself is not defective.
Audio Doesn’t Work
The internal speaker is deactivated when you use the Output Line jack
on the rear of the Workstation. If you have connected the keyboard
headphones connector to this jack, you must connect speakers to the
keyboard for audio output.
Power LED is Flashing
The Power LED located on the Power On/Off button has the following
states:
• Solid green indicates system on.
• Solid yellow indicates the Workstation is in Stand By or Hibernate
mode. See “Power Saving and Ergonometry” on page 89.
• Solid red or flashing yellow indicates a system error. The error is
indicated by the pattern on the Diag LEDs. See “Understanding the
Diag LEDs” on page 212.
Chapter 11
207
Troubleshooting
Solving Hardware Problems
Hard Disk Drive Problems
To correct hard disk drive problems:
1. If possible, back up the hard disk drive.
2. Ensure the hard disk drive power and SCSI cables are correctly
connected as described in “SCSI Hard Drive” on page 169.
3. Check that booting from the hard drive has not been disabled in the
BIOS Setup Utility and has been detected by looking in the Boot
menu of the Setup program as described in “Boot Menu” on page 57.
4. Refer to your operating system documentation for instructions on
running system diagnostic tools like scan disk or defragmentation.
5. Run the SCSI test in the Advanced System Test option from HP e-Diag
Tools. HP e-Diag Tools is described in “Using e-Diag Tools for
Hardware Problems” on page 225.
208
Chapter 11
Troubleshooting
Solving Hardware Problems
Hard Disk Drive Activity LED Doesn’t Work
If the hard disk drive activity LED does not flicker when the Workstation
is accessing the hard disk drive:
1. Make sure the control panel connector is firmly attached to the
system board.
2. Ensure the hard disk drive power and SCSI cables are correctly
connected as described in “SCSI Hard Drive” on page 169.
CD-ROM, DVD or CD-RW Drive Doesn’t Work
1. Check that a CD (or DVD) is inserted in the drive.
2. Ensure all cables (data, power and audio) have been properly
connected both to the drive and to the system board as described in
“CD-ROM, CD-RW or DVD” on page 173.
3. Verify that the drive has been detected in the Setup program
Advanced menu by displaying the IDE Devices as described in
“Advanced Menu” on page 52. You should see a drive declared in the
IDE Secondary Master or IDE Secondary Slave field.
4. If you intend to boot from the CD-ROM, CD-RW or DVD, place the
device before the hard disk drive in the boot order as described in
“Boot Menu” on page 57.
CD-RW Won’t Allow Recording
If you can read a CD in your CD-RW, but you can’t write to a CD, you
may be missing the CD-RW software.
If you have a CD-RW in your Workstation, you must install the software
that came with the drive before you can write to the device. For more
information, refer to the Adaptec Easy CD Creator disc that came with
your CD-RW.
Chapter 11
209
Troubleshooting
Solving Hardware Problems
DVD Drive Doesn’t Play DVD Video
DVD drivers are not preloaded at the factory. The DVD uses the
CD-ROM driver, which is part of the operating system. To use special
DVD features, such as reading DVD video, you must install separate
software.
You Forgot Your Password
Clearing the User Password
If you forgot your User password and remember the Administrator
password, you can clear the User password through the setup menu.
To clear the User password:
1. Start the Setup Program.
2. Enter the Administrator password when prompted.
3. Navigate to the Security menu.
4. Select Clear all Passwords.
5. Enter and confirm a new User password if needed.
6. Press ESC to leave the Security menu.
7. Select Exit Saving Changes to save your changes.
210
Chapter 11
Troubleshooting
Solving Hardware Problems
Clearing the Administrator Password
To clear the Administrator password:
1. Turn off the Workstation and remove the cover.
2. Set switch 1 on the system board switch block to ON.
3. Replace the Workstation cover.
4. Turn on the Workstation and press ESC when prompted to see the
summary page.
5. When a message appears indicating that the passwords have been
cleared, turn off the Workstation and remove the cover. You must
press the power button for 5 seconds to turn off system.
6. Set switch 1 on the system board block back to OFF.
7. Replace the Workstation cover.
8. If you want to set new passwords, follow the instructions given in
“Setting Passwords” on page 224.
Chapter 11
211
Troubleshooting
Understanding the Diag LEDs
Understanding the Diag LEDs
The Diag LEDs on the front panel of the Workstation can help you
identify specific problems with your Workstation:
• During system start up, all four LEDs are green.
• If a problem is detected, one or more of the LEDs changes color.
• If no problems are detected during start up, all four turn off.
A list of possible combinations, an explanation of the problem, and
suggested solutions are listed in Table 11-1 on page 213.
The LED patterns are defined by:
• R = Red
• Y = Yellow
• G = Green
• ● = Off
Unless the LED pattern indicates that the BIOS is in recovery mode
(YR●●), or that BIOS recovery is complete (GR●●), you should:
1. Flash the system BIOS and firmware. For complete instructions and
the latest BIOS and firmware versions, go to
www.hp.com/workstations/support.
2. Attempt the solutions given in Table 11-1 on page 213. Possible
solutions are listed in order of ease and probability. Follow the
solutions in sequence in sequence.
NOTE
If your LED pattern does not appear in Table 11-1 on page 213, your
problem could still stem from corrupted BIOS or firmware. Always flash
the BIOS and firmware before attempting other solutions.
If you still have a problem after flashing the BIOS and firmware and
following the suggested solutions in Table 11-1 on page 213, contact
customer support.
212
Chapter 11
Troubleshooting
Understanding the Diag LEDs
Table 11-1
Diag LED Patterns (R = Red, Y = Yellow, G = Green, ● = Off)
Pattern
Description
Possible Solutionsa
RRYY
Fatal internal processor error.
1. Restart the Workstation. If it's a
random event that is not a
hardware error, it will not recur.
2. Reseat the processor(s).
3. Replace the system board as
described in “System Board” on
page 186.
4. Replace the processor(s) as
described in “Processor” on page
177.
RRY●
Processor 0 not detected.
1. Reseat the processor.
2. Replace the processor as described
in “Processor” on page 177.
RYRY
The FRU table in SEEPROM is
inaccessible. The system cannot
identify the system serial number and
model type.
Replace the system board as described
in “System Board” on page 186.
RYRG
The system event log is unavailable.
Replace the system board as described
in “System Board” on page 186.
RYR●
The hardware management controller
firmware is corrupt.
Replace the system board as described
in “System Board” on page 186.
RYYR
The external temperature exceeds the
normal limit. This may be due to an
obstruction of airflow in front of or in
back of the workstation.
1. Ensure the workstation has
adequate clearance.
Chapter 11
2. Ensure the room temperature is
below 95 degrees Fahrenheit (35
degrees Celsius).
213
Troubleshooting
Understanding the Diag LEDs
Table 11-1
Diag LED Patterns (R = Red, Y = Yellow, G = Green, ● = Off)
Pattern
Description
Possible Solutionsa
RYYY
The detected memory is corrupt.
1. Reseat the RIMMs.
2. Reseat the memory expander card.
3. Replace the RIMMs as described in
“System Memory” on page 159.
4. Replace the memory expander
card.
RYY●
No memory detected.
1. Insert or reseat the RIMMs.
2. Reseat the memory expander card.
3. Replace the RIMMs as described in
“System Memory” on page 159.
4. Replace the memory expander
card.
RY●●
A memory pair is mismatched.
1. Ensure each pair of RIMMs are
matched in size and type as
described in “Upgrading Memory
on the 8-RIMM MEC” on page 159.
2. Replace the RIMMs as described in
“System Memory” on page 159.
3. Replace the memory expander
card.
YR●●
The BIOS is in Boot Block Recovery
Mode. Boot Block Recovery Mode can
be initiated automatically by the
BIOS from corruption caused by a
power failure during flash. Boot Block
Recovery Mode can be forced by
setting system board switch 2 to ON.
1. Wait until the BIOS recovery
operation is complete (LED pattern
GR●●) and follow the solution
steps for pattern GR●●.
2. Ensure system board switch 2 is
OFF.
3. Replace the system board as
described in “System Board” on
page 186.
214
Chapter 11
Troubleshooting
Understanding the Diag LEDs
Table 11-1
Diag LED Patterns (R = Red, Y = Yellow, G = Green, ● = Off)
Pattern
Description
Possible Solutionsa
YYRY
There is an error in the main power
(5V) circuit. This could be due to
something in the 5V circuit that is
poorly seated or out of specification.
This includes I/O cards, the memory
expander card, hard disk drives,
optical drives, floppy drives, the
system board, and the power supply.
1. Reseat the power connections to
the hard disk drive, floppy disk
drive, and any optical drives.
2. Try to narrow down the device
causing the problem by removing
the power connection to the hard
disk drive, floppy disk drive, and
any optical drives one at a time,
restarting the Workstation after
each change. If a single device
seems to be the source of the error,
replace the device.
3. Reseat the 32-bit PCI and AGP I/O
cards and the memory expander
card.
4. Try to narrow down the problem by
removing the I/O cards one at a
time. If a single card seems to be
the source of the error, replace the
card.
5. Replace the power supply as
described in “System Memory” on
page 159.
6. Replace the system board as
described in “System Board” on
page 186.
Chapter 11
215
Troubleshooting
Understanding the Diag LEDs
Table 11-1
Diag LED Patterns (R = Red, Y = Yellow, G = Green, ● = Off)
Pattern
Description
Possible Solutionsa
YYRG
AGP (graphics card) 1.5V circuitry
error.
1. Remove the graphics card from the
AGP Pro 110 4X slot and restart
the Workstation. If the error goes
away or changes, replace the
graphics card as described in
“Graphics Card” on page 164.
2. Replace the system board as
described in “System Board” on
page 186.
YYR●
3.3V circuitry error.
1. Reseat I/O cards.
2. Try to narrow down the problem by
removing the 64-bit PCI and AGP
I/O cards one at a time. If a single
card seems to be the source of the
error, replace the card.
3. Replace the power supply as
described in “Power Supply” on
page 184.
4. Replace the system board as
described in “System Board” on
page 186.
YYYR
The fan inside the power supply is not
functioning.
1. Replace the power supply as
described in “System Memory” on
page 159.
2. Replace the system board as
described in “System Board” on
page 186.
216
Chapter 11
Troubleshooting
Understanding the Diag LEDs
Table 11-1
Diag LED Patterns (R = Red, Y = Yellow, G = Green, ● = Off)
Pattern
Description
Possible Solutionsa
YY●R
The PCI fan is not functioning. This
fan is located at the front of the
Workstation.
1. Reseat the fan’s power cable to the
system board.
The sensor reads the state of the fan
that is connected to the “PCI fan”
power connector on the system board,
regardless of which fan is connected.
2. Verify that the cabel leads to the
PCI fan and replace the fan as
show in the “Fan and Speaker
Assembly” on page 194.
3. If you cannot verify that the cabel
leads to the PCI fan, replace both
the PCI and hard disk drive fans as
described in “Fan and Speaker
Assembly” on page 194 and “Hard
Disk Drive Fan” on page 197
Y●RY
There is an error in the 3.3V standby
power circuit on the system board.
Replace the system board as described
in “System Board” on page 186.
Y●●R
The turbo cooler fan for processor 0 is
not functioning.
1. Reseat the fan’s power cable to the
system board.
2. Replace the turbo cooler as
described in “Processor” on page
177.
3. Replace the system board as
described in “System Board” on
page 186.
GR●●
BIOS Boot Block Recovery is
complete.
1. If you have previously set system
switch 2 on the system board to ON,
turn off the Workstation and set
the switch to OFF. Restart the
Workstation.
2. Replace the system board as
described in “System Board” on
page 186.
Chapter 11
217
Troubleshooting
Understanding the Diag LEDs
Table 11-1
Diag LED Patterns (R = Red, Y = Yellow, G = Green, ● = Off)
Pattern
Description
Possible Solutionsa
GYRY
-12V power circuitry failure.
1. Reseat all the I/O cards and serial
device connections.
This circuit is only used by a few
serial devices and PCI cards.
2. Try removing the I/O cards and
serial devices one at a time to see
which card or device may be
causing the error. Replace any
device or card that appears to
cause the error.
3. Replace the power supply as
described in “System Memory” on
page 159.
4. Replace the system board as
described in “System Board” on
page 186.
GYRG
Processor core (VCC_CORE) power
circuit error.
1. If you have recently added a
processor, reseat the processor.
2. If you have recently added a
processor, remove it. If the error
goes away or changes, replace it as
described in “Processor” on page
177.
3. Replace the system board as
described in “System Board” on
page 186.
GYR●
1.8V power circuitry error.
1. Reseat the memory expander card.
2. Replace the memory expander
card.
3. Replace the system board as
described in “System Board” on
page 186.
218
Chapter 11
Troubleshooting
Understanding the Diag LEDs
Table 11-1
Diag LED Patterns (R = Red, Y = Yellow, G = Green, ● = Off)
Pattern
Description
Possible Solutionsa
GGRY
Battery voltage error.
1. Reseat the battery.
2. Replace the battery as described in
“Battery” on page 199.
3. Replace the system board as
described in “System Board” on
page 186.
GGRG
Processor voltage mismatch. A
non-HP processor has been installed
as a second processor, or the
processors are different frequencies.
1. Replace the unsupported processor
with an HP processor identical to
the first as described in “Processor”
on page 177.
2. Replace the system board as
described in “System Board” on
page 186.
G●RY
1.8V standby circuit error.
Chapter 11
Replace the system board as described
in “System Board” on page 186.
219
Troubleshooting
Understanding the Diag LEDs
Table 11-1
Diag LED Patterns (R = Red, Y = Yellow, G = Green, ● = Off)
Pattern
Description
Possible Solutionsa
●R●●
The BIOS cannot load.
1. Try using a known good keyboard
in place of the current keyboard.
Replace the keyboard if the error
goes away.
2. Try removing the floppy disk drive,
the optical drives, and any other
IDE devices one at a time,
restarting the Workstation each
time. If it appears that one device
is causing the error, replace it.
3. Try removing the I/O cards one at a
time, restarting the Workstation
each time. If it appears that one
card is causing the error, replace it.
4. Reseat the RIMMs.
5. Remove the RIMMs. If the error
goes away or changes, replace the
RIMMs as described in “System
Memory” on page 159.
6. If a second processor was just
added, remove the second
processor and restart the
Workstation. If the error goes away,
replace the second processor with
one that is identical to the first
processor as described in
“Processor” on page 177.
7. Replace the system board as
described in “System Board” on
page 186.
220
Chapter 11
Troubleshooting
Understanding the Diag LEDs
Table 11-1
Diag LED Patterns (R = Red, Y = Yellow, G = Green, ● = Off)
Pattern
Description
Possible Solutionsa
●YRY
12V power circuitry error.
1. Reseat PCI and AGP I/O cards.
2. Try removing the I/O cards one at a
time, restarting the Workstation
each time. If it appears the error is
being caused by one card, replace
the card.
3. Replace the power supply as
described in “System Memory” on
page 159.
4. Replace the system board as
described in “System Board” on
page 186.
●YRG
2.5 V RDRAM power circuitry error.
1. Reseat the memory expander card.
2. If the memory expander card has a
separate voltage regulator module,
reseat or replace the voltage
regulator module.
3. Replace the RIMMs or CRIMMs as
described in “System Memory” on
page 159.
4. Replace the memory expander
card.
Chapter 11
221
Troubleshooting
Understanding the Diag LEDs
Table 11-1
Diag LED Patterns (R = Red, Y = Yellow, G = Green, ● = Off)
Pattern
Description
Possible Solutionsa
●YYR
The hard disk drive fan is not
functioning. This fan is located
behind the hard disk drive cage.
1. Reseat the fan’s power cable on the
system board.
The sensor reads the state of the fan
that is connected to the “hard disk
drive fan” power connector on the
system board, regardless of which fan
is connected.
●Y●R
The turbo cooler fan for processor 1 is
not functioning.
2. Verify that the cabel leads to the
hard disk drive fan and replace the
fan as in “Hard Disk Drive Fan” on
page 197.
3. If you cannot verify that the cable
leads to the hard disk drive fan,
replace both the PCI and hard disk
drive fans as described in “Fan and
Speaker Assembly” on page 194
and in “Hard Disk Drive Fan” on
page 197.
1. Reseat the fan’s power cable to the
system board.
2. Replace the turbocooler as
described in “Processor” on page
177.
3. Replace the system board as
described in “System Board” on
page 186.
●●RY
The rear system fan is not
functioning.
1. Reseat the fan’s power cable to the
system board.
2. Replace the fan.
3. Replace the system board as
described in “System Board” on
page 186.
222
Chapter 11
Troubleshooting
Understanding the Diag LEDs
Table 11-1
Diag LED Patterns (R = Red, Y = Yellow, G = Green, ● = Off)
Pattern
Description
Possible Solutionsa
●●YR
5 V standby power circuit error.
1. Replace the power supply as
described in “System Memory” on
page 159.
2. Replace the system board as
described in “System Board” on
page 186.
a. Possible solutions are listed in order of ease and probability. Follow the solutions in
sequence in sequence. Remember to flash the BIOS and firmware before attempting
any of the solutions in the table.
Chapter 11
223
Troubleshooting
Setting and Removing System Passwords
Setting and Removing System Passwords
Setting Passwords
You can set passwords to provide different levels of protection.
Using the Security menu in the Setup program:
• The Administrator can access and change all settings in the Setup
program. The User can only access and modify certain items in the
Main menu.
• You can enable the Power-on Password option so that a password is
required every time you start the Workstation.
NOTE
You must set an administrative password before you can set a user
password.
To set up passwords:
1. Start the Workstation and press F2 when prompted to enter the Setup
utility.
2. Select the Security menu.
3. Choose Set Administrator Password or Set User Password. When
prompted, enter, then re-enter your password.
4. Select the Exit menu, then Exit Saving Changes.
Removing Passwords
To remove a password:
1. Start the Workstation and press F2 when prompted to enter the Setup
utility.
2. Select the Security menu.
3. Select Clear All Passwords.
4. Select the Exit menu, then Exit Saving Changes.
224
Chapter 11
Troubleshooting
Using e-Diag Tools for Hardware Problems
Using e-Diag Tools for Hardware Problems
NOTE
Run e-Diag Tools before contacting HP for warranty service. e-Diag Tools
gives you information your support agent needs.
Use e-Diag Tools to diagnose hardware-related problems on your HP
Workstation. These tools help you:
• Distinguish between software and hardware problems
• Diagnose hardware-related problems
• Provide precise information to support providers so that they can
solve any problem quickly and effectively.
HP e-Diag Tools is supplied on the following media:
• Pre-installed on your hard disk drive (recommended)
Your hard disk includes a hardware diagnostic partition containing
HP e-Diag Tools hardware diagnostic utilities. Do NOT delete this
partition.
• The HP Workstation Recovery CD-ROMs that came with your
Workstation
Starting e-Diag Tools from the Hard Drive’s Utility
Partition (Recommended Method)
NOTE
This method only works if the diagnostics partition on your hard disk
drive is intact.
1. Restart your Workstation.
2. Press function key F10 when you see the message “Press F10 to enter
HP Utility Partition or any other key to proceed.”
3. Select the option to run e-Diag Tools hardware diagnostics and follow
the directions on the screen.
Chapter 11
225
Troubleshooting
Using e-Diag Tools for Hardware Problems
Starting e-Diag Tools from the HP Workstation
Recovery CD-ROM
Use this method if for any reason you are unable to start this utility from
the hard disk drive partition. Before running e-Diag Tools from the
CD-ROM ensure:
• No operating system is specified:
— Start the Setup program as described in “HP Setup Program” on
page 49. If the Main or Advanced menu has an item Plug and
Play OS, set it to No.
— If the Main or Advanced menu has an item to select the operating
system, set it to Other.
• All Hardware Protection items in the Security menu are set to
Enabled or Unlocked.
• The option to start from the CD-ROM is enabled and the CD-ROM is
configured to be the first boot device.
To start e-Diag Tools from the HP Workstation Recovery CD-ROM:
1. Insert the CD-ROM in the CD-ROM drive.
2. Restart the Workstation. The Workstation should boot from the
CD-ROM rather than the hard drive.
3. Select the option to run the hardware diagnostics and follow the
directions on the screen.
NOTE
If you are unable to boot from your CD-ROM drive, restart your
Workstation and press F12 to change the system boot order. You can also
change the boot order from the Setup utility as described in “Boot Menu”
on page 57. Check the Boot device settings to ensure that your
Workstation can boot from the CD-ROM.
226
Chapter 11
Troubleshooting
Recovering or Reconfiguring Windows 2000 or Windows NT
Recovering or Reconfiguring Windows 2000 or
Windows NT
The HP Workstation Recovery CD-ROMs let you:
• restore your computer to its original factory configuration
• change or reconfigure the operating system
• reinstall drivers or other factory-supplied software components
The drivers and software utilities, including documentation and
navigational aids, help you to recover either the full set of pre-loaded
software or subset of it.
Some of the available functions on the HP Workstation Recovery
CD-ROMs are:
• Install Windows 2000 — returns your HP Workstation to its original
state.
• Install Windows NT — install Windows NT operating system on your
Workstation.
• Windows 2000 or NT Minimal Installation — installs Windows 2000
with a minimal set of drivers (appropriate for advanced users only).
• Windows 2000 or NT Master Files — allows you to copy Windows
2000 master files to the \i386 directory on your hard disk.
• Help — displays the help text.
NOTE
Some of the operations you can perform using the HP Workstation
Recovery CD-ROMs permanently erase the current contents of your hard
disk. You should always back up your data and personal files before
using the HP Workstation Recovery CD-ROMs.
Chapter 11
227
Troubleshooting
Recovering or Reconfiguring Windows 2000 or Windows NT
Preparing to Recover Windows NT or Windows 2000
Before you perform a recovery:
• Ensure the Workstation model matches the HP Workstation Recovery
CD-ROM labels (the operating system recovery is locked to the
specific Workstation model).
• Back up all data files and, if necessary, software applications.
• Upgrade to the latest BIOS version. For instructions, refer to
www.hp.com/workstations/support.
• Clear any BIOS-level passwords as described in “Removing
Passwords” on page 224.
• In the Security menu, set all Hardware Protection items to “Enabled”
or “Unlocked” (if applicable). See “Security Menu” on page 55.
• In the Boot menu, ensure booting from the CD-ROM is enabled and
the CD-ROM drive is configured to boot before the hard disk drive in
the Boot Device Priority List. See “Boot Menu” on page 57.
• Ensure that you have the Certificate of Authenticity from Microsoft
available. (This is a label on the cover of your Workstation.)
NOTE
Windows NT 4.0 does not install with 4 GB of memory. If you have 4 GB
of memory, you must remove 4 RIMMs from slot pairs 3 and 4 (see the
memory loading label on the chassis cover or “System Memory” on page
159). After Windows NT 4.0 is loaded, you can reinstall this memory.
228
Chapter 11
Troubleshooting
Recovering or Reconfiguring Windows 2000 or Windows NT
Performing a Full Recovery of Windows NT or
Windows 2000
Depending on the hardware configuration, a full system recovery takes
30 minutes to 2 hours.
CAUTION
Remember, this procedure erases everything from the hard drive
(primary partition if defined). Make sure you have backed up all data
files and software applications.
1. Shut down the operating system and turn off your Workstation.
2. Unplug the Workstation from the power source.
3. If any non-standard components were added after you received the
Workstation, you must restore it to its original factory configuration
(remove the components).
4. Plug the Workstation into the power source.
5. Insert the HP Workstation Recovery CD-ROM containing your
operating system, either Windows 2000 or Windows NT, into the
CD-ROM drive and start the Workstation.
6. Press the F12 key and select the CD-ROM to boot first. The computer
boots from the CD-ROM and displays a DOS-style menu.
7. Follow the on-screen instructions.
8. Several reboots are carried out. This is normal. Do not interrupt the
process. Wait until a message indicates the operation has been
successfully completed.
9. Remove the HP Workstation Recovery CD-ROM from the CD-ROM
drive.
10. The operating system and drivers are installed.
Chapter 11
229
Troubleshooting
Recovering or Reconfiguring Windows 2000 or Windows NT
NOTE
The full recovery function restores a factory disk image of your computer.
We recommended you install updated drivers, BIOS, and firmware
available from www.hp.com/workstations/support.
NOTE
If you have accessories that you removed, replace them now. You must
also re-install the drivers for these accessories.
All data files and software applications that were saved before
performing the full recovery also need to be restored.
230
Chapter 11
12
Contacting Support
Chapter 12
231
Contacting Support
Online Support for Troubleshooting
Online Support for Troubleshooting
HP’s support web site provides extensive support materials that can help
you troubleshoot problems on your Workstation, including:
• Technical notes and white papers
• Documentation for your Workstation (described on the following
page)
• BIOS updates (including the upgrade utility and instructions)
• The latest drivers and software utilities including e-diagtools,
updates for the utility partition, and HP TopTools
HP’s support web site is www.hp.com/workstations/support.
232
Chapter 12
Contacting Support
Documentation Set Overview
Documentation Set Overview
HP’s web site allows you to download documentation for your
Workstation free of charge. The documents provided are in Adobe
Acrobat (PDF) format and are available from HP’s web site at
www.hp.com/workstations/support.
The available documents include:
• x4000 Getting Started Guide — describes how to set up your
Workstation for the first time.
• x4000 Workstation Technical Reference Guide — provides technical
information on system components and troubleshooting information.
Chapter 12
233
Contacting Support
Hewlett-Packard Support and Information Services
Hewlett-Packard Support and Information
Services
Collecting Information Before Contacting HP Support
You can learn more about HP service and support from the support Web
site www.hp.com/workstations/support.
Before you contact HP Support, record the information mentioned below.
This helps HP support deal with your problem quickly and efficiently.
Table 12-1
Collecting Information for Support
Information
needed
Details
Your information
General information
Workstation
model number
The model number is located on the back of the
Workstation on separate label next to the
serial number label, or on the right side of the
chassis.
If your system is running, select Start > Settings
> Control Panel and double click on the System
icon. The model number is displayed under the
General tab.
Workstation
serial number
The serial number is located on the label on
the back panel of your Workstation or on the
right side of the chassis.
If your system is running, select Start > Settings
> Control Panel and double click on the System
icon. The serial number is displayed under the
General tab.
234
Chapter 12
Contacting Support
Hewlett-Packard Support and Information Services
Table 12-1
Collecting Information for Support
Information
needed
Details
Memory: number
of MB installed
You can determine the amount of memory that
is installed on your system by pressing the ESC
key during system startup.
Your information
If your system is already running, select Start >
Settings > Control Panel and double click on the
System icon. The total amount of memory
installed is displayed under the General tab.
Is the memory HP
supplied or from
another source?
There may be some compatibility problems
with non-HP memory modules. HP supports
and recommends only HP supplied memory
modules.
Details of the problem
Frequency of
problem
How often has the problem occurred?
Normal
functionality
How long was the Workstation running before
the problem appeared?
Recent changes to
the Workstation
Have there been any recent hardware or
software changes made to the Workstation?
Hardware Configuration
Which BIOS
version is used?
The BIOS version is displayed in the Setup
program main menu, accessed by pressing F2
during start-up. This information is also in the
summary screen, accessed by pressing ESC
during start-up.
Any BIOS
parameter
changes?
Did the problem occur after changes were
made to the BIOS using the Setup program?
A list of slots and
interrupts used
by additional
cards
This is to check for interrupt conflicts. You can
find IRQs by running e-DiagTools as described
in “Using e-Diag Tools for Hardware Problems”
on page 225.
Chapter 12
235
Contacting Support
Hewlett-Packard Support and Information Services
Table 12-1
Information
needed
Collecting Information for Support
Details
Your information
Operating System
Original
operating system?
Are you using the original operating system
software that came preloaded on your
Workstation?
If not, what is the
operating system
version?
Select Start > Settings > Control Panel from the
and double-click on the System icon. The
operating system version is displayed in the
General tab.
Any operating
system-generated
error messages?
Write down the exact text of error message.
Any errors during
boot (Power-On
Self Test)?
This test checks all installed components. Any
POST errors are displayed on your monitor
screen or on your Diag LEDs. Record the exact
error message and any Diag LED patterns.
236
Chapter 12
Contacting Support
HP Customer Care Center Phone Numbers
HP Customer Care Center Phone Numbers
HP Customer Care Centers can help you solve issues related to HP
products and, if necessary, initiate appropriate service procedures. In the
U.S.A, telephone support is available 24 hours a day, 7 days a week. In
other locations, it is available during normal office hours.
NOTE
These phone numbers were correct when this document was printed. The
most recent support numbers can be found at www.hp.com/support.
North & Latin America
Argentina
0810 555 5520 (Argentina)
Brazil
Canada
Chile
Mexico
United
States
Venezuela
(5411) 4778 8380 (other
locations)
(11) 3747 7799 (Sao Paulo)
0800 157751 (other
locations)
905 206 4663
800 360 999
Europe, Middle East & Africa
Austria
+43 (0) 810 00 6080
Belgium
Dutch +32 (0)2 626 8806
French +32 (0)2 626 8807
+45 39 29 4099
+44 (0)207 512 52 02
01 800 472 6684
(970) 635-1000
Denmark
English
International
Finland
France
800 47 777
Germany
+49 (0)180 52 58 143
(24PF/min)
Israel
Italy
Middle-East
Tel. +972 (0)9 9524848
Fax. +972 (0)9 9524849
+39 02 264 10350
Tel. 971 4 883 8454
Netherlands
Norway
Poland
Portugal
Fax 971 4 883 9495
+31 (0)20 606 8751
+47 22 11 6299
Tel. +48 22 865 9800
+351 21 3176333
207 8488 (Caracas)
Asia Pacific
Australia
China
Hong Kong
India
Indonesia
Japan
(03) 8877-8000
+86 (0) 10 6564 5959
+85 (2) 2802 4098
+91 (11) 682 6035
+62 (21) 350 3408
+81 3 5344 7181
Chapter 12
+358 (0)203 47 288
+33 (0)1 43 62 34 34
237
Contacting Support
HP Customer Care Center Phone Numbers
Korea,
Republic of
+82 (2) 3270 0700
Malaysia
+82 80 999 0700 (outside
Seoul)
+60 (3) 2695 2566
Penang
New Zealand
Philippines
Singapore
Taiwan
1 300 88 00 28
+64 (9) 356 6640
+63 (2) 867 3551
+65 272 5300
+886 (2) 2717 0055
Thailand
Viet Nam
+66 (2) 661 4000
+84 (0) 8 823-4530
238
Russian
Federation
+7 095 797 3520 (Moscow)
+7 812 346 7997 (St. Peter)
South Africa
+27-11 258 9301 (outside
RSA)
086 000 1030 (inside RSA)
+34 902 321 123
+46 (0)8 619 2170
+41 (0)848 80 11 11
+90 212 221 69 69
+44 (0)207 512 52 02
Spain
Sweden
Switzerland
Turkey
United
Kingdom
Chapter 12