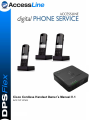
1
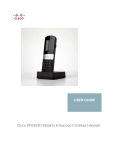
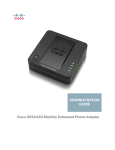
Cisco Cordless Handset Owner’s Manual V.1
ACC 1211-PUG
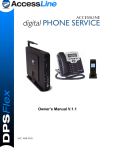
AccessLine Communications
Owner’s Manual AccessLine 3-9-11
1
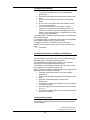
TABLE OF CONTENTS
1
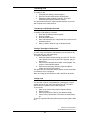
INTRODUCTION ................................................................... 5
Using this Document .......................................................... 9
Basic Requirements ........................................................... 9
2
GETTING TO KNOW YOUR DPS FLEX SYSTEM ............ 10
Before you Begin Your Installation.................................. 10
Assigning Extension Numbers and Phone
Numbers to Phones ......................................................... 13
3
INSTALLING YOUR DPS FLEX PHONE SYSTEM ........... 14
Installing Cordless Base and Handsets.......................... 14
Connecting the Cordless Base: ...................................... 14
Setting up the Cordless Handsets .................................. 15
Installing and Replacing Cordless Handset
Batteries ............................................................................ 17
Turning On Cordless Handset......................................... 18
Activating the Service ...................................................... 20
4
USING CORDLESS H ANDSETS ........................................ 21
Introduction ....................................................................... 21
Getting Started ................................................................. 23
Locating Handsets ........................................................... 24
Cordless Handset Key Descriptions ............................... 25
Components ..................................................................... 25
Cordless Handset Display Screen .................................. 26
Display Screen Icons ....................................................... 27
Entering Numbers and Text in Fields ......................... 28
Turning the Handset On and Off ..................................... 29
Options When the Handset is Idle .................................. 29
Options When There is an Active Call ............................ 29
Navigating through the Phone Menus ............................ 29
Adjusting Handset Volume and Muting .......................... 30
Answering or Ignoring a Call ........................................... 31
Placing a Call .................................................................... 31
Managing Contacts: ......................................................... 31
Redialing a Call ................................................................ 32
Putting a Call on Hold ...................................................... 32
Using Call Waiting ............................................................ 32
AccessLine Communications
Owner’s Manual AccessLine 3-9-11
2
Transferring a Call ............................................................ 33
Transferring a Call Directly to Voicemail ........................ 33
Placing a Three-Way Conference Call ........................... 33
Parking a Call ................................................................... 33
Ending a Call .................................................................... 34
Handling Missed Calls ..................................................... 34
Viewing the Call History ................................................... 34
Voicemail .......................................................................... 34
Changing your Voicemail PIN ......................................... 35
Recording a Personal Greeting via the Phone .............. 35
Forwarding Voicemail Messages via the Phone............ 36
Logging into your Voicemail Box via the Web................ 36
Retrieving messages via the Web .................................. 36
Forwarding Voicemail Messages via the Web............... 37
Setting Up Voicemail Notification via Email ................... 39
Creating a Voicemail Group ............................................ 40
Configuring Call Forwarding: ........................................... 41
Configuring Do Not Disturb, Call Waiting, and
Call Blocking ..................................................................... 41
Configuring Phone Settings............................................. 41
Changing Your Ringtone ................................................. 42
Configuring Keypad and Call Park Tones ...................... 42
Configuring the Backlight Timeout Setting ..................... 42
Configuring and Using Speed Dials ................................ 42
Creating Speed Dials ....................................................... 42
Creating Speed Dials through the Handset
Menu: ................................................................................ 43
Managing Speed Dials..................................................... 43
Using Speed Dials............................................................ 43
Using Contacts ................................................................. 43
Changing Handset Settings............................................. 44
Upgrading the Handset Software.................................... 44
Performing a Factory Reset ............................................ 44
Viewing Phone Information ............................................. 45
Advanced Handset Configuration Options ..................... 45
5
Troubleshooting the Cisco SPA302D ............................. 46
No Network Message ...................................................... 46
AccessLine Communications
Owner’s Manual AccessLine 3-9-11
3
Unresponsive Handset .................................................... 46
Handset will not Turn On (Screen will not
Illuminate) ......................................................................... 46
Handset No Longer Holds a Charge .............................. 47
Symptom for RF interference .......................................... 47
Incorrect Power Adapter Used ........................................ 47
AccessLine Communications
Owner’s Manual AccessLine 3-9-11
4
1
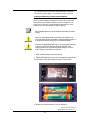
INTRODUCTION
Congratulations on purchasing the AccessLine DPS FLEX phone
system and service. You will now be able to share your phone
connection between fixed & wireless Handsets and across multiple
locations using the latest in ‘Voice over IP’ services.
This Owner’s Manual will show you how to set up and use your new
DPS FLEX phone system and service.
This guide also explains how to register a Cisco SPA302D Mobility
Enhanced Cordless Handset with the Cisco SPA232D Cordless
Base, which has an integrated DECT Base Station. Cisco
SPA302D Handsets registered to the Cisco SPA232D can make
and receive calls through AccessLine’s Voice over IP (VoIP)
service.
Only Cisco SPA302D Handsets are supported with the Cisco
SPA232D Base.
IMPORTANT SAFETY AND CONFORMANCE
INFORMATION FOR CISCO CORDLESS
BASE AND CORDLESS HANDSETS
FCC Information
FCC (Part 15 Class B), CE, ICES-003, A-Tick certification,
Restriction of Hazardous Substances (RoHS), and UL.
It is recommended that the customer install an AC surge arrester
in the AC outlet to which this device is connected. This is to
avoid damage to the equipment caused by local strikes of
lightning and other electrical surges.
This product is manufactured Cisco.
Cisco and the Cisco logo are trademarks or registered
trademarks of Cisco and/or its affiliates in the U.S. and other
countries. To view a list of Cisco trademarks, go to this URL:
www.cisco.com/go/trademarks.
Third-party
trademarks
mentioned are the property of their respective owners. The use of
the word partner does not imply a partnership relationship
between Cisco and any other company. (1110R)
AccessLine Communications
Owner’s Manual AccessLine 3-9-11
5
Important Safety Information
Only use the power adapter designed for use with Cisco SPA300
Series devices.
To prevent the ATA from overheating, do not operate it in an area
that exceeds an ambient temperature of 104°F (40°C).
Do not place anything on top of the Cisco Cordless Base; excessive
weight could damage it.
Insecure mounting might damage the Cisco Cordless Base or
cause injury. AccessLine is not responsible for damages incurred by
insecure wall- mounting
Important Battery Information
Use only size AAA Ni-MH 800 mAh (1.2V) rechargeable batteries
in the Cisco SPA302D Handset. Place the Handset in the charging
cradle for a recommended initial charge of 10 hours before using
the Handset for the first time.
Sensitive Electronic Environment
Any radio-Based equipment can potentially cause interference
with other equipment and can be interfered from other
equipment. This also applies for DECT equipment. However due
to the very low transmission power level the chances for
interference is very small. Research proves that operational
DECT phones normally don’t influence electronic equipment
however some precautions must be taken into account for
sensitive electronic equipment e.g. sensitive laboratory
equipment. When DECT phones operate in straight nearness of
sensitive electronic equipment incidental influence can appear.
You are advised not to place the DECT phone on or close (less
than 10cm) to this kind of equipment, even in standby mode.
Please also use the other documentation supplied with the
various parts of your telephone system.
Product Disposal Information
Disposal of electrical and electronic products should be done in
line with local regulations. Please contact the local authorities for
further information.
Battery Disposal Information
Defect or exhausted batteries should never be disposed of as
municipal waste. Return old batteries a licensed battery dealer or
a designated collection facility. Do not incinerate batteries.
Regulatory Information
Interference Information:
This device complies with Part 15 of the FCC Rules. Operation is
subject to the following two conditions: (1) this device may not
cause harmful interference, and (2) this device must accept any
AccessLine Communications
Owner’s Manual AccessLine 3-9-11
6
interference received, including interference that may cause
undesired operation.
NOTE: This equipment has been tested and found to comply
with the limits for a Class B digital device, pursuant to Part 15 of
the FCC Rules. These limits are designed to provide reasonable
protection against harmful interference in a residential
installation. This equipment generates uses and can radiate
radio frequency energy and, if not installed and used in
accordance with the instructions, may cause harmful interference
to radio communications. However, there is no guarantee that
interference will not occur in a particular installation. If this
equipment does cause harmful interference to radio or television
reception, which can be determined by turning the equipment off
and on, the user is encouraged to try to correct the interference
by one or more of the following measures:
Reorient or relocate the receiving antenna.
•
Increase the separation between the equipment and
•
receiver.
Connect the equipment into an outlet on a circuit different
•
from that to which the receiver is connected.
•
Consult the dealer or an experienced radio/TV technician
for help.
WARNING: Changes or modifications to this equipment not
expressly approved by the party responsible for compliance
could void the user’s authority to operate the equipment.
Privacy of communications may not be ensured when using this
phone.
Exposure to Radio Frequency (RF) Signals:
This wireless phone is a radio Base and receiver. It is designed
and manufactured not to exceed the emission limits for exposure
to radio frequency (RF) energy set by the Federal
Communications Commission (FCC) of the U.S. Government.
These limits are part of comprehensive guidelines and establish
permitted levels of RF energy for the general population. The
guidelines are based on the safety standards previously set by
both U.S. and international standards bodies. These standards
include a substantial safety margin designed to assure the safety
of all persons, regardless of age and health. This device and its
antenna must not be co-located or operating in conjunction with
any other antenna or Base.
This product has been shown to be capable of compliance for
localized specific absorption rate (SAR) for uncontrolled
environment/general population exposure limits specified in
ANSI/IEEE Std. C95.1-1992 and had been tested in accordance
with the measurement procedures specified in FCC/OET Bulletin
65 Supplement C (2001) and IEEE 1528-2003” .
CAUTION: To maintain the compliance with the FCC’s RF
exposure guideline, place the Base unit at least 20 cm from
nearby persons. For body worn operation, this Handset has also
been tested and meets the FCC RF exposure guideline when
used with the belt clip supplied for this product. Use of other
AccessLine Communications
Owner’s Manual AccessLine 3-9-11
7
accessories may not ensure compliance with FCC RF exposure
guidelines.
AccessLine Communications
Owner’s Manual AccessLine 3-9-11
8
Using this Document
Notational conventions
Acronyms are defined the first time they appear in the text.
The term LAN refers to a group of Ethernet-connected computers at
one site.
Typographical conventions
Italic text is used for items you select from menus and drop-down
lists and the names of displayed web pages.
Bold text is used for text strings that you type when prompted by the
program, and to emphasize important points.
Special messages
This document uses the following icons to draw your attention to
specific instructions or explanations.
Note
Definition
Provides clarifying or non-essential information on the current
topic.
Explains terms or acronyms that may be unfamiliar to many
readers. These terms are also included in the Glossary.
Provides messages of high importance, including messages
relating to personal safety or system integrity.
WARNING
Basic Requirements
The DPS FLEX phone system is designed to use your existing
broadband data connection as well as the existing data wiring in
your office. Where you don’t have data wiring, you may use the
optional Wireless Adapters to connect Desk Phones to the optional
Base Unit wirelessly.
In order to use all the features of the DPS FLEX phone system and
service, you must have the following:
Broadband Internet access
At least one free port on your router or modem/router
Your router must be set to DHCP
AccessLine Communications
Owner’s Manual AccessLine 3-9-11
9
2
GETTING TO KNOW YOUR DPS FLEX SYSTEM
Before you Begin Your Installation
The DPS FLEX phone system is designed to use your existing
broadband data connection as well as the existing data wiring in
your office. Where you don’t have data wiring, you may use the
optional Wireless Transmitter and Wireless Adapters to connect
Desk Phones to the Base Unit wirelessly. In order to begin using
your new phone system and service, you need to perform the
following steps:
1. Make sure you have received all of your phones and
optional equipment
2. Go to www.accessline.com/login. Enter your login
name and password to the Admin Portal
3. Activate your phone lines
4. Install your phones and optional equipment
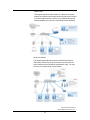
You have several options regarding how to setup your new phone
system. How you choose to install your phone system will depend
on your existing data network and the phones and optional
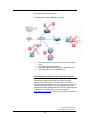
equipment you have purchased. The diagrams below describe
options for setting up the phone system.
AccessLine Communications
Owner’s Manual AccessLine 3-9-11
10
Shared Lines:
This diagram depicts the setup options for a Shared Line system.
Shared Line systems require that all shared line phones are located
in the same logical network or subnet. By purchasing the optional
Wireless Adapters you may also connect Desk Phones wirelessly.
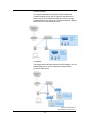
Single Line Phones:
This diagram depicts the setup options for Stand Alone Phones.
Stand Alone Phones require you to purchase one phone line per
phone (each phone can handle two simultaneous calls). You may
have one or more phones at a given address.
AccessLine Communications
Owner’s Manual AccessLine 3-9-11
11
Cordless Handsets:
This diagram depicts the setup options for Cordless Handsets.
Cordless Handsets can be used in conjunction with Shared Line
Phones or they can be installed as Stand Alone Phones. A single
Cordless Base unit can support up to 3 Cordless Handsets. Multiple
Base units can be used at a single location.
Fax Adapter:
This diagram depicts the setup options for the Fax Adapter. The Fax
Adapter allows you to use your existing fax machine with the
AccessLine DPS service.
AccessLine Communications
Owner’s Manual AccessLine 3-9-11
12
Setup Options that are not supported
The following setup options ARE NOT supported:
1. Connecting a phone to a router that is connected to another
router
2. Connecting one phone to another
3. Connecting a phone wirelessly and then connecting a PC
4. Connecting a PC to the Cordless Base unit
Assigning Extension Numbers and Phone Numbers to Phones
Each phone is assigned an extension and a phone number.
Packing list includes a list of your phones and their associated
phone numbers and extension. You should have also received and
email from AccessLine with the phone numbers and extensions
associated with each enhanced services such as an Auto Attendant
or WebFax. You may also log into your Admin Portal at
www.accessline.com/login to view a list of your phone numbers and
extensions.
AccessLine Communications
Owner’s Manual AccessLine 3-9-11
13
3
INSTALLING YOUR DPS FLEX PHONE SYSTEM
Installing Cordless Base and Handsets
Cordless Handsets can be installed in the following ways
You may use up to 3 Cordless Handsets per Cordless Base.
Connecting the Cordless Base:
1. Open the Cordless Base box and remove the cordless base,
power clip, power adapter and blue Ethernet cable.
Connect one end of the blue Ethernet cable to the blue INTERNET
port on the rear of the Cordless Base
2. Connect the other end of the blue Ethernet cable to any free
port on your existing router or anywhere on your existing data
network.
3. Connect the Cordless Base power adapter to the “DC 5V
Power” connector at the rear of the Cordless Base
, and then plug the power adaptor into a power outlet.
AccessLine Communications
Owner’s Manual AccessLine 3-9-11
14
Note
WARNING
The ports labeled “PHONE” and “LINE” at the rear of the Cordless
Base are not used. Do not connect anything to these connectors.
The “RESET” button at the rear of the Cordless Base is not used.
Pressing the RESET button will make your Cordless Base
inoperable and require replacement.
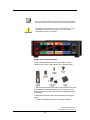
Setting up the Cordless Handsets
4. Open Cordless Handset box and remove the Cordless
Handset, Power Clip, Power Adapter, and Charging Cradle.
5. Each Cordless Handset purchased from AccessLine will come
with batteries pre-installed. Batteries must be charged for 10
hours prior to first use. See instructions for installing batteries if
not installed.
6. Remove the protective film from the Handset and charging
cradle.
7. Install the optional Belt Clip on the Cordless Handset
AccessLine Communications
Owner’s Manual AccessLine 3-9-11
15
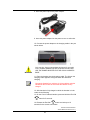
8. Insert the power clip into the power adapter.
9. Insert the power adapter into the power source or wall outlet.
10. Connect the power adapter to the charging cradle in the port
shown below.
WARNING
Only use the 1Amp power adapter designed for use with
Cisco Cordless Handset SPA300 Series devices.DO NOT
USE THE POWER ADPATER FOR THE CISCO CORDLESS
BASE
11. Place the handset into the charging cradle. The light on the
charging cradle appears solid green when the handset is
charging.
Note
Charge the Handset for a minimum of 10 hours before using the
Handset for the first time to ensure that the Handset is fully
charged.
12. After handset is fully charged or while the handset is in the
cradle do the following.
13. On the Cisco Cordless Handset, press and hold the End Call
button for 5 seconds.
14. Release the End Call
button and wait up to 10
seconds for the screen to illuminate.
AccessLine Communications
Owner’s Manual AccessLine 3-9-11
16
15. If screen does not illuminate verify batteries are installed
correctly and repeat steps 11-12 before moving to next step.
Installing and Replacing Cordless Handset Batteries
Each Cordless Handset purchased from AccessLine will come
with batteries pre-installed. Batteries must be charged for 10
hours prior to first use. Use the following instructions to verify
batteries are correctly installed or when replacing.
Note
WARNING
WARNING
Rechargeable batteries must be replaced periodically to retain a
charge.
Defect or exhausted batteries should never be disposed of as
municipal waste. Return old batteries a licensed battery dealer or
a designated collection facility. Do not incinerate batteries.
Use only size AAA Ni-MH 800 mAh (1.2V) rechargeable batteries
in the Cisco SPA302D Handset. Place the Handset in the
charging cradle for a recommended initial charge of 10 hours
before using the Handset for the first time.
1. Slide Handset battery cover and remove.
2. Place AAA Ni-MH 800 mAh (1.2V) rechargeable batteries into
the Handset per the label inside the battery compartment.
3. Replace the Handset battery cover by sliding on.
AccessLine Communications
Owner’s Manual AccessLine 3-9-11
17
4. Place the Handset into the charging cradle. The light on the
charging cradle appears solid green when the Handset is
charging. Charge the Handset for a minimum of 10 hours
before using the Handset for the first time to ensure that the
Handset is fully charged.
Note
If the batteries are charged, the Handset turns on when the
batteries are inserted. If the batteries are not charged, the
Handset turns on when it is placed into the charging cradle
Turning On Cordless Handset
Each Cordless Handset and Cordless Base purchased from
AccessLine will be pre-registered and configured. Additional or
replacement Cordless Handsets will need to be manually
registered (see Manual Phone Registration). The Cisco Cordless
Handsets will be shipped with the batteries pre-installed.
1. Install and configure the Cisco Cordless Base. See the Cisco
Cordless Base instructions above for more information. Cordless
Base SYSTEM
and INTERNET
lights should be lit.
2. On the Cisco Cordless Handset, press and hold the End Call
button for 5 seconds.
3. Release the End Call
for the screen to illuminate.
button and wait up to 10 seconds
4. If screen does not illuminate verify batteries are installed
correctly and charged and repeat steps 1-3.
5. Handset screen will first display date and time, followed by
steady signal strength indicator then finally the Handset phone
number.
Registering a Cordless Handset
Each Cordless Handset purchased at the time the Cordless Base
is purchased will be pre-registered. Additional or replacement
Cordless Handsets will need to be manually registered:
Install and configure the Cisco SPA232D. See the Cisco
SPA232D Quick Start Guide for more information.
AccessLine Communications
Owner’s Manual AccessLine 3-9-11
18
1
On the Cisco SPA302 Handset, press the Select button
in the center of the 4-way navigation keypad.
2
Using the navigation arrow buttons, scroll to the Settings
3
4
5
icon
and press the center Select button to select it.
Select Handset Registration.
Select Register.
On the Cisco SPA232D, press the Page/Registration
6
button (shown below) and hold it down for at least
seven seconds until the green status light flashes
quickly.
Enter the Handset PIN when prompted.
Note: You will need to call Customer Service to retrieve the
Handset PIN required for subsequent registrations.
7
Press the Confirm soft-key.
TIP: If you press the button for fewer than seven seconds, the
green status light flashes slowly, indicating the unit is in “paging”
mode and is not in registration mode.
Registration will not work if the unit is in paging mode.
Note: You will need to call Customer Service to retrieve
the Handset PIN required for subsequent registrations.
AccessLine Communications
Owner’s Manual AccessLine 3-9-11
19
Activating the Service
Before you can make or receive calls, you need to activate your
phone line(s). This also activates the billing for your phone
line(s). To activate your phone line(s):
1. Go to www.accessline.com/login and enter your Administrator
Portal login name and password
2. On the 1st screen, click “Activate Phone Lines” button
NOTE- You will activate all of your lines at once, so if there
is no “Activate Lines” button, then you have already activated the
lines.
AccessLine Communications
Owner’s Manual AccessLine 3-9-11
20
4
USING CORDLESS HANDSETS
Introduction
The DPS FLEX phone system supports up to 3 Cordless
Handsets per Cordless Base. The Cordless Base is used to
connect the Cordless Handsets to the AccessLine Network. The
Cordless Base can be plugged into any one of the 4 phone jacks
on the back of the optional Base Unit or into your router or
switch. Each Cordless Handset can take up to 2 calls but you
may only have 3 simultaneous calls going with your 3 Cordless
Handsets (for example, 3 Cordless Handsets may each have
one phone call, or one Cordless Handset can be on a call with
one call on hold, and one other Cordless Handset can be on a
call).
Handset features
• 2.0-in. TFT (176 x 220 pixels),
65,000 colors, backlit with
scratch-resistant lens
• White illuminated keypad
backlight
• Status icons (do not disturb
[DND], call forward, mute, offhook, speakerphone, signal
status, and battery strength)
• Date and time display
• Handset name display
• Dial key lock
• Speed dial: Eight
programmable
• Private phone book (50
records)
• Shared phone book (50
records)
• Call history (50 records filtered
by Outgoing, Incoming, and
Missed)
• One-touch dial from call
history
• Missed call(s)
• Message-Waiting Indicator
(MWI) tones
• Visual MWI (VMWI)
• Five ringtones
• Distinctive ring support
• Hearing Aid Compatibility (HAC)
AccessLine Communications
Owner’s Manual AccessLine 3-9-11
21
Call-control features
• Caller ID
• Call mute
• Call hold/resume
• New call (support for two active call segments)
• Call forward (conditional, unconditional, busy, or no
answer)
• Call transfer (attended or blind)
• Call waiting and indication (CWI)
• Call blocking
• Redial
• DND
• Three-way conferencing with local mixing
• Call parking and un-parking
DECT Base Station
• Technical details
• 3 Handset registrations on a Cisco SPA232D (DECT
Base Station)
• 3 simultaneous active calls
• Page/Registration button
Physical specifications
• Off-hook button
• On-hook/Power off button
• Two soft-key buttons
• Dedicated speakerphone and mute buttons
• Four-way navigation keypad
• Headset jack: 2.5 mm
• Removable belt clip
• Charging cradle stand
• Range: Indoor: 165 ft. (50m); outdoor: 980 ft. (300m)
• Battery 2 Ni-MH 800-mAh (1.2V) AAA batteries
(rechargeable)
• 10 hours of talk time
• 120 hours of standby time
AccessLine Communications
Owner’s Manual AccessLine 3-9-11
22
Getting Started
The Cordless Handsets and Cordless Base are shipped to you preconfigured. You do not have to do any configuring or programming of
the Cordless Handset. Each Cordless Handset has been assigned a
phone number and extension number. This section describes the
function of the lights on the Cordless Base and some of the initial
phone startup screens.
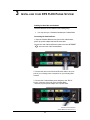
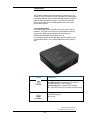
Cordless Base Basics
The Cordless Base provides wireless connectivity to the Cordless
Handsets. The Lights on the top of the Cordless Base indicate the
current status. After the initial installation and activation, the
SYSTEM and INTERNET lights should remain lit.
The following describes the indicator lights, ports and buttons on the
Cordless Base which, in turn, provides information on the operating
state.
Feature
Description
Steady green—The system is ready.
Slow flashing green—Acquiring an IP address, if
applicable. (DHCP is used by default.)
Fast flashing green—Upgrading the firmware.
SYSTEM
Off—There is no power or the system cannot boot up.
Flashing green—Transmitting or receiving data
through the WAN port.
Off—No link.
INTERNET
AccessLine Communications
Owner’s Manual AccessLine 3-9-11
23
Feature Not Supported
PHONE
Feature Not Supported
LINE
Page/Registration
Steady green—One or more Handset is registered.
Fast flashing green—The Base is in registration
mode. To activate registration mode, press the button
for at least 7 seconds.
Slow flashing green—The Base is in paging mode or
a Handset is off hook. To activate paging mode to
locate a Handset, press the button for a few seconds;
Handsets ring.
Off—No Handset is registered to the Base.
Locating Handsets
To locate Handsets that may have been misplaced, you can have all
Handsets registered to the Cisco SPA232D receive a ringing “locator
call.” To page all Handsets, on the Cisco SPA232D, briefly press the
Page/Registration
button until the green status light flashes
slowly.
A “Handset locator” message displays on the ringing Handsets.
Press the Start Call or End Call
button to stop the ringing.
Note: If the Handset ringer is turned off, the Handset locator
call does not ring.
AccessLine Communications
Owner’s Manual AccessLine 3-9-11
24
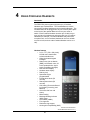
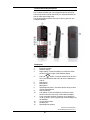
Cordless Handset Key Descriptions
The Cordless Handset has a front keypad as well as side keys.
These keys can be used to customize your Cordless Handset as
well as make and manage calls.
The following table describes the keys on the key panel of your
Cordless Handset.
Components
1
2
3
Earphone speaker.
Handset display.
Right softkey—Press the softkey to perform the action
shown in the lower right of the Handset display.
4
End Call
button—Press the button briefly to end a
call. Press the button and hold it to turn the Handset on
and off.
Dial keypad.
Mute button.
Microphone.
Speakerphone button—Press this button during a call to
use the speakerphone.
Start Call button.
Left softkey—Press the softkey to perform the action
shown in the lower left corner of the Handset display.
4-way navigation keypad—Press the arrow buttons to
move up, down, left, or right through menus displayed on
the Handset.
Center Select button.
Headset port.
Speakerphone speaker.
5
6
7
8
9
10
11
12
13
14
AccessLine Communications
Owner’s Manual AccessLine 3-9-11
25
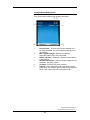
Cordless Handset Display Screen
Your phone screen displays the following information:
1
2
3
4
5
6
Date and time—The date and time are obtained from
the CiscoSPA232D, but can be updated manually from
the Handset.
DECT signal strength—Reflects the Handset
registration status to the Cisco SPA232D.
Battery indicator—Reflects the charge level and status
of the batteries.
Handset information—Lists the number assigned to the
Handset in the phone system.
Contacts—Accesses the phone contacts.
Options—Items displayed in this menu depend on the
phone state. For example, different options are displayed
when a call is active than when the phone is idle.
AccessLine Communications
Owner’s Manual AccessLine 3-9-11
26
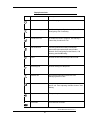
Display Screen Icons
Icon
Name
Description
Active call
A call is in progress.
Call forwarding
Call forwarding is configured on the phone. See
Configuring Call Forwarding.
Conference call
A conference call is in progress. See Placing a
Three-Way Conference Call.
Do Not Disturb
Incoming calls do not reach your Handset
because the phone has been set to Do Not
Disturb. See Configuring Do Not Disturb, Call
Waiting, and Call Blocking.
Hold
A call is on hold. See Putting a Call on Hold.
Incoming call
A call is coming in to the phone.
Missed call
An incoming call was not answered. See
Managing Missed Calls.
Mute
The phone speaker is muted. Appears during an
active call. See Adjusting Handset Volume and
Muting.
Speaker
The speakerphone is turned on.
Voicemail
You have new voicemail.
AccessLine Communications
Owner’s Manual AccessLine 3-9-11
27
Entering Numbers and Text in Fields
Some fields on the Cisco SPA302D require you to enter
numbers and text by using the keypad. In general, the
following guidelines apply:
Use the keypad to enter numbers and characters,
pressing the key multiple times to select the correct
number or letter.
Press the number key multiple times to move to a
different letter under that number. (For example, to
enter “Mary,” you would press 6 five times rapidly and
then pause (for M); press 2 and then pause (for a),
press 7 three times rapidly (for r), and then press 9
three times rapidly (for y).
Press the Right softkey (Delete) to backspace and
delete the last character, or cancel data entry.
Press the Left softkey to save entered data.
Press the arrow buttons on the keypad to move
between fields.
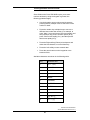
Available characters are shown in the following table:
Key
Character Set
1
1/:\,!;$^|
2
abc2ABC
3
def3DEF
4
ghi4GHI
5
jkl5JKL
6
mno6MNO
7
pqrs7PQRS
8
tuv8TUV
9
wxyz9WXYZ
0
Space 0 ~ ? > ‘ < “
*
.@*&%[]_
#
#+-=(){}
AccessLine Communications
Owner’s Manual AccessLine 3-9-11
28
Turning the Handset On and Off
To turn the Handset on and off, press and hold the End
Call
button.
Note: Placing the Handset into the cradle
automatically turns the Handset on, even it if has been
shut off.
Options When the Handset is Idle
Redial—Press to dial the last number called.
Intercom (Unsupported)—Press to call another Cisco
SPA302D that is registered to the same Cisco SPA232D.
Choose the Handset from a list and press the center
Select button.
Parked Calls—Retrieve a parked call. See “Parking a
Call”
Grp Pickup (Unsupported)—Pick up a call ringing at
another Handset in a group of phones.
Pickup (Unsupported)——Pick up a call ringing at a
specified extension.
Keylock—Press to lock the phone. To unlock, press the
center Select button, and then press the asterisk key (*).
Options When There is an Active Call
New Call—Put an active call on hold and begins a new
call.
Hold—Put a call on hold. See “Putting a Call on Hold”
Transfer—Transfer the call. See “Transferring a Call”
Conference—Create a conference call between you, the
caller on the active call and another caller. See “Placing a
Three-Way Conference Call”
Navigating through the Phone Menus
From the main display screen, press the Left softkey to
access the Options menu (Redial, Intercom, and
Keylock).
Press the Right softkey to access the Contacts menu.
These buttons also provide other options such as Cancel
and Back, depending on the phone menu that you are
viewing.
On the Cisco SPA302 Handset, press the Select button in
the center of the 4-way navigation keypad to access
additional phone functions.
AccessLine Communications
Owner’s Manual AccessLine 3-9-11
29
The table below lists the Phone Menu functions and where to
look for configuration information.
Adjusting Handset Volume and Muting
To adjust the audio volume during a call:
1 Press the Right Arrow button on the 4-way navigation
keypad to increase the volume.
2 Press the Left Arrow button to decrease the volume.
To adjust the ringtone volume when a call is not in progress:
1 Press the Right Arrow button to increase the volume.
2 Press the Left Arrow button to decrease the volume.
To turn off the ringer, continue to press the Left Arrow button until
the message on the display and the ringer off icon indicate that
the ringer is turned off.
AccessLine Communications
Owner’s Manual AccessLine 3-9-11
30
To mute the Handset microphone, press the Mute button on the
Handset. The mute icon appears at the top of the Handset
display.
Answering or Ignoring a Call
To answer an incoming call, do one of the following tasks:
Press the Start Call button.
Press the Left softkey to select Answer.
Press the Speakerphone button to answer with the
speakerphone.
To decline to answer a call, press the Right softkey to select
Ignore.
Placing a Call
To place a call, do one of the following tasks:
Enter the number on the keypad and press the green
Start Call button.
To use the speakerphone, enter the number on the
keypad and press the Speakerphone button.
Managing Contacts:
You can store Private and Shared contacts on your Handset.
Private contacts are specific to each Handset. Shared contacts
are available on all Handsets registered to the Cisco SPA232D
(Base). When a Shared contact is entered from a Handset, the
contact is made available to all Handsets registered to the same
Base station.
You can configure up to 100 Private contacts, and 50 Shared
contacts on the Cisco SPA302D.
To configure contacts:
1 Press the center Select button.
2 Select Contacts.
3 Select Private (contacts are stored only on this Handset)
or Shared (contacts are shared and stored among all
Handsets registered to the same Cisco SPA232D).
4 Press the Options softkey to perform one of the following
actions:
Add New: Add a new contact. Enter the name and
number, then press the Save softkey. Names and
numbers have a 32-character limit.
Edit Dial: Retrieves the number from the Contacts list and
opens the dialler window, so that the number can be
edited before dialling. Press the Right and Left Arrow
AccessLine Communications
Owner’s Manual AccessLine 3-9-11
31
buttons to move the cursor in the number field, and the
Back softkey to delete characters.
Edit: Edit the name and number for the contact. You can
also assign a ringtone for the contact. Press Save to save
your changes.
Delete: Deletes the selected contact. Press Confirm to
delete.
Delete All: Deletes all contacts. Press Confirm to delete
all contacts.
Redialing a Call
To redial the last number called,
1 Press the Left softkey to select Options.
2 Select Redial.
Putting a Call on Hold
To put a call on hold:
1
Press the Left softkey to select Options.
2
Scroll to Hold and press the center Select button.
The Hold icon and on-screen message indicates a call is on hold.
To resume the call:
1 Press the Left softkey to select Options.
2 Scroll to Resume and press the center Select button.
The Active Call icon indicates the call is active again.
Using Call Waiting
If Call Waiting is enabled, while on a call, a beep tone will alert
you of a second incoming call.
To answer the call:
Press the Left softkey to select Answer (the first call is
placed on hold.)
To ignore the call:
Press the Right softkey to select Ignore.
To return to the first call, do one of the following tasks:
to end
• Press the Right softkey to select End Call
the active call and return to the call on hold.
• Press the Left softkey to select Options and choose
Swap to place the current call on hold and return to the
first call.
The active call is shown at the top of the screen and is indicated
by the active call icon.
AccessLine Communications
Owner’s Manual AccessLine 3-9-11
32
Transferring a Call
To transfer a call:
1 Press the Left softkey to select Options.
2 Scroll to Transfer and press the Select button.
3 Enter the number to which to transfer. The Cisco
SPA302D automatically dials the number.
You can transfer before the called number answers, or you can
wait to speak to the called number.
Transferring a Call Directly to Voicemail
To transfer a call directly to voicemail:
1 Press the Left softkey to select Options.
2 Scroll to Transfer.
3 Press the Select button.
4 Enter *99 followed by the 3-digit extension number for the
destination phone.
5 Hang up when it starts to ring, to transfer the call.
Placing a Three-Way Conference Call
You can create a conference call between you, the caller on an
active call with you, and a third party.
To create a conference call:
1 Press the Options softkey during an active call. The first
call is placed on hold, a second line is opened, and you
hear a tone.
2 Enter the second telephone number on the keypad. The
number is automatically dialled.
3 When the second party answers, press the Options
softkey and choose Conference.
The three calls are connected and the display screen shows that
a conference call is in progress.
When you hang up, the conference call is ended for all parties.
Parking a Call
You can park a call on a designated line (“parking lot”) so that
another person in your office can retrieve the call. The call is
active until it is un-parked or the caller hangs up.
To park a call:
1 While on an active call, press the Options softkey.
2 Select Transfer.
3 Enter the park group number. (the default is 9000)
4 Listen for the park number to be voiced, and then hang
up.
To pick up a parked call simply dial the park number (9001, 9002,
etc.)
AccessLine Communications
Owner’s Manual AccessLine 3-9-11
33
Ending a Call
To end a call, press the red End Call
button.
Handling Missed Calls
A message appears on the display screen notifying you if a call is
not answered. Pressing any button on the Handset clears this
message from the screen.
Note: The missed call notification cannot be turned off, only
cleared after the notification appears.
To view and return a missed call:
1 Press the Up Arrow button to display the Call History, or
press the center Select button and select Call History.
2 Select the missed call you want to return.
3
Press the Start Call
button.
Viewing the Call History
You can view a list of calls placed from and received on your
Handset. To view the call history:
1 Press the center Select button.
2 Select Call History. A list of calls is shown.
3 Scroll to the call you want to view and do one of the
following actions:
• Press the Center select button to see more information about
the call.
• Press the Start Call button to call the number.
• Press the Options softkey to perform one of the following
actions:
- Send to Contacts—Adds the number to your list of private
contacts. If desired, edit the name in the Name field and choose a
ringtone for the contact. Press Save to save the new contact.
- Clear Entry—Deletes the call from the call history. Press
Confirm to delete.
- Clear List—Deletes all calls from the call history. Press Confirm
to clear the list.
- Edit Dial—Retrieves the number from the call history and opens
the dialler window, so that the number can be edited before
dialling (for example, to add a steering digit to reach an outside
line). Press the Right and Left Arrow buttons to move the cursor in
the number field and the Back softkey to delete characters.
Voicemail
Each Cordless Handset comes with a Voicemail box which can
record up to 90 minutes of messaging with a max of 5 minutes per
AccessLine Communications
Owner’s Manual AccessLine 3-9-11
34
message. Each user can record his or her personal greeting for
the voicemail box. Voicemail is automatically saved for 90 days.
Similar to the Desk Phone, you may access voicemail through the
phone, change your PIN and record your voicemail greeting.
To access your voicemail messages:
Method A:
1 Dial **1.
2
3
Press the Start Call
Enter your PIN.
button.
Method B:
1 Press & Hold 1 on your keypad.
2 Down Arrow to your phone number.
3 Press the Select (center) button.
4 Enter your PIN.
Method C:
1 Dial your phone number.
2
3
Press the Start Call
Enter your PIN.
button.
Retrieving messages when you are away from the office:
1 Dial your 10-digit phone number and allow it to ring.
2 When your voicemail greeting begins to play, enter your
PIN over your greeting.
Returning a Call:
While listening to a message or after listening to a
message, press 9* to call that person back.
You may return to your voicemail box without calling
back in by pressing ## after talking to the person you
called back.
Changing your Voicemail PIN
1
2
3
4
Log in to your voicemail box.
Press 8 for User Options.
Press 7 to change your PIN.
Enter the new 6 to 10-digit PIN when prompted.
Recording a Personal Greeting via the Phone
1
2
3
4
Log in to your voicemail box.
Select 8 for User Options.
Select 1 to record your Unavailable Greeting.
Follow the voiced instructions.
AccessLine Communications
Owner’s Manual AccessLine 3-9-11
35
Forwarding Voicemail Messages via the Phone
A user can forward a voicemail from his or her voicemail box to
another voicemail box or group of voicemail boxes.
Once logged in to your voicemail box, press 1 to listen to your
message(s).
1 Press 6 at any time while listening to the message or after
the message.
2 Press 1 to forward the message.
3 Enter the phone number, extension number or group
number to receive the message.
4 Record an introduction to the message, if desired.
5 Touch * to send the message.
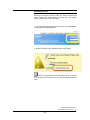
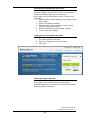
Logging into your Voicemail Box via the Web
1
2
3
Go to www.accessline.com/login.
Enter your 10-digit phone number and PIN.
Click Login.
Retrieving messages via the Web
Once logged in, click the Play button associated with the
voicemail message you wish to listen to. The voicemail message
will play through your speakers.
AccessLine Communications
Owner’s Manual AccessLine 3-9-11
36
Forwarding Voicemail Messages via the Web
A user can forward a voicemail message from his or her voicemail
box to another AccessLine voicemail box once logged into the
personal website.
Voicemail messages may be forwarded via email to anyone or
forwarded directly into another person’s voicemail box (providing
they are in your company and have an AccessLine phone)
1
2
3
4
5
6
Once logged in click the Forward button associated with
the voicemail message you wish to forward.
Enter one or more email address or one or more
AccessLine phone numbers.
Click the Continue button.
If you have entered email address, fill in your email
address, the subject line and any message you wish to
include.
Select the delivery method: Send a link to the voicemail
message or send the voicemail message as an
attachment.
Click the Send button when finished.
AccessLine Communications
Owner’s Manual AccessLine 3-9-11
37
AccessLine Communications
Owner’s Manual AccessLine 3-9-11
38
Setting Up Voicemail Notification via Email
You may setup your voicemail box to send you an email alert
whenever someone leaves you a voicemail message.
1 Go to www.accessline.com/login.
2 Enter your Desk Phone Number and PIN.
3 Click Login.
4 Select the Personal Info Tab at the top of the web page.
5 Select the Notification button.
6 Enter your email address in the space provided (you may
enter multiple email addresses separated by a
semicolon).
7 Select the Display Format (what the email message looks
like).
8 Click Ok to save your changes.
AccessLine Communications
Owner’s Manual AccessLine 3-9-11
39
Creating a Voicemail Group
A Voicemail Group allows you to quickly forward a voicemail
message to multiple other people without entering each person’s
information individually. Voicemail groups are created through
your web interface.
1 Once logged in, select the Personal Info Tab.
2 Select the Group Manager button.
3 Click the Create Group button.
4 Assign a Group Number- used when forwarding to a
group through the phone.
5 Assign a Group Name.
6 Add an optional description.
7 Add members to the group one at a time by entering their
name or phone number.
8 For each member you add, determine if that person
should be:
Administrator - Able to make changes to the group
Sender - Able to send to this group
Recipient - Able to receive messages sent to this group
9 Click the Add button.
10 Repeat step 7 through 9 as necessary to add all of the
Members.
11 Click the Save button.
AccessLine Communications
Owner’s Manual AccessLine 3-9-11
40
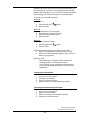
Configuring Call Forwarding:
1
Press the center Select button to view the available
preferences.
2 Scroll to Call Settings and press the center Select button
again.
3 Scroll to Call Forwarding and press the center Select
button.
4 In one or more of the fields, enter the number to which
you want to forward calls.
5 You can forward calls to a voice mailbox, another
extension, or an outside line. If forwarding calls to an
outside line, be sure to enter any steering digits, access
codes, or area codes required to complete the call. Press
the Delete key to backspace.
• Forward All Dest—Forwards all incoming calls to the destination
of the entered number.
• Forward Busy Dest—Forwards incoming calls to the destination
of the entered number when your phone is busy.
• Forward No Ans Dest—Forwards incoming calls to the
destination of the entered number when you do not answer the
phone.
6 Press Save.
Configuring Do Not Disturb, Call Waiting, and Call Blocking
You can configure call preferences, such as Do Not Disturb and
Call Waiting, by accessing the following options:
• Do Not Disturb—Incoming calls do not reach your Handset.
(They will not display in the Received Calls list.)
• Call Waiting—If call waiting is enabled, while on a call, a beep
tone will alert you of a second incoming call.
• Block Anonym Call—Blocks incoming calls to your Handset from
callers who have blocked their Caller ID.
1 Press the center Select button to view the available
preferences.
2 Scroll to Call Settings and press the center Select button
again.
3 Press the center Select button to choose Call
Preferences.
4 Press the Up or Down Arrow button to scroll to the setting
you want to configure.
5 Press the Right and Left Arrow buttons to turn the feature
on or off.
6 Press the Left softkey (Save), or the center Select button
to save your changes.
Configuring Phone Settings
To accessthe settings menu, press the center Seclect button and
scroll to settings.
AccessLine Communications
Owner’s Manual AccessLine 3-9-11
41
Configuring Network Settings: (Unsupported) For assistance,
please call Customer Service.
SIP Settings: (Unsupported) For assistance, please call Customer
Service.
Changing Your Ringtone
To change your Handset ringtone:
1 From the Settings menu, choose Ringtones.
2 Press the Up and Down Arrow buttons to select a
ringtone. A preview of the ringtone plays.
3 Press Save to save the selected ringtone as the ringtone
for your Handset.
Configuring Keypad and Call Park Tones
You can configure a tone to play when keys on the Handset are
pressed or when a phone call is parked. To configure tones:
1 From the Settings menu, choose Tones.
2 Press the Up and Down Arrow buttons to select the tone
setting that you want to change. Press the Right and Left
arrow buttons to turn the tone on or off.
3 Press Save to save your changes.
Configuring the Backlight Timeout Setting
You can configure the amount of time that the Handset display
screen remains lit before it is turned off to conserve battery
power. To configure the timeout setting:
1 From the Settings menu, choose Backlight Settings.
2 Press the Right and Left Arrow buttons to choose from
15, 30, or 60 seconds.
3 Press Save.
Configuring and Using Speed Dials
You can configure up to 9 speed dials (numbers 2 through 9 and
0) on your Handset. A speed dial number can be configured by
pressing and holding an unassigned number on the keypad, or by
using the Call Settings menu on the Handset.
Creating Speed Dials
To create a speed dial by choosing an unassigned number on the
phone keypad:
1 Press and hold the number (2 through 9 or 0).
2 When the message appears asking you to confirm the
speed dial entry, press the Left softkey to Confirm.
Perform one of the following actions:
AccessLine Communications
Owner’s Manual AccessLine 3-9-11
42
• Press the Left softkey to choose Contacts to add a speed dial
from the private Contacts list. Select the contact and press the
center Select button.
• Use the keypad to enter the speed dial name. Press the Down
Arrow button to reach the number field and use the keypad to
enter the number. Be sure to enter any steering digits, access
codes, or area codes needed.
3 Press the center Select button to save the speed dial and
return to the main display screen.
Creating Speed Dials through the Handset Menu:
1
Press the center Select button to view the available
preferences.
2 Scroll to Call Settings and press the Select button
again.
3 Select Speed Dial.
4 Press the Up and Down Arrow buttons to move to the
speed dial slot that you want to configure.
5 Press Options, and then select Edit.
6 Perform one of the following actions:
• Press the Left softkey to choose Contacts to add a speed dial
from the private Contacts list. Select the contact and press the
center Select button.
• Use the keypad to enter the speed dial name. Press the Down
Arrow button to reach the number field and use the keypad to
enter the number. Be sure to enter any steering digits, access
codes, or area codes needed.
7 Press the center Select button to save the speed dial
and return to the list of speed dials.
Managing Speed Dials
From the Speed Dial menu, press Options. You can do the
following:
• Edit—Edit the selected speed dial.
• Clear Entry—Delete the selected speed dial.
• Clear List—Delete all speed dials.
Using Speed Dials
1
2
3
To use a speed dial, press the asterisk key (*).
Press the number of the speed dial.
Press the Start Call button.
Using Contacts
You can store private and shared contacts on your Handset.
Private contacts are specific to each Handset. Shared contacts
are available on all Handsets registered to the Cisco SPA232D.
When a shared contact is entered from a Handset, the contact is
AccessLine Communications
Owner’s Manual AccessLine 3-9-11
43
made available to all Handsets registered to the same Base
station.
You can configure up to 100 private contacts and 50 shared
contacts on the Cisco SPA302D.
To configure contacts:
1 Press the center Select button.
2 Choose Contacts.
3 Choose Private (contacts are stored only on this Handset)
or Shared (contacts are shared and stored among all
Handsets registered to the same Cisco SPA232D).
4 Press the Options softkey to perform one of the following
actions:
• Add New—Add a new contact. Enter the name and number, and
then press the Save softkey. Names and numbers have a 32character limit.
• Edit Dial—Retrieves the number from the Contacts list and
opens the dialler window, so that the number can be edited before
dialling (for example, to add a steering digit to reach an outside
line). Press the Right and Left Arrow buttons to move the cursor in
the number field and the Back softkey to delete characters.
• Edit—Edit the name and number of the contact. You can also
assign a ringtone for the contact. Press Save to save your
changes.
• Delete—Deletes the selected contact. Press Confirm to delete.
• Delete All—Deletes all contacts. Press Confirm to delete all
contacts.
Changing Handset Settings
A unique Handset name can be defined, which is reflected in the
upper right corner of the display. The Handset name is used to
identify the SPA302D with the Intercom and Handset
deregistration.
To change the Handset name, display language, or input
language:
1 From the Settings menu, choose Handset Settings.
2 Press the Up and Down arrow buttons to select the field
you want to change. Press the Right and Left arrow
buttons to change the values in the field.
3 Press Save.
Upgrading the Handset Software
Upgrading the Handset Software: (Unsupported) For assistance,
please call Customer Service.
Performing a Factory Reset
Performing a Factory Reset: (Unsupported) For assistance, please
call Customer Service.
AccessLine Communications
Owner’s Manual AccessLine 3-9-11
44
Viewing Phone Information
To view information about your Handset, including the software
version, hardware version, and serial number:
1 From the Settings menu, scroll to Phone Info, and press
the center Select button.
2 Press the Up and Down arrow buttons to scroll through
the available phone information:
Model: Handset model.
Software Version: Version of software that is current
installed on the Handset.
HID VID: Hardware version ID.
PID: Product ID
SN: Serial number
IPEI: International Portable Equipment ID, or a unique
number used to identify each DECT Handset to the Base
station.
Base RFPI: Radio Fixed Part ID, or a unique number
used to identify each DECT Base station to the Handset.
Advanced Handset Configuration Options
Advanced Handset Configuration Options: (Unsupported) For
assistance, please call Customer Service.
AccessLine Communications
Owner’s Manual AccessLine 3-9-11
45
5
Troubleshooting the Cisco SPA302D
Advanced troubleshooting is performed by phone system
administrators and is not covered in this document. However, some
common problems and solutions are described below.
No Network Message
If a “No Network” message is displayed on the phone screen, the
WAN interface of the Cisco SPA232D is not connected to the
network. This means that the Cisco SPA232D cannot connect to the
Internet and some functions are unavailable. Try the following
actions:
1. Make sure the Internet connection is active.
2. Check the cable connecting the WAN interface
of the Cisco SPA232D to the Internet source
(for example, the cable modem) to make sure it
is functional.
3. Reboot the Cisco SPA232D.
Unresponsive Handset
If the Handset is unresponsive after a few moments, press the End
Call
button to turn the Handset off. Wait a few moments and
then press the End Call button again to turn the Handset back on. If
the Handset is still unresponsive, remove the batteries for a few
moments to “reboot” the Handset, and then replace the batteries.
Note: There is no “hard reset” button on the Handset.
Handset will not Turn On (Screen will not Illuminate)
1. Follow Instructions for correctly installing
batteries.
2. Follow Instructions to Turn On Handset
AccessLine Communications
Owner’s Manual AccessLine 3-9-11
46
3. If batteries are not charged, the Handset will
turn on after placing the Handset into the
charging cradle
4. Verify that the correct power adapter is
installed.
Handset No Longer Holds a Charge
1. Verify that the Cordless charging cradle is
plugged in and has power to it.
2. Verity that the batteries are installed correctly
3. Replace rechargeable batteries.
4. Verify that the correct power adapter is
installed.
Symptom for RF interference
Any radio-Based equipment can potentially cause
interference with other equipment and can be interfered from
other equipment.
1. Reposition Cordless Base closer to Handsets
2. Reposition Cordless Base away from electrical
equipment
3. Reposition Cordless Base away from
microwaves
Incorrect Power Adapter Used
The Cordless Base and Cordless Handset charging cradle
use visually identical power adapters but with different
amperage ratings.
The Cordless Base uses a 2 Amp power adapter.
AccessLine Communications
Owner’s Manual AccessLine 3-9-11
47
The Cordless Handset charging cradle uses a
1 Amp power adapter.
AccessLine Communications
Owner’s Manual AccessLine 3-9-11
48