1
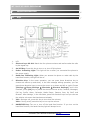
WT-2003 3 3G GV Viid de eo oD De essk kp ph ho on ne e User Manual W R W T U A T E C H N O L O G Y S D N B H D WIIIT TU UR RA AT TE EC CH HN NO OL LO OG GY Y S SD DN NB BH HD D WT-2003 3G VIDEO DESKPHONE 1. PRODUCT INTRODUCTION Thank you for your chosen of our 3G Video Desk phone. You can know how to use this phone and enjoy the perfect function completely by reading this user manual. Our company reserves the right that we can change some of the contents without informing our customer. 1.1 Packing List 3G Video Desk Phone – 1 unit Handset with wire – 1pcs Rechargeable Battery – 1pcs Power Supply – 1pcs User Manual 1.2 Usage Condition Environment Temperature: -20°C ~ +60°C Relative Humidity: 0% ~ 95% Air Pressure: 86 ~ 106Kpa 1.3 Technology Parameters Work Frequency: WCDMA2110-2170MHz Carrier Wave Interval: WCDMA 1.6MHz Max. Frequency Deviation: ±0.1ppm Max. Power Output: 1.76W (24dBm) @ WCDMA Receive Sensitivity: <-108dBm@WCDMA Work Voltage: AC220V, 50Hz, DC5V Backup Battery: Rechargeable Battery WT-2003 – USER MANUAL – Rev1.0 – Technical Support: [email protected] COPYRIGHT ©2011 WITURA TECHNOLOGY SDN BHD 2 WT-2003 3G VIDEO DESKPHONE 2. PHONE INTRODUCTION 2.1 Keys 1. LCD 2. Shortcut keys M1-M4: Match the four phone numbers and realize make the calls by the signal key 3. On/Off Key: Press this key to turn on or turn off this phone 4. Power Indicating Light: This light will be on after you connected the phone to the power supply 5. Hand-free Indicating Light: When you answer the phone or make calls by the hand-free function, the light will be on. 6. Direction Key: In the menu operation, you can press these directions key to choose sub-menus up and down; in the text message editing operation, you can press these direction keys to move the cursor up or down and left or right. Choose [Settings Phone Settings Shortcuts Shortcut Settings], and in this interface, press [OK] key to preset the shortcut menus as No, Contacts, Messages, Call log, Profile, Alarm, Calendar, Media Player, Camera, Java, My Stuff, and Browser. After settings, in the idle state, press the direction keys and you can see the relative sub-menu that has been set already. 7. VOL-: During a call, press this key to turn down the volume; VOL+: During a call, press this key to turn up the volume. 8. HANDFREE Key: Turn on or turn off the hand-free function. If you turn on the hand-free function, the hand-free key light will always be on. WT-2003 – USER MANUAL – Rev1.0 – Technical Support: [email protected] COPYRIGHT ©2011 WITURA TECHNOLOGY SDN BHD 3 WT-2003 3G VIDEO DESKPHONE 9. SEND key: In the idle state, press this key to get into the dialed number list directly; In put the phone number or choose numbers from contacts and press this key to make a call. 10. OK key: In the idle state, press this key to get into the main menu; in the add a new name state, press this key to edit or change relative record. 11. DEL key: In the input interface, press this key to delete the newest input information. 12. Digits, *, # keys 13. Digits keys: For inputting 0-9 digits or input the relative numbers in the input interface. You can press 0 to input blank in the non-digits input state. * Key: When you input characters, press this key to open the symbols lists. # key: in the editing state, press this key to switch the inputting ways. 14. SET key: In the idle state, press this key to get into the set menu directly 15. SMS key: In the idle state, press this key to get into the SMS sub-menu directly. 16. MENU/SELECT key: In the idle state, press this key to get into the main function menus; in the menu operation state, press this key to do the function in the down left corner 17. P.B/BACK key: In the idle state, press this key to get into the contacts menu; in the menu operation state, press this key to do the function in the down right corner. 2.2 1) Installation Introduction Install the USIM card and battery: Open the battery cover at the bottom of the 3G Video Desk Phone, insert the USIM card along indentation direction and fasten it to make sure the contact between the USIM card’s mental shrapnel and card seat is good; install the rechargeable battery to the battery case and then cover the battery cover. 2) The way for connection it to power supply: Insert the adapter to the city power supply 220V and connect the other end of the adapter to power interface of the 3G Video Desk Phone. 3) Provider power: You can use the external power source or rechargeable battery to provide power for this phone. When there is power off, you can use the rechargeable battery. When the power is not enough, please connect the phone to the external power to recharge the battery Attention: Please do not insert or move out the USIM card when the phone is connected to external power supply WT-2003 – USER MANUAL – Rev1.0 – Technical Support: [email protected] COPYRIGHT ©2011 WITURA TECHNOLOGY SDN BHD 4 WT-2003 3G VIDEO DESKPHONE 2.3 Table Description Icon Function Icon Function The network is WCDMA and The network is GSM and the signal strength, the the Signal strength, the more signal masts, the more signal masts, the signal is better signal is better When the green bar is Power capacity, the more rolling, the phone has been green bar, the more power. connected to external power supply There is a new unread The space for the short message message is full In the condition of agreeing to receive PUSH information, there are a multimedia message has not been Now you are using the GPRS data service received in the service box The alarm clock is on 3. CALL FUNCTION 3.1 Making Calls When you can see the operator name, you can use this function (For example, CELCOM) There are some making call ways as following: The First Way: Pick up the handset and you can hear the dialing tone, and then input the numbers, pressing [OK] key to send the calls. It will make the faster connection of the call. The Second Way: In the idle status, press [P.B/BACK] key to get into the contacts menu and you can choose the needed record and then press[SEND] key to dial out the number immediately. The Third Way: In the idle status, press [SEND] key to get into outgoing calls menu and you can choose the needed numbers and press [SEND] key to dial out the number immediately. WT-2003 – USER MANUAL – Rev1.0 – Technical Support: [email protected] COPYRIGHT ©2011 WITURA TECHNOLOGY SDN BHD 5 WT-2003 3G VIDEO DESKPHONE The Forth Way: After you get the needed number that you want to dial according the three ways mentioned, and you do not press [SEND] key but press [VIDEO CALL] key to dial out the number immediately by video way. The Fifth Way: In the off-hook status, press [REDIAL] key directly, or press hand-free key first and then press [REDIAL] key, the phone will dial out the number that has been dialed last time automatically. 3.2 Answering Or Refusing A Call If you have open the Caller ID function and there is an incoming call, the phone will send alarm alert and show the numbers of the incoming call. If the Caller’s phone numbers has been saved as a name, you can see the name instead of incoming numbers on the LCD of the phone. Answering: Pick up the handset, or press [SEND] key or press [MENU/SELECT] key to answer this phone Rejecting: Press [P.B./BACK] key to rejecting an incoming call 3.3 Operations During A Call Adjusting Volume: Press [VOL+] or [VOL-] to adjust the volume of the handset during a call During a call, press [Menu/SELECT] key to do the following operation options: Mute: You can make the sending sound as mute for this phone or cancel it Ending Call: You can end this call New Call: You can make a new call New Message: You can edit a new message and send it out Send DTMF: You can send DTMF Record On: You can start to record this call or stop it Contacts: You can do operations in the contacts menu Volume: You can adjust the volume during a call WT-2003 – USER MANUAL – Rev1.0 – Technical Support: [email protected] COPYRIGHT ©2011 WITURA TECHNOLOGY SDN BHD 6 WT-2003 3G VIDEO DESKPHONE 4. INPUTTING WAYS INTRODUCTION The content editing function in this phone is a common function. And there are some inputting ways: Pinyin, Strokes of a Chines Character, abc and 123 (digits) and so on. Here we will introduce specially using the abc and 123 inputting ways. 4.1 abc Inputting Way You can press this key with the relative letters several times to choose the letter you needed, for example, if you want to input the letter “e” and you can find that the letter “E” is the second letter on the digit [3] key, first you can press [#] key to switch the inputting way as “ABC”, and then, you can press [3] key twice to input the letter “E”. Press [*] key to open the symbol lists. 4.2 123 (Digits) Inputting Way Press the relative digits keys to input the digits. Press [*] key to open the symbol lists. 4.3 Delete Operation When you are inputting the letters, press [DEL] key to delete the letters. When there are some letters in the text box, press [DEL] key one time to delete the last letter before the cursor. If you press [DEL] key for a long time, you will delete all content. 5. Menu Operations You can enjoy series functions which are assigned in different function lists in this phone. In the idle state, press [MENU/SELECT] key to get into the main menu and press [P.B/BACK] key to get into contacts. Press [, , , ] key to get into the shortcut sub-menus which can be preset first, or you also can change the shortcut menus. (Please refer to 9.1.5 for the details) (1) If there are sub-menus for the function menu, you can press [/] key to choose the relative sub-menus and then press [MENU/SELECT] key to get into the submenu that has been selected. If there are also sub-menu, you can do the same operation to choose the next stage sub-menus. (2) Press [P.B./BACK] key to return to the upper menu and press [ON/OFF] key to exit the menu and return back to the idle interface. WT-2003 – USER MANUAL – Rev1.0 – Technical Support: [email protected] COPYRIGHT ©2011 WITURA TECHNOLOGY SDN BHD 7 WT-2003 3G VIDEO DESKPHONE 6. Messages You can send short message and multimedia message and do other operations at the same time. The information service is one kind of network service which should be supported by your SIM Card and the operators 6.1 Messages You can use messages service (Short Message Service, SMS), and you can send and receive the messages including the messages with pictures. You can also input the letters exceeding the limit one message digits which will be sent as two messages or more according to how many letters you have input. The letters with some symbols and other character which have been input in some language inputting way will occupy more space, so the letter number for one message will be limit. You can see the input letters number and how many messages should be send for this time on the up right corner on the LCD. For example, 160 means that you can also input 160 letters. 6.1.1 Text Message You can input 70 pieces of characters or 160 pieces of letters for one message in this phone. In the idle state, press [MENU/SELECT] key to get into the main menu and you can choose [Messages Text Message New] to get into “Text Message” interface, and then you can choose the inputting way for editing a message. When you are editing a message, press [MENU/SELECT] key and you can do the following operations: Send: You can send the message that you have wrote already. (Please refer to 6.1.2 for details) Insert: You can insert contact name, common sentence and Internet site. Save to draft: You can also save this message to the Draft Input Mode: You can also choose the needed inputting mode Inputting Settings: You can set the inputting and you also always as default option. Press [P.B./BACK] key to return to the text message interface. 6.1.2 Sending Messages You can choose or input the needed numbers and send your messages. After you have finished editing your message, press [MENU/SELECT] key to choose [Send], and then press [MENU/SELECT] key again and then the phone will show [Input Numbers] menu, and after you input the needed numbers, press [OK] key to send the messages directly; or press [MENU/SELECT] key, you can do the operations: WT-2003 – USER MANUAL – Rev1.0 – Technical Support: [email protected] COPYRIGHT ©2011 WITURA TECHNOLOGY SDN BHD 8 WT-2003 3G VIDEO DESKPHONE Send: Send the messages (You should input numbers in the “To:” text box) Recent Receiver: You can choose the needed number that you have used recently Contacts: You can choose the needed numbers from your records in contacts Save to draft: You can save your message to “Draft Box” 6.1.3 Inbox You can save incoming messages in inbox. Default, the messages will be saved to [Inbox] automatically. In the [Inbox] interface, you can choose some message and press [MENU/SELECT] key to do the following operations: Reply: Reply a text message or multimedia message to sender. Forward: Forward the message to other people Delete: Delete the message Delete All: Delete all messages saved in [Inbox] Call: You also can make a call to one who send you this message by voice call or video call Save Number: You can create or update existing record in you contacts View Mode: You can search all messages orderly in [Inbox] according to date or subject Details: You can see the detail information of this message Choose <OK>, and you can see the “Read Message” interface and press “OK” key to reply this message directly, and you can also press [MENU/SELECT] key to do the following operations: Reply: Reply a text message or multimedia to sender Forward: Forward the message to other people Delete: Delete the current message Call: You can also make a call to one who send you this message by voice call or video call Extract: You can extract the number, URL or Email Address of the sender. Move to USIM Card: Move this message to USIM Card WT-2003 – USER MANUAL – Rev1.0 – Technical Support: [email protected] COPYRIGHT ©2011 WITURA TECHNOLOGY SDN BHD 9 WT-2003 3G VIDEO DESKPHONE 6.1.4 Outbox The message failed sent will be saved in outbox. After you open this outbox, you can choose some message and press [OK] key to open this message: press [MENU/SELECT] key and you can do the following operations: Resend: You can send this message again Delete: You can delete the current message Call: You can also make a call to one who send you this message by voice call or video call Extract: You can extract the numbers, Internet site or email address of the sender 6.1.5 Sent Box If you have set the “Save to Sent Box” in [Messages Settings] [Save To Sent Box], the messages will be saved to [Sent Box] after being sent successfully. You can choose some message and press [MENU/SELECT] key to do the following operations: Forward: Forward the message to other people Delete: Delete the current message Delete All: Delete all messages in [Sent Box] Call: You can also make a call to one who send you this message by voice call or video call View Mode: You can search all messages orderly in [Sent Box] according to date or subject Details: You can see the detail information of this message Press [OK] key, and you can see the “Read Message” interface and press [MENU/SELECT] key to do the following operations: Forward: Forward the message to other people Delete: Delete the current message Call: You also can make a call to one who send you this message by voice call or video call Extract: You can extract the numbers, Internet sit or email address of the sender 6.1.6 Draft Box Save the messages which have not been sent. You can choose some message and you can press [MENU/SELECT] key to do the following operations: Edit: Edit the current message Delete: Delete the current message WT-2003 – USER MANUAL – Rev1.0 – Technical Support: [email protected] COPYRIGHT ©2011 WITURA TECHNOLOGY SDN BHD 10 WT-2003 3G VIDEO DESKPHONE Delete All: Delete all messages in [Draft Box] View Mode: You can search all messages orderly in [Draft Box] according to date or subject Details: You can see the detail information of this message 6.1.7 Cell Broadcast You can set the information storage mode as on-file and temporary. (Please refer to 6.1.9.2 for details) Attention: Network services should be supported by network operator 6.1.8 Templates You can edit ten pieces of common-use sentences at most and you can insert these sentences when you are editing a message. For the existing templates, you can press [MENU/SELECT] key to delete or send it (if the pieces of templates are less ten 10, you can create a new one), and then press [OK] key to edit it. 6.1.9 Settings Press [MENU/SELECT] key to get into the sub-menus, such as Text Messages and Cell Broadcast 6.1.9.1 Text Message Settings Press [MENU/SELECT] key to get into the set sub-menu. There are four sub-menus: Setting, Send Settings, Default storage and Memory Status. Choose Settings, and press [MENU/SELECT] key to do the following operations: Service Center: You can get the number from your service supplier. Most of the SIM Card have been included this number. Attention: If you have changed this number, this may make you cannot send messages. Period Of Validity: You can choose the maximum period of trying to send the messages. There are following options: 1hour, 6 hours, 12 hours, 1 day, 3 days, 1 week, 1 month or none. WT-2003 – USER MANUAL – Rev1.0 – Technical Support: [email protected] COPYRIGHT ©2011 WITURA TECHNOLOGY SDN BHD 11 WT-2003 3G VIDEO DESKPHONE Setting Name: Set the account name Choose Send Settings, and press [MENU/SELECT] key to do the following operations: Reply Path: Turn on or turn off the reply path. Status Report: Turn on or turn off the send report Network Selection: Prefer to choose PS preferred or CS Preferred. Choose Default Storage, and press [MENU/SELECT] key to do the following operations: Default Storage: Choose USIM Card or Phone to save the information. Choose Memory Status, and [MENU/SELECT] key to do the following operations: Message Memory Status: Show the memory place and capacity. 6.1.9.2 Cell Broadcast Press [MENU/SELECT] key or [OK] key to get into the cell broadcast settings. Receive: You can turn on or turn off this broadcast. Channel: Press directions to choose one channel and you can add/delete or delete all channels by pressing [MENU/SELECT] key 6.2 Multimedia Message Multimedia message is one kind of multimedia message service which can support GIF, BMP pictures displaying 6.2.1 New Multimedia Message In the idle state, press [MENU/SELECT] key to get into the function menu, and choose [Message Multimedia New] to get into the multimedia message options interface. Subject: Edit the subject for this multimedia message Text: Edit the content for describing this multimedia message Choose <Options>, and you can do the following operations: WT-2003 – USER MANUAL – Rev1.0 – Technical Support: [email protected] COPYRIGHT ©2011 WITURA TECHNOLOGY SDN BHD 12 WT-2003 3G VIDEO DESKPHONE Insert New: You can insert new page and you can insert 10 pieces of pages at most (no automatic signature settings) Insert Image: You can insert pictures with GIF, BMP formats. Edit Text: Edit the text message Insert Sound Clip: You can insert sound clip with MIDI, WAV formats Remove Image: You can delete the current picture Remove Sound Clip: You can delete the current sound clip Remove Page: You can delete the current slide Previous Page: Turn to previous page Next Page: Turn to next page Send: Send the finished multimedia message. In this menu, press [OK] key to [Add], [Delete], [Change] recipient operations; press [MENU/SELECT] key to change send modes as To, CC, or BCC Preview: You can preview each page Save To Draft: You can save this multimedia message to [Draftbox] in order to edit and sent it conveniently in further Slide Time: You can set the slide play time interval. Add Page: You can add more pages. Save as MMS Template: Save this multimedia message as template in order to edit and send it conveniently in further. Attention: You should input on of the number of recipient, copy recipient, blind recipient at least and there are some content, so that you send this message. 6.2.2 Inbox All multimedia messages will be saved in inbox, and if the sender’s name has been saved in contacts, and then you can see the name for this multimedia on the LCD or you just can see the numbers. When there is a new multimedia message, the phone will send a special sound that you have been set and there will be an icon indicating the unread message, and the default set is “automatic receive” in this phone. At the same time, you can see “Downloading Message” on the LCD. Choose some multimedia message and press [OK] key to open this message to do the following operations: Play: Play the current multimedia message Reply: Reply short message or multimedia message to sender Forward: Forward this multimedia message to other people or the appointed numbers WT-2003 – USER MANUAL – Rev1.0 – Technical Support: [email protected] COPYRIGHT ©2011 WITURA TECHNOLOGY SDN BHD 13 WT-2003 3G VIDEO DESKPHONE Call: You can also make a call to one who send you this message by voice call or video call Save: Save the pictures, sound, video in this multimedia message to Media Player Delete All: You can delete all multimedia messages in inbox Extract: You can extract the numbers and the digits in the content Delete: Delete the current multimedia message Details: You can see the receiving date, subject, numbers and size of this multimedia message 6.2.3 Sentbox In [Sentbox], you can search the multimedia message that has been sent successfully and you can also edit or send it again. Choose some multimedia message, and press [MENU/SELECT] key to do the following operations: Forward: Forward this message (or send it after editing) to the appointed numbers. Delete: Delete the current multimedia message Delete All: Delete all multimedia messages in [Sentbox] Call: You can also make a call to one who send you this message by voice call or video call. View Mode: You can search all multimedia messages orderly in inbox according to date or subject Details: You can see the receiving time, subject, numbers and size of this multimedia message 6.2.4 Outbox The multimedia messages failed sent will be saved in outbox. Choose some multimedia message, and press [MENU/SELECT] key to do the following operations: Resend: Send this message to the appointed number again Delete: Delete this current multimedia message Delete All: Delete all multimedia messages in [Outbox] View Mode: You can search all multimedia messages orderly in outbox according to date or subject Details: You can see the receiving time, subject, numbers and size of this multimedia message WT-2003 – USER MANUAL – Rev1.0 – Technical Support: [email protected] COPYRIGHT ©2011 WITURA TECHNOLOGY SDN BHD 14 WT-2003 3G VIDEO DESKPHONE 6.2.5 Draftbox Save multimedia message to draftbox manually. Choose some message and press [MENU/SELECT] key to do the following operations: Send: Send this message to the appointed number Delete: Delete this current multimedia message Delete All: Delete all multimedia messages in [Draftbox] View Mode: You can search all multimedia messages orderly in Draftbox according to date or subject Details: You can see the receiving time, subject, numbers and size of this multimedia message 6.2.6 Templates Choose one of the templates and press [MENU/SELECT] key to do following operations: Edit: Edit the template Send: Send this template to the appointed number Delete: Delete the current template (or a batch of templates) Delete: Delete all templates 6.2.7 Settings Multimedia messages settings will have impact on sending, receiving and searching for multimedia messages. Press [MENU/SELECT] key to get into the sub-menus: Delivery size limit: You should set the limit size as 100KB. Reception size limit: You can set the limit size as100/200/300KB. Profile settings: You can set the profile. Deploy: You can choose WAP or HTTP in continuous mode and you can do the following settings Service center: Default: http://mmsc.myuni.com.cn Gateway: Default IP address: 10.0.0.172 Port No.: Default: 80 User name: None Password: None Data account: The same with operator WT-2003 – USER MANUAL – Rev1.0 – Technical Support: [email protected] COPYRIGHT ©2011 WITURA TECHNOLOGY SDN BHD 15 WT-2003 3G VIDEO DESKPHONE 6.3 Email 6.3.1 New Email In the idle state, press [MENU/SELECT] key to get into the main menu and choose [Messages Email New] to get into the e-mail options interface. Subject: Edit the subject title for this e-mail. Text body: Edit the content and choose <Options> to do the following operations: Insert image: Insert pictures with GIF, BMP format. Edit text: Edit text for this e-mail. Insert sound: Insert sound clip with MIDI, WAV format. Send: Send this e-mail after finished it. In this menu, press [OK] key to [add], [delete], [change] recipients operations; press [MENU/SELECT] key to change the sending modes as To, CC, or BCC. Save to draft: Save this e-mail to [Draftbox] in order to edit or send in further conveniently. 6.3.2 Inbox All received e-mails are saved in inbox, and if the sender's name has been saved in contacts, and then you can see the name for this e-mail on the LCD or you just can see the numbers. When there is a new e-mail, the phone will send a special indicating sound that you have been set and the new e-mail will be saved to [Inbox] automatically. You can press [MENU/SELECT] directly key to read the received e-mail and you can see the latest information such as receive time, date, and sender's address. Choose one of the received e-mails and press [MENU/SELECT] key to do the following operations: Open: Open this received e-mail. Details: Show the received time and subject of this received e-mail. Delete: Delete the received e-mail. Reply: Reply message or multimedia messages to sender. Forward: Forward this received e-mail to the appointed number. Call: You also can make a call to one who send you this message by voice call or video call. Save: Save the pictures, sound and video from this e-mail to media player. Delete all: Delete all e-mails in [Inbox]. WT-2003 – USER MANUAL – Rev1.0 – Technical Support: [email protected] COPYRIGHT ©2011 WITURA TECHNOLOGY SDN BHD 16 WT-2003 3G VIDEO DESKPHONE Extract: Extract the use number and the total numbers of the characters or letters in this e-mail. (Digits) 6.3.3 Outbox The e-mail failed sent are save to outbox. Choose some sent e-mail and press [MENU/SELECT] key to do the following operations: Send: Send this e-mail to the appointed numbers. Edit: Edit the content of this e-mail. Delete: Delete this failed sent e-mail. Delete all: Delete all e-mails in [Outbox] 6.3.4 Sentbox In [Sentbox], you can search the e-mails that has been sent successfully and you can edit or send it again. Choose some e-mail, press [MENU/SELECT] key to get into the following options: Forward: Forward this sent e-mail to the appointed numbers. Messages details: Show the sent time and subject of this e-mail. Delete: Delete this sent e-mail. Delete all: Delete all sent e-mails in [Sentbox]. 6.3.5 Draftbox Save e-mails to draftbox manually. Choose some e-mails, and press [MENU/SELECT] key to do the following operations: Edit: Edit the content of this e-mail. Delete: Delete this saved e-mail. Delete all: Delete all emails in [Draftbox]. 6.3.6 Settings Press [MENU/SELECT] key to get into the sub-menus and there are options: General settings, Email accounts and About. WT-2003 – USER MANUAL – Rev1.0 – Technical Support: [email protected] COPYRIGHT ©2011 WITURA TECHNOLOGY SDN BHD 17 WT-2003 3G VIDEO DESKPHONE 6.3.6.1 General Settings Press [MENU/SELECT] key or [OK] key to do the following settings: Per sent mail: You can set the capacity for each sent e-mail. Per received mail: You can set the capacity for each received e-mail. Only receive headers: You can set whether only to receive the e-mail title or not. Auto receives: You can set whether to receive e-mails automatically or not. Receive auto timer: You can set the interval time for receiving emails automatically. 6.3.6.2 Email Accounts You can do the following settings, for example: Account name: [email protected] Password: w810810 Receive server: pop.qq.com Send server: smtp.qq.com Receive port: 110 Send port: 25 Auth. type: POP3 SMTP authentication: yes Use SSL: no Data account: You should set the data account: Settings Connection settings Data account, and you should set a data account is matched to card, such as mobile card, set as: cmnet. 6.3.6.3 About Press [MENU/SELECT] key or [OK] key to search the detail information of version. 7. CONTACTS In the idle state, press [MENU/SELECT] key to get into the main function menu and choose [Contacts]. Press [/] to switch different groups. The default groups are: All, Family, Friends, Colleague, VIP and others. (Press [MENU/SELECT] key to create a new group or edit groups) Maybe you can do the following operations for selecting all phone records according to different groups: (Attention: The numbers only saved in this phone can be set as different groups) Call: You can dial the number records saved in this phone by voice call or video call. WT-2003 – USER MANUAL – Rev1.0 – Technical Support: [email protected] COPYRIGHT ©2011 WITURA TECHNOLOGY SDN BHD 18 WT-2003 3G VIDEO DESKPHONE Send message: You can edit messages or multimedia messages and send to these numbers. New: You can add a new contact to your SIM card or phone. Edit: Press / key to choose the different details for current record and change them. Delete: Delete the current record or a batch of records. Copy to phone (all records are set in All group): If the record you have chosen is saved in SIM card, the sub option is: Copy to Phone. If the record you have chosen is saved in phone, the sub option is: Copy to SIM or Copy to memory. Add to: Add this record to other groups. Add members: You can add new record for this group. Remove: You can delete this record in this group. Contacts Display: You can choose the contacts display as phone, USIM card or all. Send: You can choose to send this record by short message, multimedia message or e-mails. Memory status: Show the memory status. Settings: You can set My business card, Speed dial, Reject call, Fixed dial, Own number and the white list of video calls. Remarks: The white list of video calls After setting the white list of video calls, when the user in the white list initiates Video call and your phone rings 6 standard voices, the phone will connect to the call automatically. (This function aims at warding the elder) 7.1 Contacts Records 7.1.1 Create A New Record In Phone 1. Get into the contacts and press [MENU/SELECT] key to choose [New]. 2. Choose groups: All, Family, Friends, Colleague, VIP and others. 3. Write the detail information: <Saved>, <Name>, <Phone number>, <Video number>, <Number>, <Number type>, <Email>, <URL>, <Birthday>, <Ring Tone>, <Image>, <Notes> and so on. Description: Attention:Press [OK] key to change and write down the detail information. You should input one of the <Phone number>, <Video number>, <Number>, <Email> at least or this record cannot be saved. WT-2003 – USER MANUAL – Rev1.0 – Technical Support: [email protected] COPYRIGHT ©2011 WITURA TECHNOLOGY SDN BHD 19 WT-2003 3G VIDEO DESKPHONE 7.1.2 Create A New Record In SIM Card 1. Get into the contacts and press [MENU/SELECT] key to choose [New]. 2. Save: Choose USIM card. 3. Write the detail information: <Name>, <Number> and so on. Attention: <Number> should be input so that this record can be saved. 7.2 Quick Search Input the first letter of the needed contact person. For example, in the contacts menu, you want to search "hello" and you can press digit [6] key twice to input "h" letter and then press [/] key to choose your needed record. 8. Browser Network is one platform for combining application between wireless communication and Internet. You can get more Internet information sources and the e-business application. In the idle state, press [MENU/SELECT] key to choose [Browser]. Attention: 1. Maybe some functions cannot be supported by your network and in order to ensure the browser running normally, please check whether your SIM are with GPRS function or not first. 2. If you browse some website, it is necessary to charge you for relative flow. 8.1 Go To Homepage Accessing to homepage and you can also set the phone page website 8.2 Enter URL Wireless Internet search engine. 8.3 Bookmark You can mark the web-site as bookmark which will be looked up conveniently in further. You can save the common web-sites as a simple name. You can choose to add a new bookmark and then input the web-site address, name to save it. WT-2003 – USER MANUAL – Rev1.0 – Technical Support: [email protected] COPYRIGHT ©2011 WITURA TECHNOLOGY SDN BHD 20 WT-2003 3G VIDEO DESKPHONE Choose one added bookmark, and press [MENU/SELECT] key to do the following operations: Access: Connect to the appointed site. Edit: Edit the site and name of the bookmark. Delete: Delete the bookmark. Delete all: Delete all bookmarks. Details: Check the site for this bookmark. Send links: Send links by short message or multimedia message. Move: Move the place of this bookmark. 8.4 History The phone will record the websites that you have access in and you can lookup the former websites by searching history records. 8.5 PUSH Message Box When the multimedia message has not been received, it will be saved in service inbox automatically. You can receive it in this inbox later 8.6 Saved Pages The websites will be recorded by phone automatically and you can look up the former websites by searching saved sites. 8.7 Browser Settings 8.7.1 Clear Clear history: In order to save space, advice you to delete history records regularly. Clear cache: In order to avoid any block and increase the browsing speed, advice you to delete buffer memory regularly. Clear cookies: The same to delete buffer memory. Clear login info: In order to protect private information, advice to delete user name password regularly. WT-2003 – USER MANUAL – Rev1.0 – Technical Support: [email protected] COPYRIGHT ©2011 WITURA TECHNOLOGY SDN BHD 21 WT-2003 3G VIDEO DESKPHONE 8.7.2 Security Settings Cache mode: You can choose to use cache mode: Do not use cache, Access network first, Access cache first, and use only cache. Cookies: You can choose Accept or Reject. Login info: You can choose Accept or Reject. 8.7.3 Look And Feel Rendering mode: You can choose Smart fit, Desktop, Mobile desktop, and Text. Response time out: You can choose 30 seconds, 60 seconds, 90 seconds and 120 seconds. 8.7.4 About Browser You can look up the detail information of browser. Press [MENU/SELECT] key and set WAP as factory default 8.8 Network Settings According to the deploy information, you can set the network connection gateway, IP address and so on. You can do the following settings, for example: Deploy name: User-defined Home page: http://wap.wo.com.cn Connecting mode: http(Agency) Agency: 10.0.0.172 Port: 80 Attention: The network services are relative to network operator. 8.9 Basic Operations For Browsing Pages Get into browsing sites interface, and press [MENU/SELECT] key to get into the function sub-menus (below the browser interface) and press / key to switch functions. Press [OK] key to choose the function. From left to right, the functions are: Tools: You can send this link by short message or multimedia message, keep bookmark, keep web-site and save project. Go to: You can go to home page, URL, bookmark, history record and PUSH message box. Delete: You can delete history records, buffer, cookies, user name and password. Zoom: You can choose the display ratio. WT-2003 – USER MANUAL – Rev1.0 – Technical Support: [email protected] COPYRIGHT ©2011 WITURA TECHNOLOGY SDN BHD 22 WT-2003 3G VIDEO DESKPHONE Refresh: Refresh the current web site. Details: You can look up the detail information of this link. Exit: Exit the browsing the web site. 9. CALL LOG There are [Outgoing calls], [Incoming calls], [Missed calls], [All calls] in call records. Only these relative can be supported by network and also the phone placed within network service area is turn on. Then missed calls and received calls and so on can be recorded. You can save 20 pieces of records for missed calls, incoming calls and outgoing calls separately. If the records are full, the earliest log will be deleted automatically. In the idle state, press [MENU/SELECT] key to get into main function menu and choose [Call log] to get into this menu. 9.1 Call Log There are four call history: [Missed calls], [Outgoing calls], [Incoming calls], [All calls]. Choose one of them and press [OK] key to lookup the details; press [MENU/SELECT] to do the following operations: Voice call: You can make a call from this call history by voice call. Video call: You can make a call from this call history by video call. Edit and dial: You can edit the number before making a call. Send message: You can edit short messages/multimedia message to this number. Delete:Press / key to choose the log that you want to delete and you can delete or delete all logs. Save number:Save this number to phone or SIM card. Set speed dial: Set this number as speed dial number. Set reject call: Set rejects call. 9.2 Data Transmission Show the GPRS service flow for [All sent GPRS] and [All received GPRS] such as multimedia messages. Press [MENU/SELECT] or [OK] to reset all. WT-2003 – USER MANUAL – Rev1.0 – Technical Support: [email protected] COPYRIGHT ©2011 WITURA TECHNOLOGY SDN BHD 23 WT-2003 3G VIDEO DESKPHONE 9.3 Call Duration Show the time of [Last call time], [All outgoing voice call],[All incoming voice call], [All outgoing video call], [All incoming video call]. Press [MENU/SELECT] or [OK] key to reset all. 10. SETTINGS [Settings] is the setting center for phone parameters and then let you know and use this phone fully which will be let you enjoy your life better. 10.1 Display Settings You can preset the wallpaper in this phone. Choose [Menu->Settings->Display Settings] to get into sub-menu. Idle screen: You can set relative parameters for phone standby time, such as, wallpaper, whether showing the time and date. Backlight time: Set the backlight time. Brightness: Press / to choose the light levels. 10.2 Phone Set Choose [Menu Settings Phone Settings] to get into sub-menu 10.2.1 Language There are three kinds of languages for selecting: [Auto], [简体中文], and [English] 10.2.2 Time And Date You can set the current date and time and displaying format. Time: Set the current time. Date: Set the current date. Time format: Choose the time display format and there are 12-hour and 24 hour for selecting. Date format: Choose the date display format and there are yyyy/mm/dd or dd/mm/yyyy for selecting. WT-2003 – USER MANUAL – Rev1.0 – Technical Support: [email protected] COPYRIGHT ©2011 WITURA TECHNOLOGY SDN BHD 24 WT-2003 3G VIDEO DESKPHONE Summer time: Turn on or turn off the summer time 10.2.3 Shortcuts You can set the direction keys [ ] as appointed shortcut menus. In the idle state, press the direction keys to get into the appointed shortcut menus directly. (Default on any shortcut menus.) Choose [Settings Shortcuts Shortcut settings], and you can set the direction keys as no, contacts, Messages, Call log, Profile, Alarm, Calendar, Media player, camera, Java My stuff, Browser. 10.3 Call Settings Set the parameters of the phone 10.3.1 Phone Number If you want to make calls and hide your phone number at the same time, you can hide set it to hide your phone number. You can do the operations: Hide, Display, and network control. Attention:The network services should be supported by network operator. 10.3.2 Call Waiting During a call, you can open the call waiting function and you also can switch or keep some calls at the same time and do other relative operations. Attention:The network services should be supported by network operator 10.3.3 Answer Mode You can choose to answer a call by any key or send key to answer a call 10.3.4 Auto Redial You can choose to turn on or turn off automatic redial function 10.3.5 Minute Prompt WT-2003 – USER MANUAL – Rev1.0 – Technical Support: [email protected] COPYRIGHT ©2011 WITURA TECHNOLOGY SDN BHD 25 WT-2003 3G VIDEO DESKPHONE Choose [ON], the phone will give you a hint for every minute after you begin a call so that you can hang up the phone in time to save phone expenses. 10.3.6 Answer Prompt You can choose turn on or turn off the answer prompt 10.3.7 Call Divert According to the setting condition, the incoming call will be diverted to the appointed phone numbers. All calls: Choose [ON]. All incoming voice calls or video calls will be diverted to preset phone numbers. Choose [Check status] to lookup the current all call divert service status. If busy: Choose [ON]. When you are on-line, all incoming voice calls or video calls will be diverted to preset phone numbers. Choose [Check status] to lookup the current if busy divert service status. If not answered: Choose [ON]. When there is no one answer this phone, all incoming voice calls or video calls will be diverted to preset phone numbers. Choose [Check status] to lookup the current if not answered divert service status. If not available: Choose [ON]. When the phone cannot be connected for the network reason, all incoming voice calls or video calls will be diverted to preset phone numbers. Choose [Check status] to lookup the current if no network or turn off divert service status. Cancel all: Cancel all call divert services. 10.3.8 Call Barring You can limit the phone to make calls or receive calls. After choosing the settings, press [MENU/SELECT] key to get into it, and then choose the call types (voice calls and video calls). You can turn on, turn off this function or search the status. Choose [ON] after setting, the settings will be accepted by network and the phone can provide following call barring options: All outgoing: Forbid to make any calls. All incoming: Forbid any incoming calls. Int'l but home: You can just make calls to your our country when you are abroad. International: Forbid to make international calls. WT-2003 – USER MANUAL – Rev1.0 – Technical Support: [email protected] COPYRIGHT ©2011 WITURA TECHNOLOGY SDN BHD 26 WT-2003 3G VIDEO DESKPHONE Abroad incoming: You can not make any calls when abroad. Cancel all: Cancel all call barring. Change call barring PD: Change the call barring password. Attention:The network services should be supported by network operator. 10.3.9 Voice Mail You can set the voice mail number 10.3.10 Video Mail You can set the video mail number 10.4 Network Settings You can choose the network mode by this function. When you are roaming, you can choose the needed network manually. (This function should be supported by network operator) Network mode: Auto, GSM, WCDMA. Search mode: Auto, Manual. Preferred network: Set different preferred network 10.5 Security Settings You can set password for your phone to protect it. Phone lock: When you turn on [Phone lock] function, you should input the password every time when you turn on the phone. (Initial password is:0000) PIN lock: PIN code is a personal identifier for protecting SIM card password to avoid being used by others. If you input the wrong PIN code three times, the SIM card will be locked and you should use PUK code to unlock the SIM card. Alarm: Please be cautious to use this function and if you forget the PUK code, please ask your network operator. On: If you turn on PIN lock function, you should input password every time when you turn on the phone. Change: If you want to change the PIC code, you should turn on PIN code and input the old PIN code and then input the new PIN code. Off: There is no necessary for you to input the PIN code to use this phone when you turn on it. WT-2003 – USER MANUAL – Rev1.0 – Technical Support: [email protected] COPYRIGHT ©2011 WITURA TECHNOLOGY SDN BHD 27 WT-2003 3G VIDEO DESKPHONE Change phone code: When you turn on the [Phone lock] function, you should input the password every time turning on the phone. If you want to change the password or turn off phone code function, please choose [Change phone code] to change phone code or set [Off]. Change PIN2: You can change PIN2 code. Press [MENU/SELECT] key to input the old password and then input the new password. Attention: When you turn on (turn off) this function and add (change, delete) FDN code, you will use this PIN2 code. 10.6 Connection Settings You can set connection parameters. USB: You can choose PC sync, USB and Dial up. Data account: The default account is China Unicom. You also can create a new account and you also can do the operations: create, check, edit and delete for the new data account. 10.7 Reset Settings You can restore all parameters as factory default settings. You also can choose restore some settings. 11. Tools 11.1 Alarm In the idle state, press [MENU/SELECT] to get into the function main menu and choose [Tools Alarm] There are three groups of alarms [Alarm 1], [Alarm 2], [Alarm3] and you can set them separately. Edit: You can set the alarm time and you can set [Time], [Alarm alert], [Once], [Everyday], [Alarm interval], and you can press / to choose them. Press [MENU/SELECT] to save all settings. On: After you finish the settings, you can choose to turn on this alarm. Off: If you have turn on one alarm, you can choose to turn off this alarm. WT-2003 – USER MANUAL – Rev1.0 – Technical Support: [email protected] COPYRIGHT ©2011 WITURA TECHNOLOGY SDN BHD 28 WT-2003 3G VIDEO DESKPHONE 11.2 Notes You can write some things in these notes 11.3 Calculator You can use this calculator for calculating 11.4 Recorder In the idle state, press [MENU/SELECT] to get into main function menu. Choose [Tools Recorder] and press [OK] key to begin to record. Press [MENU/SELECT] key to do the following operations: Record folder: You can check the existed record files. Setting: Choose [Default file name] and press [OK] key or press [MENU/SELECT] to change the default record name; choose [Record time limit] and you can choose [1 minute], [5 minutes], [15 minutes], [60 minutes], [No restrict], and you can press [ ]for selecting. After choosing, press [OK] or [MENU/SELECT] to save settings. 11.5 World Time In the idle state, press [MENU/SELECT] key to get into main function menu. Choose [Tool World Time] to get into the world time interface. Press [MENU/SELECT] key to do the following operations: Edit: Press [ ] to choose the time. (Press [OK] or [MENU/SELECT] to get into quick search interface). After settings, press [MENU/SELECT Set locate zone] to save this settings. 12 Summer time:Start or stop the summer time. My Stuff My stuff is one kind of phone database tools. You can do some basic operations for files. In the idle state, press [MENU/SELECT] key to get into main function menu and choose [My stuff]. Choose some folder, and press [MENU/SELECT] to do the following operations: WT-2003 – USER MANUAL – Rev1.0 – Technical Support: [email protected] COPYRIGHT ©2011 WITURA TECHNOLOGY SDN BHD 29 WT-2003 3G VIDEO DESKPHONE New folder: Create a new folder. Delete folder: Delete the chosen folder. Mover folder: Move the chosen folder to other needed place. Copy folder: Copy the folder and all content in this chosen folder. View mode: Choose list or grid to check the folders. Memory status: Check the memory status. 12.1 Images Press [OK] key to open [Images] folder, and the taken pictures are saved in [Alarm], and wallpapers are saved in [Pictures]. 12.2 Sounds Press [OK] key to open [Sounds] folder, and download music and personal made music are saved in [music]; download records and personal made records are saved in [record] download ring tones and personal made ring tones are saved in [ring]. 12.3 Videos Press [OK] key to open [Video], folder, and download videos and personal made videos are saved in this folder. 12.4 Applications Press [OK] key to open [Application] folder and you can see the JAVA sub-menu and press [OK] key to get into install applications 12.5 Others Press [OK] key to open [Others] folder, and the other type download files and the other personal made files are saved in this folder. 13. Calendar In the idle state, press [MENU/SELECT] to get into the calendar menu to choose [Calendar]. Press [OK] key to check the memorandum for current date. Press [MENU/SELECT] to do the following operations: WT-2003 – USER MANUAL – Rev1.0 – Technical Support: [email protected] COPYRIGHT ©2011 WITURA TECHNOLOGY SDN BHD 30 WT-2003 3G VIDEO DESKPHONE New event: Choose this sub menu to get into the new event. Title: Press [OK] key to edit the title. Type: Press [ ] key to choose the type. Summary: Edit your explanations. Address: Edit the place address. Start date/time: Press [OK] key to edit the start date and time. End date/time: Press [OK] key to edit the end date and time. Alarm: Press [ ] key to turn on or turn off the alarm. Repeat: Press [ ] key to choose repeat type. Week view: Choose this sub menu, and press [MENU/SELECT] key to do the following operations: New event: Edit new event. To certain day: Go to appointed date for editing. Expired event: Check the expired events. To certain day: Go to appointed date for editing. Settings: Go to this sub menu to do the following operations: Alarm alert: Press [OK] key to get into [My stuff] and you can choose [Sounds]. Press [MENU/SELECT] key and choose [ring], and after choosing, press [MENU/SELECT] to save this setting. Start weekday: Press [/] key to choose the start weekday. Week view title: Press [/] to choose the titles Expired event: Check the expired events 14. Profile You can set a set of default vale as you like and press [MENU/SELECT] key to save your settings for different occasions. Press [OK] key to do the following settings: Voice call ring: You can set the voice call ring tone. Video call ring: You can set the video call ring tone. Volume: The default volume is: 3 levels;0 level as mute; the range of volume from low to high: 1 level to 5 levels and you can press [/] key to adjust the volume. Message alert: You can set the message alert. Email alert: You can set the email alert. Key tone: You can choose [On] or [Off] to set the key tone and the default value is: [On]. Warning tone: You can choose [On] or [Off] to set whether the phone will send out the warning tone when the power is not enough and the default value is: [On]. WT-2003 – USER MANUAL – Rev1.0 – Technical Support: [email protected] COPYRIGHT ©2011 WITURA TECHNOLOGY SDN BHD 31 WT-2003 3G VIDEO DESKPHONE 15. Camera There is camera function in this phone. In the idle state, press [MENU/SELECT] key to get into the [Camera] menu,and then press [OK] or [MENU/SELECT] to get into image mode. In this interface, press [OK] key to take a photo; press [/] key to adjust the brightness; press [/] key to adjust the frame size. (You cannot use this function if the size has been set as Max) Press [MENU/SELECT] key to do the following operations: To camcorder: From image mode to video mode. Photo album: Go to my album and you can check, rename, delete photos saved in album and also you can set the photo as wallpaper or contact image. Countdown: You can set the self timer or close this function: 3 seconds, 5 seconds, and 10 seconds. Effect: You can choose Close, Black and white, Negative, Sepia, Aqua. Settings: Choose this sub menu and go to settings list. Press [MENU/SELECT] to do the following editing: Shutter sound: Choose the shutter sound when you take a phone. Quality: Choose the photo quality. Image size: Choose the image size. White balance: Choose the lightness when taking a photo. Anti-Banding: Choose the anti-banding. Night mode: Choose to turn on or turn off night mode. Photo default name: Set the beginning name for photo. Save location: Check the photos location. Memory status: Check the capacity of memory. SECURITY TIPS Electrical Equipments Please turn off the phone beside the high-precision controlled equipments, or it will because the equipments cannot work normally. The Electrical equipments include: hearing aids, pace maker, fire alarm, automatic door and other automatic controlled equipments. If you will use some medical machines, please first contact with the service center which deal with these medical machines to check whether these medical machines will be influenced by wireless wave or not. WT-2003 – USER MANUAL – Rev1.0 – Technical Support: [email protected] COPYRIGHT ©2011 WITURA TECHNOLOGY SDN BHD 32 WT-2003 3G VIDEO DESKPHONE Medical Places Please pay much attention to the following tips in medical places: Please do not install and use this phone in operating room, ICU room and CCU room. Turn off this phone near to medical machine areas. Carry out the policy and rules in medical place which should be forbidden to use phone. Pay much attention to the ring tone, volume and vibrating alert settings in order to cause any influence on heart patient. Flammable And Explosive Places n the flammable and explosive areas, please do not connect this phone to external power supply in order to avoid explosion or fire. These places include: Gas station; Fuel zone; Transport and storage place for fuel and heavy chemicals: Places with the chemical substances or mote air; Areas with explosion and dangerous mark; Areas with "turn off wireless equipments" mark; Areas needed you to turn off the car engine and so on. Storage Environment Put the phone far away from the magnetic equipments such as, magcard and floppy disk for the radiation of the phone will erasure the information saved in these magnetic equipments. Please do not put the phone, battery and adapter in strong magnetic implements, such as electromagnetic pan and microwave oven, or it may cause circuit problem of this phone, fire or explosion. Please do not put the phone, batter and adapter in high temperature or low temperature places, or it may cause circuit problem of this phone, fire or explosion. Please do not put the pin and other mental like pin near to handset, or these pins or other mental like pin will be caught by the magnetism of handset and this maybe make damage on people. WT-2003 – USER MANUAL – Rev1.0 – Technical Support: [email protected] COPYRIGHT ©2011 WITURA TECHNOLOGY SDN BHD 33 WT-2003 3G VIDEO DESKPHONE Children Healthy Please put the phone, battery and adapter on the place which cannot be touched by children and also do not let unattended children play this phone, battery and adapter. Please do not let children suck the battery or it may cause poisoning. Please do not let children touch the components of this phone or it may cause damage on children. Operation Environment There is no water resistance for your phone, battery and adapter, so please keep dry when you use this phone. Please do not let your phone, battery and adapter in wet environment or do not pick up the handset by wet hands in order to avoid phone short circuit, problems caused by rusty or people getting electric shocks. Do not use this phone in the dusty, wet, dirty, or near to magnetic field environment in order to avoid inside circuit problems. In thundery weather, please do not use this phone when this phone is being charged or use this phone outdoor in order to avoid lightning strike or other damages. Please do not touch the antenna when you are in a call which will affect the call quality and the power will be higher than normal one which will cut down the speaking time and stand-by time. The signals of this phone will interference the near television, radio and computer. Please use the authorized accessories and comply with international radio frequency radiation policy. Clean And Maintenance Turn off the phone before clearing and maintaining and if the phone also is connected to external power supply, please disconnect the phone from external power supply in order to avoid getting electric shocks, battery or adapter short circuit. Do not use chemical materials (such as alcohol, benzene), chemical lotion, or frosted cleanser to clean phone housing or this may cause damage or fire. You can use a little wet, anti-static soft cloth to clean the phone. Please do not scratch or alter phone housing, otherwise, the coatings could cause allergy if body is an allergic reaction. Then you should stop using this phone and go to see a doctor for help. Clean the dust on the plug and keep the plug dry in order to avoid fire. If the phone and authorized accessories cannot work normally, please contact the authorized service center where you can get help. WT-2003 – USER MANUAL – Rev1.0 – Technical Support: [email protected] COPYRIGHT ©2011 WITURA TECHNOLOGY SDN BHD 34 WT-2003 3G VIDEO DESKPHONE Emergency Call In emergency situation, when the phone is turned on and is placed in service area, you can make emergency calls by this phone. But, we can not ensure the network can be connected in any conditions, so this phone can not be as the only contact way. Battery Usage Only the authorized battery made by manufacturer can be used, and do not use other wrong battery, or it may cause explosion. Please do not throw the battery to fire, or it maybe cause battery on fire or burst. Please connect mental, keys, jewelry and so on to positive and negative terminals in order to avoid battery short circuit and the body damage for hot battery, such as burn. Do not remove the battery or weld the battery poles directly by yourself in order to avoid battery leakage, overheating, fire or burst. If battery leakage, smoke or with bad smell, please stop using it and keep it far away from fire and body in order to avoid fire or burst. Under the security condition, hand it to qualified maintenance place for handling. If the inside liquid of the battery drop on skin or clothes, please immediately flush it with water in order to avoid skin damage. If the inside liquid of the battery is splashed to eyes, please do not rub it or it will make eye sight damaged. You should immediately flush eyes with water and go to hospital for medical treatment. When the battery is being charged or in a storage process, you find deformation, color changed, with high temperature. Please stop using it, or it may cause battery leakage, overheating, burst or on fire. When the battery cannot be installed correctly, please do not extrude the battery in order to avoid battery leakage or burst. If you do not use battery for a long time, please keep it in room temperature after charging it. Eternal Power Supply Only the authorized adapter made by manufacturer can be used, and do not use other wrong adapter, or it may cause problems or explosion. Do not cause external power supply short circuit in order to avoid problems, smoking or on fire. If the power supply has been damaged (such as wires, fault), or exposed connection plug has been loosen, please do not continue to use it in order to avoid shock, external power supply short circuit or fire. WT-2003 – USER MANUAL – Rev1.0 – Technical Support: [email protected] COPYRIGHT ©2011 WITURA TECHNOLOGY SDN BHD 35 WT-2003 3G VIDEO DESKPHONE Do not place the water container with water in to the external power supply which may cause leakage or other malfunctions. Do not charge the battery in dusty, damp environment and the power cable can not be near to heating utensils. Before charging the battery, please confirm that the external power plug has been inserted to socket correctly. If the external power plug is undeserved, it can cause shock, phone or battery on fire or explosion. After finish the charge, please pull out the plug and do not pull out the adapter cable. External power supply should be qualified alternating voltage, or it may cause fire or problems. It is forbidden to put the heavy instrument on external adapter and do not damage, modify or pull adapter cable; otherwise, it may cause shock or fire. Do not wet hands contact the adapter plug, cable which are being charged, or it may cause a shock. If the liquid like water enter into the adapter, please pullout the plug from the socket in order to avoid overheating, fire or other malfunction Radio Frequency Exposure Standards This phone is in accordance with requirements of radio frequency exposure standards. This phone is a low power receiver and transmitter, and its design is made comply to the international standards advice on RF radiation energy limits which are parts of international norms and it is part of the provisions in the general public RF energy radiation housings. These principles are made by international independent scientific organization after exhaustive research and then they are set. At the same time, the group also evaluates these stands regularly to ensure its effectiveness. These standards contain many safety coefficients to ensure the health of any age people and user's personal safety. The radio frequency radiation standards of this phone is measured and evaluated by SAR (Specific Absorption Rate). According this standard, the maximum SAR value for this phone is 2.0W/kg. The SAR value tests for this phone comply with the standards tests and we are using the normal use of this phone pose maximum output power to test various frequencies. Although the SAR value is measured as the maximum one, in fact, this phone is in general used with the SAR value far less than the maximum □of network connection with the lowest level of power. Usually, the phone is more close to base station, the less power output. When you are using this phone near to head, the measured maximum SAR value is 1.161W/kg, although the SAR values are different at different positions for this phone, which are all related to standards. Please note: If this phone design has been changed, the SAR value will be changed. But in any case, the designs of this phone are accord with requirements of standards. WT-2003 – USER MANUAL – Rev1.0 – Technical Support: [email protected] COPYRIGHT ©2011 WITURA TECHNOLOGY SDN BHD 36 WT-2003 3G VIDEO DESKPHONE (1) ICNIRP advice that for the phone used by public people, the standard max. SAR value will be less 2.0W/kg for every value of every 10 grams of body. This standard contains enough safety space for protecting public security. At the same time, it also contains the difference caused by measuring error. In the condition with different measuring requirements and frequency, maybe the SAR values are different. Environmental Protection Please comply with the local laws for handling the wrapper of this phone, the old battery and phone. Please do not throw the defective phone or battery to waste bin or fire in order to avoid explosion. WT-2003 – USER MANUAL – Rev1.0 – Technical Support: [email protected] COPYRIGHT ©2011 WITURA TECHNOLOGY SDN BHD 37