1
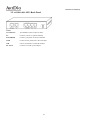
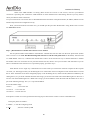
Voice Internet Phone Gateway
User Manual
IPH 1000 Series
Version:1.2 Update:2004/1/2
ARTDio Company Inc.
1000 Series VoIP Gateway
1. Safety Instructions
1.
Do not attempt to tear or fix the product without a specialist; otherwise, there may be unexpected damage, fire, or electric
shock due to any improper or wrongful action.
2.
Do not put any metal objects such as pins and wires, or your fingers into vents and gaps since it might cause electric shock
and certain harm.
3.
Do not rip, twist, extend the power cord/cable, or place it under any heavy objects; otherwise, it might cause fire or
electric shock due to the damage of the power cord.
4.
The product should be connected to a suitable/compatible power supply with appropriate voltage as marked on the product;
otherwise, it might cause fire or electric shock.
5.
Please keep children away from the disposable plastic covering in order to prevent children from choking by placing the
plastic covering close to nose or mouth.
6.
The phone line from wall plug should always be connected to the “LINE” socket. It should not be connected to the
“PHONE” socket as it may cause damage to the product.
7.
Please read through the instructions before using this product.
2
1000 Series VoIP Gateway
Table of Contents
1.
SAFETY INSTRUCTIONS .................................................................................................. 2
2.
I NTRODUCTION................................................................................................................ 6
2.1 The ARTDIO VoIP gateway...................................................................................................................................................6
2.2. Features ..................................................................................................................................................................................6
2.3. Package Contents ..................................................................................................................................................................8
2.4. System Recommendations ....................................................................................................................................................8
3.
GETTING TO KNOW THE ARTDIO VOIP GATEWAY ....................................................... 9
3.1. ARTDIO IPH-102’s Front Panel ..........................................................................................................................................9
3.2. ARTDIO IPH-102’s Back Panel .........................................................................................................................................10
4.
INFORMATION REQUIRED BEFORE INSTALLATION................................................... 11
4.1. Telephone number and Area Code.....................................................................................................................................11
4.2. IP Address ............................................................................................................................................................................11
4.3. Password for Web Based Management .............................................................................................................................12
5. INSTALLATION AND PARAMETERS CONFIGURATION .................................................... 13
5.1. Notice for Cable Modem users ...........................................................................................................................................13
5.2. Hardware installation .........................................................................................................................................................13
5.2.1 Connection Type 1: With an IP Sharing Device ..............................................................................................................15
5.2.2. Connection Type 2: Without an IP Sharing Device ........................................................................................................15
5.2.3. Connection Type 3: Connected in the office...................................................................................................................16
5.3. Parameters Configuration ..................................................................................................................................................16
5.3.1. Step 1: Set the Regional ID ............................................................................................................................................16
5.3.2. Step 2: IP Setting ............................................................................................................................................................19
5.4.1. Configuring the Phone Number......................................................................................................................................27
5.4.2. Disabling Auto Answer...................................................................................................................................................... 27
3
1000 Series VoIP Gateway
5.4.3. PBX CO line access (trunk access code) configuration..................................................................................................... 29
5.4 Inspection ..............................................................................................................................................................................29
6. PLACING IP CALLS.............................................................................................................. 33
6.1. Phone Book and IP Searching ............................................................................................................................................33
6.1.1. When the IP information stored in the dynamic phone book is no longer correct..........................................................34
6.2. Voice Calls ............................................................................................................................................................................34
6.2.1. Making traditional phone calls (through your local PSTN) ...........................................................................................34
6.2.2. Making IP calls between ARTDIO IPHs ........................................................................................................................35
6.2.3. Outbound Transit Calls (Placing calls from ARTDIO IPH to a traditional phone line via another ARTDIO IPH)........35
6.2.4. Inbound Transit Calls .....................................................................................................................................................36
6.3. Sending Faxes over an IP network.....................................................................................................................................37
6.3.1. Sending Faxes between ARTDIO IPHs over an IP network...........................................................................................37
6.3.2. Use Outbound Transit to Send Faxes .............................................................................................................................37
6.3.3. Use Inbound Transit to Send Faxes ................................................................................................................................37
7.
SPECIAL CONDITIONS ................................................................................................... 38
7.1. Use a Private IP Address in a NAT Environment .............................................................................................................38
7.2.
Firewall............................................................................................................................................................................38
7.3.
Bypassing the ARTDIO IPH..........................................................................................................................................38
8.
WEB BASED MANAGEMENT ......................................................................................... 40
8.1. Acquiring the ARTDIO IPH’s IP Address.........................................................................................................................40
8.2. Accessing the Web Based Management Interface.............................................................................................................40
9.
APPENDIX........................................................................................................................ 42
9.1. Appendix A: Manual IP Searching Procedure ..................................................................................................................42
9.2. Appendix B: Automatic IP Searching Procedure..............................................................................................................43
9.3. Appendix C: Edit the phone book......................................................................................................................................45
9.3.1. Use the Web Based Management interface to edit the static phone book.......................................................................45
4
1000 Series VoIP Gateway
9.3.2. Move a dynamic phone book entry to the static phone book .........................................................................................46
9.4. Appendix D: Enabling/disabling the automatic answer mode.........................................................................................46
9.5. Appendix E: Phone Set Command Codes and Parameters. ............................................................................................48
9.6. Specifications .......................................................................................................................................................................52
9.7. Unit Mounting Dimension ..................................................................................................................................................54
5
1000 Series VoIP Gateway
2. I
ntroduction
2.1 The ARTDIO VoIP gateway
Congratulations on your purchase of an ARTDIO VoIP gateway. The new ARTDIO VoIP is developed with the latest VoIP
technology. Equipped with QoS capability, ARTDIO VoIP delivers high-quality IP voice and fully integrated communications with
limited bandwidth. Most important of all, it is portable with high agility and easy installation.
2.2. Features
As long as you have high speed internet access, ARTDIO IPH adds an IP function to the regular phone with a simple dial
and talk step. By attaching the two IPH devices to the phone lines, you can start to make phone calls without any hazel.
When you want to make IP phone calls, simply dial the “*” or “#” and the same phone number normally used with a “#”
followed. Once both of parties are equipped with ARTDIO IPHs, you will have unlimited connection with the other party totally
free.
6
1000 Series VoIP Gateway
Besides the ability to make free phone calls through Internet, ARTDIO IPH also provides the following unique features:
You could always use the ARTDIO IPH to place calls even when you are not right next to the device.
When you are away from home, you can still use ARTDIO IPH to place calls to people who also have ARTDIO IPH.
Simply use a standard phone or even a mobile phone to call ARTDIO IPH located at your house, ARTDIO IPH will then transfer
your calls through the IP network to the remote ARTDIO IPH which is located at your intended recipient’s location. In this way,
you only have to afford local call expenses.
7
1000 Series VoIP Gateway
Make long distance calls while paying local phone bills
If you were lived in Los Angeles, you can make a phone call to anyone located in New York area through another
ARTDIO IPH located in New York. Because there is no cost involved when placing a call through ARTDIO IPH in Los Angeles
to ARTDIO IPH in New York, Again, you will only be charged for local calls.
2.3. Package Contents
1.
ARTDIO IPH-102 Personal VoIP Gateway
2.
AC/DC Power Adapter
3.
RJ-45 Ethernet Cable
4.
RJ-11 Telephone Cable
5.
Quick Installation Guide
6.
CD-ROM
2.4. System Recommendations
A broadband networking (Cable modem, DSL, or T1) is required to ensure voice quality, and in order to simplify
installation, a Router is recommended.
8
1000 Series VoIP Gateway
3. Getting to know the ARTDIO VoIP gateway
3.1. ARTDIO IPH-102’s Front Panel
Indicators
POWER
When the power is connected, the LED turns green
ALARM
The red light “On” indicates that the configured phone number does not match the phone number of the
connected phone line
CPU/ACT
“On” indicates that the CPU is working properly
TIME SRVR
“On” indicates that ARTDIO IPH is able to access the network’s Time Server
FORWARD
“On” indicates that Call Forwarding is enabled
A. ANSWER
“On” indicates that Auto Answer is enabled
LOOP/RING
PHONE: “On” indicates that phone is off hook
“Flash” indicates the phone is ringing
LINE: “On” indicates that phone is off hook
“Flash” indicates the phone is ringing
PC
LNK/ACT: “On” indicate link up
“Flash” indicates Sending/Receiving data packets
LAN/Internet
LNK/ACT: “On” indicate link up
“Flash” indicates Sending/Receiving data packets
9
1000 Series VoIP Gateway
3.2. ARTDIO IPH-102’s Back Panel
Ports
LAN/Internet
Your Modem connect to (RJ-45 cable)
PC
Connects your PC to operate manually
FAX/PHONE
Connects your phone set or FAX machine
LINE
Connects to the phone line to the wall outlet
CID
Can be connected to a Caller ID machine
DC 9V/1A
Connects to AC/DC power adapter
10
1000 Series VoIP Gateway
4. Information required before installation
You need to prepare the following information before installing ARTDIO IPH.
4.1. Telephone number and Area Code
A telephone number is required. ARTDIO IPH must be configured with a phone number, and area code that your
phone line belongs to, such as 213 for Los Angeles, 708 for New York, 408 for San Jose and 202 for Washington DC, etc….
4.2. IP Address
ARTDIO IPH requires an IP Address for operation. Before installation, you need to know how to get an IP address. Static
IP, DHCP IP or PPPoE IP can be used. The following table helps you to decide what information you need. If your ISP offers
static IP, you may need to obtain an IP from MIS personnel in order to prevent an IP conflict. DHCP IP (most cable broadband
providers’ offer) and PPPoE IP (most ADSL broadband providers’ offer) will work fine.
IP Environment
Static IP
Requiring information
Public IP Address IP Address
Subnet Mask
Default Gateway
PrivateIP Address IP Address
Subnet Mask
Default Gateway
The private IP Address requires an IP Sharing
device, like a Router, and you must configure the IP
Sharing device to treat ARTDIO IPH and the IP
Address as a virtual server.
Dynamic Host Configuration Enable DHCP mode
Protocol (DHCP)
PPPoE
Account Number
Password
This information is normally provided by your
ISP. If you don’t have this information, please
contact your ISP.
11
1000 Series VoIP Gateway
4.3. Password for Web Based Management
You will need to prepare a password for Web Based Management. It can be digits, letters or combination ranging from 1
to 6 digits (E.g. 123). You will need this password to access the web Management Interface (browser based). If you don’t set
this password, you will not have right to access the Web Management Interface.
12
1000 Series VoIP Gateway
5. Installation and parameters Configuration
After preparing the information that you need as specified in section 4, follow the steps below to install ARTDIO IPH
5.1. Notice for Cable Modem users
Most Cable ISP’s usually offer DHCP to their customers, allowing only one PC to access the Internet. Because of this,
Cable ISP’s request that their customers register their LAN card’s MAC address. Only the PC using a registered MAC address
is allowed to access the Internet, so it is essential that you use an IP sharing device to connect to your Cable Modem instead,
and connect the PC and ARTDIO IPH unit to your IP sharing device. After you have connected the PC and ARTDIO IPH unit to
your IP sharing device, turn off your Cable Modem and the IP sharing device, and re-turn on again, it will re-register your
MAC Address of the IP sharing device automatically. Because you will be using an IP Sharing device, you will need to set the
IP Sharing device to treat the ARTDIO IPH unit’s UDP port 2000 as a Virtual Server.
5.2. Hardware installation
When you connect ARTDIO IPH to your network, network environments are usually different in various situations. The
Following three sections list most of the popular connections; you can select one that fits your existing network’s configuration
the most. This user guide lists the most common connection types for your reference.
ISP Environment
Suggested Connection
Connection type 1:
This type of connection is used when you are using an
With an IP sharing device IP Sharing device, like Router. You have it or with HUB for
ARTDIO IPH and serious PC. You must configure ARTDIO IPH
as a Virtual Server on the IP Sharing device.
Connection type 2:
This type of connection connects ARTDIO IPH to an
Without an IP sharing
ADSL Modem or Cable Modem directly. Usually it connects
device
a Hub to ARTDIO IPH and PCs, However, your ISP must
allow at least two accounts to access the Internet at the same
time.
Connection type 3:
Connected in the office
This type of connection is that the ARTDIO IPH is
installed in your office. It won’t work if your PBX extension
line is digital or part of a Key Telephone System. A lot of
enterprises use firewalls on their networks. You will need to
ask MIS personnel to open UDP ports as specified in section
7.2. Firewall
13
1000 Series VoIP Gateway
14
1000 Series VoIP Gateway
You can connect a telephone to either port of the “FAX/PHONE” socket. If you have a FAX machine it can be connected
to the “FAX/PHONE” socket that is not being used. Since the “FAX/PHONE” ports are wired inside ARTDIO IPH itself, the
FAX and PHONE can not be used at the same time. The “LINE” port should be connected to the phone line. The “CID” socket
can be used to connect a Caller ID device to display the phone number of incoming calls.
5.2.1 Connection Type 1: With an IP Sharing Device
Use the RJ-45 cable to connect “LAN/Internet” socket of your device with the Router, wait until ”CPU/ACT” LED on
the front panel is on, the hardware installation has done.
5.2.2. Connection Type 2: Without an IP Sharing Device
Use the RJ-45 cable to connect “LAN/Internet” socket of your device with the Hub. Connect the power adapter, wait
until”CPU/ACT” LED on the front panel is on, the hardware installation has done.
15
1000 Series VoIP Gateway
5.2.3. Connection Type 3: Connected in the office
Use the RJ-45 cable to connect “LAN/Internet” socket of your device with the LAN wall jack. Connect the power adapter,
wait until”CPU/ACT” LED on the front panel is on, the hardware installation has done.
5.3. Parameters Configuration
We recommend that you use telephone to do the configurations, as using a phone set to do the configurations is the
easiest way.
5.3.1. Step 1: Set the Regional ID
The default Regional ID is printed on the label located at the bottom of the device, showing similar as like below:
If you are installing the device in the default region, skip to next step.
16
1000 Series VoIP Gateway
5.3.1.1. The Regional ID is on the List
If you are installing the device at the region other than the regional ID specified on the label but it’s in the list below, you
need to modify the device to the right Regional ID.
The Regional ID is defined as follows:
ID NO.
Country
ID NO.
Country
ID NO.
Country
ID NO.
Country
01
Argentina
02
Australia
03
Philippines
04
Portugal
05
Brazil
06
Canada
07
China
08
Russia
09
Sweden
10
Vietnam
12
France
13
Germany
15
Hong Kong
18
India
22
Italy
23
Japan
24
Korea
26
Malaysia
27
Mexico
28
Netherlands
29
New Zealand
36
Singapore
38
Slovenia
39
South Africa
40
Spain
42
Switzerland
43
Taiwan
44
Thailand
46
British
47
USA
60
Iran
61
Dubai
When the “CPU/ACT” LED is on, pick up the handset and dial as follows:
1.
##0000 ;to start the configuring mode
2.
9547# ;assume you are modifying for U.S.A.
3.
971#
4.
Hang up the phone.
;resets the device to factory default except the regional ID
The device will be reset to the new regional ID after the “CPU/ACT“LED is on again.
5.3.1.2. The Regional ID is not in the List
If you are installing the device at the region not in the regional ID list, then you need to connect a PC to modify the
information to fit your region. Use the provided Ethernet cable to connect your PC to the port labeled “PC”, located on the rear
panel of ARTDIO IPH.
17
1000 Series VoIP Gateway
First: Use a phone set to configure the Web Management Password
When the “CPU/ACT” LED is on, pick up the handset and dial as follows:
1. ##0000
; to start the configuring mode
2. 88123#
; “123” is the Web Management password
3. 981#
; restarts to update information
4. Hang up the handset.
Second: Configure Country Code, International Code and Long Distance Code
Because ARTDIO IPH’s default IP setting is 192.168.0.2, you must configure your PC to the same Subnet. 192.168.0. X
for example. The following example uses 192.168.0.5 for the IP Address and 255.255.255.0 for the Subnet Mask
After you have completed the PC’s IP Address setting, restart the PC to let the new settings take affect.
On the PC which is connected to ARTDIO IPH, enter ARTDIO IPH’s IP Address (Default 192.168.0.2) and press enter.
ARTDIO IPH will prompt you with a dialogue box requesting that you enter a password. Use “WEB” (all capitals) for the User
field, and “123” for the password field that you have previously configured. Click the “OK” button to access ARTDIO IPH Web
Based Management Interface page
1.
Click on “BASIC” at the top of the page and you will see the page as shown in the following image.
2.
Change the “Country Code” under “My Phone Number” to your country code.
3.
Click on the “Apply” button.
4.
Click on “ACCESS CODE” at the top of the page.
5.
Add your international code and long distance code in.
18
1000 Series VoIP Gateway
6.
Click on the “Apply” button again.
7.
Click on “BASIC” at the top of the page again, Select “Warm Start” to restart the system.
After the “CPU/ACT“LED is on again. ARTDIO IPH will have your regional ID settings ready, and you can have your PC
removed.
5.3.2. Step 2: IP Setting
If you are using a static IP or DHCP, you can configure the IP address by using your phone set directly. If you are using a
PPPoE service, you have to configure the account number and password by using the Browser Based Interface as the phone set
does not accept alphabetic characters.
The following two sections contain the procedures used to configure ARTDIO IPH according to how you get your IP
address (Static IP; DHCP or PPPoE).
Since a lot of the configuring procedures in the following sections are using a telephone to modify the settings.
Configuring ARTDIO IPH via the phone set will be described first.
Using a Telephone to Configure ARTDIO IPH
Follow the steps specified on the following figures:
19
1000 Series VoIP Gateway
Pick up the handset
Dial “##0000” to enter
the configuring mode
Set next parameter
Command (two digits) +
Parameter (variable length) +
“#” key to end
Replace the handset
Every time you set parameters, press the “#” key to complete it, a successful setting will be confirmed by three equal beeps in
succession. If your settings were not succeeded you will be prompted with one long beep.
The Command length is two-digits long. For example, configure “area code” is “01”, “phone number” is “02”, and
“restart” is “98”, etc... For details please refer to section 9.5. Appendix E: Phone Set Command Codes and Parameters.
5.3.2.1 Static IP
If you are using a static IP, you need to prepare the information as specified in section 4.2. IP Address, as an example as
below:
Area Code
626 (Los Angeles)
Phone Number
4453447
IP Address
210.67.96.121
Subnet Mask
255.255.255.248
Default Gateway
210.67.96.120
Web Management Password
123
Use the information above as an example. The procedure is as follows:
When the “CPU/ACT” LED is on, pick up the handset and dial as follows:
1.
##0000
; to start the configuring mode
2.
01626#
; “626” represents the Los Angeles area code
3.
024453447#
; phone number
4.
030#
; “0” is used to enable “manual” IP mode
5.
04210*67*96*121#
; IP Address
20
1000 Series VoIP Gateway
6.
05255*255*255*248# ; Subnet Mask
7.
06210*67*96*120#
; Default Gateway
8.
88123#
; “123” is the Web Management password
9.
981#
; restarts to update information
10.
Hang up the handset.
5.3.2.2. DHCP Mode
If you are using DHCP mode, you need to prepare the information as specified in section 4.2. IP Address, as an example
as below:
Area Code
626 (Los Angeles)
Phone Number
4453447
Web Management Password
123
Use the information above as an example. The procedure is as follows:
When the “CPU/ACT” LED is on, pick up the handset and dial as follows:
1. ##0000
2. 01626#
; to start the configuring mode
; “626” represents the Los Angeles area code
3. 024453447# ; phone number
4. 031#
; “1” is used to enable “automatic” IP mode
5.
88123#
; “123” is the Web Management password
6.
981#
; restarts to update information
7.
Hang up the handset.
5.3.2.3. PPPOE
If you are using PPPoE, you need to prepare the information as specified in section 4.2. IP Address, as an example as
below:
Area Code
626 (Los Angeles)
Phone Number
4453447
PPPoE Account
[email protected]
PPPoE Password
123456
Web Management Password
123
21
1000 Series VoIP Gateway
22
1000 Series VoIP Gateway
First: Use a phone set to configure the Web Management Password and phone number
You need to use a web browser to perform the PPPoE settings through ARTDIO IPH’s Web Based Management Interface.
To enter the Web Based Management you must have previously configured password. Follow the next procedure to setup your
password and phone number.
When the “CPU/ACT” LED is on, pick up the handset and dial as follows:
1.
##0000
; to start the configuring mode
2.
01626#
; “626” represents the Los Angeles area code
3.
024453447# ; phone number
4.
88123
; “123” is the web management password
5.
981#
; restarts to update information
6.
Hang up the handset.
Second:Configure IP Address from your PC
Use the provided Ethernet cable to connect your PC to the port labeled “PC”, located on the rear panel of ARTDIO IPH.
Because ARTDIO IPH’s default IP setting is 192.168.0.2, you must configure your PC to the same Subnet. 192.168.0. X
for example. The following example uses 192.168.0.5 for the IP Address and 255.255.255.0 for the Subnet Mask.
After you have completed the PC’s IP Address setting, restart the PC to let the new settings take affect.
23
1000 Series VoIP Gateway
Use the browser to configure the PPPoE Parameters
On the PC which is connected to ARTDIO IPH, enter ARTDIO IPH’s IP Address (Default 192.168.0.2) and press enter. ARTDIO
IPH will prompt you with a dialogue box requesting that you enter a password. Use “WEB” (all capitals) for the User field, and
“123” for the password field that you have previously configured. Click the “OK” button to access ARTDIO IPH Web Based
Management Interface page.
The ARTDIO IPH’s
“WEB” should
IP Address 192.168.0.2
be all capitalized
Enter Web Based Configuration Interface.
1.
Click on “IP SETTING” at the top of the page and you will see the page as shown in the following image.
24
Step1
Click “IP Setting”
to open this display
1000 Series VoIP Gateway
Step 2
Step4
Clickthe “Apply”button to
apply any
Step 3
2.
Select PPPoE from the “IP State” pull down menu.
3.
Fill in the “Account”, “Password”, and “Confirm Password” under the PPPoE Settings. You can get this information from
your ISP.
4.
Click on the “Apply” button.
5.
Click the “BASIC” button at the top to go to the “BASIC” page. Select “Warm Start” to restart the system.
After restarting, ARTDIO IPH will use PPPoE to get its’ IP Address.
At this stage, the device should be able to use PPPoE to access the Internet. However, if you configured a wrong account
number or password, your ARTDIO IPH can not access the Internet. You can not use PC to access ARTDIO IPH by using the IP
address of 192.168.0.2, because ARTDIO IPH has been set in PPPoE mode. You have to use phone set to configure ARTDIO IPH
back to a fix IP mode (##0000, 030#) and use PC browser to reconfigure parameters again.
Notice:Be sure to keep ARTDIO IPH and the broadband Modem always on
line. Going off line could reduce the IP searching function’s effectiveness.
25
1000 Series VoIP Gateway
26
1000 Series VoIP Gateway
Connecting the ARTDIO IPH to the PBX extension line
The ARTDIO IPH can also be connected to a PBX extension line as shown in the diagram below. However, the ARTDIO
IPH unit does not support the digital line extension type. The ARTDIO IPH only supports the analog line extension type. The
methods for dialing and using are similar to a standard connection. One of the differences is that the phone number that needs
to be configured to the ARTDIO IPH should include the extension number. It is also necessary that the PBX access code used to
get an external line (the digits to get an external line), should be configured too. As the following example shows, the PBX
phone number is 5295000 and the extension number is 220. So ARTDIO IPH unit A should be configured to 5295000220.
5.4.1. Configuring the Phone Number
When connecting the ARTDIO IPH to a PBX extension line, the phone number must be configured according to the
following:
The PBX line number + the extension number
As shown in the figure above, the PBX phone number is 5295000 and the extension number is 220, ARTDIO IPH A should then
be configured to 5295000220.
5.4.2. Disabling Auto Answer
Because the ARTDIO IPH is connected to an extension line of the office PBX, it is recommended that you disable the
automatic answering function (the factory default value is “Disable”). Please note that automatic IP Searching is not supported
when the ARTDIO IPH is installed under the Office PBX. You must conduct the IP Searching process manually. Please refer to
the procedure specified in 9.1. 9.1. Appendix A: Manual IP Searching Procedure.
Procedures for disabling auto-answer:
Pick up the handset and dial as follows::
1. ## 0000
; to start the configuring mode
27
1000 Series VoIP Gateway
2. 130#
; to disable the auto-answering function (the factory default value is “Disable”)
3. Hang up your phone
28
1000 Series VoIP Gateway
5.4.3. PBX CO line access (trunk access code) configuration
When the ARTDIO IPH is connected to the extension line, you need to configure the PBX CO line access code with your
ARTDIO IPH, so that it is able to acquire the external phone line of the PBX automatically. If the access code is not configured,
Auto IP Searching and Outbound transit call functions won’t work.
You can configure the access code using the phone set. Pick up the handset and dial as follows:
1. ##0000
; to start the configuring mode
2. 19 9*#
;assuming the prefix code is ‘9’. The “*” key is used to set one second pause)。
3. Hang up the phone
Length of called phone number on Outbound Transit Calls
If the ARTDIO IPH has been configured with the PBX CO line access code, the ARTDIO IPH will presume that a PBX is
connected. For outbound transit calls, it can send to another extension line or pass through the PBX to a normal phone line. If
the Outbound Transit call is sent to another extension line, there is no need to include the PBX CO access code. However, if
the Outbound Transit calls are sent to a normal phone number, the ARTDIO IPH will need to dial the PBX CO access code
before dialing the phone number. When the ARTDIO IPH receives an Outbound Transit Call request from another ARTDIO IPH,
it will check the length of the called phone number (excluding the country and area code). If the length is 5 digits or more, the
ARTDIO IPH will dial the previously configured PBX CO access code along with the called phone number. Otherwise the
ARTDIO IPH will assume that it is an extension call. The PBX CO access code then has no effect.
Please refer to the following example.
The PBX CO access code is set to “9*” on ARTDIO IPH A.
When ARTDIO IPH B dials an Outbound Transit Call via ARTDIO IPH A using #0088635295004#, ARTDIO IPH A will
then dial the number “9”, then 5295004 after a one second pause (Because the called numbers has 7 digits [5295004]).
When ARTDIO IPH B dials #008863110#, ARTDIO IPH A dials “110” without using the PBX CO access code; because the
called numbers is only 3 digits long (110).
5.4 Inspection
After connecting ARTDIO IPH to your network, we strongly suggest that you follow these procedures to check if ARTDIO
IPH is working properly.
Step 1:Check the LED of “TIME SRVR” on the front panel
If the “TIME SRVR” LED is on within 1 minutes of initial use, proceed to step 2. Otherwise perform the following
procedures.
29
1000 Series VoIP Gateway
Check if the ADSL Modem is working. (Does the PC have access to web access?). Check if your Ethernet
connection is operating? The “LNK/ACT” LED should be on if the Ethernet link is functioning; otherwise you may need to
check your Ethernet cable connections.
Use your web browser to access the device’s Web Based Interface and check if the phone number, IP Address, PPPoE account
number and password are configured correctly.
Does your network utilize a Firewall? If so, you should open the ports that ARTDIO IPH is using. Please refer to section
7.2. Firewall for details.
Step 2:Dial distributors’ ARTDIO IPH customer service number
Get the phone number and IP Address of distributors’ ARTDIO IPH, and save them into the static phone book. (Please
refer to section 9.3.1. Use the Web Based Management interface to edit the static phone book for the detail). After the LED
of “TIME SRVR” comes on, it indicates that ARTDIO IPH is able to access the Internet. Try to dial the distributor’s ARTDIO
IPH number. After one of customer service personnel answers the call, check to see if you are able to talk with them. If you are
able to communicate with customer service personnel properly, proceed to step 3.
Most failures involve single way communications. In other words you can hear the call from recipient but the recipient
can’t hear you. This happens when your IP Sharing device is used but has not been configured to treat ARTDIO IPH as a Virtual
Server. If the Virtual Server has been configured properly on the IP Sharing device, check if the IP (obtained via PPPoE by the
sharing device) is a private IP. ARTDIO IPH works fine using a private IP on the LAN side of the IP Sharing device. However it
will not work if the IP Sharing device’s WAN side is using a private IP Address. Check the WAN side IP Address to see if it is
part of the following IP range. If it is, it is a private IP Address.
Private IP Address range:
10.0.0.0
172.16.0.0
– 10.255.255.255
– 172.31.255.255
192.168.0.0 – 192.168.255.255
If the phone’s volume is too loud, perform the following steps to decrease the volume to a more comfortable level.
Pickup the phone set and dial:
1. ##0000 ; to start the configuring mode
2. 922#
; decrease volume by 2dB
30
1000 Series VoIP Gateway
Or 9222#
; decrease volume by 4dB
Or 92222#
; decrease volume by 6dB
3. Hang up the phone and redial to test
Step 3:Dialing ARTDIO IPH from a traditional phone line or mobile phone
Place a call from a traditional phone line or mobile phone to ARTDIO IPH; go through the following check list. The
column titled “solutions” is suggestions to solve the problem.
Check Items
Solutions
Make sure the phone set connected If the telephone does not ring and the “LINE”
to ARTDIO IPH rings.
LED located at the rear panel does not flash,
please check that if the phone line is connected to
the “LINE” port.
The audio volume is too high and
the quality is poor
Perform the following:
##0000
;Enter Setting Mode
922#
; decrease volume by 2dB
Or 9222#
; decrease volume by 3dB
Or 92222#
; decrease volume by 4dB
Hang up the phone and redial.
Under conversion mode, press the If you can’t hear the tone, it means that DTMF has
digits “1234567” on the phone
been filtered by the central office switches. IP
located at the calling side and see searching and Inbound Transit functions will not
if the phone connected to ARTDIO
IPH
is able to hear the DTMF
be function. Please contact your local telephone
company for service.
sounds.
Step 4:Use ARTDIO IPH’s phone to make a regular call to remote ARTDIO IPH
If you are not able to reach the remote ARTDIO IPH, please check if the phone line connected to ARTDIO IPH is limited
and not able to place long distance calls. The called party’s line may also be busy. Try again later.
Step 5:Check that the Manual IP Searching function works
Use ARTDIO IPH’s phone to place a regular phone call to a remote ARTDIO IPH. Ask the recipient to press the “#” key
twice to enter manual IP Searching mode. If the IP Searching function is unsuccessful, you will hear one long beep, and you
may need to adjust the IP Searching sensitivity as followed.
Hang up, and then pick up the phone, dial as follows:
31
1000 Series VoIP Gateway
1. ##0000
2. 911#
; to start the configuring mode
; to increase volume by 2db or
9111#
; to increase volume by 3db or
91111#”
; to increase volume by 4db
Hang up the phone and try to perform the IP Searching function again. If the IP Searching function is successful, you will hear
three short beeps.
Step 6:Use ARTDIO IPH’s phone to place an IP call to remote ARTDIO IPH
(Dial: # + phone number of called party + #)
At this point, you should be able to place IP calls. However, if it does not work, and you hear a busy tone instead, count
out how long the busy tone lasts. If the busy tone lasts about 4 seconds, this indicates that there may be network problems. If
the busy tone ends soon after it starts, this indicates that the recipient is busy. Try again later.
32
1000 Series VoIP Gateway
6. Placing IP calls
Besides ARTDIO IPH’s ability to place IP calls, it also does well at maintaining the same method you use to place regular
calls. The following table demonstrates how to place both regular and IP based calls.
Dialing Method
Description
Placing traditional Phone Calls
Phone number
Place traditional phone calls as usual
On-net calls (between two ARTDIO IPH’s) and Outbound Transit Calls
"#" + phone number + "#"
Placing calls through an IP
"#" + phone number + "*"
Sending a fax through an IP
Inbound Transit Calls – Placing a local call from a traditional phone to a local
ARTDIO IPH ,then transferring your call to another ARTDIO IPH
"#" +Inbound Transit password + "#" + Using a traditional phone while out to
phone number + "#"
call a remote ARTDIO IPH via your
local ARTDIO IPH.
"#" + Inbound Transit password + "#" + Use a traditional FAX machine while
phone number + "*"
out to send a FAX to a remote ARTDIO
IPH via your local ARTDIO IPH
The leading “#” key represents an IP phone call or an IP fax call. All calls end with the “#” key. This represents a voice
call while the “*” key represents a fax call.
6.1. Phone Book and IP Searching
The most remarkable feature of ARTDIO IPH is that it turns your traditional phone call into an IP call. When you make
traditional phone calls, dial as usual. When making IP calls, dial as you usually do plus dial a “*” or “#” before dialing the
phone number, and end with the “*” or “#” keys. This is because ARTDIO IPH comes with a dynamic phone book built in,
keeping all the records of phone numbers and their IP mappings. When a user initiates an IP call, ARTDIO IPH will search the
phone book and obtain the phone number’s IP automatically. If it is the first time to use a number to place an IP call, you must
perform the IP Searching first. The IP Searching will get the phone number and IP mapping of ARTDIO IPH that’s connected to
the phone line, the mapping will then be stored in the built in phone book. The phone number and IP information will be saved
in flash memory and will be updated every hour.
When you first begin to use ARTDIO IPH, you must initiate the IP searching process, after IP searching process has
completed, your phone number and your friend's phone number will be saved in both ARTDIO IPH’s (built in) phone address
book. Once you have done the first time searching, dial: “# + phone number + #” for later calling over VoIP.
33
1000 Series VoIP Gateway
There are two ways to search the remote IPH’s IP Address to make IP calls.
1. Automatic IP Searching Procedure (recommended)
Dial : * + phone number + #
ARTDIO IPH will use the phone line to search the remote ARTDIO IPH and get the IP information back. The phone set
connected to the remote ARTDIO IPH will ring until the recipient picks up the phone. When the recipient answers the phone,
he/she will hear a busy tone and hang up the phone. At that point, the IP Searching process begins, please do not hang up.
The caller will hear the searching tone (a short beep every two seconds; an unsuccessful searching will respond with a
busy tone). If the searching process is successful, ARTDIO IPH will switch to IP call automatically. The called ARTDIO IPH’s
phone will ring again. When the recipient picks up the phone, the free voice communication over IP call begins.
2. Manual IP Searching Procedure
1. Use the phone connected to ARTDIO IPH to dial the recipient phone number that you are attempting to search.
2. When the recipient answers the phone, ask him/her to press the “#” key twice. The searching process will then begin
and both sides should hear the searching tone (a short beep every two seconds).
3. After hearing three consecutive beeps, hang up and dial: # + phone number + # again. You can then begin voice
communication over IP.
Three consecutive beeps indicate a successful searching; otherwise you will hear a long beep indicate a failed
searching.
For inbound and outbound transit calls, the IP Searching process between the two ARTDIO IPH’s must be completed
before you can make calls. ARTDIO IPH can not make the IP searching from transit call.
6.1.1. When the IP information stored in the dynamic phone book is no longer correct
After you have completed the IP searching process with the recipient’s ARTDIO IPH, in some occasions you might find that
the searched IP information is not correct. Usually this happens when the recipient’s ARTDIO IPH has changed its IP Address
and failed to notify your ARTDIO IPH. The most common occurrence is when the recipient ARTDIO IPH is in the process of
sending an IP changing notification to your ARTDIO IPH and your ARTDIO IPH may have been powered off or temporarily
unable to access the Internet. If this happens, when you place an IP call using “#” +phone number + “#”, you will always hear
a busy tone. In this case, you have to reinitiate the IP Searching process again.
6.2. Voice Calls
6.2.1. Making traditional phone calls (through your local PSTN)
Application: While ARTDIO IPH is connected, you can still use the phone to make traditional phone calls, just dial as
before. Examples: 4458275, 3579999, and 011886282263368.
34
1000 Series VoIP Gateway
6.2.2. Making IP calls between ARTDIO IPHs
Application: Making IP phone calls between two ARTDIO IPHs.
Dialing Method: “#” + telephone number of the recipient + “#”
Examples: #4458275#, # 3579999#, and #011886282263368#.
6.2.3. Outbound Transit Calls (Placing calls from ARTDIO IPH to a traditional phone line via another
ARTDIO IPH)
Application: The dialed phone number must have the same area code as ARTDIO IPH you are calling. Since the called
ARTDIO IPH places the (local) call to the called number via a traditional phone line, it will be billed for the
cost of a local call.
Dialing Method: “# + phone number of called party + #”
Configuration:
1. IP Searching must previously be completed between both ARTDIO IPHs.
2.
Your ARTDIO IPH must also have previously obtained permission from the remote ARTDIO IPH that is attempting to dial
through. This means that the remote ARTDIO IPH must configure your telephone number (including your country and area
code) and MAC Address into its permissions table.
Using the phone set to configure the permissions
If you wanted to permit the 886-2-82263368 ARTDIO IPH to place outbound transit calls through your ARTDIO IPH, you
need to get its MAC address. The MAC Address is found on the label on the bottom of the chassis. Only the last six digits are
needed (e.g. 80-05-E0). MAC Addresses with characters ranging from A to F should be entered as: A - *1, B - *2, C - *3,
D -* 4, E - *5, F - *6)
Pick up the phone and dial
Description
1.
##0000
To enter the configuring Mode
2.
26 8005*50 886282263368#
To enter the MAC Address and phone
number:
MAC: 80-05-E0
Phone number: 886-2-82263368
Use the phone set to delete the permissions
The following example shows how to remove ARTDIO IPH’s MAC entry from the permissions table. You only have to
specify ARTDIO IPH’s MAC Address that you want to delete from the permissions table. The MAC Address with characters
ranging from A to F should be entered as: A - **1, B -*2, C - *3, D - *4, E - *5, F - *6)
35
1000 Series VoIP Gateway
Pickup the phone and dial
Description
1.
##0000
To enter the configuring mode
2.
27 8005*50#
To delete MAC Address
MAC: 80-05-E0
The transit function is only for local calls only. You can not transit long distance and/or international calls.
6.2.4. Inbound Transit Calls
Application: While out, you can place phone calls from traditional phones to local ARTDIO IPH at home. ARTDIO IPH at home
will answer the call (requires that auto-answer be enabled) with a greeting. You then dial “# + Inbound Transit
password + # + called ARTDIO IPH number + #”. If the password you entered is correct, your call will be
connected through the IP network.
Configuration:
(1) IP Searching must be previously completed between both ARTDIO IPHs.
(2) You must configure your password
Follow this procedure to use your phone to configure your unit’s Inbound Transit password
Pick up the handset listen for the dialing tone
1. Dial ##0000
2. Dial “23 + inbound transit password + #” (the password limited to 8 digits)
This example demonstrates configuring “123” as the inbound transit password.
Pickup the handset and dials as follows:
1. ##0000
; to start the configuring mode
2. 23123#
; enter “123” as the inbound transit password
3. Hang up the phone
(3) The auto-answer feature of ARTDIO IPH at home must be enabled
(The default value is “Disabled”)
Procedure for using the phone to enable the auto-answer function:
Pick up the handset and listen for the dialing tone.
1. ##0000
; to start the configuring mode
2. 131#
; to enable auto-answer function
3. Hang up the handset.
36
1000 Series VoIP Gateway
(4) Be sure that the “Transit Call” function of ARTDIO IPH at home is enabled.
(The default value is “Enable”)
Procedure for enabling Transit Calls:
Pick up the handset and listen for the dialing tone.
1. ##0000
; to start the configuring mode
2. 221#
; to enable Transit Call function
3. Hang up the handset.
6.3. Sending Faxes over an IP network
You can send faxes through ARTDIO IPH to save the phone bills, the follows are the methods you can send faxes.
6.3.1. Sending Faxes between ARTDIO IPHs over an IP network
Application: Sending free faxes over an IP network between ARTDIO IPHs.
Dial method:” # + the fax number + *”
Examples:#4458275*, # 3579999*,#011886282263368*.
6.3.2. Use Outbound Transit to Send Faxes
Application: Dialing: “# + the fax number +“*”
Dialing method: “# + the fax number +*”
Examples:#4458275*, # 3579999*,#011886282263368*.
6.3.3. Use Inbound Transit to Send Faxes
Application: While out, you can still send a fax over an IP network using ARTDIO IPH that is located at your home.
Simply have your fax machine dial manually to ARTDIO IPH located at your home. Your ARTDIO IPH will then answers
and play a greeting message. You can then dial ‘#’ + the Inbound Transit password + ‘#’ + the recipient fax machine’s
number + ‘*’. If the password is correct, the call will be connected (through the IP network) to the remote Fax
machine. When the remote fax machine responds, press the “START” key on the fax machine to send your FAX.
Dial method: ‘#’ + ‘the Inbound Transit password’ + ‘#’ + ‘fax number’ + ‘*’
The following example assumes the password is “123”
Examples: #123#4458275*;#123#3579999*;#123#011886282263368*
37
1000 Series VoIP Gateway
7. Special Conditions
7.1. Use a Private IP Address in a NAT Environment
ARTDIO IPH is able to communicate with other ARTDIO IPHs under a NAT environment using Private IP Addresses on
the LAN side of your IP Sharing device. However you must configure the IP Sharing device to treat ARTDIO IPH as a
Virtual Server using UDP port 2000. All incoming packets transmitted to UDP port 2000 will be forwarded to ARTDIO
IPH’s private IP.
7.2.
Firewall
If your network environment like most enterprises uses a Firewall, you will have to ask MIS personnel to enable the
ports listed in the following table.
7.3.
Packet Modes
Using Ports
Call Control Packets
UDP 2000
Voice Packets (RTP)
UDP 4000 – 4007
Fax Packets
UDP 4008 – 4011
FTP software upgrade
TCP 21
Web management
TCP 80
Bypassing the ARTDIO IPH
When ARTDIO IPH is connected to a PBX extension line, some PBX features such as Call Forwarding or other
functions that start with “*” or “#” will not be available, this is because they are now being used by ARTDIO IPH unit.
You can however dial “**” to bypass ARTDIO IPH and access the line directly. ARTDIO IPH will send the total amount
of digits you dialed to the Line port. For example, if the access code to disable Call Forwarding on the PBX is*81, you
can dial “**” first then dial *81.
38
1000 Series VoIP Gateway
39
1000 Series VoIP Gateway
8. Web Based Management
8.1. Acquiring the ARTDIO IPH’s IP Address
If you do not know the current IP address of your ARTDIO IPH, you can hear the IP Address directly from the phone
connected to ARTDIO IPH.
Follow the steps below:
Pickup the phone and dial as follows:
1.
##0000
; to start the configuring mode
2.
40
;to hear the IP Address(no “#” for ending)
3.
Hang up the handset.
8.2. Accessing the Web Based Management Interface
When ARTDIO IPH has been installed successfully, you can use any PC that is connected to the same network to access
ARTDIO IPH’s Web Management Interface by opening your browser and entering ARTDIO IPH’s IP address. If you don’t
know ARTDIO IPH’s IP address you will not be able to access the Web Management Interface. If ARTDIO IPH is using a
static IP address, simply enter the IP address into the Web Browser to access the Web Based Management Interface. If the IP
address is acquired via PPPoE or DHCP, the IP address will be changed most of the time.
40
1000 Series VoIP Gateway
The following procedures demonstrate how to access ARTDIO IPH’s Web Based Administration.
1. Open a Web browser window
2. Enter ARTDIO IPH’s IP address located on the LAN.
3.
Press the “Enter” key, the screen will show a sub-menu for entering your
4.
Enter a valid username and password you entered previously.
5.
Click the “OK” button, then you will be in the Web Management Interface start page.
41
username and password.
1000 Series VoIP Gateway
9. Appendix
9.1. Appendix A: Manual IP Searching Procedure
Perform the following steps to do the IP Searching:
1.
Use the phone connected to ARTDIO IPH to dial to ARTDIO IPH’s number that you attempt to search (without the “#” key).
For example: 00216264451245
2.
When the recipient answers the phone, ask him/her to press the “#” key twice. The searching process will then begin and
both sides should hear the searching tone (a short beep every two seconds).
3.
About 15 seconds later, you should hear three consecutive beeps indicating a successful searching. Otherwise you will
hear one long beep indicating that searching has failed.
4.
Hang up the handset.
The manual IP Searching function can be used when ARTDIO IPH is connected to a PBX extension line. You must dial the PBX
first then transfer to the extension number that ARTDIO IPH is connected to. Assuming you are dialing from Taipei to U.S.A.
and the number you are dialing is 1-626-3532158 with extension 540, follow the steps below:
1.
Dial “00216263532158” which connects to the recipient’s PBX.
2.
Dial the extension number “540” after the greeting.
3.
When the recipient at extension number “540” answers the call, ask him/her to press the “#” key twice.
42
1000 Series VoIP Gateway
4.
The IP Searching function will then begin and the called party will hear the searching tone (a short beep every two
seconds).
5.
It takes around 15 seconds to complete the IP Searching process.
A successful IP searching will be confirmed with three consecutive tones on the caller’s side. (One long tone indicates the
process has been failed)
6.
The recipient can now hang up the phone.
When the above is complete, you should then be able to make an IP call through ARTDIO IPH by dialing
“#00216263532158540#”.
9.2. Appendix B: Automatic IP Searching Procedure
Between two ARTDIO IPHs, you can also dial “* + the phone number + #”. However, the Automatic IP Searching
process will start every time the phone number’s IP information can’t be found in the (built in) dynamic phone book. The
acquired result after a successful searching process will be stored in the dynamic phone book and saved to the flash memory
which will be updated every hour. This will ensure that data won’t be lost even when ARTDIO IPH’s power is turned off.
However the information is updated on an hourly basis, some information may be lost if ARTDIO IPH is turned off between
updated period. The Automatic IP Searching procedure is slightly different depending on whether the Automatic Answering
function on the remote ARTDIO IPH is enabled or not. Two examples with detailed procedures are described below:
43
1000 Series VoIP Gateway
Example 1: The Automatic Answering function on the remote ARTDIO IPH is disabled (default value):
The following example assumes you are dialing from U.S.A. to Taiwan and the number you are dialing is:
011-886-2-63532158.
Pick up the handset and dial “*011886263532158#”
If the number you are dialing can not be found in the dynamic phone book, ARTDIO IPH will then use the phone line to
reach the remote ARTDIO IPH and attempt to get the IP information back. Since the automatic answering function is disabled,
the searching process will start until the called party answers the phone. The remote phone set connected to the remote ARTDIO
IPH will ring until somebody picks up the phone. When the called party answers the phone, he/she will hear a busy tone and
hang up the phone. At that point the IP Searching process begins. The calling side will hear the searching tone (a short beep
every two seconds, an unsuccessful searching process will respond with busy tone). If the searching process is successful,
ARTDIO IPH will switch the regular phone call to IP call automatically. The called ARTDIO IPH’s phone will ring again, after
the called party picks up the phone, then you can begin voice communication over IP.
Example 2: The Automatic Answering function on the remote ARTDIO IPH is enabled.
Assume you are dialing from U.S.A. to Taiwan and the number you are dialing is: 011-886-2-63532158, the IP searching
steps are:
Pick up the handset and dial “*011886263532158#”
44
1000 Series VoIP Gateway
If the number you are dialing can not be found in the phone book, ARTDIO IPH
will use the phone line to reach the remote ARTDIO IPH and acquire the IP information. Since the automatic answering
function is enabled, so the remote ARTDIO IPH will come out the greetings, the searching process will start as the remote
ARTDIO IPH answers with the greetings. The calling side will hear the searching tone (a short beep every two seconds, an
unsuccessful learning process will respond with busy tone). If the searching process is successful, the calling side will hear
three consecutive tones, hang up and dial “# + phone number + #” again, you can begin voice communication over IP.
9.3. Appendix C: Edit the phone book
9.3.1. Use the Web Based Management interface to edit the static phone book
If you already know the static IP Address and Signaling UDP Port of a particular remote ARTDIO IPH, you can use the
Web Based Management to add the Static Phone Book so that you can make IP phone calls without having to go through the IP
Searching process. The Static Phone Book keeps all phone numbers and IP addresses. In the “Phone Number” field, you should
enter a complete phone number including the country and area code. For example, if the number you are adding is
626-2263368, you must enter 16262263368. If the number is under a PBX, you must enter 16262263368314. The number
2263368
45
1000 Series VoIP Gateway
represents the company phone number and 314 is the extension number.
In the “IP/Control Port” field, you should enter the static IP address and the Signaling UDP port used of the remote ARTDIO
IPH. The factory default is 2000.
9.3.2. Move a dynamic phone book entry to the static phone book
If the called ARTDIO IPH is using a static IP address, you can also use the manual or automatic IP searching process to
acquire the IP address first, and then you can move it into the static phone book. After the IP has been searched, follow the
steps below to move it into the static phone book.
Pick up the handset connected to ARTDIO IPH
1.
##0000
;to enter the configuring mode
2.
32 + phone number
;to move the phone number’s IP to the static phone book
3.
981
4.
Hang up the phone
; restarts to update information
9.4. Appendix D: Enabling/disabling the automatic answer mode
Enable the automatic answer mode using a telephone set:
Pick up the handset and listen for the dialing tone
1. ##0000
; to enter the configuring mode
2. 131#
; to enable Auto-answer mode
46
1000 Series VoIP Gateway
3. Hang up the phone
Disable the automatic answer mode using a telephone set:
Pick up the hand set and listen for the dialing tone
1. ##0000
; to enter the configuring mode
2. 130#
; to disable Auto-answer mode
3. Hang up the phone
47
1000 Series VoIP Gateway
9.5. Appendix E: Phone Set Command Codes and Parameters.
Pick up the handset and listen for the dialing tone. Dial “##0000” and listen for three consecutive tones before setting the
following parameters. The details please refer to
5.2.2. Step 2: IP Setting
Command
Description
Parameters
01
Area Code
1 ~ 3 digits
02
Phone Number
1 ~ 19 digits
03
IP State
0 : static; 1: DHCP; 2: PPPoE
04
IP Address
xxx*xxx*xxx*xxx
05
Subnet Mask
xxx*xxx*xxx*xxx
06
Default Gateway
xxx*xxx*xxx*xxx
07
Primary DNS
xxx*xxx*xxx*xxx
Server IP
08
Secondary DNS
xxx*xxx*xxx*xxx
Server IP
09
Channel T.38
xxc
(FAX) Control
where,
xx: channel,
c: 0 disable, 1 enable
10
Channel Port
xxc
State Control
where,
xx: channel,
c: 0 disable, 1 enable
11
Select Control
0~65535
Port
12
Select VoIP Base
0~65534 (limit to even port number only)
Port
13
Auto-Answer
0 : disable ; 1: enable
Control
14
Call Forward
0 : disable ; 1: enable
Control
15
Set Call Forward
1 ~ 19 digits
Phone Number
16
Set Fax Call
0 : no forward ; 1: forward
48
1000 Series VoIP Gateway
Command
Description
Parameters
Control
17
Select Line Call
0 : voice call; 1: fax call
Type (ARTDIO
IPH only)
19
20
Set PBX CO Line
6 digits
(0~9 or *
Access Code
pause)
Manual IP
0 : disable ; 1: enable
where, * means
Learning Control
21
Select Greeting
0 : off ; 1: on
Mode
22
Inbound/Outboun
0 : disable ; 1: enable
d Transit Call
Control
23
Add an Inbound
1 ~ 8 digits
Transit Call
Password
24
Delete an
1 ~ 8 digits
Inbound Transit
Call Password
25
Delete All
1 : do it
inbound transit
call Passwords
26
Add a Member
MAC + Phone Number
Entry of an
Outbound Transit
Call
where,
MAC : last 6 digits of the MAC
Address;
0 ~ 9, A (*1), B (*2), C (*3), D (*4), E
(*5), F (*6).
Phone Number: 1 ~ 19 digits
27
Delete a Member
MAC where,
Entry of an
Outbound Transit
MAC : last 6 digits of the MAC
Address;
Call
0 ~ 9, A (*1), B (*2), C (*3), D (*4),E
(*5), F (*6)
28
Delete all
1: do it
Outbound Transit
49
1000 Series VoIP Gateway
Command
Description
Parameters
Call members
29
30
31
Add off-net
Phone Number (1 ~ 19 digits) (ARTDIO
number
only)
Delete off-net
Phone Number (1 ~ 19 digits) (ARTDIO
number
only)
Delete all off-net
1: do it (ARTDIO IPH only)
IPH
IPH
numbers
40
41
Listen for the IP
(ending ”#” is not required) (ARTDIO IPH -102)
Address
only)
Listen for the
(ending ”#” is not required) (ARTDIO IPH only)
Subnet Mask
42
Listen for the
(ending ”#” is not required) (ARTDIO IPH only)
Default Gateway
88
Change the Web
1 ~ 6 digits
Based
Management
Interface
Password
89
Export the
ARTDIO IPH’s
xxx*xxx*xxx*xxx (the IP Address of the
IP
destination PC)
Information to a
PC
90
91
Add an FTP
(null) : clear password
Server Password
1 ~ 6 digits : password
Line Port
0: normal volume
Transmission/Rec
1: Receiving +2 dB
eiving Volume
11: Receiving +3 dB
Adjustment
111: Receiving +4 dB
2: Transmission -2 dB
22: Transmission -3 dB
222: Transmission -4 dB
92
Phone Port
0: normal volume
Transmission/Rec
1 or 11 or 111: +2 dB
eiving Volume
2: -2 dB
Adjustment
22: -4 dB
50
1000 Series VoIP Gateway
Command
Description
Parameters
222: -6 dB
94
Set the Alarm
0 : disable or,
Clock Time
hh*mm*c
where,
hh*mm: hour*minute
c: 1: alarm one time;
2: alarm every day
95
Regional ID
2 digits
96
Play audio
(# stop play)
Greeting
97
Reset unit to
1: reset all; 2: preserve IP
Factory Default
values
98
System Restart
1: do it
99
Record audio
*: start record (#: stop record)
Greeting
0: start play (#: stop play)
9#: save
#: exit record mode
51
1000 Series VoIP Gateway
9.6. Specifications
ARTDIO IPH-102
Specification
Voice Port
1FXS + l FXO
Fax Transit
T.30/T.38
Foreign
Exchange
Station
Interface
Foreign
(FXS)
Circuit to connect a standard phone or fax machine.
Exchange
Office
(FXO) Circuit to connect to a PSTN central office or PBX
Interface
extension line.
Connector Type
RJ11
Voice Compression
G.711 G.729AB
Voice Activity Detection
(VAD)
G.729A B
Echo Cancellation
G.165/G.168 16ms echo tail
Jitter Buffer
Adaptive jitter buffer adjustment
Input/Output Gain
ln/Out
Packet Time
40ms
Transmission Protocol
RTP
Call Control Protocol
Proprietary Call Control Protocol
Phone Book
Auto learning and manual setting
+ / -6 db (adjustable)
52
1000 Series VoIP Gateway
Management Function
Management Tools
Web browser and traditional phone
Fixed IP Address
IP Address
Dynamic Address (DHCP),
PPPoE
Firmware Upgrade
FTP
Other Specification
Power Supply
Dimension
Working Environment
Power Adaptor
OUTPUT: 9VDC 600mA
190mm x 25mm x 110mm ( IPH -102 )
7.5”x .98” x 4.3”
Operation temperature : 0℃to 50℃
Storage temperature: -10℃to70℃
Electromagnetic radiation
FCC part 15 Class B
Standard
CE Mark, UCCI
LAN Interface
Number of Ports
Interface Standard
Connectors type
2 ports
10 / 100 Ethernet, Auto Negotiation
(10/100 Mbps Auto Negotiation)
RJ-45
53
1000 Series VoIP Gateway
9.7. Unit Mounting Dimension
54