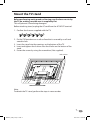
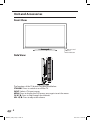
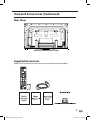
1
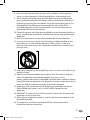
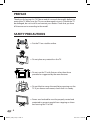
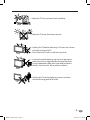
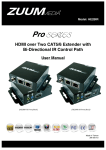
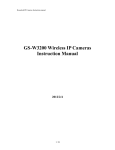
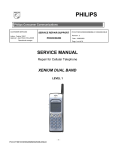
VR-5525Z_UM_cover_26 Apr 11.pdf 1 2011-4-26 18:11:02 USER’S MANUAL MANUEL DE L’UTILISATEUR MANUAL DEL USUARIO VR-5525Z Contents IMPORTANT SAFETY INSTRUCTION..........................2 PREFACE...................................4 SAFETY PRECAUTIONS............4 2. Sound menu................................................ 34 Sound Settings......................................................34 Surround Mode.....................................................35 AVL.............................................................................35 Headphone Warning..................................... 6 Analog Sound........................................................35 Where to install............................................... 6 Digital Sound.........................................................35 Mount the TV stand.................7 Unit and Accessories...............8 Digital Audio Output...........................................35 Equalizer Settings.................................................36 Front View......................................................... 8 3. Channel menu............................................ 37 Side View........................................................... 8 Channel List............................................................37 Rear View........................................................... 9 Favourite List..........................................................38 Supplied Accessories.................................... 9 Channel Settings..................................................38 Remote Control........................10 Signal Type..............................................................39 Quick Installation Tips................................... 12 4. Parental Control menu............................. 40 Using the Remote Control Unit................. 13 Lock Parental Control..........................................40 Installing Batteries in the Remote Control V-CHIP.......................................................................40 Unit...................................................................... 14 Change Password.................................................44 Connections.............................15 Keypad Lock...........................................................44 Connecting the Antenna or Cable........... 16 Source Lock...........................................................44 Connecting external devices..................... 18 5. Setup menu................................................. 45 Initial Setup..............................22 Source Menu............................27 Main Menu...............................27 Main Menu Description...........28 Menu Settings..........................30 Closed Caption......................................................45 Digital CC Style......................................................46 Menu Language....................................................46 Clock..........................................................................47 1. Picture menu............................................... 30 Blue Back.................................................................48 Picture Settings.....................................................30 No Signal Power Off.............................................48 Screen Size..............................................................31 No Operation Power Off.....................................48 PC Settings..............................................................32 All Reset...................................................................48 Color Temperature...............................................33 Advanced Picture Settings................................33 6. Others menu................................................ 48 Simple Troubleshooting..........49 Technical Specifications..........50 1RSC8-A-_GB_27 Apr 11.indd 1 2011-4-27 10:55:33 The lightning flash with arrowhead symbol, within an equilateral triangle, is intended to alert the user to the presence of un-insulated dangerous voltage within the products enclosure that may be of sufficient magnitude to constitute a risk of electric to persons. The exclamation point within an equilateral triangle is intended to alert the user to the presence of important operating and maintenance (servicing) instruction the literature accompanying the appliance. CAUTION: USE OF ANY CONTROLS, ADJUSTMENTS, OR PROCEDURES OTHER THAN THOSE SPECIFIED HEREIN MAY RESULT IN HAZARDOUS RADIATION EXPOSURE. CAUTION: These servicing instructions are for use by qualified service personnel only. To reduce the risk of electric shock, do not perform any servicing other than that contained in the operating. Refer to service manual for servicing instructions. IMPORTANT SAFETY INSTRUCTION Note: 1. Read these instructions. 2. Keep these instructions. 3. Heed all warnings. 4. Follow all instructions. 5. Do not use near water. 6. Clean only with dry cloth. 7. Do not block any ventilation openings. Install in accordance with the manufacturer’s instruction. -2 RSC8-A-_GB_27 Apr 11.indd 2 2011-4-27 10:55:33 8. Do not install near any heat sources such as radiators, heat registers, stoves, or other apparatus (including amplifiers) that produce heat. 9. Do not defeat the safety purpose of the polarized or grounding-type plug. A polarized plug has two blades with one wider than the other. A grounding type plug has two blades and a third grounding prong. The wide blade or the third prong are provided for your safety. If the provided plug does not fit into your outlet, consult an electrician for replacement of the obsolete outlet. 10.Protect the power cord from being walked on or pinched particularly at plugs, convenience receptacles, and the point where they exit from the apparatus. 11.Only use attachments / accessories specified by the manufacturer. 12. Use only with the cart, stand, tripod, bracket, or table specified by the manufacturer, or sold with the apparatus. When a cart is used, use caution when moving the cart / apparatus combination to avoid injury from tip-over. 13. Unplug this apparatus during lightning storms or when unused for long periods of time. 14. Refer all servicing to qualified service personnel. Servicing is required when the apparatus has been damaged in any way, such as power-supply cord or plug is damaged, liquid has been spilled or objects have fallen into the apparatus, the apparatus has been exposed to rain or moisture, does not operate normally, or has been dropped. 15.Apparatus shall not be exposed to dripping or splashing and that no objects filled with liquids, such as vases, shall be placed on the apparatus. 16.WARNING: To reduce the risk of fire or electric shock, do not expose this apparatus to rain or moisture. 17.Mains plug or appliance coupler is used as the disconnect device, shall be readily operable. 18.The apparatus shall be connected to MAINS socket outlet with a protective earthing connection. 3RSC8-A-_GB_27 Apr 11.indd 3 2011-4-27 10:55:33 PREFACE Thank you for buying this TV! Please read this manual thoroughly before operating the TV. Make sure the TV was not damaged in transit. Should the TV be damaged, do not install it and contact your dealer. Check that you have all the accessories according to the model. SAFETY PRECAUTIONS Put the TV on a stable surface. Do not place any material on the TV. Do not use the TV with fixtures other than those provided or suggested by the manufacturer. Do not block or cover the ventilation openings on the TV. If you have a wall mount, check that it is steady. Power cord and cables must be properly routed and protected to prevent people from stepping on them and causing the TV to fall. -4 RSC8-A-_GB_27 Apr 11.indd 4 2011-4-27 10:55:33 Keep the TV dry and away from humidity. Keep the TV away from heat sources. Unplug the TV before cleaning it. Do not use solvent or liquid to clean the TV. Only clean the TV with a soft and dry cloth. In case of troubleshooting, do not use spare parts other than those suggested by the manufacturer. Using inadequate spare parts can lead to electric shocks, short-circuits, fire or other incidents. Unplug the TV during lightning storms or when unused for long periods of time. 5RSC8-A-_GB_27 Apr 11.indd 5 2011-4-27 10:55:33 Headphone Warning Loud music can damage your hearing irreversibly, therefore do not set the volume to a high level when listening through headphones, particularly for lengthy listening periods. Where to install Locate the television away from direct sunlight and strong lights, soft indirect lighting is recommended for comfortable viewing. Use curtains or blinds to prevent direct sunlight falling on the screen. Place the TV on a sturdy platform of which the surface should be flat and steady. This will prevent it from falling over. Make sure the television is located in a position where it cannot be pushed or hit by objects, as pressure will break or damage the screen, and so that small objects cannot be inserted into the ventilation slots or openings in the cabinet. -6 RSC8-A-_GB_27 Apr 11.indd 6 2011-4-27 10:55:33 Mount the TV stand Before performing work spread cushioning over the base area to lay the TV on, making sure the area is completely flat. This will prevent it from being damaged. Before attaching stand, unplug the AC cord from the AC INPUT terminal. 1. Confirm the 6 screws supplied with the TV. 2. 3. 4. 5. Put the TV face down on a safe surface that is covered by a soft and smooth cloth. Insert the stand into the openings on the bottom of the TV. Insert and tighten the 6 screws into the 6 holes on the button of the stand. Fasten the screws by using the screwdriver (Not supplied). Soft cushion Note: To detach the TV stand, perform the steps in reverse order. 7RSC8-A-_GB_27 Apr 11.indd 7 2011-4-27 10:55:33 Unit and Accessories Front View Side View Remote Control Sensor LED Indicator The functions of the TV buttons are described below: STANDBY: Press to switch on or off the TV. INPUT: Select a TV input source. MENU: Press to display the OSD menu, press again to exit the menu. CH ◀/▶: Press to skip through the channels. VOL ◀/▶: Press to adjust the volume. -8 RSC8-A-_GB_27 Apr 11.indd 8 2011-4-27 10:55:34 Unit and Accessories (Continued) Rear View Supplied Accessories Make sure the following accessories are provided with the product. Quick Connect Guide 9RSC8-A-_GB_27 Apr 11.indd 9 2011-4-27 10:55:35 Remote Control Functions of remote control buttons Depend on the model of the TV, some keys will have no function. - 10 RSC8-A-_GB_27 Apr 11.indd 10 2011-4-27 10:55:35 1. Mute button ( ) Mutes or unmutes audio. 2. YPbPr1 button Quickly switch input to YPbPr 1 source. 3. TV button Quickly switch input to TV source. 4. YPbPr2 button Quickly switch input to YPbPr 2 source. 5. PC button Quickly switch input to PC mode. 6. CC button Turn on Closed Caption or off. Available at TV/AV. 7. P Mode button ( ) Quickly switch the predetermined picture mode. Standard/Movie/User/Dynamic. 8. Favorite button Display favourite channel list. Colour button The action they perform is shown on the menu and changes for each menu. 9. Menu button Press to display the menu. . Navigation( ▲▼◀▶) Navigates through the menus. Enter button Activates a selection or accesses the menu. . Info button (only for DTV) Press to display the channel information. . Input button Display all source list. . Vol+/Vol- button Adjust speaker volume level. . Digit (0~9), Dot buttons Input the channel number or password. When switch to a digital channel, usually should be followed by Dot button and minor channel number. Enter button to confirm. . DVD Control button Not available for this model. . Standby button Control TV to standby or on. . Video1 button Quickly switch input to Video1 source. . HDMI1 button Quickly switch input to HDMI1 source. . Video2 button Quickly switch input to Video2 source. . HDMI2 button Quickly switch input to HDMI2 source. . Sleep button ( ) Sets a delay after which the TV switches to standby. . MTS button Switch sound channel. Mono/ Stereo/SAP when analog channel. English and other languages when digital channel. . Previous Channel/Return button Jump to last channel entered by user. . Info button Display information about the TV channel or accessory device. . CH +/- button Switches to the next or previous channel. . Aspect button Press to select Aspect Ration. . Enter button Confirm a selection. 11 RSC8-A-_GB_27 Apr 11.indd 11 2011-4-27 10:55:35 Quick Installation Tips 1. Attach your antenna to the back of the television. 2. Connect the AC plug for the television into the AC outlet. AC Outlet • • Place the TV close to the AC outlet, and keep the power plug within reach. Connecting it to any other kind of outlet will damage the product and invalidate the warranty. NOTE: • TO PREVENT RISK OF ELECTRIC SHOCK, DO NOT TOUCH UNINSULATED PARTS OF ANY CABLES WITH THE AC CORD CONNECTED. 3 How to turn on the television for the first time. A) Press Standby on the television. B) The power indicator on the front of the television lights up. - 12 RSC8-A-_GB_27 Apr 11.indd 12 2011-4-27 10:55:39 Using the Remote Control Unit Use the remote control unit by pointing it towards the remote control sensor on the TV. Objects between the remote control unit and the remote control sensor may prevent proper operation. • • • • 0° 30° Horizontal & Vertical Cautions regarding the remote control unit Do not expose the remote control unit to shock. In addition, do not expose the remote control unit to liquids, and do not place in an area with high humidity. Do not install or place the remote control unit under direct sunlight. The heat may cause deformation of the remote control unit. The remote control unit may not work properly if the remote control sensor on the TV is under direct sunlight or strong lighting. In such cases, change the angle of the lighting or the TV, or operate the remote control unit closer to the remote control sensor. IMPORTANT: IF THE UNIT DOES NOT POWER ON - UNPLUG THE TELEVISION FROM THE OUTLET AND REPEAT THE INSTALLATION STEPS. 13 RSC8-A-_GB_27 Apr 11.indd 13 2011-4-27 10:55:39 Installing Batteries in the Remote Control Unit If the remote control fails to operate TV functions, replace the batteries in the remote control unit. 1. Open the battery cover. 2. Insert two “AA” size batteries (supplied with the product). • Place the batteries with their terminals corresponding to the (+) and (-) indications in the battery compartment. 3. Close the battery cover. NOTE: To use the remote control point it at the TV and press the required buttons. You must be within 6 meters and at an angle of less than 30 degrees from the centre of the TV. CAUTION: Improper use of batteries can result in chemical leakage or explosion. Be sure to follow the instructions below. • Do not mix batteries of different types. Different types of batteries have different characteristics. • Do not mix old and new batteries. Mixing old and new batteries can shorten the life of new batteries or cause chemical leakage in old batteries. • Remove batteries as soon as they are worn out. Chemicals that leak from batteries come in contact with skin can cause a rash. If you find any chemical leakage, wipe thoroughly with a cloth. • The batteries supplied with this product may have a shorter life expectancy due to storage conditions. • If you will not be using the remote control unit for an extended period of time, remove batteries from it. • The batteries (batteries installed) shall not be exposed to excessive heat such as sunshine, fire or the like. - 14 RSC8-A-_GB_27 Apr 11.indd 14 2011-4-27 10:55:39 Connections USB device Output to Audio amplifier TV Signal Satellite Box or Blue Ray DVD 15 RSC8-A-_GB_27 Apr 11.indd 15 2011-4-27 10:55:41 WARNING! ENSURE THE TV AND ALL ANCILLARY EQUIPMENT IS UNPLUGGED FROM THE MAINS BEFORE MAKING ANY CONNECTIONS! Connecting the Antenna or Cable Connect to an antenna Any DTV programs that are broadcast in your area can be received for free through an antenna connection. Contact your local content provider or your local electronics retailer if you are unsure about what HDTV programs are available in your area. Broadcasters are transitioning from analog to digital TV. This means that a given broadcaster can have channels available either in analog or in digital, or both analog and digital at the same time. The TV produces stereo sound if stereo signal is broadcast. Connect to a cable When your TV is connected to the cable socket, you might receive free digital and high definition programs (depending on your cable provider). The channel number for digital and high definition channels includes a dot “.” For example, 13.1, 20.30, 121.309. Contact your cable provider for more information. Connect to a Direct Broadcast Satellite ( DBS) There are two main DBS systems: Direct TV and Dish Network. These systems require a separate, proprietary set-top box to decode signals and send them to the TV. The set-top box contains a digital TV tuner for receiving off-air digital broadcasts. - 16 RSC8-A-_GB_27 Apr 11.indd 16 2011-4-27 10:55:41 Contact your local DBS provider for more information about the connections and the TV channels. Connect to a set-top box A cable box or satellite set-top box can be connected to the TV through the following connections: • ANT • A/V (Composite Video and Audio) • YPbPr (Component Video Input) • HDMI For information about how to connect a set-top box, see the device user manual for details. Connect to a set-top box through RF IN/OUT If the TV is connected to a cable box or satellite set-top box via a coaxial connection, set the TV to channel 3 or 4, or to the channel specified by the service provider. Connect to a set-top box through component video input or HDMI Y Pb Pr L R HDMI 1 17 RSC8-A-_GB_27 Apr 11.indd 17 2011-4-27 10:55:42 Connecting external devices This instruction manual shows the simplest and most effective way of connecting your TV to ancillary equipment. Alternate methods are listed below. HDMI Lead You can connect this TV to a compatible device using a HDMI lead. This method will give the best picture. Connect the cable from the HDMI equipment to the TV HDMI socket. VGA Cable You can use your TV as a monitor for your personal computer by using a VGA cable. Sound from your personal computer may also be played through the TV. CONNECTIONS Name Function Description AC POWER IN Connect to power supply USB Connect to USB device for factory use only RF Connect to the aerial antenna VGA Connect to the PC VGA output to display PC graphics PC audio in PC audio input YPbPr Connect to the YPbPr output on external devices (AUDIO)L/R IN Audio signal input for YPbPr CVBS Connect to the video output of external devices (AUDIO)L/R IN Audio signal input for AV LINE OUT Connect to the sound output of external devices HDMI 1/2/3/4 Connect to the HDMI socket of your DVD or Satellite Box COAX Output to audio amplifier HEADPHONE Connect headphone Caution: Before connecting external devices: Make sure to disconnect the appliances from the power supply in order to avoid any potential damage from occurring. Make sure to establish the required connection. Make sure that the connectors are properly and correctly attached before connecting the appliances to the power supply. - 18 RSC8-A-_GB_27 Apr 11.indd 18 2011-4-27 10:55:42 Connecting external devices (continued) AV Connection Connect the VIDEO and AUDIO output jack of the DVD or VCR to the CVBS jacks on the set using the RCA cable. Match the jack colors: Video is yellow, Audio left is white, and the Audio right is red. Select the AV input source using the INPUT button on the remote control. YPbPr (Component) Connection Connect the YPbPr output of the DVD or VCR to the YPbPr input on the set. The picture quality is improved; compared to connecting a regular VCR to the video input. Connect the Audio output of the DVD or VCR to the Audio input jacks on the set using the RCA cable. Match the jacks colors: Y is green, Pb is blue, Pr is red, Audio left is white and Audio right is red. Select component input source using the INPUT button on the remote control. (All illustrated cables are not supplied) 19 - RSC8-A-_GB_27 Apr 11.indd 19 2011-4-27 10:55:43 Connecting external devices (continued) PC(VGA) Connection Connect the RGB output of the PC to the PC(VGA) jack on the set. Connect the AUDIO output of the PC to the PC AUDIO jack on the set. Select the PC input source with using INPUT button on the remote control. HDMI Connection HDMI plug which replaces the HDMI connection allows transfer of all audio/ video/control signals through one cable only. There signal are transferred in digital. (All illustrated cables are not supplied) - 20 RSC8-A-_GB_27 Apr 11.indd 20 2011-4-27 10:55:43 Connecting external devices (continued) LINE OUT Connection Connect the LINE OUT (R-AUDIO-L) jacks of the set and your device using the audio cable. You can output TV sound through these jacks. COAX Connection If your AV amplifier (receiver) has digital decoder and a digital input jack, you can enjoy digital surround effects through this jack. Service Port Function Service port: (for factory use only.) (All illustrated cables are not supplied) 21 RSC8-A-_GB_27 Apr 11.indd 21 2011-4-27 10:55:43 Initial Setup When you turn on the TV for the first time, the Initial Setup will guide you through the setup process. Perform the following steps before you press POWER on the remote control unit. 1. Language setting The Initial Setup screen display at the first use. Select the OSD menu language from English, French, or Spanish. Press ▲ and ▼ button to select the desired language listed on the screen and then press the ENTER button to the next step. Select Language Follow this guide to help you up your TV. Use the Up and Down arrows on your remote control and select the language you want to use for menus and messages screens. English Enter French Enter Spanish Enter : Press to Execute 3U\K 2. Time Zone setting Press ▲ and ▼ button to select your current location for time zone, and then press the ENTER button to the next step. Time Zone Use the left or right key to selection your time zone. Time Zone Pacific Next : Return : Move : Press to Execute - 22 RSC8-A-_GB_27 Apr 11.indd 22 2011-4-27 10:55:44 Initial Setup (continued) 3. Location setting Press ▲ and ▼ button to select “Home” or “Showroom” and press ENTER button to the next step. Power On Mode Use the up/down key arrows on you remote control to select power on mode. Home optimizes the video setting for ENERGY STAR® qualification. Showroom optimizes the video setting for use on a retail showroom floor or demo environment. Home Showroom : Return : Move : Press to Execute 4. Signal select Press ▲ and ▼ button to select “Cable Box or Satellite Box”, “Game, BluRay DVD or other player” or “Antenna or coaxial cable input” and then press ENTER button to the next step. Let’s Get Connected Cable Box or Satellite Box Game, Blu-Ray DVD or other player Antenna or coaxial cable input Back : Return : Move : Press to Execute 23 RSC8-A-_GB_27 Apr 11.indd 23 2011-4-27 10:55:44 Initial Setup (continued) 5. Cable or Satellite Box Input selection Make sure what kind of connection is made with your TV when selecting for Source select item. Press ▲ and ▼ button to select “Next” and then press ENTER button to continue. Cable or Satellite Box Input What Connection are you using? For optimal video quality We Recommend HDMI or Component Input. (Refer to Quick Connect or User Manual Help) Source Select TV Skip Next Back : Return : Move : Change Setting RF Warning Note: We don’t recommend RF as your connection because its poor video signal and quality; Go back to choose another source, if you don’t have a Cable Box that can provide High Definition quality signals. We recommend you call your Cable provider for Help! Proceed Skip Back : Return : Move : Press to Execute 6. Other source select Press ▲ and ▼ button to select input source and then press ENTER button to the next step. Page 1/2 SOURCE LIST TV AV YPbPr HDMI 1 HDMI 2 HDMI 3 HDMI 4 : Select : Page : Press to Execute - 24 RSC8-A-_GB_27 Apr 11.indd 24 2011-4-27 10:55:44 Initial Setup (continued) 7. Channel scan select Press ▲ and ▼ button to select Antenna [ATSC] or Cable, and then press ENTER button to the next step. Scan Channels from Antenna or coaxial cable input Use the Up or Down key arrows on you remote control to select the channel scan type. Antenna [ATSC] Cable Back : Return : Press to Execute : Move 8. ATSC channel access selection Some of the ATSC channel require the access code. Press ▲ and ▼ button to select “Next” and then press ENTER button to next step. The 5 digit access code provided by the channel access service. Antenna [ATSC] Channel Access Antenna [ATSC] Channel Access Information Antenna users need a Channel Access Code in order to perform a channel scan and receive broadcast signals. Web: www.westinghousedigital.com/support; select Channel Access and enter Access Info Text Message: Text Tuner to 95495 Phone: 1-800-701-0680 follow instructions To access channel scan you will need the following access Info: Select next to obtain the Access code. Provide these items to Westinghouse’s channel access service by wet, text, or phone to obtain an Access Code, then select Next to input access code. Next Back Next : Return Back : Move : Move : Press to Execute : Return Model: VR-5525Z Serial No.: XXXXXXXXXXXXX Channel Scan Type: ATSC : Press to Execute Enter Channel Access Code Using your remote control to enter the 5 digit access code provided by the channel access service. Back : Return 0-9 : Enter password 25 RSC8-A-_GB_27 Apr 11.indd 25 2011-4-27 10:55:45 Initial Setup (continued) 9. Auto Channel Search Highlight and press ENTER button to start the auto searching. 9Z UV' [ZU)NGTTKR9KGXIN 9 Q OV It will search analog channels first, then digital channels. Before execute auto channel search, please confirm your antenna type is Air or Cable. Wrong setting of Signal Type maybe cause finding no channel. Found numbers do not include encryption programs. Note: Auto programming may take about 15 minutes to complete. Please wait until you see the complete message. The TV will then switch automatically to the first channel found. - 26 RSC8-A-_GB_27 Apr 11.indd 26 2011-4-27 10:55:45 Source Menu Press INPUT button to display the input source list. Press ▲ and ▼ button to select the input source and press ENTER button to confirm. 9 U[XI K9 KRKI Z :< '< ? 6 H6 X .*3/ .*3/ .*3/ .*3/ 6) Main Menu Press MENU button to display the main menu or return to the previous menu or close the main menu. Press ◀ and ▶ button to highlight the desired menu icon, and press ENTER button to select. If no buttons are pressed, the menu will close automatically after about 10 seconds. 27 RSC8-A-_GB_27 Apr 11.indd 27 2011-4-27 10:55:45 Main Menu Description 6OIZ[XK9KZZOTMY 9IXKKT9O`K ,ORR 6)9KZZOTMY )URUX:KSVKXGZ[XK4UXSGR Picture Menu Adjust your picture settings. The operation are slightly different among different source. 'J\GTIKJ6OIZ[XK9KZZOTMY 3U\K Sound Menu Adjust the sound settings. 9U[TJ9KZZOTMY 9[XXU[TJ3UJK '<2 ' TGRUM9 U[TJ *OMOZ GR9 U[TJ *OMOZGR'[JOU5[ZV[Z 6)3 +W[GRO`KX9KZZOTMY 3U\K Channel Menu Customize your channel settings. )NGTTKR9 KZ Z OTMY +TZKX 3U\K Parental Control Menu Set program rating control and input source, keypad lock function. V-CHIP )NGTMK6GYY]UXJ 1K_VGJ2UIQ 9U[XIK2UIQ ͺ+TZKX6 GYY] UXJ - 28 RSC8-A-_GB_27 Apr 11.indd 28 2011-4-27 10:55:46 Main Menu Description (Continued) Setup Menu Select closed caption options, language and time. 3U\K Others Menu Set the OSD blue background, whether auto power off if no signal or no operation, clear all user settings, etc.. 3U\K 29 RSC8-A-_GB_27 Apr 11.indd 29 2011-4-27 10:55:47 Menu Settings 1. Picture menu 6OIZ[XK9KZZOTMY 9IXKKT9O`K ,ORR 6)9KZZOTMY )URUX:KSVKXGZ[XK4UXSGR 'J\GTIKJ6OIZ[XK9KZZOTMY 3U\K 1.Press ▲ and ▼ button to highlight one of the following options, then press ENTER or ▶ button to enter next sub-menu to adjust it. 2.Press MENU button back to the previous menu. Picture Settings Adjust the picture quality including brightness, contrast, color, tint, sharpness. 8KZ[XT 3U\K When Picture Mode is set to User, the following setting can be manually adjusted. Press P MODE shortcut button on the remote control to select picture mode directly. - 30 RSC8-A-_GB_27 Apr 11.indd 30 2011-4-27 10:55:47 Menu Settings (continued) Picture Mode Highlight the item and press ◀ and ▶ button to select “Movie, Dynamic, Standard, or User”. Brightness/Contrast/Color/Tint/Sharpness Highlight the item and press ▶ button, and a process bar appears, then press ◀ or ▶ button to adjust the value. Tint is available when analog TV or NTSC - system AV. Press MENU button to back the Picture Setting menu. ( X OMNZ TKYY Screen Size Press ◀ and ▶ button to select the display aspect ratio till the picture is fit onto the screen. The options are different according to different input source. PC: Fill/Standard. AV/YPbPr/HDMI/TV: Fill/Over Scan/Standard. Generally each aspect ratio is suitable for one input format. The item is available only for PC DB15 or PC DVI input mode. 31 RSC8-A-_GB_27 Apr 11.indd 31 2011-4-27 10:55:47 Menu Settings (continued) PC Settings +TZKX +TZKX 3U\K When DVI signal input, only Horizontal Position and Vertical Position can be adjusted. Press ▲ and ▼ button to highlight one of the following options, then press ENTER button to select it. .UXO`UTZGR6 UY OZOUT Auto Adjust: Automatically adjust Clock, Phase, H - Position and V - Position settings. In order to get a good result, you should open a “filling the screen” picture before executing Auto Adjust. Horizontal Position: Shift the screen slightly to left or right. Vertical Position: Shift the screen slightly to up or down. Clock: Adjust the DB15 picture signal sampling clock rate. Phase: Adjust the DB15 picture signal sampling phase. It maybe affect the definition. Wrong value maybe result the interference. Reset: Reset the parameters of current menu to default value. - 32 RSC8-A-_GB_27 Apr 11.indd 32 2011-4-27 10:55:48 Menu Settings (continued) Color Temperature Press ◀ and ▶ button to select the color temperature that you feel comfortable. Normal: Basically will be accepted by most people. Cool: Means a high color temperature that will feel cool. Warm: Means a low color temperature that will feel warm. Advanced Picture Settings The item is some special picture feature. .`2K\KR .OMN 3U\K Press ▲ and ▼ button to highlight the item and press ENTER or ▶ button to display the sub-menu as following: Dynamic Contrast: Off/Low/Medium/High The system will adjust the luminance curve by analysing the picture content dynamically. Film Mode: Off/On For the 2:2 or 3:2 format signal of cinema, enable special pixel process to reduce the flick of moving area. Noise Reduction: Off/Low/Medium/High You can clear up analog TV signal by reducing the dot noise. This feature is not available at PC or Media source. MPEG Noise Reduction: Off/Low/Medium/High Similar with the Noise Reduction, you can set to reduce the block noise. 120Hz Level: Off/Low/Medium/High 33 RSC8-A-_GB_27 Apr 11.indd 33 2011-4-27 10:55:48 Menu Settings (continued) 2. Sound menu 9U[TJ9KZZOTMY 9[XXU[TJ3UJK '<2 ' TGRUM9 U[TJ *OMOZ GR9 U[TJ *OMOZGR'[JOU5[ZV[Z 6)3 +W[GRO`KX9KZZOTMY 3U\K 1.Press ▲ and ▼ button to highlight one of the following options, then press ENTER or ▶ button to enter next sub-menu to adjust it. 2.Press MENU button back to the previous menu. Sound Settings Set the sound mode, and Bass/Treble/Balance. 95;4*9+::/4-9 3U\K Sound Mode: Standard/Dynamic/Soft/User Only in User mode, the follow items can be adjusted. Bass: Adjust the low frequency band response. Treble: Adjust the high frequency band response. Balance: Adjust the level of sound coming from the left or right speaker. - 34 RSC8-A-_GB_27 Apr 11.indd 34 2011-4-27 10:55:49 Menu Settings (continued) Adjust the Bass/Treble/Balance 1. Set Sound Mode to User. 2. Highlight the item and press ◀ and ▶ button to display the sub-menu, then press ◀ and ▶ button to adjust the value. Surround Mode Set to enjoy the virtual surround sound. Press ENTER button to set or cancel. AVL Auto Volume Level. Press ENTER button to set or cancel. When AVL is set on, it will limit the sound being heard when sudden changes in volume occur during commercial breaks or channel changes. Usually be enabled at night. Analog Sound Available at analog TV channels. SAP/Stereo/Mono Set the preferred sound track of analog channels. Stereo and SAP exist on some channels. Generally SAP is a second language sound or help the people with hearing impair. Digital Sound Available at digital TV channels. English/French/Spanish Set the preferred sound track of digital channels. French and Spanish exist on some channels. Digital Audio Output PCM/Raw/Off Set the audio output type of coax or optical terminal. Raw means output the original format of audio stream. PCM can be matched with most AV amplifiers. 35 RSC8-A-_GB_27 Apr 11.indd 35 2011-4-27 10:55:49 Menu Settings (continued) Equalizer Settings Adjust the curve of 7 bands equalizer. 3 UJK6 UV 3U\K Mode: Off/Rock/Pop/Jazz/User (only in User mode, the following can be manually adjusted.) Adjust Equalizer Settings Based on your favourites about which frequency band need to be adjusted, make small adjustment with certain frequency band at a time. Suggest NOT making too large changes. 1. Set Mode to User. 2. Press ▼ button to select the first (100Hz) item, then press ◀ and ▶ button to select the band to be turned. 3.Press ▲ and ▼ button to adjust the value. - 36 RSC8-A-_GB_27 Apr 11.indd 36 2011-4-27 10:55:49 Menu Settings (continued) 3. Channel menu )NGTTKR9 KZ Z OTMY +TZKX 3U\K Note: The menu is available only at TV source. 1.Press ▲ and ▼ button to highlight one of the following options, then press ENTER or ▶ button to enter next sub-menu to adjust it. 2.Press MENU button back to the previous menu. Channel List You can view all the channels and choose one quickly. * '() ' ' ' 3U\K “ABC”: Label of the Channel. Press ▲ and ▼ button to highlight a channel and press ENTER to view it. 37 RSC8-A-_GB_27 Apr 11.indd 37 2011-4-27 10:55:50 Menu Settings (continued) Favourite List All of you favourite channels are listed in this menu, and you can choose them quickly.. Page 1/1 * '() ' ' 3U\K The list shows channels that you set as favourite. See “Channel Settings” to understand how to set channels be favourite. Channel Settings Set the favourite channels, skipped channels, label of channels. ).'44+29+::/4-9 Channel Skip Favorite Label ABC * ' ' ' ) [X YUX 6GMK Skip: Set the channel to be skipped when using CH + / CH - to view channels. Favourite: Set the channel to your favourite list. Label: Rename label of the channel. - 38 RSC8-A-_GB_27 Apr 11.indd 38 2011-4-27 10:55:50 Menu Settings (continued) Change the settings Skip & Favourite 1. Press ▲ and ▼ button to select the channel you want to set. 2. Press ◀ and ▶ button to highlight corresponding item, and press ENTER button to set or cancel. Label 1. Press ▲ and ▼ button to select the channel and ENTER button to enter the edit state. 2. Press ▲ and ▼ button to select the character, press ◀ and ▶ button to move the cursor. Total seven letters. Signal Type Set to Air or Cable according to your antenna source. When set to Air, TV can catch 8VSB broadcasting signal. When set to Cable, TV can catch analog and clear 64QAM/256QAM broadcasting signal. 39 RSC8-A-_GB_27 Apr 11.indd 39 2011-4-27 10:55:50 Menu Settings (continued) 4. Parental Control menu V-CHIP )NGTMK6GYY]UXJ 1K_VGJ2UIQ 9U[XIK2UIQ ͺ+TZKX6 GYY] UXJ Note: The default user password is “0000”, and if forget what you set, try “1470”. Lock Parental Control The following items are only available if the password input is correct. V-CHIP Include below settings: V-CHIP US V-Chip Canada V-Chip Block UnRated Show Downloadable Rating (N/A) Clear Downloadable Data (N/A) : Return : Move / : Go to Next Menu US V-Chip: Rating system used at USA. For the United States, the rating setting basically include the following options: Movie Rating, TV Rating. - 40 RSC8-A-_GB_27 Apr 11.indd 40 2011-4-27 10:55:51 Menu Settings (continued) Movie Rating This system defines the rating control which come from MPAA rules. 3 U\ K Rating Define G General audience. All ages admitted. PG Parental guidance suggested. Some material may not be suitable for children. PG-13 Parents strongly cautioned. Some material may be inappropriate for children under 13. R Restricted. Children under 17 require accompanying parent or adult guardian. NC-17 No one 17 and under admitted. X Adult audience only. 41 RSC8-A-_GB_27 Apr 11.indd 41 2011-4-27 10:55:51 Menu Settings (continued) TV Rating The TV rating compose of two aspects: age-based and content-based. 3 U\ K Age Define Content Define TV-Y General audience FV Fantasy violence TV-Y7 Parental guidance suggested D Suggestive dialogue TV-G Parents strongly cautioned L Strong language TV-PG Restricted S Sexual situations TV-14 No one 17 and under admitted V TV-MA Adult audience only Violence Note: The content ratings will increase depending on the level of the agebased rating. For example, a program with a TV-PG V (violence) rating may contain moderate violence, while a TV-14 V (violence) rating may contain intense violence. So locking a higher level option will automatically cause locking the options that has more sensitive level. - 42 RSC8-A-_GB_27 Apr 11.indd 42 2011-4-27 10:55:52 Menu Settings (continued) Canada V-Chip: Rating system used at Canada. For Canada, the rating setting include the following options: English Rating, French Rating. English Rating These ratings are for programs which are using English rating system. Rating Defined as C Children ) C8+ Children 8 years and older ) G General programming PG Parental guidance 14+ Viewers 14 and older 18+ Adult programming +4-2/9.8':/4- 6- 3 U\ K French Rating The ratings are for programs which are using French rating system. Rating Defined as G General 8 ans+ Not recommended for 13 ans+ GTY GTY Not recommended for chil- GTY GTY Not recommended for ages under age 16 18 ans+ - younger children dren under age 13 16 ans+ ,8+4).8':/4- 3 U\ K This program is restricted to adults Block Unrated Show: Control whether lock the program that have not any valid rating flag. Downloadable Rating: Control the RRT5 setting which are valid only at some digital cable channels. Clear Downloadable Data: Select to clear the previous downloadable rating data. 43 RSC8-A-_GB_27 Apr 11.indd 43 2011-4-27 10:55:52 Menu Settings (continued) Change Password + TZKX6 GYY] UXJ At first you should enter the correct old password then enter new password twice. If you lost your password, try to enter “1470”. Keypad Lock Press to lock the front panel keypad, press again to release. Source Lock ?6H6X .*3/ .*3/ .*3/ 3 U\ K Press ▲ and ▼ button to select the source you want to lock, then press ENTER button to set it to lock. If anyone want to use this source, the password is needed. - 44 RSC8-A-_GB_27 Apr 11.indd 44 2011-4-27 10:55:53 Menu Settings (continued) 5. Setup menu 3U\K Closed Caption CLOSED CAPTION )GVZOUT*OYVRG_ 5LL 'TGRUM)GVZOUT:_VK )) *OMOZGR)GVZOUT:_VK 9KX\OIK *OMOZGR))6XKYKZ *KLG[RZ *OMOZGR))9Z_RK4' 8KZ[XT 3U\K Closed Caption (CC) Include below options: Caption Display: Display or hide the CC. Analog Caption Type: Select from below closed-caption modes for analog programs. CC1,2,3,4: Displays corresponding caption channel of analog program. (Usually be set to CC1 for most programs.) Text1,2,3,4: Displays corresponding text service channel of a analog program. 45 RSC8-A-_GB_27 Apr 11.indd 45 2011-4-27 10:55:54 Menu Settings (continued) Digital CC Style Digital Caption Type: Applies only to digital channels with closed caption. Service1,2,3,4,5,6: These are different service data channels. Digital CC Preset: Default/Custom If set to Custom, Digital CC Style is available. Digital CC Style ))9O`K9 S GRR )),UTZ9 Z _ RK ))5VGIOZ _9 UROJ :K^ Z) URUX8 KJ ))( GIQMXU[TJ5VGIOZ _:X GTYVGXKTZ ))( GIQMXU[TJ)URUX* KL G[RZ )259+*)' 6 : /54 8KZ[XT 3U\K This menu is valid only for digital closed caption of digital channels. CC Size:Small/Standard/Large/Default CC Font: Style 0 ~7, Default CC Opacity: Flashing/Default/Solid/Translucent/Transparent/Default Text Color: Blue/Yellow/Red/Black/White/Green/Magenta/Cyan/Default CC Background Opacity: Flashing/Solid/Translucent/Transparent/Default CC Background Color: Blue/Yellow/Red/White/Green/Magenta/Cyan/Default Menu Language Set the menu language. English/French/Spanish. - 46 RSC8-A-_GB_27 Apr 11.indd 46 2011-4-27 10:55:54 Menu Settings (continued) Clock Set the Time Zone/Auto Clock/Day of time/Daylight Saving. Daylight Saving Time 8KZ[XT ͺ3 U\ K Time Zone: Hawaii/Alaska/Pacific/Central/Mountain/Eastern/Samoa/Newfoundland/Atlantic. Auto Clock: If set it to ON, the TV will sync the local clock according to the DTV broadcasting time automatically. Otherwise you can set the time manually. Setup Time: Set Auto Clock to Off, then you can set the time manually. Note: In the case of loss of power, the clock setting will be lost. Day of Week: The TV will calculate current day of week according to the time. Daylight Saving Time: When Auto Clock set to ON, this item is available to enable day-night saving option or not. 47 RSC8-A-_GB_27 Apr 11.indd 47 2011-4-27 10:55:54 Menu Settings (continued) 6. Others menu 3U\K Blue Back: Set the screen background colour blue or not when no vaild signal input. When analog TV input and has no signal, snow noise will display if this option is cleared. No Signal Power Off: If it is set, TV will automatically enter standby after 10 minutes without signal input. No Operation Power Off: If it is set, TV will automatically enter standby after 3 hours without any operation. All Reset: When you highlight the item the system will note you that “Attention! If [All Reset] was executed, TV system is reset”, and if you are sure to reset, press ENTER to reset. - 48 RSC8-A-_GB_27 Apr 11.indd 48 2011-4-27 10:55:55 Simple Troubleshooting Please check if you can solve problems by troubleshooting yourself. Troubleshooting Control No signal Please check that all cables are correctly plugged in. No color shades Adjust the contrast, the color or the brightness. Stain on the screen Maybe the result from a lighting signal from car, motor, neon light and other electrical devices or appliances. Double or multiple display image Maybe the result of an electrical wave disturb from other TV, Computer and Game machine or Radio. Snow on the screen The cables of the antenna are not correctly plugged in. The remote control does not work Please check the batteries order and alignment. Check that the IR of the remote control is not hidden by something. “Zip” made noise on TV cover Even if the display image is correct, the noise may come from an unsteady fixation of the panel. No sound Make sure that you have not press the MUTE button of the panel or of the remote control. 49 RSC8-A-_GB_27 Apr 11.indd 49 2011-4-27 10:55:55 Technical Specifications This manual is only for your reference, any changes to the design and splenification will not be advised. Screen Size 55 Inch Display Type TFT LCD Resolution(Pixel) 1920 x 1080 Aspect Ratio 16:9 Power Supply AC 100-240V 50/60Hz Power Consumption ≤ 300W TV System ATSC/NTSC Video Input Format PAL/NTSC Audio Output Power L/R 2 x 8 W Support Dimensions Weight ANTENNA Support AV-IN Support YPBPR-IN Support HDMI-IN Support VGA(PC)-IN Support VGA(PC) AUDIO-IN Support HEADPHONE OUT Support S-VIDEO-IN No Support COAXIAL-OUT Support USB Support Inc Stand (LxWxH mm) 1320 x 347 x 855 Exc Stand (LxWxH mm) 1320 x 115 x 790 Net (Kgs) 33kg Gross(Kgs) 39kg - 50 RSC8-A-_GB_27 Apr 11.indd 50 2011-4-27 10:55:55 VR-5525Z_UM_cover_28 Apr 11.pdf 2 2011-4-28 10:01:52 www.westinghousedigital.com S/N: Westinghouse Digital, LLC Orange, CA SE-UM-5502-0101