1
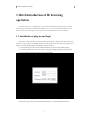
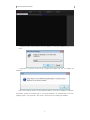
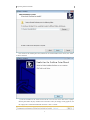
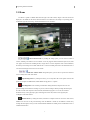
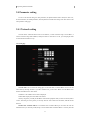
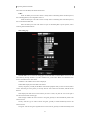
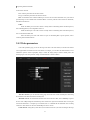
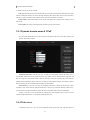
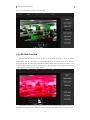
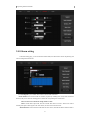
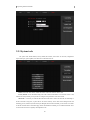
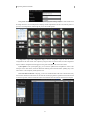
IE Operating Instruction Manual
IE Operating Instruction Manual
Feb. 4. 2013
1
IE Operating Instruction Manual
contents
1. Brief introduction of IE browsing operation.................................................................................3
1.1. Installation of plug-ins and login .......................................................................................3
2. IE menu introduction ....................................................................................................................6
2.1 Home...................................................................................................................................7
2.2 Replay .................................................................................................................................8
2.3 Log ....................................................................................................................................10
2.4 Parameter setting............................................................................................................... 11
2.4.1 Network setting ...................................................................................................... 11
2.4.2 Video parameters....................................................................................................13
2.4.3 Dynamic domain name & UPnP ............................................................................14
2.4.4 Video cover ............................................................................................................14
2.4.5 Motion detection ....................................................................................................15
2.4.6 CMOS parameter ...................................................................................................16
2.4.7 OSD parameters .....................................................................................................16
2.4.8 Alarm setting ..........................................................................................................17
2.5 System setting ...................................................................................................................18
2.5.1 Local setting...........................................................................................................19
2.5.2 Time setting............................................................................................................19
2.5.3 System tools ...........................................................................................................20
2.5.4 User management...................................................................................................22
2.5.5 Device information.................................................................................................22
2
IE Operating Instruction Manual
1. Brief introduction of IE browsing
operation
As Internet Explorer is a webpage explorer of the Microsoft Windows Operating System, and our
video camera is internally provided with the WEB service, you can use IE (Internet Explorer) to visit
the video camera, preview images in the video camera and set parameters of the video camera.
1.1. Installation of plug-ins and login
When the IE is used for the access to the video camera for the first time, images of the video camera can be
previewed as long as plug-ins are installed; and after the login of the IE, the video camera will prompt you to
install OCX component automatically. The installation steps are as follows:
(1)
Run IE and input the video camera’s IP address and HTTP port as shown in the following figure.
(2)
After the successful access to the video camera, a login page will appear, and please input a username
and a password (Both the default username and password are admin).
(3) after the successful login, a prompt “Please install ActiveX control RSAV.EXE” will be popped out at the
left upside of the page; and you can click the link “RSAV.EXE” to run or download the RSAV control.
3
IE Operating Instruction Manual
(4) Install the RSAV control and please select the language to use during the installation and then click
“Next”.
A prompt that it is necessary to close the IE is popped out and please click “Ok” for continuing the
installation.
Skip a welcome interface and select a control installation path; the control must be installed in a system disk;
and generally speaking, the installation path is “C:\Program Files\RSAV”; the installation path of the 64-bit
Operating System is “C:\Program Files(X86)\RSAV”; and click “Next”for continuing the installation.
4
IE Operating Instruction Manual
Click “install” to start installing the control; and after the successful installation of the control, click “Finish”
to end the installation.
(5) After the installation of the control and when the IE is rerun to access to the video camera, a prompt
indicating that whether the justly installed control is allowed to used by the webpage will be popped out, and
the webpage will be refreshed and loaded the control after “Allow” is clicked.
5
IE Operating Instruction Manual
(6) After the control is loaded, please log in the video camera again (if you do not want to log in repeatedly,
you can select “Auto login”); and images of the video camera are displayed in the page.
2. IE menu introduction
The IE interface of the video camera is mainly composed of several big functional classifications,
respectively including a home, replay, log, parameter setting, and system setting. Please click functional
classifications to enter into corresponding functional page
There are three operational options at the right upside of the IP operating interface; and click “download
plug-in” to download the OCX control, click “logout” to log out and turn back to the login page and change the
language option to change the display language of the IE interface.
6
IE Operating Instruction Manual
2.1 Home
The Home is opened in a default mode after the login of the video camera; images of the video camera are
displayed in the middle of the Home; functional buttons are located above the images; an operating panel is
located at the right side of the image; and the detailed functions are as follows:
Control selection menu: by clicking the change option, you can select two kinds of
controls, including “OCX-H264” and "VLC-H264”. OCX only supports Microsoft Internet Explorer (IE) while
VLC applies to most browsers including Firefox, Google and so on. After completion of the control installation,
the control preview image can be called. When the VLC control is installed, please refer to the document “How to
Use Firebox and Google Chrome to Access to Camera”.
Video flow selection menu: through this option, you can select to preview the main flow
or the secondary flow of the video camera.
Snap-shooting button: by clicking the button, you can snap-shoot the current picture and store the
picture in a computer in a BMP format; and the default storage path is “C:\capture”.
Recording button: video recording is started after clicking the button; red points will occur in a
previewed image to show that the recording is in process; video recording is ended by clicking the button again;
the video is stored in the computer in an AVI format; the default storage path is “C:\record”; the recorded
document not only can be played by a player which supports H/.264 code, but also can be played by the
AviReplayer of the video camera.
Talkback button: by clicking the button, sound from a computer end can be sent to the video camera;
talkback icon will occur in the previewed image when the talkback is turned on; the talkback is turned off by
clicking the button again; and if you want to understand the detailed use method, please read document “How to
Use Bidirectional Voice”.
7
IE Operating Instruction Manual
Voice button: by clicking the voice button, sound of accessories of the video camera can be monitored;
a voice icon will occur in the previewed image when the voice button is turned on; and the voice is turned off by
clicking the voice button again; and if you want to know the detailed use method, please read the document “How
to Use Bidirectional Voice”.
PT direction control keyboard
Vertical/Horizontal
auto scan
Zoom In/Zoom Out
Long distance
focus/near distance
focus
PT rotational speed
control
Preset select menu
Preset go button
Preset add button
Preset delete button
Brightness adjustment
Contrast adjustment
Color saturation adjustment
Power configuration
Flip configuration
Note: some functions in the control panel for high-speed ball proprietary function, if not
high-speed ball camera will not display these features.
2.2 Replay
The replay interface is only used for SD card of the video camera; when the SD card inside the video camera
has video records, you can play the videos in the replay interface to view the records; and the operating method is
as follows:
8
IE Operating Instruction Manual
You can select the time scope which you want to inquire in a time selection panel at the left side of the replay
interface and then click the search icon.
After the search, blue region will occur in the time strip above to show videos exist in the days; and the
videos can be replayed by dragging the time label to the blue region.
Functions of play buttons:
End replay
Advance a minute
Advance ten minutes
9
IE Operating Instruction Manual
Retreat a minute
Retreat ten minutes
Snap-shooting
Prompt: For the use method of the SD card, please read document “How to Use SD Card”.
2.3 Log
The Log which records operating history and motion detection alarm events of the video camera is stored in
the SD card of the video camera; and through the log page, you can view these records; and the use method is as
follows:
You can select a time scope which you want to inquire in a time selection panel at the left side of the replay
interface and then click the search icon; and after the search, you can see the log records in the middle of the page.
You can the time records of the video camera through the log; if meeting with motion detection alarm, you
can click “View” to play the alarming video at that moment.
10
IE Operating Instruction Manual
2.4 Parameter setting
You can set the network setting, the video parameters, the dynamic domain name & UPnP, the video cover,
the motion detection, the CMOS parameters, the OSD parameters and the alarm setting of the video camera in the
video parameter setting page.
2.4.1 Network setting
Network camera with WIFI function has two IP addresses, a wired connection using LAN IP address, a
wireless connection using WIFI IP address, usually the camera is connected via a LAN, you can unplug the cable
to use WIFI when the WIFI is set up.
LAN setting page
Network mode: You can switch the setting pages of LAN and WIFI; a fixed IP address can be set for the
video camera by selecting “Fixed IP”; if you have a DHCP server, you can select “DHCP” to let the DHCP server
allocate an IP address to the video camera.
IP Address: LAN IP address of the camera is displayed.
Subnet Mask: Displays the subnet mask of the camera.
Gateway: the gateway is usually the IP address of the Internet equipment which you access to Internet,such as
a router; and setting of correct gateway is necessary when the video camera uses the DDNS, P2P and the like
functions.
Domain name resolution address: Local domain name resolution address,you can know the local this
information from your network provider,setting of correct domain name resolution address is necessary when the
11
IE Operating Instruction Manual
video camera uses the DDNS, P2P and the like functions.
PORT:
HTTP: the HTTP port of the video camera is usually used for transmitting data of the HTTP protocol,
such as WEB application, CGI configuration and so on.
RTSP: the RTSP port of the video camera is usually used for transmitting data of the RTSP protocol,
such as video data and audio data.
RCFG: the RCFG port of the video camera is a port for transmitting data of private protocol, such as
connecting NVR and VMS software.
WIFI setting page
Network mode: You can switch the setting pages of LAN and WIFI; a fixed IP address can be set for the
video camera by selecting “Fixed IP”; if you have a DHCP server, you can select “DHCP” to let the DHCP server
allocate an IP address to the video camera.
IP Address: LAN IP address of the camera is displayed.
Subnet Mask: Displays the subnet mask of the camera.
Gateway: the gateway is usually the IP address of the Internet equipment which you access to Internet,such as
a router; and setting of correct gateway is necessary when the video camera uses the DDNS, P2P and the like
functions.
SSID: Displays the SSID of the wireless network you want to connect, can point the "scan" on the right to
enter the wireless network selection page.
Mode: Displays whether the wireless network is encrypted, generally be setted automatically based on the
wireless network.
Security: Select the type of wireless network encryption, generally be setted automatically based on the
wireless network.
Encryption: select the encryption algorithm of the wireless network, generally be setted automatically based
12
IE Operating Instruction Manual
on the wireless network.
KEY: enter the password for the wireless network.
Re-type: confirm the password for the wireless network
DNS: Local domain name resolution address,you can know the local this information from your network
provider,setting of correct domain name resolution address is necessary when the video camera uses the DDNS,
P2P and the like functions.
PORT:
HTTP: the HTTP port of the video camera is usually used for transmitting data of the HTTP protocol,
such as WEB application, CGI configuration and so on.
RTSP: the RTSP port of the video camera is usually used for transmitting data of the RTSP protocol,
such as video data and audio data.
RCFG: the RCFG port of the video camera is a port for transmitting data of private protocol, such as
connecting NVR and VMS software.
2.4.2 Video parameters
In the video parameter page, you can set the image video flow of the video camera, so that the video camera
can be applied better in different network environment. For example, you can reduce the frame number at a low
transmission speed to obtain a high-quality image or reduce the image quality to obtain a smooth picture; the
following figure is the video parameter setting recommended under a normal condition.
Video flow selection: you can switch the setting pages of the main flow and the secondary flow and setting
the resolutions of the main flow and the secondary flow.
Maximum code rate: the transmission maximum value of the video flow data, such as 2048KBps is equal to
the size of the 2 MBps image data transmitted per each second and is equal to the maximum value of storing the
256 Kb data document in a computer per each minute; and it is calculated that the maximum video recording
volume of a video camera at a code rate of 2048 KBps for a hour is 0.9 Gb.
I frame interval: setting the key frame interval; the smaller the interval is, the faster refreshing of the image
13
IE Operating Instruction Manual
is; and the code rate will also be increased.
Code type: the fixed code rate means that the code rate is fixed; the variable code rate means that the variable
code rate is changed according to the size of the image data of the video camera; that is to say, the code rate will be
reduced in a static environment, but the code rate will be increased in a dynamic environment.
Frame number: set the frame number in each second of the image; and 15 frames means 15 images exist in
each second.
Picture quality: the setting of the image quality will affect the size of the code rate.
2.4.3 Dynamic domain name & UPnP
You can bind the domain name to the video camera and start up the UPnP service of the video camera in the
dynamic domain name & UPnP.
Dynamic domain name: click and select “On” to make your bound domain name to take effect; select a
corresponding domain name server provider (at present, only dyndns and 3322 domain name are supported, and
there is no support for free domain names as they are unsteady) and input the username, the password and the
attributive domain parameter; and it is unnecessary to input the “Update address” and the “Work mode” as both of
them are necessary for the free domain name provided by the manufacturer.
Universal PnP: it is necessary to set port for forwarding on the router to enable the external port to point
towards the video camera when the dynamic domain name is used; if your router has started the UPNP service,
you can start the Universal PNP function to enable the router to forward the data to the ports automatically.
Prompt: if you want to know the detailed use method, please read document “How to Access to Video
Camera through Domain Name” in a “Frequently Asked Questions” file.
2.4.4 Video cover
Through the video cover, a user can cover and shield the private region in the video. The video camera at
14
IE Operating Instruction Manual
most can cover and shield four regions in the video image.
2.4.5 Motion detection
The motion detection can detect whether an object in the monitored environment is moved; the motion
detection alarm inside the video camera can be started with the help of the function; and the motion detection
functions of the NVR and CMS are also linked with the motion detection of the video camera, for example, if the
NVR has started the motion detection, the motion detection of the video camera is firstly triggered, then the NVR
is linked and then the NVR triggers the motion detection.
Motion detection switch: an option for whether to turn on the motion detection; the default state is that the
motion detection is turned on in the whole-screen region (except for the time display region as wrong report may
15
IE Operating Instruction Manual
be resulted); and you can set the red region in the image to set the motion detection region.
Motion detection level: the sensitivity of the motion detection; the smaller the value is, the more sensitive the
motion detection is.
Motion detection interval: triggering interval time of the movable detection; and the shorter the interval is,
the smaller the value is.
2.4.6 CMOS parameter
The COMS includes global setting, brightness & color setting and COMS parameter setting. As shown in the
figure below:
The global setting: the flip configuration is mainly to adjust the direction of the previewed picture; you can
set the up-down flip, left-right flip and global flip according to a need; and 50, 60 Hz power configuration can be
adopted to match with the power type used locally.
Brightness & color parameter setting: adjust picture quality of the previewed picture of the video camera.
CMOS setting: fine tune the wide dynamic parameters of the video camera (if the video camera carries with
the wide dynamic function); and as the adjustment of the infrared switch and the electric level of the switch is
configured according to the hardware of the video camera, please do not change.
2.4.7 OSD parameters
In the OSD page, a user can set the time, the name and the user-defined character displayed on the picture;
and you can set the display position, the alternately displayed color and the background color.
16
IE Operating Instruction Manual
2.4.8 Alarm setting
In the alarm setting page, you can set the alarm channel mode, the alarm motion such as snap-shooting and
video recording and the alarm time.
Pre-recording time: pre-record the video before several seconds of the alarm.
Alarm channel: there are three modes for selection, respectively including time record, alarm and motion
detection; and you can select the enabling option to enable the corresponding mode to take effect.
Time record: time record mode for acting within a set time.
Alarm: external alarm input mode; when the external alarm devices such as a smoke sensor and an
infrared probe input an alarm signal to the video camera, the video camera will take action.
Motion detection: motion detection mode inside the video camera; and when the motion detection mode is
17
IE Operating Instruction Manual
triggered, the video camera will take action.
Alarm linkage: set the action after the alarm is triggered.
Video recording and snap-shooting: perform video-recording and snap-shooting and store the video in
the SD card; and you can set the snap-shooting interval in the “Snap-shooting interval” option; and the video and
the picture cannot be stored if the video camera does not carry with the SD card.
Do out: an alarm signal will be output.
Email: an email will e sent to an appointed email box; the setting is as shown in the figure below; if you
do not know the SMTP server and the SMTP port, you can inquire your email server provider; and the snap-shot
pictures can be attached in the email by selecting the accessory.
Vediopush: a video will be sent to a mobile phone client.
Enabling time: you can set the time section of the efficient alarm; a week is regarded as a period; and each
division is regarded as half an hour.
Prompt: you can read the document “How to use the SD card” in the “Frequently Asked Questions” file to
understand how to set the alarm setting.
2.5 System setting
The system setting includes local setting, time setting, system tools, user management and device
information.
18
IE Operating Instruction Manual
2.5.1 Local setting
In the local setting page, you can set some operation parameters in the Home.
Login option: you can log in automatically by skipping the login page when the video camera is logged in
after the login option is selected.
Video flow type: amend the video flow type of the preview image in the Home and main flow and secondary
flow can be selected.
Video file storage path: storage path of the video file when a video is recorded in the Home.
Snap-shooting picture storage video: storage path of snap-shot picture when pictures are snap-shot in the
Home.
2.5.2 Time setting
In the time setting page, you can adjust the time manually, synchronize with the computer time and the NTP,
select the time zone and so on; a user can select according to the need thereof; and please set a correct time zone,
otherwise, the P2P client may display a wrong time.
19
IE Operating Instruction Manual
2.5.3 System tools
The system tools include Reboot, Factory default, SD Format, View Picture on SD card, configuration
import and export, System update, View Video Files on SD-card and so on.
Reboot: reboot the video camera; and the reboot time of the video camera is about 1 min.
Factory default: recover the default setting of the video camera; the IP address is recovered as 192.168.1.128;
and after the factory default, you may need to re-configure some parameters of the video camera.
SD format: it is necessary to format the SD card when the SD card is used for the first time; the formatting of
the SD card needs a long time, so please do not cut off the electricity of the video camera during the SD card
formatting process, otherwise, the SD card may be damaged; after the SD is formatted, you can see the rest volume
of the SD card in the device information page; and for the detailed use method, you can read the document “How
to use the SD card” in the “Frequently Asked Questions” file.
20
IE Operating Instruction Manual
View picture on SD card: enter into the SD card picture page after clicking; firstly select time and then click
the image search so as to search the pictures satisfying with the requirements in the SD card; click the picture to
preview in a zooming manner; click the right key to store the storable picture.
Configuration export and configuration import: click the configuration export to store the current
configuration of the video camera in the computer by using the name of ui.conf document; click the configuration
import to load the configuration file and apply the setting in the configuration file to the video camera.
System update: in the system update page, you can select to update the file and update the version of the
fixed piece of the video camera; and for the detailed use method, please read the document “updating steps of the
video camera” in the “Frequently Asked Questions” file.
View Video Files on SD-card: in the page, you can view and download the video files in the SD card; firstly
select the time and then click the search icon; the video file list satisfying with the requirements in the SD card will
occur in the right side; click the “Download” button to download the video files from the SD card to the computer.
21
IE Operating Instruction Manual
2.5.4 User management
In the user management page, you can amend the user password and create a new user, but cannot change the
manager account admin; and the new user is a normal user.
2.5.5 Device information
In the device information page, you can see the video camera manufacturer, the serial number, the type
number and the state of the SD card; after the SD card is inserted into the video camera, you can see the size of the
SD card in the information-capacity of the SD card; and if the SD card is formatted, the rest volume will be
displayed.
22