1
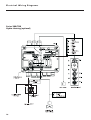
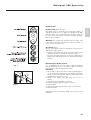
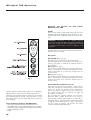
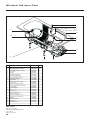
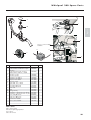
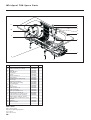
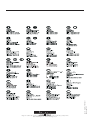
Installation Instruction
Whirlpool Systems
Whrilpool
Whirlpool
Whrilpool
Whrilpool
Whirlpool
Whrilpool
Whrilpool
Whrilpool
Whrilpool
Whrilpool
Whrilpool
Whrilpool
Moneva 300 L
Moneva 300 R
Iseo 320
Victoria 325
Teslin 330
Lugano 340
Imandra 350
Imandra 355
Ladoga 360
Malawi 370
Almonte 380
Manitoba 390
21500000/21502000
21509000/21511000
21518000/21517000
21531000/21532000
21522000/21523000
21524000/21525000
21527000/21529000
21533000/21534000
21536000/21538000
21540000/21541000
21545000/21547000
21549000/21550000
Whrilpool
Whrilpool
Whrilpool
Whrilpool
Whrilpool
Whrilpool
Whrilpool
Whrilpool
Whrilpool
Whrilpool
Monola 700 L
Monola 700 R
Kalona 710
Iseda 720
Solero 740
Imaza 750
Ladiva 760
Pareva 770
Almeda 780
Magadi 790
English
Whirlpool Serie 300
Whirlpool Serie 700
21653000/21656000
21662000/21664000
21666000/21667000
21680000/21682000
21698000/21697000
21707000/21709000
21716000/21718000
21725000/21727000
21734000/21736000
21738000/21739000
1
Contents
English
Fittings..........................................................................................................................................................................3
Installation Instructions ....................................................................................................................................................4
Service Hatch and Air Supply..........................................................................................................................................5
Surface Set Air Control and Pool Control Installation (Whirlpool Series 300) .........................................................................6
Surface Set Multi Air Control and Pool Control Installation (Whirlpool Series 700) .................................................................7
Surface Set Bath Rim Thermostat Installation (Option)..........................................................................................................8
Electrical Wiring Diagrams............................................................................................................................................10
General Information/Bath Care Instructions .....................................................................................................................17
Whirlpool 300 Operation.............................................................................................................................................18
Whirlpool 700 Operation.............................................................................................................................................20
Options ......................................................................................................................................................................22
Air System Troubleshooting ..........................................................................................................................................24
Automatic System Starting Troubleshooting......................................................................................................................25
Hydro System Troubleshooting ......................................................................................................................................26
Underwater Lighting Troubleshooting .............................................................................................................................27
Whirlpool 300 Spare Parts ...........................................................................................................................................28
Whirlpool 700 Spare Parts ...........................................................................................................................................30
2
Fittings
Included loose
Pool control (housing)
Siphon + flat seal
Air control grip
Hand shower
English
–
–
–
–
– 3-hole-armature grips (option)
– Secu-Box (Option)
Whirlpool Series 300
1. Water nozzle
2. Air nozzle
3. Air hoses
4. Pool control
5. Air control
6. Air supply
7. Water sensor
8. Drain and overflow
set
9. Water pump
10. Air blower
11. Bath supporting
frame and feet
Whirlpool Series 700
1. Water nozzle
2. Air nozzle
3. Air hoses
4. Pool control
5. MultiAirControl
6. Solenoid valve
7. Water sensor
8. Drain and overflow
set
9. Water pump
10. Air blower
11. Bath supporting
frame and feet
3
Installation Instructions
ATTENTION!
LIFTING: Always lift bath at support or bath rim.
Never use fitted hoses or installation parts to lift the
bath.
INSPECTING:
Check whirlpool after receipt for damage. Contact your dealer
immediately if you notice any damage. We do not assume
liability for damage occurring during or after installation.
Read check points:
Thoroughly read Installation and Operating Instructions before
starting installation.
Door width:
Observe door width in the room where the whirlpool is to be
installed. Series 300 whirlpools have a maximum height of 685
mm, series 700 whirlpools have a maximum height of 810 mm.
Attention!
Do not lay any circuits under the bath.
Do not install circuits, pipes or other electroconductive materials
in the area of the water level sensors.
Leakage:
Check the functions of the whirlpool when starting fitting/
installation. Check the whirlpool for leakage. Immediately
contact the dealer if defects are found.
Covering:
Thoroughly cover drain, jets, nozzles, controls etc. of the
whirlpool, before starting installation. This should prevent
damage or blocking caused by dirt or dust arising during
fitting.
Electricity:
Check the voltage (230 V), fuse (16 A), FI switch and earthing
cable (check second cable on models 780/790 with heating).
Water connection
Flush the water supply circuits according to local regulations.
Ensure that the water circuit is near the service opening and
remains connected. Two brackets with check valves DW 15 are
supplied for the whirlpool connections to prevent water flowing
back.
4
Bath installation:
1. When the bath is located at the desired position, use a spirit
level to adjust the feet to the correct height.
2. Connect the drain to the on-site drain pipe.
3. Connect the whirlpool to the power supply. Observe local
regulations.
4. Install the pool control on the bath rim.
5. Connect optional Hydro cleaning (solenoid valve) to the
water supply (cold or warm water).
6. Fill the bath with water and then check the function
and for leaks.
7. You can fit any skirting etc. after successful completion
of the tests.
Make sure that no ammonia or other aggressive materials are
applied to the installed parts when cleaning the tiles. Goldcoloured parts in particular are very vulnerable.
Ventilation grid (not in scope of delivery)
Installing a ventilation grid is mandatory. Position the ventilation
grid in the whirlpool covering. The position is optional and can
also be in a neighbouring room (see Figure at the top of Page
5).
Electric supply:
The electrical installation must only be performed by a qualified
electrician, and it must be protected with a FI protective switch
(30 mA) according to VDE 0100 (DIN IEC 60364).
Supply circuit 3x2.5 mm2, 230 V, fuse16 A (a second cable is
required on models 780/790 with heating).
Filling the bath:
The bath can be filled after connecting the bath to the water
supply and drain as well as completion of the electrical
installation. Check again for leakage.
Checking functions via pool control:
Certain parts, such as
1 Air system
2 Water pump
3 Water heating as an option
4 Underwater lighting as an option
Positions 2, 3 and 4 only run when the water level is
approximately 5 cm above the top water nozzles.
Bath water:
The bath water temperature should not be above 40 °C.
Service Hatch and Air Supply
grid
is
Service hatch and air
supply
Position service hatches, at least
40 x 40 cm, near the motor and
blower depending on the model.
Position service hatches so that
parts such as blowers, pumps,
valves, connector boxes and
other connections are always
accessible and replaceable.
Removable side panels are
ideal (e.g. Mepa decorating
system). The air grid for the
blower air supply (150 cm2) can
be installed in this service hatch.
The service hatch can also be
located in a neighbouring room.
No liability will be accepted
for any costs arising from nonobservation of this information.
Option B
Option A
If the service hatch cannot be
installed in a neighbouring
room, it must be installed in the
bathroom. A splashproof grid
must also be installed here. We
recommend insulating the grid
against noise.
Alternative:
If there is not enough space for
a service hatch, we recommend
just „laying“ the bath on the
supporting frame so that the
complete bath can be removed
if necessary. In this case, it
must be possible to disconnect
the drain connection, electrical
connections and, if necessary,
the water supply via the
ventilation hatch.
Example:
Bath laid on
supporting frame
5
English
A
ventilation
mandatory
Surface Set Air Control and Pool Control
Installation (Whirlpool Series 300)
6
English
Surface Set Multi Air Control and Pool
Control Installation (Whirlpool Series 700)
7
Surface Set
Bath Rim Thermostat Installation (Option)
1 Insert shower hose
sleeve seal in hand
shower.
5 Shut-off/diverter
valve:
Check if closed. If not,
close it so that no more
water flows.
2 Connect shower hose
to hand shower.
Fit for shut-off and diverter valve.
3 Lay hand shower in
bath.
4 Turn water on.
8
6 Push the snap-in fit on
when closed so that the
nose points to the middle of the bath.
Surface Set
Bath Rim Thermostat Installation (Option)
English
7 Fill via Exafill, adjust
temperature.
8 Test temperature, set
thermostat to 38 °C.
9
Electrical Wiring Diagrams
Series 300
Blower and hydraulic pump
10
Electrical Wiring Diagrams
English
Series 700
Blower, Hydro pump and pulsation
11
Electrical Wiring Diagrams
Series 300
Automatic underwater lighting (optional)
ON/OFF (automatic via water sensor)
12
Electrical Wiring Diagrams
English
Series 700
Automatic underwater lighting (optional)
ON/OFF (automatic via water sensor)
13
Electrical Wiring Diagrams
Series 300
Heating (optional)
14
Electrical Wiring Diagrams
English
Series 700 - 770
Heating (optional)
Series 780/790: 2 x 230 V/16 A
15
Electrical Wiring Diagrams
Series 300/700
Hydro cleaning (optional)
16
General Information
Bath Care Instructions
Wellness starts in the bathroom
Wellness starts in the bathroom. It is obvious, when you
feel clean, you feel well. You feel even better when just the
contact with the element water becomes a pure pleasure.
For example, with the whirlpools from Pharo. The movement
of the water stimulates the circulatory system, you feel light
and unburdened, muscular pain and tensions disappear in a
pleasant manner.
Surface cleaning
Acrylic products are very easy to clean and service. Hardly
any soiling remains on the smooth surface. A soft sponge or
soft cloth and some drops of antistatic cleaning agent are
recommended for daily cleaning. This restores the gloss of the
bath and creates a dirt-repelling effect. Clean strong soiling
with liquid domestic cleaners, e.g. dishwasher liquid or soapy
water (observe dilution guidelines).
Do not use abrasive cleaners for cleaning!
Use
Pharo whirlpools may not be used in public areas. They have
been designed exclusively for use inside houses. The water
must be drained after every use. Children should never use
the bath without supervision.
Please take notice of the following:
Please contact your doctor if you are worried for health
reasons.
• Taking a bath after heavy meals is not recommended.
• The water temperature should not be above 40 °C.
Using bath salts, oils, foam, herbs and algae
Using shampoos or bathing foam is not recommended.
The use of normal quantities of bath salts and bath oils causes
no problems whatsoever.
Calcification
Remove calcification with Hansgrohe fast decalcifying agent
order No. 90900.
Rinse with clear water and polish with a cloth.
When using acidic cleaning agents, only use those
recommended by Hansgrohe (e.g. Henkel‘s biff universal bath
cleaner or biff Supra bath cleaning concentrate).
Do not used acidic agents or acetic cleaners. Damage caused
by improper handling is not covered by our guarantee.
Damage
Surface damage, e.g. minor scratches, can possibly be
removed with polishing paste. Burning stains or deep
scratches must be carefully ground. Take care not to grind
through the acrylic layer.
17
English
General Information/Bath Care Instructions
Whirlpool 300 Operation
Operation and Functions
Whirlpool Series 300
for
Pool
Control
Exafill
The innovative drain system Exafill supersedes the usual
draining method by integrating three functions in one:
Exafill is bath inflow, bath drain and bath overflow all in
one!
Attention! According to the DVGW (German Association
of Gas and Water Specialists) standard, an on-site pipe
interrupter must be available when the Exafill is connected.
Check water circuits according to local regulations.
The bath inlet function is sealed off at the factory when the
bath rim option is not fitted.
Air system
Air (on/off) (button 1, Fig. 1)
The air blower is switched on or off with this button.
When the light by the on/off button is lit, the blower is
running. The system is switched off when the button is
pressed again.
Air (+) (button 2, Fig. 1)
The air blower speed and therefore the air volume in the
bath is increased by pressing and holding this button.
Touching the button for a short time increases the air
volume in steps.
Air (-) (button 3, Fig. 1)
The air blower speed and therefore the air volume in the
bath is decreased by pressing and holding this button.
Touching the button for a short time decreases the air
volume in steps.
Fig. 1
• Hydro pulsation (button 5) only on
Whirlpool Series 700.
• Hydro cleaning (button 6) optional on
Whirlpool Series 300 and 700.
Ideally located air and massage nozzles ensure a bubbling
bathing pleasure. The pressure of all massage nozzles are
identical on the air/hydro whirlpool system. An air controller
at the bath rim (air control) serves to feed air to control the
intensity of the water jets and thereby ensure a pleasant, direct
massage.
Scope of delivery of Series 300 Whirlpools
– Air nozzles with interval function and blower run-on
– Adjustable water nozzles with separate air
(Air control)
– Electronic control element (Pool control)
– Exafill
18
control
Interval function and blower run-on
Pressing the (+) and (-) buttons (buttons 2 and 3) at the
same time activates the interval function. Various water
waves are created. An electronic control switches the
blower from lowest to highest speed every 10 seconds.
The interval function can be switched off again by
pressing the on/off button.
The air system also includes a blower run-on function.
When the bath is empty, the blower runs on and serves
to drain possible residual water under the nozzles. This is
performed approx. 10 minutes after switching the system
off with the on/off button (button 1, Fig. 1). The blower
run-out is active for approx. 10 seconds. The system
switches off automatically afterwards.
Whirlpool 300 Operation
Hydro on/off (button 4, Fig. 1)
The Hydro system is switched on by pressing this button. A
light by the button turns on. Water is sucked from the bath
near the drain area and pumped into the bath again via
the side nozzles. The system is switched off when the Hydro
button is pressed again.
Attention: The system only operates when the water level
in the bath is at least 5 cm above the water top nozzles. A
sensor controls the water level.
Air control (Fig. 2)
The air control allows continuous adjustment of the air volume
added to the Hydro system:
• Turning to the left increases the air inlet to the Hydro system
and thus increases the intensity of the Hydro nozzles.
• Turning to the right reduces the air volume supplied to the
Hydro system and thus decreases the intensity of the Hydro
nozzles.
Fig. 1
Fig. 2
Disinfecting the Hydro System
It is recommended to rinse the Hydro system with diluted
chlorine bleaching every 1 to 2 months or after the whirlpool
has not been used for a longer period of time.
Procedure:
1. Fill the bath to above the water nozzles and add approx.
15 ml chlorine bleaching agent in the middle of the bath.
Never use more than 10 ml in 100 litre water. Observe the
manufacturer‘s instructions on use.
2. Switch on the Hydro pump and allow it to run for 5
minutes.
3. Leave the water in the bath for 5 minutes.
4. Activate the pump again for approx. 2 minutes.
5. Drain the bath.
6. Fill the bath again and switch the pump on for 2 minutes.
7. Drain the water.
Repeat this process if necessary. Make sure the room is well
ventilated.
19
English
Hydro system
Whirlpool 700 Operation
Operation and Functions
Whirlpool Series 700
for
Pool
Control
Exafill
The innovative drain system Exafill supersedes the usual
draining method by integrating three functions in one:
Exafill is bath inflow, bath drain and bath overflow all in
one!
Attention! According to the DVGW (German
Association of Gas and Water Specialists) standard, an
on-site pipe interrupter must be available when the Exafill
is connected. Check water circuits according to local
regulations.
The bath inlet function is sealed off at the factory when the
bath rim option is not fitted.
Air system
Fig. 1
Ideally located air and massage nozzles ensure a bubbling
bathing pleasure. The pressure of all massage nozzles is
identical on the air/hydro whirlpool system. An air controller
at the bath rim (multi air control) serves to feed air to control
the intensity of the water jets and thereby ensure a pleasant,
direct massage.
Scope of delivery of Series 700 Whirlpools
– Air nozzles with interval function and blower run-on
– Adjustable water nozzles with MultiAirControl to regulate
jet intensity and air supply between Hydro back and foot
nozzles and body showers
– Exafill
20
Air (on/off) (button 1, Fig.1)
The air blower is switched on or off with this button.
When the light by the on/off button is lit, the blower is
running. The system is switched off when the button is
pressed again.
Air (+) (button 2, Fig. 1)
The air blower speed and therefore the air volume in the
bath is increased by pressing and holding this button.
Touching the button for a short time increases the air
volume in steps.
Air (-) (button 3, Fig. 1)
The air blower speed and therefore the air volume in the
bath is decreased by pressing and holding this button.
Touching the button for a short time decreases the air
volume in steps.
Interval function and blower run-on
Pressing the (+) and (-) buttons (buttons 2 and 3) at the
same time activates the interval function. Various water
waves are created. An electronic control switches the
blower from lowest to highest speed every 10 seconds.
The interval function can be switched off again by
pressing the on/off button.
The air system also includes a blower run-on function.
When the bath is empty, the blower run-on serves to
drain possible residual water under the nozzles. This is
performed approx. 10 minutes after switching the system
off with the on/off button (button 1, Fig. 1). The blower
run-out is active for approx. 10 seconds. The system
switches off automatically afterwards.
Whirlpool 700 Operation
Hydro on/off (button 4, Fig. 1)
The Hydro system is switched on by pressing this button. A
light by the button turns on. Water is sucked from the bath
near the drain area and pumped into the bath again via
the side nozzles. The system is switched off when the Hydro
button is pressed again.
Attention: The system only operates when the water level in
the bath is at least 5 cm above the water nozzles. A sensor
controls the water level.
Fig. 1
MultiAirControl (Fig. 2)
The MultiAirControl fulfils three functions in one when the air
system is activated (button 1, Fig. 1):
1. Air control to regulate the air volume added to the Hydro
system. This function allows continuous adjustment of jet
intensity.
2. The intensity of the Hydro back and foot nozzles can be
regulated independent of the body nozzles.
3. Switching the air system on in combination with
the Hydro system activates the Superwhirl. This
pushes extra air through the Hydro nozzles.
Pressing the Air (+) button increases the air flow again
Hydro pulsation (button 5, Fig. 1)
Pressing the Hydro pulsation button switches the Hydro
pulsation on. Prerequisite for Hydro pulsation activation:
Air control fully or partially open. Hydro pulsation adds air
to the water in regular intervals. This automatically changes
the intensity of the water jet. The Superwhirl effect can be felt.
Pressing the button again switches pulsation off.
Fig. 2
Disinfecting the hydro system
After each use or if the pool has not be used for an extended
period of time, you must disinfect the hydro system.You can
use used bath water for the disin-fecting process.
• Use sodium hypochloride solution (12%) as a disinfectant
(available at the pharmacy). The dosing of the sodium
hypochloride is 25 ml for every 100 l of water.
• Add the disinfectant to the used bath water.
• You may fill the tub to the overflow level.
• Turn on the jets (whirl system) for approx. 1 to 2 minutes;
now the disinfectant will distribute.
• Let the disinfectant soak for about 30 minutes.
Disinfecting the Hydro System
Every one to two months or when the Whirlpool has not
been used for a longer period of time, it is recommended
to disinfect the hydro system with the Hansgrohe Whirlpool
disinfectant (Article No. 21980000). Follow the disinfectant‘s
instructions for use
• Turn on the jets for another 2 minutes.
• Drain the water.
• Rinse and clean the tub, the panels and the accessories using
the hand shower.
• Ventilate the room generously.
21
English
Hydro system
Options
Options for Whirlpool Series 300/700:
• Underwater lighting
• Hydro bath heating 1.5 kW (3 kW for
Whirlpool Series 780/790)
• Hydro cleaning
• Bath rim thermostat (bath rim thermostat, hand shower,
Exafill, shut-off and switch-over)
• Grabrails
Underwater lighting
The underwater halogen lamp in attractive design creates a
very special bathing atmosphere. The 12V underwater lighting
is automatically controlled by a water level sensor. The lamp
is automatically switched on when the specified water level is
reached and switched off when the water is below this level.
When the lighting is defective, loosen the chrome ring and
replace the bulb.
Underwater lighting
bath heatert
22
Hydro bath heating
The water in the bath cools down slowly due to the good
insulation of sanitary acrylic material and retains its optimum
temperature with the Hydro bath heating. The Hydro heating
system is automatically switched on (initiated by pressure
control and sensor) with an adequate water level and the
Hydro pump activated. This control ensures that the heating is
not switched on when the water level is too low. The heating
element is thermally protected. A temperature of 40 °C is
pre-set. The heating rating is 1.5 kW or 3 kW on models
780 and 790.
Hydro cleaning
The built-in water nozzles connected to the water supply are
flushed with fresh water after the whirl bath. Activating the
Hydro cleaning button (button 6, Fig. 1) after a bath flushes
the Hydro circuit through with cold water (empty bath first).
A LED in the button signal Hydro cleaning operation. Cleaning
takes approx. 5 minutes when the bath is completely empty.
Attention: Hydro cleaning needs an additional 1/2“
water connection (cold water) with subsequent check
valve.
Grips
The practical grabrails make getting in and out easier.
Hydro cleaning
Bath rim thermostat
The bath rim thermostat option comprises the bath rim
thermostat, hand shower, Exafill bath inflow, drain and
overflow. The shut-off and diverter control the water supply via
hand shower or Exafill. The thermostat determines the exact
water temperature and is fitted with a check valve.
Check valves are located in the connection angle for cold and
warm water supply under the bath.
The shower hose is protected by a Secuflex hose.
Grips
23
English
Options
A i r S y s t e m Tr o u b l e s h o o t i n g
24
English
Automatic S y s t e m S t a r t i n g Tr o u b l e s h o o t i n g
25
H y d r o S y s t e m Tr o u b l e s h o o t i n g
26
English
U n d e r w a t e r L i g h t i n g Tr o u b l e s h o o t i n g
27
Whirlpool 300 Spare Parts
1
2
3
4
11
12
10
5
6
14
7
9
13
Pos.
1
2
3
4
5
6
7
8
9
10
11
12
13
14
15
Description
Poolcontrol cpl.
cable with plug (11 leads)
cable with 2 plugs (7 leads)
escutcheon
handle
shut off unit, Elastop
escutcheon Ø 53 mm
non return valve DW 15
water level sensor
hydro pump
capacitor for hydro pump
blower cpl.
cable with plug (5 leads)
blower cpl. with control WDI 1
control WDI 1
cross fitting cpl.
air jet
air jet trim kit
hydro jet service set
hydro jet trim kit
hydro jet installation tool
flushing tool for hydro jets
grab bar
shower tray feet
sleeve nut
waste for seat
XXX = Colors
000 chrome plated
090 chrome plated/gold plated
810 satinox
880 satin chrome
28
No.
21820XXX
21821000
96669000
21822XXX
36991XXX
94149000
94115XXX
21831000
21813000
21802000
96698000
21814000
21815000
21834000
96705000
96389000
21829000
21816XXX
21803000
21804XXX
21805000
96699000
21940XXX
21832000
96696000
96931XXX
VE
1
1
1
1
1
1
1
1
1
1
1
1
1
1
1
1
1
1
1
1
1
1
1
1
1
1
8
Whirlpool 300 Spare Parts
9
1
English
10
8
2
pressure control no longer
5
available
4
11
7
6
3
Pos.
1
2
3
4
5
6
7
8
9
10
11
Description
solenoid valve for hydro cleaning
solenoid valve membrane for hydro
cleaning
solenoid coil for hydro cleaning
230 V 60 Hz 10 W No. 18650
reheater 1,5 kW
reheater 3,0 kW
switch box cpl. WDI 2
switch box cpl. WDI 4
relay box for reheater
pressure control
spare bulb 12 V / 50 W
spare bulb 12 V / 20 W
escutcheon Ø 85 mm
escutcheon Ø 60 mm
bent outlet
plug
hair guard tray
transformer f. illumination until 10/02
transformer f. illumination from 11/02
hose clamp Ø 43 mm
hydro hose Ø 43 mm
hydro hose Ø 24 mm
polish-set for bathtub
service set for bathtub
No.
VE
96703000
21806000
1
1
21807000
1
21905000
21810000
21824000
21833000
21811000
21812000
21817000
96895000
21818XXX
96795XXX
21825000
21826000
21827XXX
21819000
96896000
96700000
96701000
96702000
21800000
21801XXX
1
1
1
1
1
1
1
1
1
1
1
1
1
1
1
5
1
1
1
1
XXX = Colors
000 chrome plated
090 chrome plated/gold plated
810 satinox
880 satin chrome
29
Whirlpool 700 Spare Parts
11
1
2
3
10
4
12
9
5
6
8
13
Pos.
1
2
3
4
5
6
7
8
9
10
11
12
13
Description
Poolcontrol kpl.
Kabel mit Stecker (11 Adern)
Rosette
Griff "Quattro"
Einsatz kpl.
Rosette
Wasserstandsensor
Hydropumpe
Kondensator für Hydropumpe
blower cpl.
electronics for blower
cable with plug (5 leads)
cross fitting cpl.
air jet
air jet trim kit
hydro jet service set
hydro jet trim kit
hydro jet installation tool
flushing tool for hydro jets
solenoid valve for nested intervals
solenoid coil for hydro cleaning
230 V 60 Hz 10 W Nr. 18522
solenoid valve membrane for nested
intervals
grab bar
shower tray feet
XXX = Colors
000 chrome plated
090 chrome plated/gold plated
810 satinox
880 satin chrome
30
No.
VE
21820XXX
21821000
21822XXX
36993XXX
96604000
21828XXX
21813000
21802000
96698000
21814000
96697000
21815000
96389000
21829000
21816XXX
21803000
21804XXX
21805000
96699000
96704000
21808000
1
1
1
1
1
1
1
1
1
1
1
1
1
1
1
1
1
1
1
1
1
21830000
1
21940XXX
21832000
1
1
7
Whirlpool 700 Spare Parts
9
1
English
10
8
2
pressure control no longer
5
available
4
11
7
6
3
Pos.
1
2
3
4
5
6
7
8
9
10
11
Description
solenoid valve for hydro cleaning
solenoid valve membrane for hydro
cleaning
solenoid coil for hydro cleaning
230 V 60 Hz 10 W No. 18650
reheater 1,5 kW
reheater 3,0 kW
switch box cpl. WDI 4
relay box for reheater
pressure control
spare bulb 12 V / 50 W
spare bulb 12 V / 20 W
escutcheon Ø 85 mm
escutcheon Ø 60 mm
bent outlet
plug
hair guard tray
transformer f. illumination until 10/02
transformer f. illumination from 11/02
hose clamp Ø 43 mm
hydro hose Ø 43 mm
hydro hose Ø 24 mm
polish-set for bathtub
service set for bathtub
No.
VE
96703000
21806000
1
1
21807000
1
21905000
21810000
21833000
21811000
21812000
21817000
96895000
21818XXX
96795XXX
21825000
21826000
21827XXX
21819000
96896000
96700000
96701000
96702000
21800000
21801XXX
1
1
1
1
1
1
1
1
1
1
1
1
1
1
5
1
1
1
1
XXX = Colors
000 chrome plated
090 chrome plated/gold plated
810 satinox
880 satin chrome
31
Form-Nr. 9.08843.01
Hansgrohe · Postfach 1145 · D-77761 Schiltach · Telefon +49 (0) 78 36/51-1282 · Telefax +49 (0) 7836/511440
E-Mail: [email protected] · Internet: www.hansgrohe.com
pharo_englisch
02/10
32