1
Service Scheduler – Installation Guide
Version 0.8
INSTALLATION GUIDE
Page 1 of 42
Copyright © ABit Consulting 2011
Service Scheduler – Installation Guide
Version 0.8
Table of Contents
Requirements ................................................................................................................... 3
Database ...................................................................................................................... 3
Client ............................................................................................................................ 3
ERA Integration (option) ............................................................................................. 3
Service .......................................................................................................................... 3
SMS Integration (option) ............................................................................................ 3
MySQL Server ................................................................................................................... 4
Installation .................................................................................................................... 4
MySQL Server 5.0 upwards Installation ........................................................................... 4
MySQL Server 5.5 upwards Installation ......................................................................... 10
Create privileged user with external access ................................................................ 15
MySQL Server on Linux ................................................................................................ 16
Create privileged user with external access ................................................................ 16
Service Scheduler – Service ............................................................................................. 17
Installation .................................................................................................................. 17
Configuration............................................................................................................... 21
Service Scheduler - Client ................................................................................................ 25
Installation .................................................................................................................. 25
Configuration............................................................................................................... 30
Administrator Login...................................................................................................... 32
License Scanner .............................................................................................................. 33
Installation .................................................................................................................. 33
Backup and Restoration ................................................................................................... 36
Backup ........................................................................................................................ 36
Backup Options ........................................................................................................ 37
Manual Backup ......................................................................................................... 37
Restoration ................................................................................................................. 38
Frequently Asked Questions (FAQ) ................................................................................... 39
How large will my database get? .................................................................................. 39
Are there any maintenance schedules that need to be run on the Database to keep them
running efficiently? ...................................................................................................... 39
Backups currently run nightly, what happens if DB corruption occurs during the day? Do we
lose transactions? ........................................................................................................ 39
Known Issues ................................................................................................................. 40
Service Scheduler: Date appears in US format on Window 7 workstation ..................... 40
MySQL: Server has gone away during save ................................................................ 40
Scanner: Delay of scanner start-up............................................................................ 40
Scanner: Image Capture Error [clrhw] ....................................................................... 41
Scanner: Hardware key does not work properly [procr] RXERROR (-92) ...................... 42
Page 2 of 42
Copyright © ABit Consulting 2011
Service Scheduler – Installation Guide
Version 0.8
Requirements
Database
Operating System: Windows 2000/XP/Vista/Seven/Server 2003/Server 2008/Linux.
Network: Access to TCP port 3306
Service Scheduler’s database is powered by MySQL 5 which can run on many
different platforms. See http://dev.mysql.com/ for more information on MySQL.
Client
Operating System: Windows 2000 or greater. Windows Server 2003 or greater.
Network: TCP/IP access to MySQL server and Service Scheduler service default port 8090.
Service Scheduler is developed for workstation running Windows 2000 or greater. It
has also been designed to run efficiently in a Windows Terminal Server environment.
ERA Integration (option)
For Service Scheduler to extract data from the ERA system. Each workstation requires a
TCP/IP connection to the ERA server.
Service
Operating System: Windows 2000/XP/Vista/Server 2003/Terminal Server 2003
Network: TCP/IP access to MySQL server. Service will also listen on a port (default 8090) for
RPCXML requests from Clients for settings, updates. This port also acts as a web server for
SMS replies if SMS integration with reply to application enabled.
SMS Integration (option)
For Service Scheduler to send SMS messages an internet connection is required by the
workstation running the service.
SMS replies can be configured in 2 ways
1.) Replies are sent to a common email address or the email address of the Service
Advisor.
2.) Replies can be posted back into service scheduler as Job Notes
Option 1: Requires 1 email account and/or 1 email account per Service Advisor
Option 2: Requires static public IP address and a port forward to port 8090 (Note: The port
number can be modified if required)
Page 3 of 42
Copyright © ABit Consulting 2011
Service Scheduler – Installation Guide
Version 0.8
MySQL Server
Installation
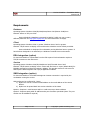
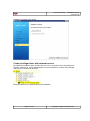
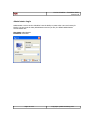
Start the MySQL installation from the “Install MySQL Server” option on the install menu.
MySQL Server 5.0 upwards Installation
Page 4 of 42
Copyright © ABit Consulting 2011
Service Scheduler – Installation Guide
Version 0.8
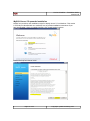
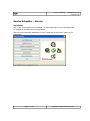
Select Typical installation
Click install to start installation
Page 5 of 42
Copyright © ABit Consulting 2011
Service Scheduler – Installation Guide
Version 0.8
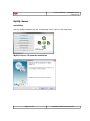
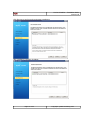
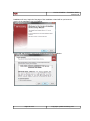
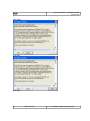
Create MySQL.com account, select Skip Sign-Up
Select Configure the MySQL Server now and select finish.
Page 6 of 42
Copyright © ABit Consulting 2011
Service Scheduler – Installation Guide
Version 0.8
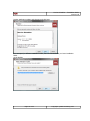
Select next to configure your MySQL server
Select Standard Configuration
Page 7 of 42
Copyright © ABit Consulting 2011
Service Scheduler – Installation Guide
Version 0.8
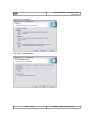
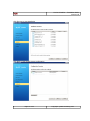
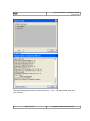
Install as Windows Service
Enter a root password, this password is used to configure MySQL, please keep a record of
this password. Ensure you tick the “Enable root access from Remote Server” or Create a new
privileged user after installation.
Page 8 of 42
Copyright © ABit Consulting 2011
Service Scheduler – Installation Guide
Version 0.8
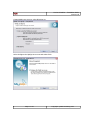
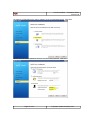
Click execute to configure your MySQL installation
MySQL is now installed and ready to be used on your system.
Page 9 of 42
Copyright © ABit Consulting 2011
Service Scheduler – Installation Guide
Version 0.8
MySQL Server 5.5 upwards Installation
MySQL now provide a new installation script for MySQL Server 5.5 on Windows. This version
is currently not bundled with our media kit, but we provide installation insutrctions if you
have downloaded it from the MySQL Website. Click Install MySQL Products
Read and accept the license terms
Page 10 of 42
Copyright © ABit Consulting 2011
Service Scheduler – Installation Guide
Version 0.8
The installation will check you have the latest version, you can choose to skip this option.
Click Execute to continue.
Choose installation type (Full Recommended) and ensure you set the correct Data Path you
wish to use. Click Next.
Page 11 of 42
Copyright © ABit Consulting 2011
Service Scheduler – Installation Guide
Version 0.8
Click Execute to perform and requirement installations.
After installation complete, click Next.
Page 12 of 42
Copyright © ABit Consulting 2011
Service Scheduler – Installation Guide
Version 0.8
Click Execute to start installation
Click Next to start MySQL Server configuration
Page 13 of 42
Copyright © ABit Consulting 2011
Service Scheduler – Installation Guide
Version 0.8
Set machine configuration type. Server machine is the recommended option. Click Next.
Specify the root account password. Ensure you record this password. Click Next.
Page 14 of 42
Copyright © ABit Consulting 2011
Service Scheduler – Installation Guide
Version 0.8
Installation Complete. Click Finish.
Create privileged user with external access
By default the installation does not allow the root user to connect from any host apart from
localhost. However for remote administration it is recommended to create a new privileged
user that can connect from any host.
Enter the password you specified during the installation
Page 15 of 42
Copyright © ABit Consulting 2011
Service Scheduler – Installation Guide
Version 0.8
Run the following SQL commands
CREATE USER 'username'@'%' IDENTIFIED BY 'password';
GRANT ALL PRIVILEGES ON *.* TO 'username'@'%' WITH GRANT OPTION;
FLUSH PRIVILEGES;
Replace username and password with your details (eg username = abit)
MySQL Server on Linux
Install MySQL via your Linux distributions recommended methods (eg apt-get)
Ensure that the server is configured to listen no just on local host in in my.cnf bind-address
setting.
# Instead of skip-networking the default is now to listen only on
# localhost which is more compatible and is not less secure.
bind-address
= 0.0.0.0
Create privileged user with external access
Mysql –u root –p
Run the following SQL commands
CREATE USER 'username'@'%' IDENTIFIED BY 'password';
GRANT ALL PRIVILEGES ON *.* TO 'username'@'%' WITH GRANT OPTION;
FLUSH PRIVILEGES;
Replace username and password with your details (eg username = abit)
Page 16 of 42
Copyright © ABit Consulting 2011
Service Scheduler – Installation Guide
Version 0.8
Service Scheduler – Service
Installation
Only 1 copy of the service is to be installed. The Service Scheduler service should generally
be installed on the same server running MySQL.
Start the Service Scheduler installation from the “Install Service Scheduler” option on the
install menu.
Page 17 of 42
Copyright © ABit Consulting 2011
Service Scheduler – Installation Guide
Version 0.8
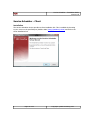
Installation will now, begin the first page of the installation wizard will let you know the
version of the application you are installing.
Please read and accept the terms and conditions to continue installation.
Page 18 of 42
Copyright © ABit Consulting 2011
Service Scheduler – Installation Guide
Version 0.8
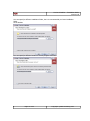
Review application update and changes and click Next.
You can specify a different installation folder, but it is recommended you leave installation
folder
as the default.
Page 19 of 42
Copyright © ABit Consulting 2011
Service Scheduler – Installation Guide
Version 0.8
You can specify a different location to create program shortcut’s
Service scheduler is now ready to be installed, click install.
Installation complete.
Page 20 of 42
Copyright © ABit Consulting 2011
Service Scheduler – Installation Guide
Version 0.8
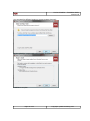
Configuration
A Server Update wizard will launch after the installation of Service Scheduler Service. This
wizard will guide you through the registration with the Abit Consulting Application Manager
server, database installation and configuration, automatic update configuration and NT
service settings.
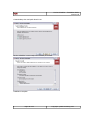
Enter registration information and click “Register” button. These details are to receive
notification when a new verison of Service Scheduler is available. The Service will
automatically download the updates. If you require proxy settings, click the Advanced button.
Page 21 of 42
Copyright © ABit Consulting 2011
Service Scheduler – Installation Guide
Version 0.8
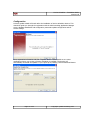
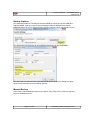
Enter your MySQL server details. The wizard will require an administrator level username and
password for database creation (ie root) and a username and password the client’s will
connect with. By default this is servsched for both username and password.
Select Install new database and click next
Page 22 of 42
Copyright © ABit Consulting 2011
Service Scheduler – Installation Guide
Version 0.8
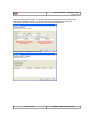
Enter details for new account. Catalog name is an internal name used by Service Scheduler /
mySQL, Account name is displayed to the user. Click Next to start database configuration.
Account settings can be made, if you have received your registration key you can enter it
here; or you can enter it later from within Service Scheduler.
Page 23 of 42
Copyright © ABit Consulting 2011
Service Scheduler – Installation Guide
Version 0.8
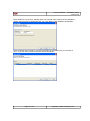
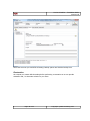
Specify automatic update settings. Enable / Disable automatic updates and provide a Run As
username and password used by the client to install updates. This user would have
Administrative privledges on all workstations. Ie Domain Administrator.
Service settings. Specify the port Service Scheduler Service listen’s on.
Wizard complete. Clients can now be installed and logged in.
Page 24 of 42
Copyright © ABit Consulting 2011
Service Scheduler – Installation Guide
Version 0.8
Service Scheduler - Client
Installation
The Service Scheduler Service provides a client installation link. This is available by browsing
to your server on the specified port (default: 8090) http://{ipaddress}:8090/ and click on the
Client Installation link.
Page 25 of 42
Copyright © ABit Consulting 2011
Service Scheduler – Installation Guide
Version 0.8
Please read and accept the terms and conditions to continue installation.
Review application update and changes and click Next.
Page 26 of 42
Copyright © ABit Consulting 2011
Service Scheduler – Installation Guide
Version 0.8
You can specify a different installation folder, but it is recommended you leave installation
folder
as the default.
You can specify a different location to create program shortcut’s
Page 27 of 42
Copyright © ABit Consulting 2011
Service Scheduler – Installation Guide
Version 0.8
Create desktop icon and quick launch icon.
Service scheduler is now ready to be installed, click install.
Installation complete.
Page 28 of 42
Copyright © ABit Consulting 2011
Service Scheduler – Installation Guide
Version 0.8
Page 29 of 42
Copyright © ABit Consulting 2011
Service Scheduler – Installation Guide
Version 0.8
Configuration
Service Scheduler requires communication with the Service Scheduler Service to provide
database, update and error reporting communication.
File -> Options
Select Application Servers tab
Either create a new connection or edit the default connection (recommended) and enter the
IP address of your server. If the port is different also change the port. Click Save to save
Application Server Settings.
Page 30 of 42
Copyright © ABit Consulting 2011
Service Scheduler – Installation Guide
Version 0.8
NOTE: Multiple Application Service configurations are available for users who may roam
around multiple sites. Generally only one connection is required.
Page 31 of 42
Copyright © ABit Consulting 2011
Service Scheduler – Installation Guide
Version 0.8
Administrator Login
Administrator users in Service Scheduler have the ability to create other users and create job
blocks. You can create as many administrator users as you like, the default administrator
account details are:
Username: administrator
Password: servsched
Page 32 of 42
Copyright © ABit Consulting 2011
Service Scheduler – Installation Guide
Version 0.8
License Scanner
Installation
The installation of the License Scanner will require Administrator access. The scanner should
also be used once as an administrative user as it needs to write information on first access to
the Windows file system.
Select Install 32bit Version
Page 33 of 42
Copyright © ABit Consulting 2011
Service Scheduler – Installation Guide
Version 0.8
Click Agree
Click Next
Click Next
Page 34 of 42
Copyright © ABit Consulting 2011
Service Scheduler – Installation Guide
Version 0.8
Click Finish
Start GX Full Page Reader Demo from the Start Menu -> GX -> Full Page Reader demo and
scan a license.
Page 35 of 42
Copyright © ABit Consulting 2011
Service Scheduler – Installation Guide
Version 0.8
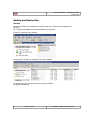
Backup and Restoration
Backup
By default PoliceBook is configured to dump it’s data every night into the program files
directory.
Eg C:\Program Files\ABit Consulting\PoliceBook Server\backup
A folder is created for each account
A backup file is stored in a separate file for each weekday.
A separate file is also created before any account upgrades.
Eg Upgrade Backup.sql
Page 36 of 42
Copyright © ABit Consulting 2011
Service Scheduler – Installation Guide
Version 0.8
Backup Options
The destination folder for the backups can be modified by running the Server Install and
Upgrade Wizard. Click Next until the Service Settings wizard is displayed then click the
Advanced button. Be sure to click next after changing settings to save and start the service.
The allowed times for backups can be modified and backups can also be disabled.
The allow start time and end time properties provide a time window the backup can start,
this does not determine when the backup will stop.
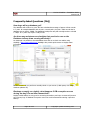
Manual Backup
In the case a manual backup is required; the Server Tools utility can be used from the start
menu for PoliceBook Server.
Page 37 of 42
Copyright © ABit Consulting 2011
Service Scheduler – Installation Guide
Version 0.8
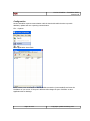
Select the accounts you would like to backup, backup options and click the backup icon.
Restoration
We request you contact ABit Consulting before performing a restoration as we can provide
assistance and / or alternative solution to your issue.
Page 38 of 42
Copyright © ABit Consulting 2011
Service Scheduler – Installation Guide
Version 0.8
Frequently Asked Questions (FAQ)
How large will my database get?
The database will continue to grow. We have calculated an average of approx 15000 records
in 7 years. An example database with 20,000+ records and 1,000,000+ audit records had a
database size on disk is 179MB. The database backup files are plain text SQL and are 120 MB
x 7 days. So 7 years may require 1 GB per site.
Are there any maintenance schedules that need to be run on the
Database to keep them running efficiently?
No. Although it is possible to check database sizes and run a check over tables using
HeidiSQL. http://www.heidisql.com/ HeidiSQL also provide quick access to MySQL status
information
We do recommend you perform a monthly check on your server (ie disk space, CPU usage,
windows updates etc)
Backups currently run nightly, what happens if DB corruption occurs
during the day? Do we lose transactions?
MySQL InnoDB tables are very good a recovering themselves, and upon a restart will process
any recovery logs. If database corruption occurs we would recommend restoring a previous
backup.
Page 39 of 42
Copyright © ABit Consulting 2011
Service Scheduler – Installation Guide
Version 0.8
Known Issues
Service Scheduler: Date appears in US format on Window 7
workstation
This is a known issue for Windows 7. More information can be found here
MySQL: Server has gone away during save
Usually this requires an increased max_allowed_packet setting to allow larger data packets.
http://dev.mysql.com/doc/refman/5.0/en/gone-away.html
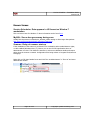
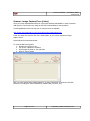
Scanner: Delay of scanner start-up
If the installation of the scanner is performed on a workstation without administrator rights,
or UAC enabled (Windows Vista / 7). Ensure you run the FX Full Page Reader demo as
administrator one time. This allows the scanner to write some calibration details and stops a
delay when the scanner is started. Configuration files being written to Program Files\Common
Files\gx\pr.
Right click on Full Page Reader Demo and click “Run as Administrator” or “Run As” and enter
administrator details.
Page 40 of 42
Copyright © ABit Consulting 2011
Service Scheduler – Installation Guide
Version 0.8
Scanner: Image Capture Error [clrhw]
There are some motherboards which do not provide sufficient bandwidth for each connected
USB devices. The scanners are using the full USB 2.0 bandwidth for fast operation.
A small application which can help you to solve this issue is available.
http://www.downloads.abit-wa.com.au/products/dev/CLRSpeedConf.zip
It will slow down the transfer rate of the Card Reader so you will not experience image
capture errors.
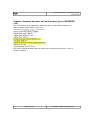
Please follow the instructions below:
To reset the Half-Clock please:
1. Rename the ex1 file to exe
2. Tick IN the “HalfClock” checkbox
3. Pull through the slider to the right side
4. Click on “Store” button
After you have stored these settings please try to scan a document. If the device still fails
please try to unplug the other USB devices (mobile HDD, pen drive, etc.).
Page 41 of 42
Copyright © ABit Consulting 2011
Service Scheduler – Installation Guide
Version 0.8
Scanner: Hardware key does not work properly [procr] RXERROR
(-92)
This error can also cause application to take a long time to scan, with an eventual error
failing to extract license data for every scan.
This issue is resolved in latest release of scanner drive. Please ensure version 2.1.2-02 or
greater is installed.
Page 42 of 42
Copyright © ABit Consulting 2011