1
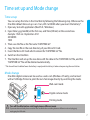
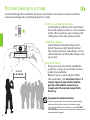
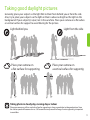
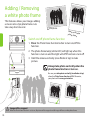
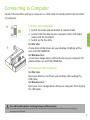
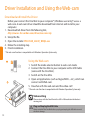
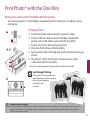
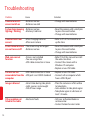
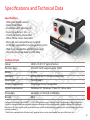
User Manual
1
For Your Safety
To prevent demage to your Carbon product or injury to yourself or to others, read the following safety precautions in
their entirety before using this equipment. Keep these safety instructions where all those who use the product will read
them.
The consequences that could result from failure to observe the precautions listed in this section are indicated by the
following symbol:
This icon marks warnings, information that should be read before using this Carbon product to prevent
possible injury.
Turn off in the event of malfunction
Observe caution when handling batteries
Should you notice smoke or an unusual smell coming
from the camera, remove the batteries immediately,
taking care to avoid burns. Continued operation could
result in injury. After removing the batteries, take the
equipment to a Carbon-authorized service representative
for inspection.
Batteries may leak or explode if improperly handled.
Observe the following precautions when handling
batteries for use in this product:
Do not disassemble
Touch the product’s internal parts could result in
injury. Repairs should be performed only by qualified
technicians. Shoud the camera break open as the result
of a fall or other accident, take the product to a Carbonauthorized service representative for inspection after
unplugging the product and/or removing the batteries.
Do not use the camera in the presence of
flammable gas
Do not use electronic equipment in the presence of
flammable gas, as this could result in explosion or fire.
Handle the camera strap with care
Never place the strap around the neck of an infant
or child.
Keep out of reach of children
Particular care should be taken to prevent infants
from putting the batteries or other small parts into
their mouths.
2
• Before replacing the batteries, turn the product off.
• Use only the 15AU/LR6/SizeAA/1.5V alkaline batteries.
Do not mix old and new batteries or batteries of
different makes or types.
• Insert batteries in the correct orientation.
• Do not short or disassemble batteries or attempt to
remove or break the covering.
• Do not expose batteries to flame or to excessive heat.
• Do not immerse in or expose to water.
• Do not transport or store with metal objects such as
necklaces or hairpins.
• Discontinue use immediately should you notice any
change in the batteries, such as discoloration or
deformation.
• If liquid from damaged batteries comes in contact with
clothing or skin, rinse immediately with plenty of water.
Use appropraite cables
When connecting USB cables to USB jack, use only the
cables provided to maintain compliance with product
regulations.
Welcome
You’re taking snap shot with Carbon One Mini
Contents
Chapter 1: About the Camera
Chapter 4: Web-cam Mode
4 What’s in the box
What you need
12Driver Installation and Using the Web-cam
5 Parts of your Camera
Chapter 2: Getting Start
6 Starting up your One Mini
7 Time set up and Mode change
Chapter 3: Camera Mode
Chapter 5: Printing Mode
13Print Photo with the One Mini
Chapter 6: Service
14Troubleshooting
15Technical Data and Specifications
16Warranty and Service
8 Picture taking is a snap
9 Taking good daylight pictures
10Adding / Removing a white photo frame
11 Connecting to Computer
To make it easier to find the information you need, the following
symbols and conventions are used:
This icon marks tips, additional information that may be
helpful when using the camera.
This icon marks notes, information that should be read
before using the camera.
3
What’s in the box
One Mini
Digital Camera
USB
Connection Cable
User
Manual
What you need
Micro SD
Memory Card
15AU / LR6 / AA
Battery x 2pcs
One Mini Digital Camera
Enjoy original snap shot fun
USB Connection Cable
Connect with PictBridge compatiable printer and computer
User Manual
Read before you enjoy with the One Mini
Micro SD Card
For storage all your photo here
Battery
The only power for your One Mini
4
Parts of the Camera
Photo frame lamp
System lamp
View finder
Print button /
Photo frame
Function button
Power switch
Lens
Power-on lamp
Shutter-release
button
USB socket
Battery-chamber cover
Mode selector
Memory card
slot
Reset button hole
Eyelet for
camera strap
5
Starting up your One Mini
1. Open Battery-chamber cover
2. Insert batteries in the correct
orientation.
1
2
3. Insert Micro SD Card
6
4. Switch on your One Mini
Time set up and Mode change
Time set up
You can set up the time in the One Mini by following the following step. Otherwise the
One Mini default time set up is on 1 Jan, 2012 at 00:00 when you insert the battery*.
1. Open any text edit application (MacOS X / Windows).
2. Input Date (yyyymmdd) at the frist row, and Time (hhmm) at the second row.
Example: 19:45 on 3 September 2012
20120903
1945
3. Then save the file as the file name “DATETIME.txt”.
4. Copy the text file in the root directory of your Micro SD Card.
5. Insert the Micro SD Card which contain the “DATETIME.txt” file.
6. Switch on the One Mini.
7. The One Mini will set up the new time with the data in the “DATETIME.txt” file, and the
“DATETIME.txt” file will be deleted automatically.
* The time will reset to default once the battery is empty and the battery is taken out or pressing the reset button.
Mode change
One Mini digital camera can be used as a web-cam (Windows OS only), and connect
with a PictBridge Printer to print the last shot image directly by switching the mode.
Web-cam mode
Digital camera mode
Printing mode
Turn off One Mini before switching between different mode
To prevent electronic fault, please switch off the One Mini before switching between different mode and plugging/
unplugging the USB cable.
7
Picture taking is a snap
Just look through the viewfinder and press one button. Your camera’s prefocused lens
make sharp images of everything beyond 1.2 metre.
Before your taking pictures
Insert battery and micro-SD card. Check
the mode selector button is set to camera
mode. Then switch on your camera with
sliding down the main power switch.
Hold the camera
Grip it firmly in the palm of your left
hand. Place your right thumb behind
the camera and your index finger on the
shutter button. Curl the other fingers into
your palm.
Aim and Shoot
at least
1.2 meter
Bring your eye close to the viewfinder
eyepiece so you can see all four corners
inside the viewfinder.
Move in close so your subject within
the viewfinder , but not closer than 1.2
meter. Squeeze the shutter button
gently and hold the camera very
steady until the system lamp finish
flashing.
Squeeze the shutter button
Once you squeeze the shutter button, photo will be
taken and data will be saved in the memory card.
System lamp will flash until all data is saved. DO NOT
SHUT DOWN the camera at this moment, otherwise the
camera may be hanged.
8
Taking good daylight pictures
Generally, place your subject so the light falls to them from behind you or from the side.
Also, try to place your subjects so the light on them is about as bright as the light on the
background. If your subject(s) is(are) not in the sunshine. Place your camera on a flat suface
or vertical surface for support to avoid bluring for the picture.
Light behind you
Place your camera on
a flat surface for supporting
Light from the side
Place your camera on
a vertical surface for supportig
Taking photo in cloudy day, ranning day or indoor
Place your camera on a flat or vertical surface for supporting is always a good idea to take good picture. Since
the shutter speed will become slow as 1/60 second that may cause blur image. A extra supporting is important
to avoid blur.
9
Adding / Removing
a white photo frame
This features allows your images adding
a classic retro style photo frame. Lets
take snap shot classical.
1
Normal photo
Switch on/off photo frame function
Photo with
retro
photo fra
me
1. Press the Photo frame function button to turn on/off this
function.
2. The photo frame lamp (white LED) will light up when this
function is turn on and the light will off if function is turn off.
3. Hold the camera vertically (view finder at top) to take
picture.
2
Always take photo vertically when the
photo frame function is turn on.
Bu sure your take photo vertically (view finder at top)
when the Photo Frame function is ON. Otherwise,
your photo will in wrong orientation.
3
3
Image will be cropped.
7
When the Photo frame function is set to on, all picture will be cropped and all image will have a white photo frame.
10
Connecting to Computer
Connect the One Mini with your computer vis a USB cable to transfer photo from One Mini
to Computer.
1
2
Connect with computer
1. Switch the mode selector button to camera mode.
2. Connect the One Mini to your computer with a USB Cable
(come with the One Mini).
3. Switch on the One Mini.
For Mac User
A new drive will be shown on your desktop. All photo will be
save at DCIM/100MEDIA
For Windows User
A new mass stoage device will be shown on your computer. All
photo will be save at DCIM/100MEDIA
Dis-connect with computer
For Mac User
Eject your Memory Card from your desktop, then unplug the
USB cable.
For Windows User
Eject your mass storage device from your conputer, then unplug
the USB cable.
Turn off One Mini before switching between different mode
To prevent electronic fault, please switch off the One Mini before switching between different mode and plugging/
unplugging the USB cable.
11
Driver Installation and Using the Web-cam
Download and Install the Driver
Before your connect the One Mini to your computer* (Windows user only)* use as a
web-cam. A web-cam driver should be download from internet and install to your
computer.
1. Download teh driver from the following link,
http://www.c-for-carbon.com/driver/one-mini.zip
2. Unzip the file.
3. Open the installer SPCA1528_V2220_WHQL.exe
4. follow the installing step.
5. Finish installation.
* The web-cam function is compatiable with Windows Operation System only.
1
2
Using the Web-cam
1. Switch the mode selector button to web-cam mode.
2. Connect the One Mini to your computer with a USB Cable
(come with the One Mini).
3. Switch on the One Mini.
4. Open an Applications (such as Skype/MSN.....etc ), which can
connect with Web-cam.
5. Have fun with the web-cam and the video call !
* The web-cam function is compatiable with Windows Operation System only.
Video setting
Please set up with the One Mini with a 640 x 480 resolution for the best
viewing size.
Plug and Unplug the USB Cable
Always switch off the One Mini before you plug and unplug the USB cable to avoid
electronic demage.
12
Print Photo* with the One Mini
Before you connect the One Mini with the printer
Be sure your printer is a Pict-Bridge compatiable printer. Otherwise, no photo can be
printed out.
Printing Photo*
1
2 3
1. Switch the mode selector button to printer mode.
2. Connect the One Mini to yourPict-Bridge compatiable
printer with a USB Cable (come with the One Mini).
3. Switch on the One Mini and your printer.
4. Press the Print Button of the One Mini.
5. System lamp will be flashing during the data transfer to your
Printer.
6. The photo* will be printed out with the printer which
connected with the One Mini.
* Only the last shooting photo will be printed out withe the One Mini.
Last Image Printing
Always print the photo before you
take another new photo. Since only
the last shoot image can
printed out with
One Mini.
4
Image may be cropped.
Since the proportion of each printer is different. And the photo taken by One MIni is in 4:3 ratio. Photo print out may be
cropped with different size of printing paper and printing mode of your printer. Always check the specification of your
printer to aviod image cropped.
13
Troubleshooting
14
Problem
Cause
Solution
Camera turns off/
cannot switch on
• Batteries are low
• Batteries are cold
• Change with new batteries
System lamp keeping • Batteries are low
lighting / flashing
• Memory Card Error
• Reset the camera with a small pins
to press the reset button.
• Change with new batteries
Camera clock is not
correct
• Refer to P.7 of this manual to set
up the time
• After changing batteries
• After reset camera
Photo frame function • The camera may be hanged
can not turn on/off
• Batteries are low
• Reset the camera with a small pins
to press the reset button.
• Change with new batteries
Web-cam con not
function
• Refer P.12 of this manual to install
the web-cam driver
• Connect the camera with a
Windows OS computer
• Replace a new USB cable
• Driver is not installed
• You are using a Mac
• USB cable connection is loose
Can not see the
• USB cabel connection is loose
camera data from the • USB port is aa USB2.0 standard
computer
• Replace a new USB cable
• Connect wth a computer which
have a USB 2.0 port
Image is blurred
• Hand shake during take photo
• Light source is not enought
• Out of focus range
• Place the camera on a flat surface
to take photo
• Goto outdoor to take photo agian
• Take photo again at a distance at
least 1.2 metre.
Other problem not
listed in this table
• Electronic faults
• Call your authorized dealer or
service center
• Contact Carbon Service Center
Specifications and Technical Data
Specifications
• 300K pixel digital camera
• Retro Photo Effect
• Vivid Color with Dark Corner
• Focus: Auto focus 1.2m ~ ∞
• Vivid Color Retro photo effect
• White Photo Frame Selectable
• Micro SD card compatible (up to 32GB)
• PictBridge compatible (Last image direct print)
• Web-Cam (compatible with Windows only)
• Direct access image data vis USB cable
Techinical Data
Sensor
Memory type
Battery
Interface
View Finder
Printer compatibility
System requirement
Dimension
Weight
2048 x 1520 1/3” optical format
MicroSD Card (support up to 32GB)
2 x AA
Mini B USB for PC/Printer Connection
Pass through
PictBridge Printer Compatible
Windows XP, Windows 7, Mac OS 10.6 or later
66mm(w) x 72mm(d) x 48mm(h)
59 g
Designed in Hong Kong by CARBON™ • © 2012 All Rights Reserved • Made in China • Specifications and equipment are
subject to change without any notice or obligation on the part of the manufacturer • Image shown on this package is
simulated • All other brand names mentioned herein are for identification purpose only and may be trademarks of their
respective holder(s)
* Web-Cam is compatible for Windows only, optional driver can be downloaded from out official web-site.
15
Warranty
If your camera proves to be defective within the warranty period (depends to different country, normally is
3 months from the original date of your purchase), we will repair it or at our option replace it with a smilar
camera wihout charge (Customer should bear the shiping cost for the returning of the camera).
To verify the warranty period, you should keep the sales slip or other proof of the purchase date.
This warranty does not cover damage caused by accident, misuse, or tampering with the camera, and a
charge will be made for such repairs.
For Warranty Service
The camera must be returned to and repaired by Carbon Service Center, Authorized Service Center or
Authorized Distributor. Email any inquiry for the warranty or check with the nearby Authorized Carbon
Service Center or Authorized Distributor at
[email protected].
Customer Service
If you have a picture taking problem, or a question for which you can’t find an answer in the instruction
manual, email Carbon Service Center
[email protected]
www.c-for-carbon.com
Designed in Hong Kong by CARBON™ • © 2012 All Rights Reserved • Made in
China • Specifications and equipment are subject to change without any notice
or obligation on the part of the manufacturer • Image shown on this package
is simulated • All other brand names mentioned herein are for identification
purpose only and may be trademarks of their respective holder(s)
Design Patent Number: HK 1200992.6
Manual Version: 1.0 2012 Printed in Hong Kong
16