1
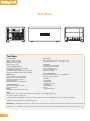
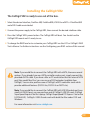
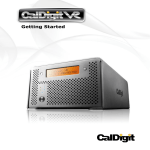
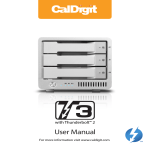
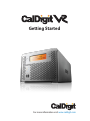
Getting Started
For more information visit www.caldigit.com
CalDigit VR2
RAID 1 PROTECTED
Apple, Apple Logo, Mac, the Mac logo and Macintosh are trademarks of Apple Inc.
Microsoft, Windows and Windows Logos are registered trademarks of the Microsoft Corporation.
All other trademarks are the property of their respective owners.
02
*Specifications and package contents are subject to change without notice.
Contents
Introduction
4
CalDigit VR2 Overview
8
Installing the CalDigit VR2
9
General Use Warnings
Safety Warnings
Tech Specs
Package Contents
CalDigit VR2 Front Panel
CalDigit VR2 Rear Panel
5
5
6
7
8
8
LCD Menu Overview
10
RAID Tool Feature Overview
13
Configuring your RAID
15
Accessories and Parts
19
Technical Support & Warranty Information
20
LCD Display Information
CalDigit VR2 LCD Menu Tree Overview
Using the LCD Menu
Using RAID Tool
Technical Support
CalDigit Warranty Information
10
12
15
17
20
20
03
Introduction
Thank you for choosing the CalDigit VR2. The CalDigit VR2 is the most complete two drive
RAID system on the market today. It offers unmatched performance, impressive connectivity
and superior quality all in a sleek and easily upgradeable enclosure that is both portable
and functional.
Please use the following quick installation instructions to setup your CalDigit VR2.
Note: Please only use the CalDigit VR2 in places with cool and natural
ventilation. Please do not use the CalDigit VR2 under extremely hot or
cold environments to avoid possible data damage that can be caused by
extreme temperatures.
04
General Use Warnings
Please read the CalDigit VR2 manual thoroughly and become familiar with the product
before use.
Only use the CalDigit VR2 in an area with cool ventilation. Make sure that the fan is
not obstructed to ensure heat dissipation. Do not leave or use the VR2 near a heat
source such as a heater or direct sunlight.
Avoid using the VR2 in extremely hot and cold environments as it will increase the
likelihood of premature drive failure. A safe temperature range is between 40F – 95F.
Avoid using the VR2 in humid environments. Moisture and condensation can accumulate
in the drive and damage the electrical components, resulting in unit failure
and catastrophic data loss.
Only use the power adapter that has been supplied with the VR2 Drive. An excessive or
inadequate power supply can result in unstable performance or drive failure.
Make sure to transport your VR2 with care. Hard drives are sensitive to shock and
rough handling can result in degrading performance or disk failure.
Safety Warnings
Keep the VR2 away from liquids and moisture. Direct application of liquids on the VR2 can
result in electric shock, fire hazard and damage the unit. If your VR2 gets wet while it is still
off, do not turn it on.
Do not tamper with or try to repair the VR2 unless you are a certified CalDigit technician.
Doing so can result in personal injury and damage the VR2. This will also void your
warranty. If you have any issues, contact CalDigit Technical Support.
05
Tech Specs
Tech Specs
Size and Weight:
Height: 3.6 inches (92 mm)
Width: 5.3 inches (134 mm)
Depth: 8.5 inches (216 mm)
Weight: 6.6lbs (3.0 kgs)
Interface and Data Transfer:
1x SuperSpeed USB 3.0 Port up to 5Gbps
1x eSATA Port up to 3Gbps
2x FireWire 800 (IEEE 1394b) Ports up to 800Mbps
1x FireWire 400 (IEEE 1394a) Port up to 400Mbps
RAID Function:
Supports RAID 0, 1, Spanning, JBOD*
Automatic online fast disk rebuilding
Automatic disk failure detection
Hot swappable disks
*USB 3.0 & eSATA do not support JBOD
System Requirements:
Windows 2000, XP, Vista, 7 or later
Mac OS 10.4 or later
USB 3.0
Windows XP or later, Mac OS 10.5 or later
Environment:
Operating Temperature: 41°F ~ 140°F (5°C ~ 60°C)
Storage Temperature: -40°F ~ 158°F (-40°C ~ 70°C)
Fan Module:
Size: 50(L) x 50(W) x 15(H) mm
Rated Voltage: DC 12V, 1.08W
Speed: 3400 R.P.M. ± 10%
Airflow: 10.2 CFM (ft3/min)
Noise Level: 22 dB(A)
Power Supply Adapter:
Full range AC Input: 100V-240V ~ 50/60Hz Max 2A
DC Output: 12V/3.5A, 5V/4A
In the Box:
1x CalDigit VR2
1x eSATA Cable
1x FireWire 800 Cable
1x AC Adapter
1x AC Power Cord
2x Keys
1x Driver & Manual CD
Notes:
Downloadable versions of the user manual & drivers are available on the CalDigit support page.
http://www.caldigit.com/support.asp
Burst transfer rates will vary from one computer to another. Depending on the host configuration, average speeds are usually lower.
Weight varies by configuration and manufacturing process.
IMPORTANT: Use of this product is subject to acceptance of the software license agreements included. Product contains electronic documentation.
1TB (Terabyte) = 1000GB. 1GB = 1,000,000,000 bytes. Total accessible capacity varies depending upon operating environment (typically 5-10% less).
06
Package Contents:
1. (One) CalDigit VR2
2. (Two) CalDigit drive modules
3. (One) FireWire 800 cable
4. (One) eSATA cable
5. (Two) drive module keys
6. CalDigit Driver & Manual CD
7. (One) Power supply kit
Please contact your CalDigit reseller for any faulty or missing parts.
DWARRA
NDE
NTY
EXTE
EXTE
NTY
DWARRA
E
D
N
Congratulations on your purchase of this CalDigit product!
To make the most of your storage investment you can purchase the
CalDigit Extended Warranty. You'll extend the already great CalDigit
warranty to 3 years. If the product is discontinued during the
warranty period, you'll be eligible for equal or greater value upgrade
(if the product cannot be fixed). In addition, you'll get one-way
shipping costs covered by CalDigit, plus get an exclusive warranty
case number to CalDigit's tech support team.
The extended warranty must be purchased within 90 days of purchase date.
Visit the CalDigit Online Store for more information www.caldigit.com
07
CalDigit VR2 Overview
CalDigit VR2 Front Panel
LCD Screen
CalDigit VR2
RAID 1 PROTECTED
Left Button
Right Button
LED Status Lights
Ventilation Holes
Smart Fan
Power Button
CalDigit VR2 Rear Panel
Drive Key Hole
Drive Module A0
Drive Module A1
Power
Security Lock*
eSATA
USB 3.0
FireWire
*Security lock (lock is not included)
Use a standard computer lock to secure the CalDigit VR2 and prevent theft.
08
Installing the CalDigit VR2
The CalDigit VR2 is ready to use out of the box.
1 Select the desired interface, FireWire 400, FireWire 800, USB 3.0 or eSATA. A FireWire 800
and eSATA cable are included.
2 Connect the power supply to the CalDigit VR2, then connect the desired interface cable.
3 Press the CalDigit VR2's power button. The CalDigit VR2 will boot. You should see the
CalDigit VR2 mount and it's ready to use.
4 To change the RAID level or to customize your CalDigit VR2 use the LCD or CalDigit’s RAID
Tool software. For further instructions see the Configuring your RAID section of this manual.
Note: If you would like to connect the CalDigit VR2 with eSATA, there are several
options. If you already have an eSATA controller card or port, simply connect the
provided eSATA cable. If you have a Mac or PC workstation that has internal SATA
port (late model Mac Pros) you can use an eSATA extender (available from
CalDigit). You can also purchase one of CalDigit's eSATA controller cards which
provide additional features (FASTA-2ex, FASTA-2e or FASTA-4e).
Note: If you would like to connect the CalDigit VR2 with USB 3.0 and do not have
a built in USB 3.0 port, you can purchase one of CalDigit’s USB 3.0 cards (CalDigit
SuperSpeed ExpressCard for Laptop, CalDigit SuperSpeed PCI Express Card or the
FASTA-6GU3). CalDigit's USB 3.0 cards work with both the Mac under OS X and
Windows.
For more information visit www.caldigit.com.
09
LCD Menu Overview
LCD Display Information
The CalDigit VR2 LCD displays information in the following order:
1 System Profile - will display the status of 8 features
1.1 RAID status
Displays the current RAID status.
1.2 Serial number
Displays the CalDigit VR2 serial number.
1.3 Firmware version
Current CalDigit VR2 firmware version.
1.4 System temp
Displays the current system temperature.
1.5 Disk 1 temp
Displays temperature of the top hard drive.
1.6 Disk 2 temp
Displays temperature of the bottom hard drive.
1.7 Beeper status, LCD config status
Provides beep alarm status, provides LCD menu configuration status.
1.8 Access LED status, Auto rebuild status
Provides LED access status, provides auto rebuild status.
2 Create RAID - 3 different RAID levels can be set
2.1 Create RAID 0
Data is written onto two hard drives at a time for maximum speed.
2.2 Create RAID 1
Identical data is written onto two hard drives with maximum protection.
2.3 Create SPAN
Combine two hard drives into one volume, data will be accessed from the first
hard drive until full, then the second hard drive will be used.
2.4 Create JBOD
“Just a Bunch of Disks” Creates 2 independent volumes, one from the disk 1 and
the second from disk 2. This mode can also be used to read a single drive from a
RAID 1 mirror, however once used the RAID 1 mirror cannot be restored.
2.5 Clear RAID Info
Clears the RAID table information on the CalDigit VR2 and both drives.
10
3 MISC config - internal system set up
3.1 Beeper on/off
Turn the audible alarm on or off.
3.2 Turbo Mode on/off
Turn Turbo Mode on or off. Turbo Mode is designed to provide the CalDigit VR2
with an extra speed boost.
3.3 Japanese language
Toggle the CalDigit VR2 LCD menu between English or Japanese.
3.4 Boot option 1/2
Toggle between boot option 1 or 2. Boot option is recommended for most users,
who are using the CalDigit VR2 as a boot drive under OS X. You can use
boot option 2 if you have any issues booting from the VR2.
3.5 Access LED on/off
Turn the access LED lights on or off.
3.6 Auto rebuild on/off
Turn the auto rebuild function of the VR2 on or off. Auto rebuild is used when the
CalDigit VR2 is used in RAID 1 and a new CalDigit drive module is inserted.
3.7 Load default config.
Restore the CalDigit VR2 to the factory settings.
For more information about the LCD, please go to www.caldigit.com/support.asp
11
CalDigit VR2 Menu Tree Overview
CalDigit Menu
● SYSTEM PROFILE
● CREATE RAID
STATUS
CREATE RAID 0
BEEPER ON/OFF
SERIAL NUMBER
CREATE RAID 1
TURBO MODE ON/OFF
FIRMWARE VERSION
CREATE SPAN
JAPANESE LANGUAGE
SYSTEM TEMP
CREATE JBOD
BOOT OPTION 1/2
DISK1 TEMP
CLEAR RAID INFO
ACCESS LED ON/OFF
DISK2 TEMP
AUTO REBUILD ON/OFF
"BEEPER STATUS
LOAD DEFAULT CFG
LCD CONFIG STATUS"
"ACCESS LED STATUS
AUTO REBUILD STATUS"
● ARE YOU SURE?
● ERASE ALL DATA
● FINAL CONFIRM
12
● MISC. CONFIG
RAID Tool Feature Overview
RAID Tool provides several types of display information to
help users obtain the current status of the CalDigit VR2.
1 RAID information
Provides related information for the current RAID set.
2 RAID configuration
Create RAID 0, RAID 1, JBOD or SPAN.
3 Email configuration
Error logging system set up. When an error occurs, the CalDigit VR2 will
automatically send out the log to the system administrator via email.
Internet connection required.
13
4 Fan and Temperature
Obtain current environmental data for the CalDigit VR2.
5 Event Log
Displays log of all CalDigit VR2 events.
6 Firmware update
Manually update the CalDigit VR2 Firmware, to add new features or
bug fixes.
7 MISC. Configuration
Set RAID Tool password protection, LCD config enable/disable, beeper
enable/disable and VR2 nickname to customize LCD with personalized
message.
8 Re-Scan
Re-Scan all devices connected to the computer.
9 Online Update
Online search for current version of firmware or RAID Tool software.
Internet connection required.
For more information about RAID Tool, please go to
http://www.caldigit.com/support.asp
14
Configuring your RAID
If you wish to create your RAID from the LCD, please follow the steps below.
1
Turn on the CalDigit VR2. Press the right button next to the LCD panel. Press the button
one more time when the LCD displays Create RAID. Confirm by pressing the left button.
2
You will see the CalDigit VR2 cycle through the following RAID levels;
RAID 0>RAID 1>SPAN>JBOD>Clear RAID Info. Select the desired RAID level by pressing
the right button. You will receive a confirmation message with the RAID level you
selected. Select Yes to continue, Cancel to go back. When you see"Are you sure?" press
the left button to confirm, or the right button to cancel and return to the previous menu.
3
Press the left button when you see "Erase all data". Or press the right button to cancel
and return to the previous menu.
4
Press the left button when you see "Final Confirm". This will erase all data on the RAID.
Or press the right button to cancel and return to the previous menu.
WARNING: This will erase ALL data on the RAID.
15
5 Please wait a moment while the CalDigit VR2 creates the RAID.
6 The CalDigit VR2 will restart automatically.
7 Please restart your computer.
8 The CalDigit VR2 will display the new RAID setting. It can be verified via RAID Tool or
the LCD.
9 Once the computer has restarted a message will appear asking you to initialize your
CalDigit VR2.
• Disk Utility will launch and allow you to format the CalDigit VR2. If you do not
see this message, simply launch Disk Utility which can be found in the
Applications > Utilities folder.
• Select the erase tab.
• Select your desired volume format (Mac OS extended is recommended) and
name your volume.
• Select Erase and Disk Utility will format the CalDigit VR2.
• The CalDigit VR2 will mount and is now ready for use.
16
If you wish to create your RAID using RAID Tool, please follow the steps below.
1
Launch RAID Tool. RAID Tool can be found in the
Applications > CalDigit RAID Tool folder.
2 2. Select the desired CalDigit VR2 to enter the menu.
3 Select RAID configuration.
Note: the bottom of the RAID Tool will show you different RAID configurations.
4 Choose the desired RAID level and click "Yes" to proceed. Press "No" to cancel.
WARNING: Changing RAID level will cause all data on the array to be lost.
5 The CalDigit VR2 will now update its settings and restart automatically.
17
6
Check LCD and RAID Tool to make sure that the RAID levels match.
7
Please restart your computer.
8
Run Disk Utility (Mac) or Disk management tool (PC) to format your CalDigit VR2.
9
Once the computer has restarted a message will appear asking you to initialize your
CalDigit VR2.
• Disk Utility will launch and allow you to format the CalDigit VR2. If you do not
see this message, simply launch Disk Utility which can be found in the
Applications > Utilities folder.
• Select the erase tab.
• Select your desired volume format (Mac OS extended is recommended) and
name your volume.
• Select Erase and Disk Utility will format the CalDigit VR2.
• The CalDigit VR2 will mount and is now ready for use.
18
Accessories and Parts
SuperSpeed PCI Express Card for USB 3.0 for Mac
Part # U3-HostAdapter SKU # 791900
SuperSpeed ExpressCard for Laptop
Part # U3-ExpressCard SKU # 791901
CalDigit FireWire 800 cable, 9-pin to 9-pin, 6ft
Part # CBFWY9-6 SKU # 704102
CalDigit USB 3.0 A/B Cable, 3ft
Part # CBUSB3AB-3-CD SKU # 791980
CalDigit USB 3.0 A/B Cable, 6ft
Part # CBUSB3AB-6-CD SKU # 791981
CalDigit VR Power Supply
Part # CDPS-0512 SKU # 704101
2 port PCI-e SATA 6G & 2 port USB 3.0 Combo Host Adaptor
Part # FASTA-6GU3 SKU # 791902
CalDigit 2 port eSATA 6G host card
Part # FASTA-2e SKU # 727100
CalDigit 2 port eSATA 6G Express Card for Laptop
Part # FASTA-2ex SKU # 726101
CalDigit eSATA Extender
Part # CBeSATA-Extender SKU # 704113
19
Technical Support & Warranty Information
Technical Support
If you run into any issues while installing your CalDigit VR2 please contact CalDigit
Technical Support:
[email protected]
www.caldigit.com/support.asp
1 (714) 572-6668 (North & South America)
+44 (0) 845 835 0372 (UK and Europe)
When contacting CalDigit Technical Support, make sure to be at your computer and have the
following information available:
• Your serial number
• Operating system and version
• Computer brand and model
• Other devices attached to your computer
You can also post on the CalDigit forum at the Creative Cow:
http://forums.creativecow.net/caldigit
CalDigit Warranty Information
For detailed CalDigit warranty information please see the following CalDigit websites:
www.caldigit.com/warranty
www.caldigit.com/rma/Limited-Warranty.pdf
20
CalDigit VR2 Manual v1.0
www.caldigit.com
© 2012 CalDigit, Inc. All Rights Reserved