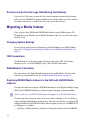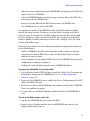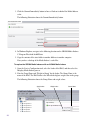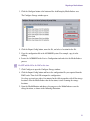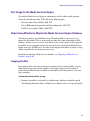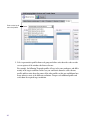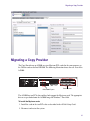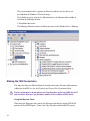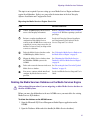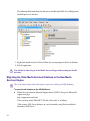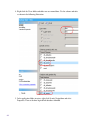
1
Migrating Avid® Interplay® Applications to AS3000 Servers ReadMe Date Revised Changes Made 6/24/2011 Added the following: • “Changing System Settings on Windows Server 2008 Standard Systems” on page 12 • “Migrating a General Purpose Server” on page 39 The document describes how to migrate Interplay applications to the AS3000 servers. For additional information, see the following documents: • AS3000 Setup Guide • Avid Interplay Software Installation and Configuration Guide • Interplay v2.3 ReadMe • Avid Interplay Engine and Avid Interplay Archive Engine Administration Guide • Avid Interplay Failover Guide for AS3000 Servers • Interplay Media Services Setup and User’s Guide • Interplay Transfer Setup and User’s Guide • Interplay Capture Installation and Administration Guide. Legal Notices Product specifications are subject to change without notice and do not represent a commitment on the part of Avid Technology, Inc. This product is subject to the terms and conditions of a software license agreement provided with the software. The product may only be used in accordance with the license agreement. Avid products or portions thereof are protected by one or more of the following United States Patents: 5,267,351; 5,309,528; 5,355,450; 5,396,594; 5,440,348; 5,467,288; 5,513,375; 5,528,310; 5,557,423; 5,577,190; 5,584,006; 5,640,601; 5,644,364; 5,654,737; 5,715,018; 5,719,570; 5,724,605; 5,726,717; 5,729,673; 5,745,637; 5,752,029; 5,754,851; 5,799,150; 5,812,216; 5,828,678; 5,842,014; 5,852,435; 5,986,584; 5,999,406; 6,038,573; 6,061,758; 6,141,007; 6,211,869; 6,532,043; 6,546,190; 6,596,031; 6,636,869; 6,747,705; 6,763,523; 6,766,357; 6,813,622; 6,847,373; 7,081,900; RE40,107; 7,403,561; 7,433,519; 7,555,557; 7,562,099; D352,278; D372,478; D373,778; D392,267; D392,268; D392,269; D395,291; D396,853; D398,912. Other patents are pending. Avid products or portions thereof are protected by one or more of the following European Patents: 0506870; 0515031; 0635188; 0674414; 0694243; 0705517; 0752174; 0895623; 1068617; 1111910; 1629675. Other patents are pending. This document is protected under copyright law. An authorized licensee of Avid Interplay may reproduce this publication for the licensee’s own use in learning how to use the software. This document may not be reproduced or distributed, in whole or in part, for commercial purposes, such as selling copies of this document or providing support or educational services to others. This document is supplied as a guide for Avid Interplay. Reasonable care has been taken in preparing the information it contains. However, this document may contain omissions, technical inaccuracies, or typographical errors. Avid Technology, Inc. does not accept responsibility of any kind for customers’ losses due to the use of this document. Product specifications are subject to change without notice. Copyright © 2011 Avid Technology, Inc. and its licensors. All rights reserved. Attn. Government User(s). Restricted Rights Legend U.S. GOVERNMENT RESTRICTED RIGHTS. This Software and its documentation are “commercial computer software” or “commercial computer software documentation.” In the event that such Software or documentation is acquired by or on behalf of a unit or agency of the U.S. Government, all rights with respect to this Software and documentation are subject to the terms of the License Agreement, pursuant to FAR §12.212(a) and/or DFARS §227.7202-1(a), as applicable. Trademarks 003, 192 Digital I/O, 192XD I/O, 888 I/O, AirPlay, AirSPACE, AirSPACE HD, AirSpeed, ALEX, Alienbrain, AniMatte, AudioMarket, AudioPages, AudioSuite, AudioVision, AutoSync, Avid, Avid Advanced Response, Avid DNA, Avid DNxcel, Avid DNxHD, AVIDdrive, Avid DS Assist Station, Avid EditStar, Avid Learning Excellerator, Avid Liquid, Avid Liquid Chrome Xe, Avid MEDIArray, Avid Mojo, AvidNet, AvidNetwork, Avid NewStar, Avid Remote Response, AVIDstripe, Avid Unity, Avid Unity ISIS, Avid VideoRAID, Avid Xpress, AVoption, AVX, Beauty Without The Bandwidth, Boom, C|24, CaptureManager, ChromaCurve, ChromaWheel, Command|24, Conectiv, CountDown, DAE, Dazzle, Dazzle Digital Video Creator, Deko, DekoCast, D-Fi, D-fx, DigiDelivery, Digidesign, Digidesign Audio Engine, Digidesign Intelligent Noise Reduction, DigiDrive, DigiLink, DigiMeter, DigiSerial, DigiStudio, DigiStudio Control, Digital Nonlinear Accelerator, DigiTranslator, DINR, DNxchange, do more, DVD Complete, D-Verb, Eleven, Equinox, EveryPhase, ExpertRender, Fastbreak, Fast Track, FieldPak, Film Composer, FilmScribe, Flexevent, FluidMotion, FXDeko, G7, G-Rack, HD Core, HD Process, HDPack, HYBRID, HyperControl, HyperSPACE, HyperSPACE HDCAM, IllusionFX, Image Independence, iNEWS, iNEWS Assign, iNEWS ControlAir, Instantwrite, Instinct, Intelli-sat Broadcasting Recording Manager, Intelli-Sat, InterFX, Interplay, inTONE, Intraframe, iS9, iS18, iS23, iS36, ISIS, IsoSync, KeyRig, KeyStudio, LaunchPad, LeaderPlus, Lightning, ListSync, Lo-Fi, Magic Mask, Make Anything Hollywood, make manage move | media, Marquee, M-Audio, M-Audio Micro, Maxim, Mbox, MCXpress, Media Browse, Media Composer, MediaDock, MediaDock Shuttle, Media Fusion, Media Illusion, MediaLog, Media Reader, Media Recorder, MEDIArray, MediaShare, MediaStream, Media Suite, Meridien, MetaFuze, MetaSync, MicroTrack, Midiman, MissionControl, Mix Rack, MixLab, Moviebox, Moviestar, NaturalMatch, Nearchive, NetReview, NewsCutter, Nitris, NRV-10 interFX, Octane, OMF, OMF Interchange, OMM, OnDVD, Open Media Framework, Open Media Management, Palladium, Pinnacle, Pinnacle DistanTV, Pinnacle Geniebox, Pinnacle HomeMusic, Pinnacle MediaSuite, Pinnacle Mobile Media, Pinnacle Studio, Pinnacle Studio MovieBoard, Pinnacle Systems, ProEncode, ProServices, ProSessions, Pro Tools, QuietDrive, Recti-Fi, Reel Tape Delay, Reel Tape Flanger, Reel Tape Saturation, RetroLoop, rS9, rS18, Salesview, Sci-Fi, Scorch, Scorefitter, ScriptSync, SecureProductionEnvironment, Session, Show Center, Sibelius, SIDON, Soft SampleCell, Soft-Clip Limiter, Sound Designer II, SPACE, SPACEShift, SpectraGraph, SpectraMatte, Sputnik, Starplay, SteadyGlide, Streamfactory, Streamgenie, StreamRAID, Strike, Structure, Studiophile, SubCap, Sundance Digital, Sundance, Symphony, SYNC HD, SynchroScience, SynchroScope, Syntax, TDM FlexCable, Thunder, Titan, Titansync, TL Aggro, TL AutoPan, TL Drum Rehab, TL Everyphase, TL Fauxlder, TL In Tune, TL MasterMeter, TL Metro, TL Space, TL Utilities, Torq, Torq Xponent, Transfuser, Trigger Finger, Trillium Lane Labs, TruTouch, UnityRAID, Vari-Fi, Velvet, Venom, VideoRAID, Video Slave Driver, VideoSPACE, VideoSpin, Vortx, Xdeck, X-Form, Xmon, Xponent, and X-Session are either registered trademarks or trademarks of Avid Technology, Inc. in the United States and/or other countries. 2 Adobe and Photoshop are either registered trademarks or trademarks of Adobe Systems Incorporated in the United States and/or other countries. Apple and are trademarks of Apple Computer, Inc., registered in the U.S. and other countries. Windows is either a registered trademark or trademark of Microsoft Corporation in the United States and/or other countries. All other trademarks contained herein are the property of their respective owners. Migrating Avid Interplay Applications to AS3000 Servers • 0130-30667-01 B • June 2011 • Created 6/24/11 • This document is distributed by Avid in online (electronic) form only, and is not available for purchase in printed form. 3 Contents Limitations . . . . . . . . . . . . . . . . . . . . . . . . . . . . . . . . . . . . . . . . . . . . . . . . . . . . . . . . . 7 Qualified Software . . . . . . . . . . . . . . . . . . . . . . . . . . . . . . . . . . . . . . . . . . . . . . . . . . . 8 AS3000 Configurations . . . . . . . . . . . . . . . . . . . . . . . . . . . . . . . . . . . . . . . . . . . . . . . 9 Loading Application Software . . . . . . . . . . . . . . . . . . . . . . . . . . . . . . . . . . . . . . . . . 10 Best Practices for Migrating to AS3000 Servers . . . . . . . . . . . . . . . . . . . . . . . . . . . 11 Changing System Settings on Windows Server 2008 Standard Systems . . . . . . . . 12 Migrating Interplay Capture . . . . . . . . . . . . . . . . . . . . . . . . . . . . . . . . . . . . . . . . . . . 14 Migrating an Interplay Engine Cluster . . . . . . . . . . . . . . . . . . . . . . . . . . . . . . . . . . . 14 Migrating an Interplay Engine Standalone System . . . . . . . . . . . . . . . . . . . . . . . . . 15 Port Usage for the Interplay Engine Standalone . . . . . . . . . . . . . . . . . . . . . . . . 15 Changing System Settings . . . . . . . . . . . . . . . . . . . . . . . . . . . . . . . . . . . . . . . . 15 Best Practices for Migrating an Interplay Engine to Another Server . . . . . . . . . . . . 15 Upgrade the Interplay Engine to Interplay v2.3 . . . . . . . . . . . . . . . . . . . . . . . . . 16 Back Up the Interplay Database . . . . . . . . . . . . . . . . . . . . . . . . . . . . . . . . . . . . 16 Send the Database to Avid Engineering for Testing . . . . . . . . . . . . . . . . . . . . . 16 Examine Log Files Before Moving the Database . . . . . . . . . . . . . . . . . . . . . . . 16 Restart the Interplay Engine Before Moving the Database . . . . . . . . . . . . . . . . 17 Determine the Location of the CCS. . . . . . . . . . . . . . . . . . . . . . . . . . . . . . . . . . 17 Follow the Move Instructions in the Interplay Administrator Guide . . . . . . . . . . 17 Examine and Archive the Logs After Moving the Database . . . . . . . . . . . . . . . 18 Migrating a Media Indexer . . . . . . . . . . . . . . . . . . . . . . . . . . . . . . . . . . . . . . . . . . . . 18 Changing System Settings . . . . . . . . . . . . . . . . . . . . . . . . . . . . . . . . . . . . . . . . 18 ISIS Connections. . . . . . . . . . . . . . . . . . . . . . . . . . . . . . . . . . . . . . . . . . . . . . . . 18 MediaNetwork Connection . . . . . . . . . . . . . . . . . . . . . . . . . . . . . . . . . . . . . . . . 18 Replacing SR2500 Media Indexers in the HAG with AS3000 Media Indexers . 18 Migrating an Interplay Transfer Server. . . . . . . . . . . . . . . . . . . . . . . . . . . . . . . . . . . 23 ISIS and Network Connections . . . . . . . . . . . . . . . . . . . . . . . . . . . . . . . . . . . . . 24 MediaNetwork Connection . . . . . . . . . . . . . . . . . . . . . . . . . . . . . . . . . . . . . . . . 24 4 Port Usage on the Interplay Transfer Server . . . . . . . . . . . . . . . . . . . . . . . . . . . 24 For Installation and Configuration Information . . . . . . . . . . . . . . . . . . . . . . . . . . 25 Copying the TMServer.ini file to the AS3000 . . . . . . . . . . . . . . . . . . . . . . . . . . . 25 Migrating DET Configuration Files to Another Server . . . . . . . . . . . . . . . . . . . . 25 Migrating Generic FTP Profiles to Another Server . . . . . . . . . . . . . . . . . . . . . . . 26 Migrating a Media Services Engine. . . . . . . . . . . . . . . . . . . . . . . . . . . . . . . . . . . . . . 28 Port Usage for the Media Services Engine . . . . . . . . . . . . . . . . . . . . . . . . . . . . 29 Determining Whether to Migrate the Media Services Engine Database . . . . . . 29 Copying Profiles . . . . . . . . . . . . . . . . . . . . . . . . . . . . . . . . . . . . . . . . . . . . . . . . . 29 Migrating a Copy Provider. . . . . . . . . . . . . . . . . . . . . . . . . . . . . . . . . . . . . . . . . . . . . 31 Making the ISIS Connections . . . . . . . . . . . . . . . . . . . . . . . . . . . . . . . . . . . . . . . 32 Installing the ISIS Client Software . . . . . . . . . . . . . . . . . . . . . . . . . . . . . . . . . . . 33 ISIS Client Manager Settings . . . . . . . . . . . . . . . . . . . . . . . . . . . . . . . . . . . . . . . 34 Migrating a Move Provider . . . . . . . . . . . . . . . . . . . . . . . . . . . . . . . . . . . . . . . . . . . . 34 Using a 1Gb Onboad NIC on the Move Provider . . . . . . . . . . . . . . . . . . . . . . . . 35 ISIS Connections and Client Software Installation . . . . . . . . . . . . . . . . . . . . . . . 35 Migrating an Archive Provider . . . . . . . . . . . . . . . . . . . . . . . . . . . . . . . . . . . . . . . . . . 35 ISIS and Network Connections . . . . . . . . . . . . . . . . . . . . . . . . . . . . . . . . . . . . . 35 MediaNetwork Connection . . . . . . . . . . . . . . . . . . . . . . . . . . . . . . . . . . . . . . . . . 36 Port Usage for the Archive Provider (SGL only). . . . . . . . . . . . . . . . . . . . . . . . . 36 Migrating a Transcode Provider . . . . . . . . . . . . . . . . . . . . . . . . . . . . . . . . . . . . . . . . 36 Migrating a Stream Server . . . . . . . . . . . . . . . . . . . . . . . . . . . . . . . . . . . . . . . . . . . . 36 Changing System Settings . . . . . . . . . . . . . . . . . . . . . . . . . . . . . . . . . . . . . . . . . 36 ISIS Connections . . . . . . . . . . . . . . . . . . . . . . . . . . . . . . . . . . . . . . . . . . . . . . . . 37 MediaNetwork Connection . . . . . . . . . . . . . . . . . . . . . . . . . . . . . . . . . . . . . . . . . 37 Partitions on the Stream Server . . . . . . . . . . . . . . . . . . . . . . . . . . . . . . . . . . . . . 37 Port Usage for the Interplay Stream Server . . . . . . . . . . . . . . . . . . . . . . . . . . . . 37 Migrating, Renaming, or Adding a Stream Server . . . . . . . . . . . . . . . . . . . . . . . 38 Migrating a General Purpose Server. . . . . . . . . . . . . . . . . . . . . . . . . . . . . . . . . . . . . 39 Changing System Settings . . . . . . . . . . . . . . . . . . . . . . . . . . . . . . . . . . . . . . . . . 39 MediaNetwork Connections . . . . . . . . . . . . . . . . . . . . . . . . . . . . . . . . . . . . . . . . . . . 39 Fibre Channel Card Drivers . . . . . . . . . . . . . . . . . . . . . . . . . . . . . . . . . . . . . . . . 40 Migrating a Media Services Database . . . . . . . . . . . . . . . . . . . . . . . . . . . . . . . . . . . 40 5 Checklist for Migrating the Media Services Database to an AS3000 Server. . . 40 Deleting the Media Services Database on the Media Services Engine. . . . . . . 41 Migrating the Older Media Services Database to the New Media Services Engine . . . . . . . . . . . . . . . . . . . . . . . . . . . . . . . . . . . . . . . . . . . . . . . 42 Recreating the dms User in the Updated Database . . . . . . . . . . . . . . . . . . . . . 43 6 Limitations The id Interplay ReadMe Limitations The following limitations exist for migrating Interplay applications to AS3000 servers: • The AS3000 servers are currently qualified on Interplay v2.3. • The servers running Windows Server 2008 Standard require additional system settings changes. See “Changing System Settings on Windows Server 2008 Standard Systems” on page 12. • As of this writing, Interplay Transfer is not supported on MediaNetwork on an AS3000. Reference problem UDEVC00152485. • Interplay engineering is in the process of qualifying a Fibre card for the Interplay Engine cluster running on the AS3000. Until the qualification is complete, AS3000 servers are not supported as components in an Interplay Engine cluster or Interplay Archive Engine cluster. • SR2500 and AS3000 servers can reside in the same Interplay Production and Capture environments except for Interplay Clustered Engines and Archive Engines. Both servers in clustered configurations must be the identical hardware. • The Interplay v2.3 Stream Server and related Workflow Engine require updated installers for the AS3000 servers. Do not use the installers on the Interplay v2.3 Installer DVD or Interplay v2.3 Installer USB flash drive. See your Avid representative for information on obtaining the software. See “Qualified Software” on page 8. • Telestream and Anystream software is in the process of being qualified on the AS3000. Until the qualification is complete, ProEncode is not supported on the AS3000. • Copy and Move Providers: The Chelsio cards used on Intel SR2400 and SR2500 systems are not supported on the AS3000. Use Myricom cards as described in “Migrating a Copy Provider” on page 31 and “Migrating a Move Provider” on page 34. 7 Qualified Software The following software versions are qualified on the AS3000. Qualified Software for Interplay Components and Related Software Product Version Avid Interplay products Avid Interplay Installer USB flash drives (Server and Client v2.3 versions). See “Loading Application Software” on page 10. Avid Interplay Engine and Archive Engine standalone (non-cluster systems) v2.3 Avid Interplay Engine and Archive Engine cluster See “Limitations” on page 7. Avid Interplay Media Indexer v2.3 Avid Interplay Access v2.3 Avid Interplay Transfer v2.3 Avid Interplay Stream Server v2.3.0.24677 See “Limitations” on page 7. Workflow Engine used with Stream Server v2.0.0 “Limitations” on page 7 Avid Interplay Media Services and providers v2.3 Avid Interplay ProEncode™ See “Limitations” on page 7. Avid Interplay Capture v1.2 Avid Service Framework v1.4.2 Avid Shared Storage products 8 Avid Unity MediaNetwork v5.1.3 Avid ISIS 7000 v2.3 Avid ISIS 5000 v3.2 AS3000 Configurations AS3000 Configurations The following table lists the configurations that apply to Interplay server applications. All configurations have two processors and 12 GB RAM standard. For information on other Avid servers and the most up to date information on requirements for specific products, see the related Avid server product documentation. For information on adding PCIe cards, see the AS3000 Setup Guide. Avid Applications Operating System Interplay Engine cluster, Interplay Archive cluster Windows Server 2008 R2 Enterprise Optional PCIe Cards or Optional Kits Memory expansion kit - increase memory of each AS3000 in the cluster to 32 GB RAM (add 6x4GB DIMMs for a 36GB total) Avid part number: 7010-30391-01 Qualified Fibre Channel carda Interplay Engine, Interplay Archive, GPS Lookup Server Windows Server 2008 R2 Standard x64 NA Interplay Transfer Engine, Interplay Media Services, Interplay Media Services providers: Copy, Move, Transcode, Archive, etc. Windows 7 Pro 64 Bit Move and Copy providers: Myricom 10G-PCIE-8B-S 10 Gb Ethernet. See “Migrating a Copy Provider” on page 31 and “Migrating a Move Provider” on page 34. Interplay Media Indexer (64-bit) Windows Server 2008 R2 Standard x64 NA Interplay Capture Server, Airspeed Multi Stream Device Services Server Windows Server 2008 R2 Standard x64 Interplay Capture: Timecode w RCA Connector Adrienne Electronics PCIe-LTC/RDR. See “Migrating Interplay Capture” on page 14. Interplay Streaming Server Windows Server 2008 R2 Standard x64 Expansion Storage Kit adding two 1 TB drives. Avid part number: 7010-30135-02 a. The Fibre channel card is also available for other servers when connecting to Avid Unity MediaNetwork. See “MediaNetwork Connections” on page 39. 9 Loading Application Software The AS3000 does not have a DVD reader. Software is loaded onto the system using a USB flash drive. The system ships with two or more USB flash drives as follows: • One (or two in the case of the Interplay Engine) 4 GB USB flash drives loaded with the Avid application software. • One 16 GB USB flash drive intended to be used as a bootable USB flash drive with an Avid Product Recovery image. For instructions on creating a bootable USB flash drive containing the Product Recovery image, see the AS3000 Setup Guide. In this topic the folder that contains all of the application software installation files is referred to as the software kit. To load the application software: 1. Log in to the AS3000 as Administrator (default password: is-admin). 2. Make a folder for the software kit on the root directory (C:\) of the AS3000. For example: C:\Installers\Interplay_v2_3_Server 3. Insert the 4 GB USB flash drive (with the software kit) into any of the USB ports on the AS3000. n You can run the software installer from the USB flash drive. The advantage of copying the software kit to the AS3000 is that you have easy access to installer files if you should ever need them in the future. If the USB flash drive does not automatically display: a. Double-click the computer icon on the desktop. b. Double-click the USB flash drive icon to open it. 4. Copy the software kit into the new folder you created on the AS3000 system. For example, use CTRL-A to select all the files and folders in the software kit and copy and paste to the new folder you created. 5. Navigate to the software kit folder and double-click the Autorun.exe file. The application installer splash screen opens. 6. Install the Avid application software as you normally would. For additional information see the Avid Interplay Readme and the Avid Interplay Software Installation and Configuration Guide. 10 Best Practices for Migrating to AS3000 Servers Best Practices for Migrating to AS3000 Servers This topic presents a best practices method for moving your entire Interplay environment to AS3000 servers. To move your Interplay environment to AS3000 servers: 1. Upgrade your Interplay environment to Interplay v2.3 and make sure media is online and ensure that you can check clips and sequences in and out of the Interplay database. This ensures that you have a stable environment before you begin the upgrade. 2. Move the server applications to the AS3000 one at a time and make sure they are up and running before starting the migration of the next server. Avid recommends the following migration order: - Interplay Engine and Interplay Archive Engine - Media Indexer - Interplay Transfer - Interplay Capture - Media Services Engine - Media Services providers: Copy, Move, Transcode, Archive, etc. - Stream Server Following these steps will ensure that you have a stable Interplay environment throughout the migration process. n As of this writing, the Interplay Engine cluster and Interplay Archive cluster are not qualified on the AS3000. 11 Changing System Settings on Windows Server 2008 Standard Systems The default image for the AS3000 Windows Server 2008 R2 Standard x64 image has several system settings that should be changed for Interplay servers. The following table lists the settings that should be changed. Server Application Remove Web Switch Server role to Server IIS Role Application Server Interplay Engine Yes Yes Media Indexer Yes Yes Streaming Server Yes Yes General Purpose Server with Avid Service Framework Lookup Service Yes Yes The following procedures describe how to make the changes. To remove the Web Server IIS role: 1. Click Start > All Programs> Administrative Tools > Server manager. 2. Click Roles on the left side of the window. 3. Click Remove Roles and click Server Roles. The Remove Server Roles dialog box opens. 4. Uncheck Web Server (IIS). A dialog box opens asking if you want to remove the dependent features. 5. Click Remove Dependent Features. 6. Click Next and then click Remove. 7. Follow the system prompts to remove the role and then restart the computer. 12 Changing System Settings on Windows Server 2008 Standard Systems To switch the Server Role to Application Server: 1. Click Control Panel > System and Security > System. The System control panel opens. 2. Click “Advanced system settings” on the left of the window. The System Properties dialog box opens. 3. Click the Advanced tab and click Settings in the Performance area. The Performance Options dialog box opens, 4. Click the Advanced tab. 5. In the Processor scheduling area, under “Adjust for best performance of”, select Programs as shown in the following illustration. 13 6. Click Apply and click OK to close the window. 7. Click OK to close the System properties window and close the System window. Migrating Interplay Capture For information on configuring an Interplay Capture server on an AS3000, see the Interplay Capture Installation and Administration Guide. The guide contains specific details on configuring the Adrienne Electronics PCIe card. Migrating an Interplay Engine Cluster For details on setting up a Interplay Engine cluster and Archive engine cluster on an AS3000, see Avid Interplay Failover Guide for AS3000 Servers. For information on moving an existing cluster database to a new server, see “Best Practices for Migrating an Interplay Engine to Another Server” on page 15. This document will be available when the Interplay Engine cluster is qualified on the AS3000 platform. 14 Migrating an Interplay Engine Standalone System Migrating an Interplay Engine Standalone System Interplay Engine standalone systems (non-cluster systems) are supported on the AS3000 server. The Interplay Engine runs Windows Server 2008 R2 Standard 64-bit. No additional PCIe cards are required. Use one of the Intel Pro/1000 PT ports for your network connection. For information on moving an existing Interplay database to a new server, see “Best Practices for Migrating an Interplay Engine to Another Server” on page 15. Port Usage for the Interplay Engine Standalone To enable the Interplay Engine to communicate with the various Interplay clients, the network must allow UCP and TCP traffic on the following ports: • Server Browser: 8321 UDP • Client communication: 80 TCP Changing System Settings Several system settings must be changed on the default Windows Server 2008 Standard image. See “Changing System Settings on Windows Server 2008 Standard Systems” on page 12. Best Practices for Migrating an Interplay Engine to Another Server The Interplay Engine and Interplay Archive Engine Administration Guide describes how to move an Interplay Engine database and an Interplay user database to a different server such as the AS3000. This topic lists procedures that can ensure a smooth transition as you perform the move. It is useful to obtain a baseline snapshot of the health of the database and of the Interplay Engine before moving the Interplay database and users. This allows you to fix any problems before the move begins. It also provides a record of the state of the system over time. You can use this information for comparison later. n For information on configuring a cluster system on an AS3000, see “Migrating an Interplay Engine Cluster” on page 14. 15 Upgrade the Interplay Engine to Interplay v2.3 If you are upgrading your entire site to AS3000 systems, Avid recommends that you upgrade to Interplay v2.3 before you start migrating to the new servers. See “Best Practices for Migrating to AS3000 Servers” on page 11. Back Up the Interplay Database You use the Interplay Administrator to create backups of the database. Make sure that you have a recent Full backup before you begin the move. The Interplay Administrator does not back up the complete database folder. Before you move to the new server, Avid recommends that you create a backup copy of the complete database folder (AvidWG or AvidAM) and the user database folder (_InternalData). See the Interplay ReadMe or the Interplay Engine and Interplay Archive Engine Administration Guide for information on backing up the database. Send the Database to Avid Engineering for Testing Avid recommends that you contact your Avid representative about sending a copy of your Interplay database to Interplay engineering for testing. This testing provides a report that includes the following type of information: • An analysis of database characteristics such as object count • Tips for moving the database if there are any caveats Your Avid representative can provide details on which files should be provided for the test. n Sending the database for testing is recommended for all version but should be considered mandatory for Interplay versions v1.4 and lower. Examine Log Files Before Moving the Database For an analysis of the state of the Interplay Engine, you need the relevant log files and the status of the OS/machine hosting the Interplay Engine or Archive Engine. The easiest way to gather these logs is to use the Collect tool. The Collect tool is typically run by Avid support. See your Avid representative for details. Your Avid representative can examine the Base Analyzer portion of the Collect tool before the move and determine whether you should make any changes before proceeding with the move. Save the output of the Collect tool. Besides providing troubleshooting information, the Collect tool will provide a baseline of system status information that you can refer back to at a later date. 16 Best Practices for Migrating an Interplay Engine to Another Server Restart the Interplay Engine Before Moving the Database While not required, this is a good test of the health of the system. In particular, it is useful to perform a failover of an Interplay cluster system. This can expose any problems with the cluster services. If there are any problems restarting the system, fix the problems before you begin moving the database. Determine the Location of the CCS An Interplay workgroup requires a Central Configuration Server (CCS), a module that stores the Interplay user database and other settings. In an environment with a single Interplay Engine, the CCS is located on the Interplay Engine. In an environment that includes more than one Interplay Engine, one Interplay Engine can include the CCS for all Interplay Engines in the environment. To determine the CCS for a workgroup: 1. Open the Interplay Administrator. 2. In the User Management section of the Interplay Administrator window, click the Central Configuration Server icon. The computer name of the CCS is displayed. If you need to migrate the server that includes the CCS, you need to migrate the Interplay users database (_InternalData folder). For more information, see the next topic. Follow the Move Instructions in the Interplay Administrator Guide See the following topics in the Interplay Engine and Interplay Archive Engine Administration Guide. If you need to move an Interplay Engine database, see the following: • Moving a Database to Another Server (Non-Clustered Systems) • Moving a Database to Another Server (Clustered Systems) If you need to move an Interplay Engine database and an Interplay users database (CCS), see the following: • Moving a Database and Users to Another Server (Non-Clustered Systems) • Moving a Database and Users to Another Server (Clustered Systems) 17 Examine and Archive the Logs After Moving the Database If you use the Collect tool, examine the Base Analyzer portion after moving the database and users to the AS3000. This portion should run successfully without any errors. Archive the output of the tool as a record of the state of the system after the move. Migrating a Media Indexer You can replace Intel SR2400 and SR2500 Media Indexers with AS3000 systems. The Media Indexer runs Windows Server 2008 R2 Standard 64-bit. The server does not require any PCIe cards. Changing System Settings Several system settings must be changed on the default Windows Server 2008 Standard image. See “Changing System Settings on Windows Server 2008 Standard Systems” on page 12. ISIS Connections The Media Indexer can be single connected or dual connected to ISIS. As with other Interplay servers, use the Pro/1000 PT ports (2 and 4) for ISIS connections. MediaNetwork Connection For connection to Avid Unity MediaNetwork, insert the qualified Fibre Channel card in either the top or bottom PCIe slot. See “MediaNetwork Connections” on page 39. Replacing SR2500 Media Indexers in the HAG with AS3000 Media Indexers This topic describes how to replace SR2500 Media Indexers in the High Availability Group (HAG) with AS3000 Media Indexers without taking the Interplay environment offline. n In this section, the term SR2500 Media Indexer also applies to an SR2400 Media Indexer. This procedure takes advantage of one of the new features in Interplay v2.3: the ability to export and import Media Indexer configurations. This topic describes how to export the MI configuration from the SR2500 HAG leader and then import it to the new AS3000 MI. The overall process is as follows: • 18 Install the 64-bit Media Indexer and Service Framework software on the AS3000 MI Migrating a Media Indexer • Export the storage configuration from the SR2500 MI leader (primary) of the HAG and import it to the new AS3000 MI • After the AS3000 MI finishes scanning the storage locations, add it to the HAG with a lower priority than the SR2500 leader • Remove any backup MIs from the HAG and then remove the SR2500 leader • The AS3000 takes over as leader of the HAG It is important not to make the AS3000 MI the leader of the HAG until it has finished indexing the storage locations. If it took over as leader before it acquired the full list of storage locations, its incomplete list would be replicated to the other MIs and you would have to reconfigure the storage locations for the HAG. Also, keeping it out of the HAG avoids the problem of editors connecting to it before it has a complete cache. This could result in media offline errors. Alternatively, you could use one of the following methods for configuring the locations on the new Media Indexer: • Add the AS3000 MI to the HAG with a low priority number, and after it copies the storage locations from the HAG leader, remove it from the HAG and let it continue indexing the storage locations. • Copy the ummds.cache file from the HAG leader to the AS3000 MI. This will copy the configurations, including the workspaces. • Configure the storage locations manually on the AS3000 Media Indexer. To prepare the AS3000 MIs for joining the HAG: 1. Use the Interplay Installer USB flash drive to install the 64-bit Service Framework and Media Indexer software on the AS3000 MI servers. See “Loading Application Software” on page 10. 2. Ensure that the AS3000 MI system is visible in the Service Configuration tool. Do NOT add it to the HAG at this time. 3. Run the Service Framework Health Monitor and confirm the health of the AS3000 MI. Correct any problems that appear. 4. As a precaution, use the Health Monitor to confirm the health of the SR2500 MIs as well. To back up the Media Indexer cache files: 1. Log onto the SR2500 MI that is the leader of the HAG. 2. Open the Service Configuration tool, locate the MI SR2500 leader, and select the Interplay Media Indexer process. 19 3. Click the Commit Immediately button to force a flush out to disk of the Media Indexer cache. The following illustration shows the Commit Immediately button. 4. In Windows Explorer, navigate to the following location on the SR2500 Media Indexer: C:\Program Files\Avid\AvidMI\state 5. Copy the contents of the state folder to another folder or to another computer. Now you have a backup of the Media Indexer’s cache files. To replace the SR2500 Media Indexers with an AS3000 Media Indexer 1. Open the Service Configuration tool, select the leader of the HAG, and then select the Interplay Media Indexer process. 2. Note the Group Name and “Weight in Group” for the leader. The Group Name is the name of the HAG. The HAG leader is the MI with the highest weight value in the group. The following illustration shows the Group Name and weight values. Apply button 20 Weight value Group Name Migrating a Media Indexer 3. Click the Configure button at the bottom of the Avid Interplay Media Indexer area. The Configure Storage window opens. 4. Click the Export Config button, name the file, and select a location for the file. 5. Copy the configuration file to the AS3000 MI system. For example, copy it to the desktop. 6. Locate the AS3000 MI in the Service Configuration tool and select the Media Indexer process. n Do NOT add the MI to the HAG at this time. 7. Click Configure to open the Configure Storage window. 8. Click the Import Config button and locate the configuration file you exported from the HAG leader. Then click OK to import the configuration. On a large system it may take a few minutes for the table to populate with all the storage locations. After the Media Indexer has the locations, it starts scanning the storage locations. 9. Open the Health Monitor and observe the progress as the Media Indexer scans the storage locations, as shown in the following illustration. 21 10. After the MI returns a Normal status for all of the shared storage locations, do the following: a. Open the Service Configuration tool, locate the AS3000 MI, and select the Media Indexer process. b. Enter a low priority value (lower than the leader) and enter the name of the HAG in the Group Name text box. c. Click the Join High Availability Group button and click Apply at the top of the window. 11. If you have backup SR2500 Media Indexers in the HAG, open the Media Indexer process for each of those Media Indexers and deselect the Join High Availability Group button to remove the MI from the HAG. Do not remove the HAG leader at this time. 12. (Option) Open the Health Monitor and select the Interplay Media Indexer process for the AS3000 MI. Then open the Redundancy Information window. This will allow you to view the election as the AS3000 MI becomes the leader of the HAG. The following illustration shows the Health Monitor window before the election. There are two members in the HAG and the AS3000 MI is the backup. 13. When you have only the AS3000 MI and the SR2500 leader left in the HAG, remove the SR2500 leader from the HAG. 22 Migrating an Interplay Transfer Server This will force an election and the Service Framework will make the AS3000 MI the leader of the HAG. If you are watching the Health Monitor application, the Redundancy Status will show Election in Progress during the election. Finally, the AS3000 MI Redundancy State will show as the Primary. 14. (Option) Use the Service Configuration tool to add a second AS3000 Media Indexer to the HAG as a backup (with a lower weight than the leader). To verify the migration process: 1. Open the Service Configuration tool, locate the AS3000 MI leader, click Configure, and confirm that the Media tables are not listed as “replicating and read only.” The entries should be accessible and not grayed out. 2. If you have any redundant AS3000 MIs in the HAG, their media tables should be listed as “replicating and read only.” 3. Run the Health Monitor, locate the AS3000 leader, and verify the number of files indexed. The “Number of Unique Files Indexed” is the number of files that the Media Indexer is monitoring. 4. Open Interplay Access and verify that media is online. Right-click a clip and choose “Update Status from Media Indexer.” The clip should remain online. Migrating an Interplay Transfer Server This topic describes how to configure an Interplay Transfer Engine running on an AS3000 server. The full description of how to configure the system is described in the Interplay Transfer Setup and User’s Guide. This topic describes tasks specific to the AS3000. The following illustration shows the rear view of an AS3000 server. AS3000 Back Panel 1 2 3 4 PRO/1000 PT Ports PCIe Slots The Interplay Transfer server runs Windows 7 Pro 64 Bit. The server does not require any PCIe cards. For more information about the AS3000, see the Avid AS3000 Setup Guide. 23 ISIS and Network Connections The following table shows the connections for ISIS 5000 and ISIS 7000. Connection Type ISIS 5000 ISIS 7000 First ISIS connection Pro/1000 PT Port Pro/1000 PT Port Second ISIS connection NA Pro/1000 PT Port Network connection Pro/1000 PT Port Port 1 or 3. If you have only one ISIS connection, use the second Pro/1000 PT Port for the network connection. External devices should communicate with the Interplay Transfer engine via the DNS entry of the network connection. MediaNetwork Connection For connection to Avid Unity MediaNetwork, insert the qualified Fibre Channel card in either the top or bottom PCIe slot. Use either of the Pro/1000 PT Ports for the network connection. See “MediaNetwork Connections” on page 39. Port Usage on the Interplay Transfer Server For two workgroups to cooperate, some workstations in one workgroup must have access to services in the other workgroup. If these workgroups are not in the same site, or are separated by routers or firewalls, you have to establish access to allow these services to work together. The main components are an Avid Interplay Engine and two Interplay Transfer Engines. All these services are TCP/IP based. 24 • The Avid Interplay Engine leverages the standard HTTP service on port 80. • The Interplay Transfer Engines use port numbers that are defined in the services file in \WINDOWS\SYSTEM32\DRIVERS\ETC\. As installed, these port numbers are as follows: - 6532 - the Interplay Transfer Engine listens on this port for requests from other TM servers (for example, initiating a workgroup transfer). - 6535 - This is the default port used by the Interplay Transfer Engine for connecting to playback servers (for example, AirSpeed Multi Stream). - 6539 - The Interplay Transfer Engine listens on this port for incoming requests from the Transfer Client. Migrating an Interplay Transfer Server Interplay Transfer uses ports 6432 and 6535 to communicate with the sending or receiving device. After the Transfer Engine establishes the connection, the OS on the external device assigns a port and notifies the Transfer Engine of the new port number. Then the external device starts listening on that port. Transfer Engine uses the new port number for sending or receiving data. For Installation and Configuration Information For information on installing software and configuring an Interplay Transfer Engine, see Interplay Transfer Setup and User’s Guide or the Interplay Help. Copying the TMServer.ini file to the AS3000 The TMServer.ini file contains many of the Interplay Transfer settings. This is the file that the system uses when you open the Interplay Transfer Engine Configuration tool. If you will be using the same ingest and playout devices, it is useful to copy the file to the new AS3000 server. To copy the TMServer.ini file to the AS3000: 1. Navigate to the following location on the Windows XP Interplay Transfer server: C:\Documents and Settings\All Users\Application Data\Avid\Avid Interplay Transfer Engine 2. Copy the TMServer.ini file to the following folder on the AS3000: C:\ProgramData\All Users\Avid\Avid Interplay Transfer Engine 3. (Option) Open the Interplay Transfer Engine Configuration tool to view the settings. 4. (Option) If you use DET for operations such as archive, restore, or Long GOP transfers, copy the DET folder to the AS3000 as described in “Migrating DET Configuration Files to Another Server” on page 25. 5. (Option) If you use Generic FTP profiles, export the FTP Registry key to the AS3000 as described in “Migrating Generic FTP Profiles to Another Server” on page 26. 6. Restart the Transfer Engine. Migrating DET Configuration Files to Another Server If you use DET for operations such as archive and restore or for Long GOP transfers, you can copy the DET configuration files to the AS3000. This also applies if you use third party DET implementations. 25 To copy the DET folder to the AS3000: 1. Navigate to the following location on the Windows XP Interplay Transfer server: C:\Documents and Settings\All Users\Application Data\Avid\Avid Interplay Transfer Engine 2. Copy the DET folder to the following folder on the AS3000: C:\ProgramData\All Users\Avid\Avid Interplay Transfer Engine n For third party DET and DHM implementations you will need to reinstall any third party DET or DHM. Migrating Generic FTP Profiles to Another Server If you have FTP profiles that you want to move to the AS3000, use this procedure to export the FTP registry key containing the profile definitions. To export the FTP registry key: 1. Start the Regedit application on the old Interplay Transfer server. 2. Navigate to the FTP folder shown in the following path and illustration. HKEY_LOCAL_MACHINE > Software > Avid Technology > FTP 26 Migrating an Interplay Transfer Server FTP folder n This is the path used on a Windows XP Transfer Engine system. 3. Right-click the FTP folder and select Export. Export the file to the Desktop and give it a recognizable name such as FTP-regedit-export.reg. 4. Copy the file to the AS3000 Interplay Transfer system. 5. Log onto the AS3000 system and start Regedit. n This assumes that you have already installed Interplay Transfer on the AS3000. 6. Navigate to the following folder on the AS3000: HKEY_LOCAL_MACHINE > Software > Wow6432Node > Avid Technology > FTP Notice that on the Windows 7 system, an additional “Wow6432Node” level is added to the path. This identifies a 32-bit application running on the Windows 7 64-bit system. 7. Open the exported registry file in Notepad or Wordpad. 27 8. The exported file contains the path from the old Windows XP system. You must add the additional Wow6432Node level. 9. Perform a replace/edit to replace SOFTWARE\Avid with the following. SOFTWARE\Wow6432Node\Avid The following illustration shows the open file and the replace window. 10. Save and close the registry file. 11. Right-click the registry file (FTP-regedit-export.reg) and select Merge. The system merges the data with the existing FTP key. 12. (Option) Navigate to the FTP folder in regedit to view the imported profile keys. Migrating a Media Services Engine The Interplay Media Services Engine is supported on the AS3000 server. The Media Services Engine runs Windows 7 Pro 64-bit. No additional PCIe cards are required. Use one of the Intel Pro/1000 PT ports for your network connection. 28 Migrating a Media Services Engine Port Usage for the Media Services Engine To enable the Media Services Engine to communicate with the editors and the provider clients, the network must allow TCP traffic on the following ports: • Listen for editor clients (SOAP): 8080 TCP • Listen; RMI protocol for providers and Status/Admin tool: 1099 TCP • If 1099 is not available: 42000 - 42060 TCP Determining Whether to Migrate the Media Services Engine Database The only way to move your old Media Services Provider profiles to a new server is to migrate the old database. This is an advanced procedure that requires knowledge of SQL databases. In most cases it is easier to write down or take screen captures of the settings for the profiles you are using and then recreate them when after you install the Media Services Engine on the new AS3000 server. You only need to migrate the database if you have a large number of profiles that you do not want to recreate. For details on migrating a Media Services database, see “Migrating a Media Services Database” on page 40. Copying Profiles If you plan to either write down or take screen captures of your existing profiles, you may find it useful to copy representative profiles. For example, you may have a number of profiles that perform transcodes at different resolutions but all of the profiles use the same target workspace. To determine which profiles to copy: 1. Examine the profiles in each profile set and determine which ones should be copied. The following illustration shows a Media Services Engine with several types of profiles. 29 Each service has its own set of profiles 2. Select representative profiles from each group and either write down the values or take screen captures of the windows for future reference. For example, the following Transcode profiles all save to the same workspace and differ mainly in the target resolution. In this case you could write down the values for one profile and then write down the names of the other profiles so that you would know how many others to create at the different resolutions. Or open each additional profile and write down the required target resolution. 30 Migrating a Copy Provider Migrating a Copy Provider The Copy Provider on an AS3000 uses two Myricom PCIe cards for the same purposes as the Chelsio cards on the Intel SR2500. The following illustration shows the rear view of the AS3000. 1 2 3 4 PRO/1000 PT ports Two PCIe slots The AS3000 has two PCIe slots and they both support the Myricom cards. The appropriate drivers are pre-loaded onto the AS3000 image for Windows 7 Pro 64-bit. To install the Myricom cards: 1. Install the cards in the two PCIe slots as described in the AS3000 Setup Guide. 2. Reconnect and restart the system. 31 The system automatically recognizes the Myricom cards because the drivers are pre-loaded on the Windows 7 Pro 64-bit image. If you find it necessary to locate the Myricom drivers, the Myricom drivers folder is located in the following location: C:\Installables\drivers\nic The following illustration shows the Myricom entries in the Windows Device Manager. Making the ISIS Connections This topic describes two different kinds of network connections. For more information on cabling for Avid ISIS, see the Avid Products and Network Site Preparation Guide. c For best performance, do not connect two Copy Providers to the same ISIS chassis. If you have more than one Copy Provider, connect each to a different ISIS chassis. Using the Myricom Cards When using the Myricom cards, connect the Myricom cards directly into the ISS 10-Gb ports on the Avid ISIS Engines. Connect the Copy Provider to both Avid ISIS systems. 32 Migrating a Copy Provider The following illustration shows the Myricom connections to two different ISIS systems named Big ISIS and WG6. n Unused network connections are disabled in the above illustration. This not required and depends on your site policies. Some sites disable all unused NICs. Using the 1Gb Onboad NICs on the Copy Provider When using the 1 Gb onboard NIC on the Copy Provider, connect the Pro/1000 PT ports labeled 2 and 4 on the Copy Provider directly into any 1 Gb port on the Avid ISIS Engines. Connect the Copy Provider to both Avid ISIS systems. Avid does not recommend using the onboard NICs because performance is better using the Myricom cards. Installing the ISIS Client Software This topic describes how to install the ISIS client software. To install the ISIS Client software: t Use the Avid ISIS installer Flash drive to install the ISIS client software. The Avid ISIS System Quick Start Card, located in the top-level Avid ISIS Documentation folder on the Avid ISIS installer flash card, contains instructions for installing Avid ISIS client software. See the ISIS ReadMe for additional information about installing the client software on your system. 33 ISIS Client Manager Settings The Interplay Software Installation and Configuration Guide describes how to set ISIS Client Manager settings and how to configure a Chelsio card as the default network connection. These operations are NOT required for the Myricom cards. Migrating a Move Provider This topic describes how to set up the hardware and ISIS client information for a Move Provider on an AS3000 server. The Move provider is used to move files from one ISIS workspace to another. n The Move feature works only within a single workgroup with a single ISIS System Director. To copy assets and media to a different workgroup, use the Copy Provider. 1 2 3 4 PRO/1000 PT ports Two PCIe slots The AS3000 has two PCIe slots and both support the Myricom cards. The appropriate drivers are pre-loaded onto the AS3000 image for Windows 7 Pro 64-bit. The Move Provider only requires one Myricom card. You can install it in either slot. To install the Myricom card: 1. Install the card in the either of the two PCIe slots as described in the AS3000 Setup Guide. For convenience, use the bottom slot. 2. Reconnect and restart the system. The system automatically recognizes the Myricom card because the drivers are pre installed on the Windows 7 Pro recovery image. For an illustration shows that shows the Myricom card in the Windows Device Manager, see “Migrating a Copy Provider” on page 31. If you find it necessary to locate the Myricom drivers, the Myricom drivers folder is located in the following location: C:\Installables\drivers\nic 34 Migrating an Archive Provider Using a 1Gb Onboad NIC on the Move Provider When using a 1 Gb onboard NIC on the Move Provider, connect one of the Pro/1000 PT ports labeled 2 or 4 on the Move Provider directly into any 1 Gb port on the Avid ISIS Engines. Avid does not recommend using the onboard NICs because performance is better using the Myricom cards. ISIS Connections and Client Software Installation The Move Provider must be directly connected to the ISIS system, using a 10 Gb Ethernet connection. For more information on cabling for Avid ISIS, see the Avid Products and Network Site Preparation Guide. To make the ISIS connections: t Connect the Myricom card directly into the ISS 10-Gb port on the Avid ISIS Engine. To install the ISIS Client software: t Use the Avid ISIS installer USB flash drive to install the ISIS client software. The Avid ISIS System Quick Start Card, located in the top-level Avid ISIS Documentation folder on the Avid ISIS installer flash drive, contains instructions for installing Avid ISIS client software. See the ISIS ReadMe for additional information about installing the client software on your system. Migrating an Archive Provider The Archive Provider runs Windows 7 Pro 64-bit. The server does not require any PCIe cards. For more information about configuring an Archive Provider, see the Avid Media Services Setup and User’s Guide. ISIS and Network Connections The following table shows the connections for ISIS 5000 and ISIS 7000. Connection Type ISIS 5000 ISIS 7000 First ISIS connection Pro/1000 PT Port Pro/1000 PT Port Second ISIS connection NA Pro/1000 PT Port Network connection Pro/1000 PT Port Port 1 or 3. If you only have one ISIS connection, use the second Pro/1000 PT Port for the network connection. 35 Use the network connection to connect to the FlashNet server. MediaNetwork Connection For connection to Avid Unity MediaNetwork, insert the qualified Fibre Channel card in either the top or bottom PCIe slot. See “MediaNetwork Connections” on page 39. Port Usage for the Archive Provider (SGL only) To enable the Archive Provider to communicate with the SGL FlashNet server, the network must allow UDP and TCP traffic on the following ports: • • SQL server and monitor: - 1433, 1434 TCP - 1433, 1434 UDP FlashNet client: 8192 TCP For other third-party archive solutions, see the third party documentation. Migrating a Transcode Provider Transcode Provider runs Windows 7 Pro 64-bit. The server does not require any PCIe cards. Use one of the PRO/1000 PT ports (port 2 or port 4) for a network connection. Migrating a Stream Server The Interplay Stream Server is supported on an AS3000 server running Windows Server 2008 R2 Standard 64-bit. No additional PCIe cards are required. For installation and configuration instructions see the Avid Interplay Software Installation and Configuration Guide. For information on using the Stream Server, see the Interplay Media Services Setup and User’s Guide. Changing System Settings Several system settings must be changed on the default Windows Server 2008 Standard image. See “Changing System Settings on Windows Server 2008 Standard Systems” on page 12. 36 Migrating a Stream Server ISIS Connections The Interplay Stream Server has been qualified with one network connection and with two network connections. Connections to the ISIS network should be through PRO/1000 PT port 2, port 4, or both. There is no performance benefit to dual-connecting the Interplay Stream Server to an ISIS network, since there is enough bandwidth to support 100 simultaneous clients. If a second network connection is required to segment your Stream Server client for security purposes, then it should be connected to the outgoing streaming VLAN. If you use more than one network connection, you must ensure that DNS assigns the appropriate IP address to the Stream Server clients and Interplay Engine. MediaNetwork Connection For connection to Avid Unity MediaNetwork, insert the qualified Fibre Channel card in either the top or bottom PCIe slot. Partitions on the Stream Server The AS3000 Interplay Stream Server ships with two 1 TB (930 GB) drives that are mirrored by the embedded Intel RAID controller. The RAID1 array contains the following partitions: • An unmapped 10GB recovery partition • C:\ with 80 GB of storage • D:\ with the remaining 840 GB of storage You can add an optional expansion kit that adds 4 TB of unmirrored storage. For additional information, see the Avid Interplay Stream Server AS3000 Expansion Kit Upgrade Readme on the Knowledge Base. Port Usage for the Interplay Stream Server To enable streaming from the Interplay Stream Server to Interplay Access clients, the network must allow UDP and TCP traffic on the following ports: n • Direct client/server communications: 554, 7070 TCP • UDP streaming: 6970 - 6999 UDP • Interplay Engine communication: 80 TCP If UDP packets are lost on the way from the server to the client there is no direct feedback. The Stream Server does not get any feedback that the packets were lost, and the Access client must wait until a timeout occurs. 37 Migrating, Renaming, or Adding a Stream Server If you already have a Stream Server in your Interplay environment, you can do one of the following: • Replace an existing Stream Server with an AS3000 that uses the same hostname • Replace an existing Stream Server with an AS3000 that uses a different hostname • Install a new Stream Server on an AS3000 and add it as an additional Stream Server To migrate a Stream Server and keep the same hostname: 1. Install a new Stream Server on an AS3000 by following the instructions in the “Installing and Configuring the Stream Server Software” section of the Avid Interplay Software Installation and Configuration Guide. 2. Copy the contents of the following folder from the original Stream Server to the same location on the new Stream Server: D:\Workgroup_Streams To migrate a Stream Server and rename it: 1. Install a new Stream Server on an AS3000 by following the instructions in the “Installing and Configuring the Stream Server Software” section of the Avid Interplay Software Installation and Configuration Guide but do not add the new Stream Server in the Server Hostname Settings view in the Interplay Administrator. 2. Copy the contents of the following folder from the original Stream Server to the same location on the new Stream Server: D:\Workgroup_Streams 3. Open the Interplay Administrator and log in to the Interplay Engine server for the workgroup that includes the Stream Server. 4. In the Site Settings section, click the Server Hostname Settings icon. The Server Hostname Settings view opens. 5. In the Stream Server Settings area, click the Rename button. The Rename Stream Server and Share dialog box opens. 6. Type the computer name of the system that is now running the Interplay Stream Server. You do not have to type \\ before the name of the server. 7. Click OK. The computer name is displayed in the Server Hostname Settings view, along with the sharename that is the storage location for the required reference movies. 38 Migrating a General Purpose Server To add a Stream Server: t Install a new Stream Server on an AS3000 by following the instructions in the “Installing and Configuring the Stream Server Software” section of the Avid Interplay Software Installation and Configuration Guide but do not install the Framework, Auto-Publish service or Workflow Engine on the same system. A workgroup should contain only one Auto-Publish service and Workflow Engine, which is installed on the system that is running the first Stream Server. After QuickTime reference movies are published, the Interplay Engine automatically distributes them among multiple Stream Servers so that each reference movie is stored on one stream server. Migrating a General Purpose Server The General Purpose Server is used for applications like the Lookup Server, Interplay Adapter, and DNS. The server runs Windows Server 2008 R2 Standard x64. The server does not require any PCIe cards. Use the PRO/1000 PT ports (port 2 or port 4) for network connections. Changing System Settings Several system settings must be changed on the default Windows Server 2008 Standard image. See “Changing System Settings on Windows Server 2008 Standard Systems” on page 12. MediaNetwork Connections This topic describes how to install a Fibre channel card used for MediaNetwork connections on an AS3000 server. The following illustration shows the location of the two PCIe slots. 1 2 3 4 PRO/1000 PT ports Two PCIe slots The AS3000 has two PCIe slots and both support the qualified Fibre channel card. 39 To install the Fibre channel card: 1. Install the card in the either of the two PCIe slots as described in the AS3000 Setup Guide. For convenience, use the bottom slot in case you need to add a second card at a later time. 2. Reconnect and restart the system. See “Fibre Channel Card Drivers” on page 40. 3. If necessary, use one of the Pro/1000 PT ports for a network connection. Fibre Channel Card Drivers The drivers for an ATTO Fibre channel card (model CTFC-41ES-BR1) are pre installed on the Windows 7 Pro 64-bit and Windows Server 2008 R2 Standard 64-bit images. If you install this card, the system automatically recognizes the drivers after you install the card and restart the system. If Avid qualifies additional Fibre channel cards, this document will be updated with information on obtaining the appropriate drivers. You can find the latest version of this document on the Avid Knowledge Base. If you find it necessary to locate the pre installed ATTO drivers, the installers are located in the following location: C:\Installables\drivers\HBA Migrating a Media Services Database For information on migrating a Media Services Engine, see “Migrating a Media Services Engine” on page 28. This section describes how to move your original Media Services database to a new system. Move the database if your site uses a large number of Media Services profiles that you do not want to recreate. If you have a relatively small number of profiles, it is easier to install a new version of the Media Services Engine and recreate the profiles. Checklist for Migrating the Media Services Database to an AS3000 Server This topic describes how to move the Media Services database to the new AS3000 system in order to maintain your existing profiles. c 40 This is an advanced procedure and requires experience working with SQL databases. Perform this procedure only if you have a large number of profiles that you want to maintain. Migrating a Media Services Database This topic is not required if you are setting up a new Media Services Engine and do not require the old database. In that case, proceed to the instructions in the Avid Interplay Software Installation and Configuration Guide. Migrating the Media Services Engine Check List Task Section Reference Add the AS3000 Interplay Media Services server to the Interplay environment. Perform a complete installation and See the Avid Interplay Software Installation configuration of the Media Services and Configuration Guide and Avid Media software on the AS3000. Do not create users Services Setup and User’s Guide. or profiles if you are going to move the old database. It is not necessary to add providers or services at this time. Delete the Media Services database on the AS3000 Interplay Media Services See “Deleting the Media Services Database on the Media Services Engine” on page 41. Migrate the Media Services database from the SR2400 or SR2500 system to the AS3000. See “Migrating the Older Media Services Database to the New Media Services Engine” on page 42. Delete and recreate the dms user in the new See “Recreating the dms User in the Updated Media Services database. Database” on page 43. If necessary, continue with the install and configure any Media Services service providers. Refer to “Migrating a Media Services Engine” on page 28 for Windows operating system and port usage. See the Avid Media Services Setup and User’s Guide. Deleting the Media Services Database on the Media Services Engine c Only perform this procedure if you are migrating an older Media Services database to the new AS3000 system. Before you move the old database to the new AS3000 server, you must delete the existing Media Services SQL database. To delete the database on the AS3000 server: 1. Open the Microsoft SQL Server Management Studio Express application on the AS3000. 2. Open the Databases folder and select dmsdb (the Media Services database). 41 The following illustration shows the dms user in the Microsoft SQL Server Management Studio Express user interface. 3. Right-click dmsdb and select Delete. Follow the system prompts to delete the database. 4. Exit the application. c You will not be able to log in to the Media Services Engine until you migrate the old database. Migrating the Older Media Services Database to the New Media Services Engine n This is an advanced procedure that requires experience working with SQL databases. To move the old database to the AS3000 Server: t Follow the instructions in Microsoft Support Article 224071. Navigate to Microsoft’s support web page: http://support.microsoft.com/ Then search for Article ID 224071. The title of the article is as follows: “How to move SQL Server databases to a new location by using Detach and Attach functions in SQL Server” 42 Migrating a Media Services Database After you move the database, delete and recreate the dms user in the SQL database as described in the following procedure. Recreating the dms User in the Updated Database This procedure is only required if you are migrating an existing database to the AS3000. The Media Services Engine automatically creates a user named “dms.” After you migrate the database you must delete this user and recreate it. To delete and recreate the dms user: 1. Open the Microsoft SQL Server Management Studio Express application on the AS3000. 2. Navigate to Databases/dmsdb/Security/Users and select the dms user, as shown in the following illustration. 3. Right-click the dms user and delete it.The system may state that the user owns a schema and ask if you want to delete it. Click OK and follow the system prompts to delete the user. 43 4. Right-click the Users folder and add a new user named dms. Use the schema and roles as shown in the following illustration. 5. In the application folder structure, right-click Security/Logins/dms and select Properties. Then set the dms login default database to dmsdb. 44 Migrating a Media Services Database n Do not change the default password. This password is automatically created by the Media Services installer and should not be changed,. 6. Exit the application. 7. To verify that the database was successfully migrated, log in to the Media Services engine and check for your old profiles and users. 45 46