1
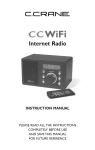
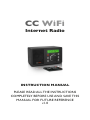
CC WiFi
Internet Radio
INSTRUCTION MANUAL
PLEASE READ ALL THE INSTRUCTIONS
COMPLETELY BEFORE USE AND SAVE THIS
MANUAL FOR FUTURE REFERENCE
v1.0
Before Use
Please read IMPORTANT SAFETY INSTRUCTIONS before use. It
is important to read and understand all instructions. Keep these
precautions and instructions where all who use this radio will read
them.
WARNING: TO PREVENT FIRE OR ELECTRIC SHOCK HAZARD,
DO NOT EXPOSE THIS PRODUCT TO RAIN OR MOISTURE.
CAUTION
CAUTION
RISK OF ELECTRIC SHOCK DO
NOT OPEN
CAUTION: TO REDUCE THE RISK OF ELECTRIC SHOCK, DO
NOT REMOVE THE RADIO BACK. NO USER SERVICEABLE
PARTS INSIDE. REFER SERVICING TO QUALIFIED SERVICE
PERSONNEL.
THE LIGHTNING FLASH AND ARROWHEAD WITHIN
THE TRIANGLE IS A WARNING SIGN ALERTING YOU
OF “DANGEROUS VOLTAGE” INSIDE THE RADIO.
THE EXCLAMATION POINT WITHIN THE TRIANGLE IS
A WARNING SIGN ALERTING YOU OF IMPORTANT
INSTRUCTIONS ACCOMPANYING THIS RADIO.
The box should contain the CC WiFi Radio, AC Adapter and this man ual.
If anything is missing or damaged, please contact your dealer immediately.
We recommend you keep the box in the unlikely event your radio needs to
be serviced.
2
CC WIFI
Table of Contents
Unpacking ................................................................................ 2
Unpacking .............................................................................................................
2
.....
Location of Controls ........................................................... 4-5
Location of Controls ............................................................................................
4-5
Getting Started
Turning the Radio On ................................................ 6
Turning theScanning
Radio On ......................................................................................
6
for Wireless Networks .............................
6
Scanning for
Wireless Networks
6
Connecting
to a...................................................................
Wireless Network ..........................
7
Your
WEP
or WPA Key ..............................
8
ConnectingEntering
to a Wireless
Network
................................................................
7
Connecting to Network Using Ethernet Cable ......
10
Entering Your WEP or WPA Key ....................................................................
8
Choosing a Radio Station ..................................................... 11
Connecting to Network Using Ethernet Cable .............................................
10
Searching for a Station ......................................................... 13
Choosing a Radio Station ...................................................................................
11
Changing the Volume ............................................................
14
Changing
the
Volume
..........................................................................................
12
Storing a Station as a Preset ................................................ 14
Play
a Stored
Radio Station Preset .....................................
Menu
Time
Out .....................................................................................................
13 14
Menu
Out
Setting
theTime
Time and
Date......................................................................
...................................................................................
13 15
Setting the Time and Date .................................................... 15
Setting the Alarm .................................................................................................
14
Setting the Alarm ................................................................... 16
Setting the Sleep Timer .......................................................................................
16
Setting the Sleep Timer ......................................................... 18
Configure
Options
.....................................................................................
17 19
MediaMenu
Player
Functions
........................................................
Help
Pages ...........................................................................................................
19-23
Configure
Menu Options .......................................................
23
Configuring
“My
Stuff”
..........................................................
25
Safety Instructions ..............................................................................................
24
Configuring
“My
Stations”
....................................................
25
Location of CC WiFi Radio Serial Number ........................................................
25
Adding Content to “My Streams” or “My Podcasts” .......... 26
Setting Up Extra Features ..................................................... 27
Using “My Pandora” .............................................................. 27
Using “My Aupeo” ................................................................. 29
Using “Live365” ..................................................................... 31
Help Pages ............................................................................. 33
Menu Flow Charts ................................................................. 40
Safety Instructions ................................................................. 43
Memory Preset Log ............................................................... 44
Location of CC WiFi Radio Serial Number ........................... 48
Software License Information ............................................... 48
Getting Started
CC WIFI
3
Thank you for choosing the CC WiFi radio. Read this manual carefully
to get the best performance from this unit.
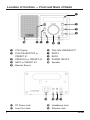
Location of Controls — Front and Back of Radio
Location of Controls — Front and Back of Radio
QQ
WW
EE
RR
P
P
OI U Y T
OI
U Y T
Q LCD Display
Q WLCD
Display
PLAY/PAUSE/STOP
or
PRESET #1
W PLAY/PAUSE/STOP
or
#1 or PRESET #2
EPRESET
PREVIOUS
NEXT or PRESET
#3 #2
E RPREVIOUS
or PRESET
T
Remote
Sensor
R NEXT or PRESET #3
T Remote Sensor
Y
Y
U
U
I
I
O
P
O
P Speaker
w
{ DC Power Jack
} Line Out Jack
{ Page
DC4 Power Jack
} Line Out Jack
4
DIAL/VOLUME/SELECT
DIAL/VOLUME/SELECT
REPLY
REPLY
BACK
BACK ON/OFF
POWER
Speaker
POWER ON/OFF
q}{
Jack
wq Headphone
q}{
w Ethernet Jack
q Headphone Jack CC WiFiCC WIFI
w Ethernet Jack
Location
— Remote
RemoteControl
Control
LocationofofControls
Controls —
e
e
rr
tt
yy
uu
i
i
o
o
p
p
[
[]
A ]
S
A
J
J
H
H
G
G
S
F D
F29-30Dare used only in Media Player
Buttons 23-26 and
mode while playing tracks from your computer.
Buttons 23-26 and 29-30 are used only in Media Player
mode while
computer.
e POWER:
Switchplaying
radio tracks from
] your
STOP:
Stop track play. Press
ON/OFF
1-9: Store
presets
and recall
erPOWER:
Switch
radio
functions
ON/OFF
MUTE: Mute the audio
rt1-9:
Store presets and recall
yfunctions
REPLY: Used for Pandora,
Aupeo! and adding stations
MUTE:
Mute the audio
to Reciva
t
yuREPLY:
Used
STORE:
StoreforupPandora,
to 99
radio stations
Aupeo!
and adding stations
Reciva
ito --/-:
Used for presets 10 and
above Store up to 99
u STORE:
oradio
RECALL:
Play pre-set
stations
stations
i --/-: Used for presets 10 and
pabove
+ or - VOL: Adjust volume
[ PLAY/PAUSE: Play or pause
o RECALL:
track Play pre-set
stations
p +WiFi
or - VOL: Adjust volume
[ PLAY/PAUSE: Play or pause
CC WIFI
CC
track
and hold to delete a track
from the playlist
] STOP: Stop track play. Press
A NEXT:
track a track
and Play
hold next
to delete
S BROWSE:
tracks in
from theView
playlist
A playlist
NEXT: Play next track
S options
BROWSE: View tracks in
D UP/DOWN: Scroll through
playlist
F SELECT:
Select a displayed
D option
UP/DOWN: Scroll through
options
G MODE:
Switch between
and Shuffle
F Repeat
SELECT:
Select modes
a displayed
H PREV:
Play previous track
option
J
BACK:
Reverts
back
to the
G MODE:
Switch
between
previous
option modes
Repeatmenu
and or
Shuffle
H PREV: Play previous track
J BACK: Reverts back to the
previous menu or option
Page 5
5
GettingStarted
Started–– Turning
Turning On
Getting
On Your
YourWiFi
WiFiRadio
Radio
Note: Configuring a WiFi radio is similar to navigating through a cell
Note: Configuring a WiFi radio is similar to navigating through a cell
phone menu.
phone menu.
Plug the power adapter cube into a 120V AC power outlet. Connect
Plug
power
adapter
cube
120V
thethe
power
adapters
small
pluginto
intoathe
jackAC
on power
the backoutlet.
of theConnect
radio
thethat
power
adapters
small
plug
into
the
jack
on
the
back
of the radio
is labeled “DC IN 7.5V”.
that
is labeled
7.5V”.
Caution:
Use“DC
onlyINthe
power adapter supplied with the radio.
Caution:
Use aonly
theadapter
power adapter
supplied
the radio.
Connecting
power
other than
the one with
that was
supplied with your
radioadapter
could cause
permanent
the supConnecting
a power
other
than the damage
one thattowas
radio
andyour
may radio
be hazardous.
plied
with
could cause permanent damage to the
radio
may
be hazardous.
Afterand
a few
seconds
the display on the front of the radio will light up
andashow:
After
few seconds the display on the front of the radio will light up
and show:
CC WiFi Radio
CC WiFi Radio
Followed by:
Followed by:
Reciva Enabled
ARM Powered
Reciva Enabled
ARM Powered
Followed by:
Followed by:Starting ...
and
Starting ...
and
Followed by:
Initialising
Network
Initialising
Network
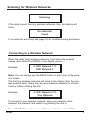
< Scan for Networks >
Followed by:
Enter Network
< Scan for Networks >
Enter Network
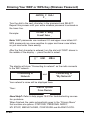
Scanning for Wireless Networks
When <Scan for Networks> is displayed, press “SELECT” by press-
Scanning
for Wireless
Networks
ing “in” the main
dial (the main
dial should click when pressed in).
The display will show:
When <Scan for Networks> is displayed, press “SELECT” by press6ing “in” the main dial (the main dial should click when pressed in).CC WIFI
Page 6
CC WiFi
The display will show:
Scanning
Networks
Scanning for
for Wireless
Wireless Networks
Scanning
Scanning
IfIfthe
wireless networks,
networks,then
thenthe
thedisplay
displaywillwill
theradio
radiocannot
cannot find
find any wireless
show:
show:
No
No networks
networks
found
found
nonetworks
networks are
are found,
found, see
see page
33
IfIfno
page19
33for
fortroubleshooting
troubleshootingassistance.
assistance.
Connecting to a Wireless Network
Connecting to a Wireless Network
When the radio finds wireless networks, it will show the network
When
radio
findsthe
wireless
it willscreen.
show the network
namesthe
(also
called
ESSID)networks,
in the display
names (also called the ESSID) in the display screen.
Example:
Example:
< WiFi Network 1 >
< WiFi
WiFi Network
Network21 >
WiFi Network 2
Note: You can always use the BACK button to start over at the previous screen.
Note:
You can always use the BACK button to start over at the previous
Thescreen.
first two wireless networks will show in the display after the wirelessfirst
network
scan. There
may be
wireless
to choose
The
two wireless
networks
willmore
show
in the networks
display after
the wirefromnetwork
by further
rotating
themay
dial.be more wireless networks to choose
less
scan.
There
from by further rotating the dial.
< WiFi Network 2 >
Example:
YourNetwork
Network 2 >
< WiFi
Example:
Your Network
To connect to your wireless network, align your network name
between the brackets and select it by pushing the dial in.
To connect to your wireless network, align your network name
between the brackets and select it by pushing the dial in.
Need Help?: Refer to help page 36 for help finding which SSID
Name) is yours.
CC(Network
WIFI
Need Help?: Refer to help page 36 for help finding which SSID
(Network Name) is yours.
CC WiFi
Page 7
7
Connectingto
toaa Wireless
Wireless Network
Connecting
Network
If the display
If the display
shows:
shows:
Connecting to
Connecting
to
Network
Network
then continue
then continue
on to page 12.
on to page 12.
However, if the screen displays:
However, if the screen displays:
Enter WEP Key
Enter WEP Key
or
or
Enter WPA Key
Enter WPA Key
you must enter the correct WEP or WPA wireless encryption key
Password)
to proceed.
you(Wireless
must enter
the correct
WEP or WPA wireless encryption key
Note: Take
note which
of key your network requires for future
(Wireless
Password)
to type
proceed.
reference.
Note: Take note which type of key your network requires for future
reference.
Entering Your WEP or WPA Key (Wireless Password)
Entering
Your WEP or WPA33Key
(Wireless Password)
Need Help?: Refer to help page 19
for help finding your WEP or
WPA Key.
Need
Refer tothe
help
pagewill
33goforinto
help
finding your
or
AfterHelp?:
a few seconds
display
a password
entryWEP
mode.
WPA
Key.
This mode contains upper case letters, lower case letters, numbers,
andaspecial
characters.
After
few seconds
the display will go into a password entry mode.
This mode contains upper case letters, lower case letters, numbers,
and special characters. END < > A BCDE
<>
BCDE
Notice that the letter “A” END
is separatedAfrom
the other characters in the
center of the display. Rotate the dial and you will see how the center
character is always separated from the other characters. Continue
rotating
dial
until“A”
the is
first
character from
of your
or characters
WPA password
Notice
thatthethe
letter
separated
theWEP
other
in the
is
in
the
center
of
the
display.
Select
it
by
pressing
the
main
center of the display. Rotate the dial and you will see howdial
thein.
center
character is always separated from the other characters. Continue
ABCDE F GHIJ
rotating the dial until the first character of your WEP or WPA password
_ it by pressing the main dial in.
is in the center of the display. Select
After you have selected theABCDE
first character
of your password, it will
F GHIJ
appear below.
_
8
CC WIFI
Page 8
After
you have selected the first character of your password,CCit WiFi
will
appear below.
Entering
Key(Wireless
(WirelessPassword)
Password)
EnteringYour
YourWEP
WEP or
or WPA
WPA Key
ABCDE FF GHIJ
ABCDE
GHIJ
FF __
Turn the dial to the next character in the password and SELECT.
Turn the dial to the next character in the password and SELECT.
Repeat this process until your entire wireless password is entered on
Repeat
this line.
process until your entire wireless password is entered on
the lower
the lower line.
XYZab c defg
Example:
XYZab
c defg
Frank12abc
_
Example:
Frank12abc _
Note: WEP passwords use numbers 0-9 and upper case letters A-F.
WPAWEP
passwords
are case
to 0-9
upper
andupper
lowercase
case letters
letters, A-F.
Note:
passwords
usesensitive
numbers
and
so
you
must
enter
them
exactly.
WPA passwords are case sensitive to upper and lower case letters,
so After
you must
enter
them exactly.
the final
character
is entered, turn the dial until “END” shows in
the middle of the display — press the dial to select.
After the final character is entered, turn the dial until “END” shows in
the middle of the display — press the dial to select.
( ) “ END ghA
( )“
END
ghA
The display will show “Connecting to network” as the radio connects
to the WiFi network.
The display will show “Connecting to network” as the radio connects
Connecting to
to the WiFiConnecting
network. to
and
Network
“My Network”
Connecting to
and
Your networkʼs
name will be displayed here.
Network
Connecting to
“My Network”
Station Update
Then:
Your networkʼs name will be displayed
here.
From Reciva
Station Update
Then:
Need Help?: Refer to help pages 19-23
33-39 for troubleshooting connec-
From Reciva
tion problems.
When finished, the radio automatically goes to the “Primary Menu”
that Help?:
containsRefer
six options:
PERSONAL
RADIO,
Need
to helpSTATIONS,
pages 33-39
for troubleshooting
connecMY STUFF, MEDIA PLAYER, CONFIGURE and ALARM CLOCK.
tion problems.
When finished, the radio automatically goes to the “Primary Menu”
CC WIFI
WiFi
thatCCcontains
six options: STATIONS, PERSONAL RADIO, Page 9
MY STUFF, MEDIA PLAYER, CONFIGURE and ALARM CLOCK.
9
Connecting
Ethernet Cable
Cable (optional)
(optional)
Connecting to
to aa Network
Network Using
Using Ethernet
When
little setup
setup is
is required.
required.
When using
using an
an ethernet
ethernet cable
cable to
to connect,
connect, little
1.
power, connect
connect aa standard
standard Cat5
Cat5
1. While
While the
the radio
radio is
is unplugged
unplugged from
from power,
or
Cat6
Ethernet
cable
(not
included
with
radio)
or Cat6 Ethernet cable (not included with radio)
to
The LAN
LAN
to an
an open
open LAN
LAN port
port on
on your
your router.
router. The
ports
are
the
ones
typically
numbered
1-4
on
ports are the ones typically numbered 1-4 on
the
back
of
your
router.
the back of your router.
Note:
from
Note: Ethernet
Ethernet cables
cables can
can be
be purchased
purchased from
C.
Crane
Company
or
your
local
electronics
store.
C. Crane Company or your local electronics store.
2.
cable to
to the
the Ethernet
Ethernet
2. Connect
Connect the
the opposite
opposite end
end of
of the
the Ethernet
Ethernet cable
port
port on
on the
the back
back of
of your
your radio.
radio.
3.
3. Plug in the power cord to the radio.
After
After a few seconds, the connection light will flash indicating a good
connection.
connection.
After
After the radio successfully connects to your router it will automatically
go
go to
to the “Primary Menu” that contains six options: STATIONS,
PERSONAL
PERSONAL RADIO, MY STUFF, MEDIA PLAYER, CONFIGURE and
ALARM
ALARM CLOCK.
Need
37 for troubleshooting connection
Need Help?: Refer to help page 23
problems.
problems.
Note:
Note: Menu tree flow charts are located on pages 40-42.
Page
Page 10
10
10
CC WiFi
WiFi
CC
CC WIFI
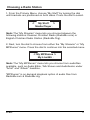
Choosing
Radio Station
Station
Choosing aa Radio
1.
From the
Menu,
choose“Stations”
“My Stuff”byby
turning
the dial
1.
thePrimary
Primary Menu,
Menu,choose
choose
turning
the
until
1. From
From
the
Primary
“Stations”
by
turning
the
dialdial
until
brackets
are
positioned
on
both
sides.
Press
the
dial
tountil
select.
brackets
are positioned
positionedon
onboth
bothsides.
sides.Press
Pressthethe
dial
select.
brackets are
dial
to to
select.
<<
Stations
My
Stuff
Stations
>>
Personal
Radio
Personal
Radio
Media
Player
2. Next,
Next, turn the
either
thethe
2.
the dial
dial totochoose
chooseaaradio
radiostation
stationfrom
from
either
Note:
The “My“Genre”
Streams”“Search”
menu lets youPress
choose dial
between
the
“Location”,
to to
continue
“Location”,
“Genre”or
or “Search”menu.
menu. Pressthethe
dial
continue
following
stations:
Russian
Christian
Radio
(RadioMv.com)
or
into the selected
into
selected menu.
menu.
English
Christian
Radio
Station
(RadioMv.Org).
Choosing a Radio Station
Note: The
The “Location”
station
from
a parNote:
“Location” menu
menulets
letsyou
youchoose
choosea aradio
radio
station
from
a particular
continent
then
country.
The
“Genre”
menu
lets
you
choose
a
ticular
continent
then
country.
The
“Genre”
menu
lets
you
choose
2. Next, turn the dial to choose from either the “My Streams” ora “My
1. From
theby
Primary
Menu,content
choose–“Stations”
by turning
dial
until
radio
station
categorized
forforexample:
“Dance,the
Classical,
radio
station
by
categorized
example:
Classical,
MP3tunes”
menu.
Press thecontent
dial to–continue
into “Dance,
the selected
menu.
brackets
are
positioned
on
both
sides.
Press
the
dial
to
select.
Rock,
Talk”
etc.
For
direct
station
name
entry,
see
“Searching
for
a
Rock, Talk” etc. For direct station name entry, see “Searching for a
Station” on
on page
Station”
page 13.
13.
MP3tunes >
< My Stations
Location
Radio
>> Personal
My Live365
Location
<< Location
Location
or
<< Genre
>>
Genre
or
Genre
Genre
2.
Next,
turn
the
dial
to
choose
a
radio
station
from
either
the
Note: The “My MP3tunes” menu lets you choose from audiofiles
“Location”,
or “Search”
Press the dial
to favorite
continue
Need
Help?:
To“Genre”
findAudio
which
genre Talk
ormenu.
location
your
available,
such
as
Bible,
Showscontains
and Audiobooks
under
Need
Help?:
Tohelp
findpage
which
genre or location contains your favorite
into
the selected
menu.
station,
refer
to
38.
"Artist" and "Album" headline.
station, refer to help page 38.
“Location”
menu on
lets“Location”
you choose
radio station
a par3.Note:
AfterThe
pressing
“SELECT”
or a“Genre”,
rotate from
the dial
"MP3tunes"
is onthen
demand
playback
option
of
audio
files
fromadial
continent
The
lets you
choose
3.ticular
After
pressing
“SELECT”
on
“Location”
or
“Genre”,
rotate
to scroll
through
thecountry.
locations
or “Genre”
genres. menu
Selections
are
listedthe
in
RadioMv.com
&order.
RadioMv.org
radio
station
by
categorized
content
for example:
“Dance,
to
scroll
through
the locations
or –genres.
Selections
areClassical,
listed in
alphabetical
Rock,
Talk”
etc.
For
direct
station
name
entry,
see
“Searching
for a
alphabetical order.
Press
theon
dialpage
to continue
into the selected menu.
Station”
13.
Press the dial to continue into the selected menu.
USA
> Location
Location< >
By<Location:
or
<
USA
Venezuela
< > Genre
>
Genre
By Location:
Venezuela
or
Need Help?: To find which genre or location contains your favorite
or
station, refer to help page 38.
<
News
Talk
>
By Genre:
3. After pressing “SELECT”
on
“Location”
or
“Genre”,
Updates
< News
News
Talk
> rotate the dial
Byto Genre:
scroll through the locations or genres. Selections are listed in
News Updates
alphabetical
4. After
loading, order.
the first two radio stations will show in the display
screen. dial to continue into the selected menu.
4.Press
Afterthe
loading, the first two radio stations will show in the display
screen.
<
USA
>
CC WiFi
Page 11
CC WIFI
11
Changing the
Changing
theVolume
Volume
You can change the volume by turning the dial clockwise to increase
You
can change the volume by turning the dial clockwise to increase
the volume and counterclockwise to decrease the volume. The display
the
volume
and counterclockwise to decrease the volume. The display
shows the volume bar. You cannot change the volume when you are
shows
the
volume
bar. using
You cannot
change
the After
volume
whenisyou are
in a menu, except when
the remote
control.
a station
in
a
menu,
except
when
using
the
remote
control.
After
a with
station
selected and begins to play, you can then change the volume
the is
selected
and
begins
to
play,
you
can
then
change
the
volume
with the
main dial.
main dial.
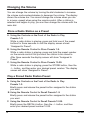
Store a Radio Station as a Preset
Store a Radio Station as a Preset
A. Using the Controls on the Front of the Radio to Play
Presetsthe
1-3.Controls on the Front of the Radio to Play
A. Using
While
a
radio
Presets 1-3. station is playing, press and hold one of the preset
buttons for three seconds or until the display screen shows
While a radio station is playing, press and hold one of the preset
“Assigned to Preset”.
buttons for three seconds or until the display screen shows
B. “Assigned
Using the Remote
Control to Store Presets 1-9.
to Preset”.
While a radio station is playing, press and hold the preset number
B. Using
the Remote
Store
on the remote
controlControl
that youto
want
the Presets
station to1-9.
be stored to.
While
a radio
station
playing,
press
hold
the preset
After three
seconds
theisdisplay
screen
willand
show
“Assigned
to number
Preset”.
on
the remote control that you want the station to be stored to.
seconds
the display
screen
will10-99.
show “Assigned to
C. After
Usingthree
the Remote
Control
to Store
Presets
Preset”.
While a radio station is playing, press the STORE button, then the
-/-- button,
then enter
yourtodesired
number.
C. Using
the and
Remote
Control
Store preset
Presets
10-99.The display
screen
will
show
“Assigned
to
Preset”.
While a radio station is playing, press the STORE button, then the
-/-- button, and then enter your desired preset number. The display
screen
will show
“Assigned
Preset”.
Play
a Stored
Radio
StationtoPreset
A. Using the Controls on the Front of the Radio to Play
Play
a Stored
Presets
1-3. Radio Station Preset
Briefly press and release the preset button assigned to the station
A. Using
the Controls on the Front of the Radio to Play
you want.
Presets 1-3.
B. Using the Remote Control to Recall Presets 1-9.
Briefly
pressand
andrelease
release
preset
button
assigned
the station
Briefly press
thethe
preset
button
assigned
to thetostation
you
want.
you want.
B. Using
theRemote
RemoteControl
Control
Recall
Presets
1-9.
C.
Using the
to to
Recall
Presets
10-99.
Briefly
pressthe
andRECALL
releasebutton,
the preset
button
assigned
the station
Briefly press
then the
--/- button,
andto
then
enterwant.
your desired preset number 10-99.
you
C. Using the Remote Control to Recall Presets 10-99.
14
CC WiFi CC WIFI
Briefly
press the RECALL button, then the --/- button, and
then
enter your desired preset number 10-99.
12Page
MenuTime-Out
Time-Out
Menu
Whena aradio
radiostation
station is
is playing
playing —
SELECT
is pressed,
the the
When
—ififBACK
BACKoror
SELECT
is pressed,
radio will go into menu selection mode. If no radio controls are used
radio will go into menu selection mode. If no radio controls are used
within ten seconds, the radio will “time-out” and go back to the curwithin
ten seconds, the radio will “time-out” and go back to the currently playing radio station.
rently playing radio station.
Setting the Time and Date
Setting the Time and Date
Note: At any point, you can use the BACK button to start over at the
previous
screen.
Note:
At any
point, you can use the BACK button to start over at the
1. If you
are currently listening to a radio station, briefly press the dial
previous
screen.
once to access the Primary Menu. You can also access the
1. If you
are Menu
currently
listening
to holding
a radiothe
station,
Primary
by pressing
and
BACKbriefly
button.press the dial
once to access the Primary Menu. You can also access the
The Primary Menu contains six options: STATIONS, PERSONAL
Primary
by pressing
holding
the BACK and
button.
RADIO,Menu
MY STUFF,
MEDIAand
PLAYER,
CONFIGURE
ALARM
The
Primary Menu contains six options: STATIONS, PERSONAL
CLOCK.
STUFF,
MEDIA
PLAYER,
CONFIGURE
ALARM
2.RADIO,
Turn theMY
main
dial until
“Configure”
shows
in brackets —and
press
the
CLOCK.
dial to select.
2. Turn the main dial until “Configure”
shows in brackets — press the
Media Player
dial to select.
< Configure >
Media Player
Configure
3. Turn the dial clockwise to “Clock Setup” — press the dial to select.
<
>
Register
3. Turn the dial clockwise
to
“Clock
Setup”>— press the dial to select.
< Clock Setup
Register
4. Turn the dial to “Set Time/Date”
— press the dial to select..
<
Clock Setup
>
< Set Time/Date >
Clock Format
4. Turn the dial to “Set Time/Date”
— press the dial to select..
5. Turn the dial until the hour setting is correct — press the dial to
Set Time/Date
select.
<
>
Clock
Format
6. Turn the dial until the minute
setting
is correct — press the dial to
select.
5. Turn the dial until the hour setting is correct — press the dial to
select.
CC WIFI
CC WiFi
Page 15
6. Turn the dial until the minute setting is correct — press the dial to
select.
13
Settingthe
the Time
Time and
Setting
andDate
Date
Set
SetTime
Time
12:00 AM
12:00 AM
7. Turn the dial until the day of the month is correct — press the dial
7. Turn
the dial
untilthe
thesame
day method
of the month
is correct
— press
the dial
to select.
Follow
for setting
the month
and year.
to select. Follow the same method for setting the month and year.
Set Date
01 Set
Jan Date
2008
01 Jan 2008
8. When finished, the radio will show “Time and Date Set”.
8. When finished, the radio will show “Time and Date Set”.
Time and Date
TimeSet
and Date
Set
Setting the Alarm
Setting
thepoint,
Alarm
Note: At any
you can use the BACK button to start over at the
previous screen.
1. If At
youany
arepoint,
currently
a radio
station,
briefly
pressover
the dial
Note:
youlistening
can usetothe
BACK
button
to start
at the
oncescreen.
to access the Primary Menu. You can also access the
previous
Primary Menu by pressing and holding the BACK button.
1. If you are currently listening to a radio station, briefly press the dial
The Primary Menu contains six options: STATIONS, PERSONAL
once
to access the Primary Menu. You can also access the
RADIO, MY STUFF, MEDIA PLAYER, CONFIGURE and ALARM
Primary
Menu by pressing and holding the BACK button.
CLOCK.
contains until
six options:
STATIONS,
2.The
TurnPrimary
the mainMenu
dial clockwise
“Alarm Clock”
shows inPERSONAL
brackets
RADIO,
MEDIA PLAYER, CONFIGURE and ALARM
— pressMY
theSTUFF,
dial to select.
CLOCK.
Configure
2. Turn the main dial clockwise
until “Alarm Clock” shows in brackets
<
Alarm
Clock >
— press the dial to select.
3. Turn the dial until “Set Alarms”
shows in brackets — press the dial
Configure
to select.
<
Alarm Clock
>
<
Set Alarms
Sleep Timer
>
<
Set Alarms
>
3. Turn the dial until “Set Alarms”
shows in brackets — press the dial
Sleep Timer
to select.
14
Page 16
CC WiFi
CC WIFI
Settingthe
theAlarm
Alarm
Setting
4. Turn the dial and choose one of the five alarm slots to set — press
4. Turn the dial and choose one of the five alarm slots to set — press
the dial to select.
the dial to select.
Disable All
< Disable
1 OFF All >
<
1 OFF
>
5. Turn the dial until the hour setting is correct — press the dial to
select.
5. Turn
the dial until the hour setting is correct — press the dial to
6.select.
Turn the dial until the minute setting is correct — press the dial to
select.
6. Turn
the dial until the minute setting is correct — press the dial to
select.
Set Alarm
12:00
AM
Set Alarm
12:00 AM
7. Choose how frequently you want the alarm to sound. Choose
between “Once”, “Every Day”, “Weekly”, “Week Days”, and
7. Choose
how frequently
the alarm to sound. Choose
“Weekends”
— press theyou
dialwant
to select.
between “Once”, “Every Day”, “Weekly”, “Week Days”, and
“Weekends” — press<the dialOnce
to select.>
Every Day
<
Once
>
Note: If “Once” or “Weekly” is selected, you will also be prompted to
Every Day
select the day of the week that you would like the alarm to sound.
Note: If “Once” or “Weekly” is selected, you will also be prompted to
8. Choose whether to sound the alarm as a buzzer or a preset radio
select the day of the week that you would like the alarm to sound.
station — press the dial to select.
8. Choose whether to sound
alarm as >
a buzzer or a preset radio
< the
Buzzer
station — press the dialPreset
to select.
Station
<
>
Note: If you do not have any radio
stations stored as presets, then
Buzzer
“Buzzer” will be your only option.
Preset Station
9. When the setup is finished, the display will show “Alarm Set”.
Note: If you do not have any radio stations stored as presets, then
“Buzzer” will be your only option.
Alarm Set
9. When the setup is finished, the display will show “Alarm Set”.
CC WIFI
CC WiFi
Alarm Set
Page 17
15
Settingthe
theSleep
Sleep Timer
Timer
Setting
Withthe
thesleep
sleeptimer
timer enabled,
enabled, the
willwill
automatically
With
theinternet
internetradio
radio
automatically
switch itself off after a set amount of time.
switch itself off after a set amount of time.
Note: At any point, you can use the BACK button to start over at the
Note:
At any point, you can use the BACK button to start over at the
previous screen.
previous screen.
1. If you are currently listening to a radio station, briefly press the dial
1. If once
you are
currently
to a radio
station,
briefly press
to access
the listening
Primary Menu.
You can
also access
the the dial
once
to
access
the
Primary
Menu.
You
can
also
access
Primary Menu by pressing and holding the BACK button. the
Primary
MenuMenu
by pressing
holdingSTATIONS,
the BACK PERSONAL
button.
The Primary
containsand
six options:
RADIO,
MY Menu
STUFF,contains
MEDIA PLAYER,
CONFIGURE
andPERSONAL
ALARM
The
Primary
six options:
STATIONS,
CLOCK.MY STUFF, MEDIA PLAYER, CONFIGURE and ALARM
RADIO,
2.CLOCK.
Turn the main dial clockwise until “Alarm Clock” shows in brackets
— press
the dial
select. until “Alarm Clock” shows in brackets
2. Turn
the main
dialtoclockwise
— press the dial to select. Configure
<
>
Alarm
Clock
Configure
<
>
Alarm Clock
3. Turn the dial until “Sleep Timer” shows in brackets — press the
dial to select.
3. Turn the dial until “Sleep Timer” shows in brackets — press the
Set Alarms
dial to select.
< Sleep Timer >
Set Alarms
4. The radio will show<“SleepSleep
Timeout”
and the amount
Timer
> of time before
the radio turns off. By default the sleep timer is turned off.
4. The radio will show “Sleep
Timeout”
and the amount of time before
Sleep
Timeout
the radio turns off. By default
the
sleep
< Off > timer is turned off.
Sleep Timeout
Turn the dial to increase the amount of time before the radio turns
itself off. 15 minute increments areOff
used. Press the dial to select.
<
>
Timeout
Turn the dial to increase theSleep
amount
of time before the radio turns
< are
00:15
itself off. 15 minute increments
used. >
Press the dial to select.
“Timer Set” will show in the Sleep
display Timeout
indicating that the radio will play for
00:15
the selected amount of time before
switching itself off.
<
“Timer Set” will show in the display
indicating that the radio will play for
16 Page 18
the selected amount of time before
switching itself off.
>
Timer Set
Timer SetCC WiFiCC WIFI
Configure Menu
Menu Options
Configure
Options
To access the “Configure” menu follow these steps:
To access the “Configure” menu follow these steps:
1. Briefly press the dial once to access the Primary Menu. You can
1. Briefly
press the
thePrimary
dial once
to access
the Primary
Menu.
can
also access
Menu
by pressing
and holding
theYou
BACK
also
access
the
Primary
Menu
by
pressing
and
holding
the
BACK
button.
button.
The Primary Menu contains six options: STATIONS, PERSONAL
The
Primary
Menu contains
six options:
STATIONS,and
PERSONAL
RADIO,
MY STUFF,
MEDIA PLAYER,
CONFIGURE
ALARM
RADIO,
CLOCK.MY STUFF, MEDIA PLAYER, CONFIGURE and ALARM
2. CLOCK.
Turn the main dial until “Configure” shows in brackets — press the
2. Turn
mainTurn
dial until
“Configure”
in brackets
— press the
dial tothe
select.
the dial
clockwiseshows
to access
all the options.
dial to select. Turn the dial clockwise to access all the options.
<Network Config>
<Network
This optionConfig>
is used for configuring your radioʼs network settings, network
parameters,
for your
wireless
networks.
Once
the radio
This option
is usedand
for scanning
configuring
radioʼs
network
settings,
nethas
established
a
connection
to
the
network,
the
information
work parameters, and scanning for wireless networks. Oncewill
theberadio
saved
to the radio
for later use.to the network, the information will be
has
established
a connection
saved to the radio for later use.
<Version>
Displays the electronic serial number and other information pertaining
<Version>
to
software
hardware
installed
on your
internet
radio.
Displays
theand
electronic
serial
number
and other
information
pertaining
to<Upgrade
software Firmware>
and hardware installed on your internet radio.
Use this option
to download new control programing for the radio. If
<Upgrade
Firmware>
there is new firmware available when this option is selected, then the
Use this option to download new control programing for the radio. If
radio will prompt you to download.
there is new firmware available when this option is selected, then the
Note:
A firmware
upgrade
may take several minutes. DO NOT TURN
Configure
Menu
Options
radio
will
prompt
you
to download.
OFF THE POWER TO YOUR RADIO WHEN UPGRADING FIRMNote: A firmware upgrade may take several minutes. DO NOT TURN
WARE.
the firmware
is interrupted,
radio may endure
OFF
THEIf POWER
TO upgrade
YOUR RADIO
WHENyour
UPGRADING
FIRMCC WiFi
Pageto23
permanent
damage. A firmware upgrade may take several minutes
finish.
CC WiFi
<Language>
Allows you to change the display language.
Page 23
<Factory Reset>
This option puts all settings back to their default, as they were when
the radio left the factory. If you perform a factory reset on your radio,
you will lose all your presets, clock settings, and wireless network
connection settings.
<Register>
This option will display a key that can be used to register the radio on
the Reciva Customer Portal.
CC WIFI
17
<Factory Reset>
This option puts all settings back to their default, as they were when
the radio left the factory. If you perform a factory reset on your radio,
you
will lose all
your presets,
clock settings, and wireless network
Configure
Menu
Options
connection settings.
To<Register>
access the “Configure” menu follow these steps:
option
will display
key that
be used
registerMenu.
the radio
1.This
Briefly
press
the diala once
to can
access
the to
Primary
Youoncan
RadioMv
Stream
Network.
the
Reciva
Customer
Portal.
also access the Primary Menu by pressing and holding the BACK
button.Set Up>
<Clock
Use
option to
set the
time, date
clock STATIONS,
format. See “Setting
Thethis
Primary
Menu
contains
six and
options:
PERSONAL
the
Time
and
Date”
on
page
15.
13-16.
RADIO, MY STUFF, MEDIA PLAYER, CONFIGURE and ALARM
CLOCK.
<Backlight>
2.Selecting
Turn thethis
main
dial until “Configure” shows in brackets — press the
option will alter the Internet radioʼs backlight values.
dial to select. Turn the dial clockwise to access all the options.
1. After selecting the “Backlight” menu item, the radio will show three
backlight
adjustment modes: “Inactive”, “Active”, and “Standby”.
<Network
Config>
These three settings are explained below:
This option is used for configuring your radioʼs network settings, neta) The “active” state is when the user is pressing buttons or
work parameters, and scanning for wireless networks. Once the radio
turning knobs.
has established a connection to the network, the information will be
b) The radio goes into its “inactive” state when there is no
saved to theuser
radio
for later use.
activity for 30 seconds.
c) “Standby” is the state when the radio has been turned off.
<Version>
2.
Rotate
dial to select
thenumber
desired backlight
— press pertaining
the
Displays thetheelectronic
serial
and othermode
information
dial to select.
to software and hardware installed on your internet radio.
3. The radio will display the current backlight value for the selected
mode. You
can change this value by turning the dial to increase or
<Upgrade
Firmware>
decrease it.
Use this option to download new control programing for the radio. If
there
is new firmware
available when this option is selected, then the
<UPNP>
Configure
Menu Options
radio
will
prompt
you
to
download.
Use this option to set a name
for your radio that can be recognized by
Note:
A firmware
the UPNP
Server.upgrade may take several minutes. DO NOT TURN
OFF
THE
POWER
TO YOUR RADIO WHEN UPGRADING
Page 24
CCFIRMWiFi
<WiFi Strength>
the 23
CCThis
WiFioption will give you your current WiFi signal strength between Page
radio and the router. Our experience shows that a signal strength of
20 to 30% is required for good reception.
Configuring “My Stuff”
18
Registering an account on Recivaʼs website:
1. Open Recivaʼs website, http://radios.reciva.com, from your
Internet browser on your computer.
CC WIFI
2. Enter your Register Code, which can be found from the “Configure
> Register” menu on the radio. Refer to page 42 for the Menu
HelpPages
Pages—
—Wireless
Wireless Network
Help
NetworkHelp
Help
“No
NetworksFound”
Found” shows
shows after
wireless
net-net“No
Networks
afterscanning
scanningforfor
wireless
works:
works:
1. Sometimes your wireless network will not show on the first scan.
1. Sometimes
your wireless network will not show on the first scan.
Try scanning for networks again on your radio.
Try scanning for networks again on your radio.
2. Check the LED lights on the front of your wireless router. Be sure
2. Check
the“power”
LED lights
on the front
yourare
wireless
router.
that the
and “wireless”
LEDoflights
on. If they
are Be
not sure
that
andto“wireless”
LED lightsofare
If they
are not
on,the
you“power”
may need
call the manufacturer
theon.
router
for more
on,assistance.
you may need to call the manufacturer of the router for more
assistance.
3. Your radio may be out of range of your wireless network. Place the
radio
closer
to your
router
as a test,
thenwireless
scan for wireless
3. Your
radio
may
be out
of range
of your
network.netPlace the
works
again.
WiFi as
Radio
maythen
not have
WiFinetradio
closer
toThe
yourCC
router
a test,
scanthe
forsame
wireless
rangeagain.
as a new
laptop.
works
TheWiFi
CC enabled
WiFi Radio
may not have the same WiFi
4.range
Thereasisaa new
setting
on enabled
your WiFilaptop.
router called “Enable SSID
WiFi
Broadcast”. This must be enabled. You may need to call the manu-
4. There
is aofsetting
on your
WiFiassistance.
router called “Enable SSID
facturer
the router
for more
Broadcast”. This must be enabled. You may need to call the manufacturer of the router for more assistance.
About Your Network Name (SSID): This is the name which was
assigned to your wireless router by the person who set it up. After
scanning
your wireless
network,
rotate
dial name
throughwhich
all of the
About
YourforNetwork
Name
(SSID):
Thisthe
is the
was
results because
you may recognize
networkwho
nameset
(SSID).
your
assigned
to your wireless
router by your
the person
it up. IfAfter
routerʼs for
manufacture
namenetwork,
is displayed,
try the
selecting
it (e.g., “Linksys”
scanning
your wireless
rotate
dial through
all of the
or “Netgear”).
yourmay
wireless
networkyour
has network
not been name
renamed
from the
results
becauseIfyou
recognize
(SSID).
If your
default factory name, then it most likely does not require a wireless
routerʼs
manufacture name is displayed, try selecting it (e.g., “Linksys”
encryption key (WEP or WPA) password to connect.
or “Netgear”). If your wireless network has not been renamed from the
default factory name, then it most likely does not require a wireless
encryption
keyWEP
(WEP
WPA)
password
to This
connect.
About Your
or or
WPA
Encryption
Key:
is also called a
“Wireless Network Password” and is used to keep unwanted “guests”
from using your wireless network. If you are unaware of what your
About
Youris,WEP
or WPA
Key:
This
also called
a
password
you can
followEncryption
our suggested
steps
forisfinding
it:
“Wireless
Network
Password”
and is used
keep
unwanted
1. Search
your records
for a document
that to
was
printed
out after“guests”
the
from using
your
network.
If youshould
are unaware
of WEP
what Key
your
setup of
yourwireless
router. This
document
contain the
password
is, Passphrase.
you can follow
ourrouter
suggested
steps
findingelse,
it:
or WPA
If your
was setup
byfor
someone
they should
have provided
you with a document
that contained
thethe
1. Search
your records
for a document
that was printed
out after
needed information.
setup of your router. This document should contain the WEP Key
2.or IfWPA
you are
using a wireless
that
wassetup
provided
by your InterPassphrase.
If yourrouter
router
was
by someone
else,
net
Service
Provider,
the
WEP
or
WPA
key
will
sometimes
be
they should have provided you with a document that contained
the
needed information.
CC WIFI
WiFi
Page 33
2. CC
If you
are using a wireless router that was provided by your
Internet Service Provider, the WEP or WPA key will sometimes be
19
Help Pages — Wireless Network Help
Help Pages — Wireless Network Help
printed on the bottom of the router.
“No Networks Found” shows after scanning for wireless net3. If all else fails, try calling the manufacturer of your wireless router
works:
for assistance with locating the routers wireless encryption key.
1. Sometimes your wireless network will not show on the first scan.
Try scanning for networks again on your radio.
2. Check the LED lights on the front of your wireless router. Be sure
that the
“power”
and “wireless”
LED lights
are on. IfThis
theyproblem
are not
Having
Trouble
Connecting
to a Wireless
Network:
mayby
need
to call of
thepossible
manufacturer
of the router for more
canon,
beyou
caused
a number
scenarios.
1. assistance.
Check your WEP or WPA wireless encryption key — it may be
wrong.
If you
know
WEP
or WPA
encryption
key,Place
refer to
3. Your
radio
maydon't
be out
of your
range
of your
wireless
network.
the
the section
“About
WPA
Key.
radio
closer above
to yourtitled
router
as aYour
test,WEP
then or
scan
forEncryption
wireless netagain.should
The CC
WiFi Radio
not haveletters
the same
WiFi
2. works
WEP keys
be entered
usingmay
uppercase
A-F and
range
as
a
new
WiFi
enabled
laptop.
numbers 0-9. WEP keys are easy to spot because they use
either is
10atotal
characters
26 total
characters.
When SSID
entering a
4. There
setting
on yourorWiFi
router
called “Enable
WPA key you
must
enter
exactly as
entered
in your
Broadcast”.
This
must
beitenabled.
You
may need
to routerʼs
call the manusettings,ofincluding
upper
and lower
case letters.
facturer
the router
for more
assistance.
3. After scanning for wireless networks, turn the dial through all the
possible choices. You may recognize your network as another
About Your Network Name (SSID): This is the name which was
name.
assigned to your wireless router by the person who set it up. After
4. Checkfor
your
routerʼs
compatibility
with the
Theall
radio
is
scanning
your
wireless
network, rotate
theWiFi
dialradio.
through
of the
not because
compatible
wireless
“N” technology,
also
called
802.11N.
If
results
youwith
may
recognize
your network
name
(SSID).
If your
usingmanufacture
“N” technology
only,
changetryyour
routerʼsit settings
to
routerʼs
name
is then
displayed,
selecting
(e.g., “Linksys”
use wireless
“B” and/or
“G”network
technology
It mayrenamed
be necessary
or “Netgear”).
If your
wireless
hasalso.
not been
from the
to
call
the
manufacturer
of
your
router
for
help
making
default factory name, then it most likely does not require these
a wireless
changes.
encryption
key (WEP or WPA) password to connect.
5. Be sure that your internet is working. Try accessing the internet
using a computer that is connected to the same router as the
radio.
If you
cannot
access
the internet
onThis
youriscomputer,
thea
About
Your
WEP
or WPA
Encryption
Key:
also called
radio will
not connect
either.and
It may
be necessary
to call your
inter“Wireless
Network
Password”
is used
to keep unwanted
“guests”
service
help repairing
yourunaware
internet connection.
fromnet
using
yourprovider
wirelessfornetwork.
If you are
of what your
password
suggested
steps
for finding
6. Checkis,
to you
see can
if thefollow
radio our
will work
using an
Ethernet
cable.it:If still
no
success,
then
call
C.
Crane
(800-522-8863)
for
troubleshooting
1. Search your records for a document that was printed out after the
assistance.
setup
of your router. This document should contain the WEP Key
or WPA Passphrase. If your router was setup by someone else,
they should have provided you with a document that contained the
needed information.
20
CC WIFI
2. If you are using a wireless router that was provided by your Internet34Service Provider, the WEP or WPA key will sometimesCC
beWiFi
Page
Help Pages — Error Message Troubleshooting
Help Pages — Error Message Troubleshooting
Timeout Getting IP Address:
Timeout
GettingWEP
IP Address:
1. An incorrect
or WPA key may have been entered into the
radio.
This
is
the
most
common
reason
forbeen
this error.
Check
1. An incorrect WEP or WPA
key may
have
entered
intoyour
the
routerThis
to make
your
wirelessreason
encryption
keyerror.
is correct
or your
see
radio.
is thesure
most
common
for this
Check
page 19
33-34
moreyour
helpwireless
with finding
your encryption
key. A good
-20 forsure
router
to
make
encryption
key is correct
or see
troubleshooting
test ishelp
to temporarily
connecting
to your
page
33-34 for more
with findingtryyour
encryption
key.router
A good
with encryption disabled.
troubleshooting test is to temporarily try connecting to your router
2. with
Yourencryption
radio maydisabled.
be too far away from the wireless router. Try moving it closer or use the ethernet cable.
2. Your radio may be too far away from the wireless router. Try mov3. Wireless router is not DHCP enabled. Consult your routerʼs user
ing it closer or use the ethernet cable.
manual for enabling DHCP or contact the manufacturer of the
3. Wireless
not DHCP enabled. Consult your routerʼs user
router forrouter
more is
assistance.
manual
for
enabling
DHCPanorunknown
contact the
manufacturer
4. Your router may be using
encryption
type. Tryofathe
differrouter
for
more
assistance.
ent type of encryption on your router. One good troubleshooting
4. Your
may be using
an your
unknown
encryption
type.
test router
is to temporarily
disable
routerʼs
encryption
andTry
seeaifdifferthe
ent
type
of encryption
radio
connects
to it. on your router. One good troubleshooting
is router
to temporarily
disable
routerʼs encryption
see if the
5. test
Your
may be set
up to your
use “Wireless
N” only. In and
this case,
radio
connects
to it. wireless settings to use “Wireless B and G
change
the routerʼs
Mixed”
or “Wireless
B, G,
N Mixed”.
For N”
more
information
5. Your
router
may be set
upand
to use
“Wireless
only.
In this case,
about how
to configure
your routerʼs
consult your
routerʼs
change
the routerʼs
wireless
settingssettings,
to use “Wireless
B and
G
user manual
or call B,
theG,
routerʼs
more
assistance.
Mixed”
or “Wireless
and Nmanufacturer
Mixed”. For for
more
information
6. about
Therehow
maytobeconfigure
too muchyour
interference
nearby
wireless
routerʼs from
settings,
consult
yourdevices.
routerʼs
Move
the radio
away
laptops
or other wireless
devices.
user
manual
or call
thefrom
routerʼs
manufacturer
for more
assistance.
2.4gHz
telephones
and baby
monitorsfrom
can cause
6. There
may
be too much
interference
nearbyinterference,
wireless devices.
if
placed
near
the
radio.
Move the radio away from laptops or other wireless devices.
7. 2.4gHz
You may
be attempting
connect
to ancan
ad-hoc
type
network. If
telephones
and to
baby
monitors
cause
interference,
are near
attempting
to connect to a network that is not yours, it may
if you
placed
the radio.
be configured for ad-hoc (computer-to-computer) and may not
7. You
may
be attempting
connect
to type
an ad-hoc
network.to,If
have
internet.
To check to
what
network
you aretype
connecting
you
are
attempting
to
connect
to
a
network
that
is
not
yours,
use your computer to scan for available networks. On the
list ofit may
beavailable
configured
for
ad-hoc
(computer-to-computer)
and
may
networks you should be able to see if the network isnot
have
internet. To
what
network
type you are connecting to,
infrastructure
typecheck
(good)
or ad-hoc
(bad).
use your computer to scan for available networks. On the list of
available networks you should be able to see if the network is
Port
80 Connecttype
Failed.
Unable
to Load
Station List:
infrastructure
(good)
or ad-hoc
(bad).
Your radio is unable to connect to Reciva using the internet.
1. Your internet connection may not be working. Check the internet
Port 80 Connect Failed. Unable to Load Station List:
using a computer that is connected to the same router.
Your radio is unable to connect to Reciva using the internet.
CC WIFI
21
1.CCYour
WiFi internet connection may not be working. Check the internet
Page 35
using a computer that is connected to the same router.
Help Pages — Error Message Troubleshooting
Help
Pages — Error Message Troubleshooting
2. UPNP may be disabled on your router. UPNP must be enabled for
Timeout
Getting
IP correctly.
Address:Consult your routerʼs user manual for
the radio
to work
enabling
UPNP
or contact
of theentered
router forinto
more
1. An
incorrect
WEP
or WPAthe
keymanufacturer
may have been
the
assistance.
radio.
This is the most common reason for this error. Check your
3. router
Your router
or modem
maywireless
be temporarily
confused
though
to make
sure your
encryption
key even
is correct
or see
your computer
working
unplugging
the power from
page
33-34 for ismore
helpfine.
withTry
finding
your encryption
key.both
A good
the router and modem
minutes. try
First,
power thetomodem
troubleshooting
test is for
to two
temporarily
connecting
your router
(giving it time to startup), then power the router (also giving it time
with encryption disabled.
to startup). Last, power your radio and try connecting again.
2. Your radio may be too far away from the wireless router. Try moving it closer
or use to
theReciva
ethernet
cable.
Timeout
Connecting
Gateway.
3.Check
Wireless
router
is
not
DHCP
enabled.
Consult your routerʼs user
Firewall Port 5000:
manual
for
enabling
DHCP
or
contact
the
manufacturer
of the
Your router is not letting the radio connect to Reciva
using the UPNP
router
for
more
assistance.
service.
4.1. Your
router
be using
encryption
Try afordifferUPNP
may may
be disabled
on an
yourunknown
router. UPNP
must betype.
enabled
ent
on your
router.
good
troubleshooting
thetype
radiooftoencryption
work correctly.
Consult
yourOne
routerʼs
user
manual for
test
is to temporarily
disable
routerʼs of
encryption
see if the
enabling
UPNP or contact
the your
manufacturer
the routerand
for more
assistance.
radio
connects to it.
Your router
router may
or modem
confused
even
5.2. Your
be setmay
up be
to temporarily
use “Wireless
N” only.
In though
this case,
your computer
is working
fine. settings
Try unplugging
power from
both
change
the routerʼs
wireless
to use the
“Wireless
B and
G
the router
and modem
First,
power
modem
Mixed”
or “Wireless
B,for
G,two
andminutes.
N Mixed”.
For
moretheinformation
(givinghow
it time
to startup),your
then routerʼs
power the
router (also
giving
it time
about
to configure
settings,
consult
your
routerʼs
to startup). Last, power your radio and try connecting again.
user manual or call the routerʼs manufacturer for more assistance.
3. Your internet provider may be blocking UPNP (port 5000) from
6. There
may be too much interference from nearby wireless devices.
being used by their customers. This is very uncommon but some
Move
the
radio away
from laptops
other
wirelessblock
devices.
satellite internet
companies,
colleges,orand
businesses
this
2.4gHz
telephones
and
baby
monitors
can
cause
interference,
port for an extra layer of network security. To find out if this port is
ifbeing
placed
near the
radio.
blocked,
speak
with your internet service provider or system
administrator.
7. You
may be attempting to connect to an ad-hoc type network. If
attempting
connect
to a setting.
networkInthat
is not manually
yours, it may
4. you
Yourare
router
may not to
offer
the UPNP
this case,
open
port 4999-5001
and assign
these open ports toand
an IPmay not
be
configured
for ad-hoc
(computer-to-computer)
address
that isTo
a little
higher
your computerʼs.
(Example:
If to,
have
internet.
check
whatthan
network
type you are
connecting
your
computerʼs
IP
address
is
192.168.1.5,
assign
the
open
ports
use your computer to scan for available networks. On the list of
to 192.168.1.9.)
On you
yourshould
radio, select
“CONFIGURE”,
select
available
networks
be able
to see if the then
network
is
“NETWORK
CONFIG”,
then
select
“EDIT
CONFIG”.
When
the
infrastructure type (good) or ad-hoc (bad).
message displays “Auto DHCP Yes or No” select “NO”. From this
point, enter the new IP address that has the open ports assigned
along withFailed.
other network
information.
Portto80it, Connect
Unable
to Load Station List:
Your radio is unable to connect to Reciva using the internet.
36
WiFi CC WIFI
1.Page
Your
internet connection may not be working. Check theCC
internet
using a computer that is connected to the same router.
22
Help Pages
Pages — Error
Ethernet
Network
Help
Help
Message
Troubleshooting
The LEDGetting
Connection
Light Does Not Flash When Cable is
Timeout
IP Address:
Inserted into Radio:
1. An incorrect WEP or WPA key may have been entered into the
1. radio.
Be sure
that
is connected
to both
the error.
radio and
theyour
This
is the
the power
most common
reason
for this
Check
router.to make sure your wireless encryption key is correct or see
router
2. page
Your Ethernet
damaged
incompatible.
33-34 forcable
moremay
helpbe
with
finding or
your
encryption Use
key. aA good
“Straight Through”
Cat6 Ethernet
Cable. You to
can
purchase
troubleshooting
testCat5
is toortemporarily
try connecting
your
router
Ethernet
cablesdisabled.
from C. Crane or your local electronics store.
with
encryption
2. Your radio may be too far away from the wireless router. Try moving it closer or use the ethernet cable.
Trouble
Connecting
to aenabled.
Network
using an
3.Having
Wireless
router
is not DHCP
Consult
yourEthernet
routerʼs user
Cable:
manual for enabling DHCP or contact the manufacturer of the
1. router
The CC
may be set to use “Wireless Only”. By default,
forWiFi
moreRadio
assistance.
the
radio
is
set
to
“Auto”
connect
to either type.
a wireless
4. Your router may be usingand
an can
unknown
encryption
Try anetdifferwork
or
an
Ethernet
network.
To
change
this
setting
navigate
to:
ent type of encryption on your router. One good troubleshooting
CONFIGURE
> NETWORK
> WIRED/WIRELESS.
Forif the
test
is to temporarily
disableCONFIG
your routerʼs
encryption and see
an
ethernet
cable
connection,
set
to
“Auto”
or
“Wired
Only”.
radio connects to it.
Be sure
thatmay
yourbe
internet
Try accessing
internet
5.2. Your
router
set upistoworking.
use “Wireless
N” only.the
In this
case,
using a the
computer
that
is connected
to to
theuse
same
router as
the G
change
routerʼs
wireless
settings
“Wireless
B and
radio. Iforyou
cannot access
the Ninternet
your
computer,
the
Mixed”
“Wireless
B, G, and
Mixed”.onFor
more
information
radio
will
not
connect
either.
It
may
be
necessary
to
call
your
interabout how to configure your routerʼs settings, consult your routerʼs
net
service
provider
for
help
repairing
your
internet
connection.
user manual or call the routerʼs manufacturer for more assistance.
It maymay
be necessary
to configure
yourfrom
radionearby
with a “static”
6.3. There
be too much
interference
wirelessIPdevices.
address
your router
is notlaptops
setup tooruse
DHCP.
To manually
Move
theifradio
away from
other
wireless
devices.configure the
radioʼs network
settings,
navigate
on yourinterference,
radio to: CON2.4gHz
telephones
and baby
monitors
can cause
> NETWORK
ifFIGURE
placed near
the radio.CONFIG > EDIT CONFIG. Contact your
network administrator to acquire the proper network addresses.
7. You may be attempting to connect to an ad-hoc type network. If
you are attempting to connect to a network that is not yours, it may
be configured for ad-hoc (computer-to-computer) and may not
have internet. To check what network type you are connecting to,
use your computer to scan for available networks. On the list of
available networks you should be able to see if the network is
infrastructure type (good) or ad-hoc (bad).
Port 80 Connect Failed. Unable to Load Station List:
Your radio is unable to connect to Reciva using the internet.
1. Your internet connection may not be working. Check the internet
using a computer that is connected to the same router.
CC WIFI
CC WiFi
Page 37
23
Safety Instructions
"
READ BEFORE
OPERATING EQUIPMENT
SAVE THESE INSTRUCTIONS
!
To prevent damage to your radio or possible injury to you or others, read
these safety precautions and instructions entirely before applying power
to your radio. Keep these precautions and instructions where all who use
this radio will read them.
1) COMMON CARE !
Check the radio, AC adapter and any accessories regularly. Do not use
the radio if there is any sign of damage. Only operate in accordance
with the instructions in this manual. Only use attachments or accessories specified by the manufacturer.
2) DISCONNECT THE RADIO IN CASE OF MALFUNCTION !
If you smell or notice smoke, disconnect the AC Adapter immediately,
taking care to avoid burns. Contact C. Crane Company or their representative for inspection and service before any future operation. Only
use the AC-DC Adapter recommended with the unit and replace it if
wires become frayed or exposed. It should have an output of three
Volts DC with the center negative, and not less than 150 MAh. Use
only the recommended adapter. Otherwise it may damage the radio or
cause a fire or electric shock.
3) KEEP OUT OF REACH OF CHILDREN !
Dropping the radio can cause damage or injury. Keep the AC Adapter
cord in a position so someone cannot trip and cause the radio to fall.
4) KEEP AWAY FROM WATER AND MOISTURE !
Keep the radio dry. Liquids and moisture can damage the radio. If a liquid leaks into the radio do not operate and seek a qualified service
shop. To clean the radio, remove the power and use a damp cloth on
the exterior only.
5) KEEP AWAY FROM EXTREME TEMPERATURES !
Extreme temperatures can damage the radio. Do not leave or use the
radio where it can be subjected to high or very cold temperatures.
6) DO NOT ATTEMPT TO SERVICE RADIO !
Refer all service work to a qualified service shop when the radio does
not appear to operate normally, exhibits a change in performance or
the radio has received damage. Never open the radio as this may
expose you to dangerous voltages and this will void all warranties.
7) OUTSIDE ANTENNAS OR CABLES !
Outside antennas or cables that create a potential hazard should not
be used with this radio unless installed by qualified personnel.
24
CC WiFi
Page 43
CC WIFI
Location of Your CC WiFi Radio Serial Number
Location of Your CC WiFi Radio Serial Number
From the “Primary Menu” of the CC WiFi Radio, follow this path to
find your serial number: CONFIGURE > VERSION > SERIAL
NUMBER.
From
the “Primary Menu” of the CC WiFi Radio, follow this path to
find your serial number: CONFIGURE > VERSION > SERIAL
Record your serial number here for future reference:
NUMBER.
Record your serial number here for future reference:
This product contains software licensed under version 2 of the GNU public
license and version 2.1 of the GNU Lesser Public License. The source code
for this software is available from:
http://www.reciva.com/gpl/
This product includes technology owned by Microsoft Corporation and under
This
product contains software licensed under version 2 of the GNU public
a license from Microsoft Licensing GP. Use or distribution of such technology
license
and
2.1 is
of prohibited
the GNU without
LesseraPublic
The source code
outside
of version
this product
licenseLicense.
from Microsoft
for Corporation
this software
is available
and/or
Microsoftfrom:
Licensing, GP as applicable.
http://www.reciva.com/gpl/
Model:
CC Wifi
This
product
includes
ANSI
C63.4:
2003 technology owned by Microsoft Corporation and under
THIS DEVICE
COMPLIES
WITH PART
15 OF
FCC RULES.
OPERAa license
from Microsoft
Licensing
GP. Use
or THE
distribution
of such
technology
TION of
IS this
SUBJECT
TOisTHE
FOLLOWING
CONDITIONS.
outside
product
prohibited
withoutTWO
a license
from Microsoft
1) THIS DEVICE
MAY NOTLicensing,
CAUSE HARMFUL
INTERFERENCE, AND
Corporation
and/or Microsoft
GP as applicable.
2) THIS DEVICE MUST ACCEPT ANY INTERFERENCE RECEIVED,
Model: INCLUDING
CC Wifi INTERFERENCE THAT MAY CAUSE UNDESIRED
ANSI C63.4:
2003
OPERATION.
THIS DEVICE COMPLIES WITH PART 15 OF THE FCC RULES. OPERANotice:
Any changes
or modifications
notTWO
expressly
approved by the
TION
IS SUBJECT
TO THE
FOLLOWING
CONDITIONS.
party responsible
compliance
could void
the user’s authority
1) THIS DEVICE
MAY NOTforCAUSE
HARMFUL
INTERFERENCE,
AND
to operate
the equipment.
2) THIS DEVICE
MUST
ACCEPT ANY INTERFERENCE RECEIVED,
INCLUDING INTERFERENCE THAT MAY CAUSE UNDESIRED
OPERATION.
CC WIFI
Notice: Any changes or modifications not expressly approved by the
party responsible for compliance could void the user’s authority
25