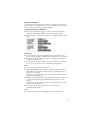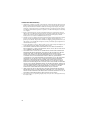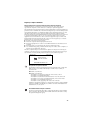
1
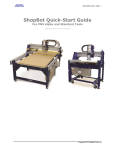
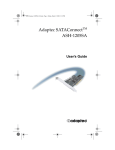
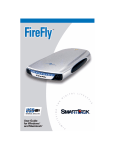
VideOh! CD AVC-1200
User’s Guide
R
Copyright
© 2004 Adaptec, Inc. All rights reserved. No part of this publication may be
reproduced, stored in a retrieval system, or transmitted in any form or by any
means, electronic, mechanical, photocopying, recording or otherwise, without the
prior written consent of Adaptec, Inc., 691 South Milpitas Blvd., Milpitas, CA 95035.
Trademarks
Adaptec, the Adaptec logo, and VideOh! are trademarks of Adaptec, Inc., which
may be registered in some jurisdictions.
Microsoft, Windows 98SE, Windows Me, Windows 2000, and Windows XP are
registered trademarks of Microsoft Corporation in the U.S. and other countries,
used under license.
Sonic and MyDVD are registered trademarks of Sonic Solutions in the U.S. and
other countries, used under license.
All other trademarks are the property of their respective owners.
Changes
The material in this document is for information only and is subject to change
without notice. While reasonable efforts have been made in the preparation of this
document to assure its accuracy, Adaptec, Inc. assumes no liability resulting from
errors or omissions in this document, or from the use of the information contained
herein.
Adaptec reserves the right to make changes in the product design without
reservation and without notification to its users.
Disclaimer
IF THIS PRODUCT DIRECTS YOU TO COPY MATERIALS, YOU MUST HAVE
PERMISSION FROM THE COPYRIGHT OWNER OF THE MATERIALS TO AVOID
VIOLATING THE LAW WHICH COULD RESULT IN DAMAGES OR OTHER
REMEDIES.
ii
Adaptec Customer Support
If you have questions about installing or using your Adaptec product, check this
document first—you will find answers to most of your questions here. If you need
further assistance, use the support options listed below.
Technical Support Identification (TSID) Number
■
Before contacting Technical Support, you need your unique 12-digit TSID
number. The TSID number identifies your product and support status.
■
The TSID number is included on two white, bar-coded labels, like the example
below.
Support Options
■
Search the Adaptec Support Knowledgebase (ASK) at ask.adaptec.com for
articles, troubleshooting tips, and frequently asked questions for your product.
■
For support via Email, submit your question to Adaptec's Technical Support
Specialists at ask.adaptec.com.
■
To order Adaptec products, including accessories and cables, call +1 408-9577274. Or, you can order cables online at www.adaptec.com/buy-cables.
Europe
■
Visit our Web site at www.adaptec-europe.com.
■
German and English: Search the Adaptec Support Knowledgebase (ASK) at
ask-de.adaptec.com for articles, troubleshooting tips, and frequently asked
questions for your product.
For support via e-mail, submit your question to Adaptec's Technical Support
Specialists at ask-de.adaptec.com.
■
French: Search the Adaptec Support Knowledgebase (ASK) at ask-fr.adaptec.com
for articles, troubleshooting tips, and frequently asked questions for your
product.
For support via e-mail, submit your question to Adaptec's Technical Support
Specialists at ask-fr.adaptec.com.
■
To order Adaptec products, including accessories and cables, go to
www.adaptec.com/buy-cables.
Japan
■
Search the Adaptec Support Knowledgebase (ASK) at ask.adaptec.co.jp
iii
Limited 2-Year Hardware Warranty
1.
Adaptec, Inc. (“Adaptec”) warrants to the purchaser of this product that it will be free from
defects in material and workmanship for a period of two (2) years from the date of purchase.
If the product should become defective within the warranty period, Adaptec, at its option,
will repair or replace the product, or refund the purchaser’s purchase price for the product,
provided it is delivered at the purchaser’s expense to an authorized Adaptec service facility
or to Adaptec.
2.
Repair or replacement parts or products will be furnished on an exchange basis and will
either be new or reconditioned. All replaced parts or products shall become the property of
Adaptec. This warranty shall not apply if the product has been damaged by accident,
misuse, abuse or as a result of unauthorized service or parts.
3.
Warranty service is available to the purchaser by delivering the product during the warranty
period to an authorized Adaptec service facility or to Adaptec and providing proof of
purchase price and date. The purchaser shall bear all shipping, packing and insurance costs
and all other costs, excluding labor and parts, necessary to effectuate repair, replacement or
refund under this warranty.
4.
For more information on how to obtain warranty service, write or telephone Adaptec at 691
South Milpitas Boulevard, Milpitas, CA 95035, (800) 959-7274.
5.
THIS LIMITED WARRANTY DOES NOT EXTEND TO ANY PRODUCT WHICH HAS
BEEN DAMAGED AS A RESULT OF ACCIDENT, MISUSE, ABUSE, OR AS A RESULT OF
UNAUTHORIZED SERVICE OR PARTS.
6.
THIS WARRANTY IS IN LIEU OF ALL OTHER EXPRESS WARRANTIES WHICH NOW
OR HEREAFTER MIGHT OTHERWISE ARISE RESPECT TO THIS PRODUCT. IMPLIED
WARRANTIES, INCLUDING THOSE OF MERCHANTABILITY, FITNESS FOR A
PARTICULAR PURPOSE AND NON-INFRINGEMENT SHALL (A) HAVE NO GREATER
DURATION THAN 2 YEARS FROM THE DATE OF PURCHASE, (B) TERMINATE
AUTOMATICALLY AT THE EXPIRATION OF SUCH PERIOD AND (C) TO THE EXTENT
PERMITTED BY LAW BE EXCLUDED. IN THE EVENT THIS PRODUCT BECOMES
DEFECTIVE DURING THE WARRANTY PERIOD, THE PURCHASER’S EXCLUSIVE
REMEDY SHALL BE REPAIR, REPLACEMENT OR REFUND AS PROVIDED ABOVE.
INCIDENTAL OR CONSEQUENTIAL DAMAGES, INCLUDING WITHOUT LIMITATION
LOSS OF DATA, ARISING FROM BREACH OF ANY EXPRESS OR IMPLIED WARRANTY
ARE NOT THE RESPONSIBILITY OF ADAPTEC AND, TO THE EXTENT PERMITTED BY
LAW, ARE HEREBY EXCLUDED BOTH FOR PROPERTY DAMAGE, AND TO THE
EXTENT NOT UNCONSCIONABLE, FOR PERSONAL INJURY DAMAGE.
7.
SOME STATES DO NOT ALLOW THE EXCLUSION OR LIMITATION OF INCIDENTAL
OR CONSEQUENTIAL DAMAGES FOR CONSUMER PRODUCTS, AND SOME STATES
DO NOT ALLOW LIMITATIONS ON HOW LONG AN IMPLIED WARRANTY LASTS, SO
THE ABOVE LIMITATION OR EXCLUSIONS MAY NOT APPLY TO YOU.
8.
This warranty gives you specific legal rights, and you may also have other rights which vary
from state to state.
iv
Adaptec Software License Agreement
PLEASE READ CAREFULLY: THE USE OF THIS SOFTWARE IS SUBJECT TO THE SOFTWARE
LICENSE TERMS OF ADAPTEC, INC. AND OTHER LICENSORS WHOSE SOFTWARE MAY
BE BUNDLED WITH THIS PRODUCT.
BY YOUR USE OF THE SOFTWARE INCLUDED WITH THIS PRODUCT YOU AGREE TO THE
LICENSE TERMS REQUIRED BY THE LICENSOR OF THAT SOFTWARE, AS SET FORTH
DURING THE INSTALLATION PROCESS. IF YOU DO NOT AGREE TO THE LICENSE
TERMS APPLICABLE TO THE SOFTWARE, YOU MAY RETURN THE ENTIRE UNUSED
PRODUCT FOR A FULL REFUND.
(1) In return for acquiring a license to use the Adaptec software, which may include software
from third party licensors and patches made available by Adaptec (“Software”), and the related
documentation, you agree to the following terms and conditions:
1.
License. This Agreement grants you, the Licensee, a license to:
a.
2.
3.
4.
5.
6.
Use the Software on a single computer system, which is not intended for use by more
than one (1) user; and:
b. Make one copy of the Software in machine readable form solely for back-up purposes,
provided you reproduce Adaptec’s copyright proprietary legends as well as the
copyright and proprietary notices of any third party licensors whose software may be
incorporated. You shall not remove any copyright notices in the Software.
Notwithstanding the foregoing, the Software may be used on the home, laptop or other
secondary computer of the principal user of the Software, and an additional copy of the
Software may be made to support such use. As used in this license, the Software is “in
use” when it is either loaded into RAM or installed on a hard disk or other permanent
memory device. The Software may be “in use” on only one computer at any given time.
You agree to use the Software in compliance with all applicable laws, including
copyright laws, and that you will not copy, transmit, perform, or distribute any audio or
other content using the Software without obtaining all necessary licenses or permissions
from the owner of the content.
Restrictions. You may not distribute copies of the Software to others. You may not post or
otherwise make available the Software, or any portion thereof, in any form, on the Internet.
You may not use the Software in a computer service business, including in time sharing
applications. You may not create additional classes, interfaces or subpackages of any portion
of the Software. The Software contains trade secrets and, in order to protect them, you may
not decompile, reverse engineer, disassemble, or otherwise reduce the Software to a humanperceivable form. YOU MAY NOT MODIFY, ADAPT, TRANSLATE, RENT, LEASE, LOAN,
RESELL FOR PROFIT, DISTRIBUTE, NETWORK OR CREATE DERIVATIVE WORKS
BASED UPON THE SOFTWARE OR ANY PART THEREOF.
Ownership of Software. As Licensee, you own the media upon which the software is
recorded or fixed, but Adaptec and its licensors retain title and ownership of the Software
recorded on the original media and all subsequent copies of the Software, regardless of the
form or media in which or on which the original and other copies may exist. This license is
not a sale of the Software or any copy.
Confidentiality. You agree to maintain the Software in confidence and that you will not
disclose the Software to any third party without the express written consent of Adaptec. You
further agree to take all reasonable precautions to preclude access of unauthorized persons
to the Software.
Term. This license is effective until January 1, 2045, unless terminated earlier. You may
terminate the license at any time by destroying the Software (including the related
documentation) together with all copies or modifications in any form. Adaptec will have the
right to terminate our license immediately if you fail to comply with any term or condition
of this Agreement. Upon any termination, including termination by you, you must destroy
the Software (including the related documentation), together with all copies or
modifications in any form.
Special Terms Applicable to Databases. Where a database is included with the Software, you
acknowledge that it is licensed only in connection with the use of the Software to perform
disc creation, and that the database and all data derived therefrom must be maintained in
confidence in accordance with the provisions of Section 4. This license does not grant you
any rights to distribute or disclose such database or data.
v
7.
Limited Warranty. Adaptec and its Licensors warrant only that the media upon which the
Software is furnished will be free from defects in material or workmanship under normal
use and service for a period of thirty (30) days from the date of delivery to you. ADAPTEC
AND ITS LICENSORS DO NOT AND CANNOT WARRANT THE PERFORMANCE OR
RESULTS YOU MAY OBTAIN BY USING THE SOFTWARE OR DOCUMENTATION.
EXCEPT FOR THE FOREGOING LIMITED WARRANTY, ADAPTEC AND ITS LICENSORS
MAKE NO WARRANTIES, EXPRESSED OR IMPLIED, INCLUDING, BUT NOT LIMITED,
AS TO NON-INFRINGEMENT OF THIRD PARTY RIGHTS, MERCHANTABILITY OR
FITNESS FOR A PARTICULAR PURPOSE. Some states do not allow the exclusion of
implied warranties or limitations on how long an implied warranty may last, so the above
limitations may not apply to you. This warranty gives you specific legal rights and you may
also have other rights which vary from state to state.
8. The entire liability of Adaptec and its Licensors, and your exclusive remedy for a breach of
this warranty, shall be:
a. The replacement of any media not meeting the above limited warranty which is
returned to Adaptec; or:
b. if Adaptec or its distributor is unable to deliver replacement media which is free from
defects in materials or workmanship, you may terminate this Agreement by returning
the Software and your money will be refunded.
THE FOREGOING STATES THE SOLE AND EXCLUSIVE REMEDIES ADAPTEC AND
ITS LICENSORS WILL PROVIDE FOR BREACH OF WARRANTY.
9. Limitation of Liability. IN NO EVENT WILL ADAPTEC OR ITS LICENSORS BE LIABLE TO
YOU FOR ANY INCIDENTAL, CONSEQUENTIAL OR INDIRECT DAMAGES,
INCLUDING ANY LOST PROFITS, LOST SAVINGS, OR LOSS OF DATA, EVEN IF
ADAPTEC OR A LICENSOR HAS BEEN ADVISED OF THE POSSIBILITY OF SUCH
DAMAGES, OR FOR ANY CLAIM BY ANY OTHER PARTY. Some states do not allow the
exclusion or limitation of special, incidental, or consequential damages, so the above
limitation or exclusion may not apply to you.
10. Export. You acknowledge that the laws and regulations of the United States and other
countries may restrict the export and re-export of the Software. You agree that you will not
export or re-export the Software or documentation in any form in violation of applicable
United States and foreign law.
11. Government Restricted Rights. The Software is subject to restricted rights as follows. If the
Software is acquired under the terms of a GSA contract: use, reproduction or disclosure is
subject to the restrictions set forth in the applicable ADP Schedule contract. If the Software is
acquired under the terms of a DoD or civilian agency contract, use, duplication or disclosure
by the Government is subject to the restrictions of this Agreement in accordance with 48
C.F.R. 12.212 of the Federal Acquisition Regulations and its successors and 48 C.F.R.
227.7202-1 of the DoD FAR Supplement and its successors.
12. General. You acknowledge that you have read this Agreement, understand it, and that by
using the Software you agree to be bound by its terms and conditions. You further agree that
it is the complete and exclusive statement of the agreement between Adaptec and you, and
supersedes any proposal or prior agreement, oral or written, and any other communication
between Adaptec and you relating to the subject matter of this Agreement. No additional or
any different terms will be enforceable against Adaptec unless Adaptec gives its express
consent, including an express waiver of the terms of this Agreement, in writing signed by an
officer of Adaptec. You assume full responsibility for the use of the Software and agree to
use the Software legally and responsibly. This Agreement shall be governed by the internal
laws of the state of California, without regard to or application of its conflicts of laws
principles, except as to copyright matters, which are covered by Federal law. This
Agreement is deemed entered into at Milpitas, California by both parties. Should any
provision of this Agreement be declared unenforceable in any jurisdiction, then such
provision shall be deemed severable from this Agreement and shall not affect the remainder
hereof. All rights in the Software not specifically granted in this Agreement are reserved by
Adaptec.
Should you have any questions concerning this Agreement, you may contact Adaptec by
writing to:
Adaptec, Inc.
Legal Department
691 South Milpitas Boulevard
Milpitas, California 95035.
vi
Regulatory Compliance Statements
Federal Communications Commission Radio Frequency Interference Statement
WARNING: Changes or modifications to this unit not expressly approved by the party
responsible for compliance could void the user’s authority to operate the equipment.
This equipment has been tested and found to comply with the limits for a Class B digital device,
pursuant to Part 15 of the FCC rules. These limits are designed to provide reasonable protection
against harmful interference in a residential installation. This equipment generates, uses, and
can radiate radio frequency energy, and if not installed and used in accordance with the
instruction manual, may cause harmful interference to radio communications. However, there is
no guarantee that interference will not occur in a particular installation. However, if this
equipment does cause interference to radio or television equipment reception, which can be
determined by turning the equipment off and on, the user is encouraged to try to correct the
interference by one or more of the following measures:
■ Reorient or relocate the receiving antenna.
■ Increase the separation between equipment and receiver.
■ Connect the equipment to an outlet on a circuit different from that to which the receiver is
connected.
■ Consult the dealer or an experienced radio/television technician for help.
■ Use a shielded and properly grounded I/O cable and power cable to ensure compliance of
this unit to the specified limits of the rules.
This device complies with part 15 of the FCC rules. Operation is subject to the following two
conditions: (1) this device may not cause harmful interference and (2) this device must accept
any interference received, including interference that may cause undesired operation.
Adaptec, Inc.
AVC-1200
Tested to Comply
With FCC Standards
FOR HOME OR OFFICE USE
European Union Compliance Statement
This Information Technology Equipment has been tested and found to comply with
EMC Directive 89/336/EEC, as amended by 92/31/EEC and 93/68/EEC, in
accordance with:
■ EN55022 (1998) Emissions
■ EN55024 (1998) Immunity:
–
–
–
–
–
–
EN61000-4-2 (1998) Electrostatic discharge: ±4 kV contact, ±8 kV air
EN61000-4-3 (1998) Radiated immunity
EN61000-4-4 (1995) Electrical fast transients/burst: ±1 kV AC, ±0.5 kV I/O
EN61000-4-5 (1995) Surges ±1 kV differential mode, ±2 kV common mode
EN61000-4-6 (1996) Conducted immunity: 3 V
EN61000-4-11 (1994) Supply dips and variation: 30% and 100%
In addition, all equipment requiring U.L. listing has been found to comply with EMC
Directive 73/23/EEC as amended by 93/68/EEC in accordance with EN60950 with
amendments A1, A2, A3, A4, A11.
Australian/New Zealand Compliance Statement
This device has been tested and found to comply with the limits for a Class B digital
device, pursuant to the Australian/New Zealand standard AS/NZS 3548 set out by
the Spectrum Management Agency.
vii
Canadian Compliance Statement
This Class B digital apparatus meets all requirements of the Canadian InterferenceCausing Equipment Regulations.
Cet appareil numérique de la classe B respecte toutes les exigences du Règlement sur
le matériel brouilleur du Canada.
Japanese Compliance (Voluntary Control Council Initiative)
This equipment complies to class B Information Technology equipment based on
VCCI (Voluntary Control Council for Interface). This equipment is designed for home
use but it may causes radio frequency interference problem if used too near to a
television or radio. Please handle it correctly per this documentation.
viii
In this Guide
Introduction
2
Plugging In
4
Installing the Drivers
6
Installing the VideOh! CD Software
23
Creating A Video Project With MyDVD
24
Getting Help
32
Technical Specifications
34
1
Adaptec AVC-1200 User’s Guide
Introduction
Note: This product includes models AVC-1100 and AVC-1200.
If you have AVC-1100, when you install your AVC-1200
drivers, it will automatically upgrade to AVC-1200.
Congratulations on the purchase of your Adaptec VideOh! CD
AVC-1200. With your VideOh! CD kit, you can convert your
analog videos into digital format and create your own Video CDs
(VCDs) or DVD:
■
Capture your favorite video footage with your AVC-1200 and
the bundled Sonic® MyDVD® software.
■
Organize and burn VCDs or DVDs with Sonic MyDVD
software, which also helps you add backgrounds to your videos
and menus for easy navigation.
■
Edit your videos with the digital video editing tool integrated
with MyDVD, if you want to add music, transitions, and titles
to your movies.
Note: The digital video editing features of MyDVD are only
supported with the Windows 2000 and XP operating
systems.
This User’s Guide tells you how to set up your VideOh! CD
hardware, and provides detailed instructions for installing and
using the VideOh! CD software.
DISCLAIMER: This product or software may be designed to assist you in reproducing materials in
which you own the copyright or have obtained permission to copy from the copyright owner.
Unless you own the copyright or have permission to copy from the copyright owner, you may
be violating copyright law and be subject to payment of damages and other remedies. If you are
uncertain about your rights you should contact your legal advisor.
2
Introduction
What’s in the Package
Your Adaptec VideOh! CD kit includes:
■
Adaptec AVC-1200 USB video capture device
■
6-foot USB cable
■
6-inch L-R RCA audio Y cable
■
CD, including drivers, and Sonic MyDVD
■
Getting Started with VideOh! AVC-1200
System Requirements
To use your VideOh! CD kit, you need a computer with:
■
Intel Pentium II 600 MHz (or faster) processor (800 MHz
recommended)
■
Microsoft® Windows® 98SE, Me, 2000, or XP with latest patches
■
128 MB RAM minimum
■
350 MB free disk space for applications
■
450 MB free disk space per 10 minutes of captured video
■
Sound card
■
Available USB1.1 or 2.0 port
■
CD-ROM drive
■
CD-Recorder or DVD-Recorder for output
■
Video card and monitor that support 16-bit color at 1024 x 768
resolution (24/32-bit color and higher resolution
recommended)
■
Analog video output device(s) such as camcorder or VCR with
RCA audio/video outpusts
3
Adaptec AVC-1200 User’s Guide
Plugging In
To set up your AVC-1200:
1 Connect your AVC-1200 to your computer, using the 6-foot
USB cable.
Cable connects to USB
port on computer
USB port
Note: Adaptec highly recommends that you connect
directly to your computer, and not through a USB hub.
2 If required, insert the L-R RCA audio Y cable into the Audio In
port.
Video In port
Audio In port
4
Plugging In
3 Plug one end of your camcorder cable into the Audio In and
Video In ports of your AVC-1200, using the Y cable if required.
Plug the other end into your analog video device.
Note: To ensure that your videos are captured successfully,
unplug any extraneous USB devices you may have connected
to your computer.
5
Adaptec AVC-1200 User’s Guide
Installing the Drivers
Before you can begin capturing video, you must install the VideOh!
CD device drivers.
Because several drivers must be installed, these instructions lead
you through the installation procedure more than once. Follow the
complete set of installation instructions provided for your
operating system to ensure that all drivers are properly installed:
■
For Windows XP, see page 6.
■
For Windows 2000, see page 9.
■
For Windows Me, see page 14.
■
For Windows 98SE, see page 18.
Windows XP
When you plug in your AVC-1200, Windows XP automatically
detects it and opens the Found New Hardware Wizard. To perform
the installation, follow the instructions provided in this section.
During the installation process, the Video Capture driver is
installed first and the Audio Capture driver is installed next. To
ensure that all drivers are installed properly, follow the
instructions provided in Double-Checking Driver Installation on
page 8.
To install the drivers:
1 Insert the CD from your VideOh! CD kit into your CD-ROM
drive.
Note: If the VideOh! software installation screen appears,
exit this screen until driver installation is complete.
6
Installing the Drivers
2 In the Found New Hardware Wizard, select Install the
software automatically..., then click Next.
3 Click Continue Anyway.
Windows installs the driver.
7
Adaptec AVC-1200 User’s Guide
4 Click Finish.
The Found New Hardware Wizard appears.
5 Repeat Step 2 through Step 4 to complete the installation.
Double-Checking Driver Installation
To ensure that the driver has installed properly on your
Windows XP system:
1 On your desktop, right-click My Computer then select
Properties.
2 Select the Hardware tab.
3 Click Device Manager, then:
8
■
Click Imaging devices. Adaptec AVC-1200 Video Capture
should be listed.
■
Click Sound, video, and game controllers. Adaptec AVC-1200
Audio Capture should be listed.
Installing the Drivers
■
Click Universal Serial Bus controllers. USB Composite
Device should be listed.
Drivers
If any or all of these drivers don’t appear, refer to Troubleshooting
Your AVC-1200 on page 32.
Windows 2000
When you plug in your AVC-1200, Windows 2000 automatically
detects it and opens the Found New Hardware Wizard. To perform
the installation, follow the instructions provided in this section.
During the installation process, the Audio Capture driver is
installed first and the Video Capture driver is installed next. To
ensure that all drivers are installed properly, follow the
instructions provided in Double-Checking Driver Installation on
page 13.
To install the drivers:
1 Insert the CD from your VideOh! CD kit into your CD-ROM
drive.
Note: If the VideOh! software installation screen appears,
exit this screen until driver installation is complete.
9
Adaptec AVC-1200 User’s Guide
2 In the Found New Hardware Wizard, click Next.
3 Select Search for a suitable driver..., then click Next.
10
Installing the Drivers
4 Select only CD-ROM drives, then click Next.
Windows locates a driver file.
5 Click Next.
Note: The drive letter for your CD-ROM drive may be
different than the one shown in the example above.
11
Adaptec AVC-1200 User’s Guide
6 Click Yes.
7 Click Finish.
8 Click No.
The Found New Hardware Wizard appears.
12
Installing the Drivers
9 Repeat Step 2 through Step 7 to complete the installation.
10 When the installation is complete, restart your computer.
Double-Checking Driver Installation
To ensure that the driver has installed properly on your
Windows 2000 system:
1 On your desktop, right-click My Computer then select
Properties.
2 Select the Hardware tab.
3 Click Device Manager, then:
■
Click Imaging devices. Adaptec AVC-1200 Video Capture
should be listed.
■
Click Sound, video, and game controllers. Adaptec AVC-1200
Audio Capture should be listed.
13
Adaptec AVC-1200 User’s Guide
■
Click Universal Serial Bus controllers. USB Composite
Device should be listed.
Drivers
If any or all of these drivers don’t appear, refer to Troubleshooting
Your AVC-1200 on page 32.
Windows Me
When you plug in your AVC-1200, Windows Me automatically
detects it and opens the Found New Hardware Wizard. To perform
the installation, follow the instructions provided in this section.
During the installation process, the Video Capture driver is
installed first and the Audio Capture driver is installed next. To
ensure that all drivers are installed properly, follow the
instructions provided in Double-Checking Driver Installation on
page 17.
14
Installing the Drivers
To install the drivers:
1 Insert the CD from your VideOh! CD kit into your CD-ROM
drive.
Note: If the VideOh! software installation screen appears,
exit this screen until driver installation is complete.
2 In the Found New Hardware Wizard, click Next.
3 Select Automatic search..., then click Next.
15
Adaptec AVC-1200 User’s Guide
4 Your computer may generate up to four Version Conflict
messages in a row. (This is common, especially if you have
previously installed these drivers on your computer.) If a
Version Conflict message appears, click Yes to continue with
the installation.
5 Click Finish.
The Found New Hardware Wizard appears.
6 Click Next.
16
Installing the Drivers
7 Click Finish to complete the installation.
Double-Checking Driver Installation
To ensure that the driver has installed properly on your
Windows Me system:
1 On your desktop, double-click My Computer, double-click
Control Panel, then double-click System. The System
Properties window opens.
2 Select the Device Manager tab, select View devices by type,
then:
■
Click Imaging Device. Adaptec AVC-1200 Video Capture
should be listed.
■
Click Sound, video, and game controllers. Adaptec AVC-1200
Audio Capture should be listed.
17
Adaptec AVC-1200 User’s Guide
■
Click Universal Serial Bus controllers. USB Composite
Device should be listed.
Drivers
If any or all of these drivers don’t appear, refer to Troubleshooting
Your AVC-1200 on page 32.
Windows 98SE
When you plug in your AVC-1200, Windows 98SE automatically
detects it and opens the Found New Hardware Wizard. To perform
the installation, follow the instructions provided in this section.
During the installation process, the Composite Device driver is
installed first, the Audio Capture driver is installed next, and the
Video Capture driver is installed last. To ensure that all drivers are
installed properly, follow the instructions provided in DoubleChecking Driver Installation on page 22.
Note: You may need your Windows 98SE CD to complete the
installation.
18
Installing the Drivers
To install the drivers:
1 Insert the CD from your VideOh! CD kit into your CD-ROM
drive.
Note: If the VideOh! software installation screen appears,
exit this screen until driver installation is complete.
2 In the Found New Hardware Wizard, click Next.
3 Select Search for best driver..., then click Next.
19
Adaptec AVC-1200 User’s Guide
4 Select only CD-ROM drive, then click Next.
5 Click Next.
Note: The drive letter for your CD-ROM drive may be
different than the one shown in the example above. Also,
as you repeat the installation procedure for the other two
drivers, driver filenames different from the one shown
above will appear.
20
Installing the Drivers
6 Click Finish.
The Found New Hardware Wizard appears.
7 Repeat Step 2 through Step 5.
8 Insert your Windows 98SE CD, then click OK.
9 Insert your VideOh! CD, then click OK.
10 Click Finish.
The Found New Hardware Wizard appears.
11 Repeat Step 2 through Step 6 to complete the installation.
21
Adaptec AVC-1200 User’s Guide
Double-Checking Driver Installation
To ensure that the driver has installed properly on your
Windows 98SE system:
1 On your desktop, double-click My Computer, double-click
Control Panel, then double-click System. The System
Properties window opens.
2 Select the Device Manager tab, select View devices by type,
then:
■
Click Imaging Device. Adaptec AVC-1200 Video Capture
should be listed.
■
Click Sound, video, and game controllers. Adaptec AVC-1200
Audio Capture should be listed.
■
Click Universal Serial Bus controllers. USB Composite
Device should be listed.
Drivers
If any or all of these drivers don’t appear, refer to Troubleshooting
Your AVC-1200 on page 32.
22
Installing the VideOh! CD Software
Installing the VideOh! CD
Software
To install Sonic MyDVD:
■
Insert the CD from your VideOh! CD kit into your CD-ROM
drive and follow the on-screen instructions.
■
If the CD is already in your CD-ROM drive, reinsert it to
activate the software installation screen.
Using Your VideOh! CD
Your VideOh! CD package includes software tools to help you
capture your videos in digital format, edit them, and create VCDs
or DVDs.
■
Use Sonic MyDVD to transfer your videos onto your computer
in digital format. See Creating A Video Project With MyDVD on
page 24 for detailed instructions for using this application.
■
Use MyDVD to create VCDs or DVDs. MyDVD helps you
organize your digital videos, and add backgrounds and a menu
navigation system.
Refer to the online documentation included with MyDVD and
the video editing tool for help using this software application.
■
MyDVD has a video editing tool that can edit your digital
videos and add music, transitions, and titles.
Note: The digital video editing features of MyDVD are only
supported with the Windows 2000 and XP operating
systems.
Refer to the online documentation included with MyDVD and
the video editing tool for help using this software application.
23
Adaptec AVC-1200 User’s Guide
Creating A Video Project
With MyDVD
These instructions give you the basic steps for capturing your
video, editing it, and then burning it to DVD or CD.
To get more information, refer to the online tutorial included with
Sonic MyDVD. Or, at any time while you’re using this software,
click ? or Help, to display detailed information about any step you
want to perform.
Before you begin creating:
■
Make sure your analog video device (such as a camcorder or
VCR) is connected to the AVC-1200 and switched on.
■
If you have an external DVD/CD recorder, make sure it is
connected to your computer and switched on. You need a
DVD-Recordable drive and appropriate media to burn DVDs.
DVD-ROM, CD-R, and CD-RW drives do not have the
capability to burn DVD discs. However, a CD-Recordable drive
can burn a Video CD that you can play back on a DVD player.
24
Creating A Video Project With MyDVD
Capturing Your Video
To successfully capture your video, make sure you complete each
step in the order given.
1 Start MyDVD by clicking the Sonic MyDVD icon on your
desktop. The Welcome window appears.
Click here for more information
2 Move the mouse pointer over either DVD-Video or Video CD,
then click Create or Modify a ... Project. The Main project
window appears.
25
Adaptec AVC-1200 User’s Guide
3 On the Main project window, click Capture. The Capture
window appears.
4 Press the Play button on your analog video device. The video
image appears in the Capture window.
5 To begin transferring your video to your computer, click Start
Capturing.
MyDVD captures your video, including the audio.
Note: Although you won’t hear the audio portion of your
video during capture, MyDVD captures both audio and
video. The video may appear shaky during capture but
will play normally on the finished DVD or CD.
Note: If you get any error messages at this point in your
video capturing, stop your analog video device and see
Need Help Capturing Your Video? on page 32.
6 When you want to stop transferring your video to your
computer, click Stop Capturing, then stop or pause your analog
video device.
26
Creating A Video Project With MyDVD
7 On the Save As screen, enter the filename of your video clip
and click Save. The filename you choose becomes the title of
your video clip and is displayed on the Main project window.
(You can change the title later if you choose.)
8 Click Finish.
Your video clip is saved and you will see a thumbnail picture
on your Main project window.
The layout shown in the MyDVD Main
project window is what your DVD menu
will look like on your TV.
Note: If you plan to do multiple video captures in the same
session, save your project, then close and relaunch MyDVD
after six captures.
27
Adaptec AVC-1200 User’s Guide
Editing Your Video
Now that you’ve captured some video footage, you can give your
video more impact by trimming it and adding transitions, effects,
and titles. See Editing Your Video with Windows XP or Windows 2000
on page 28 for instructions.
If you are using the Windows Me or 98SE operating systems, after
you’ve captured some video footage, you can trim it. For example,
you can change your Start and End points. You can also choose the
specific video frame that you want to use as the thumbnail picture
that is displayed in your Main project window. See Trimming Your
Video with Windows Me or Windows 98SE on page 31 for
instructions.
Editing Your Video with Windows XP or Windows 2000
To begin editing your video:
1 From the Main project window, double-click the thumbnail for
the video clip you want to edit.
2 If you want MyDVD to help you break your video into scenes
for easy editing, click Yes when prompted. The Mark Scenes for
Editing window opens. (Click No to go directly to the Edit
window. See page 29.)
Drag the slider to move through your video
28
Creating A Video Project With MyDVD
3 Click Detect Scenes if you want MyDVD to automatically find
scene breaks, or use the Mark Scene button to add your own
scene breaks.
4 Click Add to Storyboard when you have marked all your scenes.
The Edit window opens, as shown below.
In the Edit window, you can trim, merge, or split scenes,
rearrange scenes and add or remove video and still images, and
add special effects like transitions and titles.
Add filter effects
Add transition effects
Drag the green
bracket to choose
a Start Frame
Add text
Drag the red bracket to
Drag the slider to choose a choose an End Frame
Thumbnail image
5 Edit your video as desired, then click OK to save the changes.
29
Adaptec AVC-1200 User’s Guide
6 To create chapters on your DVD, in the Main project window,
right-click the thumbnail for the video clip you want, then click
Add/Edit Chapters.
The Chapter Points window opens.
7 Use the playback controls to preview your video, and click Add
Chapter to create chapter points where you want them. You can
also move existing chapter points by dragging their markers.
8 Click OK to save your chapter points.
Note: For more advanced editing functions, refer to MyDVD
online Help.
30
Creating A Video Project With MyDVD
Trimming Your Video with Windows Me or Windows 98SE
To begin trimming your video:
1 From the Main project window, double-click the thumbnail for
the video clip you want to trim.
2 Use the controls in the Trimming window to trim your video.
You can
trim out
unwanted
video
footage
Drag the
red bracke
to choose
an End
Frame
Drag the green bracket to choose a Start Frame
3 Click OK when finished.
31
Adaptec AVC-1200 User’s Guide
Getting Help
Registering Your AVC-1200
To ensure your eligibility for support and upgrades, and to qualify
for future promotions, please register your AVC-1200 on the
Adaptec website at register.adaptec.com.
Troubleshooting Your AVC-1200
If you encounter difficulties installing or using your AVC-1200,
follow these suggestions:
■
Ensure that your analog video device is connected, powered on,
and set up to provide a video signal to the AVC-1200.
■
Double-check all cable connections.
■
Try connecting to a different USB port on your system.
■
If your AVC-1200 is connected to a USB hub, try connecting it
directly to a system USB port. (Adaptec highly recommends that
you connect directly to your computer, and not through a USB
hub.)
■
Ensure that the AVC-1200 is connected properly and that the
drivers have installed correctly. (See Installing the Drivers on
page 6 for detailed instructions.)
Need Help Capturing Your Video?
Note: Due to Windows’ FAT file system, the largest file you
can capture is 4 GB. If possible, use a NTFS formatted hard
disk drive.
■
32
MyDVD may not be able to recognize video from a damaged or
degraded video tape.
Getting Help
■
If there are gaps in your analog video tape, MyDVD may stop
capturing. To continue, start capturing a new clip after the gap.
Gaps in video footage are often caused by stops, pauses, static,
or unrecorded space in the original recording. They can also be
caused by old, damaged, or deteriorated video tapes.
■
Set your computer monitor’s screen resolution to 1024 x 768 or
higher for optimum viewing.
■
If you are playing your video and it is not appearing on the
MyDVD Main project window, make sure MyDVD is capturing
from the correct device.
To check your device, go to the Capture Window (as shown in
Step 3 of page 26) and under Record Settings, click Change.
Make sure Adaptec AVC-1200 Video Capture is selected.
■
To avoid choppy video in a captured file, especially a long
video clip, disable any scanning background programs such as
virus software or any CPU-loaded software.
33
Adaptec AVC-1200 User’s Guide
Technical Specifications
Video Input
Composite RCA
Video Capture Format
Compressed AVI
Bit Rate
Variable within the DVD Specification
Video Standards
NTSC and PAL
VCD MPEG1 (352 x 240 NTSC/352 x 288 PAL)
Frame Rates: 29.97 NTSC and 25 fps PAL
Audio Inputs
left, right RCA with included Y cable
PC Interface
USB 1.1, or USB 2.0 at 1.1 speed
Form Factor
2.8” (L) x 4.0” (W) x 0.9” (H)
Power
Supplied by USB
Regulatory Certifications
FCC Class B, CE Class B
(See page vii for more information.)
34
R
Adaptec, Inc.
691 South Milpitas Boulevard
Milpitas, CA 95035 USA
© 2004 Adaptec, Inc.
All rights reserved. Adaptec and the Adaptec logo
are trademarks of Adaptec, Inc. which may be
registered in some jurisdictions.
Part Number: 513877-06, Ver. AA, JG 03/04