Download Compaq Professional XP1000 Setup guide

Transcript
Compaq Professional Workstation
XP1000
Installation and Setup Guide
Part Number: EK-CPWXP-SI. A01
January 1999
Compaq Computer Corporation
NOTICE
COMPAQ COMPUTER CORPORATION SHALL NOT BE LIABLE FOR TECHNICAL OR EDITORIAL
ERRORS OR OMISSIONS CONTAINED HEREIN, NOR FOR INCIDENTAL OR CONSEQUENTIAL
DAMAGES RESULTING FROM THE FURNISHING, PERFORMANCE, OR USE OF THIS MATERIAL. THIS
INFORMATION IS PROVIDED “AS IS” AND COMPAQ COMPUTER CORPORATION DISCLAIMS ANY
WARRANTIES, ESPRESS, IMPLIED, OR STATUTORY AND EXPRESSLY DISCLAIMS THE IMPLIED
WARRANTIES OF MERCHANTABILITY, FITNESS FOR PARTICULAR PURPOSE, GOOD TITLE AND
AGAINST INFRINGEMENT.
This publication contains information protected by copyright. No part of this publication may be photocopied or
reproduced in any form without prior written consent from Compaq Computer Corporation.
© 1999 Compaq Computer Corporation. All rights reserved.
The software described in this guide is furnished under a license agreement or nondisclosure agreement. The software
may be used or copied only in accordance with the terms of the agreement.
This publication does not constitute an endorsement or the product or products that were tested. The configuration or
configurations tested or described may or may not be the only available solution. This test is not a determination or
product quality or correctness, nor does it ensure compliance with any federal, state, or local requirements. Compaq
does not warrant products other than its own strictly as stated in Compaq product warranties.
Compaq is a registered trademark with the United States Patent and Trademark Office.
Compaq Tru64 UNIX is a trademark of Compaq Computer Corporation.
Microsoft and MS-DOS are registered trademarks and Windows NT is a trademark of Microsoft Corporation.
UNIX is a registered trademark in the United States and other countries, licensed exclusively through X/Open
Company, Ltd.
Compaq Professional Workstation XP1000 Installation and Setup Guide
Table of Contents
Preface
Welcome .................................................................................................................................. vii
Ergonomics .............................................................................................................................. vii
Conventions............................................................................................................................. viii
Customer Support ...................................................................................................................... ix
Feedback ................................................................................................................................... ix
1 Getting Started
Before You Begin......................................................................................................... 1-1
Initial System Inventory.................................................................................................... 1-1
Pre-Startup Checklist ........................................................................................................ 1-2
Precautions ....................................................................................................................... 1-2
Creating a Comfortable Work Environment...................................................................... 1-2
Installing Your System ................................................................................................. 1-3
Connecting External System Devices................................................................................ 1-5
Starting Your System.................................................................................................... 1-7
Sleep Mode....................................................................................................................... 1-7
Preloaded Operating System Software .............................................................................. 1-7
Turning Off Your System ............................................................................................. 1-8
Microsoft Windows NT ............................................................................................. 1-8
Compaq Tru64 UNIX ................................................................................................ 1-9
System Security.......................................................................................................... 1-10
iii
Contents
Chassis Lockdown Hasp ................................................................................................. 1-10
Kensington Lock ............................................................................................................ 1-10
Passwords....................................................................................................................... 1-10
2 Setting Up an Operating System
Starting a Windows NT Installation.............................................................................. 2-2
Starting an Installation of Compaq Tru64 UNIX .......................................................... 2-6
Updating Firmware ...................................................................................................... 2-7
Microsoft Windows NT Operating System Firmware........................................................ 2-7
Using the Flash Update Utility from AlphaBIOS ....................................................... 2-7
Updating Firmware from AlphaBIOS ........................................................................ 2-7
Preparing a Firmware 1.44-MB Diskette.................................................................... 2-7
Compaq Tru64 UNIX Operating System Firmware........................................................... 2-8
Update Utility............................................................................................................ 2-8
Using the Flash Update Utility from the SRM Console .............................................. 2-8
3 Troubleshooting
Battery Guidelines........................................................................................................ 3-1
ISA Restrictions ........................................................................................................... 3-2
PCI Restrictions ........................................................................................................... 3-2
AlphaBIOS Restrictions ............................................................................................... 3-2
Tips.............................................................................................................................. 3-2
Logging Equipment...................................................................................................... 3-3
?
System Troubleshooting ............................................................................................... 3-4
4 Customer Support
Product Information ..................................................................................................... 4-1
Support Resources/Checklist ........................................................................................ 4-1
iv Installation and Setup Guide
Contents
A Regulatory Compliance Notices
Federal Communications Commission Notice ........................................................................ A-1
Class A Equipment .............................................................................................................. ... A-1
Class B Equipment .............................................................................................................. ... A-2
Declaration of Conformity for Products Marked with FCC Logo, United States
Only .............................................................................................................................. A-2
Modifications................................................................................................................... A-2
Cables.............................................................................................................................. A-3
Canadian Notice (Avis Canadien)........................................................................................... A-3
Class A Equipment .......................................................................................................... A-3
Class B Equipment .......................................................................................................... A-3
European Union Notice.................................................................................................... A-3
Acoustic Declaration .............................................................................................................. A-4
B Power Cord Requirements
General Requirements ............................................................................................................ B-1
Country-Specific Requirements .............................................................................................. B-2
C Electrostatic Discharge Guidelines
Grounding Methods ................................................................................................................ C-1
Index
Installation and Setup Guide v
Contents
Tables
Table 2-1: Starting a Microsoft Windows NT Installation....................................................... 2-2
Table 2-2: Setting Up Partitions for a Windows NT Installation .............................................. 2-5
Table 2-3: Starting an Installation of Compaq Tru64 UNIX.................................................... 2-6
Table 3-1: System Troubleshooting ........................................................................................ 3-4
Table 3-2: Disk Drive Troubleshooting .................................................................................. 3-9
Table 3-3: Audio Troubleshooting........................................................................................ 3-10
Table 3-4: Monitor Troubleshooting..................................................................................... 3-11
Table A-1: Acoustics – Declared Values per ISO 9296 and ISO 7779 ................................... A-4
Table B-1 Power Cord Set Requirements, By Country............................................................B-2
vi Installation and Setup Guide
Preface
Welcome
This guide describes how to install, set up, and troubleshoot your Compaq Professional
Workstation XP1000 system. Topics covered include:
•
System inventory
•
Connection of external devices
•
System installation
•
Preloaded operating system software
•
System security
•
Troubleshooting
•
Customer support
Ergonomics
For information on ergonomics, please see the Compaq Safety and Comfort Guide, which
shipped with your keyboard. This information also is available on the Web at
http://www.compaq.com and, in some cases, may have been included on your system’s
preinstalled image.
vii
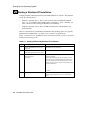
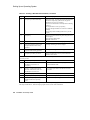
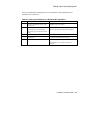
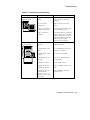
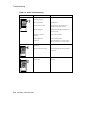
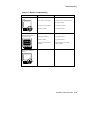
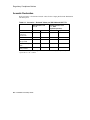
Preface
Conventions
The following table shows symbols used in this guide and their meanings:
Symbol
Meaning
WWW
Indicates a reference to material located on a Web site.
Indicates an inventory step or checklist.
Used to alert users to Warnings and Cautions.
Indicates installation and connection steps.
Indicates system startup and turning off steps.
Indicates system security topics.
Indicates topics on operating system installation or firmware
updates.
Indicates general troubleshooting tips.
Indicates system logging or general product information.
Indicates topics on system troubleshooting.
NOTE: Throughout this guide, illustrations and some textual explanations are intended as
examples only; based on your system’s particular hardware configuration, operating
system version, firmware update version, and so forth, your system’s display may differ.
viii Installation and Setup Guide
Preface
Customer Support
See the Checklist in Chapter 4, Customer Support, for instructions on finding support and
additional information on the use of your new workstation.
Feedback
Our readers' opinions about this guide or any other Compaq Computer Corporation product
are important to us. If you have any comments, please send e-mail to
[email protected].
Please refer to order number EK-CPWXP-SI. A01 in your correspondence.
Installation and Setup Guide ix
This is some white text.
1
Getting Started
This chapter includes an inventory of the items shipped with your system and tells you
how to start, install, restart, and turn off your system. Information about preloaded
software and guidelines for system security are included as well.
Your Compaq Professional Workstation XP1000 is a high-performance system that uses
the latest Alpha 21264 microprocessor and core logic technology. Housed in a mini-tower
box, the system can stand alone or function as a
client in an office network environment.
A typical Compaq Professional Workstation
configuration is shown here.
Before You Begin
Initial System Inventory
Check to make sure you received the following components with your system, and note the
items in a safe place, for later reference:
… Monitor
… Power cords
… System box
… Microphone
… Mouse
… Keyboard
… Video cable
… Headphones
Your system may include different components from those listed. Consult the shipping list
that came with your system for an accurate listing of parts. If you think something is
missing, contact your distributor or Compaq Computer Corporation representative.
1-1
Getting Started
Pre-Startup Checklist
Before you start your system, perform the following checks:
•
Review the information supplied with your system, including user documentation.
•
Select a well-ventilated site for your system near a grounded power outlet and away
from sources of excessive heat. The site also should be isolated from electric noise (for
example, spikes, sags, and surges) produced by devices such as air conditioners, large
fans, radios, and televisions.
•
Save all shipping containers and packing material for repackaging or moving the
system later.
Precautions
NOTE: Do not install optional hardware or application software until you have started
your system and verified that the base system is working correctly.
Do not move your Professional Workstation XP1000 with any removable media (for
example, CD disk) in the drives. This may cause damage to the media and/or the drives.
WARNING: When unpacking and moving system components, be aware that
some components (such as the monitor) may be too heavy for you to lift alone safely. If
you are doubtful about whether you can lift these items alone, please get assistance.
Creating a Comfortable Work Environment
To learn how Compaq recommends setting up your work environment, refer to the Comfort
Guide that you received with your system keyboard.
WWW Alternatively, you can refer to the online version of the Comfort Guide at
http://www.compaq.com .
1-2 Installation and Setup Guide
Getting Started
Installing Your System
This section shows the installation and connection
steps for your system.
NOTE: All connectors are keyed with icons on the
back of the system box.
CAUTION: To ensure proper cooling, verify
that air can flow freely into the system front and
out the rear of the system. Position your system so
that air can flow freely to and from the vents, as
shown. Do not block any of the vents, especially
those on the system rear or bottom front.
To connect system components, follow these steps:
1. Connect the mouse (green connector on your
system) and keyboard (orange or red connector on
your system), as shown.
Installation and Setup Guide 1-3
Getting Started
2. Connect the monitor, as shown.
ML014610
3. The internal network cables for your system
are installed already, as the figure shows.
Optional network kits are available. Contact
your Compaq Computer Corporation
representative for more information about these
options.
ML014611
1-4 Installation and Setup Guide
Getting Started
Connecting External System Devices
To install external devices into your system,
connect the microphone and headphones
into the icon-keyed connectors on the side of
the system box, as shown. NOTE: Sound,
including CD-ROM-related audio, is not
audible unless either external speakers or
headphones are plugged in. The speaker
plays beeps only for firmware warning
codes. Because beeps are not sent through
the audio device, they are not audible
through headphones or external speakers.
If you purchased speakers for your workstation, refer to the figure and perform the
following steps to connect them:
1.
Unpack the speakers.
2.
Plug the secondary speaker cable into the primary speaker (“Speaker Output”).
3.
Connect the loose cable to the primary speaker (“Audio Input”) and to the adapter-card
top connector (“Speaker Out”).
4.
Connect the AC adapter cord to the primary speaker.
5.
Plug the speaker AC adapter into a power outlet.
NOTES: When headphones are plugged in, the speakers are disabled. The figure shows a
typical speaker system. Your speakers and connections may vary, depending upon the
make and model you purchased.
Refer to the documentation that came with your speakers for further information.
Installation and Setup Guide 1-5
Getting Started
Perform the following steps to connect a local
printer to your workstation:
1. Review your printer documentation and
perform any pre-installation instructions
before attempting to connect it to your
workstation.
2. Make sure your printer and workstation are
turned off.
3. Plug the printer cable into the appropriate
printer port (the parallel port for a parallel
printer, in figure, or a serial port for a
serial printer).
ML014613
4. Turn on your printer and workstation.
5. Configure your printer for operation with
your workstation.
Refer to your operating system online Help and printed documentation for instructions on
installing your printer’s device driver.
1-6 Installation and Setup Guide
Getting Started
Starting Your System
Perform the following steps to start (boot) your
Compaq Professional Workstation:
1. Make sure the system cover is on.
2. Plug the power cord into the system
and then into the wall outlet.
3. Turn on any external devices, monitor
power, and system unit power button
(shown in figure).
4. After waiting for the monitor to warm up,
adjust the contrast and brightness to obtain
a readable screen display, if necessary.
5. Allow your system to complete the
power-on self test (POST) and device
initialization. (This takes approximately
one [1] minute.)
Refer to the information supplied with your monitor for adjustment instructions.
Sleep Mode
The Compaq Professional Workstation XP1000 system is industry-compliant with standard
ACPI specifications and provides support for several sleep modes. Sleep mode for your
system is operating system-dependent. The power LED blinks during some sleep modes.
An advantage of sleep mode is that your system uses lower levels of power and does not
require a reboot, which saves system context for you. To get your system out of sleep
mode, press the power button.
Refer to your operating system documentation for details.
Some operating system versions (including Microsoft Windows 2000) turn the system
power off automatically when the shutdown process is complete. In fact, users also can
configure Windows 2000 so that the power button can be either a standby button or a
shutdown and power off button.
Preloaded Operating System Software
Your system was preloaded with the operating system that you specified when ordering
your system (i.e., Microsoft Windows NT or Compaq Tru64 UNIX). See Chapter 2,
Setting Up an Operating System, for instructions on reinstalling an operating system.
Installation and Setup Guide 1-7
Getting Started
Turning Off Your System
Before turning off your system, save and close all open files according to the steps outlined
for your specific operating system. If you turn the system off without saving and closing
files, you might lose some or all of your work.
CAUTION: Do not turn off power to your system or peripherals until the shutdown
sequence has completed.
WARNING: Always disconnect the power cord from the wall before servicing
your system.
Microsoft Windows NT
Perform the following steps, in order, to turn off your system:
1.
Close any application data files you have open as well as any applications you have
running. Most application programs prompt you to save the information before
closing.
2.
To shut down your operating system:
•
•
•
3.
Click on Start on the Windows NT toolbar.
Select Shut Down…
The Shut Down Windows menu displays.
You are asked to confirm the shutdown.
• Select Shut Down and click the Yes button.
Wait for the operating system to complete the shutdown process. Your system displays
a message indicating it is safe to turn off or restart the system.
4.
To turn off power, press the system unit power button.
5.
Disconnect the power cord from the wall before servicing your system.
1-8 Installation and Setup Guide
Getting Started
Compaq Tru64 UNIX
Perform the following steps, in order, to turn off your system:
1.
Close any open application data files as well as any running applications. Most
application programs prompt you to save the information before closing.
2.
To shut down your operating system:
NOTE: You must be a superuser to shut down the system.
•
•
•
Open a terminal window.
Type shutdown -h now.
The system returns to the SRM console.
3.
Your system displays >>> indicating it is safe to turn off or restart the system.
4.
To turn off power, press the system unit power button.
5.
Disconnect the power cord from the wall before servicing your system.
Installation and Setup Guide 1-9
Getting Started
System Security
Chassis Lockdown Hasp
The system is equipped with a lockdown hasp welded onto the back of the chassis. To use
this security feature, use a lock of your choice to attach the system to a secured surface such
as a table, cabinet, and so forth.
Kensington Lock
If you ordered an optional Kensington lock (order number
PCP3H-AG), refer to the figure, secure the lock onto your
system as shown, and then follow these steps:
ML014614
1.
Insert the lock into the opening at the back of
the system.
2.
Turn the lock clockwise to secure it.
3.
Connect the power cord and plug it into the wall outlet.
4.
Turn on the system.
Passwords
For additional security, most screen saver and pause screen displays can have password
protection enabled. See Chapter 3, Troubleshooting.
1-10 Installation and Setup Guide
2
Setting Up an Operating System
Refer to the specific operating system information you received for details.
NOTE: This information provides what you need to begin an operating system installation.
Once you have started an installation, follow the on-screen instructions, which may differ
slightly from what is documented here.
NOTE: You will need the following media, which was shipped with your system, to perform
a Windows NT installation: backup CD (either QC-07QAA-H8, for English, Dutch, French,
Italian, German, and Spanish kits or QC-07QJA-H8, for Japanese kits); 1.44-MB diskette
containing the ATAPI driver and the HAL (hardware abstraction layer (AK-REQPA-CA).
This chapter describes how to install an operating system; set up partitions for a Microsoft
Windows NT installation; and update firmware.
Refer to Table 2-1 for instructions on installing the Microsoft Windows NT operating
system on a properly partitioned and formatted disk; see Table 2-2 for instructions on
setting up partitions for an NT installation. Refer to Table 2-3 for instructions on
installing the Compaq Tru64 UNIX operating system.
CAUTION: If you boot from a Compaq Tru64 UNIX disk and also occasionally boot
Microsoft Windows NT from another disk, use caution when you run the Windows NT
Disk Administrator. When the Disk Administrator detects additional disks, it updates the
system configuration. The Disk Administrator prompts you for permission to write a
signature to the additional disks. Writing the signature to any disk used by Compaq Tru64
UNIX destroys the boot block on that disk and makes the operating system on that disk no
longer bootable. Select NO when you are asked if you want to write a signature to your
Compaq Tru64 UNIX disk.
2-1
Setting Up an Operating System
Starting a Windows NT Installation
Compaq partitions and formats disk 0 in non-RAID Windows NT systems. The partitions
are set up as described next.
•
Partition 1 (typically, the “C” drive) is the size of the disk less 6MB and formatted
FAT (e.g., a 3.2-GB drive minus 6MB equals a 3.194-GB “C” drive). Normally, you
select “convert to NTFS” during the Windows NT installation.
•
Partition 2 (typically, the “D” drive) is 6MB, formatted FAT, and identified as the
system partition.
Table 2-1 describes how to install Microsoft Windows NT operating system on a properly
partitioned and formatted disk. See Table 2-2 if you need to set up partitions.
NOTE: You must have the AlphaBIOS console installed and running in order to install the
Windows NT operating system.
Table 2-1: Starting a Microsoft Windows NT Installation
Step
Action
Result or Displayed Text
1
From the AlphaBIOS boot screen, press
the [F2] key.
AlphaBIOS setup screen displays.
2
Insert the Microsoft Windows NT
Workstation CD-ROM into the CD drive.
CD-ROM drive is ready.
3
Select
Install Windows NT.
Press [Enter].
Windows NT setup procedure starts. The following
message is displayed:
Setup could not determine the type of computer you have,
or you have chosen to manually specify the computer type.
Select the computer type from the following list, or select
“Other” if you have a device support disk provided by your
computer manufacturer.
.
.
.
=> Other
4
Select Other.
2-2 Installation and Setup Guide
“Please insert the disk labeled Manufacturer-supplied
hardware support disk into drive A:. Press Enter when
ready.”
Setting Up an Operating System
Table 2-1: Starting a Windows NT Installation, continued
Step
Action
Result or Displayed Text
5
Insert the 1.44-MB diskette labeled
Hardware Support Disk for Microsoft®
Windows NT® 4.0 (AK-REQPA-CA)
into the 1.44-MB drive.
Press [Enter].
You have chosen to configure a computer for use with
Windows NT using a device support disk provided by the
computer’s manufacturer.
Select the computer type from the following list, or press
[Esc] to return to the previous screen.
=>Compaq Professional Workstation XP1000. (Your
screen may show a different series name.)
6
Select Compaq Professional Workstation
XP1000 (Your screen may show a
different series name.)
Press [Enter].
“Please insert the disk labeled Manufacturer-supplied
hardware support disk into Drive A:. Press Enter when
ready.”
7
Insert the 1.44-MB diskette labeled
Hardware Support Disk for Microsoft®
Windows NT® 4.0 (AK-REQPA-CA)
into the 1.44-MB drive.
Press [Enter].
Setup could not determine the type of one or more mass
storage devices installed in your system, or you have chosen
to manually specify an adapter. Currently, Setup will load
support for the Qlogic PCI SCSI Host adapter.
8
Type “S” to select additional devices.
Select the SCSI adapter you want from the following list, or
select “Other” if you have a device support disk provided
by an adapter manufacturer.
.
.
.
=>Other
9
Select Other.
“Please insert the disk labeled Manufacturer-supplied
hardware support disk into Drive A:. Press Enter when
ready.”
9
Insert the 1.44-MB diskette
(AK-REQPA-CA) in drive A.
Press [Enter] to select the driver.
You have chosen to configure a SCSI adapter for use with
Windows NT, using a device support disk provided by an
adapter manufacturer.
Select the SCSI) adapter you want from the following list,
or press [Esc] to return to the previous screen.
=>e.g., Microsoft ATAPI driver
10
Press [Enter] to load the driver.
Follow the screen prompts for mass-storage device-loading
support.
11
To continue,
Press [Enter].
Setup will load support for the following mass storage
devices:
Qlogic PCI SCSI Host Adapter
Microsoft ATAPI driver
Installation and Setup Guide 2-3
Setting Up an Operating System
Table 2-1: Starting a Windows NT Installation, continued
Step
Action
Result or Displayed Text
12
Press [Enter] to continue with Setup.
Welcome to Setup. The Setup program for the Microsoft®
Windows NT® operating system version 4.0 prepares
Windows NT to run on your computer.
To learn more about Windows NT Setup before continuing,
press [F1].
To set up Windows NT now, press [Enter].
To repair a damaged Windows NT version 4.0 installation,
press [R].
To quit Setup without installing Windows NT, press the
[F3] key.
13
Press [Enter].
Setup has recognized the following mass storage devices in
your computer:
Qlogic PCI SCSI Host Adapter
Microsoft ATAPI driver
14
Press [Enter].
The Microsoft Windows NT licensing agreement displays.
15
Use the [Page Down] keypad to scroll
through the Windows NT licensing
agreement.
A message indicating your choices displays.
16
Press the [F8] key to indicate your
acceptance of the licensing agreement.
A message indicating your choices displays.
17
Press [Enter] to confirm your choice.
Setup has found Windows NT on your hard disk in the
directories shown below.
NOTE: Follow the screen prompts to choose a partition, to confirm a partition, and to decide whether or not to
format the partition.
18
Press [Enter] to accept the choice.
Setup will now examine your hard disks.
19
Insert the 1.44-MB diskette
(AK-REQPA-CA) into drive A.
Press [Enter].
“Please insert the disk labeled Compaq Alpha 21264
Systems Installation Disk.”
20
Insert the 1.44-MB diskette labeled
Microsoft ATAPI Driver, Disk 1 of 1
(AK-REQPA-CA) into drive A.
The system copies the HAL and Microsoft ATAPI
driver files.
21
Follow screen prompts.
Please wait while Setup copies files to the hard disk.
22
Press [Enter] to restart your computer.
This portion of Setup has completed successfully.
23
Follow the screen prompts to set up the
reinstalled Windows NT operating
system.
The Windows NT operating system loads and starts.
Note: The 1.44-MB diskette (EK-REQPA-CA) includes the following information: HAL, the
Microsoft ATAPI driver, and the Compaq Alpha 21264 systems NT4 installation.
2-4 Installation and Setup Guide
Setting Up an Operating System
If you are installing the operating system on a disk that has not been partitioned and
formatted, refer to Table 2-2.
Table 2-2: Setting Up Partitions for a Windows NT Installation
Step
Action
Result
1
From the AlphaBIOS boot screen, press
the [F2] key.
AlphaBIOS setup screen displays.
2
Select Hard Disk Setup...
Press the [F6] key to format the disk.
Press the [F7] key for express Hard Disk
Setup.
If disk 0 is not partitioned, a message asking if you would
like to proceed with default disk partitioning displays.
3
Press the [F10] key to continue.
Express Setup Complete screen displays.
4
Press [Enter].
A list of disks, including partitions, displays.
5
Press [Esc].
AlphaBIOS setup screen displays.
Refer to Table 2-1 to re-attempt a Windows NT
installation.
Installation and Setup Guide 2-5
Setting Up an Operating System
Starting an Installation of Compaq Tru64 UNIX
To start an installation of Compaq Tru64 UNIX, follow the steps in Table 2-3.
NOTE: The SRM console must be installed and running in order to install Compaq Tru64
UNIX. If the AlphaBIOS console is running, refer to the Compaq Professional
Workstation XP1000 System Reference and Maintenance Guide for instructions on loading
the SRM firmware.
WWW See http://www.compaq.com/ for more information.
Table 2-3: Starting an Installation of Compaq Tru64 UNIX
Step
Action
Result
1
At the SRM prompt, type:
>>>set boot_osflags " "
Clears the boot_osflags variable.
2
At the SRM prompt, type:
>>>set auto_action halt
Halts the system at the console prompt each time the system is
turned on, crashes, or when the reset button is pushed.
3
At the SRM prompt, type:
>>>set os_type unix
>>>init
Sets the operating system (Compaq Tru64 UNIX).
4
Insert the CD-ROM for Compaq
Tru64 UNIX into the CD drive.
CD-ROM drive is ready.
5
At the SRM prompt, type:
>>>show device
List of devices displays:
From the SRM console, boot the
CD-ROM for Compaq Tru64
UNIX.
>>>boot DQA0
Installation information is displayed, and you are prompted
to select an option. For more information, see the Compaq
Tru64 UNIX Installation Guide.
6
2-6 Installation and Setup Guide
dka0.0.0.6.1 DKA0 Quantum XP34550W LXTA
dqa0.0.0.107.0 DQA0 Compaq DVD-TOM SR-8583 A50A
dva0.0.0.0.0 DVA0
ewa0.0.0.3.1 EWA0 00-00-F8-71-32-60
pka0.7.0.6.1 PKA0 SCSI Bus ID7 5.57
Setting Up an Operating System
Updating Firmware
NOTE: The user is responsible for performing system firmware upgrades. When updating
firmware, use the firmware CD version 5.4 or higher.
The Compaq Professional Workstation XP1000 system contains flashROM for the console
firmware. The flashROM contains the AlphaBIOS console firmware (for the Microsoft
Windows NT operating system) and the SRM console firmware (for the Compaq Tru64
UNIX operating system).
This section explains how to use the firmware update utility to install firmware upgrades.
Consult the appropriate operating system-specific section (e.g., Microsoft Windows NT or
Compaq Tru64 UNIX).
Consult your upgrade documentation for more information.
Microsoft Windows NT Operating System Firmware
Using the Flash Update Utility from AlphaBIOS
You may update the firmware by either using the supplied backup CD (QC-07QAA-H8 or
QC-07QJA-H8) or by copying the firmware from the Internet onto a 1.44-MB diskette.
Updating Firmware from AlphaBIOS
To update the firmware from AlphaBIOS using the firmware CD or 1.44-MB diskette,
follow these steps:
1.
Shut down the Windows NT operating system and restart the system.
2.
Insert the Firmware Update CD-ROM or a 1.44-MB diskette (prepared as the next
section describes) into the appropriate drive.
3.
From the AlphaBIOS boot screen, press the [F2] key to enter AlphaBIOS setup.
4.
From the AlphaBIOS setup screen, select Upgrade AlphaBIOS.
HINT: AlphaBIOS verifies the system image and displays the old and new firmware
versions.
5.
Follow the screen prompts to complete the update.
Preparing a Firmware 1.44-MB Diskette
If you have access to the network and have either lost the backup CD supplied with your
system or wish to obtain newer firmware, you may use an Internet browser to copy the
firmware from http://www.compaq.com. Follow the directions outlined at the site.
Installation and Setup Guide 2-7
Setting Up an Operating System
Compaq Tru64 UNIX Operating System Firmware
Update Utility
Use the update utility to update your SRM firmware. The update utility contains two
images: the update utility itself and the SRM image.
Using the Flash Update Utility from the SRM Console
To update the firmware from the SRM console, do the following:
1.
Insert the Firmware Update CD-ROM into the CD-ROM drive.
2.
Type the show device command to determine the device ID of the CD-ROM drive.
>>>sh dev
dka0.0.0.6.1
dqa0.0.0.107.0
dra0.0.0.12.0
dra1.0.0.12.0
dva0.0.0.0.0
ewa0.0.0.3.1
pka0.7.0.6.1
3.
DKA0
DQA0
DRA0
DRA1
DVA0
EWA0
PKA0
RZ2CC-KA 4110
Toshiba CD-ROM XM-6202B 1110
3 Member RAID 5
2 Member RAID 1
00-00-F8-71-BC-9C
SCSI Bus ID 7 5.57
Boot the Firmware Update Utility CD-ROM using the device ID display in step 2.
>>>b dva0
(boot dva0.0.0.0.0 –flags a) (for Compaq Tru64 UNIX)
You should see a display that reflects your system’s particular hardware configuration
and firmware update version while the update utility is loading and executing, for
example:
bootstrap code read in
base = 1d4000, image_start = 0, image_bytes = 151e00
initializing HWRPB at 2000
initializing page table at 1c6000
initializing machine state
setting affinity to the primary CPU
jumping to bootstrap code
ff.fe.fd.fc.fb.fa.f9.f8.f7.f6.f5.CPU 0 speed is 2.00 ns
(500MHz)
ef.ee.ed.ec.eb.f4.ea.e9.e8.e7.e5.e4
Compaq Professional Workstation XP1000
>>>(boot pmem:180000 -flags 0)
bootstrap code read in
base = 180000, image_start = 0, image_bytes = 800000
initializing HWRPB at 2000
initializing page table at FFF0000
2-8 Installation and Setup Guide
Setting Up an Operating System
initializing machine state
setting affinity to the primary CPU
jumping to bootstrap code
Compaq Professional Workstation XP1000 Firmware Update
Use HELP or ? for help
Update
VERIfy
List
Show
DUmp
VERBose
NVerbose
DEbug
NDebug
?
Apu->
Installation and Setup Guide 2-9
This is some white text.
3
Troubleshooting
This chapter describes guidelines for battery replacement, ISA restrictions, and initial as
well as some detailed troubleshooting for your Compaq Professional Workstation XP1000.
Refer to the documentation supplied with additional options if you experience problems
with specific options that you have installed.
Battery Guidelines
When replacing batteries in this system, use only batteries that are compatible with the
product’s electrical requirements and recharging circuitry, if applicable. Consult your
local Compaq Service Center for information and proper servicing.
WARNING: Lithium batteries are subject to special precautions. There is a danger
of explosion if the battery is incorrectly replaced. Replace only with the same or
equivalent type recommended by the manufacturer.
Recycle or dispose of batteries contained in this product properly, in accordance with local
regulations for the battery type, as marked on the battery. Prior to disposal or recycling,
protect batteries against accidental short-circuiting by affixing nonconductive tape across
the battery terminals or conductive surfaces.
If the battery is not marked, or if you require further information, consult your nearest
Compaq Service Center.
Keep batteries away from children.
ISA Restrictions
There are certain restrictions regarding the use of IRQs in the Professional Workstation
XP1000 system.
3-1
Troubleshooting
AlphaBIOS sets up for audio use of IRQ5 at system power-on before it checks for any
user-preference selections. Once IRQ5 is set up, it cannot be undone, which means that
IRQ5 can only be used for audio. Audio does not work with IRQ7, and it is important that
users do not attempt to override the default.
IRQ5 is reserved for use with audio. IRQ7 is reserved for use by the parallel port. IRQ10
is reserved for use by the USB controller, regardless of whether it is enabled.
PCI Restrictions
All TGA-2 and Powerstorm 4D51T options must be installed in PCI Bus 0.
In a multi-hit environment with ELSA Gloria modules, the VGA-enabled ELSA Gloria
must be installed in PCI Bus 0.
Do not use 64-bit cards in 32-bit slots.
AlphaBIOS Restrictions
Under AlphaBIOS, autosensing for the media type does not work. Instead, users must
select the media type (e.g., 10BaseT) from the AlphaBIOS menu.
Tips
Use these troubleshooting tips should your computer ever fail to operate correctly.
•
Keep it simple; troubleshoot one problem at a time. Also, only make one change at a
time. For example, if your SCSI hard disk drive fails to boot, do not try all the
suggested actions at once. Instead, start with one suggestion such as checking the
cables. After securing the cables, try booting your computer. If it does not work, try
another suggestion.
•
Look for abnormal computer, keyboard, and monitor light-emitting diode (LED)
indications. For example, make sure the power-on LED lights when you turn on your
computer and the drive access indicators light when using either the diskette drive or
hard disk drive.
•
If you installed external devices, make sure all cables are correctly and securely
connected to the appropriate devices and that the devices are installed correctly and
have power.
•
If you installed devices inside the computer, make sure nothing was bumped or jarred
loose, and that all cable connections are securely in place.
•
Make sure all device drivers are installed correctly.
3-2 Installation and Setup Guide
Troubleshooting
•
For systems running the Windows NT operating system, press the Reset (or Halt)
button. Try rebooting your system.
•
Pay close attention to any error message that appears on your screen. If the error
message is hardware related, refer to the troubleshooting tables later in this chapter for
recommended actions.
If the error message is operating system-related, refer to online Help and the
appropriate operating system documentation supplied with your computer.
•
Check for README files, which might be factory installed, on the CD-ROM disk, or
as printed material. This README information can help you setup, configure, and
operate your computer.
NOTE: If Customer Support tells you to return a failed component, pack it in its original
container and then return it to Compaq Computer Corporation or your Compaq authorized
distributor as instructed.
•
Check that the power indicator is on and that the fans (CPU, PCI, and power supply)
are running.
•
Check the power indicator on the monitor. Also, check the monitor, keyboard, and
mouse cables to ensure that they are connected and seated properly.
•
Contact Compaq Services or your service provider for software- or hardware-related
problems.
Logging Equipment
Record all model numbers and serial numbers of your hardware components in the
Checklist portion of Chapter 4, Customer Support. This will help Customer Support
personnel to answer your questions more quickly.
Installation and Setup Guide 3-3
Troubleshooting
?
System Troubleshooting
Table 3-1 lists how to identify and solve problems that could occur with your system, disk
drive, audio, and monitor.
Table 3-1: System Troubleshooting
Problem
Possible Cause
Action
Power indicator not on.
System is not plugged in.
Plug the system in, and then turn it
back on. Check that the power cable is
secure, if necessary.
System is not turned on.
Push the power button.
No power at the wall outlet.
Use another wall outlet and separate
circuit.
Internal power supply cables
not reconnected after
installing options.
Reconnect internal power cables.
Power supply failure.
Contact your service representative.
CPU and/or PCI fan not
connected to the main logic
board.
Connect fans.
Fan vents blocked.
Remove obstruction from fan vents.
Front-panel cable not
plugged in to the main logic
board.
Plug cable in.
3-4 Installation and Setup Guide
Troubleshooting
Table 3-1: System Troubleshooting, continued
Problem
Possible Cause
Action
Power is on, but there is no
screen display and no beeps.
Monitor brightness and
contrast controls are not
correctly set.
Adjust the brightness and contrast
controls.
Monitor is off.
Ensure AC power cord is plugged in and
turn on the monitor.
Monitor cable or power cord
is incorrectly installed.
Check all monitor connections.
Configuration error.
Refer to the video module
documentation for more information.
Monitor is defective.
Try another monitor.
Bad monitor cable.
Try another cable.
Defective video controller
module.
Replace the video module.
Keyboard or video controller
missing or malfunctioning.
The console firmware tests for keyboard
and video before displaying information.
Check connections.
System is in ACPI sleep
mode.
Press power button briefly to wake up
the system. If that doesn’t work, press
power button for 4 seconds to shut down
the system fully. Reapply power.
If necessary, unplug power cord and
then replug power cord.
Various possible causes.
Listen carefully for computer beep
codes; record the number of beeps and
their patterns and then check the beep
codes below:
1 short and 4 long beeps − No usable
memory detected.
2 long and 4 or 5 short beeps −
Firmware in flashROM is corrupted.
Power is on, but there is no
screen display.
Installation and Setup Guide 3-5
Troubleshooting
Table 3-1: System Troubleshooting, continued
Problem
Possible Cause
Action
System does not boot.
Operating system software is
not installed on the hard disk
drive.
Install the appropriate operating system.
Hard drive cable is not
connected or there is no
power to the drive.
Connect hard drive signal and power
cables.
System cannot find the boot
device.
Check the system configuration for
correct device parameters. Use the
firmware to display system
configuration. Look at the hard disk
configuration to determine what hard
disk is available. Verify the operating
system selection information.
Environment variables
incorrectly set.
For AlphaBIOS: From the Boot screen,
press the [F2] key to go to setup. From
there, go to the desired menu to
correctly set the environment variables.
For Compaq Tru64 UNIX, type
>>>show all
to get a list of all environment variables.
Hard disk drive is not
correctly formatted or the
requested partition does not
exist.
Format the hard disk drive or correctly
partition the hard disk drive using the
supplied software.
There is no software on the
requested partition.
Install software on the requested
partition or point to the correct partition.
Windows NT overwrote
Compaq Tru64 UNIX boot
block.
Reinstall the UNIX operating system.
3-6 Installation and Setup Guide
Troubleshooting
Table 3-1: System Troubleshooting, continued
Problem
Possible Cause
Action
System boots automatically
when you don’t want it to.
System is set to autoboot.
For Compaq Tru64 UNIX users: When
the SRM console starts, press [Ctrl/C] to
stop the autostart countdown. Type
>>>auto_action halt
to change a variable.
For Windows NT users: When
AlphaBIOS starts, press a to stop the
autostart countdown. Go to Setup to
change a variable.
È
Target boot device not listed
in the SRM display system
configuration.
No response to keyboard
commands.
Loose power and/or data
cable.
Secure all signal and power cable
connections.
SCSI bus too long.
First ensure that you are using qualified
SCSI cable. Then alter SCSI bus to
correct length in compliance with the
1.5-meter limitation for combined cable
and signals on the circuit board.
If your SCSI bus is longer than 1.5
meters, use shorter cables where
possible, remove some devices, or slow
down the bus. See the SCSI setup
screen in AlphaBIOS or SRM.
SCSI drive not set as drive 0.
For Windows NT users: Reset SCSI
drive as drive 0.
SCSI termination is done
incorrectly.
Terminate the extreme ends of the bus.
Make sure that there are two, and only
two, terminators.
Make sure there is no extra termination,
for example, disable termination in
drives.
Check that there is active termination
only.
Keyboard is password
protected.
Enter the keyboard password, if
supported by your operating system.
Keyboard is not connected.
Connect the keyboard to the keyboard
port. Ensure that cable is seated
securely.
Keyboard is connected to the
mouse port.
Connect the keyboard to the keyboard
port.
Installation and Setup Guide 3-7
Troubleshooting
Table 3-1: System Troubleshooting, continued
Problem
Possible Cause
Action
No response to mouse
commands.
Mouse is not connected.
Connect the mouse and restart the
system.
Mouse is connected to the
keyboard port.
Connect the mouse to the mouse port
and restart the system.
Mouse driver not installed.
Install the appropriate mouse driver.
Refer to your supplied application
software documentation.
Mouse ball sticking.
Clean the mouse.
Dead battery.
Replace the lithium battery. Use a
DIGITAL (P/N 12-41476-06) or type
BR2032 three-Volt DC lithium battery.
See the Compaq Professional
Workstation XP1000 System Reference
and Maintenance Guide for details.
No contact between battery
holder and battery.
Carefully adjust metal tab on battery
holder to allow contact with battery.
System forgets some
environment variables or the
time-of-day while powered
off.
For Compaq Tru64 UNIX
users: System starts
AlphaBIOS rather than
SRM firmware.
or
System forgets user
preference for SRM
firmware and starts
AlphaBIOS firmware when
powered on.
3-8 Installation and Setup Guide
Troubleshooting
Table 3-2: Disk Drive Troubleshooting
Problem
Possible Cause
Action
Hard disk drive cannot read
or write information.
Incorrect SCSI drive ID
settings.
Set the SCSI ID.
Refer to the disk drive installation
instructions.
Loose or incorrectly
installed cables.
Make sure all cables are correctly
installed.
Disk drive is not correctly
formatted or partitioned.
Format and partition as required using
the supplied operating system.
SCSI bus is terminated
improperly.
Ensure that the SCSI bus is terminated
properly. The last device on the cable
should terminate the bus or no devices
should have termination and the cable
should be terminated with the
12-45538-01 active terminator.
1.44-MB diskette is not
formatted.
Format the 1.44-MB diskette or use
preformatted diskettes.
1.44-MB diskette is wrong
density.
Use a 1.44-MB diskette of the proper
density for your hard drive.
1.44-MB diskette is worn or
damaged.
Try another 1.44-MB diskette.
1.44-MB diskette is write
protected.
Slide the write-protect switch so the
hole is not visible.
1.44-MB drive is empty.
Insert a 1.44-MB diskette.
1.44-MB drive power or
data cable not connected.
Connect 1.44-MB drive power or data
cable.
1.44-MB drive data cable
connector installed
backwards. NOTE: 1.44MB drive light is on during
this condition.
Install 1.44-MB drive data cable
connector correctly.
C:
1.44-MB drive cannot read
or write information.
Installation and Setup Guide 3-9
Troubleshooting
Table 3-3: Audio Troubleshooting
Problem
Possible Cause
Action
No sound.
Front-panel internal audio
cable not plugged in.
Plug in the cable.
Driver not installed.
Install the driver.
Volume control set low.
Use an on-screen volume control (if
available) to increase the volume.
Headset plugged in.
Unplug headset and plug microphone into
correct connector.
No power to external
speakers.
Plug in external speakers.
Internal speaker not
connected.
Connect internal speaker.
NOTE: Headphone or external speakers
must be connected for “sound = Audio.”
Front-panel audio cable not
plugged in.
Plug in the cable.
Record volume level set low.
Use the appropriate control to increase the
record level.
Record or playback volume
level set high.
Reduce the volume level. (Use amplified
speakers.)
Cannot record.
Distorted sound.
3-10 Installation and Setup Guide
Troubleshooting
Table 3-4: Monitor Troubleshooting
Problem
Possible Cause
Action
Monitor power indicator is
not on.
Monitor is turned off.
Turn on the monitor.
Power cord is not connected.
Connect the power cord to the system
or a wall receptacle.
No power at wall receptacle.
Use another receptacle.
Monitor is defective.
Try another monitor.
Adjustments incorrect.
Adjust accordingly.
Wrong type of monitor.
Try another monitor.
Defective monitor.
Try another monitor.
Monitor signal cable loose or
damaged.
Inspect connector pins. Replace
cable if damaged.
Monitor cable not connected.
Connect monitor cable.
Distorted, rolling, or
flickering screen display, or
wrong/uneven color.
Monitor power indicator is
flashing.
Installation and Setup Guide 3-11
This is some white text.
4
Customer Support
This chapter provides information on obtaining additional product operating instructions as
well as ways to obtain advanced troubleshooting assistance.
Product Information
Several resources are available to answer your questions about using and maintaining your
system as well as product- and operating–system-related updates.
WWW Go to http://www.compaq.com/support/workstations/index.html
•
Compaq Professional Workstation XP1000 System Reference and Maintenance Guide
(available at product shipment). Detailed information on service, maintenance, FRUs,
and configuration issues.
•
Compaq Professional Workstation XP1000 Technical Information Guide (available at
product shipment). Detailed information on CPU, ISA, PCI, interrupts, registers,
addressing, connectors and cables, LEDs, and FRU replacement, among other topics.
•
Compaq Professional Workstation XP1000 Dual Boot Installation Guide
(EK-ALUNX-DB). Instructions on running multiple operating systems.
Also, you may consult your distributor or Compaq representative.
Support Resources/Checklist
In addition to the resources listed above, Compaq provides telephone customer support
available at 1-800-354-9000 (in the United States) or 1-800-267-5251 (in Canada). To
make the most of your telephone or Web inquiry, please fill in the following checklist prior
to placing a call to ensure that the customer support staff have the information necessary to
process your request.
4-1
Customer Support
BEFORE YOU CALL, fill in the following information:
Today’s date
Customer company name
Address
Contact name
Phone number
System model number
Serial number
Date of purchase
Software platform and version
Layered software applications
System configuration
CPU revision:
MLB revision:
Firmware
SROM:
PALcode VMS:
OSF:
BIOS
ARC:
SRM:
Memory/size (in total MB):
DIMMs:
PCI cards:
ISA card:
Number of drives/revision:
Power supply/revision:
Monitor type:
4-2 Installation and Setup Guide
Customer Support
Problem description
When did the problem start?
Is the system new?
Did the problem start after an upgrade?
Some time after installation?
Is the error repeatable?
Does the error happen occasionally?
Intermittently?
Are there any network-related issues?
Customer impact
Is the system running? Down?
Solutions attempted so far
What diagnostics have been used for testing?
(POST, boot operating system, etc.)
What hardware has been replaced?
Additional notes
Installation and Setup Guide 4-3
This is some white text.
A
Regulatory Compliance Notices
NOTE: The Compaq Professional Workstation XP1000 system is a Class B product.
Federal Communications Commission Notice
Part 15 of the Federal Communications Commission (FCC) Rules and Regulations has
established Radio Frequency (RF) emission limits to provide an interference-free radio
frequency spectrum. Many electronic devices, including computers, generate RF energy
incidental to their intended function and are, therefore, covered by these rules. These rules
place computers and related peripheral devices into two classes, A and B, depending upon
their intended installation. Class A devices are those that may reasonably be expected to
be installed in a business or commercial environment. Class B devices are those that may
reasonably be expected to be installed in a residential environment (e.g., personal
computers). The FCC requires devices in both classes to bear a label indicating the
interference potential of the device as well as additional operating instructions for the user.
The rating label on the device shows which class (A or B) the equipment falls into. Class B
devices have an FCC logo or FCC ID on the label. Class A devices do not have an FCC
logo or ID on the label. Once the class of the device is determined, refer to the following
corresponding statement.
Class A Equipment
This equipment has been tested and found to comply with the limits for a Class A digital
device, pursuant to Part 15 of the FCC Rules. These limits are designed to provide
reasonable protection against harmful interference when the equipment is operated in a
commercial environment. This equipment generates, uses, and can radiate radio frequency
energy and, if not installed and used in accordance with the instructions, may cause
harmful interference to radio communications. Operation of this equipment in a residential
area is likely to cause harmful interference, in which case the user will be required to
correct the interference at personal expense.
A-1
Regulatory Compliance Notices
Class B Equipment
This equipment has been tested and found to comply with the limits for a Class B digital
device, pursuant to Part 15 of the FCC Rules. These limits are designed to provide
reasonable protection against harmful interference in a residential installation. This
equipment generates, uses, and can radiate radio frequency energy and, if not installed and
used in accordance with the instructions, may cause harmful interference to radio
communications. However, there is no guarantee that interference will not occur in a
particular installation. If this equipment does cause harmful interference to radio or
television reception, which can be determined by turning the equipment off and on, the
user is encouraged to try to correct the interference by one or more of the following
measures:
•
Reorient or relocate the receiving antenna.
•
Increase the separation between the equipment and receiver.
•
Connect the equipment into an outlet on a circuit different from that to which the
receiver is connected.
•
Consult the dealer or an experienced radio or television technician for help.
Declaration of Conformity for Products Marked with FCC Logo, United
States Only
This device complies with Part 15 of the FCC Rules. Operation is subject to the following
two conditions: (1) this device may not cause harmful interference, and (2) this device
must accept any interference received, including interference that may cause undesired
operation. For questions regarding this declaration, contact:
Compaq Computer Corporation
P. O. Box 692000, Mail Stop 510101
Houston, Texas 77269-2000
Or call (281) 514-3333
To identify this product, refer to the Series number found on the product.
Modifications
The FCC requires the user to be notified that any changes or modifications made to this
device that are not expressly approved by Compaq Computer Corporation may void the
user's authority to operate the equipment.
Cables
Connections to this device must be made with shielded cables with metallic RFI/EMI
connector hoods in order to maintain compliance with FCC Rules and Regulations.
A-2 Installation and Setup Guide
Regulatory Compliance Notices
Canadian Notice (Avis Canadien)
Class A Equipment
This Class A digital apparatus meets all requirements of the Canadian InterferenceCausing Equipment Regulations.
Cet appareil numérique de la classe A respecte toutes les exigences du Règlement sur le
matériel brouilleur du Canada.
Class B Equipment
This Class B digital apparatus meets all requirements of the Canadian InterferenceCausing Equipment Regulations.
Cet appareil numérique de la classe B respecte toutes les exigences du Règlement sur le
matériel brouilleur du Canada.
European Union Notice
Products with the CE Marking comply with both the EMC Directive (89/336/EEC) and the
Low Voltage Directive (73/23/EEC) issued by the Commission of the European
Community.
Installation and Setup Guide A-3
Regulatory Compliance Notices
Acoustic Declaration
Refer to Table A-1 for declared acoustic values for the Compaq Professional Workstation
XP1000 system.
Table A-1: Acoustics – Declared Values per ISO 9296 and ISO 7779
Sound Power Level
LWAd, B
Sound Pressure Level
LpAm, dBA
(operator position)
Idle
Operate
Idle
Operate
0 x HDD
5.1
5.1
37
37
1 x 4GB (or 9GB)
10k rpm HDD
5.2
5.8
37
41
1 x 18 GB 10k rpm
HDD
5.3
5.6
39
42
Product
Professional
Workstation
XP1000 with:
1 x 4GB (or 9GB)
5.2
5.3
38
41
7200 rpm HDD
Current values for specific configurations are available from Compaq Computer Corporation
representatives. 1 B = 10 dBA.
A-4 Installation and Setup Guide
B
Power Cord Requirements
The power cord set meets the requirements for use in the country where you purchased
your equipment. The voltage selection switch allows you to select the appropriate line
voltage for your server.
Power cord sets for use in other countries must meet the requirements of the country where
you use the system. For more information on power cord set requirements, contact your
Authorized Compaq Dealer.
General Requirements
•
The requirements listed below are applicable to all countries:
•
The length of the power cord must be at least 6.0 feet (1.8 m) and a maximum of 12
feet (3.7 m).
•
The power cord set must be approved by an acceptable accredited agency responsible
for evaluation in the country where the power cord will be used.
•
The power cord set must have a minimum current capacity and nominal voltage rating
of 10 A/125 volts AC, or 10A/250 volts AC, as required by each country’s power
system.
•
The appliance coupler must meet the mechanical configuration of an EN60320/IEC
320 Standard Sheet C13 Connector, for mating with the appliance outlet on the
computer.
B-1
Power Cord Requirements
Country-Specific Requirements
Use Table B-1 to identify the appropriate accredited agency in your country.
Table B-1 Power Cord Set Requirements, By Country
Country
Accredited Agency
Applicable Note
Numbers
Australia
EANSW
1
Austria
OVE
1
Belgium
CEBC
1
Canada
CSA
2
Denmark
DEMKO
1
Finland
SETI
1
France
UTE
1
Germany
VDE
1
Italy
IMQ
1
Japan
JIS
3
Norway
NEMKO
1
Sweden
SEMKO
1
Switzerland
SEV
1
United Kingdom
BSI
1
United States
UL
2
Notes:
1. Flexible cord must be <HAR> Type HO5VV-F, 3-conductor, 1.0 mm2 conductor
size. Power cord set fittings (appliance coupler and wall plug) must bear the
certification mark of the agency responsible for evaluation in the country where it
will be used.
2. Flexible cord must be Type SVT or equivalent, No. 18 AWG, 3-conductor. Wall
plug must be a two-pole grounding type with a NEMA 5-15P (15A, 125V).
3. Appliance coupler, flexible cord, and wall plug must bear a "T" mark and
registration number in accordance with the Japanese Dentori Law. Flexible cord
must be Type VCT or VCTF, 3-conductor, 1.0 mm2 conductor size. Wall plug must
be a two-pole grounding type with a Japanese Industrial Standard C8303 (7A, 125V)
configuration.
B-2 Installation and Setup Guide
C
Electrostatic Discharge Guidelines
To prevent damaging the system, be aware of the precautions you need to follow when
setting up the system or handling parts. A discharge of static electricity from a finger or
other conductor may damage system boards or other static-sensitive devices. This type of
damage may reduce the life expectancy of the device.
To prevent electrostatic damage, observe the following precautions:
Avoid hand contact by transporting and storing products in static-safe containers.
Keep electrostatic-sensitive parts in their containers until they arrive at static-free
workstations.
Place parts on a grounded surface before removing them from their containers.
Avoid touching pins, leads, or circuitry.
Always be properly grounded when touching a static-sensitive component or assembly.
Do not remove the cover when the system is plugged into the wall. Some logic remains
powered on even when the system is turned off.
Grounding Methods
There are several methods for grounding. Use one or more of the following methods when
handling or installing electrostatic-sensitive parts:
NOTE: Grounding to the system won’t work because the power cord must be disconnected.
Use a wrist strap connected by a ground cord to a grounded workstation (i.e., work area) or
computer chassis. Wrist straps are flexible straps with a minimum of 1 megohm ± 10
percent resistance in the ground cords. To provide proper ground, wear the strap snug
against the skin.
C-1
ESD Guidelines
Use heel straps, toe straps, or boot straps at standing workstations (i.e., work areas). Wear
the straps on both feet when standing on conductive floors or dissipating floor mats.
Use conductive field service tools.
Use a portable field service kit with a folding static-dissipating work mat.
If you do not have any of the suggested equipment for proper grounding, have an
Authorized Compaq Reseller supply the part.
NOTE: For more information on static electricity, or assistance with product installation,
contact your Authorized Compaq Reseller.
C-2 Installation and Setup Guide
Index
A
E
AlphaBIOS
console, 2-2
Audio
troubleshooting, table, 3-10
Electrostatic discharge
guidelines, C-1
Equipment
logging, 3-3
Ergonomics, 1-2
External devices
connecting, 1-5
B
Battery
type, 3-8
Battery replacement
guidelines, 3-1
Beep codes, 3-5
Boot
multiple, precautions, 2-1
C
Checklist
pre-startup, 1-2
Comfort
guide, vii
Console
update utility, 2-8
Customer support
checklist, 4-1
telephone numbers, 4-1
F
FCC
Canadian notice, A-3
Class A equipment, A-1
Class B equipment, A-2
declaration of conformity, A-2
European Union notice, A-3
rules and regulations, A-1
Firmware
preparing a floppy diskette, 2-7
update utility, 2-8
updating, 2-1, 2-7
Flash
update utility, 2-8
G
Grounding Methods, C-1
D
Disk drive
troubleshooting, table, 3-9
Index - 1
Index
I
S
Inventory
system, 1-1
ISA
restrictions, 3-1
Safety
guide, vii
Security
Kensington lock, 1-10
lockdown hasp, 1-10
system, 1-10
Sleep mode, 1-7
Speakers
connecting, 1-5
System
configuration, 1-1
cooling, 1-3
installing and connecting, 1-3
inventory, 1-1
passwords, 1-10
security, 1-10
startup, 1-7
turning off, 1-8
turning off, 1-8
System components
lifting, 1-2
L
LEDs, 3-2
Local rinter
connecting, 1-6
M
Monitor
troubleshooting, table, 3-11
O
Operating system
installing, 2-1
required media, 2-1
P
Partitions
setting up, 2-1
setting up, table, 2-5
Power cord
requirements, country-specific, B2
Power Cord
requirements, B-1
Problem solving, 3-1
R
README files, 3-3
Reset button, 3-3
Resources
product information, 4-1
Web sites, 4-1
Index-2 Installation and Setup Guide
T
Troubleshooting, 3-1, 3-4
audio, table, 3-10
basic tips, 3-2
boot device not listed, 3-7
boot problem, 3-6
dead battery, 3-8
disk drive, table, 3-9
disk read and write problem, 3-9
display problems, 3-11
keyboard, 3-7
monitor power indicator problem,
3-11
monitor, table, 3-11
mouse, 3-8
system forgets settings, 3-8
system, table, 3-4
Index
U
UNIX
installing, 2-6
updating firmware, 2-8
Update utility, 2-8
W
Web sites, 4-1
Windows NT
installing, 2-2
installing, table, 2-2
updating firmware, 2-7
Installation and Setup Guide Index-3
This is some white text.