1
User Manual
advanced record nq
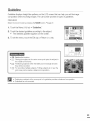
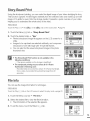
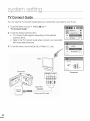
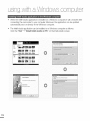
Quick View
Using the Ouick View function,
you can view
images as soon as the recording is finished.
the most
recently
recorded
video
and photo
_RECH_:CK!
Select the record mode by pressing the MODE button. _page
1. Touch the Menu (l_,,
i ) tab -*"Quick
23
View."
2. Touch the desired submenu item.
3. To exit the menu, touch the Exit (@) or Return (_)
tab.
x\
-
Off: Quick View icon does not appear on the screen after you finish
the recording.
On: Quick View icon appears on the screen as seen as you finish
the recording. Touch the Quick Vk)w icon to view the most
recent video or photo you have recorded. After the Quick View
is completed, your camcorder switches back to the standby
mode.
If you touch the delete ([_)
tab during Quick View, the file is deleted.
• The Quick View function is not available in the following conditions:
- If the mode has been changed after the recording
- If the USB cable is connected to the camcorder,
- if the camcorder has been restarted after the recording
- After playing Quick View
• For photos recorded with the "Cont. Shot," only the most recent file is played.
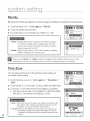
Guideline
Guideline displays straight line patterns
on the LCD screen that can help you set the image
composition
when recording
images. The camcorder
provides 3 types of guidelines.
PRECHECK!
Select the record mode by pressing the MODE button, _page
1. Touch
the Menu
(i_)
23
tab -*"Guideline."
2. Touch the desired guideline according
to the subject.
• The selected guideline appears
on the screen.
3. To exit the menu,
touch
the Exit (_)
or Return
([!})
tab.
• off: Disables the function,
• [] : Placing the subject at the centre cross point puts the subject in
the middle of the frame,
• D : Poskioning subjects within the Safety Zone rectangle ensures
they will be recorded,
• [] : For recording multiple subjects, Putting subjects at or near the
grid cross points creates a balanced composition.
• Positioning a subject at the cross point of a guideline provides a balanced composition,
• Guidelines are not recorded,
69
dv nc ed
i
_/
Play Option
You can set a specific
playback
style according
to your
preference.
PRFCHECK!
louch the Play ({)-*
HD (_HD)
1. Touch the Menu (,i)
or SD (_sD)
tab on the LCD screen. _page
tab -*"Play Option."
2. Touch the desired submenu item.
3. To exit the menu, touch the Exit (D) or Return ('_) tab.
• Play All (_Ij.): Plays video clips in succession starting from the
selected vide() to the last one, then returns to the
thumbnail index view.
• Play One (,_.,): Plays the selected vide() only and returns to the
thumbnail view.
• Repeat All (q/): Repeats playing all the video clips until the
Return([ i ) tab is touched.
- Repeat One (1_): Repeats playing the selected video only until the
Return ({:}) tab is touched.
43
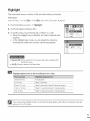
This
camcorder
shows
asection
oftherecorded
video(s)
atrandom.
PRECHECK
_Tbuch
thePlay
(0)_ HD
(_4HU)
orSD(_lsu)
tabontheLCD
screen.
_page
43
1. Touch the Menu (i:_Ti)tab. -* "Highlight."
2. Touch the desired submenu item.
3. To exit the menu, touch the Exit (_) or Return (o_) tab.
• When the highlight view is finished, the video thumbnail view
appears.
• In the highlight play mode, you can adjust the volume by
touching the screen and can also cancel the playback.
-I,_N
• Recent (_): Shows a section of the videos that were created within
the last 24 hours.
All (_): Shows a section of all video files.
Highlight
playback
time to the recording
time for a video
Less than 5 sec.
Full playback
5 to 30 sec.
Plays 5 seconds.
30 sec. to 5 min.
Plays 5 seconds of each 30 second section.
5 min. to 10 min.
Plays 11 seconds of each 2 minute section.
Over 10 rain.
Plays 15 seconds of each 3 minute section.
If you execute the Highlight function in the date thumbnail display, all the files in the selected date set
appear on the LCD screen.
71
dv n ed
I
J
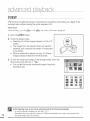
tNIEW
This function provides the preview of storyboard to be printed, which gives you digest of the
recorded video without viewing the whole sequence of it.
PRECHECK
_Tbuchthe Play({)-_
HD (_tHD) or SD (ass)
tab on the LCD screen. ".*page 43
1. Press the _'VlEW button.
2. Touch the desired video.
•
•
•
Sampling 16 i-Frame images appears on the LCD
screen.
The images from the selected video are selected
arbitrarily, and compose the preview of storyboard
to be printed,
When a thumbnail is selected among 16 i-Frame
images, playback starts from the thumbnail.
................................
3. To save the storyboard image on the storage media, touch the
Story-board print (it() tab -_ "Yes."
• You can find the saved storyboard image in the photo
thumbnail view.
{_::_
In the following case, it can not be extracted with all 16 i-Frame thumbnails:
- In case thumbnail is displayed by the date ( ' h;_ ).
- Recorded video is too short (to exlract 16 i-Frame thumbnails from a video, its recorded time
should be longer than 32 seconds.)
Story-Board
Print
Using the storyboard printing, you can make the digest image of your video abridging its story.
This function captures 16 still images arbitrarily from the selected video and makes up one still
image of 16-splits to save it into the storage media. It presents a quick overview of your video,
helping you to understand the whole story of the video.
PR_:CHECK
Touch the Play (
)-* HD
(_HD)
or SD (_SD)
tab on the LCD screen. '=_page 43
1. Touch the Menu (i_,_) tab -* "Story-Board
Print."
2. Touch the desired video -* "Yes."
* Printed storyboard image file appears on the LCD screen for a
while.
* Images to be captured are selected arbitrarily, and composes
storyboard of one still image with 16-split still frames.
o You can also find the saved storyboard image in the photo
thumbnail view.
• The Story-Board
Print function is not available in the
following conditions:
If free space available on the storage is insufficient.
• The storyboard
printing may not show all 16 i-Frame
thumbnails in following case:
Recorded video is too short (to extract 16 i-Frame thumbnails
from a video, its recorded time should be longer than 32
seconds.)
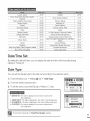
File info
You can see the image information for all images.
PRECHECK!
Touchthe Play(:)
tab on the LCD screen to select the play mode. _page 23
D[
1. Touch the Menu (,,,) tab -* "FiLe Info."
2. Select the desired file to view the file information.
• The information of the selected file appears.
3. To exit the menu, touch the Return (_,) tab.
i
e;#
_
I OOVlDE 0
Date
: 01. JAN. 2010
Duration
: 00:e0:lt5
Size
: 9.56MB
Resolution
: 14D 108O 50i F
73
Storage
Type (HMX-H203/H204/H205
only)
You can record videos and photos on the internal memory or a memory card, so you should
select the desired storage media before starting recording or playback. _page 27
Storage
info (HMX-H203/H204/H205
only)
This function shows you the storage information of the selected storage media, such as used
and available memory space, etc.
PRECHECK!
Inserta memory card in the camcorder before viewingthe storage information.
1. Touch the Menu (,_,,_)-_ Setting (@) tab -_ "Storage
2. Touch the desired submenu item.
•
Info."
Used memory space, available memory space for use,
and the recordable time depending on the selected video
resolution appears.
3. To exit the menu, touch the Return ( 0,) tab.
• Internal Memory: Displaysthe storage informationof the internal
memory.
,, Card: Displaysthe storage informationof the memory card.
Card info (HMX-H200/H220
only)
This function shows you the storage information of the memory card, such as used and
available memory space, etc.
PRECHECK!
Insertthe memory card inthe camcorder beforeviewing the storage information.
1. Touch the Menu (_,,,,_.)
-_ Setting (@) tab -_ "Card Info."
• Used memory space, available memory space for use, and the
recordable time depending on the selected video resolution
appears.
2. To exit the menu, touch the Return (_,) tab.
_
,_
super Fin_
•
2_3Min
Normal
:
3_0Min
Format
Use this function if you want to delete all files completely or to correct problems on the storage
media.
PRFCHECK!
You can completely
delete all files and options on the storage media, including protected flies.
This enablesstable speeds and operation when accessing the storage media,
Be aware that all files and data including protected files will be erased.
1. Touch the Menu (i_,,_)-* Setting (@)tab -* "Format."
2. Touch the desired submenu item. (HMX-H203/H204/H205
only)
• A message appears asking about formatting the memory card.
3. Touch "Yes."
•
•
I
•
The format is executed with a message,
Internal
Memory:
Formats
o mn_ I
_ H
m _,J_
Card:
Formats
the memory
the internal
_
_
card,
memory,
_ €
o ! ,
J
• De not remove the storage media or perform any other operation (such as turning off the power)
during formatting. Also, be sure to use the provided AC power adapter, as the storage media may
be corrupted if the battery becomes exhausted during lormatting.
• If the storage media becomes corrupted, format it again.
• Do not format the storage media on a PC or other device.
Make sure to format the storage media on this camcorder.
• A memory card with the protection tab set to lock wi, not be formatted. _page 29
• If there is no storage media inserted, it can net be selected. Then it will be dimmed on the menu.
• The memory card format is executed by touching "Format." (HMX H200/H220 only)
75
File No.
File names (numbers) are assigned to recorded images according to the selected numbering option.
1. Touch the Menu (,_,,_)-_ Setting (@)tab -_"File No."
2. Touch the desired submenu item.
3. To exit the menu, touch the Exit (P;£_)
or Return ([,:,) tab.
• Series : Assignsfile numbers in sequenceeven after you replace
or format the storage media or delete all files. Each file
is givenwith a unique file number that allowsconvenient
image management on a PC.
• Reset : Resetsthe file numberto 0001 after formatting or deleting
all files or insertinga new memory card.
When you set "File No." to "Series." each file is assigned with a different number se as to avoid
duplicating file names, It is convenient when you want to manage your files on a computer,
Time Zone
You can easily set the clock to the local time when using your
camcorder while traveling.
1. Touch the Menu (l,_,,,i)tab -_ Setting (@)tab -_ "Time Zone" -_
"Visit."
2
Touch the left (_)
or the right (_)
tab to select the visited area.
3. Touch the (_,,) tab when the time zone setting is completed.
• The time zone set value is not applied if you finish the setting
with the (o_) tab without touching the (_,_) tab.
Home : The clock will be used according to your setting on the Date/Time Set
menu. Select it when using this camcorder for the first time or when
returning the clock to your hometown date/time setting.
® Visit (._): When you visit a different time zone, it allows you to use the local
time without changing your hometown time setting. The clock wi,
be adjusted in accordance with the time difference between the two
locations.
ii_iiii!iii!ili_ti_ti_ti_ti_ti_ti_ti_ti_ti_ti_ti_ti_ti_ti_ti_tiiiii
!iiiS__ _iiiiiiii_iiiiii!!
!i!iiiiii!iiiiiii!iii!ii!ii!ii!ii!ii!ii!ii!ii!ii!ii!ii!ii
London, Lisbon
Rome, Paris, Berlin, Stockholm,
Frankfurt
Athens,
Madrid,
Helsinki, Cairo, Ankara
i!i!i!i!i!i!i!i!i!i!i!i!i!i!i!i!i!i!i _ie_
! _iiiii_ii/iiiii_ti_ti_ti_ti_ti_ti_ti_ti_ti_ti_ti_ti_ti_ti_ti_tii
+00:00
Adelaide
+09:30
+01:00
Guam, Sydney, Brisbane
+10:00
+02:00
Solomon
Islands
+11:00
Fiji
+12:00
+03:30
Samoa, Midway
-11:00
Abu Dhabi, Muscat
+04:00
Honolulu, Hawaii, Tahiti
-10:00
Kabul
+04:30
Alaska
Moskva, Riyadh
Teheran
+03:00
Tashkent,
Calcutta,
Karachi
+05:00
New Delhi
+05:30
Kathmandu
Almaty,
Wellington,
Seattle
Denver, Phoenix, Salt Lake City
+05:45
Chicagol
+06:00
Dacca
-09:00
LA, San Francisco, Vancouver,
Dallas, Houston,
New York, Miami, Washington
Atlanta
-08:00
-07:00
Mexico City
-06:00
D.C., Montreal,
-05:00
Yangon
+06:30
Caracas, Santiago
-04:00
Bangkok
+07:00
Buenos Aires, Brasilia, Sac Paulo
-03:00
+08:00
Fernando de Noronha
-02:00
+09:00
Azores, Cape Verde
-01:00
Hong Keng, Beijing, Taipei, Singapore,
Manila
Seoul, Tokyo, Pyongyang
Date/Time
Set
By setting the date and time, you can display the date and time of the recording during
playback. _-,page 25
Date Type
You can set the display type for the date set according to the selected option.
1. Touch the Menu (,)
-* Setting (@)tab -* "Date Type."
2. Touch the desired submenu item.
3. To exit the menu, touch the Exit (_) or Return (_i) tab.
2010/01/01
: The date
is displayed
in the order of year/month
(two-digit)/date.
JAN/01/2010
: The date
is displayed
in the order
of month/date/year.
01/JAN/2010
: The date
is dispbyed
in the order
of date/month/year.
01/01/2010
: The date
is displayed
in the order of date/month
(two-digit)/year.
This function depends on "Date/Time
Display"
setting,
77
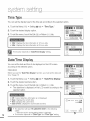
Time Type
You can set the display type for the time set according to the selected option.
1, Touch the Menu (i_)
-_ Setting (@)tab -_ "Time Type."
2, Touch the desired display option.
3, To exit the menu, touch the Exit (B) or Return (_)
tab.
• 12Mr : Displaysthe time informationin 12 hour units.
• 24Mr : Displaysthe time informationin 24 hour units.
This function depends on "Date/Time Display" setting,
Date/Time
Display
You can set the date and time to be displayed on the LCD screen
according to the selected option.
PRECHECK!
Beforeyou use the "Date/Time Display" function,you must set the date and
time, _page 78
1, Touch the Menu (_'i ,;) -_ Setting (@)tab -_ "Date/Time
2, Touch the desired submenu item.
DispLay."
3, To exit the menu, touch the Exit (F_) or Return ({,0) tab.
• The date/time is displayed on the LCD screen according to the
selected option.
•
•
•
•
off : Current date/time inlormation is not displayed,
Date : Displaysthe current date.
Time : Displaysthe current time.
Date & Time : Displaysthe current date and time.
• The date/time will read "01/JAN/2010 00:00" in the following
cases:
When the built-in rechargeablebattery is depleted.
• This function depends on "Date Type" and "Time Type"
setting,
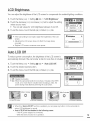
LCD Brightness
You can adjust the brightness of the LCD screen to compensate for ambient lighting conditions.
1. Touch the Menu (_,_,,,o)
--. Setting (@) tab --* "LCD Brightness"
2. Touch the decrease ([],_i) or increase (¢) tab to adjust the setting
values as you want.
• You can set values for LCD brightness between 0 and 35.
3. To exit the menu, touch the Exit (_-_)or Return (_() tab.
•
If the surrounding is too bright, adjust the brightness of the LCD
screen.
• Adjusting the LCD screen does not afflict the image being
recorded.
• Brighter LCD screen consumes more power.
Auto LCD Off
To reduce power consumption, the brightness of the LCD screen is
automatically dimmed if the camcorder is idle for more than 2 minutes.
1. Touch the Menu (i_') -* Setting (@)tab -* "Auto LCD Off."
2. Touch the desired submenu item.
3. To exit the menu, touch the Exit (_) or Return (_)
tab.
• off : Disablethe function,
• On : When the camcorder is idle for morethan 2 minutes inthe STBY
mode, or for more than 5 minuteswhen recordinga video, the
power saving mode starts by dimmingthe LCD screen,
I]I
After 2 minutes
< In the STB¥mqde_
<LCD screen isdarkened>
<During recording>
<LCD screen isdarkened>
• When this "Auto LCD Off" function is enabled, you can press any button on the camcorder to
return LCD brightness to normal.
• Auto LCD Off will be disabled in the following cases:
If the AC power adaptor is connected.
While the Demo function is in operation.
79
Beep Sound
This setting allows operations
such as touching
the screen to be signaled by a beep.
tabs
and buttons
on
1. Touch the Menu (i,,,,l) -* Setting (@)tab -* "Beep Sound."
2. Touch the desired submenu item.
3o To exit, touch the Exit (D) or Return (,,)
disappears.
tab until the menu
• Off : Disables the function.
• On : You will hear a beep sound when operating buttons or tabs
such as the Power (_) button or recording start/stop
button.
The Beep Sound is cancelled in the following
- During recordklg, playklg
- When the camcorder has a cable conrlection.
Shutter
cases:
(component/AV
cable, HDMI cable, etc.)
Sound
You can turn the shutter sound on or off when pressing the PHOTO
button.
1o Touch the Menu (!)
-* Setting (@)tab -* "Shutter Sound."
2. Touch the desired submenu item.
3o To exit the menu, touch the Exit (E_) or Return (_,) tab.
• Off : Disable the function.
• On : You will hear the shutter sound when operating the PHOTO
button.
The Shutter Sound is not heard in the following conditions:
- In case of using the PHOTO button during video recording.
- When the camcorder has a cable conrlection. (component/AV
cable, HDMI cable, etc.)
Auto Power Off
You can set your camcorder to automatically turn off if it is idle for 5 minutes without an
operation. This function will prevent unnecessary power consumption.
1. Touch the Menu (i
l) -* Setting (@)tab -* "Auto Power Off."
2. Touch the desired submenu item.
3. To exit the menu, touch the Exit (_) or Return ('il)
tab.
• Off : Disable the function.
• 5 Min : The camcorder turns off if idle for 5 minutes without an
operation.
• Auto Power Off does not work in the following situations:
When the camcorder has a cable connection. (HDMI cable, component/AV
etc.)
While the Quick On STBY function is in operation.
While the Demo function is in operation.
While in recording, playing (except pause), photo slide show.
• lo operate the camcorder again, press the Power (<®_)button.
cable, USB cable,
81
Quick On STBY
When you are going to record frequently
for an extended
time, use the Quick
function• In standby mode, closing the LCD screen will commence
the Quick
reduce
energy
consumption.
Once
you are ready to record
again,
this function
On STBY
On STBY mode
enables
to the
camcorder to come on quickly from the power saving mode.
1. Touch the Menu (5)
-* Setting (@)tab -* "Quick On STBY."
2. Touch the desired submenu item.
3. To exit the menu, touch the Exit (D) or Return (_ ,]) tab.
• In the standby mode, closing the LCD screen will soon execute
the Quick On STBY mode, and then the camcorder turns off
after the selected time setting.
• Off : In the standby mode, closing the LCD screen turns off the
camcorden
• 5 Min : In the slandby mode, closing the L.CD screen will soon
execute the Quick On STBY mode, and then the camcerder
turns off alter 5 minutes.
• 10 Min : In the standby mode, closing the LCD screen will
seen execute the Quick On STBY mode, and then the
camcorder turns off after 10 minutes.
• 20 Min : In the standby mode, closing the LCD screen will
seen execute the Quick On STBY mode, and then the
camcorder turns off after 20 minutes,
•
Turning off the camcorder after use is always recommended to reduce the energy consumption,
however, you can effectively use the Quick On STBY function for the frequent shooting conditions
in the specified time schedule,
• The mode indicator keeps blinking in the Quick On STBY mode,
• The Quick On STBY mode is not available in the following conditions:
When the LCD screen is open,
When a video cable (HDMI, Component/AV) or the USB cable is connected to the camcorder.
When operating the buttons on the camcorder,
to
PC Software
If you set PC Software to On, you can simply use the PC software by connecting the USB cable
between the camcorder and your PC. You can download the stored video and photo images
on the camcorder to your PC's hard disk. Editing video/photo files is also available using the PC
software.
1. Touch the Menu (i
l) -* Setting (@)tab -* "PC Software."
2. Touch the desired submenu item.
3. To exit the menu, touch the Exit (_) or Return (_il) tab.
• off : Disablesthe function,
On : The built--inediting software launches when the camcorder is
connected to the PC.
The PC Software function is not available in the following conditions:
If "USB Connect" is set to "PictBridge"
• lb enable the PC Software function, set "USB Connect" to "Mass Storage,"
menu option.
• The PC Software is compatible with the Windows OS only.
in the system setting
83
USB Connect
You can transfer
data to a PC or print
1. Touch the Menu (i_)
photos
directly
by establishing
the USB connection.
-* Setting (@)tab -* "USB Connect."
2. Touch the desired submenu item.
3. To exit the menu, touch the Exit (bz¢)or Return (_)
tab.
• Mass Storage
• PictBridge
: Connect to a PC to transfer videes or photos,
page 115
: Connect to a PictBndge printer to print photos directly
(when using the PictBridge function). _page 100
Before connecting a USB cable, check whether the current USB
mode is appropriate for the function to be used,
HDMi TV Out
You can set the HDMI video
output
to match
the TV you have connected.
PRECHECK!
Using the HDMI cable (not supplied), connect the camcorder
1. Touch the Menu (i
to your lV. _page
102
l) -* Setting (@)tab -* "HDMI TV Out."
2. Touch the desired submenu item.
3. To exit the menu, touch the Exit (_) or Return ('i)
tab.
• Auto : The vide() signals are output in the same format as the
recorded file, Use this setting only when connecting to an
H DTV.
• 576p : The recorded file is output in the 720x576p fermat, Use this
setting only when connecting to a regular TV which supports
the pregressive scan at the SD (Standard Definition) level by
using the HDMI jacks.
i¸ _, i
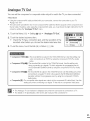
Analogue
TV Out
You can set the component
or composite video output to match the TV you have connected.
PRECHECK!
• Using the corrlponent/AV cable provided with your camcorder, connect the camcorder to your TV.
"-,page 103-_ 104
• This camcorder provides the two--in-one component/AV cable that fits the purpose of the component and
the AV cable. Therefore, when using the corrlponent/AV cable, you must check the right method for the TV
output by setting the "Analogue TV Out" menu.
1. Touch the Menu (
) -* Setting (@)tab -* "Analogue TV Out."
2. Touch the desired submenu item.
• Check the TV type, connection jack, and the resolution of the
recorded video before you choose the desired submenu item.
3. To exit the menu, touch the Exit (_) or Return ('t,)
• Component
tab.
: The recorded file is output in the 1920x1080i format. Use this setting only
when connecting to an HDTV by using the component (Y/PB/PR, Audio)
jacks.
" Component 576p(_):
The recorded file is output in the 720x576p format. Use this setting only
when connecting to a regular TV which supports the progressive scan at
the SD (Standard Definition) level by using the component (Y/PB/PR, Audio)
jacks.
• Component 576i(1_): The recorded file is output in the 720x576i format. Use this setting only when
connecting to a regular TV which only supports the SD (Standard Definition)
resolution without the progressive scars by using the component (Y/PB/PR,
Audio) jacks.
• Composite(_]):
The composite video signals are output via the corrlponent/AV cable (blue). Use this
setting only when connecting to a regular fV that has no component video jacks.
-
1080i (_)
The Analogue TV Out indicator is displayed only when the camcorder is connected to a TV.
For details ors TV specification, refer to the user manual of the connected fV.
85
TV Connect
Guide
You can view the TV Connect Guide before you connect the camcorder to your TV set.
1. Touch the Menu (,) tab -* Setting (@) tab -*
"TV Connect Guide."
2. Touch the desired submenu item.
•
TV Connect Guide appears depending on the selected
submenu items.
Refer to the TV Connect Guide when connect your camcorder
with other external devices.
3. To exit the menu, touch the Exit (_) or Return (})
tab.
q/q
HDTV
Camoorder
Component
TV Display
You can enable or disable the On Screen Display (OSD) that appears on the TV screen when
connecting your camcorder to a TV.
1. Touch the Menu (i
l) -* Setting (@)tab -* "TV DLspLay."
2. Touch the desired submenu item.
3. To exit the menu, touch the Exit (_) or Return (!i)
•
Off
: The
OSD
(On Screen
Display)
menus
are only shown
tab.
on the
LCD screen,
• On : The OSD menus are shown on the LCD screen and the lV
screen as well,
The thumbnail displayand demo screensare shown on the fV even if you set "TV Display" to "Off."
Default Set
You can restore all menu settings to the default conditions.
1. Touch the Menu (,_) -* Setting (@)tab -* "DefauLt Set."
• A message appears asking for your confirmation.
2. Touch "Yes" if you want all the settings return to the default.
• The Time Zone screen appears after all settings return to the
default.
3. Set the date and time again. _-,page 25
•
•
Do not turn off the power while using this function,
Initialising the camcorder settings to factory defaults does net affect recorded images.
87
Lance
You can select a desired language to display the menu and messages. _page 26
Demo
Demo mode automatically shows you the major functions that are included with your camcorder
so that you may use them more easily.
1. Touch the Menu (i_,,.) -_ Setting (@)tab -_ "Demo."
2. Touch the desired submenu item.
3. To exit the menu, touch the Exit (E_) or Return (._) tab.
off : Disablethe function.
• On: Enablesthe Demofunction.
]
The Demo moae _scance,eG _ntne following cases:
If the LCD screen is toucnea.
If any DuEon S operated (Recording start/stop. Q.MENU.
Display (It'll), SMART AUTO. MODE. PHOTO. etc.
However. tne camcoraer _ enter the Demo mooe
automaucal y after 5 minutes in STBY mode f it is die for 5
rnlnu_es wKnout an operation. If you don't want the Demo
function starts, set "Demo" to "Off".
The Derno function does not operate in the following cases:
- If "Auto Power Off" is set to "5 Min'(uses the battery as main power), the Auto Power Off function
will turn the camcorder off before Demo carl run,
Anynet+
(HDMi-CEC)
This camcorder supports Anynet+. Anynet+ is an AV network system that enables you to
control all connected Samsung AV devices with an Anynet+ supported Samsung TV remote
control.
1. Touch the Menu (,_!!_,_)
-* Setting (@)tab -* "Anynet+ (HDMI-CEC)."
2. Touch the desired submenu item.
3. To exit the menu, touch the Exit (_£_)or Return (, ,i) tab.
• When the camcorder is connected to the Anynet+ supported
T_, you can operate some functions of the camcorder using
the TV's remote control.
o off: Disablethe function.
On: The Anynet+ function is enabled.
; i
• When you turn on the camcorder that is conneeted to an Anynet+ supporting TV with an HDMI
cable, the TV (Anynet + suppoded) is automatically turned on. If you do not want to use this
Anynet+ function, set the "Anynet+ (NDMI-CEC)" to "Off."
• For details on the Anynet _ (HDMI-CEC) function, refer to the user manual of Samsung's Anynet+
supported TV.
89
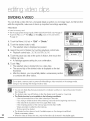
DIVIDING A VIDEO
You can divide a video into two, and easily delete a section you no longer need. As this function
edits the original file, make sure to back up important recordings separately.
PRECHECK!
• Insert a memory card.
• Set the appropriate storage media. (HMX-H203/H204/H205
only) _page
• louch the Play ()
-* HD (_IHD) or SD (_--_sD) tab on the LCD screen.
page 83
27
1. Touch the Menu (_,_) tab -* "Edit" -* "Divide."
2. Touch the desired video to edit.
•
The selected video is displayed as paused.
3. Search the point of division by touching playback control tabs.
• Playback control tabs: _i-/_/_/F¢R/!<i/L]
4. Touch the pause ([ _ i) tab at the point of division, then touch the
Cutting ([ _ ) tab.
• A message appears asking for your confirmation.
i!ii:i:!ii
5. Touch "Yes."
• The selected video is divided into two video clips.
• The second clip of the divided video is displayed as the last
thumbnail.
• After the division, you can partially delete a unnecessary section
or combine with other videos.
Do not eject a memory card or power off while editing a video recorded on the storage media.
Doing so may damage the storage media or data.
• You carl not divide files that are protected (G_) indicator is written on. Cancel the protect function
first. ",page 96
• The divided video may drift before or after the division point by approx. 2 seconds.
• The Divide function is not available in the following conditions:
If the total recorded time of the video is less than 6 seconds.
If you trying to divide sections without leaving 3 seconds at the beginning and the end.
If the video file is recorded in the Time Lapse REC mode.
If the remaining section of the memory space is less than 15MB.
Videos recorded or edited by other devices.
Photos cannot be divided.
• The division function does not work if available space on the storage is insufficient.
Delete unnecessary videos.
• When the video is divided into two, only the first video clip is stored in the playlist again.
COMBINING
VIDEOS
You can combine two different videos. As this function edits the original file, make sure to back
up important recordings separately.
PRECHECK!
• Insert a memory card.
• Set the appropriate storage media. (HMX-H203/H204/H205
only) _page
• louch the Play ({_) -_ HD (_HD) or SD (_sD) tab on the LCD screen.
page 43
27
1. Touch the Menu (i_' ,_)tab -* "Edit" -* "Combine."
2. Touch the video thumbnails to be combined.
• The (_/) indicator and the order number are displayed on the
selected videos. Touching the video thumbnail toggles the
image between being selected (_) or not selected.
• The (_:) indicator does not appear if there is a different
resolution between selected videos files.
/
3. Touch the (,_) tab.
• A message appears asking for your confirmation.
4. Touch "Yes."
• The selected video files are combined in the chosen order and
stored as one video.
• The thumbnail of the first video will appear in the combined
video.
Do not eject a memory card or power off while editing a video recorded on the memory card.
Doing so may damage the storage media or data.
• You carl not combine files with the protect (®-_) indicator is wdtten on. Cancel the protect function
first. ".,page 96
• The original vide() will not be preserved.
• The combine function is not available in the following conditions:
Videos in different resolution formats (Videos recorded at "Video Resolution: [HD]1080/50i"
and "Video Resolution: [HD]720/50p") cannot be combined.
The file size of the combined videos cannot exceed 1.8 GB.
The video file recorded [n the Time Lapse REC mode cannot be edited.
If the remaining section of the memory space is less than 15MB. the files cannot be combined.
Videos recorded or edited by other devices.
Photos cannot be combined.
91
ed 1-na the play st
PLAYUST
W_'s
a "Playlist?"
You can create a p_a_ st on tne same storage media by gatnenng your favourite scenes from
[ne recoraec videos. Aualng or aeletlng videos from a ulay ist does not affect the origlna video
Images.
Example: You have recoraed a few scenes on tne storage media. You warn _o save _ne onglna
recoralng, DU_you also warn [o crea_e a digest by pu_lng your favour te scenes _oge_ner. in _nls
case, you can crea_e a playllSt Dy selecting your favourite scenes, leaving _ne orlg nal recording
as It IS.
15. JAN
vlaeo ( F
30. JAN. 2010
2010
vlaeo c ip 2
]eo c p 3
vlaeo cl_p 4
laeo c p 5
vlaeo ( p 6
vlaeo c "_7
i
10:00
92
10:30
11:30
14:00
20:00
,, One playlistCan be createdper each resolutionSet,IHD (High definition)"and !ISD(Standard
Definitiqn)C
,, The maximumnumber of videos on the playlist:9999 videos.
* If originalvideos are deleted, scenes on the playlistcredted with these videos are also deleted.
i
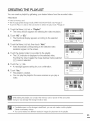
CREATING
THE PLAYLIST
You can create a playlist by gathering your desired videos from the recorded video•
PRECHECK!
• Insert a memory card.
• Set the appropriate storage media. (HMX-H203/H204/H205
only) "-,page 27
• louch the Play (l{) tab on the LCD screen to select the play mode. ',-,page 23
1. Touch the Menu (,_) tab -_ "Playlist."
• The menu window appears for selecting the video resolution•
2. Touch "HD" or "SD."
• The thumbnail display appears according to the selected
resolution•
3. Touch the Menu (:_,_,,,,i)
tab, then touch "Add."
• Video thumbnails corresponding to the selected video
resolution appear on the screen•
4. Touch the desired video to be added to the playlist.
• The (
) indicator is displayed on the selected video•
Touching the video toggles the image between being selected
({_) and not selected•
5. Touch the (,,,}) tab.
• A message appears asking for your confirmation•
ii;i!_i!iiiii
6. Touch "Yes."
•
•
The playlist is created.
You can play the playlist in the same manner as you play a
video•
While editing the playlist, do not eject the memory card or power off the camcorder.
Doing so may damage the storage media or data.
•
If available space on the storage is insufficient, you can not create or add a playlist.
Delete unnecessary videos.
• You cannot select two different resolution images for placement in the playlist.
93
ed t na the
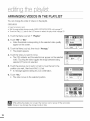
ARRANGING
You can change
VIDEOS IN THE PLAYLIST
the order
of videos
on the playlist.
PRFCUECK!
• Insert a memory card.
• Set the appropriate storage media, (HMX-H203/H204/H205
only) _page 27
• Touch the Play ({)
tab on the LOD screen to select the play mode, _page 23
1. Touch the Menu (,)
tab -* "Playlist."
2. Touch "HD" or "SD."
•
Video thumbnails corresponding to the selected video quality
appear on the screen.
3. Touch the Menu (,_) tab, then touch "Arrange."
• The playlist appears.
4.
Touch the video you want to move.
• The (_) indicator and the selection bar appear on the selected
video. Touching the video toggles the image between being
selected ([J_J)and not selected.
l!,!iiii_!i!!!
_j].]
5. Touch the previous (_)/next
([_]) tab to move the bar to the
position you want, then touch the (,_,) tab.
• A message appears asking for your confirmation.
6. Touch "Yes."
• The video moves to the selected position.
_]]-]
While editing the playlist, do not eject the memory card or power off the camcorder.
Doing so may damage the storage media or data,
DELETING VIDEOS FROM THE PLAYLIST
You can delete undesired videos from the playlist.
PRECHECK!
• Insert a memory card.
• Set the appropriate storage media, (HMX-H203/H204/H205
only) _page 27
• louch the Play (l_,) tab on the LCD screen to select the play mode, _page 23
1. Touch the Menu (,_,,_)tab -* "Playlist."
2. Touch "HD" or "SD."
• Video thumbnails corresponding to the selected video quality
appear on the screen.
3. Touch the Menu (!,_-_i)tab, then touch "Delete."
• The playlist appears.
4. Touch the video you want to delete.
• The (m) icon and the selection bar appear on the selected
video. Touching the video toggles the image between being
selected (,_) and not selected.
_J]d
5. Touch the (,_}) tab.
• A message appears asking for your confirmation.
6. Touch "Yes."
•
The selected videos are deleted from the playlist.
.....
J
While editing the playlist, do not eject the memory card or power off the camcorder.
Doing so may damage the storage media or data,
95
f e rn n aernent
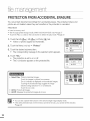
PROTECTION
FROM ACCIDENTAL
ERASURE
You can protect important recordings from accidental erasure. The protected videos and
photos are not deleted unless they are formatted or the protection is cancelled.
PRECHECK!
• Insert a memory card.
• Set the appropriate storage media, (HMX-H203/H204/H205
only) _page 27
• Touch the Play ()
tab on the LCD screen to select the play mode, _page 23
1. Touch the HD (@'_HD),SD (@sD) or Photo (_)
• Videos or photos appear as thumbnails.
tab.
2. Touch the Menu (_,_,)tab -* "Protect."
3. Touch the desired submenu item.
• The corresponding message to the selected option appears.
4. Touch "Yes."
•
•
The protection is set to on or off.
The (_,) indicator appears on the protected file.
• Select
-
Files: Protects individual images,
louch the images to protect from erasure,
The (_) indicator is displayed on the selected images.
Tbuching the thumbnail irrlage toggles the image
between being selected (_ ,) or not selected,
Touch the ( ,_<}) tab.
All On: Protects all irrlages,
All Off: Releases the protected images all at once,
-
You can alse operate this function in the full and single irrlage display mode.
If the write protection tab on the memory card is set to lock, you cannot set this function,
_page 29
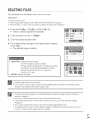
DELETING
FILES
You can erase your recordings one by one, or at once.
PRECHECK!
• Insert a memory card.
• Set the appropriate storage media. (HMX-H203/H204/H205
only) '-,page 27
• louch the Play (l_,) tab on the LCD screen to select the play mode. '.-,page 23
1. Touch the HD (L'_.B), SD (_su) or Photo (_)
• Videos or photos appear as thumbnails.
tab.
2. Touch the Menu (,,-,_:)tab -_ "Delete."
3. Touch the desired submenu item.
4. The corresponding message to the selected option appears.
Touch "Yes."
• The selected image is deleted.
,' Select Files: Deletes individual krlages.
louch the images you want to delete.
The (ill) indicator is displayed on the selected images.
lbuching the thumbnail image toggles the krlage
between being selected (ill) or not selected.
louch the (_,_) tab.
• All Files: Deletes all images.
,, Deleted images cannot be recovered.
,, Do not eject a memory card or power off while deleting videos recorded on the storage media.
Doing so may damage the storage media or data.
,, lo protect irrlportant images from accidental erasure, activate the image protection function in
advance. _page 96
,, You can not delete protected Iiles. Cancel the protect function first.
,, If the write protection tab on the memory card is set to lock, you cannot delete the images.
'-*page 29
,, You can also operate this Iunction in the full and single image display mode.
,, The delete function does not work if battery charge is insufficient. It is recommended to use AC
power to continue power supply during the deletion.
97
f e rn n aernent
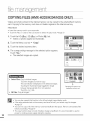
COPYING
FILES (HMX-H203/H204/H205
ONLY)
Videos and photos stored in the internal memory can be copied to the external flash memory
card. Copying to the memory card does not delete originals in the internal memory.
PRECHECK!
• Insert the memory card in your camcorder.
• Touchthe Play()
tab on the LCD screen to select the play mode. "-*page23
1. Touch the HD ((_!HD), SD (_sD) or Photo (_)
• Videos or photos appear as thumbnails.
tab.
2. Touch the Menu (_, ,.l)tab -_ "Copy."
3, Touch the desired submenu item.
4, The corresponding message to the selected option appears.
Touch "Yes."
• The selected images are copied.
i!iii_iii,ii
_
_i!!i!_{{zi:i/
,' Select Files: Copy indMdual images.
Touch the images you want to copy.
The (_) indicator is displayed on the selected images.
Tbuching the thumbnail image toggles the image
between being selected (_1) or not selected.
Touch the ([_)
tab.
All Files: Copy all images.
Remaining
destination
free
space
memory
in the
card
,, You can also operate this function in the Iull and single image display mode.
,, If the write protection tab on the memory card is set to lock, you cannot copy the images.
'-*page 29
,, You can not copy a file if the memory card has insufficient free space. Remow_ unnecessary files
before proceeding. "-*page 97
,, The copy function does not work if battery charge is insufficient. It is recommended to use AC
power to continue power supply during the copying.
pr nt ng photo,s
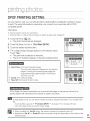
DPOF PRINTING
SETTING
On your memory card, you can write the print-out information including the number of copies
to print. The saved information is used when you connect your camcorder with a DPOFcompatible printer.
PRECHECK!
• Insert a memory card in your camcorder.
• louch the Play ()
tab on the LCD screen to select the play mode. _page
23
1. Touch the Photo (_) tab.
• The photo thumbnails are displayed.
2. Touch the Menu (:_,_
_,_)tab -* "Print Mark (DPOF)."
3. Touch the desired submenu item.
4. The corresponding message appears to the selected option.
Touch "Yes."
• The print mark is selected or removed.
• The (2 01) indicator appears on the print-marked photos.
• Select
Files: Print marks individual images.
The print marks indicator is displayed on the selected
images, louching the thumbnail image toggles the
image between being selected (2) or not selected.
[buch the ({ _ }) tab.
• Set All: Print marks all images.
• Reset All: Removes all the print marks.
V¸_i
i___i
DPOF (Digital Print Order Format) allows you to set which still images on the memory card are to be
printed, together with information on the number of Copies to be printed,
In single display mode, you cars set the number of prints by using the decrease (
) or increase (_)
tab.
- Touch the Menu (_,,) tab _ "Print Mark (DPOF)" _ decrease (m}) or increase (_÷i) tab.
- Up to 99 copies cars be set to print of each image.
• When you select the "Set All" option, the number of copies to be printed is set to 01.
• Selecting the "Set All" or "Reset All" options may take a long time depending ors the number of the
selected copies.
99
pr nt ng photo,
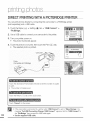
DIRECT PRINTING
WITH A PICTBRIDGE
You can print photos directly by connecting
(sold separately) and a USB cable.
PRINTER
this camcorder to a PictBridge printer
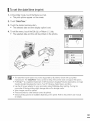
1. Touch the Menu (_,_) -* Setting (@) tab -* "USB Connect"
"PictBridge."
2. Use a USB cable to connect your camcorder to the printer.
-*
_
[ F_o_._s.,
_]1
3. Turn your printer power on.
• The photo thumbnails appear.
4. Touch the photos to be print, then touch the Print (i _. ) tab.
• The selected photo is printed.
Touchthe decrease(_])/increase (¢}) tab to set the number of copies
to print.
• The number of copies is set.
Touchthe Return (°_) tab on the LCD screen.
[buch
"Cancel"
*
,
on the
screen.
If the camcorder is connected to a printer while "USB Connect" is set to "Mass Storage," the
message "Fail USB Connecting Change 'USB Connect'" appears, Set the "USB Connect" to
the "PictBridge" then connect the USB cable again,
Use the supplied USB cable.
| To set the date/time
1.
In the printer mode,
• The print options
2. Touch
"Date/Time/'
3. Touch
the desired
•
The selected
imprint
touch the Menu (_,,,) tab.
appear on the screen.
submenu
item.
date and time display
option
is set.
4. To exit the menu, touch the Exit (_;a) or Return ([_ ,i) tab.
• The selected date and time will be printed on the photos.
• The date/time imprint option may not be supported by all printers, Check with your printer
manufacturer, The "Date/Time" menu cannot be setup if the printer does not support this option.
• PictBridge_M is a registered trademark of CIPA (Camera & Imaging Products Association), an image
transfer standard developed by Canon, Fuji, HP, Olympus, Seiko Epson, and Seny,
• Use the AC power adaptor for your camcorder during PictBridge direct printing, fiJrning the
camcorder off during printing might damage data on the storage media,
• Video images cannot be printed,
• Photos recorded on other devices cannot be printed,
• Various printing options are available depending on the printer. Ref_;r to the printer's user manual
for details,
101
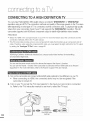
onne tina to
TV
L_
CONNECTING
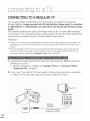
TO A HIGH DEFINITION
TV
You can enjoy High Definition (HD)quality videos, recorded in "[HD]1080/50i" or "[HD]720/50p"
resolution using an HDT_. The connection methods and quality of the image viewed on the TV screen
differ depending on what type of TV is connected, and the connectors used. To playback high quality
videos from your camcorder, check if your TV set supports the "[HD]1080/50i" resolution. This HD
camcorder supports both HDMI and component output to deliver high-definition video transfer.
PREC}_ECK!
• Select the HDMI or the corrlponent jack on your lV, For more information about the connectors and the
connection methods, refer to the TV user manuak
• This HD camcorder provides a twodn one component/AV cable that functions as an component and AV
cable. Therefore, when using the component/AV cable, you must select the right method for the TV output
by setting the "Analogue TV Out" menu. _page 85
HDMI (High Definition Multimedia Interface) is a compact
audio/video
interlace for transmitting
You can use the Anynet _ function if the carncorder is connected with an H_MI cable to an Anynet+
suppo£ed -FV, Eor more information, refer to the Anynet_- support TV!e user manual,
1. Turn on the camcorder and connect a Mini HDMI cable (optional) to the HDMI jack on your T_.
• When connecting via HDMI, the connected device may not be recognised if the
camcorder is turned off.
2. Turn on your TV and set the W's input selector to the Input your camcorder is connected
to. Refer to the TV's instruction manual to see how to select the TV input.
Camcorder
Signal flow
I
Mini HDMI Cah e
oDtlona
_&_\J
'_
HDMI IN
_'_'
1. Connect the provided component/AV
L-R (Audio) on your T_.
• After the connection
is complete,
_page
85
cable
to the component
set "Analogue
TV Out"
jack,
Y-PB-PR
to "Component
2. Turn on your TV and set the W's input selector to the Input your camcorder
to. Refer to the TV's instruction
manual to see how to select the TV input.
(Video) and
1080L"
is connected
HDTV
Camooraer
COMPONENT
IN
AUDIO
IN
SignaJ flow
Comoonent!AV
cable
_cornbonent
conneotlop
If the PB, mR,or Y jack is not connected
correctly, the TV screen may appear red or blue,
* When connecting to fV using the component/AV cable, match the colours between the cables and
the corresponding jacks,
* Videos recorded using the HD camcorder will playback ors an HDIV in the original resolution you
set in the camcorder. Videos recorded in SD quality cannot playback ors an HDl_/in the HD quality,
For example, videos recorded in HD quality (resolution of "[HD]1080/50i"
or "[HD]720/50p")
playback in HD quality while the videos recorded in SD quality (resolution of "[SD]576/50p")
playback in the SD quality,
. This camcorder is provided with the "TV Connect Guide" menu function. If you try to connect the
camcorder to a fV (without using the user manual), use the "TV Connect Guide" menu function,
_page 86
. You must use the provided component//W cable, Do not use cables from other manufacturers.
. Only a C to A type Mini HDMI cable cars be used with this camcorder.
. The HDMI jack ors the camcorder is provided for the output usage only.
. If the Anynet+ supported lV is connected with the camcorder, turning on the camcorder may turn
the lV's TV power on, (Anynet _ function) If you don't want this function, set "Anynet+ (HDMI-CEC)"
to "Off." _-,page 89
. Use only the HDMI 1,3 cable when connecting to the HDMI jack of this camcorder. If the
camcorder is connected with other HDMI cables, the screen display may not work,
103
onne tina to
CONNECTING
TV
TO A REGULAR TV
You can enjoy images recorded with your HD camcorder on a regular TV that supports
standard definition. Images recorded with HD (high definition) image quality (Le. resolution
of "[HD]1080/50i"
or "[HD]720/50p")
are played back with SD (standard definition) image
quality.
The connection methods and quality of the image viewed on the TV screen differ depending
on what type of TV is connected, and the connectors used. This HD camcorder supports both
component and composite output for standard definition video transfer.
PRECHECK!
• Check your TV connection jack and select the connection method depending on the component or the
corrlposite jack, For more informationabout the connection jack and the method, referto the TV user
manual,
• This HD camcorder providesa two in one component/AV cable that functions as an component and
AVcable. Therefore,when using the component/AV cable, you must select the right method for the
camcorder's output by setting the "Analogue "IV Out" menu, _page 85
1. Connect the provided component/AV cable to the component jack, Y-PB-PR (Video) and
L-R (Audio) on your T_.
• After the connection is complete, set "Analogue TV Out" to "Component 576p or
Component 576L" _page 85
2. Turn on your TV and set the TV's input selector to the Input your camcorder is connected
to. Refer to the TV's instruction manual to see how to select the TV input.
Oamcorae
Regular TV
_OMPONENT
mNAUDIOm
Signal flo_
Domoonent/AV
_comDonent
2_
cable
connectlor
1. Connect the provided component/AV cable to the composite jack, Video and L-R (Audio)
on TV. Use the blue plug with the yellow label to connect to the Video input on your TV.
• After the connection is complete, check the desired TV out method by setting "Analogue
TV Out" to "Composite."
_-,page 85
2. Turn on your TV and set the W's input selector to the Input your camcorder is connected
to.
• This is often referred to as "line."
• Refer to the TV's instruction manual to see how to select the TV input.
Camcorder
RegularTV
Oomaonent/AVcable
OOmDOSKe
oonnectlor
If the PB, PR, or Y jack is connected
incorrectly, the IV screen may appear red or blue.
• Check the connection status between the HD camcorder and IV, the 'FV screen may not deliw_r
the right video information if connected incorrectly.
• When the camcorder is connected to a IV with more than one cable, the output signal is followed
in the order of priority: HDMI -* corrlponent/AV output.
• Do not use excessive force when corlrlecting the cables.
• For more information about the TV connection jack and the connecting method, rder to the TV
user manual.
•
Following method Type B above, the blue plug may not match the Video input on your TV due to
the VIDEO input being labelled diff_rently. Sometimes the IV has a Y input jack instead of WDEO.
105
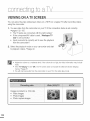
VIEWING ON A TV SCREEN
You can enjoy the enjoy widescreen videos on a HDTV (or a regular TV) after recording videos
using the camcorder.
1. You see video from the camcorder on your TV if the connection status is set correctly.
_-,pages 102-105
• The TV jacks are connected with the right cables?
• If the component/AV cable is used, "Analogue TV
Out" is set correctly?
• Input source list is correctly set to view the playback
from the camcorder?
2. Select the playback mode on your camcorder and start
to playback videos. _-,page 44
• Adjust the volume to a moderate level, If the volume is too high, the video information may include
noise.
• If the "TV Display" is set "Off," the TV screen does not include the OSD (On Screen Display)
menus, _page 87
• You will only hear audio from the camcorder on your TV in the video play mode.
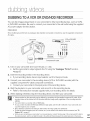
DUBBING
TO A VCR OR DVD/HDD
RECORDER
You can dub images played back on you camcorder to other recording devices, such as VCRs
or DVD/HDD recorders. Be sure to connect your camcorder to the wall outlet using the supplied
AC power adaptor for this function.
PRECHECK!
Since dubbing is performed via analogue data transfer (composite
AV cable.
connection),
use the supplied component/
Camcoraer
recoraer
VCR or DVD/HDD
©omoonen*dAV
cable
1. Turn on your camcorder and touch the play (
) tab.
• Set the camcorder's output signal to the TV using the "Analogue TV Out" function.
_page 85
2. Insert the recording media in the recording device.
• If your recording device has an input selector, set it to the input mode.
3. Connect your camcorder to the recording device (VCR or DVD/HDD recorder) with the
supplied component/AV cable (composite connection).
• Connect your camcorder to the input jacks of the recording device.
4. Start the playback on your camcorder, and record it on the recording device.
Refer to the instruction manuals supplied with your recording device for details.
5. When dubbing is finished, stop the recording device, and then your camcorder.
Videos recorded on this camcorder can be dubbed by connecting with the supplied component/AV cable. All the
recorded videos will be dubbed with SD (standard definition) image quality, regardless of the recording resolution
(HD/SD).
You cannot dub to a recorder with an HDMI cable.
To copy a video recorded with HD (high definition) image quality, use the builtqn software of your camcorder, and
copy the images to your computer.
Since dubbing is performed via analogue data transfer, the image quality may deteriorate.
To hide the screen indicators (such as a counter, etc.) on the screen of the monitor device connected, set "TV
Display: Off." "-,page 87
When you are connecting your camcorder to a monaural device, connect the blue plug of the component/AV cable to
the video input jack, and the red (right channel) or the white (left channel) plug to the audio input jack on the device.
107
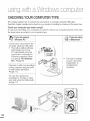
CHECKING
YOUR COMPUTER
TYPE
This chapter explains how to connect the camcorder to a computer using the USB cable.
Read this chapter carefully and be free from your burden of handling two devices at the same time.
Check your computer type before using???
To view your recordings on a computer, you need to check your computer type first. Then, take
the steps below according to your computer type.
Connect your camcorder to the
computer using the USB cable.
• The built-in editing software,
Intelli-studio runs on the
PC automatically once the
camcorder is connected to
Windows computer. (When
you specify "PC Software:
On"). '-_page 83
Play back or edit your recordings
on the computer using the builtin Intelli-studio application.
,-_page 112
You can also upload your
recordings to YouTube or other
web sites using the Intelli-studio.
'-_page 113
•
The built-in software
on your camcorder,
'lntelli-studio' is
not Macintosh
compliant.
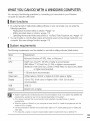
WHAT YOU CAN DO WITH A WINDOWS
COMPUTER
You can enjoy the following operations by connecting your camcorder to your Windows
computer by using the USB cable.
| Main functions
•
•
By using the built-in Intelli-studio editing software on your camcorder, you can enjoy the
following operations.
Playing back recorded videos or photos. _page 112
Editing recorded videos or photos. _page 112
Uploading the recorded videos and photos to YouTube, Flickr, Facebook, etc. _page 113
You can transfer or copy the files (videos and photos) saved on the storage media into your
computer. (the mass storage function) _-,page 115
| System
requirements
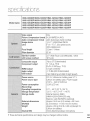
The following requirements must be satisfied to use built-in editing software (Intelli-studio):
Items
Requirement
OS
Microsoft Windows XP SP2, Vista, or Windows 7
CPU
Intel® Core 2 Duo® 1.66 GHz or higher is recommended
AMD Athlon TMX2 Dual-Core 2.2 GHz or higher is recommended
'qotebook: Intel Core2 Duo 2.2GHz or AMD Athlon X2 Dual-Core 2.6GHz
or higher recommended)
RAM
GB and above recommended
Video Card
nVIDIA Geforce 7600GT or higher Ati X1600 series or higher
DiSplay
1024 x 768, 16-bit colour or higher (1280 x 1024, 32-bit colour
recommended)
USB
USB 2.0
Direct X
DirectX 9.0c or higher
• System requirements mentioned above are recommendations.
Even on a system that satisfies the
requirements, operations may not be ensured depending on the system,
• On a slower computer than recommended, video playback may skip frames or operate
unexpectedly,
• When the version of DirectX on your computer is lower than 9.0c, install the programme with the
version of 9,00 or higher,
• It is recommended to transfer the recorded vide() data to a PC before playing back or editing the
video data.
•
For doing this, a laptop computer requires higher system requirements than a desktop PC.
109
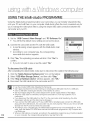
USING THE intelli-studio
PROGRAMME
Using the Intelli-studio programme built-in your camcorder, you can transfer video/photo files
onto your PC and edit them on your computer. Intelli-studio offers the most convenient way for
you to manage the video/photo files by using the simple USB cable connection between the
camcorder and your PC.
1. Set the "USB Connect:
Mass Storage"
• You will find the default menu settings
2. Connect
the camcorder
•
A new file saving
window.
•
According
removable
3. Click "Yes,"
confirm.
•
and "PC Software:
On."
are set as the above.
and the PC with the USB cable.
screen
appears
with the Intelli-studio
main
to your computer
type, the corresponding
disk window appears.
the uploading
procedure
will start.
Click
If you do not want to save a new file, select
"No."
"Yes"
to
To disconnect the USB cable
After completing the data transfer, make sure to disconnect the cable in the following way:
1.
2.
3.
4.
Click the "Safely Remove Hardware icon" icon on the taskbar.
Select "USB Mass Storage Device," and then click "Stop."
If the "Stop a Hardware device" window appears, click "OK."
Disconnect the USB cable from the camcorder and PC.
* Use the provided USB cable. (Supplied by Samsung)
* Dorft apply excessive force when inserting or extracting the USB cable into/from a USB jack,
* Insert a USB afler checking the direction of ks insertion is correct,
, We recommend using the AC power adaptor as the power supply instead of the battery.
, When the USB cable is connected, turning the camcorder on or off may cause the PC to
malfunction
* If you disconnect the USB cable from the PC or the camcorder while transferring, the data
transmission will stop and the data may be damaged,
, If you connect the USB cable to a PC via a USB HUB or simultaneously connect the USB cable
along with other USB devices, the camcorder may not work properly. If this occurs, remove all USB
devices from the PC and reconnect the camcorder,
, According to your computer type, the Intelli-studio programme may net automatically run, In this
case, ()pen the desired CD-ROM drive that has the Intelli-studio programme in My Computer and
run iStudie.exe,
, When an USB cable is connected, according to the application programme (e,g, EmoDio) installed
on your computer, the correspendirlg programme may start first of all,
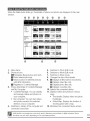
When the Intelli-studio starts up, thumbnails of videos and photos are displayed in the main
window.
1.
2.
3.
4.
Menu items
Shortcut icons
Navigates files (previous and next).
l Prints selected photo(s).
l Views location of selected photo(s)
with GPS information.
W Registers to Contents Manager.
Shows directories of Contents Manager
and My Computer
Contents Manager: You can classify
and manage videos and photos on
your computer.
My Computer: You can view videos
and photos saved in the selected
directory of your computer.
Switches to Library of the computer and
connected camcorder.
5.
6.
7.
8.
9.
Switches to Photo Edit mode.
Switches to Movie Edit mode.
Switches to Share mode.
Changes the size of thumbnails.
_ Displays all files (videos and photos).
Displays video files only.
Displays photo files only.
Displays voice files only.
10. Selects the connected device.
11. Displays videos and photos in various
ways.
Thumbnails: Displays video and photo
thumbnails
Global Map: Displays the location of
shooting place with a map.
12. Minimises the connected device screen.
InteHi-studiois a programme commonly used in Samsungcamcorders or digital cameras.Some
functions may not work depending on the purchased product.
111
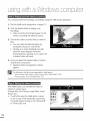
You
canplay
back
therecordings
conveniently
using
theIntelli-studio
application.
1. Run
theIntelli-studio
programme.
_page
110
2.Click
thedesired
folder
todisplay
your
recordings.
• Video
(orphoto)
thumbnails
appear
onthe
screen,
according
theselected
source.
3.Choose
thevideo
(orphoto)
thatyouwant
to
play.
• Youcancheck
thefileinformation
by
moving
themouse
onover
thefile.
• Clicking
onavideo
thumbnail
once
will
show
thevideo
playback
inside
the
thumbnail
frame,
allowing
youtosearch
for
adesired
video
withease.
4.Once
youselect
thedesired
video
(orphoto),
double-click
toplay
back.
Playback
starts
andplayback
controls
appear.
The following is the file format supportable in Intelli-studio:
- Video formats: MP4 (Video: H,264, Audio: AAC), WMV (WMV 7/8/9)
- Photo formats: JPG, GIF, BMP, PNG, TIFF
With Intelli-studio, you can edit the videos or
photos in various ways.
(Change Size, Fine-Tuning, Image Effect, Insert
Frame, etc.)
• To edit a file using the Intelli-studio, ensure
to use a copy of the desired file saved in My
Computer before clicking on the "Movie Edit"
or "Photo Edit" icon.
Share your contents
with the world, by uploading
photos and videos directly to a web site with one
click.
1, Select the desired videos or photos to share.
2. Click "Share" on the browser.
•
The selected file appears on the sharing
window.
3, Click the web site you would like to upload
files.
• You can choose "YouTube," "Fickr,"
"Facebook, "or the specified web site
you want to set for your uploading
management.
4, Click "UpJoad" to start uploading.
A pop up window appears asking your ID
and the password.
5, Enter your ID and the password to access.
• Access to the web site contents can be
limited depending on your web access
environment.
For mere infermation about Intelli--studio use, see
the Help Guide by clicking "Help."
_,_
_
*
Flickr is an image and videe hesting website, web services suite, and online cemmunity
platferm, In additien te being a pepular website fer users te share persenal phetegraphs,
th_ service is widely used by bleggers as a phete repesitery,
ht_p:flwww.flickr.com/
_ _ ebeek is a glebal secial netwerking website that is eperated and privately ewned by
Facebeek
Irlc. Users can add friends and send messages and update their persenal
.......
:: _refiles te nefify friends abeut themselves. Additienally, users can ein netwerks
........... organized by city, werkplace, scheel, and regien,
® httP://www.faceboo
k.com/
videe clips, The San Brune--based service uses Adebe Flash technelegy te display
o YeuTube
is a videe
sharing website,centents
Users can
upload,videe
view,clips,
and TV
share
a wide variety
ef users-generated
including
clipspersenalized
and music
videes, as well as amateur centents such as videe blegging and shert original videes.
o http://www.youtube.com/
113
•
When the Intelli-studio application is installed on a Windows computer, it will run faster after
connecting the camcorder to your computer. Moreover, the application can be updated
automatically and run directly in the Windows computer.
•
The Intelli-studio application can be installed on a Windows computer as follows:
Click the "Tool" -_ "Install Intelli-studio on PC" on the Intelli-studio screen.
USING AS A REMOVABLE
STORAGE
DEVICE
You can copy video or photo files recorded by the camcorder to a Windows computer by
connecting the USB cable to the camcorder.
| Viewing the contents
1. Check out the "USB Connect:
_-,page 84
2. Check out the "PC Software:
of storage
Mass Storage"
media
setting.
Off" setting. _-, page 83
3. Check out the storage media.
4. Connect the camcorder to the PC with the USB cable.
_-,page 110
• The "Removable Disk" or "Samsung" window appears
on the PC's screen after a moment.
• The removable disk appears when connecting a USB.
• Select "Open folders to view files using Windows
Explorer" and click "OK."
5. The folders in the storage media appear.
• Different file types are stored in different folders.
6. Select the desired folder (or files) to copy, then drag and
drop it into the destination folder.
• The folder (or files) is copied from the storage media
to the PC.
•
If the "Removable Disk" window does not appear,
confirm the connection (",page 110 or perform steps 1
and 4 again,
• When the removable disk does not appear automatically,
open the removable disk folder of My Computer,
• If the connected camcorder's disk drive does not open
or the context menu that appears when right clicking
your mouse (open or browse) appears broken, your
computer is suspected to be infected by Autorun virus,
It is recommended to update the anti-virus software for
its latest version,
115
| Structure
•
•
of folders
and flies on the storage
media
The folder and file structure
for storage media is as follows:
The file naming follows DCF (Design rule for Camera File System).
,, The HD quality videos have HDV ####.MP4 formal
,, The SD quality videos haw] SDV ####.MP4 format.
,, The file number automatically increases when a new video
file is created.
,, A new folder is created when the number of files in a folder
exceeds 999 ~1,000.
,, The folder names are given in order of 100VIDEO,
101VIDEO. The maximum number of the folders is 999.
,, The maximum of 9,999 files carl be created in a storage
media by using the camcorder.
,, As in video files, the file number automatically increases
when a new photo file is created.
. The photos have SAM ####.JPG format.
- A new folder is created when the number of files in a folder
exceeds 999 ~1,000.
- The folder names are given in order of 100PHOTO,
101 PHOTO. The maximum number of the folders is 999.
- The maximum of 9,999 files can be created in a storage
media by using the camcorder.
Video files
• Video files are compressed in H.264 format. The file extension is ".MP4."
• Refer to page 54 for the video resolution.
Photo files
•
Photo images are compressed in JPEG (Joint Photographic Experts Group) format. The file
extension is ".JPG."
•
Refer to page 55 for the photo resolution.
The name of a video file recorded by the camcorder should not be modified, since proper playback by
the camcorder requires original folder and file naming convention.
troLAbe hootna
Before contacting a Samsung authorised service centre, perform the following simple checks.
They may save you the time and expense of an unnecessary call.
WARNING
Problems
corrective
may occur
action.
INDICATORS
because
AND MESSAGES
of the following
reasons.
Check
the information
and take
Battery
Low Batten/
The battery is almost
discharged,
Check the
authenticity of this
battery
The battery carl not pass
authenticity check,
•
Replace with a charged battery or
connect the AC power adaptor.
• Check whether the battery is authentic
and change to rlew one.
• It is recommended that only genuine
Samsung batteries are used in this
camcorder.
Storage medea
There is not enough space
to record on the internal
memory,
!nteinai Memory Full
Insert card
inserted
memory
There is in
no the
memory
cardcard
slot.
Delete unnecessary files on the internal
memory,
• Back--up files to your PC or another
storage media and delete files.
- Use a memory card,
•
Insert a memory card,
Card Full
Card Locked
There isonnot
enough card,
space to
record
memory
[_
The write protection tab on
an SD or SDHC card has
been set to lock,
Delete unnecessary files on the memory
card,
• Back--up files to PC or another storage
media and delete files,
- Change memory card to another one
has enough free space,
Release
write
protection
tab,
117
troLAbe hoot na
Card Error
The memory card has some
problem and carl not be
recognised,
• Change memory card with another one,
Not Formatted
The memory card is not
formatted,
• Format the memory card using the
menu,
The memory card may have
been formalted by another
device and may still haw_
existing images on it,
o
Not Supported
Format
The memory card is not
supported in this camcorder.
o
Change the memory card with the one
recommended,
-
Record vide() at a lower quality,
Change memory card with a one,
o
Turn the camcorder's power off and on
for data recovery.
If a file is not recovered, format storage
media using menus after back--up
important files to PC or another storage
media,
Not Supported
Card
LOw speed card.
Please record at a
lower resolution.
The memory card does not
have enough performance to
record.
o
The image format is not supported,
Check the supported file format,
Format the memory card using menu
item,
Recording
i!! iiii i
ii iiii
Write Error
Some problem occurred
while writing data to storage
media,
Release the Smart
Auto
You carl not operate seme
functions manually when
Smart Auto is activated,
•
Release Smart Auto function,
Recovering Data, i,
Don!t power Off and
keep card inside,
The file was not created
•
•
Wait until dala recovery is finished,
Never turn off the power or eject
memory card during recording,
-
Ddete unnecessary files on the storage
media,
Back up files to your PC or another
storage media and delete files.
Change with another card which has
enough free space.
q-he number o{ video
files is full.
Cannot record video.
normally,
The number of video files
that carl be stored is 9,999.
o
-
Recording
•
The number Of photo
files is fu!l.
Cannot take a photo.
The number of photo files
that carl be stored is 9,999.
File number is full.
Cannot record video.
Folder and file number have
reached maximum number
and you carl not record.
File number is full.
Cannot take a photo.
Check the lens Cover
Delete unnecessary files on the storage
media.
• Back up files to your PC or another
storage media and delete files.
• Change with another card whieh has
enough free spaee.
-
Set "File No." to "Reset"
storage media.
and format the
-
Set "File No." to "Reset"
storage media.
and format the
Lens cower is closed.
-
Open the bns cower.
Tetal file size that can be
combined is limited to 1.8GB.
-
Combined files must be less than 1.8GB.
-
It is possible to combine up to 2 different
videos into one.
-
It is not possible to combine the flies that
haw_ different resolutions.
Folder and file number have
reached maximum number
and you carl not record.
Playback
lbtal file size is over
1.8GB.
Select 2 files for
combine.
You cars not
than
one.
combine
2 different
videos
more
into
Cannot select
different resolution
The files you want to
combine
have different
resolutions.
Bead Error
Some problems occurred
when reading data from the
storage media.
Format the storage media using menus
after backing up important files to a PC or
another storage deviee.
Corrupted
This file carl not be read.
Format the storage media using menus
after back up irrlportant Iiles to a PC or
another storage deviee.
file
x
Not enough free
space in Intema!
Memory
File editing functions carl not
be performed because there
is not enough free spaee in
the internal memory.
o
File editing functions carl not
be performed because there
is not enough free spaee in
the memory card.
o
Not enough free
space in Card
o
o
Delete unnecessary files on the storage
media.
Back up files to a PC or another storage
media and delete files.
Delete unnecessary files on the storage
media.
Back up files to a PC or another storage
media and delete files.
119
troLAbe, hoot na
k_J
USB
Fail Printer
Connecting
Change 'USB
Connect'
Fail USB Connecting
Change !USB
Connect'
/
o
A problem
connecting
via USB
occurred
the
when
camcorder
o
o
to a printer.
A problem occurred when
connecting the camcorder
via USB to a PC.
o
o
o
Check the USB cable,
[i'y the connection procedure again,
Switch "USB connect" function to
"PictBridge."
Check the USB cable,
[i'y the connection procedure again,
Switch "USB connect" function to "Mass
Storage."
Ink Error
There is a problem with the
ink cartridge.
o
PaAer Error
There is a problem with the
paper.
o
Check the paper in the printer, If there is
no paper, insert the paper,
o
File Error
There is a problem with the
file.
Your camcorder does not support this file
format,
li'y another file recorded on your
camcorder.
Printer Error
There is a problem with the
printer.
Print Error
A problem occurred during
printing.
o
o
o
o
o
Check the ink cartridge.
Put a new ink cartridge in the printer.
rLJrn the printer's power off and on,
Contact the printer manufacturer's service
centre.
Do not remove power source or eject
memory card during printing,
When there is dew condensation,
put the camcorder aside for a while before using
• What is dew condensation?
Dew condensation happens when a camcorder is moved to a place where there is a significant
temperature difference from the previous place, The Dew condenses on the external or internal
parts of the camcorder, and on the reflection lens, When this happens, it may cause a malfunction
or damage to the camcorder when using the device with the power on while there is dew
corldensation,
• What can I do?
Turn the power off and detach the battery, and leaw_ it in a dry area for 1 ~2 hours before using it,
• When does the dew condensation occur?
When the device is relocated to a place with a higher temperature than the previous location, or
when using it in a hot area suddenly, it will cause condensation,
When recording outside in cold weather during the winter and then using it in indoors.
When recording outside in hot weather after being indoors or inside a car where the A/C was
runrling,
SYMPTOMS
If these instructions
service centre.
AND SOLUTIONS
do not solve your problem,
contact
your nearest
Samsung
authorised
Power
I he cerncorder
aces
not
turn orl.
• The battery may not be installed on your camcorder. Insert the
battery to the cameorder.
• The inserted battery may be discharged.
Charge the battery or replace it with a charged one.
• If you use the AC power adaptor, make sure it is properly
connected to a wall outlet.
•
I he cower turns off automa[ica
Is "Auto Power Off" set to "5 Min"? If no button is pressed for
about 5 minutes, the camcorder is automatically turned off ("Auto
Power Off"). To disable this option, change the setting of "Auto
Power Off" to "Off." "page 81
• The battery is almost exhausted. Charge the battery or repiaee it
with a charged one.
Power cannot be turned off.
-
Remove the baltery or unplug AC power adaptor, and connect the
power supply to the camcorder again before turning it on,
The battery is quicKly alscnargea.
-
The
The
The
Use
The TV screen or LCD display has
distorted images or has stripes at
the top/bottom or on the left/right,
-
It can occur when recording or viewing a 16:9--ratio image on
a 4:3-ratio TV, or vice versa. For more details, see the display
specifieation, _ page 106
Unknown image appears on the
LCD screen,
-
The camcorder is in Demo mode. If you do not want to see Demo
image, change the setting "Demo" to "Off." "-,page 88
Unknown indicator appears on the
screen.
-
A warning indiealor or message appears on the screen,
_ pages 117 ~ 120
The afterimage remains on the LCD
screen,
-
This occurs if you disconnect the AC power adaptor or remow) the
battery before turning the power off.
-
Ambient light too bright. Adjust the brightness and angle of LCD,
temperaIure is too low.
battery is not fully charged. Charge the battery again.
battery reaehed its lifespan and cannot be recharged.
another battery.
DispLay
The image on the LCD screen looks
dark.
121
troLAbe hoot na
Recording
Pressing the Recording start/stop
put13n aces not start recoralng.
• Press the MODE button to set the record mode. _page 23
• There is no1 enough free space to record on the storage media.
• Check if memory card is not inserted or write--protect tab is set to
lock.
The actual recording time is less
;:nan _:nees[imatea recorrJlng _:lme.
• The estimated recording time may vary depending on content and
features used.
• When you record an object that moves fast, the actual recording
time may be shortened.
The recording slops automaucau}.
• There is no more free space for recording on the storage media.
Back up irrlportant files on your PC and format the storage media
or delete the unnecessary files.
• If you make recordings or delete files frequently, the performance
of the storage media will be deteriorated. In this case, format the
storage media again.
• If you use the memory card with low writing speed, the camcorder
automatically stops recording the videos and the corresponding
message appears on the LCD screen.
When
recoraJng
a subjec[
llumlnal:ea
Dy Drlgnt
ine aDoears.
When
the screen
Ilgn[.
a ver[ica
is exoosea
• This is not a malfunction.
Io
alrect surmgnt aurJng recoralng,
_ne
screen
becomes
red or black for an
• This is not a malfunction.
ns[an[
Durip ] r-ec _ralng
does
tne
aate/ume
no[ alspls_
YOU canno[
record
q he snu[ter sound
a pnoio
image.
Bno[ neara
^/ner you recora a pno[o image.
The beeo souncl is not neara.
•
"Date/Time Display"
to On. _page 78
is set to "Off."
Set the "Date/Time
Display"
• Set your camcorder to the record mode. _page 23
• Release the lock on the write-protection tab of the memory card if
any.
• The storage media is full. Use a new memory card or format the
storage media. "-,page 75 Or remow_ unnecessary images.
_page 97
• Set "Shutter Sound" to "On."
• During dual recording, the Shutter Sound is not heard.
• Set "Beep Sound" to "On."
• Beep sound is temporally off while recording videos.
Recording
There is a time difference between
the point where you press the
Recording start/stop button and
the point where the recorded video
starts/slops
• On your camcorder, there may be a slight time delay between the
point when you press the Recording start/stop button and the
actual point where the recorded video starts/stops. This is not an
error.
Horizontal SLdpes appear on the
images.
• This occurs when recording images under a fluorescent lamp,
sodium lamp, or mercury lamp. This is not a malfunction.
Storage Media
Memory
taro
functions
are no[
operable,
•
•
Insert a memory card into your camcorder properly. _page 28
If you use a memory card formatted on a computer, format it again
directly on your camcorder. _page 75
•
image
canno[
De moved
or deleted,
Release the lock on the write--protect tab of the memory card
(SDHC/SD memory card), if any. ",page 29
• You cannot move or delete the protected images. Release the
protection of the image on the storage media. _page 96
-
You canno[
car(],
[he
data
correo[ly,
rorma[
file name
tne memor,
is no[ inaicatea
Release the lock on the write--protect tab of the memory card
(SDHC/SD memory card), if any. _page 29
• The memory card is not supported on your camcorder or card has
some problems.
• The file may be corrupted.
• The file format is not supported by your camcorder.
• Only the file name is displayed if the directory structure complies
with the international standard.
123
troLAbe hoot na
Adjusting
the image during
recording
• Set "Focus" to "Auto." _page 60
• The recording conditions are not suitable for auto focus. Adjust the
focus manually. _page 60
• The lens is dusty on the surface. Clear the lens and check the
focus.
Focus does not adJUSI
au[omatlcally
•
Recording is being made in a dark location.
Use a light to brighten the area.
The image appears too bright or
flickering, or changes in colour
This may occur when you make a recording under a fluorescent
sodium or or mercury lamp.
Cancel "_SCENE" to avoid or minimise this pherlomenon.
_page 53
image s colour
°'atural.
White balance adjustment
Balance." "-,page 56
oalance
is not
is required. Adjust to the proper "White
This is called the focal plane phenomenon. This is not a
malfunction. Because of the way the image device (CMOS sensor)
reads out video signals, the subject passing by the frame rapidly
may appear to bend, depending on the recording condition.
The SuDJeC[passing oy the frame
appears very quickly
PLayback on your camcorder
D'a"back
_!
y
, _',_,_ op; _un_'+ion,
'pl_"/_'mJ_"_'
,_
ddes
not work.
"
Photo images stored on a storage
media are nat displayed in the
actual size.
•
Photo images recorded on other device may not appear in the
actual size. This is not an error.
playback is interrupted
unexpeotedly,
"
Check if the AC power adaptor or battery back is properly
connected and secure.
•
Image files recorded using another devk)e may not be played on
your camcorder.
Check out the memory card compatibility. _page 29
PLayback on other devices
(TV, etc.)
•
YOU cannot view [ne IRI8 #e or hear
l:ne sound from the connected
clev De,
Connect the audio of the component/AV cable to your camcorder
or connected device (FV, HD recorder, etc.).
(Red colour- right, White colour- left)
• The connection cable (component/AV cable) is not conneeted
properly. Make sure that the connection cable is connected to the
proper jack. _ pages 103~ 104
• When you are using the component/AV cable, make sure the red
and white plugs of your component/AV cable are connected.
'.-,pages 103~104
- This camcorder does not support the audio output signal when the
camcorder is connected with lM in the record mode. The audio
output signal is supported as long as the camcorder
in the vide() playbaek mode. This is not an error,
Fhe [Rage appears alstor[ea on a
TV.
This phenomenon
aspect ratio.
You cannot view IRe Im8 ]e or near
_ne sound from a TV connec[ea
with other devices
You Cannot dub cQrrect!y using th_
HDMI cable,
component/AV
cable,
Printouts ganno[ be made using a
PictBridge printer,
is caused by connecting to the IV with 4:3
Images will not be output from the HDMI jack if the material is
copyright protected.
using the HDMI cable.
Connecting/Dubbing
is connected
(Recorder, PC, Printer, etc.)
-
You cannot dub images using the HDMI cable.
-
The eomponent/AV cable is not connected properly. Make sure
that the component/AV cable is conneeted to the proper jack, i.e.
to the input jaek of the deviee used for dubbing images from your
camcorder. "-,page 107
" Your printer may not print images edited ors a computer or
recorded using other deviee. This is not an error.
125
troLAbeshootna
Connecting
The
to a computer
compute
does
•
nol: recognlse
j our camcorder.
Disconnect the USB cable from the computer and camcorder,
restart the computer, then connect it again correctly,
Cannot p_ay a video file properly on
a PC.
• A video codec is needed to play the file recorded on your
camcorder, Install the seffware provided with your camcorder,
_page 114
• Make sure you insert the connector in the correct direction, and
connect the USB cable to the USB jack on your camcorder firmly,
• Disconnect the cable from the computer and camcorder, restart
the computer, Cennect it again properly.
• Tb play back an HD video file, a computer with better specification
Jsrequired.
Check a computer with recommended specification, _page 109
inte
-
-StUdIO does
noI
TURCI.ION
propen_
Set PC Seffware to On in the Settings menu or install Intelli--studio
in the computer. _pages 83, 114
_ntelli-studio is no! performed.
l he image
camcorder
computer
or sound on your
is not played on your
-
propeny.
o
o
The
playDBCK
dlszor[ed,
scre@n
Is DaUSeO
Exit the Intelli--studio application, and restart the Windows
computer.
or
o
Video playback or sound may stop temporarily depending on your
corrlputer. The video or sound copied to your computer is not
affected,
If your camcorder is connected to a computer that does not
support Hi--speed USB (USB2.0), the image or sound may not be
played correctly, The image and sound copied to your computer
are not afflicted,
Check the system requirements to play a video.
Exit other all applicalions running on the current computer,
If a recorded video is played on your camcorder connected to a
corrlputer, the image may not play smoothly, depending on the
transfer speed, Please copy the file to your PC, and then play it
back,
Overall operations
The date and time are incorrect.
Hasthe camcorder beenleft unused for a long period of time?
The baekup built in rechrgeable battery may be discharged.
_page 25
Menu items that cannot be used at the same time
"_SCENE ....
Aperture
"Aperture:
Shutter
"Shutter:
Menu
items
are greyeo
Manual ....
Manual ....
"Photo
•
•
•
: Manual,"
: Manual,"
"Shutter
: Manual"
"tSCENE"
"tSCENE"
ou[
"Video Resolution,"
"Video Quality, ....
"Fader"
•
•
Aperture
: Manual,"
Resolution
Time Lapse REC"
....
Cont. Shot"
You cannot select greyed items in the current recording/playback mode.
There are some functions you cannot activate simultaneously.
The list shown above shows examples of unworkable combinations of functions and menu
items.
Menu and quick menu cannot be used in Smart Auto mode.
The following functions cannot be used during video recording:
"Video Resolution," "Video Quality," "Photo Resolution," "Photo Sharpness," "Fader,"
"Cont.Shot," "Digital Zoom," "Self Timer," "Time Lapse REC."
The following functions are automatically set to Off or Auto mode in the Smart Auto mode:
"_SCENE", "Shutter", "Digital Effect", "Tele Macro", etc.
In the Smart Auto mode, your camcorder automatically chooses the appropriate camcorder
settings based on a detected type of scene. Most settings are automatically adjusted in
Smart Auto mode. And so, to set or adjust functions on your own, release the Smart Auto
mode first.
127
MAINTENANCE
Your camcorder is a product of superior design and craftsmanship and should be treated with
care.
The suggestions below will help you fulfill any warranty obligations and allow you to enjoy this
product for many years.
• For safekeeping of the camcorder, turn oft the camcorder.
Remove the battery and AC power adaptor. _-,pages 16, 20
Remove the memory card. _page 28
•
•
•
•
Do not leave the camcorder in a place where the temperature is very high for a long
period of time:
The temperature inside a closed vehicle or trunk can become very high in a hot weather.
If you leave the camcorder in such a place, it could malfunction or the case could be
damaged. Do not expose the camcorder to a direct sunlight or place it near a heater.
Do not store the camcorder in a place where the humidity is high or in a dusty place:
Dust entering the camcorder could cause a malfunction. If humidity is high, the lens could
become mouldy, and the camcorder could become inoperative. It is recommended that you
put the camcorder in a box together with a small silica bag when storing it in a closet, etc.
Do not store the camcorder in a place subject to strong magnetism or intense
vibration:
This could cause malfunctions.
Detach the battery from the camcorder and store it in a cool place:
Leaving the battery attached or storing it at a high temperature could shorten its life.
Before cleaning,
turn off the camcorder
and remove the battery and AC power adaptor.
•
To clean the exterior
Wipe gently with a soft dry cloth. Do not apply excessive force when cleaning, gently rub
the surface.
Do not use benzene or thinner to clean the camcorder. The coating of exterior could peel
oft or the case could deteriorate.
•
To fix the case the LCD screen
•
Wipe gently with a soft dry cloth. Be careful not to damage the monitor.
To clean the lens
Use an optional air blower to blow out dirt and other small objects. Do not wipe the lens with
cloth or your fingers.
If necessary, wipe gently with lens with a paper.
Mould may form if the lens is left dirty.
If the lens looks dim, turn oft the camcorder and leave it for about 1 hour.
ADDITIONAL
•
INFORMATION
Be sure to follow the guidelines
recorded data.
below to prevent corruption
or damage to your
Do not bend or drop the storage media, or subject it to strong pressure, jolts or
vibrations.
•
•
Do not splash the storage media with water.
Do not use, replace, or store the storage media in locations that are exposed to a strong
static electricity or electrical noise.
Do not turn off the camcorder power or remove the battery or AC power adaptor during
recording, playback, or when accessing the storage media.
Do not bring the storage media near to objects that have a strong magnetic field or that
emit strong electromagnetic waves.
Do not store the storage media in locations with high temperature or high humidity.
Do not touch the metal parts.
Copy the recorded files to your PC. Samsung shall not be responsible for any lost
data. (It is recommended that you copy the data from your PC to other media for
storage.)
A malfunction may cause the storage media to fail to operate properly. Samsung will
not provide any compensation
for any lost contents.
Before cleaning, turn off the camcorder
• To clean the exterior
•
•
and remove the battery and AC power adaptor.
Do not push it too hard or knock it on anything.
Do not place the camcorder with the LCD screen facing the bottom.
To prolong the service life, avoid rubbing it with a coarse cloth.
Be aware of the following phenomena for LCD screen use. They are not malfunctions.
While using the camcorder, the surface around the LCD screen may heat up.
If you leave power on for a long time, the surface around the LCD screen becomes hot.
129
USING YOUR CAMCORDER
•
•
ABROAD
Each country or region has its own electric and colour systems.
Before using your camcorder abroad, check the following items.
Power sources
The provided AC adaptor features automatic voltage selection in the AC range from 100 V
to 240 V. You can use your camcorder in any countries/regions using the AC power adaptor
supplied with your camcorder within the AC 100 V to 240 V, 50/60 Hz range.
Use a commercially available AC plug adaptor, if necessary, depending on the design of the
wall outlet.
Viewing videos recorded with HD (high definition) image quality
In countries/regions where 1080/50i is supported, you can view the images with the same HD
(high definition) image quality as that of the recorded images. You need an PAL-system-based
and 1080/50i compatible TV (or monitor) with an HDMI or component/AV cable connected.
Viewing videos recorded with SD (standard definition) image quality
To view images recorded with SD (standard definition) image resolution, you need an PALsystem-based TV with audio/video or component input jacks, and an component/AV cable
connected.
On TV colour systems
Your camcorder is an PAL-system-based camcorder.
If you want to view your recordings on a TV or to copy it to an external device, it must be an
PAL-system-based TV or an external device and have the appropriate Audio/Video jacks.
Otherwise, you may need to use a separate video format transcoder (PAL-NTSC format
converter).
The format transcoder
is not provided by Samsung,
Australia, Austria, Belgium, Bulgaria, China, CIS, Czech Republic, Denmark, Egypt, Finland,
France, Germany, Greece, Great Britain, Holland, Hong Kong, Hungary, India, Iran, Iraq,
Kuwait, Libya, Malaysia, Mauritius, Norway, Romania, Saudi Arabia, Singapore, Slovak
Republic, Spain, Sweden, Switzerland, Syria, Thailand, Tunisia, etc.
Bahamas, Canada, Central America, Japan, Korea, Mexico, Philippines, Taiwan, United
States of America, etc.
You carl make recordings with your camcorder and view pictures on the LCD screen from
anywhere in the world,
ecification
I
HMX-H200BP/HMX-H200SP/HMX-H200LP/HMX-H200RP
HMX-H204BP/HMX-H204SP/HMX-H204LP/HMX-H204RP
HMX-H203BP/HMX-H203SP/HMX-H203LP/HMX-H203RP
HMX-H205BP/HMX-H205SP/HMX-H205LP/HMX-H205RP
HMX-H220BP/HMX-H220SP/HMX-H220LP/HMX-H220RP
Video signal
Picture compression format
Audio compression format
Image device
Lens
Focal length
Filter diameter
PAL
H.264 (MPEG-4.AVC)
AAC (Advanced Audio Coding)
1/4.1 ", 3.32M Pixel CMOS
F1.8 - F3.7, 20x optical zoom,
200x digital zoom
3.2mm - 64mm
© 34
Size/dot number
LCD screen method
2.7" Wide Touch LCD (960x240) / 230k
TFT LCD
Composite output
Component output
1Vp-p (75 O terminated)
Y: 1 Vp-p, 75 O
PB/PR:0.350Vp-p, 75 O
C type connector
-7.5 dBs (600 O terminated)
HDMI output
Audio output
USB output
Power source
Power source type
Power consumption
(Recording)
Operating temperature
Storage temperature
Storage media
External dimensions
(WxHxD)
Weight
Internal MIC
mini USB-B type (USB2.0 High Speed)
DC 5 V, Lithium Ion battery pack 3.7 V
Lithium Ion battery pack, Power supply
100 V _ 240 V) 50/60 Hz
3.2W (LCD on)
0 °C _ 40 °C (32 °F_104 OF)
-20 °C _ 60 °C (-4 °F - 140 OF)
Internal memory (SSD)
HMX-H203/H204/H205
only),
Memory card (SD/SDHC) (optional)
Approx. 58.5 mm (2.3 inches) x 59.3 mm
2.33 inches) x 111.65 mm (4.4 inches)
Approx. 283 g (0.62 Ib, 9.98 oz) (Except for
Lithium Ion battery)
Omni-directional stereo microphone
These technical specifications and design may be changed without notice.
131
Themains
lead
onthepower
adapter
issupplied
withamoulded
plugincorporating
afuse.
Thevalue
ofthefuseisindicated
onthepinfaceoftheplug
and,ifitrequires
replacing,
afuse
approved
toBS1362
ofthesame
rating
must
beused.
Never
usetheplugwiththefusecover
omitted
ifthecover
isdetachable.
Ifareplacement
fusecover
isrequired,
itmust
beofthesame
colour
asthepinfaceoftheplug.
Replacement
covers
areavailable
from
your
dealer.
Ifthefitted
plugisnotsuitable
forthepower
points
inyour
house
orthecable
isnotlong
enough
toreach
apower
point,
youshould
obtain
asuitable
safety
approved
extension
leador
consult
your
dealer
forassistance.
However,
ifthere
isnoalternative
tocutting
offtheplug,
remove
thefuseandthensafely
dispose
oftheplug.
DoNOT
connect
theplug
toamains
socket
asthere
isariskofshock
hazard
fromthebared
flexible
cord.
IMPORTANT
Thewires
inthemains
lead
arecoloured
inaccordance
withthefollowing
code:
BLUE
=NEUTRAL
BROWN
=LIVE
Asthese
colours
may
notcorrespond
tothecoloured
markings
identifying
theterminals
inyour
plug,
proceed
asfollows:
Thewirecoloured
BLUE
must
beconnected
totheterminal
marqueed
withtheletter
Nor
coloured
BLUE
orBLACK.
Thewirecoloured
BROWN
must
beconnected
totheterminal
marqueed
withtheletter
Lor
coloured
BROWN
orRED.
Do not connect either wire to the earth terminal marqueed with the letter E or the earth symbol,
coloured GREEN or GREEN and YELLOW,
This page is applicable to Great Britain only,
JL
_, or
If you have any questions or comments relating to Samsung products,
SAMSUNG customer care centre.
Region
USA
ARGENTINE
iill _ i
Contact
Country
CANADA
MEXICO
No::h America
i_ ii_
__
C_'LEB
.....
_
N_lragua
COSTA RICA
ECUADOR
EL SALVADOR
LatEn America
Cent_
1 800 SAMSUNG(726 7864)
0/ 800 SAMSUNG{726 7864}
1 800 SAMSUNG(726 7864)
0800 333 3733
sansun_
sansun_
corn
corn
_
_
_
_
sansun_
sansun_
sansun_
sansun_
corn
corn
corn
corn
800 7919267
_
_
sansung
sansung
corn
corn
0 800 507 7267
_
sansung
corn
1 800 10 7267
800 6225
_
sansung
corn
_
sansung
corn
_
_
sansung
sansung
corn
corn
_
sansung
corn
_
sansung
corn
_
_
sansung
sansung
corn
corn
_
sansung
corn
_
sansung
corn
_
_
_
sansung
samsung
samsung
corn
corn/be (Dutch}
corn/be jr (French)
_
samsung
corn
_
_
samsung
samsung
corn
corn
s_
samsun9
corn
0800 124 421 4004 0000
800 SAMSUNG(726 7864}
00 /800 5O77267
1 800 299 0013
JAMAICA
1 800 2?4 7267
PANAMA
PUERTO RICO
800 7267
1 800 682 3180
REP DOM]NICA
1 800 75/ 2676
TRINIDAD & TOBAGO
1 800 SAMSUNG(726
VENEZUELA
COLOMBIA
0 800 100 53O3
0/ 800O112112
AUSTRIA
0810
SAMSUNG
7864)
(7267864
€ 0 07hYqn)
02 20_ 24 18
DENMARK
800 SAMSUNG(800
70 70 19 70
FINLAND
03O
726786)
6227515
0/ 48 63 00 00
)
samsun9
corn
samsun9
samsun9
corn
corn
261 03 710
s_
samsun9
corn
s_
samsun9
corn
s_
samsun9
corn
0 80/ 1SAMSUNG/172678)
022 607 93 33
80820 SAMSUNG(726
7864)
s_
s_
samsun9
samsun9
corn
corn
0800 SAMSUNG(726
s_
samsun9
corn
902 I SAMSUNG (902 172 678)
s_
samsun9
corn
UK
_RELAND
0771 726 7864 (SAMSUNG)
0845 SAMSUNG (7267864)
0818 717100
s_
s_
samsun9
samsun9
corn
corn
0848
s_
_
_
samsun9
samsun(
samsun(
corn
Swi_ie
s_
samsun9
corn
LAI_dA
8 800 77777
8000 7267
s_
samsun9
corn
ESTONIA
8OO 7267
s_
samsun9
corn
8 800 555 55 55
s_
samsun9
corn
NORWAY
POLAND
SWEDEN
and
UTHUAN]A
ArmeniaGe°rqia......
Azerbaiia
0900 SAMSUNG/0900
8/5 _480
7267864) (€ 0 10fMin)
7864)
SAMSUNG(7267864
CHF 0 08/ml
)
8 800 555 555
0 800 05 555
088 55 55 555
8 /0 800 500 55 500
UZBEKISTAN
KYRGYZSTAN
TADJ]K_STAN
8 /0 800 500 55 500
a_
samsung
corn
00 800 500 55 500
a_
samsung
corn
8 /0 800 500 55 500
a_
samsung
corn
U_RA'"E
0 800 502 000
_
samsung
ua
Be arus
Mouldova
AUSTRALIA
New zea and
8/0 800 500 55 500
00 800 500 55 500
1300 362 603
_
_
_
a_
a_
a_
_
_
_
_
_
samsun_ corn
samsun_ corn
samsun_ corn
samsungcom/hk
samsungcom/hken/
samsun#corn
sansun_ corn
sansun_ corn
sansun_ corn
sansun_ corn
sansun_ corn
_
_
_
_
_
sansun_ corn
sansun_ corn
sansun_ corn
sansun_ corn
sansun_ corn
C_,NA
HONG KONG
_NDEA
_NDONESIA
JAPAN
MALAYSFA
PHIUPPINES
SINGAPORE
THAILAND
TA]WAN
VIETNAM
Turkey
SOUTH AFRICA
UAE
M:#d]e Easl & AfcJca
7864 € 0/4/M_
s_
s_
SLOVAKIA
AsEa Paci_c
SAMSUNG(726
s_
LUXEMBURG
NETHERLANDS
C]S
01805
06 8O SAMSUNG(726 7864)
800 SAMSUNG(726 7864)
......
Europ e
Web Site
_
_
GUATEMALA
GERMANY
HUNGARY
please contact the
Bahrain
Jordan
E¢lypt
KSA
Oa_a
Sv,,a
0800 SAMSUNG (0800 726 786)
400 8 _0 5858 0/0 6475 1880
(852) 3698
4698
303O 8282 1800 110011 1800 3000 8282
0800 1/2 8888 02 _ _99 7777
0/20 327 527
1800 88 9999
1 80O 8 SAMSUNG/726
7864) 02 5805777
1800 SAMSUNG{726
7864}
1800 29 3232 02 689 3232
0800 329 999
1 800 588 889
444 77 11
0860 SAMSUNG(726
7864 }
800 SAMSUNG (726 7864}
80004726
800 22273
0800 726786
9200 21230
800 2255
1825 22 73
1800 266 8282
Rolls compliant
Our product complies with "The Restriction Of the
use of certain Hazardous Substances in electrical
and electronic equipment", and we do not use the
6 hazardous materials- Cadmium(Od), Lead (Pb),
Mercury (Hg), Hexavalent Chromium (Cr +6), Poly
Brominated Biphenyls (PBBs), Poly Brominated
Diphenyl Ethers(PBDEs)- in our products.