1
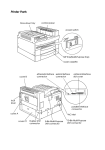
EPL-7500
SETUP SHEET
CONTENTS
Unpacking
Assembling
Paper Loading
Test Printing
Selecting the Interface
Connecting the Printer to the Computer
Macintosh® Users : You must
follow the steps on page 6
before you connect your printer.
EPSON
Copyright 1990 by Seiko Epson Corporation
Printed in Japan 90.11-2
®
4000350
G01-00
Unpacking
1. Remove the accessory pack
from the large box.
2. Remove the printer from
the box and set it on a flat,
stable surface.
3. Remove the plastic bags
protecting the printer and
the paper cassette. Save the
packing material in case you
need to transport the
printer.
4. Locate the protective plate.
Use the wrench to unscrew
the two screws as shown
below; open the printer and
remove the protective plate.
P o w e r c o r d
- W r e n c h
Accessory pack
Printer
Assembling
Installing the imaging cartridge
To install the imaging cartridge and the cleaning pad, follow the
instructions in the imaging cartridge box.
CAUTIONS:
l
Do not turn the cartridge upside down.
l
Never transport the printer with the imaging cartridge
installed.
- 2 -
Installing the paper cassette
1. Remove the tapes from the
paper cassette.
2. Align the small notches on
either side of the paper
cassette with the metal pins
inside the printer; then
lower the paper cassette
into place. Make sure the
notches fit securely onto the
pins on the printer. If the
paper cassette is not
installed properly, an OUT
OF PAPER error may
appear on the display.
Attaching the power cord
1. Make sure the power switch
is turned off.
2. Insert the power cord into
the socket at the back of
the printer. Then plug the
other end of the power cord
into a properly-grounded
outlet.
I! ! 9
WARNING: If the rated voltage of the printer and your
outlet voltage do not match, contact your dealer for
assistance. Do not plug in the power cable.
- 3 -
Paper Loading
1. Push the paper set lever
forward to the manual
position.
2. Slide the paper guides on
the paper cassette all the
way open.
3. Take a stack of paper (highquality copier paper is
preferred). Tap the edge of
the paper on a flat surface.
4. Insert the stack of paper
into the paper cassette,
making sure that the top of
the stack does not exceed
the maximum height mark
inside the cassette.
5. Slide the paper guides
together until they both rest
lightly against the paper.
6. Pull the paper set lever back
to the automatic position.
- 4 -
Test Printing
1. Make sure the imaging cartridge is installed. Then, turn on the
printer by pressing the vertical bar ( I) on the power switch.
2. After about 70 seconds, the printer automatically begins
printing a start page.
a
l
CAUTION: Be careful not to touch the fuser, which is
marked by a caution label. Also, don’t touch the areas
marked by high voltage labels.
Selecting the Interface
®
IBM and Compatible Computer Users
Users of IBM and compatible computers can skip to the next
section because the parallel interface is already selected.
Macintosh® Users
Follow the simple 10-step procedure below to select the EPL-7560’s
AppleTalk® interface before connecting your Mac® to the printer.
CAUTION: Do not connect the cable before you have
selected the AppleTalk interface on the EPL-7500.
To select the AppleTalk interface, follow these steps:
1. Turn on the printer and wait until it prints the start page.
2. Press ON LINE to take the printer off line.
3. Press
SelecType twice. The level 2 light comes on.
4. If INTERFACE does not appear on the display, press m
once. INTERFACE appears on the display.
- 6 -
5. Press 1,1 once and then press m until APPLETALK
appears on the display.
WF’LETFILK
6. Press m once. SELECTED appears briefly on the display;
then APPLETALK* appears. The asterisk (*) shows that
AppleTalk is selected.
7. Press m once, then m once, then m once.
8. Press m until SAVE LEVEL 2 appears on the display.
SQl..JE
LEI..!EL
2
9. Press m once.
10. Turn the printer off.
CAUTION: If you connect an AppleTalk cable, never
operate the printer with the SelecType INTERFACE
APPLETALK setting may leave your printer inoperable or
-7-
Connecting the Printer to the Computer
1. Make sure both the printer and the computer are off.
2. Connect a properly-shielded interface cable to the appropriate
interface connector, as shown below.
Parallel interface
Plug the other end of the cable into your computer.
Next, read the instructions on the disk package.
IBM is a registered trademark of International Business Machines Corporation.
AppleTalk, Macintosh, and Mac are registered trademarks of Apple Computer, Inc
-8-