1
RICOH Printing Systems DDP Server
Database Print Manager
Reference Guide
SOFHA GmbH
Version 2.1
N905306
Preface
Welcome to Database Print Manager (DPM)!
DPM is the variable data printing solution of the DDP Server printing system.
DPM is described in the following manuals:
•
DDP Server User Guide – describing the installation and giving an
overview of all DDP Server components
•
Database Print Manager Reference Guide – this manual
The DPM reference guide is stored in machine readable form (PDF format) on
the DDP Server CD-ROM. You may print it for use with your DDP Server.
The following conventions are used in this manual:
•
Dialogs and functions to be selected by the user are referenced in
this style.
•
Some user interface elements are denoted by a path. For example,
View » Template refers to the dialog obtained by selecting the
menu View and the menu item Template.
Copyright © 1999 – 2004 SOFHA GmbH, Germany.
Version 2.1, 1 Dec. 2004
SOFHA, POD Server, ProfiRIP, SOFHA DocuFLOW, and DocXPLORER are
registered trademarks of SOFHA GmbH, Germany.
Adobe, Acrobat and PostScript are registered trademarks of Adobe Systems
Incorporated in the U.S.A. and other countries.
Microsoft and Windows are registered trademarks of Microsoft Corporation in
the U.S.A. and other countries.
Quark and QuarkXPress are (registered) trademarks of Quark, Incorporated in
the U.S.A. and other countries.
All other company and product names are (registered) trademarks of the
respective owners.
While every effort has been made to ensure the accuracy of information
contained in this document, SOFHA GmbH shall not be held responsible for any
inaccuracies it may contain.
All specifications are subject to change without notice.
Contents
Preface .......................................................................................................................................ii
General
1
Database Print Manager Overview ............................................................................................ 1
Prerequisites............................................................................................................................... 1
DPM Installation........................................................................................................................ 2
Basic Steps................................................................................................................................. 2
Database Source......................................................................................................................... 2
Template and control file........................................................................................................... 2
Tags and Field Names ............................................................................................................... 3
Images........................................................................................................................................ 3
Paragraph reflow........................................................................................................................ 3
Creating a DPM Template
4
Preparing a Database ................................................................................................................. 4
Creating a DPM control file....................................................................................................... 4
Selecting a Database Source ...................................................................................................... 5
Creating a Template Document ................................................................................................. 7
Inserting Tags ............................................................................................................................ 7
Saving the Template file as PDF ............................................................................................... 7
Viewing and printing a DPM Template
8
Opening a DPM Control File..................................................................................................... 8
The DPM Window..................................................................................................................... 9
DPM Settings........................................................................................................................... 10
Viewing the Database .............................................................................................................. 11
Editing a Template................................................................................................................... 12
Editing Image Properties ......................................................................................................... 13
Editing paragraph properties.................................................................................................... 14
Previewing Documents ............................................................................................................ 16
Printing .................................................................................................................................... 17
Printing Options....................................................................................................................... 17
Distribution by E-Mail............................................................................................................. 18
Glossary
Database Print Manager Reference
19
Contents • i
General
Database Print Manager Overview
Database Print Manager (DPM) is the variable data printing solution of the DDP
Server printing system. It is designed to be simple to install and operate,
compatible with widely used word processing and database applications, and a
constructive document tool for digital office, production, print for pay and
graphic design users.
Using DPM enables you to personalize documents by performing text and image
substitution. It automatically inserts variable data such as customer names,
addresses, sentences and pictures within documents based on the DPM template.
A template consists of static elements (text, graphics and images), and tags
(«tag») that represent placeholders for variable data. A personalized document
is the result of merging the template and the variable data. These documents
have varying content and static content. This provides for a variable look and
message for each document.
Real world applications that use personalized documents include direct mailings,
brochures, transactional documents such as invoices, tickets and coupons,
handbooks, manuals and any document that requires custom content. Personalized documents are important to relationship marketing and other business
communication activities. DPM is a workflow tool designed to enhance output
productivity and be easy to use for any document application.
DPM works together with other DDP Server applications such as e-Forms and
imposition management. You can take personalized documents and add a job
ticket, overlay a company logo or a business address using the e-Forms
capability, or submit a personalized document to a special finishing queue. In
this way, you have the option to leverage other DDP Server features to further
enhance your printing results.
To design templates DPM works with any software application such as
Microsoft Word and Quark QuarkXPress. DPM is currently a Windows only
application.
Prerequisites
DPM runs on Windows 98/ME, Windows NT, Windows 2000, and Windows
XP clients. The system RAM requirement is a minimum of 64 MB
(recommended: 128 MB). A printer driver for a DDP Server must be installed.
Before Database Print Manager (DPM) can be used it must be installed at the
user’s client workstation. Also required is Adobe Acrobat 5.0 or 6.0.
Database Print Manager Reference
General • 1
DPM Installation
DPM is installed during the DDP Server installation. See the DDP Server User
Guide for details of the installation.
Basic Steps
The basic workflow steps for using DPM are as follows:
1. Select or create a database to use with DPM
2. Create a DPM template using your favorite application
3. Launch DPM to edit and preview the template with merged data
4. Add a form or finishing options to the DPM print job (optional)
5. Print the DPM job
Database Source
A database is used to store data to populate a DPM document and personalize it.
Typically this data is customer demographic information and images. For use
with DPM the database can be locally stored or located on a network server.
The types of data supported by DPM include text, graphics and images.
Supported graphics/image formats include but are not limited to eps, TIFF and
jpg.
DPM can connect to a wide array of database sources. DPM supports ODBC
drivers allowing it to have compatibility with popular database applications. A
partial list of databases that can connect to DPM includes: the latest versions of
Microsoft Access, MS SQL Server, MS Visual FoxPro, FoxPro Files, MS Excel,
Corel Paradox, Oracle Database and other ODBC compliant databases.
To connect to a database see Selecting a Database Source.
Template and control file
A template is a document created in any software application (e.g. MS
Word),which consists of static elements (text, graphics, and images), and
placeholders (tags) for variable elements (text, graphics and images).
A DPM template can be a one or more pages document.
For use with DPM, the template must be printed to or saved as a PDF file
(*.pdf).
A DPM control file (*.dpm) contains additional information necessary for
creating instances from the template: the database source, information about
tags, and layout information.
Template and control file ususally have the same filename and are distinguished
only by file type (*.pdf and *.dpm). Template and control file should be stored in
the same folder. They can be moved together to a different location.
2 • General
Database Print Manager Reference
Tags and Field Names
A tag in the DPM template represents a placeholder for variable data. A tag is
identified by an enclosing marker which may be french brackets like «tag»,
double brackets like <<tag>>, a single bracket and brace like <{tag}> or a single
brace and bracket like {<tag>}. DPM will recognize any of these markers.
The marker must be the same throughout the document, and it must be used in
the document only to mark tags.
The tag is a name or word that corresponds to a field name of a database. A field
name is the column heading of a database field, for example «address» or
«client_name». You can insert tags into a document of any software application.
For more information about inserting tags see Inserting Tags.
Tags may be qualified as text, number, or date/time. Default is text. Number and
date/time allow you to configure DPM’s representation of the tag value if the
database delivers it in the respective internal format.
During personalization of the DPM document, text tags are replaced with the
text from the corresponding field of the current record of the database.
Images
Vector graphics and bitmap images are handled almost interchangeably by DPM.
The only difference is in how they can be selected. See Editing Image
Properties. In the following text, the term image (without qualification) will
refer to both graphics and images.
To obtain variable images, an image has to be inserted as placeholder into the
template document. The position and space occupied by the placeholder image
will be used by the variable images substituted for it.
A placeholder image must be marked within DPM with a field name from the
database. The database field must contain filenames of images to be used for
substitution.
Images should be stored all in the same folder, preferably a folder near the
control file.
During personalization, the placeholder image is substituted by the images
named in the database field. For example, if the database record contains the
filename “house1.eps”, then the placeholder image is substituted by the contents
of the file “house1.eps”.
Paragraph reflow
During personalization, paragraphs are automatically reflowed. This provides
proper alignment and document flow desired by the user. Paragraph reflow is
based on:
•
the size of the variable data (substituted strings may be shorter or
longer)
•
the vertical extent of preceding paragraphs (reflow may cause a
paragraph to shrink or grow by a line)
It is possible to exclude text from reflow, e.g. footer lines of a document. See
Editing Paragraph Properties.
In the current DPM version, text will not be reflowed across page boundaries.
Also the lines used to draw tables will in general not be resized to match
personalized data.
Database Print Manager Reference
General • 3
Creating a DPM Template
Preparing a Database
It is recommended to first create and fill in data into a database or identify an
existing database to use with a DPM job. Type of data supported by DPM
include text strings and graphics or images. Graphics/image formats supported
include but are not limited to eps, TIFF and jpg.
After preparing the database, a DPM control file can be created.
Creating a DPM control file
The DPM control file contains additional information needed by DPM to
personalize the template document.
To create a DPM control file, launch DPM. DPM shows an empty Settings
dialog. Fill in the information required in the dialog.
To fill in the template name, select Browse across from Template, and select the
template’s PDF filename.
Choose the marker used in the template.
To fill in a database, select Browse across from Database. For further
information see Selecting a Database Source.
If the database contains more than one table, select the table to be used by DPM.
To refine the database selection, click Manual query and enter an SQL query
manually. To return to a simple query, click Automatic query.
To fill in the image path, select Browse across from Image Path.
Once the database source has been established, a list of tags is presented. By
default, tags are qualified as text tags. This means that they are used as they
appear in the database view.
Qualify tags representing numbers or date/time correspondingly if you want to
format them specifically. DPM offers a number of choices for representing
numerical values, including 5 digit postal codes and monetary values. DPM also
offers a numbers of choices for representing dates and times.
4 • Creating a DPM Template
Database Print Manager Reference
After all settings informations have been entered, select File » Save to save the
DPM control file. The template can now be viewed and personalized.
Selecting a Database Source
The database must be established before creating a DPM template.
In the Settings dialog of DPM, across from Database, select the Browse button.
This will connect DPM and the template with the target database.
DPM will launch Select Data Source from Windows, so you can select the
correct database driver and give the database a name for future connections.
If a data source has been created during a previous DPM print job, for example,
demodata, click on the data source filename. Click OK to return to DPM.
If your type of data source is listed, e.g. Microsoft Access database, click on the
entry and select OK. In the file selection dialog which follows, select your
database.
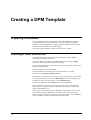
If a data source has not yet been established, select Machine Data Source, then
select the New button.
Database Print Manager Reference
Creating a DPM Template • 5
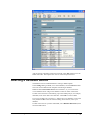
Select a Type of Data Source (probably a user data source). Then select Next.
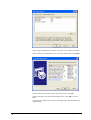
Select the driver for the database source, then select Next. Then select Finish.
Select the database file and provide a name and location. Click OK.
Select the database name from Machine Data Source. Click OK to return to
DPM.
The path for the database has now been established and connected DPM to the
target database.
6 • Creating a DPM Template
Database Print Manager Reference
Creating a Template Document
A DPM template consists of static elements (text, graphics, and images), and
variable elements represented by tags.
You may create a DPM template using any application which can layout pages,
e.g. Microsoft Word and Quark QuarkXPress.
For more information about templates see Template and Control File.
Inserting Tags
To insert a text tag, enter the field name, surrounded by the chosen marker, e.g.
«client_name» or <<client_name>>. The marker must be the same throughout
the document and should be used only to mark tags.
Alternatively, switch to DPM, select the Settings view, right click on the tag in
the tag list, and select Copy tag to clipboard. Then switch back to your editing
application and paste the tag. The tag will already be surrounded by the chosen
markers.
Note: Fast switching between Windows applications can be done by holding the
ALT key and clicking TAB.
Typographic attributes of the tag like font type and size will be taken over for its
replacement during substitution. A change of typographic attributes within a tag
will be ignored.
To insert an image tag, insert the image at the desired position and scale it to
take the space which shall be used later during image substitution.
The image must be marked with a tag later within DPM. See Editing Image
Properties.
Saving the Template file as PDF
To create a PDF file for the template, print it using the Adobe Acrobat Distiller®
printer.
Acrobat Distiller should be installed as a Windows printer during Acrobat
installation. To obtain PDF suitable for DPM, you should configure Distiller to
use the DPM job options file which is installed during DDP Server installation.
Database Print Manager Reference
Creating a DPM Template • 7
Viewing and printing a DPM
Template
Opening a DPM Control File
To preview and print a DPM job, double click a DPM control file within
Windows Explorer, or launch DPM and select File » Open to select a DPM
control file.
A properly created control file refers to a template file containing layout and
place holders for the document to be personalized.
DPM offers the following dialogs to work on a DPM job:
•
Settings – this establishes and shows the control information for a
DPM job.
•
Database – this shows the contents of the selected database.
•
Template – this shows the template and allows to check and modify
the markup of text and image elements.
•
Preview – this shows the template personalized with data from the
database and allows to step through the records.
These dialogs can be selected from the View menu or by the corresponding
buttons from the tool bar.
Print dialogs are described in the section Printing.
8 • Viewing and printing a DPM Template
Database Print Manager Reference
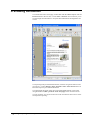
The DPM Window
You can select DPM functions from the pull down menus or the tool bar. You
can control what tools are displayed from the View menu.
The Tool bar allows to switch between the different viewing and editing
dialogs.
The Template bar contains buttons for editing the template. See Editing a
Template.
The Preview bar contains buttons for navigating in the preview. See Previewing
Documents.
The Status line at the bottom of the window displays status messages and hints.
While a template is shown or a personalized document is previewed, part of the
DPM window is managed by Adobe Acrobat. This can be recognized from the
Acrobat tool bar which is then visible. The Acrobat tool bar allows, among
others, the following operations:
•
Zoom into or out of the document – this can be done by using the
zoom tool, by clicking on the buttons for predefined zoom levels
(fit window, actual size, fit window width), or by entering a zoom
factor at the bottom of the window.
•
Go to other pages of the document (first, last, previous, next) – this
can be done by clicking on the navigation buttons at the top and
bottom of the window, or by entering a page number into the page
number display at the bottom of the window.
•
Search for text using the search tool.
•
Print the template or the current personalized document.
For more information see the Adobe Acrobat user documentation.
Database Print Manager Reference
Viewing and printing a DPM Template • 9
DPM Settings
To enter the Settings dialog click the Settings button in the tool bar, or select
View » Settings.
The Settings dialog allows you to enter information for the control file of the
DPM job:
•
the filename of the template
•
the marker used to distinguish tags
•
the access information for the database
•
the path used for variable images
•
the qualification of tags
For more details see Creating a DPM control file.
10 • Viewing and printing a DPM Template
Database Print Manager Reference
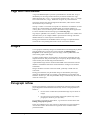
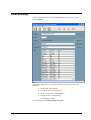
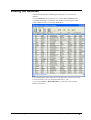
Viewing the Database
After launching DPM and establishing the data paths you can check the
database.
Click the Database button in the tool bar, or select View » Database after
completing the Settings requirements. The database interface displays field
names and data records to be used by the DPM job.
It is recommended to check and make sure all data entries exist and are correct.
Use the scroll bars to move to the desired data entry or cell.
You can select Extras » Refresh Database to synchronize with the latest
database information.
Database Print Manager Reference
Viewing and printing a DPM Template • 11
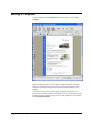
Editing a Template
To edit a template click the Template button in the tool bar, or select View »
Template.
DPM provides image and text tools to edit a template. Editing can be helpful
before previewing documents as it allows you to adjust text alignments, mark
images for replacement, and perform an automatic paragraph analysis on the
template.
You may want to use Preview before editing a template. This allows you to
check if the variable data elements are substituted correctly. If not then using the
Template interface and editing tools can correct such problems. For more details
see Previewing Documents.
12 • Viewing and printing a DPM Template
Database Print Manager Reference
Editing Image Properties
Editing images is needed to associate a tag with them. When a DPM template is
created, you need to mark images with tags within DPM. It is important to have
the correct tag associated with each image. Images can not be substituted
correctly if the tag is wrong or missing.
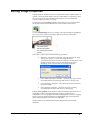
To edit images, find the Image editing tool and click on it. It is located within
the Acrobat tool bar and has the shape of a little window with an arrow.
To edit a bitmap image select it by clicking. The selected image is highlighted
by a box around it. Then click with the right mouse button on the image.
This opens a context menu with the following operations:
•
Properties – this allows to associate a tag with the selected image.
The tag must refer to a column with image filenames.
”Properties” also allows to mark the image for a fixed position. The
attribute “Fixed position” prevents that the image is moved
depending on the vertical extent of preceding paragraphs.
•
Clear underlying image’s attributes – this clears any tag previously
associated with the selected image and allows to reassign a tag.
•
Clear last image’s attributes – this undoes the last association of a
tag with an image.
•
Clear all image’s attributes – this clears any tags previously
associated with all images and allows to reassign tags.
Editing vector graphics works similar to editing a bitmap image. However you
should drag to draw a rectangle around the graphics to mark all of its
components. If too few graphical elements are highlighted, reselect by dragging
again. If too many graphical elements are highlighted, right click and choose
Clear underlying image’s attributes, then drag again.
Images which are not marked will be left unchanged in the personalized
document.
Database Print Manager Reference
Viewing and printing a DPM Template • 13
Editing paragraph properties
Editing text may be needed to adjust information about alignment and
boundaries of paragraphs.
For proper text flow, paragraphs need to be marked before personalization. This
is done automatically by the built-in paragraph scan of DPM. Paragraph marking
can be adjusted by the user.
Marked paragraphs are automatically reflowed when DPM jobs are previewed
and printed. This provides proper alignment and document flow desired by the
user. Paragraph reflow is based on the size of variable data contained in the text,
and on the vertical extent of preceding paragraphs after reflow.
Text which is not marked will be left unchanged in the personalized document.
This may be suitable e.g. for footer lines of a document. In general, it is
recommended to mark all paragraphs in the document.
To edit text, find the Text editing tool and click on it. It is located within the
Acrobat tool bar and has the shape of a marked text with an arrow.
To edit a paragraph, drag to draw a rectangle around it. The selected text will be
highlighted by an enclosing box. If the wrong amount of text is highlighted,
redraw the rectangle. Right click on the selected text.
This opens a context menu with the following operations:
•
Properties – this allows to select the alignment and to assign a line
spacing for the selected paragraph.
The attribute “Fixed position” prevents that the paragraph is moved
depending on the vertical extent of preceding paragraphs.
E.g. the subject line of a letter is usually kept at a fixed position,
regardless of whether the preceding address lines have a second
company address line or not. On the other hand, the normal paragraphs of a letter would not be kept at fixed positions, but adjust
their positions to the vertical extent of the preceding paragraphs.
•
14 • Viewing and printing a DPM Template
Split to lines – this splits the selected paragraph into single lines.
This operation should be applied e.g. in address blocks to avoid
unwanted wrapping of lines.
Database Print Manager Reference
•
Split to fixed lines – this splits the selected paragraph into single
lines. Additionally each paragraph gets the attribute “Fixed
position”.
•
Clear underlying paragraph’s attributes – this clears marking,
alignment and line spacing properties currently associated with the
selected paragraph and allows to reassign these attributes.
•
Clear last paragraph’s attributes – this undoes the last assignment
of properties to a paragraph.
•
Clear all paragraph’s attributes – this clears alignment and line
spacing attributes for all paragraphs.
To adjust the horizontal spacing of a paragraph extend the text box as
appropriate using the mouse cursor. Adjusting the left and right boundaries will
change the text flow in the paragraph. Only the left and right boundaries can be
adjusted. The top and bottom boundaries are managed completely by DPM.
The text box snaps to predefined points like boundaries of other text boxes. To
avoid this snapping, hold the CTRL key while dragging.
To show more details about the document structure, click the Text tool again.
DPM will additionally show word boundaries.
If a text edit was performed by mistake you may click the Scan Paragraphs
buttton from the template bar, or select Extras » Scan Paragraphs to refresh the
template. This start DPM’s built-in paragraph analysis and highlights paragraphs
as analyzed by DPM.
Note: Paragraph boundaries are only shown when the paragraph tool is activated.
To verify edits are correct it is recommended to select Preview after editing
paragraphs.
Database Print Manager Reference
Viewing and printing a DPM Template • 15
Previewing Documents
To examine the results of merging variable data with the DPM template click the
Preview button in the tool bar, or select View » Preview. Preview allows you to
scroll through each document to verify that data substitution and alignments are
correct.
To step through the personalized documents, click the navigation buttons in the
preview bar, or select Extras » First / Previous / Next / Last record. This will
show the respective personalized document.
To step through the pages of the current personalized document, click on the
navigation buttons (first / previous / next / last page) in the Acrobat tool bar.
You can scale the view by the zoom tools in the Acrobat tool bar. Preview is the
last step before printing.
16 • Viewing and printing a DPM Template
Database Print Manager Reference
Printing
DPM offers three options for printing:
•
Print the DPM job – this prints all or a subset of the personalized
documents. Output is optimized for download and execution speed.
Select File » Print. In the print dialog, select the first and last
document instance to be printed.
•
Print the template – this prints the template with no personalization.
Select File » Print Template, or select the Print button from the
Acrobat tool bar while DPM is in the template view mode.
•
Print one personalized document – this prints the current document
instance while DPM is in preview mode. Select the Print button
from the Acrobat tool bar.
You can execute standard printing tasks such as selecting the number of pages or
copies to print, or finishing options, to enhance the print job. For details see
Printing Options.
Printing Options
In the Print dialog, you may execute standard printing tasks such as selecting the
number of pages or copies to print. For a DPM job, you may select the first and
last document instance to be printed.
You may enhance the print job with form overlay and special finishing features.
This is done by selecting Properties and then clicking on the DDP Server tab.
From the DDP Server tab, you can select the Forms panel to overlay logos or
other types of electronic stationery with the DPM documents printed.
Special finishing options such as duplex printing and stapling can be added in
the Layout panel.
Database Print Manager Reference
Viewing and printing a DPM Template • 17
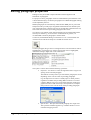
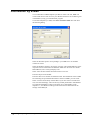
Distribution by E-Mail
You can distribute a DPM template by E-Mail. In order to do this, DPM will
create a PDF file for each record in your database and send it to an address given
in the database, using your standard mail program.
To send the template by E-Mail, select File » Send as E-Mail. This will show
the following dialog:
Select the Windows printer corresponding to your DDP Server to let DPM
confirm its license.
Select the database column to be used as recipients. The E-Mail addresses of the
recipients must be contained in the database. Make sure all entries are valid EMail addresses, like “[email protected]”.
Select select the first and last document instance to be sent.
Enter the subject of the E-Mail.
Enter the name to be used for the attachment file. The attachment will be a PDF
file containing the personalized document as shown in DPM’s preview mode.
Select a text file for the body of the E-Mail. If you don’t want to include extra
text, leave the field empty. The text file may include placeholders. Placeholders
are replaced with database values in the same way as placeholders in the
template. I.e., the delimiters and tags must be the same as determined in the
settings of the DPM job.
18 • Viewing and printing a DPM Template
Database Print Manager Reference
Glossary
Term/Abbreviation
Explanation
.DPM file
Template file saved in DPM format which launches Database Print Manager
on double click.
.tsv
Tab separated values, an exchange format for spreadsheet applications.
Acrobat
s. Adobe Acrobat
Adobe Acrobat
An application for creating and editing PDF files. Used by Database Print
Manager.
Database Print Manager
Variable data printing application of DDP Server. Database Print Manager
allows to merge a template document with a database to print efficiently a
large number of document instances.
Document instance
s. instance document
DPM
Database Print Manager
Instance document
A document produced from a template by replacing its tags with values from
a database.
Marker
A pair of brackets, for example french brackets « »
Merge
Creating an instance of a document within variable data printing. Merging is
performed in different ways on the client workstation and on the RIP to
maximize performance.
ODBC
Open database connectivity. A protocol used for linking applications to
databases.
PDF
Portable document format. PDF differs from PostScript by being less device
dependent, page independent and easily to view on many platforms.
Personalized printing
s. variable data printing
Placeholder
s. tag
PostScript
Page description language with a rich feature set for mapping text, graphics
and images on raster devices like printers and film recorders.
Preview
Showing an instance of a document produced by variable data printing on
the client workstation. S. merge.
ProfiRIP
Printer controller of DDP Server.
Tag
Identifier in a document marked for replacement with data from a database,
e.g. «FirstName». Tags correspond to database columns (e.g. FirstName,
LastName). Tags may denote text (like FirstName) or images/graphics (like
CarPicture.eps).
Template
Document with placeholders (tags) to be replaced with values from a
database.
Database Print Manager Reference
Glossary • 19
Term/Abbreviation
Explanation
Variable data printing (VDP)
Printing a template document in combination with a database. A template is
a document with placeholders (tags). During VDP, the tags are replaced with
values from the database.
A database consists of records (e.g. for John Smith, Alan Miller etc.) and
columns (e.g. FirstName, LastName). During VDP, the template is
combined with each database record to produce an instance document. In the
instance document, each placeholder is replaced with the value of the
corresponding column. E.g. FirstName is replaced successively with John,
Alan etc.
VDP
20 • Glossary
Variable data printing
Database Print Manager Reference