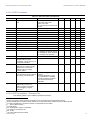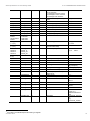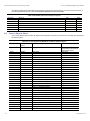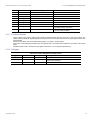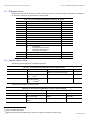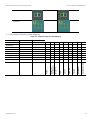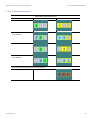
1
Symphony Plus S+ Operations 1.1.0 P13 Connectivity Guide Symphony Plus S+ Operations 1.1.0 P13 Connectivity Guide NOTICE This document contains information about one or more ABB products and may include a description of or a reference to one or more standards that may be generally relevant to the ABB products. The presence of any such description of a standard or reference to a standard is not a representation that all of the ABB products referenced in this document support all of the features of the described or referenced standard. In order to determine the specific features supported by a particular ABB product, the reader should consult the product specifications for the particular ABB product. ABB may have one or more patents or pending patent applications protecting the intellectual property in the ABB products described in this document. The information in this document is subject to change without notice and should not be construed as a commitment by ABB. ABB assumes no responsibility for any errors that may appear in this document. In no event shall ABB be liable for direct, indirect, special, incidental or consequential damages of any nature or kind arising from the use of this document, nor shall ABB be liable for incidental or consequential damages arising from use of any software or hardware described in this document. This document and parts thereof must not be reproduced or copied without written permission from ABB, and the contents thereof must not be imparted to a third party nor used for any unauthorized purpose. The software or hardware described in this document is furnished under a license and may be used, copied, or disclosed only in accordance with the terms of such license. This product meets the requirements specified in EMC Directive 2004/108/EC and in Low Voltage Directive 2006/95/EC. TRADEMARKS Symphony is a registered or pending trademark of ABB S.p.A. All rights to copyrights, registered trademarks, and trademarks reside with their respective owners. Copyright © 2012 ABB. All rights reserved. Release: July 2012 Document Number: 2VAA001153C TABLE OF CONTENTS 1. INTRODUCTION........................................................................................... 9 1.1 Terms ............................................................................................................. 10 1.2 Abbreviations ................................................................................................ 10 2. INSTALLATION .......................................................................................... 11 2.1 Software and Hardware Requirements ....................................................... 11 2.2 Software Installation ..................................................................................... 11 2.3 S+ Operations P13 Connect Installation ..................................................... 12 3. PROCONTROL P13 OPC SERVER .......................................................... 17 3.1 Product Overview ......................................................................................... 17 3.2 OPC Server Post Installation ....................................................................... 17 3.2.1 Equipment Configuration ..................................................................................... 17 3.2.2 OPC Server Service Configuration ...................................................................... 18 3.2.3 Start-up and Product Verification ......................................................................... 19 3.2.4 Licensing ............................................................................................................. 21 3.3 Configuration and Engineering ................................................................... 23 3.3.1 Overview ............................................................................................................. 23 3.3.2 Site Configuration Parameters ............................................................................. 23 3.3.3 Process Variables Engineering File ..................................................................... 30 3.3.4 DCOM Configuration to Access PServer Remote or as Service........................... 41 3.4 OPC Data Access .......................................................................................... 41 3.4.1 General................................................................................................................ 41 3.4.2 Data Access for Process Image ........................................................................... 43 3.4.3 Access to Control System Data ........................................................................... 45 3.4.4 Specific OPC Items.............................................................................................. 47 3.4.5 Support for XC80-Telegram ................................................................................. 48 3.5 OPC Alarm & Event ....................................................................................... 49 3.5.1 General................................................................................................................ 49 3.5.2 Messages ............................................................................................................ 50 3.6 Operation ....................................................................................................... 51 3.6.1 General................................................................................................................ 51 3.6.2 User Interface ...................................................................................................... 53 TABLE OF CONTENTS 3.6.3 PServer Log Files ................................................................................................ 53 3.6.4 Data Access Test Client ...................................................................................... 54 3.6.5 Event Test Client ................................................................................................. 55 3.7 PV Definitions................................................................................................ 55 3.7.1 General................................................................................................................ 55 3.7.2 Process Signals ................................................................................................... 56 3.7.3 Process Signals Extended ................................................................................... 58 3.7.4 Control Objects .................................................................................................... 60 3.7.5 System Objects ................................................................................................... 64 3.8 Redundancy Support .................................................................................... 65 3.8.1 Acknowledge Synchronization ............................................................................. 65 3.8.2 Synchronization of Event Suppression................................................................. 66 3.8.3 Propagation of Node-Specific Partner Events. ..................................................... 66 3.8.4 Bus Connection Controlled Redundancy Switch-Over ......................................... 66 3.9 VPC Mode “Individual Command Signals” ................................................. 66 3.9.1 Concept ............................................................................................................... 66 3.9.2 Engineering ......................................................................................................... 67 3.10 VPC Mode “Mixed Mode I” ........................................................................... 68 3.10.1 Concept ............................................................................................................. 68 3.10.2 Engineering ....................................................................................................... 68 3.11 Miscellaneous ............................................................................................... 70 3.11.1 RS232 Connection for BK06 .............................................................................. 70 4. S+ P13 ENGINEERING WORK BOOK ...................................................... 71 4.1 Overview ........................................................................................................ 71 4.2 Basic Workbook Structure ........................................................................... 71 4.3 Column Headings – Field Names ................................................................ 72 4.4 Named Ranges in S+ P13 Engineering Workbook ..................................... 72 4.5 Signals Sheet ................................................................................................ 72 4.6 Control Objects Sheet .................................................................................. 74 4.6.1 Feedback Signals ................................................................................................ 75 4.6.2 Subtypes ............................................................................................................. 75 4.7 ID-Signals Sheet ............................................................................................ 76 TABLE OF CONTENTS 4.8 Special Objects Sheet................................................................................... 76 4.9 S+ P13 Tag Engineering Workflow .............................................................. 77 4.10 OPC Server Configuration............................................................................ 77 5. S+ P13 OPC BUILDER .............................................................................. 78 5.1 Procedure for Engineering Data Loading ................................................... 78 5.2 S+ Operations P13 Connect OPC Communication Diagnostic ................. 79 5.3 OPC Diagnostic Tag...................................................................................... 79 6. S+ P13 OBJECT REFERENCE ................................................................. 84 6.1 Product Overview ......................................................................................... 84 6.2 General........................................................................................................... 84 6.3 Colors............................................................................................................. 84 6.4 Faceplates ..................................................................................................... 84 6.4.1 General Structure ................................................................................................ 84 6.4.2 Alarm Symbol ...................................................................................................... 85 6.4.3 Control Object...................................................................................................... 85 6.4.4 Links Area ........................................................................................................... 85 6.4.5 Object State Area ................................................................................................ 85 6.4.6 Button Area ......................................................................................................... 86 6.4.7 Selector Area ....................................................................................................... 86 6.5 Display Elements .......................................................................................... 86 6.5.1 General................................................................................................................ 86 6.6 Object Types ................................................................................................. 87 6.7 Binary Signals ............................................................................................... 87 6.7.1 Faceplates ........................................................................................................... 87 6.7.2 Display Elements ................................................................................................. 89 6.7.3 Digital Input ......................................................................................................... 94 6.7.4 Digital Output ....................................................................................................... 96 6.8 Analog Signals .............................................................................................. 99 6.8.1 Faceplates ........................................................................................................... 99 6.8.2 General structure ................................................................................................. 99 6.8.3 Parameters Tab ................................................................................................. 100 6.8.4 Trend Tab .......................................................................................................... 100 TABLE OF CONTENTS 6.8.5 Display Elements ............................................................................................... 101 6.8.6 Analog Input ...................................................................................................... 103 6.8.7 Analog Output.................................................................................................... 105 6.9 Binary Control ............................................................................................. 106 6.9.1 Faceplates ......................................................................................................... 106 6.9.2 Display Elements ............................................................................................... 108 6.9.3 ASS ................................................................................................................... 122 6.9.4 ASM .................................................................................................................. 124 6.9.5 ASE ................................................................................................................... 125 6.10 Setpoint Control (HST/SWV) ...................................................................... 127 6.10.1 Faceplates ....................................................................................................... 127 6.10.2 Display Elements ............................................................................................. 129 6.10.3 HST ................................................................................................................. 130 6.10.4 SWV ................................................................................................................ 131 6.11 Analog Drive Control (ASI/ASP) ................................................................ 132 6.11.1 Faceplates ....................................................................................................... 132 6.11.2 Display Elements ............................................................................................. 136 6.11.3 Feedback Signals to State Mapping ................................................................ 141 6.12 Group Control GSA ..................................................................................... 142 6.12.1 Faceplates ....................................................................................................... 142 6.12.2 Faceplates Indication ....................................................................................... 143 6.12.3 Step Indication ................................................................................................. 143 6.12.4 Analyze Tab .................................................................................................... 144 6.12.5 Display Elements ............................................................................................. 145 6.13 Preselector Control ..................................................................................... 146 6.13.1 Faceplates ....................................................................................................... 146 6.13.2 Feedback Signals to State Mapping ................................................................ 148 6.13.3 VW2 (2 Selector) ............................................................................................. 148 6.13.4 VW3 (3 Selector) ............................................................................................. 150 6.13.5 VW4 (4 Selector) ............................................................................................. 152 6.14 Building P13 Specific Symbols from S+ Common Symbol Library ........ 153 SPlus Operations P13 Connectivity Guide INTRODUCTION 1. INTRODUCTION “Symphony Plus Operations” is the human system interface (HSI) to various ABB distributed control systems. The “S+ Operations P13 Connect” provides the connectivity between the ABB HSI and the Procontrol P13 distributed control system. Multiple connectivity‟s to Symphony Plus Operations exist within ABB. This document describes the steps required to configure and operate the Procontrol P13 specific functions of S+ Operations. For an overview of the main components included in this product, see Figure 1-1. S+ Operations P13 Connect P13 Faceplates Operations Explorer (Display) P13 Symbols Tag Database Management Real-time Database System Setup P13 Data Processor OPC DA Tag Database Builder Procontrol P13 Plant Engineering Data Control Objects (Drives) Signals S+ P13 Engineering Work Book (.xls) Project data import and normal completion S+ P13 OPC Builder OPC AE Procontrol P13 Connect OPC Server PV Engineering Data (.pve file) Legend: Site Configuration Parameter (.psc File) Process data Engineering data For information only Figure 1-1: S+ Operations - P13 Connect Overview 2VAA001153C 9 SPlus Operations P13 Connectivity Guide 1.1 INTRODUCTION Terms Table 1-1: Terms 1.2 Term Definition S+ Operations ABB‟s operator station or human system interface (HSI) S+ Operations P13 Connect ABB‟s connectivity product between “Symphony Plus Operations” and the Procontrol P13 distributed control system S+ Operations Server S+ Operations server is the host for the P13 OPC Server Control Object Process Objects representing control functions with associated commands and feedback signals Error Error in feedback signal Channel Failure (CF) Communication Failure between P13 OPC Server and Symphony Plus Server Process Object Named object representing a Process Signal or a Control Object Process Signal Process Object representing an analog (AI, AO) or binary (DI, DO) value PServer Procontrol P13 Connect OPC Server P13 Designates the Procontrol P13 distributed control system ID-Signal Signals sent by the P13 OPC server to Procontrol as part of a command. ID-Signals are not used in Symphony Plus Process Variable Named object representing a Process Signal or a Control Object Tag Synonym for Process Variable BK06 P13 device providing communication to P13 local station via a communication network PIF P13 process bus Interface module between an intraplant bus and the S+ Operations Server PRAUT80.13P Previous Procontrol HSI based on proprietary hardware used as local HSI VPC Video Process Control comprises all the functionality directly related to process operation through the graphical user interface. This includes the handling of commands towards control objects and the handling and presentation of feedback information from control objects. Abbreviations Table 1-2: Abbreviations 10 Abbreviation Definition HSI Human System Interface (operator station) IPB Intraplant Bus of Procontrol P13/42 system LB Local Bus of Procontrol P13/42 system OPC OLE for process control. OPC is designed to deliver open connectivity via open standards in industrial automation and is based on a series of standards specifications from the OPC Foundation OPC AE OPC specifications for alarms and events OPC DA OPC specifications for data access S+ Symphony Plus PServer Procontrol P13 Connect OPC Server PV Process Variable S+ Operations Symphony Plus Operations - HSI COM Microsoft‟s Common Object Model PIF Process Bus Interface VPC Video Process Control 2VAA001153C SPlus Operations P13 Connectivity Guide INSTALLATION 2. INSTALLATION 2.1 Software and Hardware Requirements For Procontrol P13 Connect OPC Server Below SW / HW specifications are the basic requirements for optimum operation Hardware: 2.2 PC – Pentium Core DUO Serial ports: ISA slots: PCI slots: HD memory partition: Software: 1.3 GHz CPU, minimum 1 GB RAM 1 port per BK06 coupler 1 full length ISA slot per PIF coupler 1 PCI slot per PIF03 coupler 64 MB Operating system version: Windows 7, Windows 2008 Software Installation The Symphony Plus software is delivered on an installation DVD. To install the product, start Setup.exe from the installation DVD and follow the instructions of the install shield wizard. When the Symphony Plus installation DVD is inserted into the drive, the installation AUTORUN screen will appear. If it does not, navigate to the root directory of the DVD and manually launch Setup.exe. This screen allows direct access to the various software installation programs of Symphony Plus. Refer to “2VAA000714100_SPlus_System_Installer_InstallationManual” for different component installations. Figure 2-1: Symphony Plus Installation Screen 2VAA001153C 11 SPlus Operations P13 Connectivity Guide 2.3 INSTALLATION S+ Operations P13 Connect Installation After installation the different components of the server (Third Party, S+ Operations & S+ Historian), S+ System Installer the installation of S+ Operations - P13 Connect will start. . Figure 2-2: S+ Operations P13 Connect Installation – Step 1 Step 1: Click “Next” to continue the installation Figure 2-3: S+ Operations P13 Connect Installation – Step 2 Step 2: Select options as shown in the Figure 2-3. 12 2VAA001153C SPlus Operations P13 Connectivity Guide INSTALLATION Figure 2-4: S+ Operations P13 Connect Installation – Step 3 Step 3: Click “Install” to continue the installation. Figure 2-5: S+ Operations P13 Connect Installation – Step 4 Step 4: This step completes the installation of S+ P13 Engineering Workbook, S+ P13 OPC Builder and the required dll file. 2VAA001153C 13 SPlus Operations P13 Connectivity Guide INSTALLATION Figure 2-6: S+ Operations P13 Connect Installation – Step 5 Step5: This step starts the installation of the Procontrol P13 Connect OPC Server. Continue the installation by clicking “Next”. Figure 2-7: S+ Operations P13 Connect Installation – Step 6 14 2VAA001153C SPlus Operations P13 Connectivity Guide INSTALLATION Step 6: Based on the specific plant requirements check if needed the “Install PIF Support” option and select “Next”. By default “Install PIF Support” is checked. Figure 2-8: S+ Operations P13 Connect Installation – Step 7 Step 7: Complete Procontrol P13 OPC Server installation as shown in Figure 2-8: S+ Operations P13 Connect Installation – Step 2VAA001153C 15 SPlus Operations P13 Connectivity Guide INSTALLATION Figure 2-9: S+ Operations P13 Connect Installation – Step 8 Step 9: Complete S+ Operations - P13 Connect installation as shown in Figure 2-9: S+ Operations P13 Connect Installation – Step 8 Figure 2-9: S+ Operations P13 Connect Installation – After the installation of S+ Operations - P13 Connect, S+ System Installer installs S+ Operations Display Library which consists of required faceplates, P13 data processor, fonts and necessary registry settings. 16 2VAA001153C SPlus Operations P13 Connectivity Guide PROCONTROL P13 OPC SERVER 3. PROCONTROL P13 OPC SERVER 3.1 Product Overview PServer is an OPC Server for Procontrol P13/42. It supports the OPC standards for Data Access 2.0 and Alarm & Event 1.0. Via the PServer, client applications can access data in a Procontrol system. The PServer supports communication with Procontrol via serial line and bus coupler BK06 or via PIF board and intraplant bus P42. OPC Client ( HSI – Package) OPC Client (History Package) OPC Client (VBA) PServer Procontrol P13 Connect OPC Server Engineering Data RS232 P13 BK P13Station BK 06 Station 06 P13 BK Station 06 PIF P42 Intraplant Bus Figure 3-1: PServer PServer allows to access Procontrol data from two different viewpoints: 3.2 Control system data access Data items representing “raw” Procontrol data words are provided. Process image data access Data items representing “Process variables” as DI, AI, DO, AO are provided. For commands towards Procontrol multifunction, corresponding command items are provided. These command items allow a logical access to commands independent of the particular signals sent. PServer was developed as a “stand-alone” server and can be used by several client applications simultaneously or via the network. PServer runs on the Windows NT PC Platform. OPC Server Post Installation 3.2.1 Equipment Configuration 3.2.1.1 BK06 Required BK06 Firmware: HESG 492 119 or HESG 492 128C The parameters for the serial interface of BK06 are defined by respective EPROM programming. PServer uses parameter settings as listed in the following table. Table 3-1: Serial port settings for BK06 2VAA001153C Parameter Value Data bits 8 Stop bits Configurable 17 SPlus Operations P13 Connectivity Guide PROCONTROL P13 OPC SERVER Parity Configurable Flow control None Baud rate Configurable For details of BK06 programming see BK06Programming. 3.2.1.2 PIF The settings on the PIF hardware listed in the following table must match the corresponding PIF configuration parameters in PServer. Table 3-2: PIF Settings Parameter Value I/O channel (Address range) Select a free channel Station Address According to plant configuration Interrupt level Select a free level (Or disable interrupt in PServer) For details of PIF hardware configuration see PIF Users Guide 1KHZ 102 655. 3.2.2 OPC Server Service Configuration A good practice for the OPC Server service configuration is, to use the same account for the OPC Server as used for the S+ Operations, e.g. SPLUS. In order to create the Service, execute the OPC Server via Start Menu ->ABB P13 Connect OPC Server-> PServer – Create Service Figure 3-2: Configure Procontrol OPC Server Service for Redundant Servers in a Workgroup 18 2VAA001153C SPlus Operations P13 Connectivity Guide PROCONTROL P13 OPC SERVER Figure 3-3: Configure Procontrol OPC Server Service for Redundant Servers in a Domain Remark: Do enter the account in the form <Domain Name>\<User name> (e.g. INDUSTRIALIT\SPLUS), do not enter the account in the form provided by Browse...! To ensure, that the OPC Server will be started under the selected service account with the desired configuration file (psc-file), login once with this account, start the OPC Server via Start Menu ->...-> PServer Configuration, open the desired configuration file and exit again. 3.2.3 Start-up and Product Verification By means of the OPC test clients included and the sample configuration provided, the installation can be verified by the procedure as described here. After entering the site configuration and connecting the corresponding coupling hardware (BK06, PIF) an appropriate test concerning this configuration must be performed. This test procedure assumes that the data access client and the event client have been installed. 1. 2VAA001153C Start Data Access Client and connect it to the ABB Procontrol OPC Server Select: Start-> Program Files -> ABB P13 Connect OPC Server ->Data Access Client. In the data access client select: OPC->Connect. This will bring up the Select OPC Server dialog. In the list of available servers, the ABB Procontrol Server must appear. Select this and leave with OK. 19 SPlus Operations P13 Connectivity Guide PROCONTROL P13 OPC SERVER Figure 3-4: Dialog to select OPC Server in data access client This starts the PServer, if not already started. The PServer window can be opened through the Windows taskbar. The Help->About dialog shows the product version. Figure 3-5: PServer window after initial installation 1. 2. 1 Start Event Client Select: Start -> Program Files -> ABB P13 Connect OPC Server -> Event Display Client The event client is started and automatically connected to the Procontrol OPC Server. View and modify data in Data Access Client – Check messages in Event Client OPC -> Add Item…brings up the following browser dialog. 1 The PServer Window can only be seen if PServer is started in configuration mode! 20 2VAA001153C SPlus Operations P13 Connectivity Guide PROCONTROL P13 OPC SERVER Figure 3-6: Browser dialog for sample configuration Add the calculated variables 01ANR10AC101_XJ0J (Analog) and 01DTL10DC101_XS01 (Digital) to the group. Write a value to both variables and check the display. Figure 3-7: Writing values to calculated test variables Writing to the digital value will cause messages in the event client as shown in the following figure. Figure 3-8: Messages generated by writing to calculated test variables 3.2.4 Licensing After the installation of the PServer software, you will have an evaluation license which always expires after 15 days. After this time the PServer will automatically terminate. During this time you have to acquire a registered license code from ABB Power Automation AG, Switzerland. For the registration, perform the following steps: 2VAA001153C Start the Licence tool (Procontrol OPC Server -> Pserver - Licence) Select Licence->Register. Copy the Reference Code from the licence dialog : 21 SPlus Operations P13 Connectivity Guide PROCONTROL P13 OPC SERVER Figure 3-9: Reference code – License Dialog Send an E-Mail with your reference code and the product serial number to the following [email protected] address: After receiving the license key, you can finish the registration. Verify that the software is properly registered: (Licence->Licence status.) Figure 3-10: Software Registered – License Dialog 22 2VAA001153C SPlus Operations P13 Connectivity Guide 3.3 PROCONTROL P13 OPC SERVER Configuration and Engineering 3.3.1 Overview The project-specific application data used by PServer can be classified as follows: Site Configuration Parameters (.psc) These parameters comprise the basic parameters concerning bus connections, VPC interfaces etc. They can be modified through the PServer configuration user interface. Process Variable Engineering Data (.pve) These data comprise all parameters defining the process variables and control objects to be created for the application. P13 OPC Engineering File (.pve) PServer P13 OPC Configuration File (.psc) Figure 3-11: Project-specific application data for PServer 3.3.2 Site Configuration Parameters 3.3.2.1 General The Site Configuration Parameters determine the PServer-related site-specific properties of the Procontrol P13 control system. The following parameters need to be configured, VPC concept Number and types of connected buses Properties of used serial ports for BK06 connection Properties of used I/O ports for PIF/PCI-PIF connection Figure 3-12: Menu Tree for Site Parameter Configuration Site configuration parameters are stored in a PServer site configuration file (.psc). On start-up, PServer loads the site configuration file according to the recent file list, i.e. the file last accessed and existing is loaded. 2VAA001153C 23 SPlus Operations P13 Connectivity Guide PROCONTROL P13 OPC SERVER Figure 3-13: Open Dialog for PServer Site Configuration File The default file extension for PServer site configuration files is .psc . Important To activate modifications of site parameters, save the configuration file, exit the PServer configuration and then restart it! The option to handle PServer site configuration files is provided as an option in menu File. Figure 3-14: Menu items to handle PServer site configuration files 3.3.2.2 Process Variable Engineering File Configuration The PServer receives the process variable engineering data via the process variable engineering file. This file is normally loaded by the PServer at start-up. The pathname of the file to be used by the PServer can be configured as site configuration parameter. Additionally the automatic loading at start-up can be deactivated. This can be useful during testing and commissioning. Manual loading can be achieved by the menu command File->LoadPVs. The property page Engineering Files allows also to configure the Server ID, which is an identification number for the server. This number can be used in conjunction with the SERVER parameter set (see 3.3.3.4.5 SERVER Instruction) to load only a subset of the object defined in the process variable engineering file. This simplifies engineering data handling in systems with redundant HMI-servers in that the same engineering data can be used for both of the redundant servers. 24 2VAA001153C SPlus Operations P13 Connectivity Guide PROCONTROL P13 OPC SERVER Figure 3-15: Property Page for PV Engineering File Configuration 3.3.2.3 VPC Modes Configuration PServer supports a “logical” interface for VPC commands. This means, that a client can issue commands via a corresponding command item which hides the specific signal concept (“VPC mode”) implemented for a certain plant. The VPC mode to be used can be selected on the corresponding VPC mode property sheet. It should be kept in mind, that the PV engineering data to be supplied is also dependant from the VPC mode. The other two modes are options for special applications. Figure 3-16: Property Page for VPC Mode Configuration 3.3.2.4 Bus Configuration The bus configuration determines which bus connections the PServer is using. A bus connection can be either a connection to a local station via BK06 or to an intraplant bus via PIF board. To a bus connection, a port of a corresponding type must be associated. A BK06 coupling must be associated to a serial port, a PIF connection must be associated to a PIF port. 2VAA001153C 25 SPlus Operations P13 Connectivity Guide PROCONTROL P13 OPC SERVER Figure 3-17: Property Page for Bus Configuration – Type BK06 Figure 3-18: Property Page for Bus Configuration – Type PIF 26 2VAA001153C SPlus Operations P13 Connectivity Guide PROCONTROL P13 OPC SERVER Table 3-3: Bus Configuration Parameters Name Meaning Allowed Values Coupler Type Type of bus coupler. {BK06, PIF, PCI PIF, NotUsed} Station Address Number (Address) of the coupling station. For PIF coupler, this address must match the station address configured on the PIF board. 0,…,3F Port Number Communication port (Serial or PIF) used for coupler. BK06 : 1,…,8 PIF : 1,8 Poll Cycle For BK06 only: Cycle in which BK06 should be polled. Depending on the number of addresses to be polled, the real poll cycle can be higher. 1,…,1000 milliseconds Code Switch For BK06 only: Setting of the code switch on the BK06 3 front panel. 1,…,F 2 3.3.2.5 Command Channel Configuration Command channels are used for VPC Mode “Telegram and ID-Signals” and “PRAUT80.13P”. It allows to define the addresses for the standard command telegrams XC11, XC12 and XC13. For detailed explanation of this telegrams see Figure 3-19. Figure 3-19: Property Page for Command Channel Configuration Remark: Command telegrams whose address is set to 0 are assumed not to be used. 2 Output variables (DO, AO) whose station address do not match the station address of the bus will be ignored. It has to be observed, that the BK06 code switch setting must correspond to the Slave Number in the BK06‟s PROM. 2VAA001153C 3 27 SPlus Operations P13 Connectivity Guide PROCONTROL P13 OPC SERVER 3.3.2.6 Serial Ports Configuration A serial port must be associated to a BK06 coupled bus. The corresponding parameters can be specified in the 4 corresponding property sheet. Figure 3-20: Property Page for Serial Port Configuration Table 3-4: Serial Port Configuration Parameters Name Meaning Allowed Values Port Id. Port identification String, e.g. COM1, COM2, etc. Baudrate Baudrate for communication with BK06 38400, 19200, 9600, 4800, 2400 Parity Parity check setting None, Odd, Even Stop Bitsy Stop bits setting 1, 1.5, 2 4 Several serial port parameters are fixed presets according to BK06 specification. 28 2VAA001153C SPlus Operations P13 Connectivity Guide PROCONTROL P13 OPC SERVER 3.3.2.7 ISA PIF Port Configuration A PIF port must be associated to a PIF coupled bus. The corresponding parameters can be specified in the corresponding property sheet. Figure 3-21: Property Page for ISA PIF Port Configuration Table 3-5: ISA PIF Port Configuration Parameters Name Meaning Allowed Values Interrupt Level Interrupt line used by this PIF, i.e. must correspond to setting of jumper W5 on the PIF hardware. String, e.g. COM1, COM2, etc. Channel I/O address range used by this PIF, i.e. must correspond to setting of switch S1 on the PIF hardware. 0,1,..,F Interrupt Enabled Defines if communication with PIF FIFO should be based on interrupt mechanism. To disable the interrupt can avoid problems with no free IRQs It is recommended not to enable PIF interrupt 2VAA001153C 29 SPlus Operations P13 Connectivity Guide PROCONTROL P13 OPC SERVER 3.3.2.8 PCI PIF Port Configuration A PCI PIF port must be associated to a PIF coupled bus. The corresponding parameters can be specified in the corresponding property sheet. If no PCI PIF devices are detected, this property sheet is disabled. Figure 3-22: Property Page for PIF PCI Port Configuration Table 3-6: PIF PCI Port Configuration Parameters Name Meaning Allowed Values PCI Bus PCI bus nr detected for the device Assigned from list Slot Nr PCI slot nr detected for this device Assigned from list 3.3.3 Process Variables Engineering File 3.3.3.1 General The Process Variable Engineering File (PVE-File) defines a parameters set for each PV to be instantiated in the PServer. The PVE file is a text file in CSV-format. It is read by the PServer at start-up. The CSV-format allows to generate the PVE-file by means of an appropriate MS-Office-based tool (Excel, Access). The “tool-approach” appropriate for a certain project must be selected according to the concrete engineering data situation. Besides parameter sets associated with PVs, there are also global parameter sets which can be supplied through the PV engineering file. # Example PVE Fil # Digital Input DI,19CKA21GK000_XS01,Digital Value 3,2,3,3F,1,(Trip),Trip,1,3 # Analog Input AI,01ASP10AP010_XJ50,Analog Value ,2,3,7,0,0,200 # ASS Multi Function ASS,01LCB20AP010_,Main Drain Valve DI,01LCB20AP010_XL18,Open,2,3,2,5,(Open),Open,4,3 # The following DI has an Alias DI,01LCB20AP010_XX19,Opening,2,3,2,6,,,,,01LCB20AP010_XL19 DI,01LCB20AP010_XL28,Closed,2,3,2,2,(Closed),Closed,4,3 DI,01LCB20AP010_XL29,Closing,2,3,2,3 DI,01LCB20AP010_XL68,Disturbed,2,3,2,8,(Disturbed),Disturbed, 1,3 Figure 3-23: Example of a PV Engineering File DI,01LCB20AP010_XL69,Acknowledged,2,3,2,9 DO,01LCB20AP010_XD91,ID1 Channel 1,2,3,B1,0 DO,01LCB20AP010_XD92,ID2 Channel 1,2,3,B1,1 DO,01LCB20AP010_XD93,ID1 Channel 2,2,3,B1,2 DO,01LCB20AP010_XD94,ID2 Channel 2,2,3,B1,3 30 DO,01LCB20AP010_XD92,ID2 Channel 1,2,3,B1,1 DO,01LCB20AP010_XD93,ID1 Channel 2,2,3,B1,2 DO,01LCB20AP010_XD94,ID2 Channel 2,2,3,B1,3 2VAA001153C SPlus Operations P13 Connectivity Guide PROCONTROL P13 OPC SERVER 3.3.3.2 PVE File Interface Table 3-7: PVE File Interface Standard PVs Name Meaning Allowed Values Default Pos. AIAO DIDO CO Type Type of the PV or parameter set AI, DI, AO, DO ASS, ASM, ASE, GSA VW2, VW3, VW4 # : Comment line Parameter set VPCID - 1 x x x Name Name of the PV Character string - 2 x x x Descr Description text Character string Name 3 x x x Bus Bus address 0,…,5 - 4 x x Station Station address 0 ,…,3F - 5 x x Device Device address 0,…,FF 8 - 6 x x Bit Bit address 0,...,F - 7 RangeLow Range low engineering unit Number (float) 0 8 x RangeHigh Range high engineering unit Number (float) 100 9 x Text0 Text for Normal-state Character string 0-State 8 x Text1 Text for Active-state Character string 1-State 9 x Priority Priority for events 1,…,4 4 10 x EventDef Event definition 0: 1: 2: 3: 0 11 x Alias Alias name - 12 6 5 7 No message Message for Normal->Active Message for Active->Normal Message both directions Character string 4 Output Output connection Outputs without output connection can be used e.g. as “calculated variables”. {Y, N} Y 13 AssocPV Process Variable associated with this one. Used to identify the PV for the associated setpoint value for analog control objects. Name of a Process variable - 14 SpecProc Special processing specifier: For some object types a special processing can be selected. Character String, Example: UBCD1: Unsigned BCD from 1 word For complete list of available special processing see Table 3-22: Special Processing Identifiers Normal Position: Defines the normal (“not active”) position concerning event handling for digital 13 variables. {0,1} NormPos x x x 15 x 0 x 9 3 x x 10 x 11 12 16 x 3.3.3.3 PVE File Interface - Extended PVs In the following tables only the additional parameters are listed. 5 Naming convention must be observed to be able to use control objects and hierarchical browsing Output variables (DO, AO) whose station address do not match the station address of the bus will be ignored 7 For output variables (DO, AO) station number 0 is interpreted as own station 8 0,…,1FF for BK06 coupling 9 For Outputs only 10 For CO Object this means “Is Operable” 11 For analog control objects only 12 For AI only 13 The value itself will not be inverted 2VAA001153C 6 31 SPlus Operations P13 Connectivity Guide PROCONTROL P13 OPC SERVER 3.3.3.3.1 Signals (AIX, AOX, DIX, AOX) Table 3-8: PVE File Interface Signals Extended Name Meaning Allowed Values Default Pos. AIX AOX DIX DOX Section Process section 0,1,2,… 0 17 x x Inverted Invert binary signal Y, N, 1, 0 N 18 Unit Measuring unit Character string - 18 x DRLow Display range low Number RLow 19 x DRHigh Display range low Number RHigh 20 x NoDecs Number of decimal digits 0,1,2,… 2 21 x LimValue1 Value Limit 1 Number DRLow/DRHig h 22 x LimValue2 Value Limit 2 23 x LimValue3 Value Limit 3 24 x LimValue4 Value Limit 4 25 x LimType1 Type Limit 1 26 x LimType2 Type Limit 2 27 x LimType3 Type Limit 3 28 x LimType4 Type Limit 4 29 x LimTreat1 Treatment Limit 1 30 x LimTreat2 Treatment Limit 2 31 x LimTreat3 Treatment Limit 3 32 x LimTreat4 Treatment Limit 4 33 x LimPrio1 Priority Limit 1 34 x LimPrio2 Priority Limit 2 35 x LimPrio3 Priority Limit 3 36 x LimPrio4 Priority Limit 4 37 x AlarmText1 Alarm Text Limit 1 Character string >/<(LimValue1 ) 38 x NormText1 Normal Text Limit 1 Character string </>(LimValue1 ) 39 x AlarmText2 Alarm Text Limit 2 40 x AlarmText2 Alarm Text Limit 2 40 x NormText2 Normal Text Limit 2 41 x AlarmText3 Alarm Text Limit 3 42 x NormText3 Normal Text Limit 3 43 x AlarmText4 Alarm Text Limit 4 44 x NormText4 Normal Text Limit 4 45 x 32 0: Upper 1: Lower 2: No limit 0: No message 1: Message for Normal->Active 2: Message for Active->Normal 3: Message both directions 0: State message 1,2,3: Alarm 4: State message 2 0 0 x 2VAA001153C SPlus Operations P13 Connectivity Guide PROCONTROL P13 OPC SERVER 3.3.3.3.2 Binary Control Objects (ASE, ASS, ASM) Table 3-9: PVE File Interface Binary Control Objects Extended Name SubType Section Meaning Subtype Process section Operable Allowed Values Pos. Default ASEX ASSX ASMX Any string. Special processing if containing the following substring: “TIP”: ASS Tip Mode - 6 6 6 - x - 0,1,2,… 0 4 4 4 Y,N,1,0 Y 5 5 5 XL68Signal Signal for XL68 Signal reference - 7 7 7 XL69Signal Signal for XL69 Signal reference - 8 8 8 XL18Signal Signal for XL18 Signal reference - 9 9 9 XL28Signal Signal for XL28 Signal reference - 10 10 10 XL19Signal Signal for XL19 Signal reference - - 11 11 XL29Signal Signal for XL29 Signal reference - - 12 12 RELON Signal for Release ON Signal reference - 19 RELOFF Signal for Release OFF Signal reference - 20 PROTON Signal for Protection ON Signal reference - 21 PROTOFF Signal for Protection ON Signal reference - 22 XC80Ref XC80 Reference See 3.4.5Support for XC80Telegram - 27 27 27 2VAA001153C 33 SPlus Operations P13 Connectivity Guide PROCONTROL P13 OPC SERVER 3.3.3.3.3 Analog Control Objects (ASIX, ASPX, HSTX, SWVX) Table 3-10: PVE File Interface Analog Control Objects Extended Name Section Meaning Process section Operable Allowed Values Defa ult Pos. ASIX/ASPX HSTX SWVX 0,1,2,… 0 4 4 4 Y,N Y 5 5 5 - 6 6 6 SubType Subtype XL68Signal Signal for XL68 Signal reference - 7 7 - XL69Signal Signal for XL69 Signal reference - 8 8 - XL18Signal Signal for XL18 Signal reference - 9 - - XL28Signal Signal for XL28 Signal reference - 10 - - XL19Signal Signal for XL19 Signal reference - 11 12 12 XL29Signal Signal for XL29 Signal reference - 12 13 13 XL79Signal Signal for XL79 Signal reference - 13 9 - XL88Signal Signal for XL88 Signal reference - 14 10 - XL89Signal Signal for XL89 Signal reference - 15 11 - SPSignal Signal for setpoint Signal reference - 16 16 16 CVSignal Signal for control value Signal reference - 17 17 17 AVSignal Signal for actual value Signal reference - 18 18 18 RELON Signal for Release ON Signal reference - 19 - - RELOFF Signal for Release OFF Signal reference - 20 - - PROTON Signal for Protection ON Signal reference - 21 - - PROTOFF Signal for Protection ON Signal reference - 22 - - XC80Ref XC80 Reference See 3.4.5 Support for XC80-Telegram - 27 27 27 3.3.3.3.4 Group Control (GSA) Table 3-11: PVE File Interface Group Control Object Extended Name Meaning Allowed Values Default Section Process section 0,1,2,… 0 4 Y,N Y 5 Operable 34 Pos. SubType Subtype - 6 XL68Signal Signal for XL68 Signal reference - 7 XL69Signal Signal for XL69 Signal reference - 8 XL18Signal Signal for XL18 Signal reference - 9 XL28Signal Signal for XL28 Signal reference - 10 XL19Signal Signal for XL19 Signal reference - 11 XL29Signal Signal for XL29 Signal reference - 12 XL59Signal Signal for XL59 Signal reference - 13 2VAA001153C SPlus Operations P13 Connectivity Guide PROCONTROL P13 OPC SERVER ActStepSignal Signal for actual step Signal reference - 14 RELON Signal for Release ON Signal reference - 19 RELOFF Signal for Release OFF Signal reference - 20 PROTON Signal for Protection ON Signal reference - 21 PROTOFF Signal for Protection ON Signal reference - 22 StartON 1. Step for ON 1,2,3,… 1 23 LastON Last Step for ON 1,2,3,… 50 24 StartOFF 1. Step number for OFF 1,2,3,… 51 25 LastOff Last Step for OFF 1,2,3,… 99 26 XC80Ref XC80 Reference See 3.4.5 Support for XC80Telegram - 27 3.3.3.3.5 Selector Control Objects (VW2X, VW3X, VW4X) Table 3-12: PVE File Interface Selector Control Objects Extended Name Section Meaning Allowed Values Process section Operable Default Pos. VW2 VW3 VW4 0,1,2,… 0 4 4 4 Y,N Y 5 5 5 - 6 6 6 SubType Subtype XL68Signal Signal for XL68 Signal reference - 7 7 7 XL69Signal Signal for XL89 Signal reference - 8 8 8 XL19Signal Signal for XL19 Signal reference - 9 9 9 XL39Signal Signal for XL39 Signal reference - 10 10 10 XL59Signal Signal for XL59 Signal reference - - 11 11 XL79Signal Signal for XL79 Signal reference - - - 12 XL18Signal Signal for XL18 Signal reference - 11 12 13 XL38Signal Signal for XL38 Signal reference - 12 13 14 XL58Signal Signal for XL58 Signal reference - - 14 15 XL78Signal Signal for XL78 Signal reference - - - 16 XC80Ref XC80 Reference See 3.4.5 Support for XC80-Telegram - 27 27 27 3.3.3.3.6 Condition Definitions (CONDX, STEPX) Table 3-13: PVE File Interface Condition Definitions Name Meaning Allowed Values Default LogicResult Signal for Logic Result Signal reference - 4 Logic Logic for condition String - 5 2VAA001153C Pos. 35 SPlus Operations P13 Connectivity Guide PROCONTROL P13 OPC SERVER 3.3.3.4 Specific Parameter Sets and Instructions Because specific parameters sets do not create an object in the PServer but modify some global parameters, they can only appear once in a PV engineering file. 3.3.3.4.1 Parameter Set VPCID for ID-Signals Definition The default signal codes designating the associated ID-Signals for a control object can be modified by means of this parameter definition. Table 3-14: Record structure for PVE parameter set VPCID Pos. Meaning if two ID-Signals Meaning if one ID-Signals Default 2 Signal code channel 1 –ID Signal 1 Signal code channel 1 – ID Signal XD91 3 Signal code channel 1 –ID Signal 2 Signal code channel 2 – ID Signal XD92 4 Signal code channel 2 –ID Signal 1 Signal code channel 3 – ID Signal XD93 5 Signal code channel 2 –ID Signal 2 Signal code channel 4 – ID Signal XD94 6 Signal code channel 3 –ID Signal 1 Signal code channel 5 – ID Signal XD95 … … … Example: VPCID, XD91,XD92,XD93,XD94 3.3.3.4.2 Acknowledge Bit Definition VPCDEF ACKNBIT In VPC mode “Telegram and ID-Signals”, the acknowledge bit in the command telegrams is normally located at position 7 (counting from 0). On certain P13 plants, another bit in the command telegram is used. For these cases, the acknowledge bit position can be defined in the pve-file with the following instruction: VPCDEF, ACKNBIT,<BitPos> Where BitPos Position of the bit used for acknowledge (counted from 0) Example: VPCDEF, ACKNBIT,8 3.3.3.4.3 Parameter DMSID for DMS-Signal Definition DMS designates the Drive Module Status function implemented on certain Procontrol P13 sites. With this parameter, the signal code for the DMS command signal can be defined. There is no default for the DMS command signal code, i.e. if this parameter definition is missing, the DMS-command has no effect. If the DMS command signal is one of the ID-signals, a DMS command must signal must be set to “blocking” to ensure that the DMS command reserves the corresponding command channel as any other command. “Blocking” is specified by setting the second parameter to “Y”. Examples 1: DMSID,XD80 Non blocking DMS command signal Attention: The DMS-signal must be different from the ID-signals. Examples 2: DMSID,XD91,Y Blocking DMS command signal, the DMS-signal is one of the ID-signals. 3.3.3.4.4 APPEND Instruction The APPEND instruction causes the PServer to read another PVE-file after the current file has been processed completely. 36 2VAA001153C SPlus Operations P13 Connectivity Guide PROCONTROL P13 OPC SERVER Example: APPEND, C:\OPC_P13\Data\BOP.pve 3.3.3.4.5 SERVER Instruction The SERVER instruction allows to target the parameters sets to a certain server only. This can be useful for example for redundant configurations, where the parameters which have to be different (e.g. VPC ID-bit naming) on the redundant servers can be targeted to only one server, nevertheless the engineering files can be kept identical for both servers. Examples: SERVER, 2 This instruction causes all parameter sets following to be targeted to the server with Server ID = 2 only. SERVER This instruction causes all parameter sets following to be targeted to any server independent from the Server ID. 3.3.3.4.6 TELEGRAMERRORS Instruction The TELEGRAMERRORS instructions allow to activate logging of telegram errors on P42 bus connected via PIF. For normal data acquisition, the PIF does suppress sporadic single errors (e.g. data word errors are ignored if not occurring for four successive bus cycles). If telegram error logging is activated each single address or data error is reported as event message. The following options are provided: A: Address error logging D: Data error logging N: No telegram error logging (default) Examples: TELEGRAMERRORS,A,D Telegram errors of type A and D are logged. TELEGRAMERRORS,N Telegram error logging is switched off. Remark: Telegram error logging can be activated or switched off for a running OPC server by means of loading an appropriate pve-file (only containing a corresponding TELEGRAMERRORS instruction) through the command Load PVs… . 3.3.3.4.7 STATUSERRORS Instruction The STATUSERRORS instructions allows to activate logging of status errors of data words on P42 bus connected via PIF. Status error logging does only log data errors passing the error filtering functions of the PIF, i.e. errors which also invalidate corresponding PVs connected to the data word. The following options are provided: A: Address error logging D: Data error logging T: Sensor disturbance logging N: No status error logging (default) Examples: STATUSERRORS,A,D,T Status errors of type A ,D and T are logged. STATUSERRORS,N Status error logging is switched off. Remark: Status error logging can be activated or switched off for a running OPC server by means of loading an appropriate pvefile (only containing a corresponding STATUSERRORS instruction) through the command Load PVs… . 3.3.3.4.8 PRIORITYMAP Instruction The PRIORITYMAP defines mapping of priorities to severities. In the engineering data a priority attribute can be defined for limits and digital values. The alarm and event OPC server provides severities instead of priorities. For the default priority-severity mapping see 3.5.1.23.5.1.2 2VAA001153C 37 SPlus Operations P13 Connectivity Guide PROCONTROL P13 OPC SERVER Format: PRIORITYMAP, <Sever1>, <Sever2>, <Sever3>, <SeverElse> Where: Sever<n>: Severity for priority n Example: PRIORITYMAP, 1000,750,500,1 3.3.3.4.9 PARTNERNODE[X] Instruction The PARTNERNODE instruction defines the partner node in redundant configurations. (See 3.8 Redundancy Support). Format: PARTNERNODE, <NodeName>, [<ConDelay>], [<RetryCycle>] Where: NodeName: ConDelay: Default: RetryCycle: Default: Name of the partner node Delay after OPC server start-up for connection to partner node in seconds. 30 Cycle time for retry if connection failed or for partner server supervision node in seconds. 30 Examples: PARTNERNODE, ConServer02 PARTNERNODE, ConServer02,60,60 To activate also the bus connection controlled redundancy switch-over (see 3.8.4 Bus Connection Controlled Redundancy Switch-Over) one has to use the extended partner node instruction: Examples: PARTNERNODEX, ConServer02 PARTNERNODEX, ConServer02,60,60 3.3.3.4.10 Station Disturbance Word Handling Instructions In Procontrol P13 plants, P13 stations can maintain a so-called Station Disturbance Word in the bus coupler BK02. The bits of this word correspond to disturbance states within the station. The original station disturbance word can only be accessed via a dedicated service address. For disturbance indication and alarming, the value of the station disturbance word is copied to the normal address space in the BK02. Nevertheless the station disturbance word must be reset from a either a diagnostic station or, from the HMI. For the HMI, this station disturbance word reset mechanism can be provided by the OPC server. The OPC server can also provide the station disturbance word as an OPC item of the Station object as also the necessary OPC items for the AIP Status Viewer. Remark: The station disturbance related OPC items (station disturbance word, AIP Status Viewer items) can also be provided for BK06 coupling. For BK06 coupling, no automatic reset feature is provided. The station disturbance word handling has to be configured by the STATIONMONITOR and the STATION instruction. For each bus to be monitored a STATIONMONITOR instruction is required and for each station to be monitored a STATION directive is required. STATIONMONITOR instruction for reset feature: STATIONMONITOR,<Bus>,<DT>,<SA>,<NA>,[<CYC>],[<TO>],[<DL>] STATIONMONITOR instruction without reset feature: STATIONMONITOR,<Bus>,,,<NA> Where: Bus: DT: SA: NA: CYC: TO: DL: 0: 1: 38 Bus number (0,…,7) Address of diagnostic triple (Hex) Service address for disturbance word reset (Hex) Address of copy of station disturbance word in normal area (Hex) Processing cycle in seconds, default: 5 Time out cycle (see PIF description), default: 1 Debug level, default 0 no debug messages Resets are logged 2VAA001153C SPlus Operations P13 Connectivity Guide PROCONTROL P13 OPC SERVER Examples: STATIONMONITOR,2,3,4 Activates station disturbance word handling with reset feature on bus 2 via diagnostic triple at 3 with service address 4. The normal address for the disturbance word is to be defined in the STATION directive. STATIONMONITOR,1 Activates station without reset feature. The normal address for the disturbance word is to be defined in the STATION directive. Remark: The service address is usually at 4 for systems planned with Progress 10 (HEX) for systems planned with EDS-P3 For each station to be monitored, a corresponding STATION instruction must be present. STATION,<Bus>,<Station>,[<SA>],[<NA>] Where: Bus: Bus number (0,…,7) Station: Station (Hex) SA: Service address for disturbance word reset (Hex), default from STATIONMONITOR instruction. NA: Address of copy of station disturbance word in normal area (Hex), default from STATIONMONITOR instruction. Example: STATION,2,1A,,F5 STATION,2,1B,,8E STATION,2,1C,,ED On bus 2, the stations 1A, 1B and 1C will be monitored. The normal addresses for the disturbance word are F5, 8E, ED respectively. If the reset feature is active is determined by the STATIONMONITORING instruction. Remarks: Resets are sent cyclically with the cycle CYC. Reset requests are only sent, if the station disturbance word (NA copy) is not zero or if it is invalid respectively not available. Station disturbance word handling is only available via PIF connection. Be careful to define diagnostic triple, service address correctly according to the configuration in the Procontrol P13 plant to avoid disturbances. The service address (SA) is usually at o 4 for systems planned with Progress o 10 (HEX) for systems planned with EDS-P3 3.3.3.4.11 LIMHYST Instruction The LIMHIST instruction defines the hysteresis value for analog limit monitoring. The hysteresis value has to be given as positive integer per mille value. The per mille value is from the display range or, if this is zero, from the measuring range. Example: LIMHYST, 20 Defines a limit hysteresis of 20 %o If no LIMHYST instruction is given, the limit hysteresis is set to 10%o (= 1%). 2VAA001153C 39 SPlus Operations P13 Connectivity Guide PROCONTROL P13 OPC SERVER 3.3.3.4.12 AEOPTIONS Instruction The AEOPTIONS instruction allows to define options concerning handling of alarm and event messages. The options value has to be given as 16 bit positive integer defining a corresponding option pattern: AEOPTIONS, <Pattern as integer>,[<bracket pattern>] Currently the following options are supported: Table 3-15: AEOPTIONS Instruction Bit Position Value Meaning 0 1 Use actual state text as message description (instead of Description of the PV) 2 2 Use bracketed active text as inactive text for condition events. Bracketed active text uses the bracket pattern to generate the inactive text. The bracket pattern can be an arbitrary string containing the “#” character. The inactive text will then be generated ^by replacing “#” in the bracket pattern by the active text: Example AEOPTIONS,3,[#] Will provide for an active text TRIP an inactive text [TRIP] 3 4 Send no-alarm (Priority<>1,2,3) process messages as OPC simple events. 4 8 Provides condition events with a custom event attribute SimpleCondition. This attribute is set to true for no-alarm (Priority<>1,2,3) process messages. This attribute is used by 800xA PPA to handle condition events as simple events. 5 16 Provides process events with a custom event attribute ProcessSection. This attributes provides the process section of the event source. 6 32 Provides command tracking messages as simple events instead as tracking messages. Examples: AEOPTIONS,1 Use actual state text as message description AEOPTIONS,57 Use actual state text as message description Send no-alarm process events as condition events with event attribute SimpleEvent=true. Provide process events with ProcessSection attribute Command tracking messages as simple messages. => Recommended for 800xA AEOPTIONS,7 ,(#) Use actual state text as message description Use bracketed active text as inactive text Send no-alarm process messages as OPC simple events => Recommended for SPlus 3.3.3.4.13 INCHTO Instruction (Inching Timeout) With the INCHTO instruction, the timeout for inching commands can be defined. If an inching command is not terminated by a corresponding hold command, it is automatically terminated by the Inching Timeout. The Inching Timeout is given in seconds. Default value for inching timeout is 30. Example: INCHTO, 60 This defines an Inching Timeout of 60 seconds. Inching timeout is active for PIF and BK03 coupling. Inching timeout is not active for VPC mode “Individual Command Signals”. 40 2VAA001153C SPlus Operations P13 Connectivity Guide PROCONTROL P13 OPC SERVER 3.3.3.4.14 PIFCMDTO Instruction (PIF Command Timeout) The PIF Command Timeout is intended to ensure a command signal reset in situations where the PIFs host PC is not able to do the regular reset anymore. With the PIFCMDTO instruction, the timeout for active PIF command signals can be defined. A zero PIF Command Timeout means that the PIF Command Timeout is not active. If PIF Command Timeout is active, the PIF command timeout value is determined as follows: For inching commands, it is taken from the inching timeout value (see 3.3.3.4.13 INCHTO Instruction (Inching Timeout)) For non-inching commands it is taken from the PIF Command Timeout If a PIF command signal is not deactivated by a corresponding command reset within the PIF Command Timeout value, the PIF automatically resets the command signal. The PIF Command Timeout is given in seconds. Default value for the PIF Pulse Timeout is 0, i.e. PIF Pulse Timeout is not active. Example: PIFCMDTO, 1 This defines a PIF Pulse Timeout of 1 second. Remark: If inching and non-inching commands are active at the same time on the same P13 word, for the timeout for both command types the inching timeout is used. 3.3.3.4.15 ExtendedLogging Instruction With the ExtendedLogging instruction, the number of log files kept in the PServer logging directory (see3.6.3PServer Log Files) can be increased. The ExtendedLogging instruction causes keeping of a circular set of PServer log files additionally to the standard log files. The number of files in this file set can be configured via the ExtendedLogging directive. ExtendedLogging,<NoOfFiles> Where: NoOfFiles: Number of additional files to be kept (default 20) 3.3.4 DCOM Configuration to Access PServer Remote or as Service Via DCOM a client can connect to a PServer residing on a remote node. A precondition to enable access of PServer remote or as service is, that the corresponding DCOM security settings are made correctly. The detailed settings which provide optimal security may depend on the specific network situation as also from the platform environment (Operating System, Industrial IT etc.). 3.4 OPC Data Access 3.4.1 General Roughly spoken, the OPC Data Access standard defines functions allowing to “read & write” process data. The underlying concept for these data access functions is the OPC Item. Apart from access to OPC Item Properties explained later, an OPC client can only access data which is provided as OPC Item by the OPC Server. An OPC Item has an name and is comprised of value, quality and time stamp. “Subscribe” “Read/Write” OPC Client OPC Item Access (“Real Time”) “Get” OPC Property Access (Option) OPC Server OPC Item Value Quality TimeStamp Properties (Option.) Description Unit Figure 3-24: Data Access and OPC Items 2VAA001153C 41 SPlus Operations P13 Connectivity Guide PROCONTROL P13 OPC SERVER Many OPC clients do not support the data access to OPC item properties, i.e. the access via OPC items is often the only way to get data into an OPC client. It is therefore essential to know which data an OPC server exposes through OPC Items and possibly which through Item properties. The PServer provides data for process variables as also for raw Procontrol data (data words). The properties of PVs are also exposed as OPC Item Properties. Therefore the PServer provides also some “static” data (e.g. Description text) as OPC items. OPC Clients OPCItems PV Properties Value of PVs Value of AI, DI etc Procontrol Data Words DataWord e.g. Range values Description etc. Process Image Database Control System Database Figure 3-25: Conceptual View on Data exposed by PServer OPC Data Access 2.0 defines an interface, GetItemProperties, which allows to read data from a server which is not exposed as OPC items but as OPC properties. Figure 3-26: Item Properties for a DI shown in an OPC Client 3.4.1.1 Naming Conventions for OPC Items The PServer introduces an “object concept” via a corresponding naming concept for OPC items. <Object>_<Part>.<Property> Part and property level are optional. This means that it gives object-, part- and property-level OPC items. Note As every OPC item has value, quality and timestamp also every of the above mentioned types have these standard OPC attributes. 42 2VAA001153C SPlus Operations P13 Connectivity Guide PROCONTROL P13 OPC SERVER Examples: #_2.1E.3F Control System Item : Object #_: Control System Part 2.1E.3F (Bus,Station, Device) PV Property Item : 12MAW10AA001_XC50.RLOW Loop Signal Property (“RangeLow”) Figure 3-27: Examples for PServer naming conventions for OPC items The naming convention for OPC items associated with PVs is of course derived from the naming conventions for PVs (see 3.4.2.2 Naming Conventions for Process Variables). For properties supported by a certain PV type see Chapter 3.7 PV Definitions. 3.4.2 Data Access for Process Image 3.4.2.1 Data model The OPC standard does not define much on an “application data model”, i.e. a data model reflecting some sort of objects and there relations. The PServer can provide two views on the data of a Procontrol system. The Process Image view represents the process controlled by Procontrol as a collection of process variables. A Process Variable (PV) is a named object representing a Process Signal or a Control Object. A Process Signal is a process variable representing an analog (AI, AO) or binary (DI, DO) value. A Control Object is a process variable representing a control function with associated commands and feedback signals. The object classification for the process image view is shown in the following picture: Process Variable Control Object System Object Process Signals Binary Control Selector Control Bus Line AI ASE(X) DI ASM(X) Station AO ASS(X) GSA(X) DO VW2(X) VW3(X) VW4(X) Analog Control Condition Definition ASI(X) ASP(X) HST(X) SWV(X) CONDX STEP X Figure 3-28: Classification of Process Variables For further description of the individual control object types see the corresponding Procontrol documentation on multifunction. 2VAA001153C 43 SPlus Operations P13 Connectivity Guide PROCONTROL P13 OPC SERVER Control objects implement the corresponding commands and give access to the associated feedback signals. To issue 14 a command, some object individual identification signals are sent Procontrol . The association of these feedback and identification signals to its control object is defined by a corresponding naming convention for PVs. OPC Client OPC Items DI Feedback Signals By Naming Conventio n CO Commands ACKN ON OFF .. By Naming Conventio n Identification signals DO Figure 3-29: Control Objects and associated Signals 3.4.2.2 Naming Conventions for Process Variables As mentioned above a specific naming convention is assumed in respect to control objects. Control objects are associated with several individual process variables. In particular the necessary feedback information is provided as a set of DI process signals. Similarly identification signals are represented as DO process signals. The compositional view on a CO object is achieved by an appropriate naming convention: Control object id: Control object name (Alpha-numeric string, typical 12 characters) ending with “_”. Name of associated Signals: <ControlObjectName>_<SignalCode> where: ControlObjectName Name of the control object, 12 characters SignalCode: Code for Signal Signal Code .15 This convention is defined in [PMSMimicSignal] Example: Control object: 12MAW10AA001 Control object id: 12MAW10AA001_ DI of feedback “Manual”: 12MAW10AA001_XL78 DI of feedback “Open” 12MAW10AA001_XL18 16 OPC Item for “Close command” 12MAW10AA001_CMD_OPEN This naming convention allows building generic object GUI components (Faceplates, Symbols) per control object type. This means, that for such components, only the control object name has to be provided. The individual signal items can be referenced by the signal code relatively to the object name. 14 The details of object identification depends on the VPC mode used for a site. The PServer adds additional “signal codes” for commands 16 Command OPC Items correspond to properties of the control object but not to an individual PV. 44 15 2VAA001153C SPlus Operations P13 Connectivity Guide PROCONTROL P13 OPC SERVER Figure 3-30: OPC Items for an ASE Control Object in a browser To follow this naming convention is a matter of engineering and must be observed when building the object GUI components. Because naming convention as described above has not been observed consequently within projects and not in all projects the same signal names have been used, a mechanism to map existing signal names to a unified naming convention must be provided. This is achieved by the possibility to optionally provide an alias name to process variables (except CO variables). By using Extended PVs (see3.4.2.3Extended Process Variables), this concept is supported in a convenient way. If an alias name is given for a PV, this PV has two names in the process image database and as OPC item. This allows having a PV under the same name as it had within the old system also in case this original name does not fulfill the control object naming convention. The naming convention for PVs is also mapped to the naming convention for the corresponding OPC items. Therefore see also 3.4.1.1 Naming Conventions for OPC Item. 3.4.2.3 Extended Process Variables For process signals and control objects two PV types are provided: Standard PV These types provide basic value processing and event processing. Configuration of feedback signals for a control object is not possible. Extended PV Extended PVs provide some additional functionality and additional attributes. In particular the feedback signals for a control object are individually configurable. Extended PVs have the type identification of the corresponding standard PV with an “X” appended. 3.4.3 Access to Control System Data 3.4.3.1 General The control system database contains an image of the control system data on the connected local stations. The PServer exposes the Procontrol data words as data items. These data items follow the naming convention as shown in the following diagram. #_2.1E.3F Control System Database Bus Address Station Address Device address Figure 3-31: Naming Convention for Control System data Items 2VAA001153C 45 SPlus Operations P13 Connectivity Guide PROCONTROL P13 OPC SERVER The value for control system data items is provided as integer. The access rights for control system data items are defined as “readable & writeable”. Figure 3-32: Browsing Control System Items Note: For each configured BK06 connection, the corresponding control system data items are created automatically by the PServer. For a PIF connection, at least one PV must be configured for each station for which control system data items should be created. 3.4.3.2 Handling of Control System Status Data For buses and stations a corresponding data word indicating the error status of the subsystem is provided. The bus status word is identified by the virtual station STAT, the station status word is identified by the virtual device STAT. The meaning of the status word values is defined in the following table. 46 2VAA001153C SPlus Operations P13 Connectivity Guide PROCONTROL P13 OPC SERVER Table 3-16: Bus and station status word meaning Bit Meaning 0 1-15 1 * Disturbed 0 * OK The status words can be accessed as PC items as illustrated in the following picture. Figure 3-33: Bus and station status word shown in an item browser If required, DIs can be associated to bus and station status word bits. This is illustrated in the following example records for the PVE file. # Bus disturbance DI for Bus 2 DI,02BusDist_XS01,Bus 2 Disturbance,2,STAT,,0,(Disturbed),Disturbed,1,3 # Station disturbance DI for Station 2.3 DI,03StationDist_XS01,Station 2.3 Disturbance,2,3,STAT,0,(Disturbed),Disturbed,1,3 Figure 3-34: Example of PVE entries for usage of status words 3.4.4 Specific OPC Items 3.4.4.1 PServerAdmin_Node OPC Item The PServerAdmin_Node item returns the name of the node, where the OPC Server is running. 3.4.4.2 PServerAdmin_Command OPC Item The PServerAdmin_Command item allows issuing certain commands by writing a corresponding command string to the item. Commands: AcknSigErrs SetSuspend SetRunning Acknowledges all signal errors Set server state to “Suspended” Set server state to “Running” 3.4.4.3 PServerAdmin_EventRate OPC Item The PServerAdmin_EventRate provides the number of events/second reported to a client. 2VAA001153C 47 SPlus Operations P13 Connectivity Guide PROCONTROL P13 OPC SERVER 3.4.4.4 PServerAdmin_ActiveBuses, PServerAdmin_ActiveBusesPrtn OPC Item The PserverAdmin_ ActiveBuses provides the number active buses. The PserverAdmin_ ActiveBusesPrtn provides the number active buses of the partner server. These items are only available if extended partnernode communication is configured. 3.4.5 Support for XC80-Telegram 3.4.5.1 General The P13 control functions corresponding to the PServer control objects provide their state information for the control room via the so-called XC80-telegram. The XC80 telegram provides information on the position and mode of the object as also on its disturbances states. This information is represented by corresponding bits in the 16 bit word telegram. In older P13 plants, not the whole XC80- telegram was available to the HMI for state annunciation but only a subset of the bits in the XC80-telgram indicating the position and mode information. These bits are then provided as binary input signals (DIs) with signal code XLxx. The reason for this approach was either to reduce the amount of signals in the HMI database or to reduce the amount of signals on the P13 buses or both. In some of these plants, the XC80 telegram for a control object can be requested via a corresponding command on a single multiplexed address. This function is called DMS. In newer P13 plants and also some of the older ones, the XC80 telegram would be available for the HMI. This means, additional disturbance information can be provided without the DMS function. Providing the XC80 telegram via OPC has the following advantages Disturbance information without needing DMS Less OPC items to be subscribed -> better performance 17 Less DI signals to be loaded, in particular less objects counting for 800xA License Generated XC80-Telgram In cases, in which the XC80-Telegram is not provided, the PServer can put together the available part of the XC80Telegram from the available feedback signals to a generated XC80-Telegram. This allows providing to clients an interface to the control objects feedback information independent from whether this information is provided as individual signals or as a telegram. 3.4.5.2 Configuration of XC80 - Telegram 3.4.5.2.1 XC80DEF Instruction This instruction allows defining the mode for the XC80 acquisition and in case of XC80 provided from bus a corresponding address reference. XC80DEF, <Mode>,[<AddrRefs>],[XC80Option] Where: Mode: AddrRefs: XC80Option: Bus: Telegram provided by bus Generate: Generate telegram based on feedback signals List of signal codes, separated with”/” defining the potential signal references for the telegram address. Address will be taken from the first signal found. Default: &_XL68/&_XL18/&_XL19 This means, if, for a control object, a corresponding signal is found with one of these signal codes, the XC80 address is take from this signal. 18 NoXL : Load only XL signals with events. Examples: XC80DEF,Bus,&_XL68/&_XL18 XC80 telegram is provided by bus, the address is provided by XL68. XC80DEF,Generate XC80 telegram is generated based on available feedback signals 3.4.5.3 Object Individual XC80 Configuration For control objects whose XC80 configuration differs from that defined with the XC80DEF instruction, an individual configuration can be made in the XC80 field in the control object configuration record. 17 DIs used for events (e.g. XL68) have to be loaded also when using XC80. This parameter is not observed by the OPC server but controls the pve-generation in the engineering workbook ! 48 18 2VAA001153C SPlus Operations P13 Connectivity Guide PROCONTROL P13 OPC SERVER Table 3-17: Object IndividualXC80 Configuration Field Position XC80Ref 19 27 Meaning Generate: Generate XC80 <AddrRef> From bus with address reference AddrRef 3.4.5.4 OPC Item Interface for XC80 Telegram The information concerning the XC80-Telegram is provided via corresponding OPC items as shown in the table. Table 3-18: OPC Items for XC80 Information OPC Item Value Quality XC80 Telegram GOOD Defined and not disturbed bits show good value BAD Telegram invalid due to invalid XC80 reference NOT_CONNECTED No XC80 configured Which bits are defined GOOD Defined bit information valid NOT_CONNECTED No XC80 configured Which bits are disturbed GOOD Disturbed bit information valid NOT_CONNECTED No XC80 configured .XC80Bus Bus address GOOD XC80 Address configured NOT_CONNECTED XC80 Address not configured .XC80Station Station address GOOD XC80 Address configured NOT_CONNECTED XC80 Address not configured .XC80Device Device address GOOD XC80 Address configured NOT_CONNECTED XC80 Address not configured .XC80Tel .XC80Def .XC80Dist 3.5 Meaning OPC Alarm & Event 3.5.1 General 3.5.1.1 Event Categories The event categories provided by PServer and the corresponding OPC Server: Table 3-19: Event categories provided by PServer Event Category Description OPC Event Type Condition Process Message Value events for PVs x Signal Message Quality events for PVs x Limit Limit events for analog PVs x Command Message [Simple] Operator commands to process System Message PServer system messages System Event PServer system events (Alarms) x Event Suppression Event suppression messages x Tracking Simple x [x] x 3.5.1.2 Priorities and Severities The mapping of PV priorities to OPC severities is done according to the following table: 19 1-based 2VAA001153C 49 SPlus Operations P13 Connectivity Guide PROCONTROL P13 OPC SERVER Table 3-20: Mapping of priorities to OPC severities Priority Meaning OPC Severity 0 Status 1 1 Alarm 999 2 Warning 699 3 Disturbance 399 4 Status 1 This default mapping can be changed with the PRIORITYMAP Instruction. 3.5.1.3 Acknowledge Event Category Acknowledge Required Process For priority 1,2,3 Signal Yes Limit For priority 1,2,3 Command For priority 1,2,3 System No 3.5.2 Messages 3.5.2.1 Process Messages Process messages are provided for value changes of digital variables (DI and DO). Limit events of analog variables are not supported. Process messages are indicated with condition Status. For process messages, the status texts, priority and message definition can be configured (see 3.3.3.2 PVE File Interface). Example: DI,01DTL10AP102_XS01,Digital Test Signal, 2,3,60,1,Off,On,4,3 Figure 3-35: Example of process messages in an OPC alarm & event client 3.5.2.2 Signal Messages Signal messages are provided for changes in the value quality for process signals. Signal messages are indicated with condition Signal. Figure 3-36: Example of signal messages in an OPC alarm & event client 3.5.2.3 Limit Messages Limit messages are provided for analog signals if a configured limit value is crossed according to the corresponding limit treatment parameter. Limit messages are indicated with the condition Limit1, Limit2, Limit3 or Limit4. Figure 3-37: Example of limit messages in an OPC alarm & event client 50 2VAA001153C SPlus Operations P13 Connectivity Guide PROCONTROL P13 OPC SERVER 3.5.2.4 Command Messages Command messages are provided for commands issued against a control object. Process signals. Command messages are indicated with source User. Figure 3-38: Example a command messages in an OPC alarm & event client 3.5.2.5 System Messages System messages are provided to report for system events as simple messages. Figure 3-39: Example of system messages in an OPC alarm & event client 3.5.2.6 System Events System events are provided to report system events as alarms. Figure 3-40: Example of system events in an OPC alarm & event client 3.6 Operation 3.6.1 General For operation of PServer corresponding items in the Procontrol OPC Server menu are provided. Figure 3-41: Procontrol OPC Server Menu Items Diagnostic messages can be found in the Message Window of PServer (see 3.6.2 User Interface) and in PServer‟s Log Files (see 3.6.3 PServer Log Files). PServer can run in two modes: Configuration Mode In the configuration mode the user interface of PServer is accessible on the desktop. This allows to modify the site configuration parameters and also view the message window (3.6.2 User Interface). Nevertheless a PServer running in configuration mode will terminate when the current user logs out! Therefore the configuration mode is mainly useful during configuration and test phase or if PServer should run only as long as the user is logged on. PServer can be started in configuration mode by the Procontrol OPC Server menu item PServer – Configuration or automatically by a client if PServer is not installed as NT service. PServer start in configuration mode is recorded in the message log with the following message: 01/05/00 12:13:32.215 PServer launched as windows application... 2VAA001153C 51 SPlus Operations P13 Connectivity Guide PROCONTROL P13 OPC SERVER Service Mode In service mode, PServer runs as a Windows NT service. As a service, PServer remains running also if no user is logged on Windows NT. On the other hand, the user interface of PServer running in service mode is not accessible. To enable PServer to run in service mode, it must be installed as NT-service. This can be achieved by selecting the Procontrol OPC Server menu item PServer – Create Service. To prevent PServer from being started in service mode, select Procontrol OPC Server menu item PServer – Delete Service. PServer start in service mode is recorded in the message log with the following message: 01/05/00 16:52:35.832 PServer launched as NT Service.. To check if the PServer is installed as NT service, check the list of services (Start->Settings->Services). Important To enable access of the PServer as service, the corresponding DCOM configurations have to be set correctly (see3.3.4DCOM Configuration to Access PServer Remote or as Service). Figure 3-42: Procontrol OPC Server installed as Windows NT Service The normal way to start PServer in service mode is automatically by a client or automatic at start up. Manual start or stop can be done through the NT Services dialog as shown in Figure 3-42: Procontrol OPC Server installed as Windows NT Service. Figure 3-43: Property setting for Procontrol OPC Server Service Important Do not mark “Allow service to Interact with Desktop” , otherwise PServer will stop if you log out ! Selecting “Automatic” Startup type is only necessary if you wish PServer starting up with Windows NT. 52 2VAA001153C SPlus Operations P13 Connectivity Guide PROCONTROL P13 OPC SERVER Normally only one instance of PServer is started. To allow viewing of PServer site configuration without stopping a PServer running in service mode, a PServer instance in configuration mode can run in parallel to one running in service mode. Important When using PServer in configuration mode, some attention should be paid that clients do not connect to the “wrong” server. Rule: If PServer is installed as service, any client will connect to PServer in service mode unless a running PServer in configuration mode is or was already connected to a client. A “normal” procedure could look like the following: Test Phase -> 1. 2. 3. 4. 5. 6. 7. 8. 9. -> Select PServer-Delete Service to disable service mode (not necessary if just installed). Select PServer-Configuration to start PServer in configuration mode. Enter the site configuration parameters as needed. Save and exit from PServer. Start PServer either by PServer-Configuration or by connecting a client. Test the new configuration by clients and observing the message window. Repeat from (3.) if needed. If configuration ok, stop PServer Select PServer-Create Service Connect a client and examine corresponding message log Test phase finished. 3.6.2 User Interface The PServer application window contains two panes: Configuration parameter tree This tree leads to the corresponding site parameter property sheets as described in 3.3.2 Site Configuration Parameters. Message Window Informational and error messages are written to this window. The newest message is on the top of the window. Configuration Parameter Tree Message Window Figure 3-44: PServer Application Window 3.6.3 PServer Log Files PServer writes the diagnostic messages also to a corresponding log file named Messages.log. The size of the log file is restricted to about 5000 messages (200 Kbytes). If this limit is reached, the current log file is renamed to Messagesold.log. The menu Procontrol OPC Server -> Log Files opens the directory containing these files. 2VAA001153C 53 SPlus Operations P13 Connectivity Guide PROCONTROL P13 OPC SERVER Figure 3-45: PServer Log Files The PServer log files are text files which can be viewed by any text editor. With the ExtendedLogging instruction, the number of log files kept on disk can be extended (see 3.3.3.4.15 ExtendedLogging Instruction). 3.6.4 Data Access Test Client For testing the installation concerning data access, a simple OPC Data Access client can be used. Start : Start-> ABB P13 Connect OPC Server -> Data Access Client In the OPC Client, connect to PServer by OPC -> Connect… Figure 3-46: Connecting a data access client to the PServer With OPC->Add Item…add items. The added items can then be examined in the main window. Figure 3-47: View on OPC Items of PServer in a client 54 2VAA001153C SPlus Operations P13 Connectivity Guide PROCONTROL P13 OPC SERVER 3.6.5 Event Test Client For testing the installation concerning event & alarm access, an OPC alarm & event client can be used. Start : Start -> ABB P13 Connect OPC Server -> Event Display Client In the OPC Client, connect to PServer by OPC -> Connect… Remark: The alarm & event test client connects automatically to the last connected server (if possible). Figure 3-48: Connecting an alarm & event client to the PServer 3.7 PV Definitions 3.7.1 General Process variables have a set of properties which can be classified as follows: Descriptive attributes These properties have no influence on processing and are provided as engineering parameters, e.g. Description text Processing parameters These properties have influence the processing and are provided as engineering parameters, e.g. Procontrol address. Dynamic process values These properties depend dynamically on process values, e.g. actual value. Commands These properties allow to issue commands toward a control object Table 3-21: Common Attributes for Process Variables Name Meaning Data Type Name Original name of PV String x x Alias Alias name for aggregation to control object String x x Descriptive Text String x x Description 20 Paddress Engin. Para. OPC Prop. OPC Item Descr Procontrol address of data source/ destination Bus Bus address 0,…,7 x x Station Station address 0,…,3F x x 20 Is default associated OPC Item 2VAA001153C 55 SPlus Operations P13 Connectivity Guide PROCONTROL P13 OPC SERVER 21 Device Device address 0,…,FF (1FF) x x Bit Bit address 0,…,F x x OPC Item OPC Item value with x Value OPC item value Variant: Analog: Double Digital: Boolean x Quality OPC quality flags indicating the quality of the value Bitset x TimeStamp Time stamp of last update UTC Time (FILETIME) x SpecProc 23 Special processing specifier String x 22 x Table 3-22: Special Processing Identifiers Identifier Meaning AI UBCD1 Data word is interpreted as unsigned BCD coded x UBCD8L Left byte of data word is interpreted as unsigned BCD coded x UBCD8H Right byte of data word is interpreted as unsigned BCD coded x UKSU Adapt range for KSU connection x UNOSTB Handle bit 0 as normal value bit and not as sensor disturbance bit x CMD Command pulse output DI AO DO 3.7.2 Process Signals 3.7.2.1 Analog Inputs (AI) Table 3-23: Specific Attributes for Analog Inputs Name Meaning Data Type Engin. Para. OPC Prop. OPC Item RangeLow Measuring range low Double x x RLow RangeHigh Measuring range high Double x x RHigh 3.7.2.2 Digital Inputs (DI) Table 3-24: Specific Attributes for Digital Inputs Name Meaning Data Type Engin. Para. OPC Prop. Text0 Measuring range low String x x Text1 Measuring range high String x x Priority Priority Integer 1,…,3 x x EventDef Event definition Integer 0,…,3 x x NormPos Normal position Integer 0,1 x x OPC Item 21 Range 100,…,1FF (Hex) only for BKO6 Bus Type. As part of Value Item. 23 Currently only UBCD1 supported for AI to process unsigned BCD input 56 22 2VAA001153C SPlus Operations P13 Connectivity Guide PROCONTROL P13 OPC SERVER 3.7.2.3 Analog Outputs (AO) Table 3-25: Specific Attributes for Analog Outputs Name Meaning Data Type Engin. Para. OPC Prop. OPC Item RangeLow Measuring range low Double x x Rlow RangeHigh Measuring range high Double x x Rhigh Output Output connection Bool x x 3.7.2.4 Digital Outputs (DO) Table 3-26: Specific Attributes for Digital Outputs Name Meaning Data Type Engin. Para. OPC Prop. Text0 Measuring range low String x x Text1 Measuring range high String x x Priority Priority Integer 1,…,3 x x EventDef Event definition Integer 0,…,3 x x Output Output connection Bool x x NormPos Normal position Integer 0,1 x x 2VAA001153C OPC Item 57 SPlus Operations P13 Connectivity Guide PROCONTROL P13 OPC SERVER 3.7.3 Process Signals Extended 3.7.3.1 Analog Inputs Extended (AIX) Table 3-27: Specific Attributes for Analog Inputs Extended 58 Name Meaning Data Type Engin. Para. OPC Prop. OPC Item Ackn Object is acknowledged: Reset by limit alarm or signal error Bool AlarmText1 Alarm text for limit 1 Character x AlarmText1 AlarmText2 Alarm text for limit 2 Character x AlarmText2 AlarmText3 Alarm text for limit 3 Character x AlarmText3 AlarmText4 Alarm text for limit 4 Character x AlarmText4 CMD_ACKN Acknowledge command Short DRHigh Display range high Double x DRHigh DRLow Display range low Double x DRLow Error Set if object has signal error Bool LimPrio1 Priority for limit 1 Short x LimPrio1 LimPrio2 Priority for limit 2 Short x LimPrio2 LimPrio3 Priority for limit 3 Short x LimPrio3 LimPrio4 Priority for limit 4 Short x LimPrio4 LimState1 State for limit 1 Short LimState1 LimState2 State for limit 2 Short LimState2 LimState3 State for limit 3 Short LimState3 LimState4 State for limit 4 Short LimState4 LimTreat1 Treatment for limit 1 Short x LimTreat1 LimTreat2 Treatment for limit 2 Short x LimTreat2 LimTreat3 Treatment for limit 3 Short x LimTreat3 LimTreat4 Treatment for limit 4 Short x LimTreat4 LimType1 Type for limit 1 Short x LimType1 LimType2 Type for limit 2 Short x LimType2 LimType3 Type for limit 3 Short x LimType3 LimType4 Type for limit 4 Short x LimType4 LimitValue1 Value for limit 1 Double v LimitValue1 LimitValue2 Value for limit 2 Double x LimitValue2 LimitValue3 Value for limit 3 Double x LimitValue3 LimitValue4 Value for limit 4 Double x LimitValue4 NoDecs Number of decimal digits Short x NoDecs NormText1 Normal text for limit 1 Character x NormText1 NormText2 Normal text for limit 2 Character x NormText2 NormText3 Normal text for limit 3 Character x NormText3 NormText4 Normal text for limit 4 Character x NormText4 Rlow Measuring range low Double x x Rlow Rhigh Measuring range high Double x x Rhigh Section Section Short x Ackn CMD_ACKN Error Section 2VAA001153C SPlus Operations P13 Connectivity Guide Unit Measuring unit PROCONTROL P13 OPC SERVER Character x Unit 3.7.3.2 Digital Inputs Extended (DIX) Table 3-28: Specific Attributes for Digital Inputs Name Meaning Data Type Engin. Para. OPC Prop. OPC Item Ackn Object is acknowledged: Reset by limit alarm or signal error Bool Text0 Measuring range low String x x NormalText Text1 Measuring range high String x x AlarmText Priority Priority Integer 1,…,3 x x Prio EventDef Event definition Integer 0,…,3 x x EventTreat NormPos Normal position Integer 0,1 x x NormPos Inverted Input value inverted Bool x EventSup Event suppression Integer Ackn Inverted EventSup 3.7.3.3 Analog Outputs Extended (AOX) Table 3-29: Specific Attributes for Analog Outputs Name Meaning See AIX … Output Output connection Data Type Engin. Para. OPC Prop. Bool x x OPC Item 3.7.3.4 Digital Outputs Extended (DO) Table 3-30: Specific Attributes for Digital Outputs Name Meaning Data Type Engin. Para. OPC Prop. Text0 Measuring range low String x x Text1 Measuring range high String x x Priority Priority Integer 1,…,3 x x EventDef Event definition Integer 0,…,3 x x Output Output connection Bool x x NormPos Normal position Integer 0,1 x x 2VAA001153C OPC Item 59 SPlus Operations P13 Connectivity Guide PROCONTROL P13 OPC SERVER 3.7.4 Control Objects 3.7.4.1 Naming Conventions for Associated Signals Control object individual command signals are associated to the object by corresponding naming conventions. For VPC Mode 1, these signals are the identification signals. The following table shows the default naming convention use by PServer. This default naming convention can be overwritten by a corresponding VPCID record in the PV engineering file (see 3.3.3 Process Variables Engineering File) Table 3-31: Default Naming Convention for Identification Signals in VPC Mode 1 Signal Description Signal Code ID1.1 Channel 1 – ID Signal 1 XD91 – ID Signal 2 ID1.2 Channel 2 – ID Signal 1 ID2.1 – ID Signal 2 ID2.2 Channel 3 – ID Signal 1 ID3.1 – ID Signal 2 ID3.2 Channel 4 – ID Signal 1 ID4.1 – ID Signal 2 ID4.2 Channel 5 – ID Signal 1 ID5.1 – ID Signal 2 ID5.2 Channel 6 – ID Signal 1 ID6.1 – ID Signal 2 ID6.2 24 XD92 XD93 XD94 XD95 XD96 XD97 XD98 XD99 XD9A XD9B XD9C Table 3-32: Naming Convention for Individual Command Signals in VPC Mode 2 Signal Description Signal Code ON Command ON XD11 OFF Command OFF XD12 RAISE Command RAISE XD13 LOWER Command LOWER XD14 HOLD Command HOLD XD15 SELECT1 Preselect 1 XD61 SELECT2 Preselect 2 XD63 SELECT3 Preselect 3 XD65 SELECT4 Preselect 4 XD67 3.7.4.2 Specific Attributes for Control Objects 3.7.4.2.1 General Table 3-33: Specific Attributes for Control Objects Name Meaning Data Type Engin. Para. Operable Is Operable Bool x OPC Prop. OPC Item 3.7.4.2.2 Binary Control (BCO) Table 3-34: Specific Attributes for Binary Control Objects 24 Default configuration can be overwritten by a corresponding record in the PV engineering file 60 2VAA001153C SPlus Operations P13 Connectivity Guide PROCONTROL P13 OPC SERVER Name Meaning Data Type ACKN Acknowledge Command Bool CMD_ACKN AUTOMAN Auto/Manual Command Bool CMD_AUTOM AN ON On/Open Command Bool CMD_ON OFF Off/Close Command Bool CMD_OFF STOP Stop Command Bool CMD_STOP DMS DMS Command Bool CMD_DMS 27 Engin. Para. OPC Prop. OPC Item 25 26 3.7.4.2.3 Selector Control (SCO) Table 3-35: Specific Attributes for Selector Control Objects Name Meaning Data Type ACKN Acknowledge Command Bool CMD_ACKN SEL1 Select 1 Bool CMD_SEL1 SEL2 Engin. Para. OPC Prop. OPC Item Select 2 Bool CMD_SEL2 SEL3 1 Select 3 Bool CMD_SEL3 SEL4 1 Select 4 Bool CMD_SEL4 DMS command Bool CMD_DMS DMS 3.7.4.2.4 Analog Control (ACO) Table 3-36: Specific Attributes for Analog Control Objects Name Meaning Data Type Acknowledge Command Bool CMD_ACKN Auto/Manual Command Bool CMD_AUTOMA N RAISE Raise Command Bool CMD_RAISE LOWER Lower Command Bool CMD_LOWER HOLD Hold Raise/Lower Command Bool CMD_HOLD Set Value (Y/W) Command Float CMD_SETVAL DMS DMS command Bool AssocPV Name of PV associated with this object String x RangeLow Range low for setpoint output Float 28 x RangeHigh Range low for setpoint output Float 29 x ACKN AUTOMAN SETVAL 1 1 Engin. Para. OPC Prop. OPC Item CMD_DMS 3.7.4.3 Specific Attributes for Control Objects Extended 3.7.4.3.1 General Table 3-37: Specific Attributes for Control Objects Extended 25 CMD_OPEN for ASS CMD_CLOSE for ASS 27 Depending on subtype, some commands are not applicable. 28 Derived from associated PV, =0 if PV not specified 29 Derived from associated PV, =100 if PV not specified 2VAA001153C 26 61 SPlus Operations P13 Connectivity Guide PROCONTROL P13 OPC SERVER Name Meaning Data Type Engin. Para. Operable Object is operable Bool x Station Station number String Type PV Type String x Type SubType Subtype String x SubType Error Set if signal error in one of the feedbacks Short Error XC80Tel See 3.4.5 Support for XC80Telegram UI2 XC80Tel UI2 XC80Def XC80Def XC80Dist OPC Prop. OPC Item Operable Station UI2 XC80Dist XC80Bus I2 (x) XC80Bus XC80Station String (x) XC80Station XC80Device String (x) XC80Device 3.7.4.3.2 Binary Control (ASE, ASS, ASM) Table 3-38: Specific Attributes for Binary Control Objects Name Meaning Data Type ACKN Acknowledge Command AUTOMAN OPC Item ASE ASM ASS GSA Bool CMD_ACKN x x x Auto/Manual Command Bool CMD_AUTO MAN ON On/Open Command Bool CMD_ON x x OFF Off/Close Command Bool CMD_OFF x x STOP Stop Command Bool CMD_STOP DMS DMS Command Bool CMD_DMS x x x PROTOFF Signal reference for Protection OFF String PROTOFF x x x PROTON Signal reference for Protection ON String PROTON x x x RELOFF Signal reference for Release OFF String RELOFF x x x RELON Signal reference for Release ON String RELON x x x XL18 XL18 signal PV DI (see DIX) x x x XL19 XL19 signal PV DI (see DIX) x x x XL28 XL28 signal PV DI (see DIX) x x x XL29 XL29 signal PV DI (see DIX) x x x XL68 XL68 signal PV DI (see DIX) x x x XL69 XL69 signal PV DI (see DIX) x x x 32 Engin. Para. OPC Prop. 30 31 30 CMD_OPEN for ASS CMD_CLOSE for ASS 32 Depending on subtype, some commands are not applicable. 62 31 2VAA001153C SPlus Operations P13 Connectivity Guide PROCONTROL P13 OPC SERVER XL59 XL59 signal PV DI (see DIX) x AV Actual Step AI (see AIX) x 3.7.4.3.3 Selector Control (VW2, VW3, VW4) Table 3-39: Specific Attributes for Selector Control Objects Name Meaning Data Type Engin. Para. OPC Prop. OPC Item ACKN Acknowledge Command Bool CMD_ACKN SEL1 Select 1 Bool CMD_SEL1 SEL2 Select 2 Bool CMD_SEL2 SEL3 1 Select 3 Bool CMD_SEL3 SEL4 1 Select 4 Bool CMD_SEL4 DMS DMS command Bool CMD_DMS XL18 XL18 signal PV DI signal PV (see DIX) XL19 XL19 signal PV DI signal PV (see DIX) XL28 XL28 signal PV DI signal PV (see DIX) XL29 XL29 signal PV DI signal PV (see DIX) XL58 XL58 signal PV DI signal PV (see DIX) XL59 XL59 signal PV DI signal PV (see DIX) XL78 XL78 signal PV DI signal PV (see DIX) XL79 XL79 signal PV DI signal PV (see DIX) 3.7.4.3.4 Analog Control (ACO) Table 3-40: Specific Attributes for Analog Control Objects Name ACKN AUTOMAN 1 Meaning Data Type Engin. Para. OPC Prop. OPC Item Acknowledge Command Bool CMD_ACKN Auto/Manual Command Bool CMD_AUTOMAN RAISE Raise Command Bool CMD_RAISE LOWER Lower Command Bool CMD_LOWER HOLD Hold Raise/Lower Command Bool CMD_HOLD Set Value (Y/W) Command Float CMD_SETVAL DMS DMS command Bool AssocPV Name of PV associated with this object String x RangeLow Range low for setpoint output Float 33 x RangeHigh Range low for setpoint output Float 34 x XL18 XL18 signal PV DI (see DIX) XL19 XL19 signal PV DI (see DIX) XL28 XL28 signal PV DI (see DIX) XL29 XL29 signal PV DI (see DIX) XL68 XL68 signal PV DI (see DIX) XL69 XL69 signal PV DI (see DIX) SETVAL 1 ASP ASI HST SWV CMD_DMS 33 Derived from associated PV, =0 if PV not specified Derived from associated PV, =100 if PV not specified 2VAA001153C 34 63 SPlus Operations P13 Connectivity Guide PROCONTROL P13 OPC SERVER XL79 XL79 signal PV DI (see DIX) XL88 XL88 signal PV DI (see DIX) XL89 XL89 signal PV DI (see DIX) 3.7.4.3.5 Condition Definitions (COND, STEP) The Condition Definition object types do not involve any processing within PServer. It provides engineering data via OPC server to a client. Table 3-41: Attributes for Condition Definitions (COND, STEP) Name Meaning Data Type Engin. Para. OPC Prop. OPC Item Descr Description String Descr Error Error Short Error Logic Logic expression String Logic LogicResult Signal reference to logic result String LogicResult 3.7.5 System Objects 3.7.5.1 General Procontrol system objects of type Bus, Line and Station will be created in the PServer, when a signal is defined in the pve-file which references this object within its Procontrol address. Table 3-42: Procontrol System Objects System Object Type Meaning Object Name Bus An Procontrol P42 intraplant bus which can be connected to multiple station BUS <n> Examples: BUS 0 BUS 1 Line A serial connection to one station LINE <n> Examples: LINE 0 LINE 1 Station A Procontrol P13 station <b>-STN<XX> where b : Bus address (0,1,2,..) XX: Station address (hex) Examples: 1-STN15 3-STNEF Meaning Data Type Bus Line Station Table 3-43: Attributes for Procontrol System Objects Name Description Description String .Descr x x x Error Error state Bool .Error x x x S_STATUS 0 : Ok >0 : Error Short S_STATUS x x x S_TIME Time of last status change Date S_TIME x x x 64 Engin. Para. OPC Prop. OPC Item 2VAA001153C SPlus Operations P13 Connectivity Guide PROCONTROL P13 OPC SERVER S_XDESCRIPTION Object type specific error code Short S_XDESCR IPTION DistWord Station Disturbance Word Short .DistWord Message Rate Number of telegram messages per second provided by the PIF Short .MsgRate x x x x x The object-specific error codes are described in the following tables: Table 3-44: Error codes for BUS object Error Code (S_XDESCRIPTION) Meaning S_STATUS 0 OK 0 1 PIF not running 1 2 No channel active 1 3 Channel A not active 0 4 Channel B not active 0 Table 3-45: Error codes for LINE object Error Code (S_XDESCRIPTION) Meaning S_STATUS 0 OK 0 1 Communication disturbed 1 Table 3-46: Error codes for STATION object Error Code (S_XDESCRIPTION) Meaning S_STATUS 0 OK 0 1 Station not reachable 1 2 Station has disturbance 1 3 Disturbance word invalid 1 4 Not monitored 254 3.7.5.2 System Alarms 3.7.5.2.1 System Alarms for Bus and Line Communication failures to an intraplant bus or serial line are reported as alarms with event category System Event. Figure 3-49: Example of bus alarms in an OPC alarm & event client 3.8 Redundancy Support 3.8.1 Acknowledge Synchronization OPC Alarm&Event Servers maintain a list of active unacknowledged alarms. In configurations with redundant OPC Server, a mechanism must be provided to keep the acknowledge states in both server‟s lists the same. If the client application in a redundant configuration does send an acknowledge signal only to one server, the exchange of acknowledge information must take place between the OPC Servers. The exchange of acknowledge information can be activated by defining corresponding partner servers. 2VAA001153C 65 SPlus Operations P13 Connectivity Guide PServer Node01 PROCONTROL P13 OPC SERVER Acknowledge Information PARTNERNODE, Node02 PServer Node02 PARTNERNODE, Node01 Figure 3-50: Exchange of Acknowledge Information between Partner Nodes How to define a Partner Node is described in 3.3.3.4.9 PARTNERNODE[X] Instruction. 3.8.2 Synchronization of Event Suppression Via the partner node connection, the event suppression configuration is synchronized. 3.8.3 Propagation of Node-Specific Partner Events. Certain event types are node-specific, i.e. can concern only the OPC server on one of the redundant nodes. These node-specific events are Command tracking messages P13 system events. To provide these event messages to a client connected to the partner node, these types of events are reported to clients also by the partner node. The event messages received from partner node are indicated by a “>” character behind the node. Figure 3-51: Example of a Message received from PartnerNode CHIIT067 3.8.4 Bus Connection Controlled Redundancy Switch-Over A pair of redundant PServers can cause an appropriate redundancy switch-over based on the state of their bus connection states. The two redundant PServers cyclically read the number of active bus connections from its partner. If a PServer recognizes its own number of active busses as less than that of its partner (i.e. its connection state is worse than that of the partner), it sets itself to state OPC_STATUS_COMM_FAULT. This state can be used by the client (e.g. 800xA PPA) to do a switch-over to the better node. The PServer in OPC_STATUS_COMM_FAULT state sets itself to running state when it recognizes its number of active bus connections as equal or bigger compared to that of the partner. To activate bus connection controlled redundancy switch-over, the extended partner node connection (PARTNERNODEX, see 3.3.3.4.9 PARTNERNODE[X] Instruction.) must be used. The following extract of an event log illustrates the messages caused by redundancy bus connection monitoring. Figure 3-52: Redundancy Bus Connection Monitoring Messages 3.9 VPC Mode “Individual Command Signals” 3.9.1 Concept In the VPC Mode “Individual Command Signals”, an individual command signal for each command and each control object is used. Additionally a global release signal common to all control objects is necessary to enable the execution of the command. Specific handling is used for acknowledge of a control object. The individual acknowledge signal must be paired the global acknowledge. 66 2VAA001153C SPlus Operations P13 Connectivity Guide Global Release Global Acknowledge PROCONTROL P13 OPC SERVER & CO1 ON OFF ACKN Individual Command Signals CO2 SEL1 SEL2 …. Individual Command Signals Signal Interface to OPC Server Figure 3-53: Signal handling for VPC mode “Individual Command Signals Special care has been taken to avoid mutual disturbances or wrong commands in case of parallel operation of different control objects: Because the individual acknowledge signal is in reality one of the “normal” commands (e.g. ON, OFF), the release signal has to be locked to 0 during an acknowledge command to prevent unwanted execution of a command. This locking is done in Procontrol P13. The 1-state of global acknowledge signal must cover the whole span of the individual acknowledge signal. This means, that the global acknowledge must be set before the individual one and must have a slightly longer duration. Global Release and Global Acknowledge must be “reference-counted”, i.e. they should only be reset, if no more corresponding active commands exist. The following types of control objects are supported: Table 3-47: Object types supported by VPC mode “Individual Command signals” Procontrol Naming As160OS Naming ASE DCTS ASS DCS ASM DCSV SWV SPI GSA GRC VW2 SEL2 VW3 SEL3 VW4 SEL4 3.9.2 Engineering 3.9.2.1 Selecting VPC Mode “Individual Command Signals” This selection has to be done via PServer User Interface General->VPC Modes. See Figure 3-16: Property Page for VPC Mode Configuration. 3.9.2.2 Identifying Global Command Signals The global command signals are identified by the corresponding parameter set records in the pve-file. The global signals (Release, Acknowledge) are specific to the bus number. 2VAA001153C For the global release signal : VPCDEF1,REL,<RelSigBus 0>,<RelSigBus 1>,… 67 SPlus Operations P13 Connectivity Guide PROCONTROL P13 OPC SERVER For the global acknowledge signal : VPCDEF1,ACKN,<AcknSigBus 0>,<AcknSigBus 1>,… If the global signals are the same for all busses, the configuration must look as follows: Global signals valid for all busses : VPCDEF1,REL,<RelSig AllBusses>,* VPCDEF1,ACKN,<AcknSig AllBusses>,* 3.9.2.3 Identifying Individual Command Signals The individual command signals are identified by a corresponding naming convention: <Control Object Name>_<Command Signal Code> The command signal codes are dependant from the control object type. They can be defined by corresponding parameter set records in the pve-file as shown in the following list: VPCDEF1,ASE,<ACKN>,<ON>,<OFF> (AS160OS: DCTS) VPCDEF1,ASS,<ACKN>,<OPEN>,<CLOSE>,<HOLD> (AS160OS: DCS) VPCDEF1,ASM,<ACKN>,<ON>,<OFF> (AS160OS: DCSV) VPCDEF1,SWV,<ACKN>,<RAISE>,<LOWER> (AS160OS: SPI) VPCDEF1,GSA,<ACKN>,<ON>,<OFF>,<HOLD> (AS160OS: GRC) VPCDEF1,VW2,<ACKN>,<SEL1>,<SEL2> (AS160OS: SEL2) VPCDEF1,VW3,<ACKN>,<SEL1>,<SEL2>,<SEL3> (AS160OS: SEL3) VPCDEF1,VW4,<ACKN>,<SEL1>,<SEL2>,<SEL3>,<SEL4> (AS160OS: SEL4) <…> defines the signal code for the corresponding command. 3.9.2.4 Special Parameters With the VPCDEF1, DELAY1 instruction, the additional length in milliseconds of the global acknowledge signal can be defined. Default value is 50 ms. Example: VPCDEF1, DELAY1, 60 With the MSGFILTER instruction, warnings in the message log can be suppressed. This can be useful, to suppress warnings for regularly missing commands after commissioning. Example: MSGFILTER, 1 This instruction suppresses warnings. 3.10 VPC Mode “Mixed Mode I” 3.10.1 Concept The VPC Mode “Mixed Mode I” is a mix of two VPC concepts. In this mode, analog control objects as ASP, HST etc. are operated via “Telegram and ID-Signals” concept. This means that these control objects use the XC13 telegram and one 35 or two ID-Signals . Binary control objects including group control objects are operated via the “Individual Command Signals” concept (see 3.9 VPC Mode “Individual Command Signals”). 3.10.2 Engineering 3.10.2.1 Select VPC Mode “Mixed Mode I” This selection has to be done via PServer User Interface General->VPC Modes. 35 In submode RMPI, ramping SWVs use „Individual Command Signals“ (see 3.10.2.4 VPC Submode “RMPI”) 68 2VAA001153C SPlus Operations P13 Connectivity Guide PROCONTROL P13 OPC SERVER Figure 3-54: VPC Mode “Mixed Mode I” Configuration 3.10.2.2 Configure Analog Control (XC13) Part Select number of ID bits in dialog General->VPC Modes. Configure signal ID for ID bits with VPCID instruction in the pve-file (see 3.3.3.4.1 Parameter Set VPCID for ID-Signals Definition). Configure existing command channels per bus. Set addresses for XC11 and XC12 to zero. Configure bit for acknowledge if not default. 3.10.2.3 Configure Binary Control Part All configurations concerning the binary control part are done in the pve-file. 3.10.2.4 VPC Submode “RMPI” In the VPC Submode “RMPI”, SWV objects configured with subtype “RMP” (“Ramping”) are operated via „Individual Command Signals“. The VPC Submode can be selected via the following instruction: VPCDEF, SUBMODE, RMPI The SWV command signals have to be configured. 3.10.2.5 Example pve-configuration The following table shows a sample pve configuration for Mixed Mode I. Table 3-48: Sample PVE-Configuration for Mixed Mode I #Command signals for binary control Type #Global Signals VPCDEF1 2VAA001153C ACKN ACKN ON/ SEL1 Bus0 Bus1 10CKA21 GK001_ ACKN * OFF/ SEL2 STOP/ SEL3 SEL4 REL (ind.) 69 SPlus Operations P13 Connectivity Guide VPCDEF1 PROCONTROL P13 OPC SERVER REL 10CKA21 GK001_ XS55 * VPCDEF1 ASE XB11 XB11 XB12 VPCDEF1 ASS XB11 XB11 XB12 VPCDEF1 ASM XB11 XB11 XB12 VPCDEF1 VW2 XA61 XA61 XB63 VPCDEF1 GSA XA11 XA11 XA12 #Command signal codes XM23 XB13 XM23 XM23 XA15 #Reset delay for global acknowledge (ms) VPCDEF1 DELAY1 100 #Suppress warnings with missing command signals MSGFILTER 1 #Definitions for analog control #Acknowledge bit is 8 (non default) VPCDEF ACKNBIT 8 #Signal code for ID bit VPCID XS13 #DMS signal code for all types DMSID YS22 3.11 Miscellaneous 3.11.1 RS232 Connection for BK06 TD 2 35 RD 7 39 GND 3 BK06 DB9 Female 6 33 1 8 4 45 9 5 Figure 3-55: RS232 Connection for BK06 70 2VAA001153C SPlus Operations P13 Connectivity Guide S+ P13 ENGINEERING WORK BOOK 4. S+ P13 ENGINEERING WORK BOOK 4.1 Overview The input interface for the S+ P13 tag database engineering is the S+ P13 Engineering Workbook. The S+ P13 Engineering Workbook is an Excel Workbook which can be imported to the S+ Operations tag database. The corresponding pve-file used by then Procontrol P13 Connect OPC Server can be generated by means of the S+ P13 OPC Builder. The tag engineering dataflow implies that the parameters contained in the workbook are changed only in the S+ P13 Engineering Workbook and not in S+ Operations. Preconditions for doing S+ P13 tag database engineering are: 4.2 Be familiar with Procontrol P13, in particular concerning multifunctions. Be familiar with Procontrol P13 Connect OPC server configuration Be familiar with S+ Operations tag configuration Basic Workbook Structure The S+ P13 Engineering Workbook is the source for the S+ Operations tag database import and for generation of the P13 OPC server engineering file (.pve). It contains therefore the fields used by S+ Operations and/or by the Procontrol P13 Connect OPC Server. In respect to readability, the engineering data is separated into three worksheets. Figure 4-1: Worksheets in the S+ P13 Engineering Workbook 2VAA001153C 71 SPlus Operations P13 Connectivity Guide 4.3 S+ P13 ENGINEERING WORK BOOK Column Headings – Field Names Both, the S+ Operations tag import and the S+ P13 OPC Builder work with column headings to identify the columns and not with the column positions. The columns used and the field designations are different for the two utilities. Therefore two rows with column headings are provided. Field designation for SPlus P13 Builder Field designation for SPlus Operations Tags Import Figure 4-2: Column Headings in the S+ P13 Workbook 4.4 Named Ranges in S+ P13 Engineering Workbook Within the worksheets some named ranges have to be defined Table 4-1: Named ranges in the S+ P13 Engineering Workbook Worksheet Named Range for S+ Opeations Named Range for S+_P13 OPC Builder Signals Database P13OPC_Signals Control Objects Database P13OPC_ControlObjects Special Objects Database Not used ID-Signals Not Used P13OPC_IDSignals The named ranges must include all columns used by the corresponding target (S+ Operations tag import or S+ P13 OPC Builder). The named ranges for the S+ Operations tag import must not include the heading row for the S+ P13 OPC Builder. The named ranges for the S+ P13 OPC Builder will contain the heading row for the S+ Operations tag import. This row will be ignored by the S+ P13 OPC Builder. 4.5 Signals Sheet The Signals sheet contains analog and binary inputs and outputs. The fields are described in the following table. Table 4-2: S+ P13 Engineering Workbook Fields for Signals 72 OPC Field S+ Operations Field DIX/DOX AIX/AOX Meaning Value Type - x x Tag type {DIX,DOX,AIX,AOX} Name NAME x x Tag name Text Descr DESC x x Tag description Text Bus OUT1_TX1 x x Bus number 0,…,7 Station OUT1_TX2 x x Station number Hex, 00,..,3F Device OUT1_TX3 x x Device Number Hex, 00,..,FF Bit OUT1_TX4 x - Bit Number Hex, 0,…,F Section PLANTUNIT x x Section 0,1,… Text1 ONESTATE x - Text for 1-state Text Text0 ZEROSTATE x - Text for 0-state Text Priority AL_PRI x - Priority for alarm 1,…,4 2VAA001153C SPlus Operations P13 Connectivity Guide S+ P13 ENGINEERING WORK BOOK EventDef - x - Event definition: 0: No message 1: Message if Normal->Active 2: Message if Active->Normal 3: Message both directions 0,…,3 NormPos - x - Which is normal (not active) state {0,1} Inverted - x - Field value to be inverted {Y, N} RangeLow LINS_LIMT - x Measuring range low Float RangeHigh HINS_LIMT - x Measuring range high Float Unit EUDESC - x Measuring unit Text NoDecs NUMDECPL - x No of decimal places 1,2… DRLow SCA_VAL_0 - x Display range low Float DRHigh SCA_VL_100 - x Display range high Float LimValue1Lim Value2 LimValue3Lim Value4 L2ALARM L1ALARM H1ALARM H2ALARM x Limit <n> value Float LimType1 (...2,3,4) - x Limit <n> type 0: Upper 1: Lower LimTreat1 (...2,3,4) - x Limit <n> treatment (see EventDef field) 0,…,3 LimPrio1 LimPrio2 LimPrio3 LimPrio4 ALPRI_2L ALPRI_1L ALPRI_1H ALPRI_2H x Limit <n> priority 0,4: 1,2,3: AlarmText1(… 2,3,4) - x Limit <n> alarm text Text SpecProc - (x) (x) Special processing identifier Output - DOX AOX Output the value {Y, N} - FIELD_AD1 x x Refresh Time 500 - FIELD_AD2 x x Read type 120 (By exception) - TAGTYPE x x S+ Operations tag type {Analog, Digital} - TAGSRC x x Data source for S+ Opeations PROP13 - OPCEXPCLNT x x Allow output (commands) to OPC server Y - ALMGROUP x x Alarm group 0, 1… - ALMREM x x Remote alarm processing Y - FIELD_TX1 x x OPC DA server ABBProcontrolP13. OPC.1 - FIELD_TX3 x x OPC DA item name = Name - FIELD_TX5 x x OPC AE server ABBProcontrolP13. Event.1 - FIELD_TX7 x x OPC AE source item name = Name - DATA_PROC x x S+ Operations Data Processor PROP13.Block.P13. <type> e.g. PROP13.Block.P13. AIX FACEPLATE x x Faceplate Prctrl.POP_P13<typ e> e.g. Prctrl.POP_P13AIX 36 Status Alarm Text 36 See Table 4-3:Available Special Processing for Signals 2VAA001153C 73 SPlus Operations P13 Connectivity Guide S+ P13 ENGINEERING WORK BOOK The following table shows applicable special processing. Consult also the Procontrol P13 Connect OPC Server part of the manual [PROCONTROL P13 OPC SERVERError! Reference source not found.]. Table 4-3:Available Special Processing for Signals 4.6 Identifier Meaning AIX UBCD1 Data word is interpreted as unsigned BCD coded x UBCD8L Left byte of data word is interpreted as unsigned BCD coded x UBCD8H Right byte of data word is interpreted as unsigned BCD coded x UKSU Adapt range for KSU connection x UNOSTB Handle bit 0 as normal value bit and not as sensor disturbance bit x CMD Command pulse output DOX x Control Objects Sheet The Control Objects sheet contains all objects which implement a process control function. The fields are described in the following table. Table 4-4: S+ P13 Engineering Workbook- Fields for Control Objects 74 OPC Field S+ Operations Field Meaning Value Type - Tag type ASEX,ASMX,ASSX,VW2X, VW3X,VW4X,HSTX,SWVX ,ASIX;ASPX,GSAX Name NAME Tag name Tag name Descr DESC Tag description Text Section PLANTUNIT Section 1… Operable - Is foreseen for operation {Y,N} Subtype OUT2_TX9 See 4.6.2 Subtypes Tag name XL68 OUT1_TX9 See 4.6.1 Feedback Signals Tag name XL69 OUT1_TX10 See 4.6.1 Feedback Signals Tag name XL18 OUT1_TX1 See 4.6.1 Feedback Signals Tag name XL28 OUT1_TX3 See 4.6.1 Feedback Signals Tag name XL19 OUT1_TX2 See 4.6.1 Feedback Signals Tag name XL29 OUT1_TX4 See 4.6.1 Feedback Signals Tag name XL38 OUT1_TX5 See 4.6.1 Feedback Signals Tag name XL39 OUT1_TX6 See 4.6.1 Feedback Signals Tag name XL58 OUT1_TX7 See 4.6.1 Feedback Signals Tag name XL59 OUT1_TX8 See 4.6.1 Feedback Signals Tag name XL78 OUT2_TX1 See 4.6.1 Feedback Signals Tag name XL79 OUT2_TX2 See 4.6.1 Feedback Signals Tag name XL88 OUT2_TX3 See 4.6.1 Feedback Signals Tag name XL89 OUT2_TX4 See 4.6.1 Feedback Signals Tag name SP OUT2_TX5 See 4.6.1 Feedback Signals Tag name CV OUT2_TX6 See 4.6.1 Feedback Signals Tag name AV OUT2_TX7 See 4.6.1 Feedback Signals Tag name ActStep OUT2_TX8 See 4.6.1 Feedback Signals Tag name RELON - Name of the release on signal Tag name RELOFF - Name of the release off signal Tag name PROTON - Name of the protection on signal Tag name PROTOFF - Name of the protection off signal Tag name - FIELD_AD1 Refresh time in milliseconds 200 - FIELD_AD2 ReadType (By exception) 120 - OPCEXPCLNT Allow command to OPC Y 2VAA001153C SPlus Operations P13 Connectivity Guide S+ P13 ENGINEERING WORK BOOK - TAGTYPE S+ Operation stag type DIGITAL - TAGSRC Data source for S+ Operations PROP13 - ALMGROUP Alarm group for alarm display 0, 1… - ALMREM Remote alarm processing N - FIELD_TX1 OPC DA server ABBProcontrolP13.OPC.1 - FIELD_TX3 OPC DA item name = <Object Name> FIELD_TX1 OPC AE server ABBProcontrolP13.Event.1 FIELD_TX3 OPC AE item name = <Object Name> DATA_PROC S+ Operations Data Processor PROP13.Block.P13.<type> e.g. PROP13.Block.P13.ASSX FACEPLATE Faceplate Prctrl.POP_<FaceplateName> e.g. Prctrl.POP_P13BINC - 4.6.1 Feedback Signals Control objects have various digital status signals associated which represent the state of the control object. The meaning of these feedback signals depends of the type of the control objects. Consult the corresponding Procontrol P13 documentation. Analog control objects have associated analog signals, e.g. setpoint, actual position). If the name of a feedback signal begins with an ampersand („&‟), the ampersand is replaced by the name of the control object. Feedback signals have to be defined in the Signals sheet of the S+ P13 Engineering Work book. 4.6.2 Subtypes Table 4-5: Common Subtypes for Analog Control Subtype ASS TIP x Analog Control Meaning Inching mode SET x Allows also value entry for the setpoint (besides Raise/Lower operation) RMP x Default – Raise/Lower operation only 2VAA001153C 75 SPlus Operations P13 Connectivity Guide 4.7 S+ P13 ENGINEERING WORK BOOK ID-Signals Sheet ID-Signals are only used by the Procontrol P13 Connect OPC server for command output. ID-Signals are not loaded to S+ Operations. The fields are described in the following table. Table 4-6: S+ P13 Engineering Workbook- Fields for ID-Signals 4.8 OPC Field Meaning Value Type Tag type DO Name Tag name String Descr Tag description String Bus Bus number 0,…,7 Station Station number Hex, 00,..,3F Device Device Number Hex, 00,..,FF Bit Bit Number Hex, 0,…,F Section Section 0,,… Text1 Text for 1-state Text Text0 Text for 0-state Text Priority Priority for alarm 1,…,4 EventDef Event definition: 0: No message 1: Message if Normal->Active 2: Message if Active->Normal 3: Message both directions 0,…,3 NormPos Which is normal (not active) state {0,1} Inverted Field value to be inverted {Y, N} Output Output the value {Y, N} Special Objects Sheet The following special objects are configured in this sheet: Table 4-7: S+ P13 Engineering Workbook –Special Objects Sheet Special Object Type Object Name Meaning required P13CON P13 Connectivity Serves in S+ Operations as target object for P13 system messages. yes Bus Bus <Bus Number> 37 e.g. : Bus 5 Provides data items for bus status. optional Station <BusAddr>STN<StationAddr> 38 e.g. : 5-STN3E Provides data items for station status. 39 optional The fields are described in the following table. Table 4-8: S+ P13 Engineering Workbook- Fields for Special Objects Field Object Type P13CON BUS STATION NAME e.g. P13 Connectivity e.g. BUS 5 e.g. 5-STN3E DESC Procontrol P13 Connectivity Server Bus 5 Station 3E on Bus 5 37 Name must follow this pattern. Name must follow this pattern. 39 Station monitoring must be available in the Plant and configured correctly in the OPC server. 76 38 2VAA001153C SPlus Operations P13 Connectivity Guide 4.9 S+ P13 ENGINEERING WORK BOOK PLANTUNIT 1... ALMGROUP 0, 1… FIELD_AD1 200 FIELD_AD2 120 TAGTYPE ANALOG TAGSRC PROP13 AL_REM Y FIELD_TX1 ABBProcontrolP13.OPC.1 FIELD_TX3 PServerAdmin FIELD_TX5 ABBProcontrolP13.Event.1 FIELD_TX7 System BUS 5 - DATA_PROC PROP13.Block.P13. P13CON PROP13.Block.P13.BUS PROP13.Block.P13. STATION ANALOG DIGITAL BUS 5 5-STN3E - S+ P13 Tag Engineering Workflow 4.10 OPC Server Configuration The Procontrol P13 Connect OPC Server configuration has to be entered according to the Procontrol P13 OPC server manual [3.3.3 Process Variables Engineering File]. This includes in particular buses, command channels and the pvefile name. It is a good practice to use “hierarchical” pve-files by means of the APPEND instruction. # MyProjectRoot.pve -Contains general definitions # ----------------------------------------------# Alarm event options appropriate for SPlus AEOPTIONS,7,(#) # VPC ID-Signals VPCID, XD93,XD94 … #Append process variable file generated from workbook APPEND,C:\OPC_P13\Data\MyProjectTags.pve # C:\OPC_P13\Data\MyProjectTags.pve # Generated from C:\SPlus _P13\SPlus P13TestObjects.xls - 12.12.2006 15:18:24 AIX,98ANR10AP001_XJ01,Ramp - 4 Period,5,3E,C0,0,0,100,,,,,,,,,%,-200,200,2 AIX,98ANR10AP001_XJ02,Ramp - 4 Period,5,3E,C1,0,0,100,,,,,,,,,%,-200,200,2 …. Figure 4-3: Illustration of “hierarchical” PVE-Files 2VAA001153C 77 SPlus Operations P13 Connectivity Guide S+ P13 OPC BUILDER 5. S+ P13 OPC BUILDER The S+ P13 OPC Builder extracts the data needed for the Procontrol P13 OPC server from the S+ P13 Engineering workbook and creates the corresponding pve-file to be loaded by the OPC server. Figure 5-1: User Interface of S+ P13 OPC Builders Select the paths for the S+ P13 Engineering Workbook and the target OPC Engineering File. Then generate the pvefile. Note The S+ P13 OPC Builder should be started from a local drive. If started from a network drive it has by default too less file system access permissions (“partially trusted”). 5.1 Procedure for Engineering Data Loading Table 5-1: Procedure for Engineering Data Loading Action Remark Check S+ P13 Engineering Workbook Named ranges Fields and Data Update P13 OPC Server Generate pve-File with S+ P13 OPC Builder Restart the P13 OPC Server Check OPC Server log file Update S+ Operations Tag Database Import sheet Signals (if changed) and sheet Control Objects (if changed) with S+ Operations tag database builder, (See Figure 5-2: Import Setting for Update of the S+ Tag Database) The sheet to be imported must be moved to the first sheet position in the workbook. Restart S+ Opeations The following picture shows the settings for S+ Operations tag database update import. 78 2VAA001153C SPlus Operations P13 Connectivity Guide S+ P13 OPC BUILDER Figure 5-2: Import Setting for Update of the S+ Tag Database 5.2 S+ Operations P13 Connect OPC Communication Diagnostic In order to have redundancy changeover on OPC communication failure between SPlus Operations and ABB Procontrol P13 OPC Server, It‟s necessary to create OPC Connection diagnostic tag SPlus Operations level. 5.3 OPC Diagnostic Tag To add OPC Communication diagnostic tag, Open windows registry and locate Computer > HKEY_LOCAL_MACHINE > SOFTWARE > ABB Symphony Plus > Operations > APPS > OPC > OPCInstance001 > Tagname (String Value) and provide any valid Tagname. E.g. S2P13POC. 2VAA001153C 79 SPlus Operations P13 Connectivity Guide S+ P13 OPC BUILDER Figure 5-3: Adding OPC Diagnostic Tag in Windows Registry If the defined “E.g:S2P13POC” tag name is not already present in SPlus Operations database, you‟re able to configure it later in SPlus Operations without stopping the OPC Client. Note that such tag has to be of type “ExtDig” and “Ext” as follows: 80 2VAA001153C SPlus Operations P13 Connectivity Guide S+ P13 OPC BUILDER Figure 5-4: Adding OPC Diagnostic Tag in Windows Registry The following are the diagnostic tag values associated to the communication states. Table 5-2: Diagnostic tag values for OPC DA client Connection State Diagnostic Tag Value Undefined 0 Stopped 1 Running 2 Standby 3 Connecting 4 MappingItems 5 NotConnected 6 Disabled 7 ServerNotRunning 8 WaitForConnection 9 NoResponse 10 As shown below, Configure the different alarm states using DI General Tab in the Tag Configuration of added OPC Diagnostic Tag. Since Different Alarm States being created at SPlus Operations, It must keep the Remote Alarm Processing as “NO”. 2VAA001153C 81 SPlus Operations P13 Connectivity Guide S+ P13 OPC BUILDER Figure 5-5: Configuring Different Alarm States for OPC Diagnostic Tag Figure 5-6: Configuring AL_REM flag 82 2VAA001153C OPC Diagnostic Tag S+ P13 OPC BUILDER In order to shutdown the SPlus Operations during OPC Communication failure, Configure the Task monitor as shown below: 2 3 1 4 Figure 5-7: Process Monitor In System Tray, Right on PWMONITOR and Select Process Monitor > Configurator. Click on Settings and Select Tag Configuration from drop down menu. In the Process Monitor Configuration add OPC Diagnostic Tag under Alarmed Tags to Monitor. Click on the Settings and Go to General Configuration to check “Enable Restart” Flag. Then Save and Close. 3 4 1 2 Figure 5-8: Adding OPC Diagnostic Tag in the Process Monitor After configuring OPC Diagnostic Tag in the Process Monitor, whenever OPC communication fails between S+ Operations and Procontrol P13 OPC Server, SPlus will be stopped. 2VAA001153C 83 SPlus Operations P13 Connectivity Guide S+ P13 OBJECT REFERENCE 6. S+ P13 OBJECT REFERENCE 6.1 Product Overview The S+ Operations P13 Connect Object Types provide the necessary S+ Operations object types to use S+ Operations functions for process operation and monitoring of Procontrol P13 plants. In particular, the S+ Operations P13 Connect Objects Types provide the graphical components like faceplates. 6.2 General 6.3 Colors The colors used in faceplates are defined with named logical colors. The colors are defined in corresponding color tables provided by the standard S+ Operations Display Builder. 6.4 Faceplates 6.4.1 General Structure Header Alarm/Reset Symbol <Object Name> <Object Description> Links Area Object State Area Extended Info Tabs Button Area Selector Area Control Pane Extended Info Pane Figure 6-1Faceplate General Structure Table 6-1: S+ P13 Faceplate General Structure Faceplate Scope Header Link Area Control Pane Normal X X X 84 Extended Info Pane Selector Area X 2VAA001153C SPlus Operations P13 Connectivity Guide Extended X S+ P13 OBJECT REFERENCE X X X X 6.4.2 Alarm Symbol 6.4.3 Control Object State Presentation Signal Error, Unacknowledged Channel Failure, Unacknowledged Fault, Unacknowledged Fault, Acknowledged Alarm gone, Unacknowledged No Alarm, (Alarm Gone Acknowledged) Signals Control Object Reset Button 6.4.4 Links Area Operator Note Indication Operating Parameters Last Alarms List Figure 6-2: Faceplate Links Area 6.4.5 Object State Area In the Object State Area, an object state symbol and additional information on the object state is provided. 2VAA001153C 85 SPlus Operations P13 Connectivity Guide S+ P13 OBJECT REFERENCE 6.4.6 Button Area The button area provides the button to send commands to an object; Issue a command needs a two-step operation. First, the command selection button for the desired command has to be pressed. To send the command to the object, the OK/Return button has to be pressed. Command Selection Command Output Figure 6-3: Faceplate Command Area 6.4.7 Selector Area With the selector buttons, the faceplate‟s level for details can be selected Normal Faceplate Extended Faceplate Figure 6-4: Faceplate Selector Area 6.5 Display Elements 6.5.1 General Display elements represent objects within graphics. The set of different display elements provided depends on the object type. Display elements for control objects have a layout as shown in the following figure. Additional Indicators Object Symbol Figure 6-5: Layout of Display Elements for Control Objects Table 6-2: State of Additional Indicators State of Additional Indicators Indication Right Operator Note exist for this object 86 2VAA001153C SPlus Operations P13 Connectivity Guide S+ P13 OBJECT REFERENCE Left Manual 6.6 Object Types 6.7 Binary Signals 6.7.1 Faceplates 6.7.1.1 General Structure For Binary signals provided with two tabs Parameters, Trend respectively. Figure 6-6: Binary Signal Faceplate 6.7.1.2 Status Indication Table 6-3: State of Status Indication(Faceplate) Priority State - 1 State - 0 0 1 2 3 2VAA001153C 87 SPlus Operations P13 Connectivity Guide S+ P13 OBJECT REFERENCE 4 Error 6.7.1.3 Parameters Tab Parameters show the Procontrol P13 Address of the signal Figure 6-7: Binary Signal – Parameters Tab 6.7.1.4 Trend Tab Trend Tab shows the Procontrol P13 value of the signal in trend form. Figure 6-8: Binary Signal – Trend Tab 88 2VAA001153C SPlus Operations P13 Connectivity Guide S+ P13 OBJECT REFERENCE 6.7.2 Display Elements 6.7.2.1 Display Elements LED The LED element shows the value of a binary signal as colored shape. Optionally a text can be inserted into the element. For status (Priority 0) signals, alarm and normal colors can be configured. Table 6-4: Color Mapping for LED Display Element State Error Active Acknowledged Status (Priority 0) Acknowledged Not applicable Inactive Acknowledged Acknowledged Not applicable Alarm Priority 1 Flashing Flashing Flashing Flashing Flashing Flashing Alarm Priority 2 Alarm Priority 3 Table 6-5: Input Properties for Display Element LED Property Meaning Value Default Shape Orientation of the element Rectangle Circle Circle AlarmText Optional text for active (=1) state. Text No text 40 Optional text for inactive (=0) state. Text No text 41 Background color for active (=1) state. Text plgFillColorOn Background color for inactive (=0) state. Color plgFillColorOff Text color for active (=1) state. Color plgLinesInsideOn Text color for inactive (=0) state. Color plgLinesInsideOff Frame Width Frame width of selected shape Integer 1 Alarm Text Visible If “TRUE” assigned AlarmText Visible Boolean TRUE Normal Text Visible If “TRUE” assigned NormalText Visible Boolean TRUE NormalText AlarmColor 42 Normal Color AlarmTextColor 43 Normal TextColor 44 Using the text option of the LED element, “dynamic” text elements can be created. An example is shown in Table 6-6: Color Mapping for LED Display Element with Text 40 Only for signals with priority 1 Only for signals with priority 1 42 Only for signals with priority 1 43 Only for signals with priority 1 44 Only for signals with priority 1 2VAA001153C 41 89 SPlus Operations P13 Connectivity Guide S+ P13 OBJECT REFERENCE Table 6-6: Color Mapping for LED Display Element with Text State Active Error Inactive Error Active Acknowledged 0 Acknowledged Not applicable Inactive Acknowledged Acknowledged Not applicable 1 Flashing Flashing Flashing Flashing Flashing Flashing 2 3 4 Not applicable Not applicable Using the color options of the LED element, special indications for binary signals can be created. An example is shown in Table 6-7: Sample Color Mapping for LED Display Element using Color Options Table 6-7: Sample Color Mapping for LED Display Element using Color Options Active Error Inactive Error Active Inactive Example 1 AlarmColor: PlgSetPoint AlarmTextColor: Not defined NormalColor: PlgOut NormalTextColor: Not defined Example 2 AlarmColor: PlgFillColorOff AlarmTextColor: PlgSetPoint NormalColor: PlgFillColorOff NormalTextColor: PlgOut 6.7.2.2 Display Element StatusText The Status Text element shows the value of a binary signal as colored text field. Table 6-8: Color Mapping for StatusText Display Element Priori ty 0 Inactive Error Active Acknowledged Not applicable 90 Acknowledged Inactive Acknowledged Acknowledged Not applicable 2VAA001153C SPlus Operations P13 Connectivity Guide S+ P13 OBJECT REFERENCE 1 Flashing Flashing Flashing Flashing Flashing Flashing 2 3 Table 6-9: Input Properties for Display Element StatusText Property Meaning Value Default HAlign Horizontal Alignment of the text Left Center Right Center FrameWidth Width of the rectangles frame Integer 1 AlarmText Optional text for active (=1) state. Text Alarm text of the object Optional text for inactive (=0) state. Text Normal text of the object Background color for active (=1) state. Text plgFillColorOn Background color for inactive (=0) state. Color plgFillColorOff Text color for active (=1) state. Color plgLinesInsideOn Text color for inactive (=0) state. Color plgLinesInsideOff NormalText 45 AlarmColor 46 Normal Color AlarmTextColor 47 Normal TextColor 48 Using the text option of the LED element, “dynamic” text elements can be created. In the example shown in , the following property settings have been made: AlarmText: “>” NormalText : “<” Table 6-10: Color Mapping for StatusText Display Element with Configured Texts. Priority Error 0 Active Acknowledged Acknowledged Not applicable P max Inactive Acknowledged Acknowledged Not applicable P max P max P max P max 1 P max P max Flashing P max Flashing 45 Only for signals with priority 1 Only for signals with priority 1 47 Only for signals with priority 1 48 Only for signals with priority 1 2VAA001153C 46 91 SPlus Operations P13 Connectivity Guide S+ P13 OBJECT REFERENCE 2 P max P max Flashing P max P max Flashing P max P max P max Flashing P max P max Flashing P max 3 Using the color options of the StatusText element, special indications for binary signals can be created. An example is shown in Table 6-11: Sample Color Mapping for StatusText Display Element using Color Options Table 6-11: Sample Color Mapping for StatusText Display Element using Color Options Error Active Inactive AlarmColor: PlgSetPoint AlarmTextColor: Not defined NormalColor: PlgOut NormalTextColor: Not defined AlarmColor: PlgFillColorOff AlarmTextColor: PlgSetPoint NormalColor: PlgFillColorOff NormalTextColor: PlgOut Example 1 Example 2 6.7.2.3 Display Elements Flame Table 6-12: Color mapping for Flame Display Element Priority Error Active Error Inactive Active Inactive All Table 6-13: Input Properties for Display Element Flame Property Manning Value Default Direction Direction of the flame Left Right Up Down Right 92 2VAA001153C SPlus Operations P13 Connectivity Guide S+ P13 OBJECT REFERENCE 6.7.2.4 Display Elements 1WayValve Table 6-14: Color mapping for 1WayValve Display Element Priority Error Active Error Inactive Active Inactive All Table 6-15: Input Properties for Display Element 1WayValve Property Manning Value Default Direction Direction of the flame Left Right Up Down Right 6.7.2.5 Display Element TagName The display element Tagname shows the tagname (object name). Figure 6-9: Display Element TagName 6.7.2.6 Display Element Description The display element Description shows the description text. Figure 6-10: Display Element Description 6.7.2.7 Display Element Address The display element Address shows the Procontrol address. Figure 6-11: Display Element Address Format <Bus>.<Station>.<Device>.<Bit> 2VAA001153C 93 SPlus Operations P13 Connectivity Guide S+ P13 OBJECT REFERENCE 6.7.3 Digital Input 6.7.3.1 Faceplates Figure 6-12: Digital Input Signal Faceplate Figure 6-13: Digital Input Signal Extended Faceplate 94 2VAA001153C SPlus Operations P13 Connectivity Guide S+ P13 OBJECT REFERENCE Parameters Tab Parameters show the Procontrol P13 Address of the signal. Figure 6-14: Parameters Tab Trend Tab Trend Tab shows the Procontrol P13 value of the signal in trend form. Figure 6-15: Trend Tab 2VAA001153C 95 SPlus Operations P13 Connectivity Guide S+ P13 OBJECT REFERENCE 6.7.4 Digital Output 6.7.4.1 Faceplates Figure 6-16: Digital Output Signal Faceplate 96 2VAA001153C SPlus Operations P13 Connectivity Guide S+ P13 OBJECT REFERENCE Figure 6-17: Digital Output Signal Extended Faceplate Parameters Tab Parameters show the Procontrol P13 Address of the signal. Figure 6-18: Parameters Tab 2VAA001153C 97 SPlus Operations P13 Connectivity Guide S+ P13 OBJECT REFERENCE Trend Tab Trend Tab shows the Procontrol P13 value of the signal in trend form. Figure 6-19: Trend Tab 98 2VAA001153C SPlus Operations P13 Connectivity Guide 6.8 S+ P13 OBJECT REFERENCE Analog Signals 6.8.1 Faceplates 6.8.2 General structure The faceplates for AI signals provides value and limit information. Figure 6-20: Analog Signal Faceplate Figure 6-21: Analog Signal Extended Faceplate 2VAA001153C 99 SPlus Operations P13 Connectivity Guide S+ P13 OBJECT REFERENCE 6.8.3 Parameters Tab For details on numeric and bar representation Figure 6-22: Analog Signal Faceplate – Parameters Tab 6.8.4 Trend Tab Figure 6-23: Analog Signal Faceplate 100 2VAA001153C SPlus Operations P13 Connectivity Guide S+ P13 OBJECT REFERENCE 6.8.5 Display Elements 6.8.5.1 Display Element Bar The Bar element shows the value of the analog signal as length of a bar. Additionally it shows the position and type of the limits configured for the analog signal. A corresponding coloring of the bar indicates the limit state. Display Range - High Upper Limit Lower Limit Display Range - Low Figure 6-24: AI Faceplate 6.8.5.2 Properties The following table lists the properties of the Bar element: Table 6-16: Input Properties for Display Element Bar Property Manning Value Default Orientation Orientation of the bar Horizontal Vertical Vertical 6.8.5.3 State Indication Table 6-17: Sate Indication for Bar Display Element State Normal Prio1Alarm Prio2Alarm Prio3Alarm Mode Disturbance (Error) Blinking Blinking Blinking Blinking Signal Disturbance(Bad Value) Acknowledged Unacknowledged Alarm 2VAA001153C Blinking - 101 SPlus Operations P13 Connectivity Guide S+ P13 OBJECT REFERENCE 6.8.5.4 Element Scale The Scale element can be used in combination with the bar element. The scale limits are taken form the analog signal object. Figure 6-25: Bar Element combined with Scale Element 6.8.5.5 Display Element Numeric The Numeric element shows the value of the analog signal in numeric form together with the measuring unit. The number of decimal digits are defined by the signal‟s corresponding configuration parameter (NoDecs). The limit states are indicated by colors as shown in the following table. Table 6-18: State Indication for Display Element Numeric State Acknowledged Unacknowledged Normal Flashing Alarm Prio 1 Flashing Alarm Prio 2 Flashing Alarm Prio 3 Flashing Signal Disturbance - 6.8.5.6 Display Element Value The display element Value shows the value only without the measuring unit. Figure 6-26: Display Element Value 6.8.5.7 Display Element TagName The display element Tagname shows the tagname (object name). Figure 6-27: Display Element TagName 102 2VAA001153C SPlus Operations P13 Connectivity Guide S+ P13 OBJECT REFERENCE 6.8.5.8 Display Element Description The display element Description shows the description text. Figure 6-28: Display Element Description 6.8.5.9 Display Element Address The display element Address shows the Procontrol address. Figure 6-29: Display Element Address Format <Bus>.<Station>.<Device>.<Bit> 6.8.6 Analog Input 6.8.6.1 Faceplates 6.8.6.2 General Structure The faceplate for AI signals provides value and limit information. Figure 6-30: Analog Input Signal Faceplate 2VAA001153C 103 SPlus Operations P13 Connectivity Guide S+ P13 OBJECT REFERENCE Parameters Tab For details on numeric and bar representation Figure 6-31: Parameters Tab Trend Tab Figure 6-32: Trend Tab 104 2VAA001153C SPlus Operations P13 Connectivity Guide S+ P13 OBJECT REFERENCE 6.8.7 Analog Output 6.8.7.1 Faceplates Figure 6-33: Analog Output Signal Faceplate Figure 6-34: Analog Output Signal Extended Faceplate 2VAA001153C 105 SPlus Operations P13 Connectivity Guide 6.9 S+ P13 OBJECT REFERENCE Binary Control 6.9.1 Faceplates 6.9.1.1 General structure Figure 6-35: Binary Control Faceplate 6.9.1.2 State Indication Table 6-19: State Indication State State Indication Normal State Indication Disturbed On / Open Off / Closed Opening Closing 106 2VAA001153C SPlus Operations P13 Connectivity Guide S+ P13 OBJECT REFERENCE Undefined Error 6.9.1.3 Analyze Tab The Analyze tab allows retrieving information on Release and Protection criteria for the control objects. Figure 6-36: Binary Control Faceplate – Analyze Tab 6.9.1.4 XC80 Tab The Analyze tab allows retrieving information on XC80 Telegram for the control objects. Figure 6-37: Binary Control Faceplate - XC80 Tab 2VAA001153C 107 SPlus Operations P13 Connectivity Guide S+ P13 OBJECT REFERENCE 6.9.2 Display Elements 6.9.2.1 Display Element Pump Table 6-20: Binary Control Display Element Pump State State Indication Normal State Indication Disturbed Error On Off Intermediate 108 2VAA001153C SPlus Operations P13 Connectivity Guide S+ P13 OBJECT REFERENCE 6.9.2.2 Display Element Heater Table 6-21: Binary Control Display Element Heater State State Indication Normal State Indication Disturbed Error On Off Intermediate 2VAA001153C 109 SPlus Operations P13 Connectivity Guide S+ P13 OBJECT REFERENCE 6.9.2.3 Display Element Motor Table 6-22: Binary Control Display Element Motor State State Indication Normal State Indication Disturbed Error On Off Intermediate Table 6-23: Input Properties for Display Element Motor 110 Property Meaning Value MotorText Letter inside element Any Letter or empty. Example: “M”: Motor “G” : Generator 2VAA001153C SPlus Operations P13 Connectivity Guide S+ P13 OBJECT REFERENCE 6.9.2.4 Display Element Breaker Table 6-24: Binary Control Display Element Breaker State State Indication Normal State Indication Disturbed Error ON OFF Intermediate 2VAA001153C 111 SPlus Operations P13 Connectivity Guide S+ P13 OBJECT REFERENCE 6.9.2.5 Display Element Switch Table 6-25: Binary Control Display Element Switch State State Indication Normal State Indication Disturbed Error On Off Intermediate 112 2VAA001153C SPlus Operations P13 Connectivity Guide S+ P13 OBJECT REFERENCE 6.9.2.6 Display Element Fan Table 6-26: Binary Control Display Element Fan State State Indication Normal State Indication Disturbed Error ON OFF Intermediate 2VAA001153C 113 SPlus Operations P13 Connectivity Guide S+ P13 OBJECT REFERENCE 6.9.2.7 Display Element Valve Table 6-27: Binary Control Display Element Valve State State Indication Normal State Indication Disturbed Error Open Closed Opening Closing Intermediate Table 6-28: Input Properties for Display Element Valve 114 Property Meaning Orientation Orientation element of the Value Default Horizontal Vertical Horizontal 2VAA001153C SPlus Operations P13 Connectivity Guide S+ P13 OBJECT REFERENCE 6.9.2.8 Display Element 3-Way Valve Table 6-29: Binary Control Display Element 3WayValve State State Indication Normal State Indication Disturbed Error Open Closed Intermediate Table 6-30: Input Properties for Display Element 3WayValve 2VAA001153C Property Meaning Value Default Orientation Orientation element Horizontal Vertical Horizontal FlangeOpen Allows to select the dynamic part First Second Third Third FlangeStatic Allows to select static parts First Second Third Second of the 115 SPlus Operations P13 Connectivity Guide S+ P13 OBJECT REFERENCE 6.9.2.9 Display Element Indicator Table 6-31: Binary Control Display Element Indicator State State Indication Normal State Indication Disturbed Error On Off Intermediate 116 2VAA001153C SPlus Operations P13 Connectivity Guide 6.9.2.10 S+ P13 OBJECT REFERENCE Display Element Conveyer Table 6-32: Binary Control Display Element Conveyer State State Indication Normal State Indication Disturbed Error On Off Intermediate 2VAA001153C 117 SPlus Operations P13 Connectivity Guide 6.9.2.11 S+ P13 OBJECT REFERENCE Display Element Flap Table 6-33: Binary Control Display Element Flap State State Indication Normal State Indication Disturbed Error Open Closed Intermediate 118 2VAA001153C SPlus Operations P13 Connectivity Guide 6.9.2.12 S+ P13 OBJECT REFERENCE Display Element FreqTrans Table 6-34: Binary Control Display Element FreqTrans State State Indication Normal State Indication Disturbed Error On Off Intermediate 2VAA001153C 119 SPlus Operations P13 Connectivity Guide 6.9.2.13 S+ P13 OBJECT REFERENCE Display Element GuideBlade Table 6-35: Binary Control Display Element GuideBlade State State Indication Normal State Indication Disturbed Error Open Closed Intermediate 120 2VAA001153C SPlus Operations P13 Connectivity Guide 6.9.2.14 S+ P13 OBJECT REFERENCE Display Element PressReducer Table 6-36: Binary Control Display Element PressReducer State State Indication Normal State Indication Disturbed Error Open Closed Intermediate 2VAA001153C 121 SPlus Operations P13 Connectivity Guide S+ P13 OBJECT REFERENCE 6.9.3 ASS 6.9.3.1 Faceplates Figure 6-38: ASS Faceplate Figure 6-39: ASS Extended Faceplate 122 2VAA001153C SPlus Operations P13 Connectivity Guide S+ P13 OBJECT REFERENCE 6.9.3.2 Faceplate “TIP” mode If the subtype of an ASS is defined as “TIP”, operation is of the ASS is done in the TIP mode (“inching mode”), i.e. running to the desired position as long as the Command button is pressed. The Command buttons are then provided as shown in the following picture. Figure 6-40: ASS Faceplate – TIP Mode 6.9.3.3 Feedback Signals to State Mapping Feedback Signal Signal Code Default Value Open XL18 0 1 0 0 0 0 * * Opening XL19 0 0 * 1 0 0 * * Closed XL28 0 0 1 0 0 0 * * Closing XL29 0 * 0 0 1 0 * * Disturbed XL68 0 0 0 0 0 0 1 1 Acknowledged XL69 0 * * * * * 0 1 OPEN CLOSED OPENING CLOSING INTERMEDIATE DISTURBED DISTURBED ACKN Table 6-37: Feedback Signals to State Mapping 2VAA001153C 123 SPlus Operations P13 Connectivity Guide S+ P13 OBJECT REFERENCE 6.9.4 ASM 6.9.4.1 Faceplates Figure 6-41: ASM Faceplate Figure 6-42: ASM Extended Faceplate 124 2VAA001153C SPlus Operations P13 Connectivity Guide S+ P13 OBJECT REFERENCE 6.9.4.2 Feedback Signals to State Mapping Feedback Signal Signal Code Default Value Open XL18 0 1 0 0 0 0 * * Opening XL19 0 0 * 1 0 0 * * Closed XL28 0 0 1 0 0 0 * * Closing XL29 0 * 0 0 1 0 * * Disturbed XL68 0 0 0 0 0 0 1 1 Acknowledged XL69 0 * * * * * 0 1 OPEN CLOSED OPENING CLOSING UNDEFINED DISTURBED DISTURBED ACKN Table 6-38: Feedback Signals to State Mapping 6.9.5 ASE 6.9.5.1 Faceplates Figure 6-43: ASE Faceplate 2VAA001153C 125 SPlus Operations P13 Connectivity Guide S+ P13 OBJECT REFERENCE Figure 6-44: ASE Extended Faceplate 6.9.5.2 Feedback Signals to State Mapping Feedback Signal Signal Code Default Value On XL18 0 1 0 x x Off XL28 0 0 1 x x Disturbed XL68 0 0 0 1 1 Acknowledged XL69 0 * * 0 1 ON OFF DISTURBED DISTURBED ACKN Table 6-39: Feedback Signals to State Mapping 126 2VAA001153C SPlus Operations P13 Connectivity Guide S+ P13 OBJECT REFERENCE 6.10 Setpoint Control (HST/SWV) 6.10.1 Faceplates 6.10.1.1 General structure Figure 6-45: SetPoint Faceplate 6.10.1.2 State Indication Table 6-40: State Indication State State Indication Normal State Indication Disturbed Auto/Manual Indication Lower limit reached Higher limit reached Manual In Status Symbol marked with red circle. 2VAA001153C 127 SPlus Operations P13 Connectivity Guide S+ P13 OBJECT REFERENCE Manual by disturbance In Status Symbol marked with red circle. Automatic In Status Symbol marked with red circle. Undefined In Status Symbol marked with red circle. Error 6.10.1.3 Trend Tab The Trim curves tab allows showing a trend of setpoint value, the actual value and the Control value. Figure 6-46: SetPoint Faceplate- Trend Tab 6.10.1.4 Mode Indication Setpoint control object can be configured for two modes. The corresponding indication in the Faceplates is showing in the following table. Table 6-41: Mode Indication Mode Mode Indication Mode Description Ramping Mode This mode allows to Raise and Lower the setpoint with the “+” and “-“ buttons. The setpoint cannot be input as value. Setpoint Mode This mode allows both, to Raise and Lower the setpoint with the “+” and “-“ buttons and to input the setpoint as value. 128 2VAA001153C SPlus Operations P13 Connectivity Guide S+ P13 OBJECT REFERENCE 6.10.2 Display Elements 6.10.2.1 Display Element SetPoint Table 6-42: Display Element SetPoint State State Indication Normal State Indication Disturbed Error Manual Manual by Disturbance Automatic Undefined 2VAA001153C 129 SPlus Operations P13 Connectivity Guide S+ P13 OBJECT REFERENCE 6.10.3 HST 6.10.3.1 Faceplates Figure 6-47: HST Faceplate 6.10.3.2 Feedback Signals to State Mapping Signal Code Default Value Upper limit reached XL19 0 1 0 * * * * * Lower limit reached XL29 0 0 1 * * * * * Manual XL79 0 * * 1 0 0 * * Manual by disturbance XL88 0 * * 0 1 0 * * Automatic XL89 0 * * 0 0 1 * * Disturbed XL68 0 0 0 0 0 0 1 1 Acknowledged XL69 0 0 0 0 0 0 0 1 UPPER LIMIT REACHED MANUAL MANUAL BY DISTURBANCE AUTOMATIC DISTURBED 130 DISTURBED ACKN Feedback Signal UPPER LIMIT REACHED Table 6-43: Feedback Signals to State Mapping 2VAA001153C SPlus Operations P13 Connectivity Guide S+ P13 OBJECT REFERENCE 6.10.4 SWV 6.10.4.1 Faceplates Figure 6-48: SWV Faceplate 6.10.4.2 Feedback Signals to State Mapping Feedback Signal Signal Code Default Value Upper limit reached XL19 0 1 0 x x Lower limit reached XL29 0 0 1 x x Disturbed XL68 0 0 0 1 1 Acknowledged XL69 0 0 0 0 1 UPPER LIMIT REACHED UPPER LIMIT REACHED DISTURBED DISTURBED ACKN Table 6-44: Feedback Signals to State Mapping 2VAA001153C 131 SPlus Operations P13 Connectivity Guide S+ P13 OBJECT REFERENCE 6.11 Analog Drive Control (ASI/ASP) 6.11.1 Faceplates Figure 6-49: Analog Control Faceplate 132 2VAA001153C SPlus Operations P13 Connectivity Guide S+ P13 OBJECT REFERENCE Figure 6-50: Analog Control Extended Faceplate 6.11.1.1 State Indication Table 6-45: State Indication State State Indication Normal State Indication Disturbed Auto/Manual Indication Error Manual In Status Symbol marked with red circle. Manual by Disturbance In Status Symbol marked with red circle. Automatic In Status Symbol marked with red circle. Open 2VAA001153C 133 SPlus Operations P13 Connectivity Guide S+ P13 OBJECT REFERENCE Opening Arrow flashing Close Closing Arrow flashing Undefined In Status Symbol marked with red circle. 6.11.1.2 Analyze Tab The Analyze Tab allows retreiving information on Release and Protection criteria for the control objects. Figure 6-51: Analog Control Extended Faceplate – Analyze Tab 134 2VAA001153C SPlus Operations P13 Connectivity Guide S+ P13 OBJECT REFERENCE 6.11.1.3 Trend Tab The Trim Curves tab allows showing a trend of the setpoint value, the actual value and the Control value. Figure 6-52: Analog Control Extended Faceplate – Trend Tab 6.11.1.4 XC80 Telegram Tab Figure 6-53: Analog Control Extended Faceplate – XC80 Tab 2VAA001153C 135 SPlus Operations P13 Connectivity Guide S+ P13 OBJECT REFERENCE 6.11.1.5 Limits Tab Limits provides the Mininmum and Maximum range details of AV, SP and CV. Figure 6-54: Analog Control Extended Faceplate – Limits Tab 6.11.1.6 Mode Indication Setpoint control object can be configured for two modes.The corresponding indication in the Faceplates is showing in the following table. Table 6-46: Mode Indication Mode Mode Indication Mode Description Ramping Mode This mode allows to Raise and Lower the setpoint with the “+” and “-“ buttons. The setpoint cannot be input as value. Setpoint Mode This mode allows both, to Raise and Lower the setpoint with the “+” and “-“ buttons and to input the setpoint as value. 6.11.2 Display Elements 6.11.2.1 Display Element SetPoint Table 6-47: Display Element SetPoint State State Indication Normal State Indication Disturbed Error Manual Manual by Disturbance 136 2VAA001153C SPlus Operations P13 Connectivity Guide S+ P13 OBJECT REFERENCE Automatic Undefined 6.11.2.2 Display Element Valve Table 6-48: Display Element Valve State State Indication Normal State Indication Disturbed Error Manual Manual by Disturbance Automatic Open 2VAA001153C 137 SPlus Operations P13 Connectivity Guide S+ P13 OBJECT REFERENCE Opening Close Closing Undefined 6.11.2.3 Display Element 3WayValve Table 6-49: Display Element 3-WayValve State State Indication Normal State Indication Disturbed Error Manual Manual by Disturbance 138 2VAA001153C SPlus Operations P13 Connectivity Guide S+ P13 OBJECT REFERENCE Automatic Open Opening Close Closing Undefined 2VAA001153C 139 SPlus Operations P13 Connectivity Guide S+ P13 OBJECT REFERENCE 6.11.2.4 Display Element Flap Table 6-50: Display Element Flap State State Indication Normal State Indication Disturbed Error Manual Manual by Disturbance Automatic Open Opening Close 140 2VAA001153C SPlus Operations P13 Connectivity Guide S+ P13 OBJECT REFERENCE Closing Undefined 6.11.3 Feedback Signals to State Mapping Feedback Signal Signal Code Default Value Manual XL79 0 1 0 0 * * * * * * Manual by disturbance XL88 0 0 1 0 * * * * * * Automatic XL89 0 0 0 1 * * * * * * Open XL18 0 * * * 1 0 0 0 * * Opening XL19 0 * * * 0 * 1 0 * * Closed XL28 0 * * * 0 1 0 0 * * Closing XL29 0 * * * * 0 0 1 * * Disturbed XL68 0 0 0 0 0 0 0 0 1 1 Acknowledged XL69 0 0 0 0 0 0 0 0 0 1 MANUAL MANUAL BY DISTURBANCE AUTOMATIC OPEN CLOSED OPENING CLOSING DISTURBED DISTURBED ACKN Table 6-51: Feedback Signals to State Mapping 2VAA001153C 141 SPlus Operations P13 Connectivity Guide S+ P13 OBJECT REFERENCE 6.12 Group Control GSA 6.12.1 Faceplates Figure 6-55: GSA Faceplate Figure 6-56: GSA Extended Faceplate 142 2VAA001153C SPlus Operations P13 Connectivity Guide S+ P13 OBJECT REFERENCE 6.12.2 Faceplates Indication Table 6-52: Faceplates Indication State State Indication Normal State Indication Disturbed Error ON OFF Running To ON Running To OFF UNDEFINED MANUAL / STOP 6.12.3 Step Indication The current step indication on the extended faceplates allows to monitor the current Step number in the “Running to ON” and in the “Running to OFF” state. Figure 6-57: GSA Step Indication 2VAA001153C 143 SPlus Operations P13 Connectivity Guide S+ P13 OBJECT REFERENCE 6.12.4 Analyze Tab The Analyze tab of the GSA allows retrieving information on Release and Protection criteria for start and stop of the GSA. Additionally information on step release conditions can be retrieved. Figure 6-58: GSA Faceplate-Analyze Tab 144 2VAA001153C SPlus Operations P13 Connectivity Guide S+ P13 OBJECT REFERENCE 6.12.5 Display Elements Display Element GroupSequence01 Table 6-53: Display Element GroupSequence01 State State Indication Normal State Indication Disturbed ON OFF Running To ON Running To OFF UNDEFINED STOP / MANUAL ERROR 2VAA001153C 145 SPlus Operations P13 Connectivity Guide S+ P13 OBJECT REFERENCE Feedback Signals to State Mapping Signal Code Default Value ON XL18 0 1 0 0 0 0 * * Running to ON XL19 0 0 1 * 0 0 * * OFF XL28 0 0 0 1 0 0 * * Running to OFF XL29 0 * 0 0 1 0 * * Stop or Manual XL59 0 0 0 0 0 1 * * Disturbed XL68 0 0 0 0 0 0 1 1 Acknowledged XL69 0 * * * * * 0 1 RUNNING TO ON OFF RUNNING TO OFF STOP / MANUAL DISTURBED DISTURBED ACKN Feedback Signal ON Table 6-54: Feedback Signals to State Mapping 6.13 Preselector Control 6.13.1 Faceplates 6.13.1.1 General Structure Figure 6-59: Preselector Faceplate 146 2VAA001153C SPlus Operations P13 Connectivity Guide S+ P13 OBJECT REFERENCE 6.13.1.2 State Indication The following table shows the state indication for VW4. The state Indication for VW2 and VW3 follow the same principle. Table 6-55: State Indication State State Indication Normal State Indication Disturbed Unit 1 Selected Unit 2 Selected Unit 3 Selected Unit 4 Selected Unit 1 Difference Unit 2 Selected Unit 2 Difference Unit 3 Selected Unit 3 Difference Unit 4 Selected Unit 4 Difference Unit 1 Selected Error 2VAA001153C 147 SPlus Operations P13 Connectivity Guide S+ P13 OBJECT REFERENCE 6.13.2 Feedback Signals to State Mapping Feedback Signal Signal Code Default Value Drive 1 Difference XL18 0 * 1 * * * * * * x x Drive 1 Selected XL19 0 1 0 * * * * * * x x Drive 2 Difference XL38 0 * * * 1 * * * * x x Drive 2 Selected XL39 0 * * 1 0 * * * * x x Drive 3 Difference XL58 0 * * * * * 1 * * x x Drive 3 Selected XL59 0 * * * * 1 0 * * x x Drive 4 Difference XL78 0 * * * * * * * 1 x x Drive 4 Selected XL79 0 * * * * * * 1 0 x x Disturbance XL68 0 0 0 0 0 0 0 0 0 1 1 Acknowledged XL69 0 * * * * * * * * 0 1 UNIT 1 SELECTED UNIT 1 DIFFERENCE UNIT 2 SELECTED UNIT 2 DIFFERENCE UNIT 3 SELECTED UNIT 3 DIFFERENCE UNIT 4 SELECTED UNIT 4 DIFFERENCE DISTURBED DISTURBED ACKN Table 6-56: Feedback Signals to State Mapping 6.13.3 VW2 (2 Selector) 6.13.3.1 Faceplates Figure 6-60: 2-Selector Faceplate 148 2VAA001153C SPlus Operations P13 Connectivity Guide S+ P13 OBJECT REFERENCE Figure 6-61: 2-Selector Extended Faceplate 6.13.3.2 Display Element Sel 2 Table 6-57: Display Element Sel 2 State State Indication Normal State Indication Disturbed Unit 1 Selected Unit 1 Difference Unit 2 Selected Unit 2 Difference Unit 1 Selected Error 2VAA001153C 149 SPlus Operations P13 Connectivity Guide S+ P13 OBJECT REFERENCE 6.13.4 VW3 (3 Selector) 6.13.4.1 Faceplates Figure 6-62: 3-Selector Faceplate Figure 6-63: 3-Selector Extended Faceplate 150 2VAA001153C SPlus Operations P13 Connectivity Guide S+ P13 OBJECT REFERENCE 6.13.4.2 Display Element Sel 2 Table 6-58: Display Element Sel 3 State State Indication Normal State Indication Disturbed Unit 1 Selected Unit 1 Difference Unit 2 Selected Unit 2 Selected Unit 2 Difference Unit 3 Selected Presentation of other states follows the same principle… Error 2VAA001153C 151 SPlus Operations P13 Connectivity Guide S+ P13 OBJECT REFERENCE 6.13.5 VW4 (4 Selector) 6.13.5.1 Faceplates Figure 6-64: 4-Selector Faceplate Figure 6-65: 4-Selector Extended Faceplate 152 2VAA001153C SPlus Operations P13 Connectivity Guide S+ P13 OBJECT REFERENCE 6.13.5.2 Display Element Sel 4 Table 6-59: Display Element Sel 4 State State Indication Normal State Indication Disturbed Unit 1 Selected Unit 1 Difference Unit 2 Selected Presentation of other states follows the same principle… Error 6.14 Building P13 Specific Symbols from S+ Common Symbol Library Refer to S+ Operations Common Symbol Library User Manual for building P13 specific symbols. 2VAA001153C 153 ABB AG Power Generation Mannheim GERMANY E-Mail: [email protected] www.abb.com/controlsystems ABB Pte. Ltd. Power Generation Singapore SINGAPORE E-Mail: [email protected] www.abb.com/controlsystems Docment Number 2VAA001153C ABB Inc. Power Generation Wickliffe OHIO, USA E-Mail: [email protected] www.abb.com/controlsystems