1
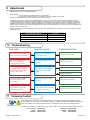
9 Adjustments
GREEN LED shows when the module is powered.
RED LED gives:
• The corresponding loop detection state in normal situation;
• The value of the oscillation frequency measurement or an error message on power ON.
Normally, the RED LED stays ON as long as the loop is in a state of detection.
On POWER ON, the sensor measures the oscillation frequency of each loop. The result of this measurement is displayed using the
corresponding RED LED. The number of flashes indicates the tens value of the frequency. For example 4 short flashes correspond to
a frequency between 40 kHz and 49 kHz. After this message the LED goes back to normal display. If the loop oscillation frequency falls
outside the limits (20 kHz to 130 kHz) the RED LED displays an error message and the sensor activates the corresponding relay. The
blinking frequency shows the type of error according to the next table. The sensor will stay in error mode until the error is cleared and the
frequency goes to the right range.
Remark: The sensor launches automatically a learning process if the oscillation frequency varies more than 10% in comparison with the
measurement value.
LOOP FREQUENCY ERROR
LED DISPLAY
Oscillation frequency too LOW or loop opened
LED blinking at 1Hz
Oscillation frequency too HIGH
LED blinking faster at 2 Hz
Loop shorted or no oscillation
LED blinking slower at 0.5 Hz
10 Troubleshooting
POSSIBLE CAUSES
SYMPTOMS
CORRECTIVE ACTION
The Loop Detector will NOT
Work. The Green LED is OFF.
There is no Power Supply
to the Loop Detector.
Check the Power Supply.
The Loop Detector will NOT
Work. The Red LED is
Flashing Slowly (0.5Hz).
The Corresponding Loop is
Shorted.
Check the Loop Cable.
The Loop Detector will NOT
Work. The Red LED Blinks
at either 1Hz or 2Hz.
The Frequency of Oscillation
Fails Outside the Allowed
Range.
The Loop LED is Detecting
Properly but the Contact
is Not Made.
Bad Connection of the Relay
Contacts.
Check Relay Connections.
Dipswiches 5 to 8 are NOT
Responding Properly.
Their Function Varies According
to Dipswitch #10 Setting.
Increase the Mircowave Rejection.
Adjust Frequency with Dipswitches.
Change Loop Turns.
11 Company Contact
Do not leave problems unresolved. If a satisfactory solution cannot be achieved after troubleshooting a problem,
please call BEA, Inc. If you must wait for the following workday to call BEA, leave the door inoperable until satisfactory
repairs can be made. Never sacrifice the safe operation of the automatic door or gate for an incomplete solution.
The following numbers can be called 24 hours a day, 7 days a week. For more information, visit www.beasensors.com.
US and Canada: 1-866-249-7937
Canada: 1-866-836-1863
Northeast: 1-866-836-1863
75.1046.05 EN 20130710
Southeast:
Midwest:
West:
1-800-407-4545
1-888-308-8843
1-888-419-2564
Page 5 of 5