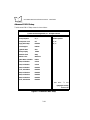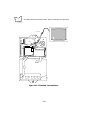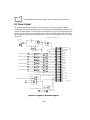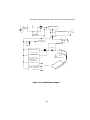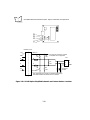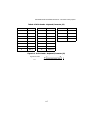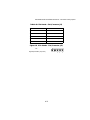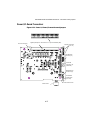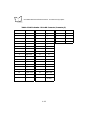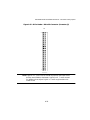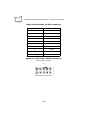
1
FMT 3000 Hardware Reference Manual About This Manual Table Of Contents Index Copyright Feedback 70-33722-01 Revision A April 1998 1998 by Symbol Technologies, Inc. All rights reserved. No part of this publication may be reproduced or used in any form, or by any electrical or mechanical means, without permission in writing from Symbol. This includes electronic or mechanical means, such as photocopying, recording, or information storage and retrieval systems. The material in this manual is subject to change without notice. The software is provided strictly on an “as is” basis. All software, including firmware, furnished to the user is on a licensed basis. Symbol grants to the user a non-transferable and non-exclusive license to use each software or firmware program delivered hereunder (licensed program). Except as noted below, such license may not be assigned, sublicensed, or otherwise transferred by the user without prior written consent of Symbol. No right to copy a licensed program in whole or in part is granted, except as permitted under copyright law. The user shall not modify, merge, or incorporate any form or portion of a licensed program with other program material, create a derivative work from a licensed program, or use a licensed program in a network without written permission from Symbol. The user agrees to maintain Symbol’s copyright notice on the licensed programs delivered hereunder, and to include the same on any authorized copies it makes, in whole or in part. The user agrees not to decompile, disassemble, decode, or reverse engineer any licensed program delivered to the user or any portion thereof. Symbol reserves the right to make changes to any software or product to improve reliability, function, or design. Symbol does not assume any product liability arising out of, or in connection with, the application or use of any product, circuit, or application described herein. No license is granted, either expressly or by implication, estoppel, or otherwise under any Symbol Technologies, Inc., intellectual property rights. An implied license only exists for equipment, circuits, and subsystems contained in Symbol products. Symbol, Spectrum One, and Spectrum24 are registered trademarks of Symbol Technologies, Inc. Other product names mentioned in this manual may be trademarks or registered trademarks of their respective companies and are hereby acknowledged. Symbol Technologies, Inc. One Symbol Plaza Holtsville, New York 11742-1300 http://www.symbol.com i Contents About This Document Overview . . . . . . . . . . . . . . . . . . . . . . . . . . . . . . . . . . . . . . . . . . . . . . . . . . . . . . . . . . . . . . . . . . . . . . i Chapter Descriptions . . . . . . . . . . . . . . . . . . . . . . . . . . . . . . . . . . . . . . . . . . . . . . . . . . . . . . . . . . . . . i Related Publications . . . . . . . . . . . . . . . . . . . . . . . . . . . . . . . . . . . . . . . . . . . . . . . . . . . . . . . . . . . . . . ii Chapter 1. Introduction FMT 3000 Features . . . . . . . . . . . . . . . . . . . . . . . . . . . . . . . . . . . . . . . . . . . . . . . . . . . . . . . . . . . . 1-1 Standard Features . . . . . . . . . . . . . . . . . . . . . . . . . . . . . . . . . . . . . . . . . . . . . . . . . . . . . . . . . . 1-1 Optional Features . . . . . . . . . . . . . . . . . . . . . . . . . . . . . . . . . . . . . . . . . . . . . . . . . . . . . . . . . . 1-4 Technical Overview . . . . . . . . . . . . . . . . . . . . . . . . . . . . . . . . . . . . . . . . . . . . . . . . . . . . . . . . . . . . 1-6 Functional Description . . . . . . . . . . . . . . . . . . . . . . . . . . . . . . . . . . . . . . . . . . . . . . . . . . . . . . . . . . 1-9 CPU. . . . . . . . . . . . . . . . . . . . . . . . . . . . . . . . . . . . . . . . . . . . . . . . . . . . . . . . . . . . . . . . . . . . . 1-9 Memory . . . . . . . . . . . . . . . . . . . . . . . . . . . . . . . . . . . . . . . . . . . . . . . . . . . . . . . . . . . . . . . . . 1-9 Communication Port Control . . . . . . . . . . . . . . . . . . . . . . . . . . . . . . . . . . . . . . . . . . . . . . . . 1-10 COM1, COM2 . . . . . . . . . . . . . . . . . . . . . . . . . . . . . . . . . . . . . . . . . . . . . . . . . . . . . . . . . . . 1-10 COM3. . . . . . . . . . . . . . . . . . . . . . . . . . . . . . . . . . . . . . . . . . . . . . . . . . . . . . . . . . . . . . . . . . 1-10 COM4. . . . . . . . . . . . . . . . . . . . . . . . . . . . . . . . . . . . . . . . . . . . . . . . . . . . . . . . . . . . . . . . . . 1-10 LCD Display . . . . . . . . . . . . . . . . . . . . . . . . . . . . . . . . . . . . . . . . . . . . . . . . . . . . . . . . . . . . . 1-11 PC/104 Expansion Interface . . . . . . . . . . . . . . . . . . . . . . . . . . . . . . . . . . . . . . . . . . . . . . . . . 1-11 Bar Code Decoder . . . . . . . . . . . . . . . . . . . . . . . . . . . . . . . . . . . . . . . . . . . . . . . . . . . . . . . . . 1-12 Keyboard Control . . . . . . . . . . . . . . . . . . . . . . . . . . . . . . . . . . . . . . . . . . . . . . . . . . . . . . . . . 1-13 Dual PC Card Slots (PCMCIA) . . . . . . . . . . . . . . . . . . . . . . . . . . . . . . . . . . . . . . . . . . . . . . . 1-13 Ethernet Interface . . . . . . . . . . . . . . . . . . . . . . . . . . . . . . . . . . . . . . . . . . . . . . . . . . . . . . . . . 1-13 Power Board (with or without digital I/O). . . . . . . . . . . . . . . . . . . . . . . . . . . . . . . . . . . . . . . 1-14 Power Supply Section . . . . . . . . . . . . . . . . . . . . . . . . . . . . . . . . . . . . . . . . . . . . . . . . . . . . . . 1-14 Battery Back-up and Battery Charger . . . . . . . . . . . . . . . . . . . . . . . . . . . . . . . . . . . . . . . . . . 1-15 Digital I/O Option. . . . . . . . . . . . . . . . . . . . . . . . . . . . . . . . . . . . . . . . . . . . . . . . . . . . . . . . . 1-15 Software Support . . . . . . . . . . . . . . . . . . . . . . . . . . . . . . . . . . . . . . . . . . . . . . . . . . . . . . . . . . . . . 1-16 Supplied System Software . . . . . . . . . . . . . . . . . . . . . . . . . . . . . . . . . . . . . . . . . . . . . . . . . . . 1-16 i FMT 3000 Hardware Reference Manual - Table Of Contents Chapter 2. Installation Introduction. . . . . . . . . . . . . . . . . . . . . . . . . . . . . . . . . . . . . . . . . . . . . . . . . . . . . . . . . . . . . . . . . . . 2-1 Starter Kit Contents . . . . . . . . . . . . . . . . . . . . . . . . . . . . . . . . . . . . . . . . . . . . . . . . . . . . . . . . . 2-2 Single Unit Purchase Contents . . . . . . . . . . . . . . . . . . . . . . . . . . . . . . . . . . . . . . . . . . . . . . . . . 2-3 Accessing the Interior of the Unit. . . . . . . . . . . . . . . . . . . . . . . . . . . . . . . . . . . . . . . . . . . . . . . . . . . 2-3 Powering the Unit . . . . . . . . . . . . . . . . . . . . . . . . . . . . . . . . . . . . . . . . . . . . . . . . . . . . . . . . . . . . . . 2-5 CMOS Setup . . . . . . . . . . . . . . . . . . . . . . . . . . . . . . . . . . . . . . . . . . . . . . . . . . . . . . . . . . . . . . . . . . 2-9 Setup Using the 4 X 40 LCD Display . . . . . . . . . . . . . . . . . . . . . . . . . . . . . . . . . . . . . . . . . . . . 2-9 Setup Using a VGA Display . . . . . . . . . . . . . . . . . . . . . . . . . . . . . . . . . . . . . . . . . . . . . . . . . . . 2-9 Connecting the Unit’s Standard Communication Interfaces . . . . . . . . . . . . . . . . . . . . . . . . . . . . . . 2-23 Connecting the Unit’s Serial Ports. . . . . . . . . . . . . . . . . . . . . . . . . . . . . . . . . . . . . . . . . . . . . . 2-23 Connecting the Unit to an Ethernet LAN . . . . . . . . . . . . . . . . . . . . . . . . . . . . . . . . . . . . . . . . 2-24 Chapter 3. Option Installation and Operation Introduction. . . . . . . . . . . . . . . . . . . . . . . . . . . . . . . . . . . . . . . . . . . . . . . . . . . . . . . . . . . . . . . . . . . 3-1 Installation Kit Parts List . . . . . . . . . . . . . . . . . . . . . . . . . . . . . . . . . . . . . . . . . . . . . . . . . . . . . 3-2 Mounting Options . . . . . . . . . . . . . . . . . . . . . . . . . . . . . . . . . . . . . . . . . . . . . . . . . . . . . . . . . . . . . . 3-3 Flat Wall Mounting Bracket . . . . . . . . . . . . . . . . . . . . . . . . . . . . . . . . . . . . . . . . . . . . . . . . . . . 3-3 Tilt Wall Mounting Enclosure . . . . . . . . . . . . . . . . . . . . . . . . . . . . . . . . . . . . . . . . . . . . . . . . . 3-5 Desk Stand . . . . . . . . . . . . . . . . . . . . . . . . . . . . . . . . . . . . . . . . . . . . . . . . . . . . . . . . . . . . . . . . 3-7 Bar Code Slot Reader and Magnetic Stripe Reader Mounting Brackets . . . . . . . . . . . . . . . . . . 3-8 PC/104 Card Installation . . . . . . . . . . . . . . . . . . . . . . . . . . . . . . . . . . . . . . . . . . . . . . . . . . . . . . . . 3-22 Digital I/O Option . . . . . . . . . . . . . . . . . . . . . . . . . . . . . . . . . . . . . . . . . . . . . . . . . . . . . . . . . . . . . 3-25 Isolated Digital Inputs . . . . . . . . . . . . . . . . . . . . . . . . . . . . . . . . . . . . . . . . . . . . . . . . . . . . . . 3-25 Relay Outputs . . . . . . . . . . . . . . . . . . . . . . . . . . . . . . . . . . . . . . . . . . . . . . . . . . . . . . . . . . . . 3-25 DC Power Output . . . . . . . . . . . . . . . . . . . . . . . . . . . . . . . . . . . . . . . . . . . . . . . . . . . . . . . . . 3-26 Battery Back-up Option Installation . . . . . . . . . . . . . . . . . . . . . . . . . . . . . . . . . . . . . . . . . . . . . . . 3-28 PC Card (PCMCIA) Installation . . . . . . . . . . . . . . . . . . . . . . . . . . . . . . . . . . . . . . . . . . . . . . . . . . 3-30 Installing Additional Memory in the 72-pin SIMM Socket . . . . . . . . . . . . . . . . . . . . . . . . . . . . . . 3-31 RS-485 Communications Option Installation . . . . . . . . . . . . . . . . . . . . . . . . . . . . . . . . . . . . . . . . 3-31 Appendix A. Connectors and Jumpers Connectors . . . . . . . . . . . . . . . . . . . . . . . . . . . . . . . . . . . . . . . . . . . . . . . . . . . . . . . . . . . . . . . . . . A-1 CPU Board Internal Connectors . . . . . . . . . . . . . . . . . . . . . . . . . . . . . . . . . . . . . . . . . . . . . . . A-2 CPU Board External Connectors . . . . . . . . . . . . . . . . . . . . . . . . . . . . . . . . . . . . . . . . . . . . . A-14 Power I/O Board Connectors . . . . . . . . . . . . . . . . . . . . . . . . . . . . . . . . . . . . . . . . . . . . . . . . A-17 Jumpers . . . . . . . . . . . . . . . . . . . . . . . . . . . . . . . . . . . . . . . . . . . . . . . . . . . . . . . . . . . . . . . . . . . . A-25 Power Board Configuration . . . . . . . . . . . . . . . . . . . . . . . . . . . . . . . . . . . . . . . . . . . . . . . . . A-25 CPU Clock Speed . . . . . . . . . . . . . . . . . . . . . . . . . . . . . . . . . . . . . . . . . . . . . . . . . . . . . . . . . A-25 CMOS Battery . . . . . . . . . . . . . . . . . . . . . . . . . . . . . . . . . . . . . . . . . . . . . . . . . . . . . . . . . . . A-26 ii FMT 3000 Hardware Reference Manual - Table Of Contents Appendix B. Specifications FMT 3000 Specifications . . . . . . . . . . . . . . . . . . . . . . . . . . . . . . . . . . . . . . . . . . . . . . . . . . . . . . . . CPU Board Technical Specifications . . . . . . . . . . . . . . . . . . . . . . . . . . . . . . . . . . . . . . . . . . . . Power, Digital I/O Board Technical Specifications. . . . . . . . . . . . . . . . . . . . . . . . . . . . . . . . . . Compliance Testing. . . . . . . . . . . . . . . . . . . . . . . . . . . . . . . . . . . . . . . . . . . . . . . . . . . . . . . . . FMT 3000 Power Usage Breakdown . . . . . . . . . . . . . . . . . . . . . . . . . . . . . . . . . . . . . . . . . . . . Dimensions . . . . . . . . . . . . . . . . . . . . . . . . . . . . . . . . . . . . . . . . . . . . . . . . . . . . . . . . . . . . . . . FMT 3000 Option Specifications . . . . . . . . . . . . . . . . . . . . . . . . . . . . . . . . . . . . . . . . . . . . . . . . . . Digital I/O Option. . . . . . . . . . . . . . . . . . . . . . . . . . . . . . . . . . . . . . . . . . . . . . . . . . . . . . . . . . Mounting Bracket Dimensions . . . . . . . . . . . . . . . . . . . . . . . . . . . . . . . . . . . . . . . . . . . . . . . . Feedback iii B-1 B-2 B-4 B-5 B-6 B-7 B-8 B-8 B-9 About This Document Overview The FMT 3000 is a compact and rugged PC compatible industrial data collection computer. Standard PC features are combined with data collection features to produce a highly integrated unit. All standard features, options and accessories are described in more detail in the following chapters. This FMT 3000 Hardware Reference Manual and the accompanying FMT 3000 Software Manual (part # 70-33721-xx) are designed to help set up and operate the FMT 3000 computer and any accessories. Chapter Descriptions The contents of each section in this hardware reference manual is listed below: t t t t t Chapter 1, Introduction provides an overview of the product. Chapter 2, Installation instructs how to setup and install the unit. Chapter 3, Option Installation and Operation instructs how to add optional components to the computer. Appendix A, Connectors and Jumpers shows all connectors, their pin definitions, and any jumpers found on the unit. Appendix B, Specifications lists specifications for the unit and available options. For information on specific software topics such as network configuration, PC Card driver setup, and bar code programming, this manual points to the appropriate sections of the FMT 3000 Software Manual. Several vendor-specific manuals are also supplied for reference information on DOS, PC Card software and bar code programming. i FMT 3000 Hardware Reference Manual - About This Manual Related Publications For detailed information on specific software topics such as network configuration, PC Card driver setup, and bar code programming, refer to the FMT 3000 Software Manual, part # 7033721-xx. For a quick overview of both this and the software manual, refer to the FMT 3000 Quick Installation Guide, part # 70-33720-xx. Included in the full manual set are: t t t t t t SystemSoft Cardsoft 3.1 Technical Reference SystemSoft Cardsoft 3.1 User’s Guide SystemSoft Cardsoft 3.1 Generic Software Customer Release Notes SystemSoft Flash File System User’s Guide Datalight ROMDOS 6.22 Welch Allyn ScanTeam 9600 Technical Manual. ii Chapter 1 Introduction FMT 3000 Features The FMT 3000 is supplied as basic unit (with or without the digital I/O option) or in a Starter Kit. Starter Kits contain the choice of external power supply (110 VAC or 220 VAC), a 2Megabyte SRAM PC Card (PCMCIA) memory card loaded with DOS (Datalight DOS or Microsoft DOS), and a set of accessory items. Starter kit accessory items include a full set of manuals (hardware reference, software reference, DOS, plus PC Card and bar code software manuals), digital I/O hardware option, wall and desk style mounting brackets, a PC/104 VGA adapter card, RS-485 adapter module, bar code wand with holder, and a AA style battery back-up pack. Standard and optional features of the FMT 3000 are described in the following sections. Standard Features PC related features, specialized data collection features and mechanical features are listed separately. PC Features t t 486-DX2 66 MHz CPU. The CPU has an internal write-through cache and math coprocessor to further enhance performance. Also, the CPU chipset and BIOS incorporates power management functions to conserve power and shutdown subsystem hardware when not in use. Includes 1 MB of DRAM on-board standard, and is expandable to 17 MBs through installing a 16 MB 72-pin SIMM memory module. The SIMM must be 70nSec or faster and operate in FPM (Fast Page Mode). 1-1 FMT 3000 Hardware Reference Manual - Introduction t t t t t t t t t ISA expansion slot in PC/104 form factor. This expansion slot is primarily intended for the PC/104 VGA adapter card option for use with an external monitor or LCD touch screen display. Alternatively, an analog or digital I/O card, solid state memory disk, or super I/O card (for floppy and hard drives, etc.) can be installed. Two general purpose PC Card (PCMCIA) slots. The top slot supports one type I, II or III card for installing a hard disk, wireless network adapter, modem or other device. The bottom slot accepts one type I or II card and is intended for holding a memory card loaded with DOS for boot up and other system software. However, either slot may be used to boot from and both slots are general purpose. Built-in 10BaseT Ethernet interface for direct connection to an existing Ethernet network. This feature makes the unit just like any other client PC on the network. Built-in 4-line by 40-character LCD display with back light. The display reflects a portion of the total video text screen according to the current position of the cursor. Alternatively, a specified fixed portion of the 80 x 25 VGA text screen can be viewed on the 4 x 40 display. Two standard RS-232 serial ports (COM1 and COM2) and an optional RS-485 adapter (COM4) for point-to-point communications. Internal PS-2 style keyboard and mouse input connectors for adding a full sized external keyboard and a mouse. Built-in speaker and connection for an additional external speaker. The speaker provides audible confirmation of bar code readings and boot-up status. A real-time clock powered by the rechargeable CMOS battery when power is not applied to the unit. Approximately 3,000 hours of clock and CMOS operation is possible from the battery without power. A jumper may be removed to disconnect the battery if extended storage of the unit is required. Internal power supply regulator accepts AC or DC voltages from 18 to 28 VAC (24 VAC nominal) or 9 to 30 VDC so that a distributed wiring system may be employed. External 110 VAC or 220 VAC power supply adapters with 24 VAC output can be used to power the unit. Also a built-in battery charger circuit is provided for the unit’s battery back-up option. Note: The unit’s power switch can be disabled, preventing an operator from accidentally turning off the unit. 1-2 FMT 3000 Hardware Reference Manual - Introduction Data Collection Features t t t Built-in bar code decoder supporting Codabar, Code 39, UPC, EAN/JAN/APN, Interleaved 2 of 5, Industrial 2 of 5, MSI, Code 11, Code 128, Matrix 2 of 5, Plessy, Code 16K, “K” Code, “WA” Code, postal code 1 and postal code red. The unit can be programmed to ignore those code types that are not used in the system. Three interface connectors support bar code wands, slot readers and laser scanners. Two DB9-pin connectors (for bar code and laser scanners) and one internal 5-pin connector (for slot readers) are provided. Fully decoded and undecoded (less expensive) laser input devices can be used. Bar code data received via the unit’s laser, bar code or slot reader connectors may be “wedged” into the keyboard making it appear as though the data was typed at the keyboard. This is performed by software drivers. Physically wedging a device into the PS2 keyboard connector is an option as well, as long as the device is designed to do so. An optional “good read” beep can be generated through the unit’s speaker, or an external speaker, when a code is successfully read. Mechanical Features t t t t t The unit’s heavy duty case is injection molded from fire-retardant ABS. The main circuit board is mounted to a metal base pan which forms the back of the unit. The hinged case seals against foam gasket material on the metal base to resist moisture and dust from entering the unit. A cutout in the base pan allows cable access to internal I/O connectors through the rear of the unit. A plate covers the cutout when not in use. When routing cables through the rear cable access opening, precautions should be taken to prevent any water from entering the unit. A removable plug at the upper right side of the case allows additional cable routing for externally mounted slot and card readers. Hinges connect the base pan to the plastic cover and provide 180 degree rotation to provide access to cabling, memory cards and the PC/104 expansion connector. The cover secures with a keyed lock at the top of the unit to prevent undesired access to internal components. The 65 key QWERTY keypad is molded from silicone rubber and sealed with a metal bezel. Clear coated keycaps prevent abrasion and wear. A polycarbonate overlay covers the metal bezel. Various I/O connectors (including bar code, laser and the COM2 port) are available at the recessed area under the case front. 1-3 FMT 3000 Hardware Reference Manual - Introduction Optional Features t t Three mounting options are available: A flat wall mounting plate, a desk mount tilt stand, and a wall mount tilt enclosure. Also, four adhesive backed rubber feet are included to rest the unit flat on a table top. The wall plate allows mounting the unit on a vertical surface. The desk mount tilt stand raises the unit at a 20 degree angle for desk top use. The tilt wall enclosure angles the unit at 26 degrees for wall mounting. Room inside this enclosure can house a power supply adapter and cabling. Brackets are available for mounting bar code slot readers and magnetic stripe readers on the left or right hand sides of the unit when used in conjunction with the above mounting options. Note: The flat wall mount plate allows mounting of slot and stripe readers on the right-hand side of the unit only. t t t t Data collection input device options include a keyboard “wedged” magnetic stripe reader (track 1 and 2), a 7.5 mil red bar code slot reader, a 7.5 mil IR bar code slot reader and a bar code laser wand. The magnetic stripe reader connects to the unit’s internal PS/2 keyboard connector through a 6-pin mini DIN plug. The 7.5 mil red and IR bar code readers interface to the unit through a 5-pin header inside the unit. The digital I/O option, which is implemented on the power I/O board of the unit, provides six optically isolated digital inputs and two digital relay outputs for applications like machine monitoring and access control. A removable terminal strip with screw-down type terminal connections allow external wires to interface with the digital inputs and outputs. COM4 on the unit primarily supports the RS-485 serial communications option. The option board plugs into a 10-pin connector on the power I/O board. The RS485 option board converts RS-232 level serial communication signals to half duplex bidirectional isolated RS-422/485. Sockets are provided on the board for custom installation of termination and line bias resistors. A 3-pin plug connector is provided for connection to an RS-485 line. Each unit contains a built-in battery charger for the optional NICAD battery backup pack. This pack mounts on top of, and plugs into, the power I/O board. It will power the unit for 20 to 90 minutes depending on which options are installed (VGA card, PC Cards, Digital I/O, etc.) and activity. An “on-battery” detect circuit senses when the input power has been lost and the battery has taken over. A “low battery” detect circuit automatically determines when the battery pack needs charging. A “very low battery” circuit sense when only a few seconds of power are left. These 1-4 FMT 3000 Hardware Reference Manual - Introduction t t t status signals allow for storing temporary buffers and for closing applications before losing power. The PC/104 VGA adapter card option allows the unit to use an external full screen monitor or LCD touch screen display. The primary use of the unit’s PC/104 connector is for VGA card installation. The built-in 4 x 40 LCD display is operational even when the VGA adapter is used. Using the VGA adapter, a pointing device, keyboard and sufficient disk space, the unit will be capable of running Windows applications. Two AC power adapters options are available for standard US and European voltages. The UL and CSA approved adapter accepts 90 - 120 VAC input (60 Hz) and provides 24 VAC output. The VDE approved adapter accepts 230 VAC input (50-60 Hz) through an IDE connector and provides 24 VAC output. Both adapters are fitted with a two pin connector to connect directly to the unit’s power I/O board. 2 Megabyte SRAM PC Cards, pre-loaded with DataLight DOS or Microsoft MSDOS, are also available separately. 1-5 FMT 3000 Hardware Reference Manual - Introduction Technical Overview The FMT 3000 is a PC in a specially designed case with specialized I/O and communications capabilities that make it particularly suitable for industrial data collection applications. A block diagram of the unit’s functional components is shown in Figure 1-1. Several views of the unit are shown in Figure 1-2 on page 1-7 and Figure 1-3 on page 1-8. 4 X 40 LCD DISPLAY 1 MB ONBOARD RAM 72-PIN SIMM SOCKET FPM 70ns or faster LPT 1 COM PORT 486DE2 CPU CONTROL COM 1 COM 2 COM 4 COM 3 BAR CODE PC/104 DECODER PS/2 KEYBD KEYBOARD PS/2 MOUSE CONTROL BAR CODE LASER MAG/SLOT SPEAKER DUAL PC CARD CONTROL KEYPAD BATTERY PACK ETHERNET CONTROL POWER SUPPLY BOARD POWER DIGITAL I/O OPTIONAL Figure 1-1. Block Diagram of the Unit 1-6 2 PC CARD SLOTS ETHERNET FMT 3000 Hardware Reference Manual - Introduction KeyLock On LED Pin 1 Pin 9 COM2 Pin 1 Pin 9 BARCODE Pin 1 Pin 9 LASER POWER On/Off Figure 1-2. Top, Front, Back, And Side Views of the Unit 1-7 FMT 3000 Hardware Reference Manual - Introduction Cable Tie Holder CPU Board Rear Cable Cut-out PCMCIA Card Ethernet Mag. Strp., COM2, Keybrd, Mouse SIMM Conn. RS-485 Opt. Conn. PC/104 Card Power, Digital I/O Card Digital I/O Opt. Conn. Keypad Cable Inside Case Front LCD Display Cable LCD Backlight Cable Side Cable Exit Hole (and plug) Figure 1-3. Open Case View of the Unit 1-8 FMT 3000 Hardware Reference Manual - Introduction Functional Description As seen in Block Diagram of the Unit on page 1-6, the unit is comprised of the following functional sections: t t t t t t t The CPU area (CPU, memory, chipset, internal bus), Communications port control (COM1-4 and LPT1 for the integral LCD display interface), PC/104 expansion interface, Bar code section (which also interfaces COM3), Keyboard control, PC Card (PCIMCA) interfaces, Ethernet control and interface, Power supply, speaker, and digital I/O option section. These functional areas are described below. CPU The CPU is a low power 486-DX2 capable of running at 33 MHz with external bus components and at 66 MHz internally. Being low power, the CPU clock can also be slowed to reduce power consumption through internal power management functions. The CPU has an internal write-through cache and math coprocessor to further enhance performance. The CPU chipset has power management features that reduce or eliminate the need for external hardware controls or software programming to monitor and control system power usage. The chipset also has other I/O lines to enable or disable COM ports, LCD backlight, the on-board speaker, the Ethernet adapter and other system components. There are 4 volume levels that the speakers may be set to (LOW, MED, HIGH, Very High). The volume level is set via “INT 2F interrupt” functionality described in Chapter 9, Custom Function Reference, of the FMT 3000 Software Manual. Memory The unit includes 1 MB of DRAM on-board. The on-board memory can be increased by installing additional memory in the 72-pin SIMM expansion connector located on the unit’s main board. The total system memory can be expanded from 1MB to 17MB (all possible combinations are: 1, 2, 3, 5, 9, and 17MB total depending on whether a 1, 2, 4, 8 or 16MB SIMM is added). The SIMM must be 70nSec or faster and operate in FPM (Fast Page Mode). 1-9 FMT 3000 Hardware Reference Manual - Introduction Note: No system setup procedures are required after installing new memory since the memory controller automatically scans the DRAM sites and determines the amount of memory. Communication Port Control The unit has four serial communications ports (COM1 - 4) and one internal parallel port (LPT1). The LPT1 port is used to interface the LCD display (described later in this section). Two dual 550 type UARTS are used to provide the 4 serial ports. COM1, COM2 Serial communications ports COM1 and COM2 are general purpose 9-pin RS-232 ports that accept and output standard RS-232 signal voltage levels. The standard DB9-pin male connector for COM1 is located inside the unit’s case, and the standard DB9-pin male connector for COM2 is located at the recessed area at the front of the unit. Using ordinary communications software, these ports can be used for any common serial communication tasks (point-to-point or external modem communications). COM3 COM3 is dedicated to interfacing to the bar code decoder. The decoder circuitry, which provides three separate bar code and magnetic card reader interfaces, is described under the Bar Code Decoder on page 1-12. Communication Port Wedging Data from COM3 can be redirected (“wedged”) into the keyboard buffer via software drivers. This allows data decoded from bar code devices appear directly in the keyboard input stream. Information on keyboard wedging is found in Chapter 4, Bar Coding, of the FMT 3000 Software Manual. COM4 COM4 is primarily dedicated to supporting the RS-485 port option board which mounts to an internal 10-pin connector on the power I/O board. The connector carries COM4’s Rx, Tx, RTS/ and CTS/ signals as well as +5 V and GND to drive the RS-485 option board. Signal inputs unused by the RS-485 interface are tied to ground. Normally, COM4 is enabled and uses IRQ 11. A category in the Setup utility (Chapter 2, Installation) allows COM4 to be disabled (or enabled), making the port assignment and associated IRQ available for use by PCMCIA or PC/104 devices. 1-10 FMT 3000 Hardware Reference Manual - Introduction RS-485 Option Board The RS-485 option board converts TTL level serial communication signals to half duplex isolated RS-422/485. Sockets are provided on the option board for customer installation of termination and line bias resistors. A 3 pin-plugable connector is provided for connection to the RS-485 line. LCD Display As shown in the Block Diagram (refer to Figure 1-1 on page 1-6), the integral 4 x 40 LCD display is driven by the LPT1 port of the “communications port section”. Internal firmware drivers control the display. The Optrix B fluid supertwist LCD display has an industry standard display window and integral backlight. Through cursor movements, a display tracker function allows the user to view a selected 4 x 40 window of video screen area. Code extracted from the BIOS ROM on boot-up and placed in upper memory controls display interface functions. See Chapter 5, LCD Display, of the FMT 3000 Software Manual for information on controlling and operating the 4 x 40 LCD display. (Also check any “Readme” text files on the utility disks supplied with the product for the latest information.) Note: LPT1 is dedicated to supporting the display and is not accessible through any general I/O connector for other use. If printing directly from the unit is required, the printer must interface the unit through a serial port or the through the network. PC/104 Expansion Interface A 16 bit PC/104 based expansion site is provided on board through a pair of socket connectors (64 and 40 standard pins). The PC/104 standard defines an ISA expansion connector in a pin and socket format for compact computer designs. The unit’s case, when closed, allows one PC/104 card to be installed. For development purposes, more than one card can be plugged in when the case is open. On the FMT 3000, the primary use for this expansion site is for VGA card installation. Alternative uses include analog and digital I/O cards, solid state memory disks, super I/O cards (for floppy and hard drives), etc. Several differences in the PC/104 expansion connector implementation on this unit from the full PC/104 standard are listed below: 1-11 FMT 3000 Hardware Reference Manual - Introduction t t t t +5 V power is supplied to the connector. +12 V, -12 V and - 5 V are not provided, however, a 4-pin Molex style header is provided on the main board to supply these voltages from an external power source if required. DMA channels 0,1 and 2 are supported. IRQ7 and IRQ 12 are reserved by the CPU board and are NOT brought out to the PC/104 connector No Bus Master support. The limitations listed may affect some analog I/O data acquisition PC/104 cards, but otherwise should have little affect on the use of the expansion site. Bar Code Decoder The bar code decoder is implemented using a microcontroller programmed with decode algorithms. The decoder communicates with the unit through COM3. The communication parameter settings are fixed at 9600 baud using space parity. Programming decoder options, such as enabling bar code symbologies or disabling reading of data from a device, is done by sending various ASCII command codes to COM3. Decoded input data can be either received through COM3, or “wedged” into the keyboard input stream, making it appear that the data was typed at the keyboard. See the FMT 3000 Software Manual for bar code programming details. Both fully decoded (more expensive) and undecoded (less expensive) laser input devices can be used, increasing flexibility and potentially reducing system cost. Three separate connectors and signal paths are provided for connection of bar code wands, slot readers, and laser scanners. Located at the front connector area on the unit is a DB9-pin connector for bar code readers and a DB9-pin connector for non-decoded lasers. The DB9 connector labeled “Barcode” is for decoded lasers or wand type devices and the DB9 connector labeled “Laser” is for undecoded laser scanners only. Inside the unit’s case is a 5pin header for connecting magnetic slot readers. The decoder circuit imposes signal polarity requirements on devices: bar code and slot devices must be black high, lasers devices must be white high. Normally, the decoder operates in a polled fashion, alternately enabling and sampling each of the three device’s data line looking for data. If only one device is used, the other two may be disabled to improve performance. Also, bar code symbologies may be eliminated to increase performance. The unit also provides for a beep to be generated by the internal speaker or external auxiliary speaker when a good read of the bar code or laser device occurs. The beep may be disabled 1-12 FMT 3000 Hardware Reference Manual - Introduction (see Chapter 9, Custom Function Reference, of the FMT 3000 Software Manual) if the bar code device generates its own “good read” beep to prevent dual good read beeps. Keyboard Control The Keyboard Control section is used to scan the integral keypad, provide external keyboard and mouse interfaces, and to interface the CPU. The connectors for the external keyboard and mouse are located inside the unit’s case. Both connectors are 6-pin mini DIN PS/2 style. Full 102 key keyboards are supported. The mouse interface is serial bus type. Although not related to the functioning of the Keyboard Control section, the main chip used in the keyboard scanner also provides the general purpose digital I/O lines used to implement the optional digital I/O interface section (described later under the Power Supply and Digital I/O section) and the speaker volume control. Dual PC Card Slots (PCMCIA) The 6720 dual slot PCMCIA controller (from CIRRUS Logic) provides full PCMCIA memory and I/O card support for two PCMCIA slots. This includes internal buffering and power control logic. A dual stacked PCMCIA connector is provided on the main board of the unit. This part stands off the PCB by 5mm to allow components to be located underneath it. Either Type I or II cards may be inserted in either slot and a Type III card is allowed in the top slot. Note: No +12 V supply is present on the board for flash programming, as many flash cards can now operate from +5 V only. Hot insertion (i.e., with power on) of PC Cards is supported (when both card and socket services are loaded) but not recommended since the case must be open to install cards. Other exposed components may be damaged or shorted if objects are accidentally dropped in the unit while the power is on. Chapter 6, PC Card Slots, of the FMT 3000 Software Manual discusses software support for PC Card or PCMCIA devices. Ethernet Interface Each unit has a built-in Ethernet controller with a twisted-pair interface. The Ethernet interface includes transmit and receive filters and diagnostic LED indicators (located inside the unit’s case). The controller performs collision detection, re-transmission, automatic polarity detection and correction on the twisted-pair, 10Base-T, cable. An 8-pin RJ-45 1-13 FMT 3000 Hardware Reference Manual - Introduction 10Base-T connector is located inside the unit’s case for connecting the device to the network. The input is transformer isolated and filtered. Chapter 3, Networking, of the FMT 3000 Software Manual describes network software support and setup. Power Board (with or without digital I/O) The power board (with or without digital I/O) plugs into the interboard connector located at the far right side of the main board of the unit. This board provides conditioning and regulation of the power source for the unit, the power on/off switch, a charger and connector for the battery back-up option and, if installed, the optional digital I/O components. All units are supplied with the basic power board. If the isolated digital I/O option was ordered, the power board contains additional components for 6 opto-isolated inputs, 2 relay outputs and a removable terminal I/O strip for wiring signals. Power Supply Section The power board accepts a wide range of AC voltages (18 to 28 VAC) so that a distributed 24 VAC wiring system may be employed. A range of DC voltages (9 to 30 VDC ) may be used to power the unit through the power board as well. To protect the unit and reduce line noise the power board employs over-voltage input protection and EMI filtering at its input. Power is connected through a two-pin connector located on the power board. The two standard AC power adapters available for the unit are fitted with a two-pin connector to connect directly to the power board. Power cables can be routed through the rear cable cutout to the interior of the unit. If a user-supplied DC source is used, the same connector should be used and the polarity of the power connection does not matter (the board has an internal bridge rectifier). The power switch extends from the board and mounts to the recessed area at the front of the unit’s case. A red LED indicates when power is on. To prevent an operator from inadvertently turning off the unit, the switch may be disabled by removing a jumper. If desired, the switch can also disconnect the back-up battery (if installed) from the circuit by removing a jumper (Refer to Appendix A, Connectors and Jumpers). A switching regulator converts the rectified and filtered input voltage to +5 VDC for internal use by the unit and any installed accessories. Power limitations of the supply are discussed in Powering the Unit on page 2-5 and in the specifications found in Appendix B, Specifications. 1-14 FMT 3000 Hardware Reference Manual - Introduction Battery Back-up and Battery Charger A Battery Back-up Option containing a 7-cell AA type NICAD pack is supported by the battery charger on the power I/O board. This pack mounts on top of and plugs into the I/O board. The pack is rated at 500mA-hours, and powers the unit for 20 to 90 minutes depending on the installed options configuration and use. A low voltage cutout circuit protects the battery from deep discharge and shuts the battery connection in case of short circuit. Other circuits monitor the battery output level and send status signals to the CPU board where the information is used to optimize battery life through automatic power management functions. Digital I/O Option If the digital I/O option was ordered, the power I/O board contains additional digital I/O components (opto-isolators, relays, screw terminator block). These optional components add 6 opto-isolated digital inputs and 2 relay outputs. Opto-isolators isolate the electronics from noisy or high voltage factory signals. The isolated inputs may be used either as high or low level voltage inputs (refer to Chapter 3, Option Installation and Operation) or as contact inputs with the addition of a wetting current source. The relay outputs use low profile, 2 amp 1 form C (single throw double throw) relays. The terminal strip for the digital I/O has 2 screw terminations (-in, +in) for each isolated digital input (channel 1 to channel 6) and 3 screw terminations (common, normally open, normally closed) for each relay output (relay 1 and relay 2). A DC output voltage source (obtained from the rectified and filtered power input) is also provided at the terminal strip. Case ground is provided on one terminal strip for shield connections. A schematic and installations instructions are provided in Chapter 3. The digital I/O lines themselves originate from the unit’s keyboard controller electronics. Programs may access the digital I/O section directly using a command set built into the controller or through the BIOS provided “INT2F interrupt” functions which greatly simplify reading and settings the digital I/O channels. Chapter 9, Custom Function Reference, of the FMT 3000 Software Manual describes how to read and set digital I/O data. Note: The basic power board configuration has the signal traces and pads for the digital I/O section, but does not have any of the optional components installed. 1-15 FMT 3000 Hardware Reference Manual - Introduction Software Support The FMT 3000 is a fully compliant DOS PC, so programs can be written for it using standard off-the-shelf programming tools. Programs written for earlier FMT models where direct display control was used will run on the FMT 3000, but will only utilize 2 lines of the 4 line display. If display tracking is used, 4 lines appear instead of 2. Supplied System Software DOS - DataLight DOS, or MS-DOS on 2 MB SRAM PC Card Network utility software SystemSoft PC Card support software Welch Allyn Bar Code support software 1-16 Chapter 2 Installation Introduction In addition to describing the contents of the FMT 3000 Starter Kit or a single unit purchase, this chapter covers the following basic topics: t t t t Accessing the interior of the unit Powering the unit and power board configuration Running the CMOS set-up Attaching and setting up network and serial communications. Refer to Chapter 3, Option Installation and Operation for descriptions and installation of accessory items including: t t t t t t t t t t Mounting options (Flat Wall, Desk, Tilt Wall Enclosure) Slot readers stripe reader wand readers associated mounting brackets PC/104 VGA card installation Digital I/O option, Battery back-up option RS-485 option PC Card (PCMCIA) installation Routing of cables inside and outside the unit. 2-1 FMT 3000 Hardware Reference Manual - Installation Where appropriate, references are made to the FMT 3000 Software Manual (part # 7033721-xx) and other supplied documentation for more information on software related topics such as network configuration, PC Card drivers, and bar code device programming. Starter Kit Contents The following items are packaged with the Starter Kit shipment: t t t t t t t t t t t t t FMT 3000 computer with digital I/O option installed 2 MB PCMCIA memory card (already installed) containing Microsoft DOS or Datalight DOS (depending on which DOS was ordered) Flat wall mount bracket Desk mounting bracket PC/104 VGA adapter card (installed) RS-485 option module (installed) Power supply (90-120 VAC in or 220 VAC in, depending on which was ordered) AA style battery back-up pack Bar code wand and wand holder Manual set (hardware, software, PC card software, bar code) Network utilities diskettes Installation kit containing the following hardware items for aiding installation and option mounting: s Keylock s cable ties s cable tie restraint s mounting screws for bracket installation s Velcro strips for battery mounting s spare wire jumpers for power option and clock speed configurations s a ferrite cable filter s hex stand-off nuts for DB9 connectors s rubber feet for the back of the unit and the desk stand mount s digital I/O terminal block. A complete list of installation kit items is provided in Chapter 3, Option Installation and Operation. 2-2 FMT 3000 Hardware Reference Manual - Installation Single Unit Purchase Contents Depending on the order, single unit purchases contain an FMT 3000 computer or an FMT 3000 computer with the digital I/O option installed and the following items: t t Installation kit containing the following items: s Keylock s cable ties s cable tie restraint s mounting screws for bracket installation s spare wire jumpers for power option and clock speed configurations s ferrite filter s rubber feet for the back of the unit s hex stand-off nuts for DB9 connectors. A complete list of installation kit items is provided in Chapter 3, Option Installation and Operation. Accessing the Interior of the Unit The case is secured with a keylock at the top of the unit and hinges down for access to the cabling and memory cards. The case seals against foam gasket material on the metal base. Operation of the keylock is shown in Figure 2-1. The keylock's pawl slides under a tab in the metal base when in the lock position. The key is supplied in the installation kit bag that ships with the unit. Two hinges connect the metal base pan of the unit to the plastic cover and provide 180 degree rotation so that the cover may hang down when the unit is open while mounted on the wall. Before using the unit, unlock the unit’s cover and connect a power source into the unit’s power supply board (see Powering the Unit on page 2-5). Also, open the unit to connect and install various optional items and cables such as the Ethernet cable, slot reader cable, external keyboard, mouse, digital I/O lines, VGA card, etc. 2-3 FMT 3000 Hardware Reference Manual - Installation KeyLock Case is locked when dots are aligned Case is unlocked when dots are 180 deg. apart Figure 2-1. Locking and Unlocking the Case Caution Always insure the power is off before opening the unit’s case. Failure to turn off the power when inserting or removing cables, boards or jumpers may damage the unit and/or accessory items. Note: After first opening the unit, notice that 3 foam pads with adhesive backing are located in the upper right cable access area (see Figure 22 on page 2-5). These pads are provided for sealing the unit when cables are feed through the cable access hole from bar code slot or magnetic stripe readers that mount to the right of the unit. Leave these pads in place even if a slot or stripe reader will not be used. Instructions for properly installing the pads are given in Chapter 3, Option Installation and Operation, in case one of these devices is installed. Whether routing cables out the side of the unit ,or through the rear cable access cut-out, use of the supplied cable tie(s) is highly recommended. Use the cable tie holder (also shown in Figure 2-2) to anchor the relevant cables. This arrangement provides strain-relief for the cables and prevents possible damage if the cables are accidentally pulled. 2-4 FMT 3000 Hardware Reference Manual - Installation Foam Pads Cable Tie Holder Cable Access Hole Cable Tie Figure 2-2. Adhesive Sealing Pad Location Powering the Unit Power plugs into the unit at connector P4 on the unit’s Power I/O board using the 2 position terminal block connected to the power supply (see the top portion of Figure 2-3 on page 2-7). Note: An additional 2 position screw type terminal block is provided in the installation kit bag to connect power from another source. The polarity of the power connection makes no difference since the power is internally rectified by the power board. Power options are shown in the lower half of Figure 2-3 on page 2-7. 1. Remove the cable cut-out cover on the back of the unit and store it for possible later use. 2-5 FMT 3000 Hardware Reference Manual - Installation 2. Feed the terminal block and cable through the cut-out area and plug the terminal block into connector P4. Be careful not to touch the exposed components within the unit to avoid possible static damage. A simplified schematic of the power board is shown in Figure 2-4 on page 2-8. The power board accepts a wide range of AC voltages (18 to 28 VAC) so that a distributed 24 VAC wiring system may be employed. A range of DC voltages (9 to 30 VDC) may be used to power the unit as well. To protect the unit and reduce line noise the power board employs over-voltage input protection and EMI filtering at its input. The power input must not exceed 35 VDC. The power switch (S1) extends from the board and mounts to the recessed area at the front of the unit’s case. A red LED indicates when power is on. To prevent an operator from inadvertently turning off the unit, the switch may be disabled by removing the jumper JP2 (refer to Figure 2-3 on page 2-7, Figure 2-4 on page 2-8, and Jumpers on page A-25). If desired, the switch can also disconnect the back-up battery option (if installed) from the circuit by removing jumper JP1. Only 1 jumper, JP1 or JP2, may be installed at a time. If JP2 is installed then JP1 must be removed. If the switch is disabled (JP2 removed) then JP1 should be installed to enable battery back-up. If battery back-up is not desired (for storage, etc.) then remove the battery connector from P1. Battery Back-up Option Installation on page 3-28, discusses installing the battery back-up pack. The power board incorporates a trickle charger to charge the optional battery back-up pack and also contains “battery on” and battery level detect circuitry. The status signals generated by this circuitry can be monitored through INT2F functions described in the FMT 3000 Software Manual. A switching regulator converts the rectified and filtered input voltage to +5 VDC for internal use by the unit and any installed accessories. The full wave rectified power input is also supplied to the DC output section of the digital I/O option if installed. For power limitations of the supply, see Appendix B, Specifications. 2-6 FMT 3000 Hardware Reference Manual - Installation Remove cable cut-out cover. Feed power cable and connector through opening. Top View Battery Connector (P1) Power Input Jack (P4) on Power I/O Board JP1 and JP2 Power I/O Board To P4 on Power Board Power Options LPP002 90-120 VAC In to 24 VAC Out LPP003 230 VAC In to 24 VAC Out User Supplied Power Source 18-28 VAC or 9-30 VDC (2 Amp Minimum Suggested) Use Power Input Plug w/screw terminals supplied in installation kit + - Figure 2-3. Power Options and Hook-Up 2-7 FMT 3000 Hardware Reference Manual - Installation P4 POWER IN (AC or DC) + POWER SHUT DOWN 1 2 1000uF +5 Vout To System VOLTAGE REGULATOR 1M .01 JP2 ENABLE S1 TO DC POWER OUT ON DIGITAL I/O SECTION OFF ON DISABLE + BATTERY SHUT DOWN 1 JP1 TRICKLE CHARGER 2 P1 BACK-UP BATTERY CON. AC OR BATTERY OPERATION DETECT AC = HIGH, BAT. = LOW To CPU Board BAT. LOW BATTERY LEVEL DETECT BAT. VERY LOW Figure 2-4. Power Board Simplified Schematic Either JP1 or JP2 should be installed, but not both at the same time. If battery back-up is not desired, remove the battery connector from P1. JP1 JP2 OUT OUT INVALID OUT IN Switch enabled and battery back-up enabled IN OUT Switch disabled and battery back-up enabled IN IN INVALID 2-8 FMT 3000 Hardware Reference Manual - Installation CMOS Setup The unit is shipped with a factory default system setup, and in most cases should not need to be modified. In general, only run the setup program if a floppy drive is added, or hard disk controller is added in the PC/104 expansion slot, or the system clock speed is changed (which also requires jumper changes). Setup Using the 4 X 40 LCD Display This setup mode is not currently supported, but will be available in the near future. Setup Using a VGA Display To use this setup mode, a VGA display monitor and installed PC/104 VGA adapter card and an external keyboard is required. The Setup program is located within the BIOS and can be activated during the power up sequence by pressing the <DEL> key. Run the BIOS Setup utility when a change to the system configuration is made, particularly if a PC/104 type floppy or hard disk drive controller card is added, to change the system clock speed, to change the power management settings, or to add or change a system password. Other minor setup options can also be configured. The BIOS Setup utility does NOT need to be run if memory is added (or removed) from the system since this is automatically detected. Also, the BIOS need NOT be changed if any PCMCIA type card is added since all PCMCIA devices are controlled through specific driver software. Caution The system may malfunction with an improperly configured setup. In almost all applications or installations, there is no need to change the system BIOS settings from the default configuration set at the factory. The BIOS Setup main screen is shown in Figure 2-5. To run one of the options, select the topic using the arrow keys and press <ENTER>. Each of the items in the main menu is briefly described. More detail is provided for each available configuration screen. Once a setup topic has been entered, exit the current setup screen by pressing the <ESC> key. To select an item to modify within a setup topic, first use the arrow keys to highlight item. Next, scroll through the options for the highlighted item using the <PgUp> or <PgDn> keys to choose the desired setting. 2-9 FMT 3000 Hardware Reference Manual - Installation Note: If you are unsure that modifications made to the BIOS settings are correct, Exit Without Saving from the main menu of setup. AMIBIOS SETUP - BIOS SETUP UTILITIES (c) 1995 American Megatrends, Inc. All Rights Reserved Standard CMOS Setup Advanced CMOS Setup Advanced Chipset Setup Power Management Setup PCI / Plug and Play Setup Peripheral Setup Change User Password Change Supervisor Password Change Language Setting Auto Configuration with Optimal Settings Auto Configuration with Fail Safe Settings Save Setting and Exit Exit Without Saving Standard CMOS setup for changing time, date, hard disk type, etc. ESC: Exit ≠Ø: Sel F2/F3: Color F10: Save & Exit Figure 2-5. BIOS Setup Main Menu Standard CMOS Setup - Changes time, date, floppy disk drive type, hard disk type(s), and enables or disables boot sector virus protection. 2-10 FMT 3000 Hardware Reference Manual - Installation Advanced CMOS Setup - Advanced setup for configuring system options: Boot-up sequence (A:, C:, etc.), Num-lock, primary display type, mouse support, enable / disable cache areas and other options. Advanced Chipset Setup - Configures chipset features: system clock speed, memory bank read write and wait states, and others. Power Management Setup - Configures power management features: system, video and hard disk power down modes and time outs. PCI / Plug and Play Setup - Configures PCI / Plug and Play features: Not applicable to this unit. Peripheral Setup - Configures peripheral features: COM port enable/disable and I/O port, parallel port enable/disable, I/O port and mode. Change User Password - Adds or changes user password. Change Supervisor Password - Adds or changes system password. Change Language Setting - Not applicable. Auto Configuration with Optimal Settings - Loads configuration settings giving highest performance. Auto Configuration with Fail Safe Settings - Loads fail safe configuration settings. Save Setting and Exit - Writes the current settings to CMOS memory and exits setup. Exit Without Saving - Exits setup without changing or saving the current settings. 2-11 FMT 3000 Hardware Reference Manual - Installation Standard CMOS Setup The Standard CMOS Setup screen is shown below: AMIBIOS SETUP - STANDARD CMOS SETUP (c) 1995 American Megatrends, Inc. All Rights Reserved Date (mm/dd/yyyy): Fri Nov 15, 1996 Time (hh/mm/ss): 08:45:55 Floppy Drive A: Not Installed Floppy Drive B: Not Installed Type Size Cyln Head Wpcom LBA Mode Blk Mode PIO Mode 32-bit Mode Pri Master: Auto On On Auto Off Pri Slave: Auto On On Auto Off Sec Master: Auto On On Auto Off Sec Slave Auto On On Auto Off Boot Sector Virus Protection: Disabled ESC: Exit ↑↓: Sel Month: Jan - Dec Day: 01 - 31 Year: 1901 - 2099 PgUp/PgDn: Modify F2/F3: Color Figure 2-6. Standard CMOS Setup 2-12 FMT 3000 Hardware Reference Manual - Installation Note: Available options and format information for the selected item is displayed in the lower left corner of the Standard CMOS Setup screen. All default settings are shown in Bold. Item Options: Date and Time: See format in lower left corner of screen shown above. Floppy Options: Not Installed, 360 KB 5π, 1.2 MB 5π, 720 KB 3∫, 1.44 MB 3∫ Hard Drive Options: (These options only apply to drives connected through a PC/104 controller card.) 1 - 46: Predefined Types USER: Enter parameters manually AUTO: Set parameters automatically on each boot CD-ROM: Use for ATAP1 CD-ROM drives Or press ENTER to set all HDD parameters automatically Hard Drive mode parameters: LBA mode: Logical Block Addressing (On/Off) Blk mode: Block (multisector) transfer (On/Off) PIO mode: Advance PIO mode (Auto, or 0 - 5) 32-bit mode: 32-bit transfer (should only enabled if supported by the HDD controller) (On/Off) Boot Sector Virus Protection: Disabled, Enabled 2-13 FMT 3000 Hardware Reference Manual - Installation Advanced CMOS Setup The Advanced CMOS Setup screen is shown below: AMIBIOS SETUP - ADVANCED CMOS SETUP (c) 1995 American Megatrends, Inc. All Rights Reserved BootUp Sequence A:, C: Available Options: BootUp Num-Lock Off C:, A: Floppy Drive Swap Disabled A:, C: Mouse Support Enabled Typematic Rate Slow Primary Display Absent Password Check Setup Internal Cache WriteThru System BIOS Cacheable Enable C000, 16k Shadow Cached C400, 16k Shadow Cached C800, 16k Shadow Disabled CC00, 16k Shadow Disabled D000, 16k Shadow Disabled D400, 16k Shadow Disabled D800, 16k Shadow Disabled DC00, 16k Shadow Disabled ESC: Exit ↑↓: Sel PgUp/PgDn: Modify F2/F3: Color Figure 2-7. Advanced CMOS Setup 2-14 FMT 3000 Hardware Reference Manual - Installation Note: Available options and format information for the selected item is displayed in right hand area of the Advanced CMOS Setup screen. All default settings are shown in Bold. Item Options: t t t t t t BootUp Sequence: BootUp Num-Lock: Floppy Drive Swap: Mouse Support: Typematic Rate: Primary Display: t Password Check: Internal Cache: System BIOS Cacheable: C000, 16k Shadow: t C400, 16k Shadow: t t C800, 16k Shadow: CC00, 16k Shadow: D000, 16k Shadow: t D400, 16k Shadow: t D800, 16k Shadow: t DC00, 16k Shadow: t t t t C:, A: or A:, C: On, Off Disabled, Enabled Disabled, Enabled Slow, Fast Absent, VGA/EGA, CGA 40X25, CGA 80X25, Mono (Select VGA/EGA when PC/104 VGA Adapter is installed) Setup, Always Disabled, WriteThru Disable, Enable Disabled, Enabled, Cached (recommended for best performance) Disabled, Enabled, Cached (recommended for best performance) Disabled, Enabled, Cached Disabled, Enabled, Cached Disabled, Enabled, Cached (must remain disabled for PCMCIA to work) Disabled, Enabled, Cached (must remain disabled for PCMCIA to work) Disabled, Enabled, Cached (must remain disabled for PCMCIA to work) Disabled, Enabled, Cached (must remain disabled for PCMCIA to work) 2-15 FMT 3000 Hardware Reference Manual - Installation Advanced Chipset Setup The Advanced Chipset Setup screen is shown below: AMIBIOS SETUP - ADVANCED CHIPSET SETUP (c) 1995 American Megatrends, Inc. All Rights Reserved Bank 0&1 Write CAS Cycle Time 2 wait Available Options: Bank 2&3 Write CAS Cycle Time 2 wait 1 wait Bank 4&5 Write CAS Cycle Time 2 wait 2 wait Bank 0&1 Read CAS Cycle Time 2 wait 3 wait Bank 2&3 Read CAS Cycle Time 2 wait Bank 4&5 Read CAS Cycle Time 2 wait SYSCLK Divisor Select CLK2IN/4 Back to Back IO Delay 3 SYSCLK Hidden AT Refresh Enable Enabled ESC: Exit ↑↓: Sel PgUp/PgDn: Modify Figure 2-8. Advanced Chipset Setup Note: Available options and format information for the selected item is displayed in right hand area of the Advanced Chipset Setup screen. All default settings are shown in Bold. Item Options: t t t t t t Bank 0&1 Write CAS Cycle Time: Bank 2&3 Write CAS Cycle Time: Bank 4&5 Write CAS Cycle Time: Bank 0&1 Read CAS Cycle Time: Bank 2&3 Read CAS Cycle Time: Bank 4&5 Read CAS Cycle Time: 1 wait, 2 wait, 3 wait (On-board 1 MB memory) 1 wait, 2 wait, 3 wait (Use 70nsec or less SIMM) 1 wait, 2 wait, 3 wait (Use 70nsec or less SIMM) 1 wait, 2 wait, 3 wait (On-board 1 MB memory) 1 wait, 2 wait, 3 wait (Use 70nsec or less SIMM) 1 wait, 2 wait, 3 wait (Use 70nsec or less SIMM) 2-16 FMT 3000 Hardware Reference Manual - Installation t SYSCLK Divisor Select: CLK2IN/3, CLK2IN/4, CLK2IN/5, CLK2IN/6 Note: Do not use CLK2IN/5 or CLK2IN/6. If the CPU is operating at 66 MHz the buss will operate at 8 MHz with CLK2IN/4 (i.e. if CPU is at 33 MHz, bus will be at 4 MHz). See Appendix A, Connectors and Jumpers, for clock jumper settings. t t Back to Back IO Delay: 0 SYSCLK, 1 SYSCLK, 2 SYSCLK, 3 SYSCLK Hidden AT Refresh Enable: Enabled, Disabled 2-17 FMT 3000 Hardware Reference Manual - Installation Power Management Setup The Power Management Setup screen is shown below: AMIBIOS SETUP - POWER MANAGEMENT SETUP (c) 1995 American Megatrends, Inc. All Rights Reserved Power Management / APM Enabled Instant On Support Disabled Disabled Green PC Monitor Power State Disabled Enabled Doze Mode CPU Clock Speed Max/2 Doze Mode Time Out 4 sec. Sleep Mode CPU Clock Speed Max/4 Sleep Mode Time Out 2 min. Video Access as an Activity Enabled Video Power Down Mode Disabled Hard Disk Power Down Mode Disabled Hard Disk Time Out (Minute) Disabled LCD Standby Time Out (Minute) Disabled Standby Time Out (Minute) Disabled Suspend Time Out (Minute) Disabled Suspend DRAM Refresh Rate Disabled Resume with Modem Ring Disabled Suspend Warning Beeps Disabled Display Activity Ignore IRQ3 Monitor IRQ4 Monitor IRQ5 Monitor IRQ7 Ignore IRQ9 Ignore IRQ10 Ignore IRQ11 Monitor IRQ12 Monitor IRQ13 Ignore IRQ14 Monitor IRQ15 Monitor Available Options: ESC: Exit ↑↓: Sel PgUp/PgDn: Modify F2/F3: Color 2-18 FMT 3000 Hardware Reference Manual - Installation Figure 2-9. Power Management Setup Note: Available options and format information for the selected item is displayed in right hand area of the Power Management Setup screen. All default settings are shown in Bold. Item Options: t t t t t t t t t t t t t t t t t t t t t t t Power Management / APM: Instant On Support: Green PC Monitor Power State: Doze Mode CPU Clock Speed: Doze Mode Time Out: Sleep Mode CPU Clock Speed: Sleep Mode Time Out: Disabled, Enabled Disabled, Enabled Disabled, Stand By, Suspend, Off Max, Max/2, Max/4, Stopped Disabled, 1 sec., 4 sec., 8 sec., 16 sec. Max, Max/2, Max/4, Stopped Disabled, 1 min. 2 min, 4 min, 6 min, 8 min, 12 min, 16 min. Video Access as an Activity: Disabled, Enabled Video Power Down Mode: Disabled, Stand By, Suspend Hard Disk Power Down Mode: Disabled, Stand By, Suspend Hard Disk Time Out (Minute): Disabled, (1 to 15) LCD Standby Time Out (Minute): Disabled, (1 to 15) Standby Time Out (Minute): Disabled, (1 to 15) Suspend Time Out (Minute): Disabled, 5, 10, 15, 20, 30, 40, 60 (This option must always be disabled) Suspend DRAM Refresh Rate: Disabled, 15 msec, 30 msec, 120 msec (This option must always be disabled) Resume with Modem Ring: Disabled, Not Accessible Suspend Warning Beeps: Disabled, Not Accessible Display Activity: Ignore, Monitor IRQ3: Ignore, Monitor (COM2 IRQ) IRQ4: Ignore, Monitor (COM1 IRQ) IRQ5: Ignore, Monitor (PCMCIA IRQ) IRQ7: Ignore, Monitor IRQ9: Ignore, Monitor (Possible network IRQ) 2-19 FMT 3000 Hardware Reference Manual - Installation t t t t t t IRQ10: IRQ11: IRQ12: IRQ13: IRQ14: IRQ15: Ignore, Monitor (Possible network IRQ) Ignore, Monitor (Bar code IRQ) Ignore, Monitor (Mouse IRQ) Ignore, Monitor Ignore, Monitor Ignore, Monitor (Bar code Decoder IRQ (COM3)) 2-20 FMT 3000 Hardware Reference Manual - Installation PCI / Plug and Play Setup The PCI/ Plug and Play Setup screen is shown below: AMIBIOS SETUP - PCI/PLUG AND PLAY SETUP (c) 1995 American Megatrends, Inc. All Rights Reserved Reserved Memory Size Disabled Reserved Memory Address C4000 Available Options: Disabled 16k 32k 64k ESC: Exit ↑↓: Sel PgUp/PgDn: Modify F2/F3: Color Figure 2-10. PCI / Plug and Play Setup Note: Available options and format information for the selected item is displayed in right hand area of the PCI/ Plug and Play Setup screen. All default settings are shown in Bold. Item Options: Reserved Memory Size: Disabled, 16k, 32k, 64k (This is the recommended setting) Reserved Memory Address: Not Accessible when the above option is disabled 2-21 FMT 3000 Hardware Reference Manual - Installation Peripheral Setup The Peripheral Setup screen is shown below: AMIBIOS SETUP - PERIPHERAL SETUP (c) 1995 American Megatrends, Inc. All Rights Reserved OnBoard FDC Auto Available Options: OnBoard Serial Port1 Auto Auto OnBoard Serial Port2 Auto Disabled OnBoard Parallel Port Auto Enabled Parallel Port Mode Normal ESC: Exit ↑↓: Sel PgUp/PgDn: Modify F2/F3: Color Figure 2-11. Peripheral Setup Note: Available options and format information for the selected item is displayed in right hand area of the Peripheral Setup screen. All default settings are shown in Bold. Item Options: OnBoard FDC: Auto, Disabled, Enabled OnBoard Serial Port1: Auto, Disabled, 3F8h, 2F8h, 3E8h, 2E8h OnBoard Serial Port2: Auto, Disabled, 3F8h, 2F8h, 3E8h, 2E8h OnBoard Parallel Port: Auto, Disabled, 378h, 278h, 3BCh Parallel Port Mode: Normal, Extended 2-22 FMT 3000 Hardware Reference Manual - Installation Connecting the Unit’s Standard Communication Interfaces This section discusses connection of the unit’s general purpose serial communications (RS232) interfaces and the 10BaseT Ethernet interface. Connection and use of data collection devices to appropriate interfaces is discussed in Chapter 3, Option Installation and Operation. To communicate using these interfaces, install and configure communications software and supply cabling. To operate any of the general purpose serial ports (COM1 and COM2), the serial communications software must be loaded on the unit’s system PCMCIA memory card or loaded from a network drive. To use the unit over a 10BaseT Ethernet network, the appropriate network driver software must be installed on the unit’s system memory card and any appropriate applications software. Disks containing the basic network software are shipped with the unit. Network software is discussed in the FMT 3000 Software Manual in Chapter 3, Networking. To initially load network software on the unit’s system memory card, remove the card and install it in another computer equipped with a PC Card (PCMCIA) slot and a 3.5” floppy diskette drive to transfer the files. This is the easiest and recommended method. Alternatively, if it is a PC/104 style drive controller and 3.5” floppy drive, run the Standard CMOS Setup (to configure the system to recognize the floppy) and transfer the files to memory card. Discussion of PC Card software (which is installed on the system memory card) is found in Chapter 6, PC Card Slots, in the FMT 3000 Software Manual. Connecting the Unit’s Serial Ports The unit has two general purpose 9-pin serial ports, COM1 and COM2. The standard DB9pin male connector for COM1 is located inside the unit’s case as shown below. COM2’s standard DB9-pin male connector is located at the recessed area at the front of the unit. 2-23 FMT 3000 Hardware Reference Manual - Installation COM1 On LED Pin 1 Pin 9 COM2 Pin 1 Pin 9 Pin 1 BARCODE Pin 9 LASER POWER On/Off Figure 2-12. COM1 and COM2 COM1 and COM2 accept and output standard RS-232 signal voltage levels. Using ordinary communications software, these ports can be used for any common serial communication tasks (point-to-point or external modem communications). When connecting a serial cable to COM1, feed the cable through the cable cut-out area at the back of the unit. Alternatively, the cable access opening at the right side of the unit may be used. Connecting the Unit to an Ethernet LAN Each unit has a built-in Ethernet controller with a twisted-pair interface for connection to the outside world. The networking support built into the computer is based on the SMC 91C94 Ethernet chip (which is software compatible with the 91C92 chip). The Ethernet chip uses a small portion of the I/O address space of the FMT 3000 (0x300) and it uses a single interrupt level (IRQ 9 or 10). 2-24 FMT 3000 Hardware Reference Manual - Installation The Ethernet interface includes transmit and receive filters and diagnostic LED indicators (located inside the unit’s case). The controller performs collision detection, re-transmission, automatic polarity detection and correction on the twisted-pair, 10Base-T, cable. An 8-pin, RJ-45 10Base-T connector is located inside the unit’s case for connecting the device to the network. The input is transformer isolated and filtered. Software support for the network functions on the unit is available from a variety of vendors. Included on the supplied network utility disk includes: t t t t NetWare VLM driver NetWare ODI driver Packet Driver Packet Driver shim (for running Packet Driver-based applications and NetWare at the same time). Refer to the FMT 3000 Software Manual for network driver installation and configuration information. The Ethernet address is permanently stored in EEPROM and is displayed when the unit boots up. 2-25 FMT 3000 Hardware Reference Manual - Installation 10BaseT Con. ACTIVITY LEDS LNK RX TX Figure 2-13. 10BaseT Ethernet Interface When connecting an Ethernet cable (with RJ-45 connectors), feed the cable through the cable cut-out area at the back of the unit and use a cable tie to secure the cable to the tie holder (Refer to Figure 2-2 on page 2-5). 2-26 Chapter 3 Option Installation and Operation Introduction This chapter provides descriptions and installation of accessory items including: t t t t t t t t Mounting options (Flat Wall Mount, Desk Stand, Tilt Wall Enclosure) Bar Code Laser Wand, Bar Code Slot reader, Magnetic Stripe reader, and associated mounting brackets and cabling PC/104 VGA Video adapter card Digital I/O option Battery Back-up option PC Card (PCMCIA) installation Upgrading memory RS-485 Communications option. Refer to the FMT 3000 Software Manual and other supplied documentation for more information on software related topics. Caution Always insure the power is off from the computer before opening the unit. Failure to turn off the power when inserting or removing cables, boards or jumpers will damage the unit and/or accessory items. 3-1 FMT 3000 Hardware Reference Guide - Option Installation and Operation Be sure to use proper static-sensitive device handling procedures (use grounded wrist-strap, avoid touching components, etc.) when handling exposed electronic devices. Installation Kit Parts List The following table lists the items contained the installation kit supplied with a Starter kit. Items appearing in Bold characters are also supplied in the installation kit shipped with single unit purchases. Refer to the part ID letter for identifying hardware items associated with installing the options discussed in this chapter. Table 3-1. Installation Kit Parts List ID Part Description Quantity Remarks A Key 1 Case key lock B Jumper 4 Used to set CPU/Power board options (clock speed, CMOS battery, power switch, back up) C 2 Terminal Plug 1 AC power connector D Cable Ferrite 1 Internal cable filter clamp: Used to filter power, VGA video and other cables if desired E 4 Inch Cable Tie 2 Cable routing F Cable Tie Holder 1 Cable routing G 4-40 x 1/4 Inch Pan Head Screw 4 PC/104 VGA card mounting HW H Fiber Washer 4 PC/104 VGA card mounting HW I 8-32 Nut 1 Bar code wand holder mounting HW J 8-32 x 1/2 Inch Flat Head Screw 1 Bar code wand holder mounting HW K 6-32 x 5/16 Pan Head Screw 4 Computer bracket mounting HW L Rubber Foot with Adhesive 4 Case back or desk stand feet M Velcro® Hook Strip 2 Battery pack to power board mounting N Velcro® Loop Strip 2 Battery pack to power board mounting O 5/16 Jackscrew 4 COM connector clip replacement HW 3-2 FMT 3000 Hardware Reference Guide - Option Installation and Operation Mounting Options If the unit will lay flat for table top use, replace the four foam pads on the back of the unit’s metal base pan with the four supplied adhesive backed rubber feet (L). To mount the unit using one of the three mounting bracket hardware options, (Flat Wall Mounting Bracket, the Tilt Wall Mount Enclosure or the Desk Stand mounting option ), install 3 of the bracket mounting screws (K) at the locations shown in Figure 3-1. Using a Phillips head screw driver, turn the screws into the screw holes until they stop. The head of each screw will protrude a short distance from the surface of the base pan to allow for insertion into the three mounting slots found on each mounting option. For Table Top use: For Mounting Option Use: Remove Foam Pads and replace with Adhesive Backed Rubber Feet. Do not remove Foam Pads and install Phillips Head Mounting Bracket Screws at locations shown. Turn screws until they stop (screw heads will protrude). Foam Pad Bracket Mounting Screws Adhesive Backed Rubber Feet Figure 3-1. Installing Rubber Feet for Table Top use and Installing Bracket Mounting Screws for Mounting Option Use Flat Wall Mounting Bracket This mounting bracket mounts the unit on a vertical surface using 4 bolts, screws or toggle bolts (not supplied), depending on the mounting surface. To mount the unit to the wall mount bracket, insert the 3 Phillips panhead mounting bracket screws (K) (supplied in the installation kit) in the unit’s metal base pan (see Figure 3-2 on page 3-4). The heads of these screws slide into the key-hole shaped slots on the bracket. Lock down the unit by inserting the remaining screw (K) (supplied in the installation kit) through the metal base pan to the wall bracket when the case is open. 3-3 FMT 3000 Hardware Reference Guide - Option Installation and Operation Front View Side View Sealing foam gaskets Wall Mount Holes Foam Gasket around cut-out Speaker cut-out Lock down screw installs here Figure 3-2. Mounting the Unit on a Wall 3-4 Wall cut-out for cable access FMT 3000 Hardware Reference Guide - Option Installation and Operation The bracket also supports a bar code slot or magnetic stripe reader mounting bracket to the right-hand side of the unit as described in Bar Code Slot Reader and Magnetic Stripe Reader Mounting Brackets on page 3-8. A cutout in the base of the unit allows cable access through the rear. A plate covers the cutout when not in use. The gaskets prevent water from entering the unit. Ensure that water does not enter the rear of the unit or wick down the cables and enter the unit. Tilt Wall Mounting Enclosure This option mounts the unit to a wall with roughly a 26˚ angle from the vertical axis (refer to Figure 3-3 on page 3-6). When attached on a vertical surface, the unit may be mounted mid-chest to waist level. The Tilt Wall Mounting Enclosure mounts to a wall with 4 to 6 bolts, screws or toggle bolts (not supplied) depending on the mounting surface. The unit, with the 3 bracket mounting screws (K) installed on its back (see Figure 3-1 on page 3-3), slides into the key-hole shaped slots on the enclosure. The case must then be opened in order to install the 4th locking screw (K) to firmly secure the unit (as shown in Figure 3-2 on page 3-4). 3-5 FMT 3000 Hardware Reference Guide - Option Installation and Operation Top 0.800" conduit hole (and plug) Front Back Left Right Left side cable access hole Bottom Tilt Wall Mount Enclosure Views 0.800" cable conduit Wall cut-out for cable access if desired Six Mounting Holes Right Side Figure 3-3. Mounting the Unit on the Tilt Wall Mounting Enclosure A key feature of the mounting enclosure is that it is completely enclosed and has sufficient interior room to house a 24 VAC power transformer, cabling and other such items. A 0.800” diameter conduit hole (and plastic hole plug) is provided on the top of the enclosure for routing power and network cabling through conduit pipe if desired. 3-6 FMT 3000 Hardware Reference Guide - Option Installation and Operation This enclosure also supports slot reader and wand holder mounting brackets to the left- or right-hand side of the unit. Desk Stand A steel desk mount stand (Figure 3-4) raises the unit at a 20 degree angle for desk top use and provides a convenient method for developers to hold the unit. The stand is made from one piece of steel and is open on all sides so that all cables are readily accessible. The unit, with 3 bracket mounting screws (K) installed on the back (refer to Figure 3-1 on page 3-3), slides into the key-hole shaped slots on the desk stand. The case must then be opened in order to install the 4th locking screw (K) to firmly secure the unit (as shown in Figure 3-2 on page 3-4). This stand also supports slot reader and wand holder mounting brackets on the left- or righthand sides of the unit. Top Front Back Left Right Bottom Install adhesive back rubber feet on the bottom of the desk stand. Bottom Right Side Figure 3-4. Mounting the Unit on the Desk Stand 3-7 FMT 3000 Hardware Reference Guide - Option Installation and Operation Bar Code Slot Reader and Magnetic Stripe Reader Mounting Brackets There are four mounting brackets designed for mounting bar code slot readers and magnetic stripe readers on the mounting options described in the previous sections. For the Tilt Wall Mounting Enclosure and the Desk Stand, the brackets can be mounted to the right- or lefthand side of the unit. For the Flat Wall Mount, brackets are mounted to the right-hand side of the unit. Separate brackets are used for the bar code slot reader and magnetic stripe reader units shown. Brackets used with the Flat Wall Mount Figure 3-5 shows the right-side mounting magnetic stripe reader bracket (LPA035) for the Flat Wall Mount and the Magnetic stripe reader track 1 & 2 with mini-DIN keyboard wedge connector (MSR-WA6920-3). Right Top Front Right Front Magnetic Stripe Reader Mounting Bracket Figure 3-5. Magnetic Stripe Reader and Mounting Bracket for the Flat Wall Mount 3-8 FMT 3000 Hardware Reference Guide - Option Installation and Operation Figure 3-6 illustrates how the magnetic stripe reader bracket mounts to the Flat Wall Mount using the supplied hardware (2 flat head screws, 2 star washers and 2 hex nuts). Star Washer Flat Head Screw Nut Star Washer Flat Head Screw Nut Bracket mounts to back side of Flat Wall Mount Figure 3-6. Attaching the Magnetic Stripe Reader Bracket to the Flat Wall Mount Figure 3-7 illustrates how to mount the magnetic stripe reader to the bracket and how to route the interface cable. To mount the reader to the bracket: 1. Remove the plug from the cable access hole on the computer. 2. Remove the screws on the back of the reader. 3. Secure the reader to the bracket with the supplied replacement screws which are slightly longer than the screws that were just removed. 4. Plug the cable connector into the PS/2 external keyboard connector (J10) as shown. The cable should route between the foam pads in the cable routing area. Refer to Chapter 4, Bar Coding, of the FMT 3000 Software Manual for magnetic stripe reader programming information. 3-9 FMT 3000 Hardware Reference Guide - Option Installation and Operation Magnetic Stripe Reader (MSR-WA6920-3) Remove original screws from back of Magnetic Stripe Reader and mount the reader to the to the bracket with the supplied longer screws Foam Pad w / hole External keyboard connector (J10) Figure 3-7. Attaching the Magnetic Stripe Reader and Routing the Cable 3-10 FMT 3000 Hardware Reference Guide - Option Installation and Operation Figure 3-8 shows the right-side mounting bar code slot reader bracket (LPA036) for the Flat Wall Mount and the 7.5 mil Red or 7.5 IR slot readers (BCS220 or BCS221). Right Top Front Right Front Mounting Bracket Bar Code Slot Reader Figure 3-8. Bar Code Slot Reader and Mounting Bracket for the Flat Wall Mount Figure 3-9 illustrates how the bar code slot reader bracket mounts to the Flat Wall Mount using the supplied hardware (2 flat head screws, 2 star washers and 2 hex nuts). Star Washer Flat Head Screw Nut Star Washer Flat Head Screw Nut Bracket mounts to back side of Flat Wall Mount Figure 3-9. Attaching the Bar Code Slot Reader Bracket to the Flat Wall Mount 3-11 FMT 3000 Hardware Reference Guide - Option Installation and Operation Figure 3-10 illustrates how to mount the bar code slot reader to the bracket and route the interface cable. 1. Remove the plug from the cable access hole on the computer. 2. Push the reader interface cable into cable channels on the back of the slot reader as shown (this allows it to mount flat on the bracket and aligns the cable with the cable access hole on the computer). 3. Secure the reader to the bracket with the supplied screws. 4. Plug the 5-pin slot reader cable connector into decoded slot reader connector (J12) as shown. The cable should route between the foam pads in the cable routing area. Refer to the FMT 3000 Software Manual for bar code programming information. Bar Code Slot Reader (BCS220 or BCS221) Mount the reader to the to the bracket with the supplied screws Route the reader's interface cable into recessed areas on back of unit as shown Foam Pad w/ hole 5-pin decoded Slot Reader input (J12) Figure 3-10. Attaching the Bar Code Slot Reader and Routing the Cable 3-12 FMT 3000 Hardware Reference Guide - Option Installation and Operation Brackets used with the Tilt Wall Enclosure and the Desk Stand Figure 3-11 shows the reversible bracket (LPA033) for mounting the magnetic stripe reader (MSR-WA6920-3) on the Tilt Wall Enclosure or Desk Stand. Also shown is the reversible bracket (LPA034) for mounting the 7.5 mil Red or 7.5 IR bar code slot readers (BCS220 or BCS221) on the Tilt Wall Enclosure or Desk Stand. Left Top Left Front Top Front Magnetic Stripe Reader Bracket Bar Code Slot Reader Bracket Figure 3-11. Magnetic Stripe Reader Bracket and Bar Code Slot Reader Bracket for use with the Tilt Wall Enclosure and Desk Stand Mounting Options 3-13 FMT 3000 Hardware Reference Guide - Option Installation and Operation Figure 3-12 illustrates how to mount the magnetic stripe reader bracket to the right-side of the Tilt Wall Enclosure. Front Flat Head Screw Threaded holes Flat Head Screw Right Figure 3-12. Attaching the Magnetic Stripe Reader Bracket to the Right Side of the Tilt Wall Enclosure 3-14 FMT 3000 Hardware Reference Guide - Option Installation and Operation Figures 3-13 and 3-14 illustrate how to mount the magnetic stripe reader to the bracket and how to route the interface cable. To mount the reader to the bracket: 1. Remove the plug from the cable access hole on the computer. 2. Remove the screws on the back of the reader. 3. Secure the reader to the bracket with the supplied replacement screws which are slightly longer than the screws that were just removed. 4. Plug the cable connector into the PS/2 external keyboard connector (J10) as shown. The cable should route between the foam pads in the cable routing area. Refer to Chapter 4, Bar Coding, of the FMT 3000 Software Manual for magnetic stripe reader programming information. Remove original screws from back of Magnetic Stripe Reader and mount the reader to the to the bracket with the supplied longer screws Magnetic Stripe Reader Right Figure 3-13. Attaching the Magnetic Stripe Reader External keyboard connector (J10) Figure 3-14. Attaching the Magnetic Stripe Reader and Routing the Cable (Right Side Tilt Wall Enclosure) 3-15 FMT 3000 Hardware Reference Guide - Option Installation and Operation Figures 3-15 and 3-16 show how to mount the magnetic stripe reader on the left side of the enclosure and route the interface cable. In this case, the interface cable must be routed through the left side cable access hole of the enclosure, then through the cable cut-out on the back of the computer unit. Threaded holes Left Feed cable through left side cable access hole Figure 3-15. Attaching the Magnetic Stripe Reader Feed cable through cut-out External keyboard connector (J10) Figure 3-16. Attaching the Magnetic Stripe Reader and Routing the Cable (Left Side Tilt Wall Enclosure) 3-16 FMT 3000 Hardware Reference Guide - Option Installation and Operation Figure 3-17, Figure 3-18, and Figure 3-19 show how to mount the bar code slot reader on the right- or left-hand side of the enclosure and how to route the interface cable. Note the routing of the reader interface cable on the back of the reader in each case. Front Flat Head Screw Threaded holes Flat Head Screw Right Figure 3-17. Attaching the Bar Code Slot Reader Bracket to the Right Side of the Tilt Wall Enclosure 3-17 FMT 3000 Hardware Reference Guide - Option Installation and Operation Front Mount the reader to the Rear View Showing cable routing on back of reader to the bracket with the supplied screws Bar Code Slot Reader Right 5-pin decoded Slot Reader input (J12) Figure 3-18. Attaching the Bar Code Slot Reader and Routing the Cable (Right Side Tilt Wall Enclosure) 3-18 FMT 3000 Hardware Reference Guide - Option Installation and Operation Rear View Showing cable routing on back of reader Threaded holes Feed cable through left side cable access hole Feed cable through cut-out 5-pin decoded Slot Reader input (J12) Figure 3-19. Attaching the Bar Code Slot Reader and Routing the Cable (Left Side Tilt Wall Enclosure) 3-19 FMT 3000 Hardware Reference Guide - Option Installation and Operation Figure 3-20 shows examples of how the bar code slot and magnetic stripe readers mount on the Desk Stand option. To mount the brackets to the left- or right-hand side of the Desk Stand, see the instructions for the Tilt Wall Enclosure. Figure 3-20. Example Bar Code Slot Reader and Magnetic Stripe Reader Mounting for the Desk Stand 3-20 FMT 3000 Hardware Reference Guide - Option Installation and Operation Bar Code Laser Wand and Holder Installation The bar code wand (supplied in starter kits) connects to the DB9 connector labeled “Barcode” on the front recessed area of the computer (refer to Figure 3-21). When inserting the connector make sure the connector clips securely around the quick-connect clips of the port. If a bar code input device which does not have quick-connect clips is installed, remove the connector clips around the port and install the hex stand-off nuts (O) supplied in the installation kit bag (Figure 3-22). Bar Code Wand On LED Pin 1 Pin 9 COM2 Pin 1 Pin 9 Pin 1 BARCODE Connector Snaps into Quick-Connect Pin 9 LASER POWER On/Off For undecoded input devices (triggered laser readers) For decoded input devices (input wand, bar code slot readers) Clip Figure 3-21. Bar Code Laser Wand Installation Remove Clip Install stand-off nuts Figure 3-22. Installing Hex Stand-off Nuts if Required 3-21 FMT 3000 Hardware Reference Guide - Option Installation and Operation The holder for the bar code wand can install on the right- or left-hand side of the Desk Stand or the Tilt Wall Mount Enclosure using the nut and screw (I, J) supplied with the installation kit and the rubber pad supplied with the wand holder. Pre-drilled hole locations for mounting the wand holder are also shown. Tilt Wall Enclosure Desk Stand Wand Holder Mounts Here Left Wand Holder Mounts Here Left Right Right Figure 3-23. Example Bar Code Wand Holder Installation PC/104 Card Installation The PC/104 expansion slot on the unit is primarily intended for the PC/104 VGA adapter card option which is shipped with starter kits. Due to the depth of the computer’s case, only one PC/104 card can be installed. Additional cards can be installed to support application development as long as the case is kept open and the limits of the power supply are not exceeded. If the VGA card is not used, other PC/104 cards such as a super I/O card (floppy or hard disk controller), or an analog or digital data acquisition board can be installed. If the other card requires -12 V, -5 V or +12 V voltages, then they must be supplied through the PC/ 104 Auxiliary Power connector (J13) on the CPU board (refer to Appendix B, Specifications). 3-22 FMT 3000 Hardware Reference Guide - Option Installation and Operation The box containing the PC/104 VGA option card also includes a ribbon adapter cable for converting the 10-pin rectangular video connector on the card to a standard DB15 connector for a VGA monitor. A user manual for the VGA card is also shipped with the VGA option. Before installing the card, turn off or remove power to the unit. Caution Failing to turn off the power when inserting or removing boards may damage the unit. To install the PC/104 VGA card: 1. Unlock and open the unit’s case. 2. Align the two rows of PC/104 headers on the card directly over the dual row PC/104 connector (J4) on the unit. Make sure all pins on the card properly align with the holes on the connector J4. 3. Gently push the card in place until the bottom of the card rests on top of the standoff posts installed (at the factory) on the CPU board. 4. Locate the small bag containing 4 screws (G) and 4 small fiber washers (H) in the installation kit. 5. Secure the VGA card to the stand-off posts using the washers and screws. 6. Install the video out ribbon cable and the power cable into the Ferrite Filter clamp (D) supplied in the installation kit as shown in Figure 3-22 on page 3-21. 3-23 FMT 3000 Hardware Reference Guide - Option Installation and Operation To VGA Monitor Ferrite Filter Video Out Power In CN2 CN3 CN1 Figure 3-24. PC/104 VGA Card Installation 3-24 FMT 3000 Hardware Reference Guide - Option Installation and Operation Digital I/O Option The digital I/O option, if originally ordered with the unit, is implemented on the power board of the unit. Note: If this option was not ordered the power board will not have any of the optional components (opto-isolators, relay, or screw terminators) mounted or soldered in. Six optically isolated digital inputs and two digital relay outputs for applications like machine monitoring and access control are provided. Also provided is a removable terminal strip with screw-down type terminal connections which allow external wires to interface with the digital inputs and outputs. The terminal block’s connections accept up to 18 AWG wire (0.823 mm2). The unit’s keyboard controller (a 81C51SL chip) controls the digital inputs and outputs. The INT2F interrupt simplifies reading and setting the digital I/O channels. Refer to Chapter 9, Custom Function Reference, of the FMT 3000 Software Manual for information on programming digital I/O functions. Figure 3-25 on page 3-26 shows a schematic diagram of the digital I/O option. Isolated Digital Inputs These six inputs have opto-isolators to isolate the electronics from noisy or high voltage factory signals. The inputs may be used either as high or low level voltage inputs or as contact inputs with the addition of a wetting current source (which may come from the DC power out lines on the board, see below). The input voltage range for turning an input “On” is from 4 VDC to 28 VDC. The inputs can withstand 35 VDC without damage. Relay Outputs The two relay outputs use low profile, 2 amp, form C relays. A transistor drive converts the TTL signals from the controller chip to the relay control voltage. The relay’s contacts have a 2 Amp maximum current rating for switching 30 VDC, and a maximum 0.5 Amp current rating for switching 125 VAC. 3-25 FMT 3000 Hardware Reference Guide - Option Installation and Operation DC Power Output DC power is available at the digital I/O terminal block for powering external devices controlled by the outputs or supplying power to devices which generate digital signals (to be read by the digital inputs). The top portion of the schematic (Figure 3-25) shows that the DC power out line is the full-wave rectified output of the unit’s power source. With 24 (RMS) VAC applied to the power input, approximately 32 VDC will be available at the DC power out pin (21). TO BOARD VOLTAGE REGULATOR 24 VAC POWER IN or 8 - 30 VDC P4 + 1 2 1000uF 1M .01 OPTO-ISOLATORS 4.7K 1/4W TO INTERFACE CIRCUITRY DC POWER OUT+ 21 DC POWER GND 20 CASE GND 19 CHAN 1 + 18 CHAN 1 - 17 CHAN 2 + 16 CHAN 2 - 15 CHAN 3 + 14 CHAN 3 - 13 CHAN 4 + 12 .01uF .01uF 4.7K 1/4W TO INTERFACE CIRCUITRY .01uF .01uF 4.7K 1/4W TO INTERFACE CIRCUITRY .01uF .01uF 4.7K 1/4W TO INTERFACE CIRCUITRY .01uF CHAN 4 - 11 CHAN 5 + 10 .01uF 4.7K 1/4W TO INTERFACE CIRCUITRY .01uF CHAN 5 - 9 CHAN 6 + 8 CHAN 6 - 7 .01uF 4.7K 1/4W TO INTERFACE CIRCUITRY .01uF .01uF NC COM 6 RELAY 2 NO 4 NC COM TO DRIVE AND INTERFACE CIRCUITRY NO RELAY 2 SPDT TO DRIVE AND INTERFACE CIRCUITRY RELAY 1 SPDT Figure 3-25. Digital I/O Schematic Diagram 3-26 5 3 RELAY 1 2 1 FMT 3000 Hardware Reference Guide - Option Installation and Operation 24 VAC POWER IN or 8 - 30 VDC P4 + POWER SHUT DOWN 1 2 1000uF +5 Vout To System VOLTAGE REGULATOR 1M .01 JP2 ENABLE S1 TO DC POWER OUT ON DIGITAL I/O SECTION OFF ON DISABLE + BATTERY SHUT DOWN 1 JP1 TRICKLE CHARGER 2 P1 BACK-UP BATTERY CON. AC OR BATTERY OPERATION DETECT AC = HIGH, BAT. = LOW BAT. LOW To CPU Board BATTERY LEVEL DETECT BAT. VERY LOW Figure 3-26. Simplified Power Diagram 3-27 FMT 3000 Hardware Reference Guide - Option Installation and Operation Battery Back-up Option Installation The Battery back-up (TMA017) is a 500 mA-Hr pack consisting of 7 Nickel-Cadmium (NiCd) cells shrink-wrapped and connected in series for a 8.4 VDC nominal voltage. The pack includes wires and a connector to plug into the power board. The Ni-Cd cells are a hightemperature type which offer superior performance for trickle charge stand-by use over standard cells. The battery pack is shipped uncharged and must be installed and charged in the unit for 48 hours before it reaches rated capacity. The battery pack is attached to the power I/O board with the supplied pressure sensitive Velcro tape (M, N). Refer to Figure 3-27 on page 3-29 and the following instructions to install the battery pack: 1. Attach the Velcro hook pads to the battery pack as shown. 2. Press the Velcro loop pads onto the hook material then remove the adhesive backing from the loop pads. 3. Turn the battery pack over and affix it to the power board as shown. 4. Plug the battery connector into P1 on the power board and install a jumper (B) into JP1 which is also on the power board (refer to Appendix A, Connectors and Jumpers). 3-28 FMT 3000 Hardware Reference Guide - Option Installation and Operation Approx. 0.2" Approx. 0.2" Cable End Hook Side Press Loop Pads on to Hook Material and Remove Adhesive Back on Loop Pads Press Gently to Affix to Board Battery Input P1 JP1 and JP2 Figure 3-27. Installing the Battery Back-up Option Installing JP1 allows the battery to charge even when the unit’s power switch is off. If desired, the unit’s power switch can disconnect the back-up battery option from the circuit if JP1 removed. Only one of the two jumpers shown, JP1 or JP2, may be installed at a time. If JP2 is installed then JP1 must be removed. If the switch is disabled (JP2 removed) then JP1 should 3-29 FMT 3000 Hardware Reference Guide - Option Installation and Operation be installed to enable battery back-up. If battery back-up is not desired (for storage, etc.) then remove the battery connector from P1. Note: The double sided adhesive tape that is included with the battery pack itself is not used for installing the pack in the unit and may be discarded. PC Card (PCMCIA) Installation Two general purpose PC Card (PCMCIA) slots are provided on the computer. The top slot (slot 1) supports one type I, II or III card for installing a hard disk, wireless network adapter, modem or other device. The bottom slot (slot 0) accepts one type I or II card and is intended for holding a memory card loaded with DOS for boot up and other system software. SystemsoftTM PCMCIA card and socket service software is already installed on the SRAM card supplied in units shipped in starter kits. This software allows the computer to configure and recognize the PC Cards installed in the slots. For more information on this software see the FMT 3000 software and SystemSoft manuals. Some PC Cards, such as network cards, sound cards and others come with proprietary drivers. If one of these type of devices is being installed, also install secondary drivers and make alterations to the “CONFIG.SYS” and possibly “AUTOEXEC.BAT” files. Follow the instructions in the manual for the particular card to implement the required changes. When a PC Card is physically installed or removed, power to the unit should first be turned OFF. Although “hot swapping” (when power is on) of cards is allowed when card and socket services are installed, it is not recommended because of the damage risk posed to other components when the case is open. A PC Card retainer block is provided on the main board to prevent cards from becoming loosened because of vibration or shock. A single screw secures the L-shaped retainer block in place. Remove the retainer before inserting a new card or removing an existing one. Always re-install the PC Card retainer when finished inserting or removing cards into or from any one of the slots. If both the unit’s PCMCIA slots are used with bootable type card devices (a memory card or a PCMCIA hard drive for example), the card present in “slot 0” (the lower slot) is used first to boot from. If only one card is used in the system, the bootable card may be installed in either PCMCIA slot. 3-30 FMT 3000 Hardware Reference Guide - Option Installation and Operation Installing Additional Memory in the 72-pin SIMM Socket The unit includes 1 MB of DRAM on-board configured as 256K x 32 bits in memory “bank 0”. Memory can be expanded to 16 MB by installing a 72-SIMM (Single In-line Memory Module) which comprises memory banks 2 and 4. Bank 4 is only present if a double-sided SIMM is being used in the 72-pin socket. Figure 3-28 illustrates how to properly install SIMM cards in the 72-pin socket is shown below. 72 pin Single In-line Memory Module Socket 1. Align tab and slot. Notch on SIMM must be toward lower left. 2. Insert at 45 deg. Gently press down on the module and rotate it as shown until the board clips in place. The socket alignment pins must engage the alignment holes at both ends of the board. Figure 3-28. Installing a SIMM Upgrade Memory must be non-parity, Fast Page Mode (FPM), 70 nsec or less. 1, 2, 4, 8, and 16 Mbyte 72-pin SIMMs are supported. The unit’s memory controller automatically scans the DRAM sites and configures the memory setup. No manual CMOS setup is required. RS-485 Communications Option Installation COM4 on the unit supports the RS-485 serial communications option. The RS-485 option board mounts above the unit’s internal speaker and plugs into a keyed 10-pin connector on the power I/O board using a short ribbon cable with connectors. A 3-pin plug connector is provided for connection to an RS-485 line. To mount this option: 1. Remove the speaker screws. 2. Use the 2 screws and 2 standoffs supplied with the RS-485 option board to secure the board over the back of the speaker (refer to Figure 3-29 on page 3-33). 3-31 FMT 3000 Hardware Reference Guide - Option Installation and Operation 3. Use the ribbon cable to connect COM4’s communication lines and to provide power to the option board from connector J1 located on the power board. The RS-485 communications lines (B, A, GND) connect to the screw terminals on the 3-pin plug connector. Use a cable tie to secure the communication cable to the cable tie hold (refer to Figure 3-27 on page 3-29) and route the cable through the rear cable cut-out of the unit. The RS-485 option uses a Maxim MAX1408B TTL to RS-485 converter IC. This IC receiver is enabled all the time but the transmit buffer must be enabled before data may be sent. The COM4 serial ports RTS# signal (which is implemented by a 16C2552 UART IC) controls the transmit buffer. The RTS# signal from the COM4 port is usually kept low, but take the RTS# high to enable the transmit buffer when data is to be sent. After a 100 microsecond delay, data can be sent, and the RTS# signal should be returned low to allow other devices on the RS-485 line to transmit data. Programming details on controlling the COM4 RTS# status signal is covered in the 16C2552 data sheet. COM4 uses the I/O locations 2E8 to 2EF (Hex). 3-32 FMT 3000 Hardware Reference Guide - Option Installation and Operation RS-485 Board B1 A2 GND 3 Remove speaker screws and mount RS-485 board over speaker using supplied screws and standoffs. Plug in option connector cable. Figure 3-29. Installing the RS-485 Option Board The RS-485 option board converts RS-232 level serial communication signals to half duplex bidirectional isolated RS-422/485. Sockets are provided on the board for custom installation of termination and line bias resistors. A simplified schematic of the board and the locations of the termination and line bias resistors is shown in Figure 3-30 on page 3-34. 3-33 FMT 3000 Hardware Reference Guide - Option Installation and Operation R3 R2 R5 R1 R4 Isolation and Interface Circuit +Vcc +ISO Vcc GND RX TX RTS R1 1.5K R2 1.5K B R5 150 A R4 1.5K ISO GND R1 to R5 are mounted in sockets to facilitate user configuration. TS1 R3 1.5K 1 B 2 A 3 GND Protection Diodes Pull Up Resistors R1 and R2 are installed at the factory. Pull Down Resistors R3 and R4 are not installed. Figure 3-30. RS-485 Option Simplified Schematic and Custom Resistor Locations 3-34 Appendix A Connectors and Jumpers Connectors Figure A-1 on page A-2 shows the locations and designations of all connectors and jumpers on the CPU board of the unit. CPU Board Internal Connectors on page A-2 lists the pin definitions of all connectors on the CPU board which are internal to the unit’s case. These connectors include: t t t t t t t t PC/104 connector and PC/104 auxiliary power connector Keypad connector LCD display interface connector and LCD backlight connector External Keyboard and Mouse connectors COM1 serial port connector Magnetic stripe reader connector Ethernet 10BaseT RJ-45 connector PCMCIA Slot connectors. CPU Board External Connectors on page A-14 lists the pin definitions of all connectors on the CPU board which are external to the unit’s case. These connectors include: t t t COM2 serial port connector Bar code reader connector Laser scanner connector A-1 FMT 3000 Hardware Reference Manual - Connectors and Jumpers Power Header for PC-104 (Connector J13) on page A-5 shows the locations and designations of all connectors and jumpers on the Power and I/O board which plugs into the inter-board connector of the CPU board. Power I/O Board, Connections and Jumpers on page A-17 lists the pin definitions of all connectors on the Power and I/O board. These connectors include: t t t t t t Inter-board connector RS-485 option connector Speaker connectors (internal and external) Battery back-up connector Power input connector Digital I/O option terminal block. Jumpers on page A-25 lists the jumper settings for all jumpers on the CPU and Power I/O board. Figure A-1 and Figure A-2 identify the locations of these jumpers. CPU Board Internal Connectors Note: For inter-board connector pin definitions (J8), see Power I/O Board Connections (CMOS Battery on page A-26). A1 D0 PC/104 Connector J2 C0 64 pins 40 pins D19 C19 A32 Figure A-1. Internal Connectors A-2 B1 B32 FMT 3000 Hardware Reference Manual - Connectors and Jumpers Each connector of J2 is a dual-row header having .1" pin spacing. There are 104 pins on the two connectors, 40 pins on one and 64 pins on the other. Table A-1. PC/104 Connector Pinouts (J2) PIN NUMBER ROW A ROW B 0 ROW C ROW D GRND GRND 1 #IOCHCHK GRND #SBHE #MEMCS16 2 SD7 RESET LA23 #IOCS16 3 SD6 +5 V LA22 IRQ10 4 SD5 IRQ9 LA21 IRQ11 5 SD4 -5 V LA20 IRQ12 6 SD3 DRQ2 LA19 IRQ15 7 SD2 -12 V LA18 IRQ14 8 SD1 #ENDXFR LA17 #DACK0 9 SD0 +12 V -MEMR DRQ0 10 IOCHRDY NOT USED (KEY) -MEMW #DACK5 11 AEN #SMEMW SD8 DRQ5 12 SA19 #SMEMR SD9 #DACK6 13 SA18 #IOW SD10 DRQ6 14 SA17 #IOR SD11 #DACK7 15 SA16 #DACK3 SD12 DRQ7 16 SA15 DRQ3 SD13 +5 V 17 SA14 #DACK1 SD14 #MASTER 18 SA13 DRQ1 SD15 GRND 19 SA12 #REFRESH NOT USED (KEY) GRND 20 SA11 CLK 21 SA10 IRQ7 22 SA9 IRQ6 23 SA8 IRQ5 A-3 FMT 3000 Hardware Reference Manual - Connectors and Jumpers Table A-1. PC/104 Connector Pinouts (J2) (Continued) PIN NUMBER ROW A ROW B 24 SA7 IRQ4 25 SA6 IRQ3 26 SA5 #DACK2 27 SA4 TC 28 SA3 BALE 29 SA2 +5 V 30 SA1 OSC 31 SA0 GRND 32 GRND GRND ROW C ROW D Note: -5 V, +12 V and -12 V are not provided on-board. The PC/104 Aux. power connector (J13) can be used to bring in these voltages if required. A-4 FMT 3000 Hardware Reference Manual - Connectors and Jumpers Table A-2. Power Header for PC-104 (Connector J13) PIN NUMBER FUNCTION 1 +12 V 2 -12 V 3 -5 V 4 GROUND Figure A-2. Power Header for PC-104 (Connector J13) PC/104 Aux. Power J13 A-5 4 3 2 1 FMT 3000 Hardware Reference Manual - Connectors and Jumpers Table A-3. 16 Pin Header - Display PIN NUMBER FUNCTION PIN NUMBER FUNCTION PIN NUMBER FUNCTION 1 Data 6 7 Data 0 13 +5 V 2 Data 7 8 Data 1 14 Ground 3 Data 4 9 Ground (R/W) 15 NC 4 Data 5 10 E1 16 E2 5 Data 2 11 Contrast 6 Data 3 12 Reg Select Figure A-3. 16 Pin Header - Display LCD Display Connector J5 A-6 2 16 1 15 FMT 3000 Hardware Reference Manual - Connectors and Jumpers Table A-4. 20 Pin Header - Keyboard (Connector J11) PIN NUMBER FUNCTION PIN NUMBER FUNCTION PIN NUMBER FUNCTION 1 Scan 0 9 Scan 8 17 Receive 3 2 Scan 1 10 Scan9 18 Receive 4 3 Scan 2 11 Scan 10 19 Receive 5 4 Scan 3 12 Scan 11 20 n.c. 5 Scan 4 13 Scan 12 6 Scan 5 14 Receive 0 7 Scan 6 15 Receive 1 8 Scan 7 16 Receive 2 Figure A-4. 20 Pin Header - Keyboard (Connector J11) Keypad Connector J11 2 1 A-7 20 19 FMT 3000 Hardware Reference Manual - Connectors and Jumpers Table A-5. 2 Pin Header LCD Backlight (Connector J7) PIN NUMBER FUNCTION 1 +5 V 2 Ground Figure A-5. 2 Pin Header LCD Backlight (Connector J7) LCD Backlight Power J7 1 A-8 2 FMT 3000 Hardware Reference Manual - Connectors and Jumpers Table A-6. DIN6 -- PS-2 Keyboard and Mouse (Connectors J9 and J10) Keyboard Mouse PIN NUMBER FUNCTION PIN NUMBER FUNCTION 1 Keyboard Data 1 Mouse Data 2 n.c. 2 n.c. 3 Ground 3 Ground 4 +5 V 4 +5 V 5 Keyboard Click 5 Mouse Click 6 n.c. 6 n.c. Figure A-6. DIN6 - PS-2 Keyboard and Mouse (Connectors J9 and J10) External Keyboard and Mouse PS/2 Style Connectors J9 and J10 A-9 6 5 4 3 2 1 FMT 3000 Hardware Reference Manual - Connectors and Jumpers Table A-7. DB9 - COM1 (Connector P2) PIN NUMBER FUNCTION 1 DCD 2 RX 3 TX 4 DTR 5 GND 6 DSR 7 RTS 8 CTS 9 RI Figure A-7. DB9 - COM1 (Connector P2) COM1 RS-232 DB9-pin Connector P2 Pin 1 A-10 Pin 9 FMT 3000 Hardware Reference Manual - Connectors and Jumpers Table A-8. 6 Pin Header - Slot (Connector J12) PIN NUMBER FUNCTION 1 GND 2 BAR DATA 2 / MAG DATA 3 +5 V 4 n.c. (not connect) 5 GND Figure A-8. 6 Pin Header - Slot (Connector J12) J12 Mag Stripe Reader (Top View) A-11 1 2 3 4 5 FMT 3000 Hardware Reference Manual - Connectors and Jumpers Table A-9. RJ45 - Ethernet 10BaseT (Connector J1) PIN NUMBER FUNCTION 1 TX+ 2 TX- 3 RX+ 4 n.c. 5 n.c. 6 RX- 7 n.c. 8 n.c. Figure A-9. RJ45 - Ethernet 10BaseT (Connector J1) Pin 8 Ethernet Connector 10BaseT J1 Pin 1 Pin 8 10BaseT Connector A-12 Pin 1 RJ-45 Cable Connector FMT 3000 Hardware Reference Manual - Connectors and Jumpers Figure A-10. PCMCIA (PC Card) Slots (68 pin) (Connectors J3 and J4) PCMCIA (PC Card) Slots (68 pin) J3 and J4 J3-34 J3-1 Slot 1 Accepts Types I, II, III Slot 0 Accepts Types I, II J4-35 J4-68 Each PCMCIA (also referred to as PC Card) connector contains two rows of 34 connections. The electrical specification for connector pinouts varies somewhat depending on the type of device used (memory, I/O etc.). Standard pin definition information can be obtained from the PCMCIA Administration, (1030 E. Duane Ave., Suite G, Sunnyvale, CA 94086) or through the web site, www.pc-card.com. The unit’s controller provides full PCMCIA memory and I/O card support for two PCMCIA slots. Note: No +12 V supply is present on the unit for flash programming as most flash cards now can be programmed and operated using +5 V only. A-13 FMT 3000 Hardware Reference Manual - Connectors and Jumpers CPU Board External Connectors Table A-10. DB9 - COM2 (Connector P3) PIN NUMBER FUNCTION 1 DCD 2 RX 3 TX 4 DTR 5 GND 6 DSR 7 RTS 8 CTS 9 RI Figure A-11. DB9 - COM2 (Connector P3) COM2 RS-232 DB9-pin Connector P3 Pin 1 A-14 Pin 9 FMT 3000 Hardware Reference Manual - Connectors and Jumpers Table A-11. DB9 - Bar Code (Connector P4) PIN NUMBER FUNCTION 1 +5 V PullUp 2 Bar Code Data 3 n.c. 4 Ground 5 n.c. 6 n.c. 7 Ground 8 n.c. 9 +5 V Figure A-12. DB9 - Bar Code (Connector P4) Bar Code DB9-pin Connector P4 Pin 1 A-15 Pin 9 FMT 3000 Hardware Reference Manual - Connectors and Jumpers Table A-12. DB9 - Laser (Connector P1) PIN NUMBER FUNCTION 1 n.c. 2 Video 3 Good Read 4 n.c. 5 Trig/ 6 Laser En/ 7 Ground 8 Ground 9 +5 V Figure A-13. DB9 - Laser (Connector P1) Laser Scanner DB9-pin Connector P1 Pin 1 A-16 Pin 9 FMT 3000 Hardware Reference Manual - Connectors and Jumpers Power I/O Board Connectors Figure A-14. Power I/O Board, Connections and Jumpers 21 Power Connector (P4) 1 Digital Input/Outputs + DC Power Out - 21-pin Terminal Block (TB1) Speaker Connectors (P3, P2) RS-485 Option Connector (J1) Inter-board Connector (J2) (Back side) Battery Back-up Connector (P1) Power Board Configuration (JP1, JP2) Power Switch A-17 Power On LED FMT 3000 Hardware Reference Manual - Connectors and Jumpers Table A-13. 40 Pin Header - BD to BD Connector (Connector J2) PIN NUMBER FUNCTION PIN NUMBER FUNCTION 1 Ground 19 Digital In 6 37 TxD 4 2 +5 V 20 Digital Out 6 38 RTS# 4 3 Ground 21 Digital In 7 39 RxD 4 4 +5 V 22 Digital Out 7 40 CTS# 4 5 Ground 23 Digital In 8 6 +5 V 24 Digital Out 8 7 Ground 25 n.c. 8 +5 V 26 Speaker 9 Digital In 1 27 n.c. 10 Digital Out 1 28 n.c. 11 Digital In 2 29 Vref 12 Digital Out 2 30 n.c. 13 Digital In 3 31 n.c. 14 Digital Out 3 32 n.c. 15 Digital In 4 33 n.c. 16 Digital Out 4 34 Batt Detect 17 Digital In 5 35 Low Batt 18 Digital Out 5 36 Analog Ground A-18 PIN NUMBER FUNCTION FMT 3000 Hardware Reference Manual - Connectors and Jumpers Figure A-15. 40 Pin Header - BD to BD Connector (Connector J2) Inter-board Connector J2 40 2 39 1 Note: Digital Out 3, 4, and 5 are not routed anywhere on the Power Board but they are available at the header. Digital Out 6, 7, and 8 are used for speaker volume adjust. Digital In 7 and 8 are grounded on the Power Board. A-19 FMT 3000 Hardware Reference Manual - Connectors and Jumpers Table A-14. 10 Pin Header - RS-485 (Connector J1) PIN NUMBER FUNCTION 1 n.c. 2 n.c. 3 +5 V 4 Ground 5 RTS 6 TX 7 +5 V 8 Ground 9 CTS 10 RX Figure A-16. 10 Pin Header - RS-485 (Connector J1) RS-485 Option Connector J1 9 1 10 2 A-20 FMT 3000 Hardware Reference Manual - Connectors and Jumpers Table A-15. Two 4-Pin Headers - 100 Ohm Speakers (Connectors P2 and P3) PIN NUMBER FUNCTION 1 +Speaker 2 -Speaker 3 n.c. 4 n.c. Figure A-17. Two 4-Pin Headers - 100 Ohm Speakers (Connectors P2 and P3) External Speaker Output 100 Ohms 1 2 P3 P3 External Speaker 1 2 3 4 3 4 Internal Speaker Output 100 Ohms 1 2 P2 P2 Internal Speaker 1 2 3 4 3 4 A-21 FMT 3000 Hardware Reference Manual - Connectors and Jumpers Table A-16. 2-Pin Header - Battery (Connector P1) PIN NUMBER FUNCTION 1 +Battery 2 -Battery Figure A-18. 2-Pin Header - Battery (Connector P1) 1 2 P1 Battery Connector A-22 FMT 3000 Hardware Reference Manual - Connectors and Jumpers Table A-17. 2-Pin Header - 24 VAC Power (Connector P4) PIN NUMBER FUNCTION 1 VAC IN1 2 VAC IN2 Figure A-19. 2-Pin Header - 24 VAC Power (Connector P4) P4 24 VAC Power Input Jack Power Input Plug w/screw terminals Note: This may be AC or DC input for power. Whichever pin (1 or 2) that does not have VAC or VDC on it should be ground.The inputs go into a full wave rectifier. A-23 FMT 3000 Hardware Reference Manual - Connectors and Jumpers Table A-18. 21-Pin Terminal Block - Digital Inputs/Outputs & DC Power (TB1) PIN NUMBER FUNCTION 21 DC Power + 20 DC Power - 19 Case Ground 18 Dig Input +1 17 Dig Input -1 16 Dig Input +2 15 Dig Input -2 14 Dig Input +3 13 Dig Input -3 12 Dig Input +4 11 Dig Input -4 10 Dig Input +5 9 Dig Input -5 8 Dig Input +6 7 Dig Input -6 6 Relay out 1 NC 5 Relay out 1 com 4 Relay out 1 ND 3 Relay out 2 NC 2 Relay out 2 com 1 Relay out 2 ND A-24 FMT 3000 Hardware Reference Manual - Connectors and Jumpers Figure A-20. 21-Pin Terminal Block - Digital Inputs/Outputs & DC Power (TB1) Digital I/O Terminal Block TB1 21 1 Jumpers Power Board Configuration JP1 - Battery back-up function JP2 Power Switch Enable (see Figure A-2 on page A-5) Either JP1 or JP2 should be installed but not both at the same time. If battery back-up is not desired, remove the battery connector from P1. JP1 JP2 Comment OUT OUT INVALID OUT IN Switch enabled and battery back-up enabled (default) IN OUT Switch disabled and battery back-up enabled IN IN INVALID CPU Clock Speed CPU Clock Jumper Settings (JP2, JP3, JP4 on the CPU Board, see Figure A-1 on page A-2) JP2 JP3 JP4 CPU CLK CPU operating speed IN IN IN 4 MHz DO NOT USE IN IN OUT 8 MHz DO NOT USE A-25 FMT 3000 Hardware Reference Manual - Connectors and Jumpers JP2 JP3 JP4 CPU CLK CPU operating speed IN OUT IN 16 MHz 33 MHz operation (default) IN OUT OUT 20 MHz OUT IN IN 25 MHz OUT IN OUT 33.3 MHz 40 MHz 50 MHZ 66 MHz operation CMOS Battery CMOS battery connect (JP5) - This jumper is normally installed. Remove for long term storage of the unit. CMOS battery discharge (JP6) - Do not install - only for troubleshooting use at the factory. A-26 Appendix B Specifications FMT 3000 Specifications This appendix lists full technical specifications (electrical, mechanical and environmental) for the FMT 3000 and accessory items. Technical specifications for the main CPU board and the power supply and digital I/O option board are listed separately. Unless otherwise stated, specifications are @ 25°C. Specifications are subject to change without notice. B-1 FMT 3000 Hardware Reference Manual - Specifications CPU Board Technical Specifications CPU 486DX2 Operating Frequency Bus-33 MHz, Internal-66MHz Operating Voltage 3.3 Volts, CPU has 5 V tolerant I/O Memory BIOS ROM 128Kx8 (256K byte) DRAM 256Kx32 (1MB on-board) DRAM SIMM SOCKET 72pin, accepts up to 16MB SIMMS Chip Set Picopower Sequoia, includes DRAM controller ISA interface, RTClock, DMA controller, etc. CMOS Battery Life Expectancy 3000 hours typical non-operating, 5 years typical, operating PCMCIA Interface One Type II and One Type III General Purpose card slots. Systemsoft Cardsoft 3.12 support. PC/104 Interface One 16-bit slot, +5V only w/ header for +12, -12 and -5V I/O Section LPT1 LCD Display Interface Supports 4x40 LCD character modules via LPT1 COM1, COM2 RS-232 RxD, TxD, RTS, CTS, DSR, DTR, RI, DCD Interface COM3 (Decoder support) RxD, TxD COM4 (RS-485 support) RxD, TxD, RTS, CTS Keyboard Support Keyboard Matrix Scan 6 x 16 matrix Keyboard Interface, external PS-2 Mouse Interface, external PS-2 Ethernet 10BaseT Section Network Interface Chip SMC91C94 with internal buffer RAM EEPROM 1024 bits Media Interface 10BaseT with RJ-45 connector B-2 FMT 3000 Hardware Reference Manual - Specifications Bar Code Processor Section Processor 80C51FA, mask programmed with Welch Allyn Firmware Operating frequency 11.0592 Mhz Memory ROM 16K bytes internal mask RAM 8K bytes Bar code Decoding (Pulse Shaping and Software Decode) Symbologies Decoded Codabar, Code 39, Code 128, Code 16K, Interleaved Code 2 of 5, Industrial 2 of 5, Matrix 2/5, Code 11, UPC, EAN, MSI Code, Plessey CPU Board Power Usage CPU Board Current 800mA (typ @ 5 VDC) Not to exceed 2 A (max @ 5 VDC) Physical Case See Dimensions (Compliance Testing on page B-5) Weight Approx. 4.1 lbs (1.8 kg) B-3 FMT 3000 Hardware Reference Manual - Specifications Power, Digital I/O Board Technical Specifications Switching Power Supply Output Voltage 5.0 Vdc +/- 5 % Output Current 3 A (max), 2 A (continuous) Short Circuit Current 4 A (nom) CPU Board Current 650 mA (typ @ 5 Vdc & 33MHz) Fully Configured Unit 1.65 A (typ @ 5 Vdc), PCMCIA 340 MB type III Hard Drive, Hard Drive 33 MHz operating, PC/104 VGA, LCD Backlight, 10BaseT Fully Configured Unit 1.13 A. (typ @ 5 Vdc) 2M SRAM card, 33 MHz operating SRAM PC/104 VGA, LCD Backlight, 10BaseT Noise and Ripple 150 mV peak-peak (max) Battery Charger Charge Current 25 mA (nominal) (range) 22-28mA 0-50 deg C Low Voltage Cutout 7.7 V (nominal) 1 A load (range) 7.5-7.9 V, 1 A, 25 deg C (range) 7.4-8.0 V, 2 A, 0-50 deg C Voltage Drop (Batt+to VIN) 0.4 V (max) 1 A, 25 deg C 0.5 V (max) 2 A, 0-50 deg C On-Battery Detect 10 V +/- 0.5 V Speaker Drive Speaker Voltage 4 Selectable levels: 1.25 to 10 Vpp Speaker impedance 100 Ohm load Speaker Output 500 mW Reset Controller and Watchdog Reset Voltage 4.62 V (nom) (range) 4.50 - 4.74 Reset Pulse Width(min) 250 msec Watchdog Service Period 0.5 sec (min) Display Backlight Supply Current to LCD backlight 200mA, 4x40 LCD display with 5mm char B-4 FMT 3000 Hardware Reference Manual - Specifications Compliance Testing FCC A single FMT 3000 unit, representative of a typical production unit, will be sent for FCC compliance testing. Units will not be available for sale until successfully passing class A (industrial) requirements. European Union Compliance: Test Level Description EN55022 Class A Light Industrial IEC 801-2 ESD 3 15 kV air discharge IEC 801-3 Radiated Susceptibility 2 3 V/m IEC801-4 Fast Transient Burst 2 1kV@5Khz, power supply 0.5 kV @ 5 khz, I/O and signal IEC 1000-5 Surge Immunity 2 1 kV Extended Burn-in FMT 3000 units, representative of typical production units, will be powered and placed at 50˚C for not less than 1000 device hours. Successful operation of 1000 device hours at 50˚C is required prior to manufacturing release. Environmental/Endurance Testing MTBF Calculation - IL_HDBK-217E, ground fixed, 0, 25˚C and 50˚C Package Drop Test - Standard TBD Functional test 0-50˚C in temperature chamber No other environmental testing of the FMT 3000 is required. B-5 FMT 3000 Hardware Reference Manual - Specifications FMT 3000 Power Usage Breakdown Table B-1. FMT 3000 Power Usage Breakdown Bare CPU Board 650 mA when CPU running at 33 MHz CLK Increase to 66 MHz 300 mA additional to double CPU CLK to 66 MHz 1 MB SRAM PC Card 80 mA 2 MB SRAM PC Card 80 mA Hard Drive PC Card 600 mA 300 mA continuous, another 300 mA spinup or access 8 Chip SIMM ~0 mA 0 mA - negligible Ethernet ~0 mA 0 mA - when idle LCD ~0 mA without backlight LCD Backlight 200 mA External PS/2 Keyboard 100 mA VGA PC/104 Card 200 mA Super I/O PC/104 Card 300 mA External Mouse 7 mA Power Board Electronics 5 mA without any digital I/O 2 Relay Outputs 56 mA relays energized 6 Opto-isolated Inputs 3 mA with signals connected Table B-2. Lasers/Scanners/Slot Readers PSC decoded laser 110 mA short duration Welch Allyn Magnetic Stripe Reader 15 mA HP Slot Reader 49 mA Symbol Laser 2.5 mA not triggered (model LS-3000-1000A Symbol Laser 131 mA triggered Bar Code Wand 44 mA The total current draw should not exceed 2 A for continuous operation. Mix and match options as desired, but always ensure it remains around 2 A or less (at 5 VDC). B-6 FMT 3000 Hardware Reference Manual - Specifications Dimensions 1.652" (4.196 cm) 1.084" (2.753 cm) 0.400" (1.016 cm) 9.6" (24.5 cm) 2.2" (5.5 cm) 10.5" (26.6 cm) 18.6" (47.24 cm) Figure B-1. Physical Dimensions B-7 FMT 3000 Hardware Reference Manual - Specifications FMT 3000 Option Specifications For specifications on the VGA PC/104 Card option, Bar Code Slot Reader, Wand, and Magnetic Stripe Reader, refer to the documentation included with these items. Digital I/O Option Connectors Number, type 1 to 21 position screw-type terminal block (18 AWG max.) The connector plugs into the power, digital I/O option board for easy wiring. Digital Inputs Number, type 6, Opto-isolated Voltage Range for 4-28 VDC (withstand to 35 VDC without damage) “ON” Digital Outputs Number, type 2, Form C relay Current Ratings (DC) 2 Amp at 30 VDC (max) Power Rating, 60 W (max) switching Current Ratings (AC) 0.5 Amp at 125 VAC (max) Voltage Output Number, type 1, Full wave rectified and filtered version of the unit’s raw power supply voltage (24 VAC typ.). B-8 FMT 3000 Hardware Reference Manual - Specifications Mounting Bracket Dimensions Flat Wall Mount Front View Side View 9.832" (24.973 cm) 8.764" (22.260 cm) 0.250" (0.6125 cm) 1.908" (4.846 cm) 0.650" (1.651 cm) 7.086" (17.998 cm) 3.620" (9.195 cm) 3.419" (8.684 cm) 0.650" (1.651 cm) 0.250" (0.6125 cm) 0.912" (2.316 cm) 6.294" (15.987 cm) DIA. 0.266" (0.675 cm) 4 PL 7.733" (19.642 cm) 0.912" (2.316 cm) Cut-Out Dimensions 0.704" (1.788 cm) 1.725" (4.382 cm) 1.965" (4.991 cm) 1.725" (4.382 cm) Figure B-2. Flat Wall Mount Dimensions B-9 FMT 3000 Hardware Reference Manual - Specifications Desk Stand 6.48" (16.46 cm) Top 10.00" (25.40 cm) Front 3.13" (7.95 cm) 9.80" (24.89 cm) 4.45" (11.30 cm) 1.00" (2.54 cm) 0.50" (1.27 cm) 2.83" (7.18 cm) 1.20" (3.05 cm) 0.42" (1.06 cm) 0.80" (2.03 cm) 20¡ 3.13" (7.95 cm) DIA. 0.183" (0.465 cm) 2 PL DIA. 0.156" (0.396 cm) 6 PL Figure B-3. Desk Stand Dimensions B-10 FMT 3000 Hardware Reference Manual - Specifications Tilt Wall Enclosure 10.00" (25.40 cm) 1.398" (3.551 cm) 0.71" (1.80 cm) 6.75" (17.15 cm) DIA. 0.800" (2.032 cm) Top 4.232" (10.749 cm) Front 6.139" (15.593 cm) 2.224" (5.649 cm) 3.250" (8.255 cm) 0.500" (1.270 cm) 4.030" (10.236 cm) Left 0.808" (2.052 cm) 2.430" (6.172 cm) PEM-632-2 6 PL 64¡ 1.704" (4.328 cm) DIA 0.188" (0.476 cm) 2 PL Right 2.750" (6.985 cm) 2.250" (5.715 cm) Back 3.500" (8.890 cm) 4.01" (10.19 cm) 6.75" (17.15 cm) 1.649" (4.188 cm) Cut-out detail 1.965" (4.991 cm) 0.35" (0.89 cm) 0.982" (2.494 cm) 0.70" (1.78 cm) Figure B-4. Tile Wall Enclosure Dimensions B-11 Index A D Accessory power usage . . . . . . . . . . . . . . . . B-6 Data collection features . . . . . . . . . . . . . . . 1-3 DC power out line . . . . . . . . . . . . . . . . . . 3-26 Decoded devices . . . . . . . . . . . . . . . . . . . . 1-12 Desk Stand . . . . . . . . . . . . . . . . . . . . . 3-7, B-10 Diagnostic LEDs . . . . . . . . . . . . . . . . 1-13, 2-25 Digital I/O connector . . . . . . . . . . . . . . . . A-17 Digital I/O input voltage range . . . . . . . . . 3-25 Digital I/O Option . . . . . . . . . . 1-15, 3-25, B-9 Digital I/O schematic . . . . . . . . . . . . . . . . 3-25 Dimensions Desk Stand . . . . . . . . . . . . . . . . . . . . B-10 Flat Wall Mount . . . . . . . . . . . . . . . . . B-9 FMT3000 . . . . . . . . . . . . . . . . . . . . . . B-7 Tilt Wall Enclosure . . . . . . . . . . . . . . B-11 Disabling the switch . . . . . . . . . . . . . . 2-6, 3-29 Display tracker . . . . . . . . . . . . . . . . . . . . . 1-11 B Bar Code Laser Wand and Holder Installation . 3-21 Battery back-up . . . . . . . . . . . . . . . . . . . . . . 2-6 Battery back-up installation . . . . . . . . . . . . 3-28 Battery status . . . . . . . . . . . . . . . . . . . . . . . . 2-6 Block diagram . . . . . . . . . . . . . . . . . . . . . . . 1-6 Board layout . . . . . . . . . . . . . . . . . . . . . . . . A-2 Bracket mounting screws . . . . . . . . . . . . . . . 3-3 Brackets used with the Desk Stand . . . . . . 3-13 Brackets used with the Flat Wall Mount . . . 3-8 Brackets used with the Tilt Wall Enclosure 3-13 C Cable access hole . . . . . . . . . . . . . . . . . . . . . 3-9 Cable cutout . . . . . . . . . . . . . . . . . . . . . . . . 3-5 Cable tie holder . . . . . . . . . . . . . . . . . . . . . . 2-4 Cable ties . . . . . . . . . . . . . . . . . . . . . . . . . . . 2-4 CMOS battery jumper . . . . . . . . . . . . . . . . A-26 CMOS setup . . . . . . . . . . . . . . . . . . . . . . . . 2-9 Com port wedging . . . . . . . . . . . . . . . . . . . 1-10 Communication ports . . . . . . . . . . . . . . . . 1-10 Compliance testing . . . . . . . . . . . . . . . . . . . B-5 Conduit hole . . . . . . . . . . . . . . . . . . . . . . . . 3-6 Connecting communications . . . . . . . . . . . 2-23 Connectors . . . . . . . . . . . . . . . . . . . . . . . . . A-1 CPU . . . . . . . . . . . . . . . . . . . . . . . . . . . . . . . 1-9 CPU board connectors . . . . . . . . . . . . . . . . . A-2 CPU Clock Jumper . . . . . . . . . . . . . . . . . . A-25 CPU operating speeds . . . . . . . . . . . . . . . . A-25 E Electrical specifications . . . . . . . . . . . . . . . . B-2 Enabling battery back-up . . . . . . . . . . . . . 3-30 Ethernet connection . . . . . . . . . . . . . . . . . 2-24 Ethernet interface . . . . . . . . . . . . . . . 1-13, 2-25 Ethernet interrupts . . . . . . . . . . . . . . . . . . 2-24 F Ferrite filter . . . . . . . . . . . . . . . . . . . . . . . . 3-23 Flat Wall Mount . . . . . . . . . . . . . . . . . . 3-3, B-9 FMT3000 specifications . . . . . . . . . . . . . . . B-1 Functional description . . . . . . . . . . . . . . . . 1-9 Index-1 FMT 3000 Hardware Reference Manual - Index H Network software support . . . . . . . . . . . . . 2-25 Hot insertion . . . . . . . . . . . . . . . . . . . . . . 1-13 Hot swapping . . . . . . . . . . . . . . . . . . . . . . 3-30 O I IMPORTANT notes . . . . . . . . . . . . . . . . . 3-23 Installation kit . . . . . . . . . . . . . . . . . . . . . . 2-2 Installation kit parts . . . . . . . . . . . . . . . . . . 3-2 Installing memory . . . . . . . . . . . . . . . . . . . 3-31 Installing the RS-485 Option Board . . . . . 3-33 INT2F functions . . . . . . . . . . . . . . . . . . . . 1-15 Inter-board connector . . . . . . . . . . . . . . . . A-18 Isolated inputs . . . . . . . . . . . . . . . . . . . . . 3-25 J Jumpers . . . . . . . . . . . . . . . . . . . . . . . . . . A-25 Mother board . . . . . . . . . . . . . . . . . . . A-2 Power board . . . . . . . . . . . . . . . . . . . A-17 K Keyboard control . . . . . . . . . . . . . . . . . . . 1-13 Keylock . . . . . . . . . . . . . . . . . . . . . . . . . . . . 2-3 L LCD display . . . . . . . . . . . . . . . . . . . . . . . 1-11 Lock down screw . . . . . . . . . . . . . . . . . . . . 3-3 lock down screw . . . . . . . . . . . . . . . . . . 3-5, 3-7 Locking the unit . . . . . . . . . . . . . . . . . . . . . 2-3 Opening the unit . . . . . . . . . . . . . . . . . . . . . 2-3 Option installation . . . . . . . . . . . . . . . . . . . . 3-1 Optional features . . . . . . . . . . . . . . . . . . . . . 1-4 Overview . . . . . . . . . . . . . . . . . . . . . . . . . . . 1-6 P PC Card boot sequence . . . . . . . . . . . . . . . 3-30 PC Card retainer block . . . . . . . . . . . . . . . 3-30 PC Card (PCMCIA) installation . . . . . . . . . 3-30 PC features . . . . . . . . . . . . . . . . . . . . . . . . . . 1-1 PCMCIA controller . . . . . . . . . . . . . . . . . . 1-13 PC/104 Aux. power connector . . . . . . 3-22, A-4 PC/104 connector . . . . . . . . . . . . . . . . . . . A-2 PC/104 differences . . . . . . . . . . . . . . . . . . . 1-11 PC/104 expansion site . . . . . . . . . . . . . . . . 1-11 PC/104 installation . . . . . . . . . . . . . . . . . . 3-22 PC/104 VGA card . . . . . . . . . . . . . . . . . . . 3-23 Power board . . . . . . . . . . . . . . 1-14, A-17, B-4 Power board configuration . . . . . . . . . . . A-25 Power circuit diagram . . . . . . . . . . . . . . . . 3-27 Power input limit . . . . . . . . . . . . . . . . . . . . . 2-6 Power input ranges . . . . . . . . . . . . . . . . . . 1-14 Power options . . . . . . . . . . . . . . . . . . . . . . . 2-5 Power usage breakdown . . . . . . . . . . . . . . . B-6 Powering the unit . . . . . . . . . . . . . . . . . . . . . 2-5 Q Quick-connect clips . . . . . . . . . . . . . . . . . . 3-21 M Mechanical features . . . . . . . . . . . . . . . . . . 1-3 Memory . . . . . . . . . . . . . . . . . . . . . . . . . . . 1-9 Mother board jumpers . . . . . . . . . . . . . . . . A-2 Mounting bar code slot readers and magnetic stripe readers . . . . . . . . . . . . . . . . 3-8 Mounting the unit on a wall . . . . . . . . . . . . 3-6 Mounting the unit on the Desk Stand . . . . . 3-7 N Network installation requirements . . . . . . 2-23 R Relay current rating . . . . . . . . . . . . . . . . . . 3-25 Relay outputs . . . . . . . . . . . . . . . . . . . . . . . 3-25 RJ45 connector . . . . . . . . . . . . . . . . . . . . . 2-26 Routing cables . . . . . . . . . . . . . . . . . . 3-9, 3-15 RS-485 . . . . . . . . . . . . . . . . . . . . . . . . . . . . 1-10 RS-485 option board . . . . . . . . . . . . . . . . . 3-33 RS-485 option connector . . . . . . . . . . . . . A-19 Rubber feet installation . . . . . . . . . . . . 3-3, 3-7 Running setup . . . . . . . . . . . . . . . . . . . . . . . 2-9 Index-2 FMT 3000 Hardware Reference Manual - Index System block diagram . . . . . . . . . . . . . . . . . 1-6 S Schematic of the power board . . . . . . . . . . . 2-6 Sealing the unit . . . . . . . . . . . . . . . . . . . . . . 2-4 Serial ports . . . . . . . . . . . . . . . . . . . . . . . . 2-23 SIMM socket . . . . . . . . . . . . . . . . . . . . . . . 3-31 Single unit contents . . . . . . . . . . . . . . . . . . . 2-3 Software support . . . . . . . . . . . . . . . . . . . . 1-16 Specifications Digital I/O Option . . . . . . . . . . . . . . . . B-9 Environmental . . . . . . . . . . . . . . . . . . . B-5 FMT3000 . . . . . . . . . . . . . . . . . . . . . . . B-2 Mounting Brackets . . . . . . . . . . . . . . . . B-9 Power board . . . . . . . . . . . . . . . . . . . . . B-4 Standard features . . . . . . . . . . . . . . . . . . . . . 1-1 Starter Kit contents . . . . . . . . . . . . . . . . . . . 2-2 Starting setup . . . . . . . . . . . . . . . . . . . . . . . . 2-9 Static . . . . . . . . . . . . . . . . . . . . . . . . . . . . . . 3-2 Strain-relief . . . . . . . . . . . . . . . . . . . . . . . . . 2-4 Switching regulator . . . . . . . . . . . . . . 1-14, 2-6 T Table top use . . . . . . . . . . . . . . . . . . . . . . . 3-3 Technical overview . . . . . . . . . . . . . . . . . . . 1-6 Tilt Wall Enclosure . . . . . . . . . . . . . . . 3-5, B-11 Trickle charger . . . . . . . . . . . . . . . . . . . . . . 2-6 U Undecoded laser scanners . . . . . . . . . . . . . 1-12 V VGA card . . . . . . . . . . . . . . . . . . . . . . . . . 3-23 Views . . . . . . . . . . . . . . . . . . . . . . . . . . . . . 1-8 W Wand holder . . . . . . . . . . . . . . . . . . . . . . . 3-21 Index-3 Feedback Tell Us What You Think... We’d like to know what you think about this Manual. Please take a moment to fill out this questionaire and fax this form to: (516) 738-3318, or mail to: Symbol Technologies, Inc. One Symbol Plaza M/S B-4 Holtsville, NY 11742-1300 Attn: Technical Publications Manager IMPORTANT: If you need product support, please call the appropriate customer support number provided. Unfortunately, we cannot provide customer support at the fax number above. User’s Manual Title: (please include revision level) How familiar were you with this product before using this manual? Very familiar Slightly familiar Not at all familiar Did this manual meet your needs? If not, please explain. What topics need to be added to the index, if applicable? What topics do you feel need to be better discussed? Please be specific. What can we do to further improve our manuals? Thank you for your input—We value your comments.