1
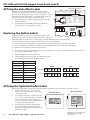
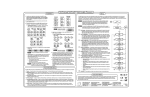
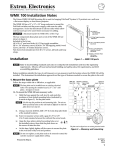
RCP 2000 with ISS 506 Support
Upgrade Kit Instructions
This guide provides procedures for upgrading an RCP 2000 with firmware version 2.04 or beta test firmware version 3.0 to
the version 3.01 for the RCP 2000 with ISS 506 Support. To view the firmware version currently installed on your RCP 2000,
cycle power to the RCP while watching the LCD screen. While the RCP is powering up, a screen appears showing the
current firmware version — 2.04 or 3.00.
Upgrading the Firmware
Before beginning the firmware upgrade process, download the latest firmware files from the Extron Web site for the
RCP 2000 with ISS 506 Support and for the ISS 506 switcher. To ensure compatibility, the ISS 506 must have firmware
version 1.07 or higher, and the RCP must have version 3.01 installed.
To upgrade the ISS firmware to version 1.07 or higher, follow the procedure described in the ISS 506 User's Manual. After
uploading the firmware, reset the ISS 506 by issuing the SIS® command E ZXXX ] to the switcher via DataViewer, or by
selecting Reset to Factory from the Advanced Configuration menu via the ISS front panel.
N
This reset erases all user settings from the ISS; therefore, be sure to note any important settings prior to beginning the
upgrade.
1.
If your RCP has firmware version 3.00 loaded, you must reset it to the factory shipped defaults (version 2.04), before
upgrading. If your RCP already has version 2.04, skip to step 2.
Reset the RCP 2000 as follows:
a.
Reset Button on
RCP Back Panel
Disconnect power from the RCP.
ETHERNET
b. Press and hold in the Reset button on the rear panel (located next to the RJ-45 Ethernet
connector) while applying power to the RCP.
c.
Release the Reset button when the LCD screen displays "Powering Up."
RESET
ACT
LINK
2.
Visit the RCP 2000's Web page by entering its IP address into the Web browser on your PC.
3.
If you know your RCP's IP address, skip to step 4. If no IP address has been set, or you do not know it, set a new IP
address as follows:
a.
Press the Wipe, Dissolve, Cut, and Take buttons simultaneously and hold them until the RCP's MAC address is
displayed on the LCD screen (about 2 seconds).
b. If necessary, press the Take button repeatedly to step through the IP Setup menu options
until the IP address screen is displayed in the LCD window.
I 010.056
P142.008
c. Press the Color/Tint, Cont/Bright, Size, or Center button to select an address block (octet)
to change. The selected octet on the LCD screen blinks.
Press
Press
Press
COLOR
TINT
CONT
BRIGHT
SIZE
Select 1st octet
Select 2nd octet
Select 3rd octet
Press
CENTER
Select 4th octet
d. Rotate the H Adjust knob to change the value of the selected octet.
e.
When finished, press the Detail button to save the IP address and exit IP Setup.
4.
On the RCP Web page, click the Configuration tab, then click the Firmware Upgrade link on the left sidebar menu.
5. On the Firmware Upgrade page, click Browse to open the Choose file window, and locate the firmware on your
computer or server. The file is usually located at c:\Program Files \ Extron \ Firmware \ RCP2000wISS506.
6.
On the Choose file window, double-click on the firmware file. The file name is displayed in the text field on the
Firmware Upgrade page.
7.
Click the Upload button to upload the firmware. The uploading process takes approximately 1 to 3 minutes,
depending on your browser.
8.
Refer to the accompanying RCP 2000 with ISS 506 Support Setup Guide and/or the RCP 2000 with ISS 506 Support User's
Manual for information on accessing and using the RCP's IP Setup menu and for operating procedures.
68-1634-01 Rev. A
08 08
RCP 2000 with ISS 506 Support Setup Guide (cont'd)
Affixing the Sub-effects Label
Affix Sub-effects label here.
The Wipe and PIP Sub-effects label lists the transition effects
available to be displayed when the RCP is transitioning from the
preview input to the program input, or when it is opening or closing
the picture-in-picture (PIP) window. Attach this label to the RCP's
top panel, to the right of the H and V adjustment knobs.
1.
2.
RCP 2000
Wipe and PIP Sub-effects
H
Ensure that the area on which the label will be placed is dry
and free of debris.
DETAIL
V
01 = Dissolve (PIP only) 10 = Soft Square In
18 = Hard Center In
02 = Soft Right
11 = Soft Square Out 19 = Hard Center Out
03 = Soft Left
12 = Soft Plus In
20 = Hard Curtain In
04 = Soft Up
13 = Soft Plus Out
21 = Hard Curtain Out
05 = Soft Down
14 = Hard Right
22 = Hard Square In
06 = Soft Center In
15 = Hard Left
23 = Hard Square Out
07 = Soft Center Out
16 = Hard Up
24 = Hard Plus In
08 = Soft Curtain In
17 = Hard Down
25 = Hard Plus Out
09 = Soft Curtain Out
Peel the backing off the label and center the label in the
designated area. See the illustration at right.
LOGO1
/BLACK
33-1635-01 Rev A
03 08
LOGO2
/BLACK
ADJUST
Replacing the Button Labels
WIPE
DISOLVE
Replace the specified program and preview button labels on the
RCP 2000's front panel with the provided button labels as indicated
in the table at the end of this section. See the "before and after" illustration to the right of the table.
Use the following procedure to install new labels in the RCP’s front panel buttons:
1.
Remove the button from the RCP by grasping the button firmly and pulling it away from the top panel.
2.
Use a small flat-head screwdriver to gently pry the transparent button cap off of the white backing plate.
3.
Remove the white diffuser and the transparent label.
4.
Insert the appropriate button label into the cap (see the table below). If "None" is specified for the button you removed,
do not insert a label and skip to step 5.
5.
Replace the diffuser in the transparent cap.
6.
Gently but firmly press the cap onto the white backing plate.
7.
Press the button into place in the RCP top panel.
Button
Replace with:
Program 9
None
Program 10
None
Program 11
Logo1/Black
Program 12
Logo2/Black
Preview 9
None
Preview 10
Auto Image
Preview 11
Logo1/Black
Preview 12
Logo2/Black
Before
After
PROGRAM
8 9 10 11 12
8
PREVIEW
8 9 10 11 12
8
LOGO 1 LOGO 2
/BLACK /BLACK
AUTO
IMAGE
LOGO 1 LOGO 2
/BLACK /BLACK
Affixing the Updated Product Label
Replace the product label on the bottom of the RCP with the updated label, part #33-873-01, revision D, as follows:
2.
Use a plastic card (such as a credit card) to pry
loose a corner of the attached label, and peel the
label off the RCP. Discard the old label. (Do
not use a screwdriver to remove the label as this
could chip the paint on the unit.)
3.
Peel the backing off the new product label
(Rev. D) and affix it to the base of the RCP,
making sure to keep the label centered (see the
illustration at right).
New Label (Rev D)
Old Label (Rev C)
RCP 2000 Remote Control Panel
Setting up the IP Addresses
RCP 2000 Remote Control Panel
The RCP 2000 ships with default client (RCP) and server (ISS or SGS) IP addresses already set. If you want
to change the default addresses, follow these steps:
1. Slide the T-bar handle to the top or bottom of its slot.
2. Press the Wipe, Dissolve, Cut, and Take buttons simultaneously until the LCD screen changes to show
the unit's MAC address (xx-xx-xx-xx-xx-xx).
3. Press the Take button. The Take, Cont/Bright, Size, and Center buttons light, and the Color/Tint button
blinks. The client (RCP) IP address (IP) is displayed on the LCD screen.
4. Press the appropriate picture control button, then turn the H Adjust knob to change each block of the
RCP’s IP address, as follows:
– Press the Color/Tint button, then change the first block of the IP address.
– Press the Cont/Bright button, then change the second block of the IP address.
– Press the Size button, then change the third block of the IP address.
– Press the Center button, then change the fourth block of the IP address.
5. Press the Take button again. The server (ISS or SGS) IP address (SI) is displayed on the LCD screen.
Repeat step 4 to change the server IP address.
6. Press the Take button again. The Subnet Mask (SM) is displayed on the LCD screen. Repeat step 4
to change the Subnet Mask.
7. Press the Take button again. The Gateway (GM) address is displayed on the LCD screen. Repeat step 4
to change the Gateway address.
8. Press the Detail button to exit and save the changes when all changes have been made.
Choosing an Effect
www.extron.com
Reset Modes
Adjusting an Image
To adjust the preview image, press and release the
appropriate control button. The selected button lights.
Make adjustments with the H and V adjustment knobs.
Button
H adjustment knob
V adjustment knob
Center
Move image horizontally
Adjust image width
Select horizontal filter
Adjust image contrast
Adjust image color
Move image vertically
Adjust image height
Select vertical filter
Adjust image brightness
Adjust image tint
Size
The following transition effects are available:
Detail
Dissolve – Causes the program input to fade out while the preview input is fading in. The dissolve duration
Cont/Bright
Color/Tint
is adjustable from 0.2 to 5.0 seconds, using the Adjust knob.
Wipe (SGS only) – Causes the preview image to appear to unroll over the program image. A variety of
wipes are available (21), including Standard, Curtain, Plus, and Square
Extron Electronics, USA
(see the User's Manual for complete descriptions). The wipe duration is
adjustable from 0.2 to 5.0 seconds, using the Adjust knob. Wipes are
selected by holding the Wipe button and rotating the Adjust knob.
Cut – Seamlessly replaces the program image with the preview image.
Making a Transition
1. Select the desired Preview (input), and press the preview input select button to display the preview image on
the preview monitor.
2. Make adjustments (centering, size, detail, contrast/brightness, color/tint) to the preview image, if necessary
(see Adjusting an Image).
3. Select the duration of the dissolve or wipe by pressing the appropriate button (Dissolve or Wipe) and using
the Adjust knob until the duration desired setting is displayed on the LCD screen.
4. If you selected a Wipe transition, choose the desired wipe effect by pressing and holding the Wipe button
while turning the Adjust knob. Turn the knob until the wipe effect you want appears on the LCD screen.
5. When you want the transition to occur, press the appropriate button (Wipe or Dissolve) for the effect you
want, then press the Take button or move the T-bar up or down to make the transition.
Alternatives
1. For an instant switch, press the Cut button.
2. To freeze the output display, press the Program button, then the Freeze button.
3. T o cause a black screen to be displayed, press the Program button, then the Black button.
1230 South Lewis Street
Anaheim, CA 92805
USA
714.491.1500
Fax 714.491.1517
Mode 1 – Holding the Reset button until the LCD display shows
Reset Mode 1 (3 seconds), followed by a brief press (<1 second),
stops all events. The LCD screen displays Unit reset when reset
is done.
Mode 2 – Holding the Reset button until the LCD display shows
Reset Mode 2 (5 seconds), followed by a brief press (<1 second),
erases all user flash memory, resets ports to defaults, and reboots
the unit. The LCD screen displays Unit reset when reset is done.
Mode 3 – Holding the Reset button until the LCD display shows
Reset Mode 3 (10 seconds), followed by a brief press (<1 second),
resets the unit to factory defaults. The LCD screen displays
Unit reset when reset is done.
Nothing happens if there is no second brief press.
Extron Electronics, Europe
Extron Electronics, Asia
Extron Electronics, Japan
Beeldschermweg 6C
3821 AH Amersfoort
The Netherlands
+31.33.453.4040
Fax +31.33.453.4050
135 Joo Seng Road, #04-01
PM Industrial Building
Singapore 368363
+65.6383.4400
Fax +65.6383.4664
Kyodo Building
16 Ichibancho
Chiyoda-ku, Tokyo 102-0082, Japan
+81.3.3511.7655
Fax +81.3.3511.7656
33-873-01
Rev. C
03 05
Front of RCP
Turn the RCP over in your lap or on a flat
surface. Be careful not to put excessive stress
on the T-bar handle.
Front of RCP
1.
Setting Up the IP Addresses
Transition Effects
The RCP 2000 ships with default IP addresses for the client (RCP) and server (ISS 408, ISS 506, or SGS
switcher) already set. If you want to change these default addresses, follow these steps:
1. Slide the T-bar handle to the top or bottom of its slot.
2. Press and hold the following four buttons simultaneously until the LCD screen displays the unit’s MAC
address (xx-xx-xx-xx-xx-xx):
• Standard RCP (firmware version 2.nn) — Press and hold the Wipe, Dissolve, Cut, and Take buttons
simultaneously.
• RCP with ISS 506 (firmware version 3.nn) — Press and hold the Color/Tint, Cont/Bright, Size, and
Center buttons simultaneously.
If you are not sure which firmware version is loaded, power off the RCP, then watch the LCD display while
powering the RCP back on.
3. Press the Take button. The Take, Cont/Bright, Size, and Center buttons light, and the Color/Tint
button blinks. The client (RCP) IP address (IP) is displayed on the LCD screen.
4. Press the appropriate picture control button, then turn the H Adjust knob to change each block of the
RCP’s IP address, as follows:
• Press the Color/Tint button, then change the first block of the IP address.
• Press the Cont/Bright button, then change the second block of the IP address.
• Press the Size button, then change the third block of the IP address.
• Press the Center button, then change the fourth block of the IP address.
5. Press the Take button again. The server (switcher) IP address (SI) is displayed on the LCD screen.
Repeat step 4 to change the server IP address.
N
For RS-232 control (RCP with ISS 506 only), set the SI address to 0.0.0.0.
6. Press the Take button again. The Subnet Mask (SM) is displayed on the LCD screen. Repeat step 4
to change the Subnet Mask.
7. Press the Take button again. The Gateway (GM) address is displayed on the LCD screen. Repeat
step 4 to change the Gateway address.
8. When finished making changes, press the Detail button to exit and save the changes.
The following visual effects are available to be applied to transitions between the preview and the program
inputs or, on the RCP with ISS 506 only, when a picture-in-picture (PIP) opens or closes on the display.
Cut — Seamlessly replaces the program image with the preview image. On the RCP with ISS 506, this
effect also immediately opens or closes the PIP or title when either of these modes is active.
Dissolve — Causes the program input to fade out while the preview input is fading in. The dissolve duration
is adjustable from 0.0 to 5.0 seconds. Dissolve is available in PIP mode as sub-effect #01 (RCP with
ISS 506 only).
Wipe (SGS and ISS 506 only) — Causes the preview image or the PIP window to appear to unroll over the
program image. A variety of sub-effects are available in Wipe mode (21 for the standard RCP, 25 for the
RCP with ISS 506 support), including Standard, Curtain, Plus, and Square (refer to your user's manual
for complete descriptions). The sub-effect duration is adjustable from 0.0 to 5.0 seconds.
PIP (picture-in-picture, ISS 506 only) — When the system is in PIP mode, the preview image appears in a
small window within the program image on the display. 25 sub-effects are available in PIP mode.
Title — Causes the preview image of predefined intensity to be superimposed over the program image.
(The size of the title box is set on the SGS or the ISS 506.) Only the cut effect is available for displaying
and removing the title; the dissolve or wipe effects cannot be applied to it.
Adjusting an Image
To adjust the preview image, press and release the appropriate control button. The selected button lights.
Make adjustments with the H and V adjustment knobs.
Button
Center
Size
Detail (ISS 408 and SGS)
Detail (ISS 506)
Cont/Bright
Color/Tint
H adjustment knob
Move image horizontally
Adjust image width
Select horizontal filter
Increase/decrease sharpness
Adjust image contrast
Adjust image color
V adjustment knob
Move image vertically
Adjust image height
Select vertical filter
Increase/decrease sharpness
Adjust image brightness
Adjust image tint
Adjusting image/window size and centering in PIP mode (ISS 506 only)
1. Press the Size or Center (positioning) button repeatedly to toggle between image and window adjustment.
2. Rotate the H and/or V knob to select the size or position of the window or image.
N
Image adjustments can be made to the preview input only. If PIP/Title effects are active, no
adjustment is possible.
Reset Modes
Mode 1 – Holding the Reset button until the LCD display shows Reset Mode 1 (3 seconds), followed by a
momentary press (<1 second), stops all events. The LCD screen displays Unit reset when reset is done.
Mode 2 – Holding the Reset button until the LCD display shows Reset Mode 2 (5 seconds), followed by a
momentary press (<1 second), erases all user flash memory, resets ports to defaults, and reboots the
unit. The LCD screen displays Unit reset when reset is done.
Mode 3 – Holding the Reset button until the LCD display shows Reset Mode 3 (10 seconds), followed by a
momentary press (<1 second), resets the unit to factory defaults. The LCD screen displays Unit reset
when reset is done.
N
Nothing happens if there is no momentary press.
Selecting a wipe, PIP, or title effect (RCP with SGS or ISS 506 support only)
1. Press and hold the Wipe button.
2. SGS: While holding the Wipe button, rotate the Adjust knob until the desired wipe or the title effect
number appears in the LCD window.
ISS 506: While holding down the Wipe button, repeatedly press the Dissolve button to cycle through the
menu options and select the display mode: Wipe, PIP, or Title.
3. ISS 506 only: Select a wipe or PIP sub-effect, or set the intensity level at which the preview image will
become transparent in Title mode:
• To select a Wipe or PIP sub-effect: With the desired function (Wipe or Pip) displayed in the LCD
window, continue to hold down the Wipe button while rotating the Adjust knob to the number of the
desired sub-effect (02–25 for Wipe mode; 01–25 for PIP mode — 01 selects dissolve). (The label on
the RCP front panel lists the sub-effect numbers.) Release the Wipe button.
• To select the Title level: When Title is displayed, release the Wipe button and rotate the Adjust knob
to the desired level (000-255), while the Wipe button remains lit.
4. If appropriate, set the duration of the selected wipe or PIP sub-effect as follows:
a. Press and release the Wipe button.
b. While the Wipe button remains lit, rotate the Adjust knob to select the number of seconds the transition
will last.
5. Press the Take button to implement the effect on the selected preview input.
Making a Transition
1. Select the desired Preview (input), and press the preview input selection button to display the preview
image on the preview monitor.
2. Make adjustments (centering, size, detail, contrast/brightness, color/tint) to the preview image as necessary
(see “Adjusting an Image,” at left).
3. Select a type of transition effect (see “Transition Effects,” above).
4. If you selected a wipe transition, choose the desired wipe sub-effect.
5. Select the duration of the dissolve or wipe.
6. When you want the transition to occur, press the Take button or move the T-bar up or down.
Alternatives
• For an instant, seamless transition, press the Cut button.
• To freeze the output display, press the Freeze button.
• To display a black screen, press the Black button.
• To recall logos that have been assigned on the ISS 506, press the Logo1 or Logo2 button (RCP with
ISS 506 only).
• To recall a user preset that was saved on the ISS 506, repeatedly press the preview input button
corresponding to the desired ISS 506 input to cycle through the user presets saved to that input (RCP with
ISS 506 only).
• To automatically size and center the preview input, press the Auto Image button (RCP with ISS 506 only).
Extron USA - West
Headquarters
+800.633.9876
Inside USA / Canada Only
LISTED
®
US 1T23
I.T.E.
N15779
+1.714.491.1500
+1.714.491.1517 FAX
Extron USA - East
Extron Europe
+800.633.9876
+800.3987.6673
Inside Europe Only
Inside Asia Only
+1.919.863.1794
+1.919.863.1797 FAX
+31.33.453.4040
+31.33.453.4050 FAX
+65.6383.4400
+65.6383.4664 FAX
Inside USA / Canada Only
Extron Asia
Extron Japan
Extron China
Extron Dubai
+800.7339.8766
+81.3.3511.7655
+81.3.3511.7656 FAX
Inside China Only
+400.883.1568
+971.4.2991800
+971.4.2991880 FAX
+86.21.3760.1568
+86.21.3760.1566 FAX
33-873-01 Rev. D
08 08
Extron Electronics, Anaheim, CA
2
RCP 2000 with ISS 506 Support • Upgrade Instructions
+800.633.987 +1.714.491.1500
www.extron.com