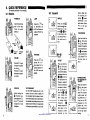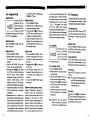
1
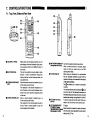
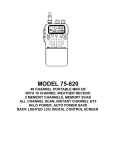
AL'NCO
...................................................... , I I I I I I I II I II I I
VHF FM HANDHELD TRANSCEIVER
DJ-191
UHF FM HANDHELD TRANSCEIVER
DJ-491
INSTRUCTION MANUAL
ALINCO, INC.
Head office: "TWIN 21" MID Tower Building 25F
1-61, 2-Chome, Shiromi, Chuo-ku, Osaka 540-8580 Japan
Phone: 06-946-8150 Fax: 06-946-8175 Telex: 63086
E-mail: [email protected]
U.S.A.: 438 Amapola Ave., Suite 130, Torrance, CA 90501-6201 U.S.A.
Phone: 310-618-8616 Fax: 310-618-8758
http1/www.alinco.coml
Germany: Eschborner Landstrasse 55, 60489 Frankfurt am Main, Germany
Phone: 069-786018 Fax: 069-789-60766
Thank you for purchasing this ALINCO transceiver.
To obtain optimum performance from this
transceiver, read this Instruction Manual
thoroughly, and keep it for future reference.
The LCD display examples in this Instruction
Manual use the DJ-191T's LCD display_
PS0228E
Table of Contents
1. INTRODUCTION
8. GETIING STARTED
.
2. INNOVATIVE ANt> NEW FEATURES
3. ACCESSORIES
:
,
19
8-1 Receiving
..
19
Keypad Direct Entry
;.............. 1
Step Key
19
·..·.. ·
19
3-1 Standard Accessories................................................................. 1
Changing Frequency in One MHz Step
20
3-2 Optional Accessories.................................................................. 2
Clearing Entry
20
4. INSTALLATION
4-1 MOOHe Installation :
;..................................................... 2
,
:
;.................................. 3
4-2 Base Station Installation.
3
4-3 Charging Your Battery
3
5. SPECiFiCATIONS......................................................................... 4
5-1 General..................................................................................... 4
5-2 Transmitter
5
8-2 Transmitting
20
8-3 Transceiver Modes
21
VFO (Variable Frequency Oscillator) Mode
21
Memory Mode
21
Programming a Memory Channel
21
Scroll Memory
21
8-4 Other Functions
22
Battery Save Function (BS)
22
5-3 Receiver.................................................................................... 5
Beep ON/OFF
22
6. QUICK REFERENCE..................................................................... 6
KL (Key Lock)
22
6-1 Receive..................................................................................... 6
FL (Frequency Lock)
22
6-2 Transmit
APO (Automatic Power Off)
23
6-3 Programming............................................................................. 8
CTCSS Tone Frequencies
23
6-4 SCanning................................................................................... 9
Cable Cloning
23
7
6-5 Auto Dial
10
8-5 Resetting
25
6-6 DSQ (DTMF Code Squelch) Function
11
8-6 CTCSS Decoder Unit EJ-28U Installation
25
7. CONTROLS and FUNCTIONS
12
7-1 Top, Front, Sides and Rear View
12
7-2 DTMF Keypad Operation
16
7-3 LCD Display
17
REFERENCE
26
APPENDIX
29
1. INTRODUCTION
NOTICE
This equipment has been tested and found to comply with the limits pursuant to
Part 15 of the FCC Rules. These limits are designed to provide reasonable
protection aginst harmful interference in a residential installation. This equipment
generates, uses, and can radiate radio frequency energy, and if not installed and
used in accordance with the instructions, may cause harmful interference to radio
communications. However, there is no guarantee that interference will not occur
in a particular installation. If this equipment does cause harmful interference to
radio or television reception, which can be'determined by turning the equipment
off and on, the user is encouraged to try to correct the interference by one or more
of the following measures.
• Reorient to relocate the receiving antenna.
• Increase the separation between the equipment and receiver.
• Connect the equipment into an outlet on a circuit different
from that which the receiver is onnected.
• Consult the dealer or an experienced radio/TV technician for help.
Information in this document are subject to change wihout notice or obligation.
All brand names and trademarks are the property of their respective owners.
Alinco cannot be liable for pictorial or typographical inaccuracies. Some options
and/or accessories are unavailable in certain areas. ©Copyright 1996-1997 All
rights reserved. No part of this document may be reproduced, copied, translated
or transcribed in any form or by any means without the prior written permission
of Alinco, Inc., Osaka, Japan. English Edition Printed in Japan
III
We at Alinco would like to thank you for purchasing the ALiNCO transceiver. Radios
and other products made by ALI NCO rank as some of the finest in the world. Your
transceiver has been manufactured and tested very carefully at the factory and will give
you satisfactory operation for many years.
We are confident that you will be very satisfied with your choice of this fine ALI NCO
radio.
2. INNOVATIVE AND NEW FEATURES .111
The transceiver features some of the most advanced features and reliable engineering
available anywhere. Our design policy at ALiNCO is focused on developing innovative
usable features, including the following:
• Easy to readout LCD.
• Comes equipped with a 50 CTCSS Tone encoder, and with the optional EJ-28U Tone
Squelch Decoder unit, the CTCSS Tones can be decoded for selective receiving.
• Tone Burst (1750Hz) feature comes built into the transceiver.
• T.O.T. (Time Out Timer) can be set to a Duty Cycle most accommodating to the
user's requirements.
• Nine Autodial Memories easily accessed from the DTMF keypad with redial
function.
•
•
•
•
Cable Cloning function. (not for DJ-491C)
Direct frequency entry from the DTMF keypad
Independent Low power output PIT key (DJ-191T/491TA1- TA3)
Independent TX LED and RX LED
3. ACCESSORIES
III
3·1 Standard Accessories
When you unpack the ALiNCO transceiver, you will find these standard accessories:
• Ni-Cd battery (optional for DJ-491C)·
• EDC-63 (120V AC) Wall charger (T Version)·
• EDC-64 (220V AC) Wall charger (E Version)·
• Flexible rubber duckie antenna (not applicable for DJ-491 C)·
• Belt clip with two screws
• Hand strap
• Instruction Manual
·Accessories may differ depending on the version you bought.
III
4-1 Mobile Installation
3-2 Optional Accessories
EJ-28U
EBP-33N
EBP-34N
EBP-35N
EBP-38N
EBP-37N
EDH-16
EDC-36
EDC-37
EDC-60
EDC-81
EDC-83
EDC-64
EM8-9
EME-12
EME-13
EME-6
ESC-28
ESC-29
ESC-30
EBC-6
EJ-27D
III
2. Power Requirements
The transceiver can be operated from
any regulated 12 or 13.8V DC negative
ground source.
For mobile use, use always with the
optional EDC-36 cigarette lighter adapter with active noise filter.
1. Location
The transceiver may be installed in any
position· in your car, where the controls
are easily accessible while maintaining
safe operation of your vehicle.
(·Iocal regulations may apply)
CTCSS Decoder Unit
(4.8V DC 650mAH) Ni-ed battery
(4.8V DC 1200mAH) Ni-ed battery
(7.2V DC 9OOmAH) Ni-ed battery
(9.6V DC 650mAH) Ni-ed battery
(4.8V DC 700mAH) Ni-ed battery
Dry-cell battery case (AA x 4)
Mobile Cigarette lighter adapter with active noise filter
External DC supply cable
(120V AC) Rapid charger
(220V AC) Rapid charger
(120V AC) Wall charger
(220V AC) Wall charger
Speaker microphone
Headset with VOX
Earphone and mic with VOX
Earphone
Softcase (for use with EBP-33N)
Softcase (for use with EBP-37N)
Softcase (for use with EBP-34N/35N/36N)
Mobile bracket
SmarTrunk™ Logic Board (for commercial versions only)
4·2 Base Station Installation
For a fixed base operation, 4.8V DC -13.8V DC RegUlated Power Supply providing a
minimum of 2A continuous is required.
When using the optional EDC-37 DC cable, connect the red lead of to the Positive ( +)
terminal, and the black lead to the Negative (-) terminal of the DC Power Supply.
Ee--@-e
4. INSTALLATION
III
External Antenna Installation (Not applicable for DJ-491 C):
When an external antenna is used, 50 ohms coaxial cable is required for all antenna
installations.
Please refer to the antenna manufacturer's manual for the proper installation and
mounting information. After installing your antenna, ensure that you have the proper
matching and best possible SWR reading. High SWR or improper matching can cause
severe damage to your unit and may void the warranty.
(Note: When your DJ-191 is used with an external antenna, you may experience some
intermodulation problem from other communication services. This is caused due to the
high sensitivity of the DJ-191 's receiver front-end circuit and its design for wideband
operation. If it is the case, we recommend you to use an antenna that has a lower gain
or the rubber duckie antenna which comes standard with the radio.)
2
caution: High RF environments can cause severe damage to your unit. Ensure that
you are not in a High RF environment when operating your radio.
t
ffi
~e
for DC Power Supply
4-3 Charging Your Battery
Before operating your transceiver, you must charge your Ni-ed battery with the wall
charger that comes standard with your radio.
It will take approx. 12 to 14 hours to be fUlly charged.
3
5. SPECIFICATIONS
III
The specifications outlined for this product are for specified TX range only. No guarantee or warranty, either specific or implied, will apply to any function or specification
outside the specified TX range, even for reception performance. Individual radios may
experience different performance and/or specification levels.
Any modification for the purpose of operation outside of the specified TX range will
result in voiding any warranties associated with this transceiver and may be a violation
of FCC regulations.
All specifications and features are subject to change without notice or obligation.
5-1 General
Frequency Coverage
DJ-191T (U.S. Am8letI'Version)
DJ-191 E (European AmaIeur Version)
DJ-191TA1 (CommeR:iaI Version)
DJ-191TA2 (CommeR:iaI Version)
DJ-491 C (EufqJean LPD Version)
DJ-491TA1 (CommeR:iaI Version)
DJ-491TA2 (CommeR:iaI Version)
DJ-491 TA3 (CommeR:iaI Version)
Channel Spacing:
Memory Channels:
Antenna Impedance:
Frequency Stability:
Microphone Input Impedance:
Signal Type:
Power Supply Requirements:
Current Consumption
at 13.8V DC:
Operating Temperature:
Ground:
Dimensions:
Weight:
DTMF:
Subaudible Tones (CTCSS):
European Standard:
4
AX
TX
136.000"': 173.995MHz
144.000 -145.995MHz
136.000 -173.995MHz
136.ooo-173.995MHz
433.0625-434.7875MHz
400.000 - 420.oooMHz
450.000 - 470.oooMHz
430.000 - 450.oooMHz
144.ooo-147.995MHz
144.000 -145.995MHz
136.000 -155.oooMHz
150.ooo-173.995MHz
433.0625-434.7825MHz
400.000 - 42O.oooMHz
450.000 - 470.oooMHz
430.000 - 450.oooMHz
5, 10, 12.5, 15,20,25, 30kHz steps
40 Channels + 1 Call Channel Memory
50 Ohms unbalanced
±5ppm
2K Ohms nominal.
F3E (FM)
4.8 -13.8V DC (4.8V DC standard)
Transmitting: Approx. 1.5 Amp. in High Power
Setting (0.1 Amp for DJ-491C)
Receiving:
Squelched Approx. 50mA
-10 to +60 degrees (Celcius),
14 to 140 degrees (Fahrenheit)
Negative
57(W) x 151(H) x 28(D) mm
without projections, with EBP-37N
Approx. 300g (with EBP-37N)
16 Buttons Keypad
Encoder installed (50 tones)
ET5-300220 (for DJ-491 Conly)
5-2 Transmitter
Output Power:
High: Approx. 5W (at 13.8V DC) / Low: Approic. 0.8W
10mW in High or Low for DJ-491C
Emission Mode:
Modulation System:
Max. Freq. Deviation:
Spurious Emission:
F3E (FM)
Variable reactance FM
±5kHz
- 70dB or under below carrier level
Tone Frequency:
Microphone:
Operating Mode:
67.0 to 254.1 Hz (50 selections)
Electret Condenser type
Simplex/Semi Duplex: Offset 5kHz or 12.5kHz steps
CTCSS Encoder:
Built-in and included
as standard
5-3 Receiver
Receiving System:
Superheterodyne Dual Conversion
Sensitivity (12dB SINAD): DJ-191 Less than -ladB/L
DJ-491 Less than -12dB/L
Intermediate Frequency: DJ-191 1st IF 21.7MHz /2nd IF 450kHz
DJ-491 1st IF 45.1 MHz / 2nd IF 455kHz
Selectivity:
More than ± 6kHz at - adB,
Less than ± 12kHz at - 60dB
Audio Output:
More than 200mW (at 10% THD)
Speaker Impedance:
80
5
III
6. QUICK REFERENCE
(For details, see Section 7 and onwards.)
6-2 Transmit
6-1 Receive
POWER ON
LAMP
,,I
nOn I
U, U
IJ
0::.-
Press the
key
to illuminate the
LCD. It will automatically go off after five
seconds.
0
II
M
nOn
U
.
IJ
To release
battery
VFOMODE
b
Press the
key to
increase the speakervolume.
key to
Press the
decrease the speakervolume.
<=:>
It ~ I
o
SQUELCH
While holding the
(Function) key,
press either the
key or
key until
background noise
disappear.
II
0
b
','- u.
nOn
u
HI
VOLUME
MR
"
,,
Press the ~ key
so that "M" or "C"
icon above the frequency segment on
the LCD does not
appear.
M
o-
II '
-11-
www.ALINCO-RADIO.ru
iii
Press and hold the
key, then press
the
key repeatedly until the display
indicates either the
or
icon on the
left side above the
frequency segment
of the LCD. Simplex
operation is indicated as absence of
or
either the
icon. Rotate the
Main Tuning Dial
to change offset
frequency.
means transmit will
take place on the
frequency shifted
upwards by the
0
M
,,
885
<is
II II
M
ncn
,
,
U.OU
~ I,
T.SOl
OFFSET
II
IJ
I,
ncn
U.OU
,
POWER SETTING
(Not aPJ)lIcable for
DJ-491 C)
Press and hold the
key, then press
the
key to
select the desired
output power setting. When the "L"
(Low) icon is NOT
displayed on the
bottom left of the
LCD, the radio is set
on the high power
setting.
II
II II
II
M
Press and hold the
key, then press
the €) key. Rotate
the Main Tuning Dial
for the desired tone.
The
icon appears
on the top left of the
LCD. (Press PTT on
the side once to
exit.)
II
II
'liand.
disappear
.(1)
VFO FREQUENCY
Use the DTMF keypad and enter a frequency. Be sure to enter all digits until
the completion high tone beep is heard,
even if the last digit is zero. Dependi ng on
the selected channel step, last one or two
digit(s) may be limited (or compensated)
to a frequency permissible in such a step.
TONE ENCODE
I
t ij I
'I'
6
,,
II
Press and hold
key on the side, then
key
press the
so that
or
icon
is not shown on the
LCD. (Press PTT on
the side once to
exit.)
<is
II II
U.
To put on
battery
II
SIMPLEX
M
IJ
shown offset than
the receiving fremeans
quency;
downwards in the
same sense. (Press
PTT on the side
once to exit.)
IJ
M
,usnn
.uu
IL''"
I .,
,
,
0::.-
7
III
6-3 Programming
MEMORY MODE
,
Pressthe ~keyto
display the "M" icon
M
I
above the frequency
'""1 ,fJfJ
segment of the LCD.
Pressing the same
key again will bring back the VFO mode
(the "M" icon disappears).
I
I
,usnn
MEMORY SCROLL
Enter the MEMORY MODE, rotate the
Main Tuning Dial.
ory channel, unless re-programmed
and ~ keys.
with
II
MEMORY ERASE
1. Enter the MEMORY MODE.
2. Rotate the Main Tuning Dial to select
the memory channel to erase.
key, then press
3. Press and hold the
the ~ key to erase the program information on the memory channel.
4. A high tone beep will sound and the
flashing "M" icon will appear on the
LCD indicating that the memory content has been erased.
II
tions), and input through keypad # 631 .
The display turns to Channel Number.
(At least one channel has to be already
programmed when you do this, orelse
E
.. c h - r " will appear.) Then cancel
the FL or KL. Where "skip" channels
have been set, the hyphen between' "c h "
and the channel number is not displayed.
Repeat the same steps to exit this mode
and get back the frequency display.
Press the @5 key.
The" C" icon will appear on the top right
,..., ,fJU
of the LCD. Press
~ to come back to
the previous channel.
the desired memory channel to
program.
3. Enter the VFO MODE. Set the frequency, tone and shift accordingly.
4. Press and hold the
key, then press
the ~ key to store the information
into the memory channel. (Stored
information: Frequency, Offset, Shift
direction, CTCSS setting, CTCSS
frequency, Power H/L, DSQ setting,
DSQ code, Skip, Battery Save setting.)
II
5. A high tone beep will sound indicating
that the programming is completed
successfully.
6. Memorized items in a channel may
be temporarily changed while you stay
on that channel, but the written information remains as originally programmed. The original items will be called
if you change the memory elsewhere
(or to VFO) then come back to the mem-
8
L
MEMORY SKIP
1. Enter the MEMORY MODE. Rotate
the Main Tuning Dial to the channel
you desire to skip during scanning
operation.
II
key, then press
2. Press and hold the
the @5\ey.
3. The 'i;equency decimal point will
disappear indicating that the memory channel will be skipped when
scanning.
4. To cancel the MEMORY SKIP, repeat
these steps.
MEMORY CHANNEL DISPLAY MODE
Instead of displaying a frequency, in
memory mode, the corresponding
memory channel number only may be
displayed. In this mode you cannot
entre VFO and you cannot program or reprogram a memory channel unless you
first exit the Memory Channel Display
Mode. To entre this mode, first program
FL or KL (see Section 8-4 Other Func-
,usnn
CALL CHANNEL WRITE
1. Enter the MEMORY MODE.
2. Rotate the Main Tuning Dial to select
the call channel.
3. Enter the VFO MODE. Set the frequency, tone and shift accordingly.
4. Press and hold the
key, then press
the ~ key to store the information
into the call channel.
II
5. A high tone beep will sound indicating
that the programming is completed
successfully.
C€5,
Transceiver has the timer scan function.
In this operation, scan stops at a busy
channel and resumes after 5 seconds.
VFO(BAND) SCAN
Enter the VFO MODE. Press the @3"
key, and the frequency decimal point will
start blinking to indicate the scanning
mode.
MEMORY SCAN
CALL CHANNEL
r
MEMORY WRITE
1. Enter the MEMORY MODE.
2. Rotate the Main Tuning Dial to select
6-4 Scanning
Note: SCAN,
<E:) keys, and the
Main Tuning Dial are not operatable in the CALL CHANNEL mode.
Enter the MEMORY MODE, and press
the @3R key. (Will not start scanning if
the call channel is indicated.)
SCAN DIRECTION
In the SCAN MODE, rotate the Main
Tuning Dial counter-elockwise to scan
downward and clockwise to scan upward.
STOP SCAN
Press the
PTT key.
@3" key
again, or press the
Note: For those memories programmed
with SKIP (see following section),
they will be passed without receiving while scanning.
SCAN SKIP
II
Press and hold the
key and press the
@5' key. Decimal point disappears from
th~ frequency display, and the channel
will be skipped when scanning.
9
III
6-5 Auto Dial
PROGRAM AUTO DIAL MEMORY
1. Press and hold the key, then press
key. The frequency indication
the
of the LCD will go blank.
2. Rotate the Main Tuning Dial to select
an auto dial memory location from
iii
€5
1-9.
3. Enter up to 16 digits (inclu. pause) thru
the DTMF keypad.
4. To complete, press either the ~ key
or PTT switch.
i
i
Note:
To enter the pause,
IUn - 3S I
iii
press and hold the
key, and press the
<[:) key. It will be
indicated with the" - " icon on the LCD.
To clear the memory contents, press and
hold the key, then press the @S key.
j
C
iii
TRANSMIT AUTO DIAL MEMORY
1. Press and hold the "PTI" switch, and
press the
key. Then the. auto
dial memory location number on the
keypad. (The number key must follow
the
key within 4 seconds.)
2. The contents of the auto dial memory
pressed by the number key will be
transmitted.
0
0
REDIAL MEMORY
1. While pressing the PTT key, press the
key.
o
10
2. Within four seconds after pressing
the 0 key, press the <[:) key on the
keypad.
3. The contents of the last dialed DTMF
string will be re-transmitted.
AUTO DIAL WITHOUT TRANSMITTING
(WHILE RECEIVING)
1. Without pressing the PTT key, press
the @5 key followed by a memory
location number key.
2. The memory content DTMF will be
heard without transmitting.
AUTO DIAL TIMING CHANGE
Refer to page 11 "Note:" and page 29
"Appendix" .
6-6 DSQ (DTMF Code
Squelch) Function
DSO (DTMF CODE S~UELCH) serves
like the tone squelch. While the tone
squelch utilizies the continuous subaudible tone to unmute the squelch, DSO
uses combination of three DTMF tones
as a squelch code.
SETTING A DSQ CODE
I 1. Press and hold
the
key, then
Dsa
press the €)
key.
I
I 2. The "DSO" icon
will appear on the LCD, and the DSO
code will displayed.
The factory's initial setting is
nnn "
uuu
i
iii
aaa
3. If there is no operation activity for
two seconds after the "DSO" icon
is blinked, the DTMF squelch will
mute automatically. The "DSO" icon,
however, continues to blink until a
operation is done.
Note:
Applicable both to AUTO DIALER and
DSO, you can change the pause time
from the moment PTI is pressed to the
start of emitting the first digit. To do this,
press and hold the key and press C!::)
key. The display will show" dt -Q'" "
as default, meaning that the pause time is
0.4 second. Now turn the dial knob to
choose one of 0.1 , 0.4, 0.7, or 1.0 second.
Press PTI to finish and exit. Also refer to
page 29 "Appendix" for other functions
related to DSO.
iii
3. Enter three digits of numbers from the
DTMF keypad.
4. To complete the setting, press either
the ~ key or the PTT switch.
DSQCALLING
After setting the DSQ code (the "DSO"
icon is displayed on the LCD), press the
PTTswitch.
DSQ RECEIVING
1. When the set
DSO code signal
Dsa
is received, the
DTMF squelch
"
.UU
will unmute and
the "DSO" icon starts blinking.
2. To respond to the call, simply press
the PTT switch and talk into the
microphone as usual.
,usnn
11
III
7. CONTROLS/FUNCTIONS
7-1 Top, Front, Sides and Rear View
:==it~~
•
(i(I
NIII
IfJ~
•
III·
.•
.==n~~.
•
•
•
;:;)
I!icHI ~I
•
...
i-~;;-I
,,-
I~"""'~<£:>I
~~_
:<D
cD ~ ~'-II'M'----.
....._C <e> __
I~
© II
l°cDG~1
L
•
LCD DISPLAY PANEL
•
MAIN TUNING DIAL
•
EXTERNAL MICROPHONE
JACK
•
EXTERNAL SPEAKER JACK
~,;:Dj:m lio...J II
•
Highly visible under all lighting conditions, the LCD
panel displays functional information during transceiver operations. Refer to LCD DISPLAY section of
this manual.
The main tuning dial/knob may be rotated in either
direction to select transmit/receive frequencies,
memory channels, transmit frequency offsets, and
sub-audible tones.
When the external microphone is prefered, plug in a
2.5mm stereo plug into this jack.
The impedance of the external microphone is 2k
ohms, therefore, most of electret condenser microphone can be used. A dynamic microphone should
not be used.
When an external speaker is prefered, plug in a
3.5mm mono plug into this jack.
The impedance of the external speaker should be
8 ohms. When an external speaker is used, the
internal speaker will be disabled.
•
BNC ANTENNA CONNECTOR
(Not applicable for DJ-491 C)
CD F (FUNCTION) KEY
Connect the supplied rubber duckie antenna.
When an external antenna is connected, please
make sure that your antenna has a low SWR
(Standing Wave Ratio).
Before using your transceiver, it is recommended
that you thoroughly familiarize yourself with the
operation of this key, as it is essential for the majority
of the radio's functions.
The
key allows you to access the secondary
functions.
You may also reset the radio by holding the key as
you turn on the unit. This restores the transceiver to
the default settings and erases all memory channels
besides other settings. (Not applicable for DJ-491 C)
To transmit, press and hold this switch. When you
release it, the unit will return to the receive mode.
iii
iii
•
PTT (PUSH TO TALK)
SWI1CH
•
L m (LOW POWER OUTPUT
T Version:
PTT) SWITCH (T Verslon)1
Wh thO
't h .
ssed th
d'
'11
.
TONE.BURST SWITCH (~ Version)
en IS SWI C IS pre
, e ra 10 WI transmit
(Not applicable for OJ-491C)
with a low power output regardless the output power
setting by the
key.
0::,-
12
13
III
•
MONI (MONITOR)/BS KEY
e POWER SWITCH
e TX LED
e RX LED
e LAMP (H/L) KEY
EVersion:
When this switch is pressed, the radio will transmit
with 1750Hz tone burst.
Pressing and holding this key while turning power
on will toggle between low power PTT (LCD to
show" Pt -L 0 ") and tone burst (LCD to show
" Pt - t b ") functions for this switch.
This key is used to unmute squelch, and a weak or
intermittent signal can be monitored regardless the
squelch setting. This is also available to monitor
receive frequencies when TSO (Tone Squelch) or
DSO is set.
Press ~nd hold this key and turn on the power to
toggle BS (Battery Save) on/off.
To turn power on the unit, press and hold for about
one second.
To turn power off, press again.
When the PTT switch is pressed, this LED lights red
indicating that the radio is in the transmit mode.
When incoming signals are received and the
squelch is unmuted, this LED lights green.
(During DSO or TSO, the audio remains muted unless the tones match, regardless of this RX LED.)
When this key is pressed, the LCD will be illuminated. It will automatically turn off after five seconds. To
keep illuminating the LCD, press and hold this key
and turn the power on; in this case, each push of the
LAMP key will toggle the illumination without the
timed light off.
This key is also used to change the output power
setting.
To change the output power setting, press and hold
the key, and press this key.
When the "L" icon appears on the bottom left of the
LCD, the radio is set to the low power output mode.
When the "L" icon is NOT displayed on the LCD, the
radio is set to the high power output mode.
This key is used to increase the speaker output
volume. While pressing and holding this key, the
Ii
•
14
UPWARD KEY
"VOL" icon will appear on the top middle of the LCD
indicating that the volume level is setting.
To change the squelch level, press and hold the
key,
and press this key.
The "SOL" icon will appear on the LCD indicating that
the squelch level is setting.
When the squelch level is set higher, only stronger signals
will be unmuted.
This key is used to decrease the speaker output volume.
While pressing and holding this key, the "VOL" icon will
appear on the top middle of the LCD indicating that the
volume level is setting.
key,
To change the squelch level, press and hold the
and press this key.
The "SOL" icon will appear on the LCD indicating that
squelch level is setting.
When the squelch level is set lower, weak signals can be
unmuted.
During transmission, each numerical or letter key activates one DTMF tone. Press in desired order.
The speaker will emit the DTMF tone to let you monitor
successful key activation.
During receiving mode, the number keys will input fre#, A, B, C, 0 keys have their respective
quency, and
functions as inprinted in grey colour on the key panel;
key, secondary
when pressed while pressing the
functions inprinted in green become their respective
functions. Invalid entries will be responded in a low-tone
beep instead of high-tone beep.
See DTMF KEYPAD OPERATION (Section 7-2) Chart for
the details.
Speak into the microphone from approximately 10cm or
3" distance.
Plug in the optional EDC-36 cigarette lighter adapter with
active noise filter for mobile operation. The jack is polarized, the center pin is positive and outer pin is negative.
Applying excessive or reverse voltage will cause severe
damages and will void the radio's warranty.
Ii
e DOWNWARD KEY
Ii
•
DTMF KEYPAD
*,
Ii
eMIC
eDCJACK
15
III
7-2 DTMF Keypad Operation
KEY
I11!P
Without pressing the
iii key
7-3 LCD Display
While pressing the
iii key
Inputs 1
Channel Step setting (page 19)
Inputs 2
Shift (offset) frequency setting
(page 7)
Inputs 3
Time Out Timer setting (page 23)
<£)
Inputs 4
Tone Encoderrone Squelch
setting (page 7)
<D
Inputs 5
NlA
<D
Inputs 6
NlA
<D
Inputs 7
<D
Inputs 8
N/A
<£)
Inputs 9
N/A
<E)
Inputs 0
N/A
<D
s_
~
CD
TIQL
V/1I11W
~
<D
Memory Write (page 8)
Start/Stop scanning (page 22)
Key Lock/Frequency Lock
(page 22)
Access the call channel (page 9)
Automatic Power Off setting
(page 23)
CALLAPO
@:)
AlnO DIAL
CD
S"'P
.... DIQ
<E::)
• DIAL II
CD
16
@
I~
aa
®
UU
APOM,L'L'
@
nOOOOJ3L@
L'L' L'JlL' 25J
LClmmD~I~~~~O-@
Change DTMF emission delay
time (page 11)
Toggles between the VFO mode
and Memory mode (page 21)
lCANKL/FL
@@@@@
Ii
VOL..l-@-KL FL DSJJ SQL
CD
TOT
<D
@@
Operating the auto dialer
(page 10)
Memory channel Skip setting
(page 9)
Increments frequencyl
memorych.
DSQ code setting (page 11)
Decrements frequencyl
memorych.
Auto dialer setting (page 10)
@ @
@
iii
@
CD Ii
When the
activated.
@(i
@(il§M!
It appears when the tone encoder is activated.
It appears when the tone squelch is activated.
The "KL" icon appears when the Key Lock is activated.
@KL
@FL
@DSQ
CDD
icon appears, secondary function keys may be
The "FL" icon appears when the Frequency Lock is
activated.
It appears during DSQ operation.
It indicates the plus offset direction. That is, your transmit frequency will be higher than the receiving frequency by the
offset-frequency amount.
@=
It indicates the minus offset direction. That is, your transmit
frequency will be lower than the receiving frequency by the
offset-frequency amount.
@APO
It appears when the APO (Automatic Power Off) function is
activated.
17
III
@VOL
@SQL
It appears while the volume level is being adjusted by either the
upward key or downward key.
It appears while the squelch level is being adjusted by pressing the
key and either the upward key or downward key.
In the Memory Mode, the "M" icon appears.
In the VFO Mode, the "M" icon is not displayed.
While either the volume level or squelch level is adjusted, some
numbers will appear indicating the setting levels (min. O-max.
31).
In the Memory Mode, it indicates the selected memory channel
number (0 - 39, or "C" for call channel).
It indicates the transmit/receive frequency, offset frequency, tone
frequency, tuning step" DSQ code and AUTO DIAL code.
When the low power output is selected, the "L" icon appears.
When the "L" icon is not displayed, the high power output is
selected. (Not applicable for DJ-491C)
iii
@M
@88
@88888
@L
@CJ
When the voltage of the battery is dropped and need to be
recharged, the "B" icon appears.
If it is displayed, turn off the power and recharge the battery. It will
take approximately 12 to 14 hours to be fully charged with EDC-63
or EDC-64.
@mmD
The "BUSY" icon will appear when a signal is received, or
squelch is unmuted.
(During DSQ or TSQ, the audio remains muted unless the tones
match, regardless of the "BUSY" icon.)
@ . (decimal point) It indicates: MHz for transmit/receive and offset frequencies.
kHz for channel step.
Hz for encoded sub-audible tone (CTCSS) tone
frequency.
In the Scan Mode, the decimal point flashes.
@ icicicicicO It indicates the received signal strength and/or the output power
level.
18
8. GETTING STARTED
III
8-1 Receiving
1. Adjust the following and controls of the unit.
POWER SWITCH:
OFF
VOLUME CONTROL: Set to "0" level
SQUELCH CONTROL: Set to "0" level
2. Connect a battery pack or external 4.8 - 13.8 Volt DC Regurated Power Supply to
the radio.
3. Ensure an antenna with the appropriate antenna connector is connected.
4. Turn the POWER switch on.
5. Press the upward key until a signal (or noise) is heard through the speaker.
6. The LCD display will indicate frequency.
7. Rotate the Main Tuning Dial, or enter the frequency from the DTMF keypad to select
a frequency. Press and hold the key, then press the upward key until the noise
disappears from the speaker.
iii
KEYPAD DIRECT ENTRY
When a frequency is selected by the direct keypad entry, numbers will appear on the
LCD display as they are entered through each push of a key.
To enter a frequency directly from the keypad, perform the following.
The following example will use frequency 146.52MHz, and step of 5kHz.
1. Enter the 1OOMHz digit first. Example: 1_._
2. Enter the 10MHz digit next. Example: 14_._ 1'-/
3. Enter the 1MHz digit next. Example: 146._ 1'-/6
4. Enter the 100kHz digit next. Example: 146.5_ 1'-/6.5
5. Enter the 10kHz digit next. Example: 146.52_ 1'-/6.52
6. Enter the 1kHz digit next. Example: 146.520
STEP KEY
The STEP function is used to select the desired incremental changes of receive/
transmit frequencies, in step of 5, 10, 12.5,15,20,25, 30kHz. Use this feature as
follows:
1. Enter the VFO MODE.
2. Press and hold the key, then press the
key.
Change the channel step by using the Main Tuning Dial.
3. Press the PTT switch to return to the operating frequency.
4. After the channel step is set, the receive/transmit frequency will increase or
decrease by the value selected when you turn the Main Tuning Dial.
iii
dS
19
III
Note: The following rules apply to channel steps as indicated.
1. When 5kHz channel step is selected, keys "0" and "5" are available for
entry into the 1kHz digit. (Last digit entry other than "0" or "5" will be taken
as "0".)
8-3 Transceiver Modes
Your transceiver has 3 modes; VFO mode, MEMORY mode and CALL mode.
2. When 10kHz channel step is selected, keys "0", "1", "2", "3", "4", "5",
VFO (Variable Frequency Oscillator) MODE
"6", "7", "s" and "9" are available for entry into the 10kHz digit.
3. When 12.SkHz channel step is selected, keys "0", "1", "2", "3", "5", "6",
"7" and "s" are available for entry into the 1OkHz digit.
4. When 15kHz channel step is selected, keys "0", and "5" are available for
The transceiver will be in the VFO mode. This mode is used to change frequency
and select the desired channel step, offset frequency shift direction, tone frequency
entry into the 1kHz digit. (Last digit entry other than "0" or "5" will be taken
as HO".)
(encoder and decoder), tone setting, DSQ code, DSQ setting, Power H/L, and
as
(battery save ON/OFF).
MEMORY MODE
5. When 20kHz channel step is selected, keys "0", "1", "2", "3", "4", "5",
The following guidelines will help you to program and manipulate memory channels.
"6", "7", "S", "9" and "0" are available for entry into the 10kHz digit.
6. When 25kHz channel step is selected, keys "0", "2", "5" and "7" are avail-
In the Memory mode, memory channels can be reviewed. To select the Memory mode,
press the ~ key.
able for entry into the 1OkHz digit.
7. When 30kHz channel step is selected, keys "0", "1", "2", "3", "4", "5",
"6", "7", "S", "9" and "0" are available for entry into the 10kHz digit.
PROGRAMMING A MEMORY CHANNEL
To write VFO informations into a memory channel, perform the followings.
1. Enter the MEMORY MODE.
CHANGING FREQUENCY IN ONE MHz STEPS
II
In the VFO Mode, pressing and holding the
key, rotate the Main Tuning Dial.
This will change the frequency Up or Down in one MHz Steps.
2. Rotate the Main Tuning Dial to choose the desired memory channel number
(clockwise to increase, counter-clockwise to decrease). Select the desired memory
channel number (0 to 39).
3. If the Memory Channel Number is flashing, it indicates the memory channel is
CLEARING ENTRY
vacant. A non-vacant channel can be over-written with new data.
To clear an error during keypad entry, you may press the PTT switch to exit and start
over again.
4. Enter the VFO mode.
8-2 Transmitting
6. Select the shift
or
or none.
7. Select the required offset (Consult your Repeater Directory) if shift is required.
5. Select the receive frequency.
II II,
cautions: Ensure that you always use the original rubber duckie antenna or
an external antenna with low SWR (Standing Wave Ratio) readings.
Improper antenna connection may cause damage to the radio and may
void warranty.
1. Make sure that you follow all steps set forth in the "6. GETIING STARTED" section
first.
S. Select the proper CTCSS Tone (Sub-Audible Tone) if needed.
9. Select the Tone Squelch if needed (An optional Tone unit (EJ-2SU) is required).
10. Other data, such as DSQ code, DSQ activation, Power H/L, and
as (battery save
OFF/ON) may be set, if so desired to memorize into the channel.
11. Press and hold the
the memory.
II key, and press the ~ key to write (store) the information to
2. Select a frequency, shift direction, shift value and CTCSS Tone (Sub-Audible Tone)
frequency.
SCROLL MEMORY
Scrolling memory channels up or down can be accomplished as followings;
3. Check to see that the frequency is not in use before transmitting.
4. Select appropriate transmitter output level.
5. Press and hold the PTT switch and speak approximately 1Ocm or 3 from the micro-
1. Select the MEMORY MODE. The memory channel number (0-39) will appear.
2. Turn the Main Tuning Dial to increase or decrease the memory channel.
H
phone located on the front bottom of the radio.
20
21
III
SCAN/SKIP
You can scan the memory channels with the @5"key.
Select to skip any memory channel in scan, by pressing and holding
pressing the ~' key (frequency's decimal point disappears).
iii key and
BATTERY SAVE FUNCTION (BS)
The battery save function helps conserve battery power. When no operation is performed and no signal is received for 5 seconds, the battery save function will activate
automatically.
The factory's default setting of the battery save function is ON.
To deactivate this function, press and hold the MONI key while pressing and holding
0 F" icon will be displayed on the LCD indicating that the
the power switch. The" b
battery save function is disabled.
Repeating above steps will re-activate the battery save function.
5-
(Note: Regardless of the above, the battery save function is temporarily disabled during
the DSQ MODE or Scanning mode.)
BEEP ON/OFF
Press and hold the @5"keywhileturning on the power switch. This will toggle between
beep sound on and off.
KL (KEY LOCK)
This function conveniently locks keys to prevent accidental function access.
Only following controls are available during the activation of the KL function.
2. PTT switch
1. Main Tuning Dial
4. O:;,,·'key
3. LOW PTT switch (T Version)/
"Tone Burst" switch (E Version)
5. MONI key
key (VOUSQL)
7.
key (VOUSQL)
6.
b
0
FL (FREQUENCY LOCK)
This function conveniently locks keys to prevent accidental frequency changes,
function access.
Only following controls are available during the activation of the FL function.
1. PTT switch
2. LOW PTT switch (T Version)1
3.
key
"Tone Burst" switch (E Version)
4. MONI key
5.
key (VOUSQL)
6.
key (VOUSQL)
0
22
0
iii
8-4 Other Functions
0:;"·'
APO (AUTOMATIC POWER OFF)
The APO function automatically turns the transceiver power off if no switches or
controls are operated, for 30 minutes. This function protects against battery drainage
when you forget to turn the power off.
To activate the APO function, perform the followings:
key, then press the
key.
1. Press and hold the
The "APO" icon will appear on the LCD.
2. While the "APO" icon appears, if no operation is performed for 30 minutes, an OFF
of Morse Code is automatically heard.
3. At the end of Morse Code, the transceiver power is automatically turned off.
0
CTCSS TONE FREQUENCIES
There are 50 different tone frequencies available for tone encode. Decoder EJ-28U is
available as an option.
Following is the list of those frequencies:
67.0
94.8
131.8
171.3
203.5
69.3
97.4
136.5
173.8
206.5
71.9
100.0
141.3
177.3
210.7
74.4
103.5
146.2
179.9
218.1
no
107.2
151.4
183.5
225.7
(Hz)
79.7
110.9
156.7
186.2
229.1
82.5
114.8
159.8
189.9
233.6
85.4
118.8
162.2
192.8
241.8
88.5
123.0
165.5
196.6
250.3
91.5
127.3
167.9
199.5
254.1
T,O,T, (Tlme-Out-Timer)
A time-out-timer automatically shuts down transmission and resumes receiving after a
set period of continuous transmit time.
To protect the radio from excessive transmit, a Time Out Timer has been installed. This
can be programmed to activate from 0 seconds to 450 seconds (7.5 Minutes).
key and press the <f.) to select the TOT programming mode;
Press and hold the
the LCD will display the selected Time Out Time in seconds. Use the Main Tuning Dial
to change the Time Out setting. Push the (is key or PTT to exit.
(Refer to page 29 "Appendix" for T.O.T-Penalty Time function.)
iii
CABLE CLONING (for all versions except DJ-491 C)
With an interface cable (see following diagram), cloning is possible with your Alinco
transceiver. This means that the entire memory and VFO contents of one transceiver
will be transfered to another transceiver via the interface cable.
Here is how it works:
1. Turn power off on both radios.
2. Plug-in one end of the interface cable into the speaker jack of one radio, and plug-in
the other end into the speaker jack of the other radio.
3. Turn on the power on both radios.
23
III
4. Press and hold the MONI key, then press the PTT switch three times on both
radios.
The" [ Lon
icon will appear on the LCD of both radios.
5. Press the MONI key of the radio receiving the information to be copied (SLAVE
RADIO).
The" ,. ERd~ .. icon will appear on the LCD.
6. Press the PTT switch of the radio (MASTER RADIO) whose memory will be transfered to the slave radio.
The" PU5h .. icon will appear on the LCD. Press the PTT switch again on the
master radio to start transfer of information data.
7. During the cloning, the" 5E nd .. icon will appear on the LCDofthe master radio,
and the"
icon will appear on the LCD of slave radio. After the cloning, the
.. End .. icon will appear for two seconds on the LCD of slave radio.
8. Turn the power off on both radios.
9. Disconnect the interface cable.
E..
GEl:"
Clone interface cable should be
built as follows:
•
24
3.5<1> Stereo plug
•
8-5 Resetting (Not applicable for DJ-491 C)
While pressing the
iii key, turn on power.
VFO Frequency
Channel Step
Shift
Offset Frequency
C811 Frequency
DSO Setting
DSaCode
Auto Dialer Code
Tone Setting
Tone Frequency
Transmitter Output
Key Lock
Time Out Timer
Low PowerfTone Burst
Battery Save function
DTMF pause before first digit
DJ·191TfTA1fTA2
DJ-191E
DJ-491TA1fT A2ITA3
145.000MHz
5kHz
None
0.6kHz
145.000MHz
None
None
None
None
88.5Hz
Low
Off
Off
LowPTT
On
0.4
145.000MHz
12.5kHz
None
0.6kHz
145.000MHz
None
None
None
None
88.5Hz
Low
Off
Off
Tone Burst
On
0.4
445.000MHz
5kHz
None
0.6kHz
445.000MHz
None
None
None
None
88.5Hz
Low
Off
Off
LowPTT
On
0.4
25
III
• Charger EDe-63 (for 120VAC), EDC-64 (for 22OVAC)
This unit is a Charger for exclusive use of Ni-Gd Battery
Packs used with the ALiNCO handheld transceiver.
With EDC-63/EDC-64, the battery packs EBP-33N/
EBP-34N can be charged while it is attached to the transceiver or the receiver.
< Installation>
Insert the battery-pack fully into the charger unit, matching
the grooves. The red lamp will light up and charging will
start.
EBP-33N
EBP-34N
EBP-35N
~ EBP-36N
WEBP-37N
EDC-63I64
rami
1. Turn off the transceiver power while charging.
2. Never charge the battery packs of other makes with this Charger.
3. The required charging time depends on the conditions and the models of battery
pack. Refer to the instruction manuals of the battery pack.
4. Never short-circuit the charging terminals of this Charger with a metal object, etc.
for the charger may be damaged by a strong current.
5. Precaution
Don't insert the above mentioned Ni-Cd batteries viceversa.
This mis-use causes damage on the drop in charger.
6. Never mount the battery pack in the charger backwards.
7. Charging should be conducted in the temperature range of O°C to 40°C as incomplete charging or deterioration of battery performance may occur if charged outside
this range.
-
• Ni-Cd Battery EBP-33N/34N/35N/36N/37N
1. The battery pack is not charged when shipped. It must be charged before using.
2. Charging should be conducted in the temperature range of O°C to 40°C, as incomplete charging or deterioration of battery performance may occur if charged outside
this range.
4. Never short-circuit the battery pack terminals, as this may cause damage to the
equipment or lead .to heating of the battery which may cause burns.
5. Unnecessarily prolonged charging (overcharging) may result in deterioration of
battery performance.
6. The battery pack should be stored in a dry place with a temperature range of - 20°C
to +45°C. Temperatures outside this range or extremely high levels of humidity
may lead to leaking of the battery liquid or resting of the metal components of the
batteries.
7. Normally the battery pack can be charged up to 300 times. However, the battery
pack can be considered to be exhausted if the period of use drops off markedly
despite being charged for the aforementioned time. When this happens, a new pack
should be used.
8. ~ ATIENTION: The battery that you have purchased is recyclable. At the
f6¢1 end of it's useful life, under various state and local laws, it may be illegal
Hi-Cd
to dispose of this battery into the municipal waste stream. Check with
your local solid waste officials for details in your area for recycling options
or proper disposal.
Charging with EOe-63 or EOe-64 (Normal Charger)
1. Mount the Ni-Cd battery pack in the charger. The red lamp will light up and charging
will start.
2. See table 2 for charging time. Dismount the battery pack from the charger after the
charging.
Charging with EOe-60 or EOC-61 (QUick Charger)
1. Mount the Ni-Cd battery pack in the charger. The red lamp will light up and charging
will start.
2. When the battery pack is mounted correctly, the red lamp will light up and quick
charging will start.
When quick charging is completed, the red lamp will go off/the green lamp will light
up. The charge rate will be then reduced to a weak supplementary charge rate to
protect the battery pack from overcharging.
3. Do not modify, dismantle, incinerate or immerse the battery pack in water as this
may be dangerous. Be careful not to drop the battery pack or subject it to any severe
shocks.
26
27
III
Specifications
OUTPUT
VOLTAGE
EDC-63 (for 120V)
(for 220V)
EDC-60 (for 120V)
EDC-61 (for 220V)
EDC~
EBP-33N
650mAH
4.8V
EBP-33N
Approx. 10 hours
Approx. 0.7 hour
EBP-34N
1200mAH
4.8V
EBP-34N
Approx. 18 hours
Approx. 1.2 hours
EBP-35N
900mAH
7.2V
EBP-35N
Approx. 10 hours
Approx. 1.7 hours
EBP-36N
650mAH
9.6V
EBP-36N
Approx. 10 hours
Approx. 1.2 hours
EBP-37N
700mAH
4.8V
EBP-37N
Approx. 11 hours
Approx. 0.7 hour
The above times are required for completely discharged
battery pack.
ATTENTION!
PREVENT SHORT-CIRCUITING OF THE Ni-Cd
BATTERY PACK
Be extra cautious when carrying the Ni-Cd battery
pack; short-circuiting will produce surge current
flow resulting in possible fire.
-
).
~ T~i"',
~
Terminals
--
III
• # 824 Functions
Charging Times and Chargers
BATTERY
CAPACITY
7~i:APPENDIX
The Transceiver supports the following #824 functions.
BClO (busy channel lock out): Enables or disables the busy channel lock out.
Default setting: Disabled.
ANS (answer-back):
Enables or disables the answer-back.
Default setting: Disabled.
BPT (burst/pause time):
Sets the DTMF burst/pause time.
Default setting: 60 msec.
BST (burst time):
Sets the burst time tor the first digit of the DTMF code.
Default setting: 60 msec.
TOT-P (TOT penalty time):
Sets the penalty time.
Default setting: 5 sec.
Starting and Exiting the # 824-Function Mode
To enter the # 824-function mode:
1. Hold down the key and press the @3'keyuntileither"Kl"or"Fl" is displayed.
2. Enter the password "# 824" with the numeric keys. When you enter the correct
password, "oPEn" will appear for a few seconds.
3. Activate the desired function by holding down the
key and pressing the
appropriate numeric key. see the following table.
iii
I:n'
iii
I
,-,
To activate:
BClO (busy channel lock out)
ANS (answer-back)
BPT (burst/pause time)
BST (burst time)
TOT-P (TOT penalty time)
imity
, e.g.
Press:
F+5
F+6
F+8
F +9
F+0
For more information about these functions, see the following sections.
_
,~<
,·r,.-,'
--i. _
•
( .. ,. 0(
•
DO enclose inside a non-conductive enclosure (bags or
handkerchief made only of non-conductive material).
~ ~
'"
. . . , .. . . . .
....
....
'0(
DO protect by spreading a
non-conductive sheet to place
on a flat surface.
To exit the # 824-functlon mode:
1. Hold down the key and press the @3'key until either "Kl" or "Fl" is displayed.
2. Enter the password "# 824" with the numeric keys. When you enter the correct
password, "CloSE" will appear for a few seconds, indicating that you can no longer
use the #824 functions.
iii
·For Carrying The battery pack, it should be kept in the bag provided.
28
www.ALINCO-RADIO.ru
29
III
BCLO (Busy Channel Lock Out)
Turning on the BCLO disables transmission, except when:
• No signal is received ("BUSY" disappears).
• The tone matches and the squelch is unmuted (while using tone squelch· only).
• The code matches and the squelch is unmuted (while using code squelch only).
• Both the tone and code match and the squelch is unmuted (while using the code
and tone squelch·).
If you press the PTT key in the BClO mode, you will hear a warning beep and
"BUSY" will blink once, instead of the transceiver transmitting data.
·optional EJ-28U requied.
To enable or disable the BelO:
1. In the #824-function mode, hold down the key and press the € ) key.
The current BClO status appears.
2. Turn the Main Tuning Dial to select the desired value.
L0 - 0 F The BClO is disabled (default).
L 0 - 01"1 The BClO is enabled.
key. Or hold down the key and press the <£) key.
3. Press the PTT or
iii
<£5
iii
ANS (Answer-Back)
To work with the answer-back, you must previously program the DSQ. When the DSQ
code matches and the squelch is unmuted, the transceiver automatically sends a
single 852 Hz, 10 second tone. The answer-back is activated even when the transceiver is in the BUSY status (the squelch has been unmuted).
To enable or disable the ANS:
1. In the #824-function mode, hold down the key and press the <£) key.
The current answer-back setting is displayed.
2. Turn the Main Tuning Dial to select the desired value.
R1"1 - 0 F The answer-back is disabled (default).
1"1 - 0 1"1 The answer-back is enabled.
3. Press the PTT or ~ key. Or hold down the key and press the <£) key.
iii
R
iii
BPT (Burst/Pause Time)
The auto dialer and DSQ uses the time you specify here as the burst and pause
durations for the DTMF code. Note that you cannot change the bursUpause time in the
Channel Indication mode.
30
To set the BPT:
1. In the #824-function mode, hold down the key and press the <£) key.
The current burst/pause time appears.
2. Turn the Main Tuning Dial to select the desired value.
Display
Burst time
Pause time
iii
p - 60
60 msec.
60 msec. (Default)
80 msec.
80 msec.
p - :60 160 msec.
160 msec.
P-i'OO 200 msec. 200 msec.
3. Press the PTT or ~ key. Or hold down the
p-eo
iii key and press the <£) key.
BST (Burst Time)
Sets the burst duration for the first digit of the DTMF code. The auto dialer and DSQ use
the time you specify here as the burst duration for the first digit of the DTMF code. Note
that you cannot change the burst time in the Channel Indication mode.
To set the BST:
key and press the <£) key. The
1. In the #824-function mode, hold down the
current burst/pause time appears.
2. Turn the Main Tuning Dial to select the desired value.
Display
1st digit burst time
iii
b- 60
60 msec. (Default)
b80 msec.
b"" :60 160 msec.
b-i'OO 2OOmsec.
3. Press the PTT or
key. Or hold down the
eo
<£5
iii key and press the <£) key.
TOT-P (TOT Penalty Time)
If the TOT (Time Out Timer) expires, the transmission is prohibited until the TOT
penalty time you specify elapses. If you press the PTT key during the penalty time,
you will hear an alarm beep. However, if you are still holding down the PTT key after
the TOT expires, the penalty will be cancelled just after the TOT penalty time elapses.
To set the TOT·P:
1. In the #824-function mode, hold down the key and press the <[:) key.
The current penalty time appears.
2 Turn the Main Tuning Dial to select the desired value. The range is from 0 to 15
seconds, and the default is 5 seconds. For example, when the LCD displays:
Cp - 5 the penalty time is set to 5 seconds.
3. Press the PTT or ~ key. Or hold down the key and press the <[:) key.
iii
a
iii
31