1
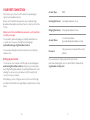
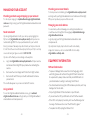
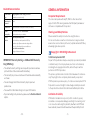
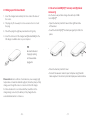
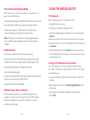
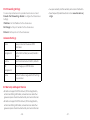
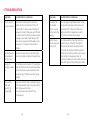
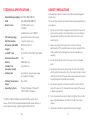
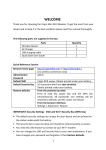
BROADBAND Mini WiFi Modem MF62 User Guide IS YOUR ACCOUNT ACTIVATED? Pre-Paid Customers Table of contents First up, you need to activate your service: Is your account activated 2 CLICKvirginmobile.com.au/activate NB: You’ll need a different internet connection to activate online. Welcome to Virgin Mobile! 4 What's in the box 4 See page 8 for the final steps to get online. System requirements 5 Post-Paid Customers Your first connection 6 Your service is already activated, so head to page 8 for the final steps to get online. Managing your account 8 Equipment Information 9 General information 11 Getting started 14 Using the wireless router 19 Device settings 21 Troubleshooting 28 Technical specifications 30 Safety precautions 31 Questions 32 or CALL 1300 763 039 top secret notes E-mail Address: @virginbroadband.com.au E-mail Password: Service Number: 0 4 Account PIN: See page 20 for tips on managing your account. -2- -3- Welcome to Virgin Mobile! System requirements Congratulations! That cool gadget you’ve got in your hands is going to let you take the internet with you, so you’ll never have to miss a beat. • Windows XP Service Pack 2, Windows Vista or Windows 7. • Mac OS X 10.5 and 10.6 with the latest updates installed. • The hardware of your computer must meet or exceed the recommended system requirements for the installed version of OS. Your new modem is easy to connect - you don’t have to waste time configuring advanced settings. You’ll be surfing the web in no time, using the latest wireless network technology (where available). In addition to being a wireless HSPA+ modem, your new modem is also a WiFi router allowing you to connect up to 8 wireless devices to the internet! To use your modem wirelessly, follow the steps on page xx. Features of your modem • Easy installation • Connect wirelessly via WiFi • Rechargeable Battery • MicroSD Card Slot • Check your connection instantly with the built-in OLED Display • Compatible with any PC, MAC or other device that Supports WiFi What’s in the box? • Wireless Router • AC Charger • USB charging cable • Quick Start User Guide -4- -5- Your First Connection The first time you connect, you’ll be taken to a special page to register your broadband service. Enter your first and last names and set up your primary Virgin Broadband email address, which we’ll use to contact you from time to time. Make a note of this email address & password – you’ll need them to check your usage. You can delete, edit and manage your existing email addresses or create up to 4 new ones through the following page: mybroadbandusage.virginbroadband.com.au. Your username and password are the same as for your primary email account. Setting up your e-mail You can access your email account through our web mail page at: webmail.virginbroadband.com.au Simply enter your Username (including the @virginbroadband.com.au bit) and Password to start emailing. You can access your email account from any Internet connection on any computer. Account Type POP3 Incoming Mail server mail.virginbroadband.com.au Outgoing Mail server smtp.virginbroadband.com.au Account Name Your full email address ([email protected]) Password The password you created with the email address. If you need specific, step by step instructions for any particular email program, visit our online FAQ’s for detailed help: virginmobile.custhelp.com Alternatively, you can configure your account to be used through an email client like Outlook or Apple Mail, by using the basic settings below: -6- -7- Managing Your Account Checking your data usage & topping up your account To check your usage, go to mybroadbandusage.virginbroadband. com.au and log in using your full Virgin Broadband email address and password. Need more data? If you’re getting a bill each month, you can top-up by logging into My Account (virginmobile.com.au/myaccount) with your service number & 6-digit PIN. The top-up will be added to your next bill. Also, if you haven’t already set up direct debit, we fully recommend it! Just fill out the enclosed form and pop it in the post. Or, to set it up on a credit card, just give us a call on 1300 555 100. If you’re on Pre-Paid you can recharge online anytime: Log in at virginmobile.com.au/myaccount with your service number and the 6-digit PIN you picked when activating the service. b. Got a voucher or recharge card? Enter the 12 digit number. c. Got a credit card? Enter your credit card details & choose your amount. The credit will appear on your account within 15 minutes. a. Using webmail To use the Virgin Broadband Webmail service, go to webmail. virginbroadband.com.au and log in with your full Virgin Broadband email address and email password. -8- Checking your account details To check your account details, go to virginmobile.com.au/myaccount and log in with your Virgin Broadband Service Number and the 6 digit PIN you set up when you opened the account. Managing your email address You can delete, edit and manage your existing email addresses or add new ones through the following page: mybroadbandusage. virginbroadband.com.au. Log in by using your full Virgin Broadband email address and email password. If you’d prefer step by step instructions with some handy images for reference, visit our online FAQ’s for more help: virginmobile.custhelp.com Equipment Information SIM card information • To prevent damage from an electronic discharge (e.g. static electricity) please do not touch the gold SIM card connectors. As a precaution, always make sure that your USB Modem is in your hand before inserting or removing the SIM card. • You should avoid removing the SIM card where possible, as it may damage it or the modem. • Only a Virgin Mobile SIM card will work in your Modem. • If you remove the SIM, your Modem will not find the network. • If the SIM is not properly inserted, you’ll see the following error message. “Remove and re-insert the SIM and try again.” • To replace the SIM, unplug the Modem first. -9- General Information Quick Reference Section Browser home page http://virginmf62.com or http://192.168.0.1 (via wireless connection only) Administrator Password admin Default SSID Virgin Wifi xxxxxx. Details printed under your battery. Default Security Key 10 characters which are case sensitive. Details printed under your battery. Restore defaults From the powered up state: Press & hold the power key and the WPS key simultaneously. All passwords and settings will be restored to defaults and the router will reboot. From the browser interface: Settings > Advanced > Restore IMPORTANT: Security Settings - SSID and WiFi Security Key (WPA Key) • The default security settings are unique for your device and are printed on the sticker underneath the battery. • The Security Key is case sensitive and should be entered exactly as shown. • You can change the SSID and Security Key to your own preferences. • You need this information to log on to your WiFi modem. • If you cannot log on to your device, please use the Restore defaults option. - 10 - Computer Requirements The router will operate with any PC, MAC or other device that supports WiFi. ZTE cannot guarantee that third party hardware or software is compatible with this product. Warnings and Safety Notices Please read all the safety notices before using this device. Do not use the device near fuel or chemicals or in any prescribed area such as service stations, refineries, hospitals and aircraft. Obey all warning signs where posted. Copyright © 2011 All Rights Reserved. 1st Edition September 2011 No part of this publication may be excerpted, reproduced, translated or utilized in any form or by any means, electronic or mechanical, including photocopying and microfilm, without the prior written permission of ZTE Corporation. The pictures, symbols and contents in this manual are for reference only. They might not be completely identical with your product. ZTE Corporation operates a policy of continuous development. ZTE Corporation reserves the right to make changes and improvements to the products described in this document without prior notice. Limitation of Liability ZTE shall not be liable for any loss of profits or indirect, special, incidental or consequential damages resulting from or arising out of or in connection with using this product, whether or not ZTE had been advised, knew or should have known thepossibility of such - 11 - damages. The user should refer to the enclosed warranty card for full warranty and service information. RoHS Declaration (Restriction of Hazardous Substances) RF Safety Information ZTE declares that the Wireless Router is free from hazardous materials and complies with EU directive 2002/95/EC (commonly known as the RoHS Directive) and the amendments. The router has an internal antenna. For optimum performance with minimum power consumption do not shield the device or cover with any object. Covering the antenna affects signal quality, may cause the router to operate at a higher power level than needed, and may shorten battery life. Radio Frequency Energy Your wireless router is a low-power radio transmitter and receiver. When switched on it intermittently transmits radio frequency (RF) energy (radio waves). The transmit power level is optimized for best performance and automatically reduces when there is good quality reception. Maximum power is only used at the edge of network coverage so under most circumstances the power output is very low. Under poor network conditions the router transmits at a higher power, may get hot and have a significantly shorter battery life. WiFi Alliance Interoperability Certification The Wireless Router has successfully completed the WiFi Alliance interoperability testing and is compatible with any wireless device bearing the logo as shown. The model number is MF62. Additional information is available at http://www.WiFi.org/certification_programs.php is a registered trademark of SD Card Association. Declaration of Conformity – Specific Absorption Rate (SAR) We declare that the product detailed in this manual, and in combination with our accessories, conform with the essential requirements of The Radio Communications Standard (Electromagnetic Radiation Human Exposure) 2003 and the Australian Communications and Media Authority Section 376 of the Telecommunications Act 1997. N14945 - 12 - - 13 - 2.1 Insert your USIM 2 Getting started Antenna Port OLED Display 2.1 Insert your USIM 1. thethe back cover down to open. 1. Slide Slide back cover 2.1 Insert your USIMdown to open. 2. Insert the (U)SIM with the gold contacts facing down and the bevelled 1. Slidecard the back cover down to open. 2. Insert the (U)SIM card with the gold contacts facing down and Power microSD slot TM WPS USB Charging Port 1. Power Key - Press and hold the for three seconds to switch on or off. 2. microSD™ slot for expandable memory up to 32GB 3. WPS – Press to enable WiFi Protected Setup authentication process. 4. USB charging port - Connect to your PC or AC charger for battery charging. 5. TS9 Antenna port – Connect an external antenna to boost your signal. 6. Display Panel: Insert the (U)SIM card with the gold contacts facing down and the bevelled edgethe on the left2. hand side as shown: edge on the left hand side as shown: bevelled edge on the left hand side as shown: TIP TIP TIP The SSID and The password SSID and password The SSID and password settings are printed inprinted the in the settings are settings are printed in the battery compartment. battery compartment. battery compartment. 3. Insert the battery with the contacts located against the gold springs: 3. Insert the battery with the contacts located against the gold springs: 3. Insert the battery with the contacts located against the gold springs: 4. Line up the back cover and slide back into place. 5. Press and hold the power key for 3 seconds to switch the router on. 4. Line up the back cover and slide back into place. 5. power key for 3 seconds to switch router on. 4.Press Lineand uphold thethe back cover and slide back intothe place. - 14 - 5. Press and hold the power key for 3 seconds to switch the router on. - 15 - For these situations it is recommended that, in addition to the charger being connected, the battery is 2.2 Charge your Wireless Router 1. Insert the charger lead carefully into the socket at the base of the router. 2. The plug only fits one way. Do not use excessive force to insert o the socketthe at plug. the base of the router. 3. Check the plug is the right way round and insert it gently. se excessive force to insert the plug. 4. Insert the other end of the charger lead (Standard USB) into the d and insert gently. or a USB socket on your computer. ACit charger ead (Standard USB) into the AC TIP mputer. Be careful to avoid tripping or pulling on the lead while g plugged in. low coverage, high temperature or maximum data Please Under conditions n though the routernote: is connected to the AC charger.of extended use, low coverage, high 2.3before Insert a microSD(HC)™ memory card (Optional fully charged extended data transfers commence. Accessory) Use the device as portable storage drive with up to 32GB 2.3 Insert a microSD(HC)™ memory card (Optional Accessory) microSD(HC)™: Open the memory card slotdrive coverwith on the handmicroSD(HC)™: side Use the•device as portable storage upright to 32GB of the router. Open the memory card slotcard cover the right side of the router. • Insert the microSD(HC)™ andon press gentlyhand to click into Insert the microSD(HC)™ card and press gently to click into place: place: • Close the memory card slot cover Connect the wireless router to your computer using the USB cable • Close the memory card slot cover supplied - the card will display as an external • Connect the memory wireless router to your computer using thedrive. USB cable supplied - the memory card will display as an external drive. temperature or maximum data through put, the battery may not fully charge, though the routerisis connected to the AC charger. dition to the chargereven being connected, the battery For these situations it is recommended that, in addition to the charger being connected, the battery is fully charged before extended data transfers commence. ard (Optional Accessory) ence. ve with up to 32GB microSD(HC)™: ver on the right hand side of the router. nd press gently to click into place: - 16 - - 17 - 2.4 Low Power Mode (Standby Mode) 3 Using the Wireless Router With no WiFi device connected the wireless router will go into low power mode after 10 minutes. 3.1 Preparation • The display will extinguish, the WiFi SSID broadcast will switch off. Before using the wireless router, make sure that: • Press the Power or WPS key to exit from Low Power Mode. • The (U)SIM card is inserted. • The device is On and the display is visible. • Search for available Wireless Networks on your computer and connect. Example for Windows XP: Start > Network Connections > Wireless Network Connection > Select the Virgin WiFi Wireless Network and click Connect. • To operate as ‘always on’ make sure there is a WiFi device connected that does not itself go into sleep mode. • Note: If the device is powered off and charging (power lead connected) then the charging animation will stop when fully charged. 2.5 Network Lock • Your wireless router is locked to the Virgin network. • When you insert a non-Virgin SIM card you are presented with unlock instructions in the web interface (http://virginmf.com) • Contact Virgin to obtain your 16 digit unlock code. • An unlocking fee may apply. • 5 incorrect attempts will block the unlock process and the device will then only work with an Virgin SIM card. • Contact Virgin for more information. 2.6 Connecting an External Antenna An external antenna may be recommended in areas of lower coverage to improve your modem performance. TS9 termination antennas are available from your retailer. Insert the connector carefully to avoid damage. - 18 - • Enter the default security key exactly as shown on the sticker under the battery. Your security key is case sensitive, be sure to use the correct text. 3.2 Login to the Web based User Interface The router will work out of the box using the default settings. If you wish to change any settings please log onto the router using a standard browser: • Use your computer to Search and Connect to the Virgin WiFi Network. • Open a web browser and enter http://virginmf62.com in the address bar. • Enter ‘admin’ into the administrator password box then press Login - 19 - 3.4 WAN Connection Always On The modem will connect to the cellular network automatically. Always on does not refer to the WiFi connection status. To operate as ‘always on’ for WiFi make sure there is a WiFi device connected that does not itself go into sleep mode. Manual Select Manual mode to manually control when the unit connects to the cellular data service. Select Connect or Disconnect and press Apply to make the selected action. When you login, the Home Page is displayed 3.5 Phone Book 3.3 Quick Setup Step through the Quick Setup wizard if you wish to change the defaults: APN Auto or Manual Only change if advised by your service provider SSID Name Name of your WiFi network SSID Enabled Select whether to broadcast your WiFi network name Encryption mode Select your required mode. No need to change WPA Key Define your own access key if required - 20 - Device View Contacts saved to your Device SIM Card View Contacts saved on the SIM card Add New Add a new contact, select the Save location to be the Device or the SIM card. Edit Edit a Contact to save it to the SIM card or Device 3.6 Settings Settings can only be changed with the device disconnected. - 21 - 3G Settings WiFi Security Settings Wireless info View network status Network Select Select your preferred network mode. Only change if instructed by your service provider. APN Setting Select or change your APN settings. Only change if instructed by your service provider. WiFi Settings Station List View number of connected WiFi devices Security Select or change your WiFi security mode and password WPS WPS uses a PIN number to share with compatible devices. - 22 - • OPEN: Anyone can connect to your network without authentication. • SHARED: WLAN clients who have the same WEP key as the wireless router can access the wireless network. • WPA-PSK: WPA Pre-Shared Key, plain text with at least 8 characters. • WPA2-PSK: A more secure version of WPA using the 802.11i standard. • WPA-PSK/WPA2-PSK: Apply both the WPA-PSK and WPA2-PSK scheme. • WEP Keys: Up to four keys can be set. The primary key is the only key in use at a given time. Whatever keys you enter for an access point, you must also enter the same keys for the clients in the same order. In other words, WEP key 1 on the AP must match WEP key 1 on the client. • If the Authentication type is OPEN or SHARED, the bottom part of the configuration page displays further parameters. • If the Authentication type is WPA-PSK , WPA2-PSK or WPA-PSK/ WPA2-PSK , the bottom part of the configuration page displays the WPA parameters. • WPA Algorithm: TKIP, AES or AUTO. • Pass phrase: You can input a pass phrase encryption key format • Click Apply to save your configuration. - 23 - Firewall Settings Firewall settings are intended for advanced users and network administrators. There is usually no need to apply any settings in a home environment. Note: You can set up to a maximum of 10 filter items for MAC/IP/ Port Filtering and Port Forwarding. MAC / IP / Port filtering • Default Policy: Set how to handle the packet if none of the rules match. • MAC address: Set the MAC address to be filtered. • Destination IP Address: Set the destination IP address to be filtered. • Source IP Address: Set the source IP address to be filtered. • Protocol: Set which protocol to be used for filtering. • Destination Port Range: Set the destination port numbers to be filtered • Source Port Range: Set the source port numbers to be filtered. • Action: Set how to handle the detected packet. Note: Filtering rules are matched one by one, if a provision is met it will not continue to match against the other rules set. - 24 - - 25 - Port Forwarding Settings You can set up virtual servers to provide internet services. Select Firewall > Port Forwarding > Enable to configure the Virtual Server Settings. • See your warranty card for warranty and service information. • View Frequently Asked Questions on line: www.zte.com.au/ virgin IP Address: Set the IP address for the virtual server. Port Range: Set the port numbers for the virtual server. Protocol: Set the protocol for the virtual server. Advanced Settings Status View your device firmware and IMEI information Management Set the Administrator password, default is ‘admin’ Restore Press to restore device to factory defaults PIN Management Set or change your SIM PIN status Router Set the IP address range and DHCP settings for your router 3.8 Warranty and Support Service • All calls and support for PIN numbers, SIM card registration, account and billing information, network services and other general enquiries should be directed to your Service Provider. • All calls and support for PIN numbers, SIM card registration, account and billing information, network services and other general enquiries should be directed to your Service Provider. - 26 - - 27 - 4 Troubleshooting Symptoms Possible Problems/ Solutions Symptoms Possible Problems/ Solutions I cannot access the internet at all. Check the LCD display which shows the number of active connections. If this is 0 or x then WiFi is notconnected. Verify your password is correct. Make sure your SIM card is inserted correctly. Check you have network coverage in your area. Check that your SIM card is active and enabled with data services. Please wait 1 - 2 minutes for the router to initialize. My battery has not charged while in use and connected to the charger. In low coverage or high data transfer modes the internal temperature of the device can rise above 45°C. In these conditions the battery cannot be charged due to safety limits with Li-ion battery technology. My WiFi device goes to sleep and disconnects. This is dependant on the other devices, ie your WiFi clients. If the WiFi client (PC or other device) has a WiFi sleep policy then WiFi signals are switched off after a period. With no active WiFi connections your wireless router will go into low power mode. To maintain an ‘always on’ service make sure you have a WiFi device connected to your router. The download or upload speeds are very slow. The speed is dependent on signal strength. Check your signal strength and network type. The signal strength is always low. This indicates poor reception. Try moving the router to another location nearer the window. You can purchase an external antenna with connector type TS9 to improve your signal strength I secured my router and have lost my password(s). Reset your router to factory defaults to erase all stored passwords and encryption settings. From the powered up state: Press the power key and the WPS key simultaneously. - 28 - - 29 - 5 Technical Specifications • Network & Frequency Band WCDMA: 900, 2100MHz • GSM 850, 900, 1800, 1900MHz • Data Services HSDPA Downlink: up to 21.6Mb/s* • HSUPA Uplink: up to 5.76Mb/s* • WiFi working range approx 25m radius in free space • WiFi Connections supports up to 8 users • Dimensions (W×H×D) 99.6 x 54 x 14.6mm • Weight: 86g • microSD™ card microSD™ or microSDHC™ up to 32GB • External Antenna Port TS9 • Battery 1500mAh Li-ion • Standby time up to 80 hours (low power mode) • Working time up to 4hours, depending on usage and network conditions. • Working Temperature 0 to +40°C Range • Operating Systems Microsoft Windows 7, Vista & XP MAC OS 10.4.11 and above. * HSDPA / HSUPA: 21.6Mbps downlink & 5.8 Mbps uplink rated device. Actual customer peak download/upload speeds will be less due to network sharing, signal strength and other factors. - 30 - 6 Safety Precautions Some electronic devices may be susceptible to electromagnetic interference. The router may interfere with medical devices like hearing aids and pacemakers. 1. Do not use your router in dangerous environments such as oil terminals, fuel depots, chemical factories or service stations. Obey all warning notices and switch off your router in such environments. 2. Please use original accessories or accessories that are authorized by ZTE. Unauthorized accessories may affect the router performance, damage the router or invalidate your warranty. 3. Do not dismantle the router. There are no user serviceable parts. 4. Do not allow the router or accessories to come into contact with liquid or moisture at any time. The router contains a liquid detection sticker that changes colour when exposed to liquids. Liquid damage will invalidate your warranty. 5. Do not place objects on top of the router or restrict air flow around the device. This may lead to overheating of the device or affect signal quality. 6. 6. Do not expose the router to direct sunlight or store it in hot areas. High temperature can shorten the life of electronic devices. 7. Do not allow children to play with the router or charger. - 31 - 8. The router and charger are for indoor use only. 9. Use an antistatic cloth to clean the router. Do not use harsh chemicals solvents or abrasive cleaners as these could damage the case. Got a question we haven’t answered here ? • Try virginmobile.custhelp.com or • Email virginmobile.com.au/contactus • Virgin Mobile stores are dotted around Oz – check online for your nearest • Old school mail can be addressed to: Virgin Mobile Locked Bag 17 Royal Exchange NSW 1225 Or Reply Paid 68456 NSW 2001 When you connect to Virgin Mobile, we need to collect personal information from you. We follow strict guidelines to keep your details safe. You can read these online at virginmobile.com.au Just click on ‘Privacy Policy’ at the bottom of the Home Page. - 32 - - 33 - - 34 -