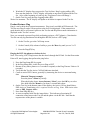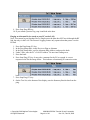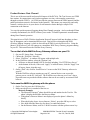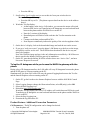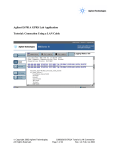
1
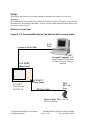
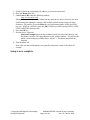
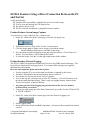
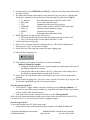
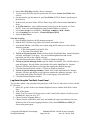
Agilent E6701A GPRS Lab Application Tutorial: Direct Connection Using a Crossover Cable Copyright 2002 Agilent Technologies. All Rights Reserved. 10001809-E6701A Tutorial Direct Connection Page 1 of 30 Rev. 1.0; Feb. 19, 2002 Table of Contents Table of Contents .......................................................................................................................... 2 About This Tutorial ...................................................................................................................... 4 Introduction ................................................................................................................................... 4 Equipment Required for this Tutorial ........................................................................................ 5 Test Set.....................................................................................................................................................5 Wireless Device .......................................................................................................................................5 Personal Computer (PC) ........................................................................................................................5 WAP Gateway software (for data connection evaluations).................................................................5 Cables.......................................................................................................................................................5 Setup ............................................................................................................................................... 7 Hardware Connections...........................................................................................................................7 Figure 1. PC Connected Directly to Test Set via LAN Crossover Cable ........................................................... 7 Test Set Setup ..........................................................................................................................................8 Set the Date and Time (Optional)..........................................................................................................9 Set the RF In/Out Amplitude.................................................................................................................9 Set the Cell Parameters ..........................................................................................................................9 PC Setup ................................................................................................................................................10 Windows 98....................................................................................................................................................... 10 Windows 2000................................................................................................................................................... 12 Verify PC Settings.................................................................................................................................13 Verify that Your Device Will Perform an Attach.............................................................................................. 14 Set Up Your Wireless Device............................................................................................................................ 14 Set WAPlite Gateway Address in Your Device ................................................................................................ 15 E6701A Features Using a Direct Connection Between the PC and Test Set ......................... 17 Product Feature: Screen Image Capture............................................................................................17 Product Feature: Protocol Logging.....................................................................................................17 View the log data on the PC .............................................................................................................................. 18 Save the Log to the PC ...................................................................................................................................... 18 View the saved log ............................................................................................................................................ 19 Log Data Using the Test Set’s Front Panel........................................................................................................ 19 Product Feature: Ping ..........................................................................................................................20 Product Feature: Data Channel ..........................................................................................................22 To run the Infinite WAPlite Proxy Gateway software on your PC: .................................................................. 22 To browse the WAPLite gateway with the phone: ............................................................................................ 22 To log the IP datagrams while you browse the WAPLite gateway with the phone:.......................................... 23 Product Feature: Additional Connection Parameters.......................................................................23 Copyright 2002 Agilent Technologies. All Rights Reserved. 10001809-E6701A Tutorial Direct Connection Page 2 of 30 Rev. 1.0; Feb. 19, 2002 Appendix A: Installing a WAP Gateway into a PC ................................................................ 25 Infinite WAPLite Gateway (by Captaris Inc.) ...................................................................................25 Appendix B: Troubleshooting................................................................................................... 26 Appendix C. Glossary ................................................................................................................ 30 Copyright 2002 Agilent Technologies. All Rights Reserved. 10001809-E6701A Tutorial Direct Connection Page 3 of 30 Rev. 1.0; Feb. 19, 2002 About This Tutorial This tutorial gives you an overview of the primary features of the E6701A GPRS Lab Application. The tutorial explains how to - Make a direct connection between the test set and a PC (not over an established LAN) - Setup the test set and PC for the application - Capture a screen from the test set - Perform a PING - Log protocol - Use the Data Channel Introduction The Agilent Technologies E6701A Lab Application shortens the GPRS wireless appliance design cycle with a one-box solution for parametric and signaling design validation. The E6701A Lab Application (LA) is an option for the Agilent 8960 Series 10 (E5515B or E5515C) Wireless Communications Test Set. With this option, R&D integration engineers working on functional verification of GPRS wireless appliance firmware and hardware now have access to a flexible, comprehensive, and easy-to-use one-box solution for quickly and accurately validating a product’s parametric and signaling design requirements. The Agilent 8960 Test Set, the industry standard for testing cellular handsets, now accommodates many requirements of GPRS wireless appliance R&D engineers. The platform’s new E6701A software retains the measurement and call processing capability of the E1964A GPRS Mobile Test Application, which establishes a vital link between design and manufacturing. The ability to use the same equipment in R&D and production allows for a rapid and smooth transition from one phase in the product lifecycle to the next, as well as improved troubleshooting processes. The Test Set’s protocol logging capabilities facilitate testing and troubleshooting of new signaling features and data channels, so engineers can extract better information about their designs. Two-way IP data communication, when set up between a device and a network, provides real data flow on a real data channel, enabling R&D integration engineers to test more of the data handling performance of a GPRS device. Users of the E6701A can set timing advance and cell parameters, which allows for testing and troubleshooting issues related to timing and base station configuration. Additional information is available on the Web at: www.agilent.com/find/8960support Copyright 2002 Agilent Technologies. All Rights Reserved. 10001809-E6701A Tutorial Direct Connection Page 4 of 30 Rev. 1.0; Feb. 19, 2002 Equipment Required for this Tutorial Test Set Agilent E5515B Opt. 002 or E5515C Opt. 002 or E5515TU Opt. 002 (upgraded) If unit is E5515B, check serial number for compatibility: Serial number with US prefix must be ≥ US40410511 Serial number with GB prefix must be ≥ GB40410348 Contact Agilent for E5515B upgrade information if you have a lower serial number. E6701A GPRS Lab Application (Test Set internal software; Rev. A.01.10 or higher) E1960A GSM Test Application (optional Test Set software; useful when testing wireless devices with both GSM and GPRS capabilities; procedures using the E1960A TA are NOT included in this tutorial) Wireless Device GPRS phone or other wireless appliance This tutorial was written using a Motorola Timeport 260 Series GPRS Mobile Phone with RF cable, battery, battery charger SIM Card (Subscriber Identity Module): Use a card appropriate for your device. Personal Computer (PC) Windows PC PC Hardware: Ethernet LAN port PC Operating System: Microsoft Windows 98 or Windows NT, Version 4.0 with Service Pack 5 or higher (other operating systems may work, but they are not supported) Web Browser: Microsoft Internet Explorer (Version 5.0) Other browsers may work, but require the following features: - Support for nested frames - Support for JavaScript (Version 1.2 or higher) - Support for tables WAP Gateway software (for data connection evaluations) The following has been tested by Agilent, but is not endorsed or guaranteed by Agilent. See Appendix A for download instructions. Infinite WAPLite Gateway (Captaris Inc.) Cables RF Cable Copyright 2002 Agilent Technologies. All Rights Reserved. 10001809-E6701A Tutorial Direct Connection Page 5 of 30 Rev. 1.0; Feb. 19, 2002 Use an appropriate cable that attaches from your wireless device to the test set’s RF IN/OUT port. Crossover LAN Cable Agilent Part Number: 8121-0510 Alternative part: Black Box Part No. EVCRB05-0006; Category-5 Crossover Cable, 1.8 meters, 4-pair, RJ-45 connectors (Black Box Corporation) Copyright 2002 Agilent Technologies. All Rights Reserved. 10001809-E6701A Tutorial Direct Connection Page 6 of 30 Rev. 1.0; Feb. 19, 2002 Setup This section describes how to set up the hardware and software needed to use the test application. Note: This tutorial was written using a Motorola Timeport® phone. Examples are provided in the instructions for setting up this phone. You may need to make different settings when using your own wireless devices. Hardware Connections Figure 1. PC Connected Directly to Test Set via LAN Crossover Cable LAN Port Crossover LAN Cable Personal Computer (with Internet Explorer Web browser and WAP Gateway software installed) LAN PORT (Rear Panel) E5515B/C Test Set with E6701A LA RF IN/OUT (Front Panel) RF Test Cable DUT RF Test Port Device Under Test (with Test SIM card installed) Copyright 2002 Agilent Technologies. All Rights Reserved. 10001809-E6701A Tutorial Direct Connection Page 7 of 30 Rev. 1.0; Feb. 19, 2002 Test Set Setup For consistent results with PC network cards, turn off your PC before proceeding. 1. Turn on the test set or press the blue SHIFT key, then the green Preset key to reset it. 2. Press the SYSTEM CONFIG key. This displays the System Config Screen. 3. Verify the test application: GPRS Lab Application, E6701A, A.01.10 Note: version should be A.01.10 or higher. If not, some functions may be missing, or may cause firmware malfunctions. If the E6701A is not the active Test Application, switch it: 1. Press Application Selection (F3) 2. Press Application Switch (F1); wait a few seconds 3. In the table, use the knob to choose the GPRS Lab Application a. Press the knob. b. Choose Yes in the Switch Now? Box. The Test Set will reconfigure to use the GPRS LA. The power will cycle, and the Test Set will re-start with the new GPRS LA. (The re-start process requires about 2 minutes). 4. After re-start, verify the test application again. 4. Find the test set’s LAN IP Address, Subnet Mask, and Default Gateway. If they are already set to non-zero values, record their values on the lines below. 5. If they are not already set, press Instrument Setup (F1) key. 6. Scroll down and set these arbitrary values for the demo: • LAN IP Address to: 111.222.33.4 • Subnet Mask to: 255.255.255.0 • Default Gateway: 111.222.33.1 (Note: a Gateway address must be entered. To define an arbitrary Gateway address, enter almost the same address as the Test Set’s LAN IP Address, except change the 4th set of digits to the integer 1. Example: Test Set LAN IP Address = 100.200.050.020 Test Set Default Gateway = 100.200.050.1 7. Write down each address: Test Set’s LAN IP Address: _________________________________ Test Set’s Subnet Mask: _________________________________ Copyright 2002 Agilent Technologies. All Rights Reserved. 10001809-E6701A Tutorial Direct Connection Page 8 of 30 Rev. 1.0; Feb. 19, 2002 Test Set’s Default Gateway: _________________________________ Set the Date and Time (Optional) If you set the correct date and time here, then protocol logs will include the correct date and time. 1. Press Instrument Setup (F1) key 2. Scroll down and set the Date in yyyy.mm.dd format (example: 2002.11.5 = November 5, 2002). 3. Press the knob 4. Edit the date, then press the knob to set it. 5. Scroll down and set the Time in hh.mm 24-hour format (example: 17.46 = 5:46 PM) as you did for the Date. 6. Press the Close Menu (F6) key. Set the RF In/Out Amplitude Set this amplitude to compensate for the device’s RF test cable if necessary. 1. Press RF IN/OUT Amptd Offset (F5) key 2. Press RF IN/OUT Amptd Offset Setup (F2) key 3. Typically, it is OK to leave the RF In/Out Amplitude Offset State Value = Off for this tutorial. If it is On, check that reasonable values are entered in the table for the device’s RF test cable. 4. Press the Close Menu (F6) key. Set the Cell Parameters 1. Press CALL SETUP key 2. On the Call Parms (right) column of softkeys, change Cell Power (F7) to –50 dBm. For many devices the test set default settings should work fine: Cell Band (F8): PGSM Broadcast Chan (F9): 20 For other wireless appliances, change the band and channel as necessary. 3. On the Control (left) column of softkeys, press the Data Conn Type (F4) key and change it to IP Data. 4. On the Control column, press the More key until you see 2 of 2. 5. Press the DUT PDP Setup key (F2); then press the knob (PDP = Packet Data Protocol.) 6. Enter almost the same address as the Test Set’s LAN IP Address, except change the 4th set of digits to an integer between 1 and 254. Enter it in the field labeled DUT IP Address. Do not use leading zeros. Example: Test Set LAN IP Address = 111.222.33.44 Phone’s DUT IP Address = 111.222.33.6 Copyright 2002 Agilent Technologies. All Rights Reserved. 10001809-E6701A Tutorial Direct Connection Page 9 of 30 Rev. 1.0; Feb. 19, 2002 IMPORTANT: The DUT IP Address and the Test Set ‘s LAN IP Address cannot be the same. Also, do not set the 4th set of numbers to 0; and do not set the 4th set of numbers greater than 254. 7. Press the knob to set the address. 8. Write down the address you entered: DUT IP ADDRESS _____________________________________________ Note that the entered DUT IP address must be on the same subnet as the Test Set. 9. Press the Close Menu (F6) key. PC Setup Turn on the PC. If already on, close any running applications. If necessary, enter your Windows password to begin using the PC. Use the instructions appropriate for your operating system (Windows 98 or Windows 2000) below. Windows 98 This procedure assumes you are using a standalone PC (not connected to a network) using the Microsoft Windows 98 operating system. Other PC configurations may use slightly different setups. 1. Open the Control Panel 2. Choose the Internet Options icon a. Select the Connections tab b. Select the LAN Settings box c. In the “Automatic configuration” section, both “Automatically detect settings” and “Use automatic configuration script” must NOT be checked. d. In the “Proxy server” section, “Use a proxy server” must NOT be checked. Select OK, then OK again to exit the Internet Options menu 3. Choose the Network icon a. Select the Configuration tab Copyright 2002 Agilent Technologies. All Rights Reserved. 10001809-E6701A Tutorial Direct Connection Page 10 of 30 Rev. 1.0; Feb. 19, 2002 b. In the scroll box labeled “The following network components are installed:” highlight your Ethernet network device. c. Select the Properties box d. In the TCP/IP Properties box, select the IP Address tab 1. Write down the original IP address here (in case you want to restore the original settings): PC’s original IP address: _________________________________ 2. Select “Specify an IP address” 3. Enter almost the same address as the Test Set’s LAN IP Address (see step 3.2.3.2 above), except change the 4th set of digits to an integer between 1 and 254. Enter it in the field labeled IP Address. Example: Test Set IP Address = 111.222.33.224 Set the PC IP Address = 111.222.33.222 4. Write down the NEW IP address here: PC’s NEW IP address: _________________________________ IMPORTANT: The DUT IP Address, the Test Set ‘s LAN IP Address, and the PC IP Address cannot be the same. Also, do not set the 4th set of numbers to 0; and do not set the 4th set of numbers greater than 254. (In the example above, the 4th set of numbers is set to “222”.) Copyright 2002 Agilent Technologies. All Rights Reserved. 10001809-E6701A Tutorial Direct Connection Page 11 of 30 Rev. 1.0; Feb. 19, 2002 5. In the Subnet Mask: field, we recommend you set the PC’s subnet mask to 255.255.255.0 6. Select OK, then OK again to exit the Network menu 7. If you made changes, a System Settings Change box will appear. Select the Yes box to Restart your PC. Windows 2000 This procedure assumes you are using a standalone PC (not connected to a network) using the Microsoft Windows 2000 operating system. Other PC configurations may use slightly different setups. 1. Go to the Control Panel 2. Choose the Internet Options icon a. Select the Connections tab b. Select the LAN Settings box c. In the “Automatic configuration” section, both “Automatically detect settings” and “Use automatic configuration script” must NOT be checked. d. In the “Proxy server” section, “Use a proxy server” must NOT be checked. e. Select OK, then OK again to exit the Internet Options menu 3. Choose the Network and Dial-up Connections icon a. Select the Local Area Connection icon b. Select Properties c. Highlight “Internet Protocol (TCP/IP)” i. Select Properties ii. Select “Use the following IP Address” iii. Write down the original IP address here (in case you want to restore the original settings): PC’s original IP address: _________________________________ iv. Enter almost the same address as the Test Set’s LAN IP Address (see step 3.2.3.2 above), except change the 4th set of digits to an integer between 1 and 254. Enter it in the field labeled IP Address. Example: Test Set IP Address = 111.222.33.224 Set the PC IP Address = 111.222.33.222 v. Write down the NEW IP address here: PC’s NEW IP address: _________________________________ IMPORTANT: The DUT IP Address, the Test Set ‘s LAN IP Address, and the PC IP Address cannot be the same. Also, do not set the 4th set of numbers to 0; and do not set the 4th set of numbers greater than 254. (In the example above, the 4th set of numbers is set to “222”.) d. In the Subnet Mask: field, we recommend you set the PC’s subnet mask to 255.255.255.0 e. Select OK, then OK again to exit the Network menu Copyright 2002 Agilent Technologies. All Rights Reserved. 10001809-E6701A Tutorial Direct Connection Page 12 of 30 Rev. 1.0; Feb. 19, 2002 Verify PC Settings On the PC, start the Microsoft Internet Explorer software. If you get a message saying “Work Offline” or “Try Again”, choose the “Try Again” box. If the PC tries to access a homepage, press the Stop icon. 1. In the browser’s Address field, enter the Test Set’s LAN IP address (from Test Set’s LAN IP Address from the Test Set Setup section above); then press Enter. Use the format http://111.222.333.222 as shown in the example below. If you get a message saying “Work Offline” or “Try Again”, choose the “Try Again” box. 2. The 8960 web page should display. Copyright 2002 Agilent Technologies. All Rights Reserved. 10001809-E6701A Tutorial Direct Connection Page 13 of 30 Rev. 1.0; Feb. 19, 2002 Verify that Your Device Will Perform an Attach If necessary, follow the manufacturer’s instructions to install the SIM into the device. 1.1. Turn on the phone or wireless appliance. Motorola Timeport phone example: The device should indicate service signal-strength bars (in the upper left corner of the display) within about 1 minute. It should also indicate the numbers “001-01” in the center of the display (this is the default test network number stored in the Test Set). 1.2. On the Test Set, in the bottom center of the display, the Active Cell box should show: Attached. 1.3. If the Active Cell box does not show service, verify that the Cell Band or Broadcast Channel for the test set matches the settings of the wireless device. Change as necessary. Motorola Timeport Example: a. Press the phone’s Menu key briefly. b. Scroll to Network Selection with the up/down arrow key. c. Press OK key to View Options? d. The phone should display Change Band. e. Press OK to View Options?. f. Scroll to Change to 900/1800. g. To choose the option, press OK to Select? 1.4. If the phone still doesn’t show service, look in Appendix B, Troubleshooting. Set Up Your Wireless Device These example instructions were written for a Motorola Timeport 260 Series GPRS Mobile Phone. Other devices will require similar setups. Note: Check the IP Address of the device whenever you turn on the device. Some devices reset this address. Set the Device’s IP Address 1. After the phone is Attached, press the phone’s Menu key briefly. 2. When the display shows Access Internet / Select? press the OK key to select. 3. Now hold down the Menu key for about 3 seconds and release. 4. On the Browser Menu, scroll to 7 >Setup with the up/down arrow key. 5. Press the OK key. If the phone hasn’t been setup yet, it will display a list of profiles such as profile1. 6. Use the up/down arrow key to highlight profile1 (or another unused profile location), or overwrite a previous profile. 7. Press the OK key. 8. Press the Menu (Edit) key. a. On the profile1 menu, scroll to 1>WAP Settings b. Press the OK key to Edit. c. On the WAP Settings menu, scroll to 1>Primary IP: d. Press the OK key to Edit Copyright 2002 Agilent Technologies. All Rights Reserved. 10001809-E6701A Tutorial Direct Connection Page 14 of 30 Rev. 1.0; Feb. 19, 2002 e. Use the number keys to enter the PC IP address (see PC Setup above for your PC IP Address). This tells the phone where to find its primary server. i. Use the left arrow (*) and right arrow (#) keys to move among the numbers; use the C key to clear (or delete) a number. Note: on the Motorola Timeport phone, you must insert leading zeros so the IP address consists of 12 numbers. The decimal points between the numbers are entered automatically by the phone for this specific function. Example: If your PC IP Address = Enter this in the phone= 111.222.33.4 111.222.033.004 Write the IP Address you entered in the phone here: PC IP Address: _________________________________ Set the Device’s Primary Port Not all devices have this port. This is based on the example of the Motorola Timeport phone. Set this as needed for your device. 1. On the WAP Settings menu, scroll to 2>Primary Port: 2. Press the OK key to Edit 3. Under Enter Port:, edit the number to 9201 This is the default value, and should already be in the data field. 4. Press the OK key when finished Set Data Bearer to GPRS This is based on the example of the Motorola Timeport phone. Set this as needed for your device. 1. Press the C key to return to the profile1 menu. 2. On the profile1 menu, scroll to 2>Data Bearer 3. Press the OK key to Edit 4. Scroll to 1>GPRS This is the default value, and should already be in the data field. 5. Press the OK key to Edit It is OK if the APN, Username, and Password are all blank. 6. Press the C key 3 times to return to the Browser Menu. Use the scroll key to move to the top of this menu. Set WAPlite Gateway Address in Your Device The WAP Gateway is used to observe WAP pages using the test set’s Data Channel feature. If you are using the Infinite WAPlite Gateway software (Installation instructions are in Appendix A), follow these steps. If not, go to the next section. Set the phone’s browser to find the WAPLite homepage on your PC 1. Scroll to 2>Web Favourites 2. Press the OK key Copyright 2002 Agilent Technologies. All Rights Reserved. 10001809-E6701A Tutorial Direct Connection Page 15 of 30 Rev. 1.0; Feb. 19, 2002 3. Scroll to choose an unused http web address (or overwrite an old one). 4. Press the Menu (Edit) key 5. Under Enter URL: enter the following address: http://local/waplite.wml Editing addresses like this can be tedious on any menu-driven device, because you must switch among the alphabetic, numeric, and multiple symbol menus to enter all of the characters. Be patient. (Press the Menu key to switch among alpha, NUM, and SYM key sets. While on a SYM set, press the OK (SYM) key to select among SYM1, SYM2, SYM3, and SYM4 character sets). 6. Press the OK key 7. Exit the device’s browser. Motorola Example: Press the lowest button on the left side of the phone to exit the phone’s browser. The upper buttons are the volume controls. You will see the phone’s turn-on display (usually shows “001-01”). The phone should still be attached. 8. Turn the phone off. Note: after you turn off the phone, you typically cannot turn it back on for about 10 seconds. Setup is now complete. Copyright 2002 Agilent Technologies. All Rights Reserved. 10001809-E6701A Tutorial Direct Connection Page 16 of 30 Rev. 1.0; Feb. 19, 2002 E6701A Features Using a Direct Connection Between the PC and Test Set Verify the following: Setup has been successfully completed (See previous section Setup) Test set is on and displays the Call Setup screen. The wireless device is off. The PC is started, and displays a compatible browser window. Product Feature: Screen Image Capture You can retrieve a copy of the Test Set’s current screen. 1. On the PC, on the 8960 Web Control page, select the Get Image icon. 2. This button retrieves a copy of the Test Set’s current screen. 3. Click the image again to capture a new screen (or refresh the image). Normal Windows functions are available for the image. 4. Save the image by right-clicking the image and using the browser’s "Save Picture As…" feature. You can choose a GIF or Bitmap file format. 5. To close the image, click the X in the upper-right corner of the window. Product Feature: Protocol Logging The E6701A GPRS Lab Application enables the Test Set to log GPRS protocol messages. The log results are displayed in a web page format. You control which messages are logged by choosing observation points. Here are some important points about the log data: • You are using the PC to access this data, but the data is captured by the test set. • The data is formatted for the Internet Explorer browser in the PC. • You cannot view the log data on the Test Set’s display. • To save this log data, you must store it in the PC’s memory. (You will learn how to do this in the instructions that follow). There is only one logging memory location in the Test Set for log data, of about 4 MB size. • Any time you select Start Logging, any previous data in the test set’s memory location will be overwritten. • You can log while using any of the Data Connection Types in the Test Set: IP Data, ETSI A, ETSI B, or BLER. 1. On the PC, on the 8960 Web Control page, select the Protocol Logging icon. 2. Select Logging Setup 3. Set the Observation Points and Buffer Operation. At least one Observation Point must be selected. Copyright 2002 Agilent Technologies. All Rights Reserved. 10001809-E6701A Tutorial Direct Connection Page 17 of 30 Rev. 1.0; Feb. 19, 2002 4. For this tutorial, select GMM/SM and GSM_L3. Make sure the other observation points are NOT selected. 5. The Observation Points correspond to seven protocol layers you can log. Logging data will only be collected for layers that have been selected prior to the start of logging. • L1_Interface Raw information between the DUT and Test Set • RLC/MAC Access and control messages • LLC Unnumbered and supervisory messages • GMM/SM Attach, detach, security, and PDP context messages • GSM_L3 Common control channel messages • SNDCP Network-level messages • IP IP datagram data and control fields 6. Buffer Operation: for this tutorial, select Linear. • The Linear buffer stops the log when the logging memory location is full. • The Cyclic buffer writes over the oldest data once it is full. 7. Scroll to the bottom of the page. 8. Enter a User Comment if desired to annotate the log. This must be alphanumeric characters only, up to 74 characters in length. 9. Select OK to save the setup and return to the main logging page. 10. Select the Start Logging icon. 11. Turn on power to the phone (to perform a switch-on and attach). Motorola Timeport Example: • The phone should indicate service signal-strength bars (in the upper-left corner of the display) within about 1 minute. • It should also indicate the numbers “001-01” in the center of the display (this is the default test network number stored in the Test Set). 12. On the Test Set, in the bottom center of the display, the Active Cell box should show Attached. 13. Select the Stop Logging icon. Note that no data is displayed until the log is stopped. The Test Set has captured the log data in its internal memory. View the log data on the PC 1. Look in the PC’s upper window using the scroll bar to see the Message Summary. If you click on one of the message summaries, a hyperlink will launch in the lower window to show you the detail for that message. 2. Look in the lower window using the scroll bar to see the Message Details. Notice the time stamp and message number at the front of each message. Refer to the E6701A Lab Application User’s Guide for more details on logged messages. Save the Log to the PC To save this log data in the PC, follow these steps: 1. At the top left corner of the Internet Explorer window, select File, then Save As. Copyright 2002 Agilent Technologies. All Rights Reserved. 10001809-E6701A Tutorial Direct Connection Page 18 of 30 Rev. 1.0; Feb. 19, 2002 2. On the Save Web Page window, choose a directory. 3. To more easily find your log files, point to the file icon to Create New Folder, then select it. 4. For this tutorial, type this name for your New Folder: E6701A Demo Logs; then press the Enter key. 5. Double-click your new folder; E6701A Demo Logs will be shown in the Save in box above. 6. In the File name box, enter a different name for this log (for this tutorial, use Good Stuff1). Note: you must highlight the entire default filename to replace it. 7. Leave Save as type: box at default -- Web Page, complete (*.htm, *.html) 8. Leave Encoding: box at default – Western European (ISO) 9. Select the Save button. View the saved log 1. Open Windows Explorer (the file manager program). 2. Find the E6701A Demo Logs folder you created, and double-click it. 3. You should find that a sub-folder was created using the file name you used, with the following contents: • A file folder named Good Stuff1_files • A file named Good Stuff1.htm. 4. To look at all your log data, double-click on the file Good Stuff1.htm. Internet Explorer will start, and display a web page. You can scroll through this data and use the hyperlinks just like on the original web page. 5. Close this Internet Explorer window. Go back to Windows Explorer. 6. To look at just the message details, open the folder Good Stuff1_files. Double-click to open the logpage_files sub-folder, then double-click on the logdtl.htm file. Internet Explorer will start, and display a web page that contains the detailed messages. 7. Close this Internet Explorer window. Go back to Windows Explorer. 8. To look at just the message summary, double-click on the logsum.htm file. Internet Explorer will start, and display a web page that contains the summary messages. (It is also located in the folder Good Stuff1_files, in the logpage_files sub-folder). 9. Close this Internet Explorer window. Log Data Using the Test Set’s Front Panel You can also capture a log using the front-panel keys of the Test Set, and retrieve it later with the PC’s browser. 1. On the PC, go back to the active Internet Explorer browser with the 8960 Web Control Page. 2. Turn off the phone. 3. On the Test Set, on the Call Setup screen, on the Control (left) column of softkeys, press the More key until you see 2 of 2. 4. Choose Protocol Logging (F1 key) 5. Choose from the selections to start, stop, and modify the setup (note that these keys are identical to the PC browser logging functions). Select the GMM/SM and GSM_L3 observation points again. Copyright 2002 Agilent Technologies. All Rights Reserved. 10001809-E6701A Tutorial Direct Connection Page 19 of 30 Rev. 1.0; Feb. 19, 2002 6. Watch the PC display after you press the Test Set Start / Stop Logging softkey (F1). Now turn the phone on. The PC display will update as new data is captured in the Test Set. (Also, at the beginning of each log, the “Log Started” time will change.) 7. On the Test Set, press the Stop Logging softkey (F1). Wait a few moments. The PC display will update as new data is captured in the Test Set. Product Feature: Ping Ping is a tool to help check system interconnects. Ping is only available in IP Data mode. The Test Set uses Ping to send a 64-byte packet to the device being pinged. If the connection is good, then the device will return a packet to the Test Set and the packet transfer information is displayed on the Test Set’s screen. Note: you can make a protocol log while performing a ping to a DUT (phone). (Note that the Test Set can only log data that travels through the RF link, such as a DUT ping). 1. On the Test Set, go to the Call Setup screen. 2. On the Control (left) column of softkeys, press the More key until you see 2 of 2. 3. Press the Ping (F3) key Pinging the DUT (the phone or wireless device) Note: You can log a DUT Ping because the data travels through the RF link. Set the Observation Point to IP, start logging, then perform the ping below. 1. Press the Ping Setup (F1) key again. 2. In the Ping Setup table, set the Device to Ping to DUT 3. Because it may take a phone over 5 seconds to respond, set the Ping Timeout Value to 10 (seconds). 4. Verify that the Test Set Active Cell field indicates Attached. 5. Create an active PDP Context, generally by instructing the device to start transferring data. Motorola Timeport example: Press the phone’s Menu key briefly. When the display shows Access Internet / Select?, press the OK key to select. Now hold down the Menu key for about 3 seconds and release. 6. On the Test Set, in the bottom center of the display, the Active Cell box should show: PDP Active or Transferring; this is required in order to Ping. Note: PDP Active is the same as PDP_Context Active. 7. Press Start Ping (F3) key 8. A correct response looks like the image below. This indicates a functioning IP connection exists between the Test Set and the phone via the RF link. Note that the response time of the phone is variable. Copyright 2002 Agilent Technologies. All Rights Reserved. 10001809-E6701A Tutorial Direct Connection Page 20 of 30 Rev. 1.0; Feb. 19, 2002 9. Press Stop Ping (F3) key 10. If you started a protocol log, stop it and look at the data. Pinging an Alternate Device (such as your PC on the LAN) Note: You cannot log an Alternate Device Ping because the data does NOT travel through the RF link, but only via the LAN. The Protocol Logging feature only captures data that passes over the RF link. 1. 2. 3. 4. 5. 6. Press the Ping Setup (F1) key In the Ping Setup table, set the Device to Ping to Alternate In the Ping Setup table, scroll to Alternate Ping Address, and press the knob. Under Value, enter the PC’s LAN IP Address. Do not enter leading zeros. Press the knob. Press Start Ping (F3) key. It may take a moment for the PC to respond. A correct response looks like the image below. This indicates a functioning IP connection exists between the Test Set and the PC. 7. Press Stop Ping (F3) key 8. On the Test Set, at the bottom of the display, note the Summary Results data from the ping. Copyright 2002 Agilent Technologies. All Rights Reserved. 10001809-E6701A Tutorial Direct Connection Page 21 of 30 Rev. 1.0; Feb. 19, 2002 Product Feature: Data Channel This is one of the most useful and powerful features of the E6701A. The Test Set acts as a GPRS base station, for connection to one wireless appliance at a time, with complete connectivity through to outside GGSN’s. (A GGSN provides the gateway between the GPRS network and the public packet data network, also known as the Internet). This means you can quickly and easily connect a wireless device to your choice of real Internet websites through a simple LAN connection to the Internet. You can also perform protocol logging during Data Channel operation. And even though IP data is usually discontinuous, the E6701A allows you to make TX and RX parametric measurements during Data Channel operation. This tutorial uses a WAP (Wireless Application Protocol) browser built into the phone to show how IP datagrams can be transmitted and received. Data will be exchanged using WML (Wireless Markup Language), which is derived from HTML for wireless device use. Using the phone’s WAP browser, you will connect to a standalone WAP Proxy Gateway program running in your PC. This tutorial uses the WAPlite Proxy Gateway. To run the Infinite WAPlite Proxy Gateway software on your PC: 1. On your PC choose Start…Programs. 2. Choose the “WAPLite” directory 3. Select “WAPLite”. A window will appear with multiple tabs. 4. In the WAPLite window, select the “Options” tab • All boxes on this tab should NOT be checked, including “Use HTTP Proxy Server” • At the bottom of the tab, if the word “Apply” is in black letters, click the “Apply” box (if in gray letters, skip this step). 5. On the “Stats” tab, click on “Install Service” to turn on the WAP Gateway software in your PC. With the WAPLite software running on your PC, external devices can access this gateway server via the PC LAN port. The WAPLite server has one set of “test” data a logo and some text provided with the software that can be accessed by an external WAP browser. To browse the WAPLite gateway with the phone: 1. On the Test Set, press the Call Setup key. 2. Make sure the device is attached to the test set. Motorola Example: • The Motorola Timeport phone should be on and attached to the Test Set. The phone’s display should show the Browser Menu. • If the phone’s Browser Menu is not displayed, press the phone’s Menu key briefly. • When the display shows Access Internet / Select?, press the OK key to select. • Now hold down the Menu key for about 3 seconds and release. • On the Browser Menu, scroll to 2>Web Favourites with the up/down arrow key. Copyright 2002 Agilent Technologies. All Rights Reserved. 10001809-E6701A Tutorial Direct Connection Page 22 of 30 Rev. 1.0; Feb. 19, 2002 • Press the OK key 3. Scroll to http://local/waplite.wml or access this site from your wireless device. Motorola Timeport Example: • Press the OK key to Go. (The phone requests data from the device at the address above). 4. Watch the Test Set display: • At the bottom, in the Active Cell window, you can note the status will switch between PDP Active and Transferring as IP datagrams are sent back and forth between the phone and the WAPLite server on the PC. • Note the 3 sections of the display: • Downlink power will flash a result each time the Test Set transmits to the phone. • Counters tracks data packets and RACH’s. • Error Reports continuously indicate the quality of the wireless appliance links. 5. On the device’s display, look at the downloaded image and read the text on the screen. 6. If you get a “web server error”, press the phone’s OK button to go back to see the image, and quickly scroll to see the text. The WAPLite data download to the device may not always be seamless. Note: this WAPLite image and text is the only information accessible by a WAP browser that is stored in the Infinite WAPLite gateway at installation. 7. On the PC, note that the Infinite WAPLite window shows one “Active User”, and now lists some “Requests Processed”. To log the IP datagrams while you browse the WAPLite gateway with the phone: During a log of IP datagram transfers, the LAN cable will carry IP datagrams between the phone and the WAP gateway software running on the PC. Simultaneously, the same LAN cable will carry the protocol logging data between the Test Set and the Internet Explorer software running on the PC. 1. On the PC, go back to the active Internet Explorer browser with the 8960 Web Control Page. 2. Select Logging Setup to change the Observation Points; select IP (only); select OK. 3. Select the Start Logging icon. 4. Reload the http://local/waplite.wml page. Watch the Test Set display; the Active Cell window will switch between PDP Active and Transferring as IP datagrams are sent back and forth between the phone and the WAPLite server on the PC. 5. Select the Stop Logging icon. 6. Examine the log data on the PC. Product Feature: Additional Connection Parameters Cell Parameters – The BCH configuration can be changed as desired. 1. Turn the phone off Copyright 2002 Agilent Technologies. All Rights Reserved. 10001809-E6701A Tutorial Direct Connection Page 23 of 30 Rev. 1.0; Feb. 19, 2002 2. On the Test Set, on the Call Setup screen, select Operating Mode (F1 key). 3. Scroll to Cell Off, and press the knob to select. 4. Select Cell Info (F6 key) 5. Select Cell Parameters (F2 key) 6. Change the Cell Parameters as desired. 7. Press Close Menu (F6 key) 8. Press Return (F6 key) 9. Press Operating Mode (F1 key) 10. Scroll to Active Cell, and press the knob to select. Timing Advance values can be sent to the DUT. This feature allows you to simulate propagation delays by telling the DUT how much to offset its transmission timing. 1. On the Test Set, on the Call Setup screen, on the Call Parms (right) column: 2. Press the More key until you see 4 of 4 3. Press the Connection Parameters (F7 key) 4. Scroll in Connection Parameters table to Timing Advance. The default value is 0; the range is 0 to 63. The User Settable Uplink Flag (USF) can be set. In a real network, this variable allows the multiplexing of several wireless appliances onto a single uplink PDCH. This parameter tells the wireless appliance when it must transmit and receive; the Test Set can verify that the wireless appliance performs correctly. (Remember: only one wireless appliance can be in a “connected state” with the Test Set at a time). 1. On the Test Set, on the Call Setup screen, on the Call Parms (right) column: Press the More key until you see 4 of 4 2. Press the Connection Parameters (F7 key) 3. Scroll in Connection Parameters table to Uplink State Flag. The default value is 0; the range is 0 to 7. Copyright 2002 Agilent Technologies. All Rights Reserved. 10001809-E6701A Tutorial Direct Connection Page 24 of 30 Rev. 1.0; Feb. 19, 2002 Appendix A: Installing a WAP Gateway into a PC Note: Agilent Technologies does not endorse or recommend the products listed below from various companies. We provide this information solely as a service to aid in this tutorial. Use them at your own risk. Agilent has done minimal testing with them in this application only. This information is subject to change without warning. Infinite WAPLite Gateway (by Captaris Inc.) For more company information: www.captaris.com For more product information: www.infinite.com If you want to install a 30-day free trial of the Infinite WAPLite Gateway program onto your PC, follow these instructions: To download the WAPlite software: 1. Connect your PC to the Internet 2. On the Internet, go to http://www.infinite.com/library/libindex.html This gives you a list of software available for download from Infinite. 3. Scroll down to the “WAPLite” section. 4. Under the “Keyword” column, click on “WAPLITE” to access the download form. 5. Fill in the form, then select the “Download Now” button at the bottom of the form.A Windows file download dialogue box will appear. 6. Choose “Save this program to disk”, then select “OK” 7. Choose a file location in the “Save As” dialogue box. 8. Select “Open” to download the file. To load the WAPlite software on your PC: 1. Find the executable file you just downloaded, then double-click on it to install it. 2. Follow the Windows installation instructions. Copyright 2002 Agilent Technologies. All Rights Reserved. 10001809-E6701A Tutorial Direct Connection Page 25 of 30 Rev. 1.0; Feb. 19, 2002 Appendix B: Troubleshooting 1. If the wireless device will not attach, check that: 1.1. 1.2. 1.3. Cable loss is correctly specified in RF IN/OUT Amplitude Offset table The SIM is good and installed correctly Cell power is sufficient (increase it up to -35dBm to overcome interference, or if an indirect RF connection is used between the Test Set and phone) 1.4. Try Coding Scheme CS-1. Go to the Call Setup Screen; Call Parms column; Menu 2 of 4 (More key); Coding Scheme (F11 key) 1.5. Maybe the wireless appliance is not capable of multislot configuration operation; if in doubt, try 1 down 1up. Go to the Call Setup Screen; Call Parms column; Menu 3 of 4 (More key); Multislot Config (F7 key) 1.6. This could relate to a connection parameter called TBF Frame Starting Position. 1.6.1. Change this parameter under call parameters menu 4 1.6.2. Try absolute or immediate frame starting position. The default is relative and not all mobiles support this. 1.7. Test Set displays IMSI warning: GSM protocol warning; No IMSI received from MS (Using default IMSI) 1.7.1. This may be an error in the firmware of the phone. 1.7.2. The default IMSI is 001012345678901. 1.7.3. If this message is received, it is not possible to make a data connection unless a SIM with the default IMSI value is installed in the wireless device. 1.8. If you experience problems establishing a data connection specifically with the BLER Data Conn Type: 1.8.1. Try changing the setting of the LLC Frame Check Sequence from Valid to Corrupt. Go to the Call Setup Screen; Call Parms column; Menu 4 of 4 (More key); Connection Parameters (F4 key); scroll in Connection Parameters table to LLC Frame Check Sequence. 1.8.2. Try changing the setting of the BLER Block Polling Interval (default is 32; range is1 to 32). Go to the Call Setup Screen; Call Parms column; Menu 4 of 4 (More key); Connection Parameters (F4 key); scroll in Connection Parameters table to BLER Block Polling Interval. 2. If BLER mode measurements have problems: 2.1. 2.2. Attach problem solutions still apply; see 1. Above MS must be capable of GMM_INFORMATION messaging. 2.2.1. This is the type of message we use to provoke an ACK/NACK from the mobile. 2.2.2. If the mobile is not capable of GMM information messaging, then the data connection will timeout. 2.2.2.1. One possible solution: set the LLC frame check sequence to Corrupt. This will stop the message getting to GMM and the mobile should still provide the ACK/NACK. Go to the Call Setup Screen; Call Parms column; Menu 4 of 4 (More key); Connection Parameters (F7 key); scroll in the Connection Copyright 2002 Agilent Technologies. All Rights Reserved. 10001809-E6701A Tutorial Direct Connection Page 26 of 30 Rev. 1.0; Feb. 19, 2002 Parameters table to LLC Frame Check Sequence; change the table value to Corrupt. 2.2.3. It is possible that the mobile is capable but GMM is prioritised too low and the wireless appliance is unable to sustain the link. 2.2.3.1. To get around this we can change the BLER block polling period. This will allow the mobile to send the ACK/NACK less frequently(one negative result: TX measurements will be slower since the mobile is not transmitting every frame.) Go to call parameters, 1 of 4. 3. ETSI Test Mode measurements have problems: 3.1. Check that the mobile is capable of the ETSI test mode you would like to use, if not it will not work 3.2. Check the same parameters as in Attach problems. 4. If the attach condition is terminated, this may be a Connection Reconfiguration problem: 4.1. This may be a Connection Reconfiguration problem. When any of the connection parameters are reconfigured the connection is terminated. 4.2. The mobile likely does not have the PACKET_TIMESLOT_RECONFIGURE message implemented. 4.2.1. This message is used to change MSTXL, channel, Band, Coding Scheme, Multislot configuration, and offset P0. 4.2.2. The solution when using the PACKET_TIMESLOT_RECONFIGURE message is to stop the data connection before changing parameters, then restart the data connection. 4.3. Alternatively, you can change the message used to change parameters to PACKET_DOWNLINK_ASSIGNMENT; or, for power changes use the PACKET_POWER_AND_TIMING_ADVANCE message. Go to call parameters, 1 of 4. 5. If Internet Explorer cannot access the 8960 Welcome Page: 5.1. Connections: 5.1.1. Check that the LAN cables are good, and are properly connected 5.1.2. If you are using the Test Set’s front panel DATA port: check that the LAN jumper cable is attached on the Test Set rear panel between the LAN PORT connector and the ETHERNET TO FRONT PANEL connector. (NOTE: For minimum RF interference, Agilent recommends using the rear-panel LAN PORT connector). 5.2. Test Set: 5.2.1. On the System Config Screen, check that the Application is GPRS Lab Application. 5.2.2. The Test Set LAN IP Address and Subnet Mask should not include leading zeros. Example: 111.22.333.44 is correct 111.022.333.044 is incorrect Copyright 2002 Agilent Technologies. All Rights Reserved. 10001809-E6701A Tutorial Direct Connection Page 27 of 30 Rev. 1.0; Feb. 19, 2002 5.3. PC: 5.3.1. Check that the network card (if present) is fully seated in the PC Card slot. 5.3.2. Check that the LAN IP address in the PC is the same as the Test Set’s LAN IP Address except for the 4th set of numbers (the last 3 digits). IMPORTANT: Do not set the 4th set of numbers to 0. Also, do not set the 4th set of numbers greater than 254. 6. The phone can’t access (browse) real Internet sites 6.1. It can be difficult to “browse” WAP sites or other locations on the Internet because of firewalls or other restrictions on a specific Intranet. Get help from your Network Administrator. 7. BER measurement errors 7.1. During Data Channel operation, the BER measurement DOES NOT function correctly. 8. Phone won’t transmit IP datagrams in Data Channel functions 8.1. Some older versions of Motorola Timeport phones may lose the IP address you have entered. Check this whenever you turn on the phone. 9. When checking the IPCONFIG of your PC, multiple non-zero IP addresses display 9.1. Use the WINIPCFG utility program to help you troubleshoot. 9.1.1. Choose Windows Start 9.1.2. Select Run 9.1.3. Enter winipcfg, then select OK 9.1.4. Select the Release All button to release the addresses 9.1.5. Select the Renew All button to re-enable the active IP address 9.2. If an old “artifact” IP address is still present in the PC: 9.2.1. You can use a network access program designed to get through a firewall (such as Nortel Networks Extranet Access Client) to reset the “bad” address. 9.2.2. Start the Extranet program 9.2.3. Use your SecureID card to enter the password and access your network as normal. 9.2.4. Log off the network 9.2.5. Use the MS-DOS IPCONFIG command, or the WINIPCFG utility to check that the errant IP address is reset to all zeroes. 10.If you see an “assert message” when you select IP Data (for E6701A revision A.01.10 only) 10.1. If the Test Set displays an assert message when you set the Data Conn Type to IP Data, there are two possible solutions: 10.2. To temporarily fix the problem: 10.2.1. Turn the Test Set power off, then on Copyright 2002 Agilent Technologies. All Rights Reserved. 10001809-E6701A Tutorial Direct Connection Page 28 of 30 Rev. 1.0; Feb. 19, 2002 10.2.2. On the System Configuration screen, enter a valid address into the Default Gateway field 10.3. To permanently fix the problem: 10.3.1. Upgrade the Test Set firmware to a later revision. 10.3.2. This firmware can be obtained from the Agilent website at: www.agilent.com/find/8960support Copyright 2002 Agilent Technologies. All Rights Reserved. 10001809-E6701A Tutorial Direct Connection Page 29 of 30 Rev. 1.0; Feb. 19, 2002 Appendix C. Glossary BER BLER DUT GGSN GMM GPRS GSM GSM L3 HTML IMSI IP L1 LAB LAN LLC MAC MS PDP RF RLC SGSN SIM SM SNDCP TBF USF WAP WML Bit Error Rate Block Error Rate (Agilent proprietary connection mode – patent applied for) Device Under Test (typically, a cellular phone or wireless appliance) Gateway GPRS Support Node. Provides gateway between GPRS network and public packet data network (Internet); connects to HLR; provides location and authentication management; counts packets for billing; and stays constant. GPRS Mobility Management General Packet Radio Service Global System for Mobile Communications Layer 3 HyperText Markup Language International Mobile Subscriber Identity Internet Protocol Layer One (defines PDCH physical channel; defines logical channels such as PDTCH and PACCH; and defines coding schemes CS1 to CS4) Laboratory (where research and development work is done) Local Area Network Logical Link Control (air interface independent; discriminates between data and control signalling) Medium Access Control (mediates access across multiple mobiles) Mobile Station (typically, a cellular phone) Packet Data Protocol Radio Frequency Radio Link Control (performs procedures to transfer data) Serving GPRS Support Node (controls connection between network and MS; manages sessions; manages mobility functions like handovers and paging; and changes as MS roams) Subscriber Identity Module Session Management Subnetwork Dependent Convergence Protocol (multiplexes multiple application protocols) Temporary Block Flow Uplink State Flag Wireless Application Protocol Wireless Markup Language Copyright 2002 Agilent Technologies. All Rights Reserved. 10001809-E6701A Tutorial Direct Connection Page 30 of 30 Rev. 1.0; Feb. 19, 2002