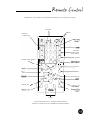
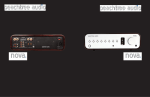
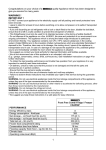
1
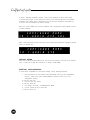
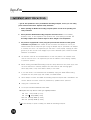
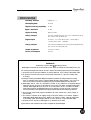
W
A
D
I
A
2
7
i
D
E
C
O
D
I
N
G
C
O
M
P
U
T
E
R
Information and Operation Manual
All of us at Wadia would like to offer thanks and congratulations
to you for purchasing the Wadia 27i Decoding Computer.
We sincerely believe that your Wadia 27i is an intelligent
purchase decision that will bring you many years
of musical pleasure and satisfaction.
While every new owner is anxious to begin listening,
we encourage you to take a few minutes to read this manual
and familiarize yourself with the full capabilities of the
Wadia 27i Decoding Computer,
v
If you are in a hurry to listen, please read the sections of this
manual where the symbol at left is shown.
A Brief History
Unpacking
The Accessory Kit
Installing the Spiked Feet
Installing Batteries in the Remote Control
Connecting to AC Power
Connecting to a CD Transport or Other Digital Source
Choosing a Digital Cable
Clocklink
Connecting Clocklink
Connecting Directly to an Amplifier
Connecting to a Preamplifier
Optimizing the Analog Output Level
Should I use Balanced or Unbalanced connection?
Why should I bypass the Preamplifier?
Does the Wadia Digital Volume Control compromise resolution?
Can I bypass the Wadia Digital Volume Controli!
What about Analog Sources?
Should I leave the Wadia 27i with the power an?
Input Enabled or Disabled
Clocklink On or Off
Custom Input Names
Troubleshooting
Software License Agreement
Environmental Care
Important Safety Precautions
Specifications
Warranty
W a DIGITAL
Wadii Digital Corporation was founded in 1988, making it one of the oldest digital audio
companies in existence. Wadia was formed by a group of engineers from the Minneapolisbased 3M Corporation (Minnesota Mining and Manufacturing) who had compiled many
years of experience in advanced digital and telecommunications research and development.
In the early 1980’s, this group had become intrigued by the emerging CD technology.
Disappointed by the sound of early CD players, they examined the designs and found them
to be unsophisticated compared with the technology available in other areas of digital design.
In response, they founded Wadia Digital - a company based on the philosophy of applying
advanced technology to improve the performance of digital home entertainment equipment.
Wadia's first product, the Wadia 2000 Decoding Computer, was a breakthrough.
For many listeners, it proved the viability of Compact Disc as a musically involving format.
Ever since, Wadia has continued to develop on the original technology; refining, listening
and improving along the way. Since the Wadia 2000, new generations of even higher
performance designs have been introduced. Each step of the way, Wodia has raised
the standard for performance of CD playback.
Here is an abbreviated list of the technological innovations the Wadia engineers
have pioneered over the past 10 years:
l
First outboard Digital-to-Anolog converter
l
DigiMaster patented algorithm (filter optimized for reproducing music)
l
First company to apply glass fiber-optics to home audio
l
First company to recognize jitter as a source of audible distortion
l
First to perfect digital volume control
l
First high-end CD player competitive with expensive separates
l
ClockLink proprietary jitter reduction technology
Although Wadia’s digital expertise and track record exceed those of any audio company,
technology alone does not guarantee musical performance. Wadia designs are born of a
delicate balance of technology shaped by a passion for music.
Now past our tenth year, Wadia continues to redefine the limits of digital music playback.
We are proud to introduce the Wadia 27i- a breakthrough in sonic performance
and a strong statement of our years of dedication to music.
After carefully unpacking your Wadia 27i Decoding Computer, inspect it for any shipping
damage and call your dealer immediately if any is found.
V
Do not plug your Wadia 27i Decoding Computer into any outlet if you find shipping damage.
Please save all packing materials so the unit can be easily and safely shipped if the need orises.
Included in the carton, you will find an accessory kit that contains the following:
l
l
l
v
Four steel spiked feet with threaded studs
Four steel coasters
Remote Control and batteries
l
Glass Optical Cable
l
RCA-to-BNC adapter
l
AC power cord
Do not tip the unit onto the back panel. This can damage input and/or output connectors.
Place the Wadia 27i on a non-marring surface; screw one of the spiked feet into the threaded
hole in each corner of the bottom panel.
Position the Wadia 27i where you would like it to reside in your system. We recommend
choosing a solid, non-resonant, level surface for best performance. If this surface is susceptible
to damage, place one of the steel coasters under each spiked foot.
You can adjust the spiked feet so that the Wodia 27i sits firmly on all four feet. Place your
hand on top of the unit ond gently rock it back and forth. If the unit moves, notice which foot
is raised, then adjust it by screwing it down from the chassis (clockwise looking from the top
of the unit). Repeat until the unit is stable.
To install the batteries, remove the back cover by removing the screws found on the bock
of the remote. Insert the batteries as indicated on the battery holders.
Q
CHECK
VOLTAGE
HERE1
v
Check to make sure your Wadia 27i Decoding Computer has been manufactured for operation
at your AC line voltage. Attempting to use your Wadia 27i Decoding Computer at any voltage
other than specified on the rear of the unit may cause damage which is not covered by Wadia's
warranty. If the voltage specified is different from your AC voltage, contact your Wadia dealer
USING AC LINE CONDITIONERS
In most cases, best performance is obtained when the Wadia 27i is plugged directly into the
wall outlet using the AC power cord provided. The Wadia 27i employs extensive power-line
filtering and noise suppression technology. It should not be necessary to use power conditioners
or after-market power cords. If you wish to experiment with any of these devices, work closely
with your dealer and most of all, trust your own ears.
USING A “SURGE PROTECTOR”
Although the Wadia 27i will resist significant voltage spikes, it can still be damaged by
extreme voltage overload such as a lightning strike. Such damage is not covered by the
warranty. In some circumstances, a “surge protector” can help prevent this type of damage.
However, surge protectors often degrade sound quality. Each Wadia owner must weigh the
protection offered by a surge protector against the sonic degradation.
v
Avoid albwing static shocks to be applied to the inputs or outputs. To prevent static shocks,
touch any grounded surface, such as the Wadia 27i chassis, before connecting or removing
a cable. It is unlikely that a static shock will damage the unit, but it may cause the Wadia 27i
Decoding Computer circuitry to “lock-up” (see Lock-Up under Trouble Shooting in “Appendices”).
Inputs and outputs can be safely connected to the Wadia 27i Decoding Computer either:
l
Before the unit is powered up
l
When the unit is in Relay-Mute mode (See “Mute Modes” in General Operation)
The Wadia 27i Decoding Computer has six digital inputs:
Input 1: Glass fiber optical
Input 2: Glass fiber optical
Input 3: Coaxial with BNC connector
Input 4: Coaxial with BNC connector
Input 5: AES/EBU with XLR type connector
Input 6: Plastic optical TOSLINK
To connect a digital source, install a digital cable between the digital output of that source and
a digital input of the Wadia 27i.
The Wadia 27i will automatically adjust to the sampling rate of any standard 32K, 44.1 K, or 48K
digital audio format.
v
Input I is factory configured for ClockLink. Using a non-ClockLink source connected to a ClockLink
input results in sonic degradation To disable ClockLink see "Configuring Inputs."
While the Wadia 27i supports all currently accepted transmission formats for digital audio,
we recommend using the glass optical cable that is included in your accessory kit. Wadia
Digital was the first company to use glass fiber-optic data transmission in digital audio.
We have continually improved this format and believe that it offers the best, most
consistent performance of all the available options.
Based on our experience, here is a list of digital interface methods in descending order
of performance:
1.
Glass optical (as implemented by Wadia)
2.
AES/EBU using XLR connector
3.
Coaxial cable using BNC connector
4.
Coaxial cable using RCA connector
5.
TOSLINK plastic-optical cable
The quality of any of these transmission methods depends on the quality of the cable and
the sophistication of the transmitter and receiver. For example, a high-quality coaxial cable
can outperform a low-quality AES/EBU cable. A high-quality AES/EBU cable will outperform
a poorly-implemented glass-optical system.
We recommend thot if you are using a coaxial cable, have the cable terminated with a BNC
connector. This will provide higher performance than an RCA connector. Your Wadia 27i comes
with an RCA/BNC adapter that can be used for experimentation between different types of
RCA terminated coaxial cable.
Again, we highly recommend that you take advantage of your dealer’s experience and, most
importantly, trust your ears.
All XLR-type inputs and outputs on the Wadia 27i Decoding Computer, both digital and analog,
use the standard audio pin configuration:
Pin 1 - Ground
Pin 2 - Positive signal
Pin 3 - Negative signal
~~~~~~~~~~~~
.:. .:.:.:.:*:.:.~.:.:.:.:.:.:.:.:.:.:.:.:.* . :.:. . :.:.:>&:$.:.:.
ClockLink is a proprietary Wadiadesigned system that improves sonic performance by greatly
reducing clock jitter. In 1990, Wadia became the first company to identify clock jitter as a
distortion in CD playback systems and we have been refining our jitter reduction technology
ever since. ClockLink is the most effective jitter reduction technology to date.
In most CD playback systems, the system master clock is located at the transport. As the clock
signal is transmitted to the digital-to-analog converter, it is contaminated with noise. This noise
results in uneven time intervals between output pulses from the DAC. This inconsistency causes
measurable and audible distortion.
With ClockLink the system master clock is located very close to the DAC chips in the digitalto-analog converter system. This simplifies the path through which the clock signal must travel,
minimizing the opportunity for jitter to contaminate the clock signal. This approach offers
lower jitter than ony previous jitter reduction method, and a commensurate improvement
in sonic performonce.
The Wadia 27i also uses improved clock circuitry for non-ClockLink sources. This circuitry results
in noticeable sonic improvements with non-ClcokLink digital sources.
If you are using a digital source equipped with Clocklink, such as a Wadia 270 in a Clocklink
mode, an ST-type glass fiber cable must be instolled between the Wadia 27i ClockLink Output
and your CD transport Clocklink Input.
This cable is installed as shown below.
Clocklink Cable
Wadia 27i Decoding Computer
N
Clocklink-Equipped CD Transport
We strongly recommend that you connect your Wadia 27i Decoding Computer directly to
your power amplifier. Even if you purchased your Wadia 27i with the intention of connecting it
through a preamplifier, we suggest that you experiment with direct connection to your amplifier.
Many listeners are surprised by the improvement in performance over even the most expensive
preamplifiers. If you would like more information about getting best performance from a system
without a preamplifier, contact your Wadia dealer.
To connect your Wadia 27i to a power amplifier, ensure that your power amplifier is turned off,
then connect your analog interconnects from the Wadia 27i balanced or unbalanced analog
outputs to the amplifier’s inputs.
While the Wadia 27i Decoding Computer was designed to be used without a preamplifier,
it will provide excellent operation in a conventional system with a preamplifier. Simply connect
the analog outputs from the Wadia 27i to a pair of linelevel inputs on the preamplifier.
When using a preamplifier, disable the Wadia 27i volume control by setting it to its
maximum volume.
Best performance is obtained when the Wadia Digital Volume Control is operated close to its
maximum level. If you find that your critical listening occurs with the volume lower than 65 on
the display, then it may be advantageous to attenuate the output. This is done by manipulating
a set of internal switches. If you would like to change the output level, consult your dealer.
The Wadia 27i output level is factory set at 4.2 volts which will accommodate the most common
range of system sensitivity without needing adjustment.
Configuration and operation of the Wadia 27i requires the use of the remote control.
BALANCE
DISPLAY
*Transport
Programming
f
r----i
Resolution
Enhancement
Mode Select*
*Drawer Open / Close
i w ii;;
I0
ot PHASE INVERT
6 (ji
L-__-JL__,~~~~~,~_,~J
II
I
o--t----_ Pause*
(j4+
Play*
Track Forward /Back*
*Repeat Disc ’
I
Index*
* These buttons are used to control a Wadio Transport.
Consult your transport owner’s manual for further information.
Configuration and operation of the Wadia 27i requires the use of the remote control.
BALANCE
DISPLAY
*Transport
Programming
f
r----i
Resolution
Enhancement
Mode Select*
*Drawer Open / Close
i w ii;;
I0
ot PHASE INVERT
6 (ji
L-__-JL__,~~~~~,~_,~J
II
I
o--t----_ Pause*
(j4+
Play*
Track Forward /Back*
*Repeat Disc ’
I
Index*
* These buttons are used to control a Wadia Transport.
Consult your transport owner’s manual for further information.
T U R N - O N S C R E E N : W hen p ower is turned on, the Wadia 27i will show the display screen,
as shown below, for five seconds.
SELECTING AN INPUT: Any of the six inputs on the Wadia 27i can be selected by pressing
the Input Select key on the remote control. Each time the Input key is pressed, the next input is
selected. For example, if Input 1 is currently selected, pressing the Input key on the remote
control will advance to Input 2 and so on. After Input 6, the list will begin again with Input 1.
When selecting an input, disabled inputs will be skipped (see “Configuring Inputs”).
When the Input key is pressed, the display will change to the Input Screen, as shown below.
The Input Screen displays information about the input currently selected, including the input
name and sampling frequency. If no signal is detected on the selected input, the display will
indicate this by showing “No Data”.
ADJUSTING THE VOLUME: Whenever the Volume Up or Volume Down keys on the
remote control are pressed, the volume on both channels will be increased or decreased by
an increment of 1 on the display screen. The range of the volume display is from 0 to 100,
with each step representing 0.5 dB change in volume. During normal operation, the Volume
Screen, as shown below, is the default screen.
ADJUSTING THE BALANCE: Relative volume of each channel can be adjusted via the
balance control keys on the remote. Each time one of the balance keys is pressed, the volume
on that channel is increased relative to the other by an increment of 0.2 on the display. As the
balance is adlusted, one channel or the other is decreased alternately. This corresponds to a
0.1 dB change as the overall volume level (the sum of the two channels) remains constant within
0.1 dB. During balance adjustment, the display will change to the Balance Screen, as shown
below, indicating the volume to 0.1 dB precision.
INVERTING ABSOLUTE PHASE: The Wadia 27i has the ability to invert absolute phase
in the digital domain. Pressing the Phase Invert key on the remote control will cause the Wadia
27i to invert phase; pressing it again will switch the phase back to normal. Whenever the Phase
Invert key on the remote control is pressed, the display will change to the Status Screen, as
shown below. The Status Screen indicates whether the current signal uses pre-emphasis and
whether the phase is normal or inverted.
CHANGING BETWEEN DISPLAY SCREENS: During normal operation, the Wadia 27i
display will switch between the display screens to show information about which functions
are being accessed. For example, the Balance Screen will be displayed if the balance keys
on the remote control ore pressed.
Pressing the Enter key will advance through the display screens in the following order:
1.
2.
3.
4.
5.
6.
7.
Volume Screen
Brightly-illuminated Volume Screen
Balance Screen
Input Screen
Status Screen
Configuration Screens (18 screens total, see “Configurafion”
Back to the Volume Screen
for more information)
TURNING DISPLAY ON/OFF: By pressing the Display On or Off key, the Wadia 27i
display can be turned off completely. Several of Wadia’s transports will respond to the same
key, allowing you to control both displays at the same time.
If the display is turned off, it will reappear for five seconds whenever a Wadia 27i function
key on the remote control is pressed.
MUTE MODES: The Wadia 27i Decoding Computer has two Mute Modes that are
automatically engaged under different circumstances.
DSP-SOFTWARE MUTE: When the Mute key is pressed on the remote control, the
Wadia 27i Decoding Computer’s DSP engine transmits a stream of zero signal level
samples to the DAC section, which results in zero output.
OUTPUT-RELAY MUTE: The Wadia 27i Decoding Computer has mute relay connected
between the positive and negative outputs. When this relay is engaged, it connects the
positive output to the negative output, reducing the output to zero. This relay, which
produces an audible click when it engages or disengages, is not in the music signal path.
The mute relay is engaged:
l
l
l
When the Wadia 27i Decoding Computer detects AC input level below its minimum
operating range
Each time the Wadia 27i Decoding Computer is powered-up
When the volume control is set to zero AND the Mute key on the remote control
is pressed.
When the Wadia 27i is in either Mute Mode, the Volume Screen will indicate this by
displaying the word, “MUTE.”
Each of the Wadia 27i digital inputs can be configured to match your system requirements
There are three configuration parameters for each input:
1. Configure Input Enabled or Disobled
2.
Configure ClockLink On or Off
3. Configure Input Name
ENTERING CONFIGURATION MODE
All configuration changes are done in the Configuration Mode. To enter Configuration
Mode, press the Enter key repeatedly until the display shows the configuration screens
All of the configuration screens have the word “CONFIGURE” on the top row. Each input has
three configuration screens, one for each of the three configuration parameters listed above.
As you repeatedly press the enter key, the Wadia 27i will scroll past the configuration
screens for each input, first showing the screens for input 1, then Input 2, and so on.
SAVING CONFIGURATIONS
Any time you change a configuration setting, it is automatically saved in volatile memory
where it will be stored unless the AC power is turned off. If the AC power is turned off, the
Wadia 27i will revert to the last configuration settings that were saved in non-volatile memory.
If none have ever been saved to non-volatile memory, the Wadia 27i will revert to the factory
settings. If you wont to save your configuration settings in non-volatile memory so that they will
remain even if the AC power is turned off, use the Mute key, as described below, when exiting
the Configuration Mode.
EXITING CONFIGURATION MODE
There are three ways to exit the Configuration Mode:
Mute: Pressing the Mute key will save all new configuration settings in non-volatile memory
and exit the Configuration Mode.
Time-out: If you do not press any key for approximately 16 seconds, the Wadia 27i will exit
the Configuration Mode.
Scroll out: If you continue to press the Enter key over and over again, you will scroll past all
the configuration screens, out of Configuration Mode and back to the volume or status screen.
If you leave the Configuration Mode by timing out, you must press the Input Select key to make
the new configuration settings take effect. If you leave Configuration Mode without pressing
Mute, any changes will be stored in volatile memory where they will be lost if AC power is
turned off.
Each input can be configured as either enabled or disabled:
Enabled: If you intend to use an input, configure it
OS
enabled. This allows the input to
function normally.
Disabled: If you do not intend to use an input, configure it as disabled. When an input is
disabled, it will not be visible when using the input key on the remote control to select an
input for listening. This saves you from having to scroll past unused inputs when selecting
your source.
In addition, if an input is configured as disobled, the Configure Clocklink and Configure
Name Screens for that input are not available when scrolling through the configuration
screens.
There is no sonic advantage to disabling the unused inputs. The Wadia 27i and the original
Wadia 27 ore equipped with “sleeping inputs.” All circuitry associated with individual inputs is
shut down whenever that input is not selected, minimizing noise.
To configure a source as either enabled or disabled, press the Enter key repeatedly until the
Configuration Screen for that input appears. Below, we see the Configure Enable/Disable
Screen for Input 1, which is currently configured as Enabled.
Using the Volume Up or Volume Down key, select between Enabled and Disabled.
FACTORY SETTING
When shipped from the factory, all of the Wadia 27i inputs are configured as enabled.
Each digital input on the Wadia 27i can be configured as either ClockLink On or ClockLink Off.
Clocklink On:
Should be used only with ClockLink sources, such as the Wadia 27i.
ClockLink Off: Should be used with all non-ClockLink sources.
To change the ClockLink configuration for any input, press the Enter key repeatedly until the
Configure ClockLink Screen for the desired input is displayed. The picture below shows the
Configure ClockLink Screen for Input 2 showing Clocklink On.
Using the Volume Up or Volume Down key, select the desired setting
FACTORY SETTING
As delivered from the factory, Input
configured for ClockLink Off.
1 is configured with ClockLink On. All other inputs are
Each input can be named for easy identification of your digital sources. For example, if you
have a Wadia 270 connected to Input 1, you can create a custom input name so that when
Input 1 is selected, the display reads: “Wadia 270”.
To name an input, begin by pressing the Enter key repeatedly until the Configure Name Screen
for that input appears. Shown below is the Configure Input Name Screen for Input 1:
Pressing either the Volume Up or Down key or Track Forward or Back displays the cursor,
which appears
OS an
underscore, indicating which character is being modified.
The Volume Up and Volume Down keys allow you to scroll through a character list to select the
desired letter or number. The Track Forward and Track Back keys move the cursor right or left
to the next or previous character.
All upper and lower case letters are available, as well as numbers and a blank space.
The blank space character is located in the character list between the number 0 and the lowercase letter “z.” Below, the letter “W” has been selected:
To erose a disployed character, replace it with a new character or with a blank space.
To insert a blonk space, use the Volume Up or Down key to scroll through the list of available
characters until a blank space is displayed. Then press the Track Forward or Track Back key
to move to the next character you wish to change.
Below, the name “Wadia 270” has been selected, and a single blank space inserted to erase
on extra character.
Below, three more blank spaces have been used to erase extra characters, leaving the desired
name as “Wodia 270”.
FACTORY SETTING
Each input is named corresponding to the type of input connector is used with it. For example,
Input 1, which has a glass fiber connector, is named, “GLASS FIBER”.
RESETTING CONFIGURATIONS
To reset all the configurations to the factory settings, use the following sequence:
1.
Press the Enter key on the remote control repeatedly until any of the Configuration
screens is visible. (The word “CONFIGURATION” appears at the top of any
configuration screen.)
2. Press the Stop key.
3.
Press the Stop key AGAIN.
4. Press the Mute key.
5.
The display will read, “CONFIGURATION RESET.”
6.
Use the Volume Up key to select YES.
7. Press the Mute key.
LOCK-UP
If the Wadia 27i experiences a powerful static shock or sudden AC surge, it is possible to “lockup” the computer circuitry. A locked-up computer may result in erratic display, no output, and no
response to remote commands.
If your Wadia 27i should lock-up, unplug the AC cord. Wait at least 30 seconds before
plugging the unit in again. If the unit still does not operate normally, contact your dealer,
THIS AGREEMENT SETS FORTH TERMS AND CONDITIONS FOR THE DigiMaster SOFTWARE.
The DigiMaster software is copyrighted and patented. It is the property of Wadia Digital
Corporation of River Falls, Wisconsin.
Title to Licensed Software is not transferred to the customer. The customer is granted a
nonexclusive license to use the licensed Software on a single Decoding Computer basis. The
licensed Software cannot be shared among multiple Decoding Computers. Each Decoding
Computer must have its own separately Licensed Software.
At Wadia Digital Corp.'s sole discretion, Wadia Digital shall provide customer with updates of
the Licensed Software. Wadia Digital retains the right to provide the Licensed Software updates
for a fee. The customer may refuse to accept such Licensed Software updates.
Wadia Digital makes every effort to be an environmentally conservative company.
We greatly appreciate it when our customers join our efforts. Please dispose of batteries
and packing material in a manner that is environmentally responsible.
To get the best performance from your Wadia 27i Decoding Computer, ond for your own safety,
please read and follow these important safety instructions.
1.
Before operating the Wadia 27i Decoding Computer please read all of the operating and
sofety instructions.
2.
Never place the Wodia 27i Decoding Computer near heat sources such as radiators,
fireplaces, stoves, or other appliances that produce heot. Avoid placing the Wadia
27i
Decoding Computer where it will be subject to direct sunlight or low temperatures.
3.
This product is equipped with a three prong IEC power inlet that includes an earth ground
connection. To prevent shock hazard, all three connectors must always be used. If your
electrical outlets will not accept this type of plug, an adapter may be purchased. If an adapter
is necessary, be sure it is an approved type and that it is used properly, supplying an earth
ground. If you are not sure of the integrity of your home’s electrical system, contact a licensed
electrician for assistance.
4.
AC extension cords are not recommended for use with this product. If an extension cord
must be used, be sure it is an approved type and has sufficient current carrying capacity
to power this product.
5.
Before clearing the Wadio
27i Decoding Computer, always disconnect the power supply cord
Use a soft cloth and, if necessary, dampen with clean water or mild cleaning agent.
Never apply water, or any other cleaner, directly to the chassis.
6.
If you smell smoke, or an abnormal smell, immediately unplug the Wadia
27i Decoding
Computer from the power supply and contact your Wadia dealer.
7.
Never attempt to service the Wadia 27i Decoding Computer beyond what is described in this
Owner’s Manual. All service should be performed by qualified service personnel.
8.
Unplug unit if it becomes wet.
9.
Do not open unit when attached to AC outlet.
10 Replace fuse only with the exact type originally included.
100 volt: 1 amp Slo-Blo (1 f u s e )
120 volt: 1
amp Slo-Blo (1 fuse)
220 volt: 1/2 amp Slo-Blo (2 fuses)
240 volt: 1/2 amp Slo-Blo (2 fuses)
11
11
. Do not attempt to repair or modify your Wadia 27i Decoding Computer.
Decoding Software
DigiMaster 1.2
Resampling Rate
64 Times
Digital Processing Capability
24 Bits
Digital Resolution
22 Bits
Signal Inverting
Digital Domain
Analog Outputs
One pair of Balanced (XLR); One pair of Unbalanced (RCA).
Both can be used simultaneously.
Digital Inputs
Six inputs - 2 ST Glass Fiber Optic; 2 SPDIF (BNC);
1 plastic Fiber Optic; 1 AES/EBU.
Analog Outputs
One pair of XLR (Balanced); One pair RCA (Single Ended).
Both can be used simultaneously.
Output Impedance
Less than 15 Ohms
Power Consumption
65 watts
WARRANTY
This Warranty covers the Wadia 27; Decoding Computer.
Wadia Digital warrants that this product shall be free horn defects in materials and workmanship far five years.
The warranty period begins at the date of sale and is subject to the following requirements and understandings:
1) The product must not have been modified in any manner whatsoever, or the warranty is immediately voided.
2) The product must not have been stored in a humid, damp environment; nor subjected to weather, water,
or salt spray.
3) During the warranty period Wadia Digital will repair the Wadia 27i Decoding Computer to working
order, or, at Wadia’s option, replace a defective Wadia 27i with a similar available roduct at no cost
to the owner for labor, materials, and shipping charges from Wadia Digital, River Falls, Wisconsin.
4) Wadia Digital shall not, under any circumstances, be liable for any incidental or consequential damages
arising from the loss of property or other damage or losses due to the failure of a Wadia 27i Decoding
Computer. Wadia Digital will not pay for lass of use or inconvenience caused b the failure of a Wadia
27i Decoding Computer. Wadia Digital will not pay for damage caused to other audio components
caused by the failure of the Wadia 27i Decoding Computer within the limits allowed by State law.
5) All non-warranty repairs will be performed and billed to the owner and will carry a 90 day warranty on
parts and labor.
6) The customer is responsible for the shipping charges far all repairs, warranty or non-warranty, shipped to
Wadia Digitol. Wadia Digital will pay return shipping to the customer or dealer within the United States]
for all warranty repairs. Special shipping methods or services will not be covered by Wadia Digital.
7) All repairs must be serviced by Wadia Digital or an authorized service facility.
8) This product is only warranted in the country of original sale by Wadia Digital.
Wadia Digital Corporation
624 Troy Street River Falls, WI 54022 • (715) 426-5900 • FAX (715) 426 5665
http://www.wadia.com