1
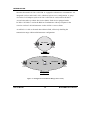
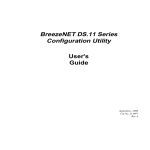
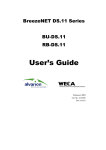
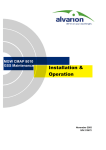
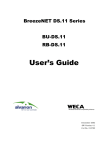
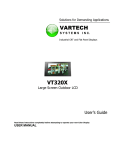
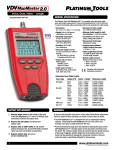
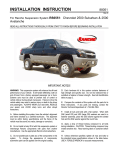
BreezeNET DS.11 Indoor
Series
AP-DS.11 Access Point
PC-DS.11 PC Card
PCI-DS.11 PCI Card
User’s Manual
March 2001
Cat No. 213171
Front Matter
© 2001 by BreezeCOM Ltd. All rights reserved.
No part of this publication may be reproduced in any material form without the written permission of the
copyright owner.
Trade Names
BreezeNET, BreezeLINK, BreezeACCESS, BreezeVIEW and BreezeMANAGE are trade names of
BreezeCOM Ltd. Other brand and product names are registered trademarks or trademarks of their respective
companies.
Statement of Conditions
The information contained in this manual is subject to change without notice. BreezeCOM Ltd. shall not be
liable for errors contained herein or for incidental or consequential damages in connection with the furnishing,
performance, or use of this manual or equipment supplied with it.
Warranty
In the following warranty text, “the Company” shall mean:
- BreezeCOM Inc., for products located in the USA.
- BreezeCOM Ltd., for products located outside the USA.
This BreezeNET product is warranted against defects in material and workmanship for a period of one year
from date of shipment. During this warranty period the Company will, at its option, either repair or replace
products that prove to be defective.
For warranty service or repair, the product must be returned to a service facility designated by the Company.
Authorization to return products must be obtained prior to shipment. The buyer shall pay all shipping charges to
the Company and the Company shall pay shipping charges to return the product to the buyer.
The Company warrants that the firmware designed by it for use with the unit will execute its programming
instructions when properly installed on the unit. The Company does not warrant that the operation of the unit or
firmware will be uninterrupted or error-free.
Limitation of Warranty
The foregoing warranty shall not apply to defects resulting from improper or inadequate maintenance by the
buyer, buyer supplied interfacing, unauthorized modification or misuse, operation outside of the environmental
User's Manual
iii
BreezeNET DS.11 Series
specifications for the product, or improper site preparation or maintenance. No other warranty is expressed or
implied. The Company specifically disclaims the implied warranties of merchantability and fitness for any
particular purpose.
Electronic Emission Notices
This device complies with Part 15 of the FCC rules. Operation is subject to the following two conditions:
1.
This device may not cause harmful interference.
2.
This device must accept any interference received, including interference that may cause undesired
operation.
FCC Radio Frequency Interference Statement
This equipment has been tested and found to comply with the limits for a Class B digital device, pursuant to part
15 of the FCC Rules. These limits are designed to provide reasonable protection against harmful interference
when the equipment is operated in a residential environment, not withstanding use in commercial, business and
industrial environments. This equipment generates, uses and can radiate radio frequency energy and, if not
installed and used in accordance with the instructions, may cause harmful interference to radio communications.
However, there is no guarantee that interference will not occur in a particular installation. If this equipment does
cause harmful interference to radio or television reception, which can be determined by turning the equipment
off and on, the user is encouraged to try to correct the interference by one or more of the following measures:
•
Reorient or relocate the equipment.
•
Increase the separation between the equipment and receiver.
•
Connect the equipment into an outlet on a circuit different from that to which the receiver is connected.
•
Consult the dealer or an experienced radio/TV technician for help
FCC Radiation Exposure Statement
To comply with FCC RF exposure requirements in section 1.1307,a minimum separation distance of 20cm. (8
inches) is required between the antenna(s) and all persons.
Information to User
Any changes or modifications of equipment not expressly approved by the manufacturer could void the user’s
BreezeNET DS.11 Series
iv
User's Manual
Table of Contents
authority to operate the equipment and the company’s warranty.
Contacting BreezeCOM Technical Support
Should you need assistance beyond the scope of this guide, please contact your local BreezeCOM reseller or
distributor. If they cannot solve your problem, feel free to contact the BreezeCOM Technical Support
Department. The support representatives can assist you in solving any problems that cannot be solved by your
reseller.
When requesting support, please have the following items available:
•
Configuration of the system, including models of the BreezeCOM equipment used.
•
Site information such as possible radio path problems (such as trees, machines, and buildings).
•
Distances between devices.
•
Description of problems encountered.
To contact BreezeCOM Technical Support, refer to the Technical Support page of the BreezeCOM web site:
www.breezecom.com.
User's Manual
v
BreezeNET DS.11 Series
TABLE OF CONTENTS
1.0
INTRODUCTION ............................................................................................ 9
1.1
AP-DS.11 Access Point................................................................................................9
1.2
PC-DS.11 PC Card .....................................................................................................10
1.3
PCI-DS.11 PC Card Adapter ......................................................................................10
1.4
Network Configurations .............................................................................................11
2.0
AP-DS.11.......................................................................................................... 17
2.1
Basic Installation ........................................................................................................17
2.2
Configuring the AP-DS.11 .........................................................................................20
2.3
Verifying Proper Operation of the AP........................................................................39
3.0
PC-DS.11 and PCI-DS.11............................................................................... 41
3.1
PC-DS.11 Technical Information ...............................................................................41
3.2
PCI-DS.11 Technical Information..............................................................................43
3.3
PC-DS.11 Driver Installation - Windows 95/98/2000/ME.........................................43
3.4
Configuring the PC-DS.11 using the Driver...............................................................45
3.5
PC-DS.11 Driver Installation for Windows NT4.0 ....................................................48
3.6
Verifying Proper Operation of the PC-DS.11.............................................................58
3.7
Installing and Operating the Configuration Utility.....................................................52
3.8
Troubleshooting..........................................................................................................59
BreezeNET DS.11 Series
vi
User's Manual
Table of Contents
4.0
Appendix A: Specifications ............................................................................ 61
4.1
AP-DS.11 Technical Specifications ...........................................................................61
4.2
PC-DS.11 Technical Specifications............................................................................63
5.0
Appendix B: Glossary..................................................................................... 65
User's Manual
vii
BreezeNET DS.11 Series
INTRODUCTION
1.0
INTRODUCTION
1.1
AP-DS.11 Access Point
The BreezeNET AP-DS.11 Access Point is an IEEE 802.11b compliant wireless hub that
provides wireless workstations access to wired Ethernet LANs. It also contains the
wireless relaying functions that enable workstations equipped with a 802.11b compatible
wireless adapters, such as BreezeCOM’s PC-DS.11, to communicate with one another.
Communication is possible even if the stations are not in direct line of sight, so long as
they are within the same cell coverage area.
The BreezeNET AP-DS.11 Access Point supports data rates of 11Mbps, 5.5Mbps,
2 Mbps and 1 Mbps. Since performance may be adversely affected by range, the
BreezeNET AP-DS.11 automatically transmits at the optimal data rate based upon range
and link quality.
Mobile workstations such as laptops and hand-held devices can roam between Access
Points that belong to the same Extended Service Set (ESS). In an ESS, all Access Points
must have the same ESSID. When the coverage areas of the Access Points overlap, users
can roam seamlessly from cell to cell. Transmission and reception is maintained while
moving, with no data packet loss or duplication. This process is fully transparent,
requiring no user intervention.
User's Manual
9
BreezeNET DS.11 Series
The AP-DS.11 contains an embedded SNMP agent, enabling effective management by
the SNMP Configuration Utility or any standard SNMP management station. It can also
be managed via its USB connector using the USB Configuration Utility.
1.2
PC-DS.11 PC Card
The PC-DS.11 is an IEEE 802.11b compliant PC card that can be installed in any type II or III
PC card slot. The PC card provides continuous connectivity and complete mobility, allowing
seamless roaming throughout the wireless LAN coverage area.
The PC card can communicate, via the AP-DS.11 Access Point, with any other device on the
wired or wireless LAN. The PC-DS.11 can thus access all network resources such as file
servers, other wired or wireless stations, printers or shared databases. The network connection
is maintained while roaming between overlapping cells. Transmission and reception is
maintained while moving, with no data packet loss or duplication.
The PC-DS.11 card also supports direct Ad-Hoc peer-to-peer connectivity with other devices
equipped with a PC-DS.11 card, without the need for a mediating Access Point.
1.3
PCI-DS.11 PC Card Adapter
The PCI-DS.11 adapts the PC-DS.11 card for use in desktop computing. It consists of a
standard plug-in card into which the PC-DS.11 card is inserted. The PCI-DS.11 is then installed
into the desktop computer.
BreezeNET DS.11 Series
10
User's Manual
INTRODUCTION
1.4
Network Configurations
1.4.1
Ad-Hoc Wireless LAN
Notebook
with
PC -D S.11
D esktop PC
with
PCI-DS.11
Ad Ho c
W ireless
LAN
Notebook
with
PC-DS.11
Desktop PC
with
PCI-DS.11
Figure 1: Ad-Hoc Wireless LAN
An Ad-Hoc wireless LAN is a group of PC-DS.11/PCI-DS.11 equipped computers,
connected as an independent wireless LAN. An Ad-Hoc LAN requires no Access
Point. Rather, the PC-DS.11/PCI-DS.11 cards communicate directly with one another.
Computers in an Ad-Hoc wireless LAN must each be configured with the same radio
channel and ESSID.
User's Manual
11
BreezeNET DS.11 Series
An Ad-Hoc wireless LAN is appropriate for very small-scale or temporary wireless
LANs.
1.4.2
Infrastructure Wireless LAN
Desktop PC
with ethernet card
Desktop PC
with ethernet card
Server
Ethernet
Infrastructure
Wired LAN
Notebook
with
PC-DS.11
Notebook
with
PC-DS.11
AP-DS.11
Notebook
with
PC-DS.11
AP-DS.11
Desktop PC
with
PCI-DS.11
Desktop PC
with
PCI-DS.11
Desktop PC
with
PCI-DS.11
Infrastructure
Wireless LAN #1
Infrastructure
Wireless LAN #2
Figure 2: Infrastructure Wireless LAN
An AP-DS.11 Access Point is a wireless hub that allows wireless workstations top be
fully integrated into the wired LAN. The AP-DS.11 contains the wireless relaying
BreezeNET DS.11 Series
12
User's Manual
INTRODUCTION
functions that enable PC-DS.11/PCI-DS.11 equipped workstations to communicate. An
integrated wireless and wired LAN is called an Infrastructure configuration. A group
of wireless LAN adapters (such as PC-DS.11/PCI-DS.11 cards) and an AP-DS.11
Access Point make up a Basic Service Set (BSS). Each device equipped with a
PC-DS.11/PCI-DS.11 card in the BSS can communicate with any computer in the
wired or wireless LAN infrastructure via the AP-DS.11 Access Point.
An AP-DS.11 is able to forward data within its BSS, effectively doubling the
transmission range within an Infrastructure configuration.
200 meters
Notebook
with
PC-DS.11
Notebook
with
PC-DS.11
Ad Hoc
Configuration
200 meters
Notebook
with
PC-DS.11
200 meters
AP-DS.11
Notebook
with
PC-DS.11
Infrastructure
Configuration
Figure 3: The Effective Transmission Range (not in scale)
User's Manual
13
BreezeNET DS.11 Series
The use of a unique ID in a BSS is essential. The AP-DS.11 and all PC-DS.11/PCI-DS.11
cards in a BSS must be configured with the same ESSID.
The Infrastructure wireless LAN configuration is appropriate for enterprise-scale wireless
networks where users require access to resources such as central databases, file servers
etc. and is necessary when roaming over a wireless LAN campus.
1.4.3
Roaming
Infrastructure configuration supports roaming capabilities. More than one BSS can be
configured together to create an Extended Service Set (ESS). This continuous network
allows users to roam freely within an ESS. PC-DS.11/PCI-DS.11 cards and AP-DS.11
Access Points within one ESS must all be configured with the same ESSID and utilize the
same radio channel.
BreezeNET DS.11 Series
14
User's Manual
INTRODUCTION
Ethernet
Infrastructure
Wired LAN
AP-DS.11
Roaming
from
BSS #1 to
John's Notebook BSS #2
with
PC-DS.11
BSS #1
AP-DS.11
John's Notebook
with
PC-DS.11
BSS #2
Extended Service Set
(ESS)
Figure 4: Roaming in an Extended Service Set (ESS)
Before enabling an ESS with roaming capability, select a feasible radio channel and
optimal Access Point positioning. Proper Access Point positioning combined with a clear
radio signal will greatly enhance performance.
User's Manual
15
BreezeNET DS.11 Series
AP-DS.11
2.0
AP-DS.11
2.1
Basic Installation
2.1.1
Packing List
The AP-DS.11 product kit includes the following items. If any of the listed items are
missing, please contact your local dealer.
•
AP-DS.11
•
AP-DS.11 USB driver and Configuration Utilities CD
•
AC Power Adapter
•
USB cable
Open the package carefully and make sure that none of the items listed above are missing.
Do not discard any packing materials. If, for any reason, the unit must be returned, it must
be shipped in its original packaging.
2.1.2
Positioning Guidelines
The following guidelines are provided to help you position the Access Point to ensure
complete coverage and optimal performance of the wireless LAN.
User's Manual
17
BreezeNET DS.11 Series
2.1.2.1
Central Location
Install the Access Point in a central location in the intended coverage area. Good
positions are:
•
In the center of a large room
•
In the center of a corridor
•
At the intersection of two corridors
2.1.2.2
Height
Install the Access Point as high as possible, clear of high partitions or tall pieces of
furniture in the coverage area.
2.1.2.3
Metal Furniture
Position the Access Point clear of metal furniture and away from any moving objects
such as metal fans or doors.
2.1.2.4
Radiation Sources
Position the Access Point clear of radiation sources that emit energy in the 2.4-2.5 GHz
band such as microwave ovens.
2.1.2.5
Heat Sources
Keep the Access Point well away from sources of heat, such as radiators and
air-conditioners.
BreezeNET DS.11 Series
18
User's Manual
AP-DS.11
2.1.2.6
Antennas
Make sure that the antennas are extended upward (or downward) vertically in relation to
the floor.
2.1.3
Connecting the Access Point to the Power Supply
The AP-DS.11 operates on a power input of 5V DC supplied by the power transformer
included with the unit.
•
Connect the power transformer’s DC cable to the POWER +5V power socket on
the unit. Use ONLY the power transformer supplied with the AP-DS.11.
•
Connect the power transformer’s AC plug to a mains power outlet –
110/220VAC.
2.1.4
Connecting the Access Point to the Ethernet Port
•
Connect one end of an Ethernet 10/100BaseT cable (straight cable, not supplied
with the unit) to the ETHERNET connection on the unit.
•
Connect the other end of the cable to the Ethernet source outlet.
User's Manual
19
BreezeNET DS.11 Series
2.2
Configuring the AP-DS.11
The AP-DS.11 can be configured using one of the two configuration utilities provided
with the unit:
a) The USB Configuration Utility, running under Windows 98/2000/ME, connecting
to the Access Point via the USB port.
b) The SNMP Configuration Utility, running under Windows 98/2000/ME/NT,
connecting to the Access Point from anywhere in the network via either the
Ethernet or the wireless LAN.
NOTE: The USB configuration utility can be used with Windows 98/2000/ME only. It does not
support Windows NT. The installation process for the configuration utility includes the
installation of the USB drivers and installation of the configuration utility.
2.2.1
USB Configuration Utility
2.2.1.1
Installing the USB Drivers
To install the AP-DS.11 USB driver with Windows 98/2000/ME:
1. Insert the AP-DS.11 Access Point Driver and Utilities CD into the CD drive of the PC.
2. Plug the USB cable into the USB slots on the AP-DS.11 and the PC.
3. Windows 98/2000/ME will automatically detect the AP-DS.11 and prompt you to install
BreezeNET DS.11 Series
20
User's Manual
AP-DS.11
the necessary driver. Click Next to begin the installation.
4. Select Search for the best driver…., and then click Next.
5.
Select Specify a location and then click Browse. From the drop-down list, double-click
the D: \AP-DS.11 USB Driver (where D is the CD-ROM drive) folder icon and
Windows 98/2000/ME automatically enters the path. Click Next to continue.
6.
Windows 98/2000/ME indicates when it has found the appropriate driver. Click Next to
continue.
7. Windows 98/2000/ME now installs the driver. As the driver files are being copied to the
appropriate location, you may be prompted to insert the Windows 98/2000/ME CD.
NOTE: If requested, you must insert the Windows 98/2000/ME CD as the driver installation
requires special files which may not be available, even if you have stored a copy of the
Windows 98/2000/ME source files on your hard drive.
8.
After Windows 98/2000/ME has finished installing the appropriate files, click Finish.
9.
Open the Control Panel from the Start menu and double-click the System icon.
The System Properties dialog box opens.
10. In the System Properties dialog box, select the Device Manager tab. Confirm that the
device BREEZENET DFU DEVICE is available. This indicates that the driver
installation was successful.
User's Manual
21
BreezeNET DS.11 Series
Figure 5: Windows System Properties dialog box
2.2.1.2
USB Configuration Utility Installation
To install the USB Configuration Utility:
1. Select Run from the Start menu.
2. Open the drop down list and select D:\AP-DS.11 USB CONFIG UTIL\setup.exe (where
D is the CD-ROM drive) or click the Browse button to search for the file. Click OK when
the correct file has been selected.
3. Click Next and continue the installation according to the on-screen instructions.
BreezeNET DS.11 Series
22
User's Manual
AP-DS.11
4. Select Browse and when the appropriate file is selected, click Next.
5. Setup adds an icon to the program folder. Click Next
6. After the installation of the utility is completed, click Finish.
2.2.1.3
Configuring the AP-DS.11 Using the USB Configuration Utility
To configure the AP-DS.11 using the USB Configuration Utility:
1. Click Start and then select Programs – BreezeNET DS. 11 and click the AP-DS.11 USB
Configuration Utility icon.
The BreezeNET AP-DS.11 USB Configuration Utility dialog box appears, open to the
Status tab.
2. The Status tab shows the status of the unit including the main parameters.
User's Manual
23
BreezeNET DS.11 Series
Figure 6: USB Configuration Utility – Status
•
Click the Reconnect Button to re-connect to the associated AP and refresh the
parameters.
•
Click the Basic Setting, Advanced, IP Setting and Security tabs to modify other
settings.
•
After you change any settings, click the Apply button.
•
Click the Restore Defaults button on the Status tab to restore the default values of
all the tabs.
3. The Basic Setting tab allows you to change the settings of the ESSID and Channel
parameters.
Figure 7: USB Configuration Utility - Basic Setting
BreezeNET DS.11 Series
24
User's Manual
AP-DS.11
•
The ESSID is a string of up to 31 case-sensitive hexadecimal characters. The
default is BreezeNET.
•
Valid Channel values are 1 – 13. The default is Channel 6.
Frequency FCC Canada
Channel
ETSI
Japan
France
(MHz)
1
2412
X
X
X
X
2
2417
X
X
X
X
3
2422
X
X
X
X
4
2427
X
X
X
X
5
2432
X
X
X
X
6
2437
X
X
X
X
7
2442
X
X
X
X
8
2447
X
X
X
X
9
2452
X
X
X
X
10
2457
X
X
X
X
X
11
2462
X
X
X
X
X
12
2467
X
X
X
13
2472
X
X
X
Figure 8: Regulatory Channel Frequencies
4. The Advanced tab allows you to change the Fragmentation and RTS Thresholds, the
Authentication Type, Preamble Type and Basic Rate parameters as well as the Antenna
Diversity settings.
User's Manual
25
BreezeNET DS.11 Series
Figure 9: USB Configuration Utility - Advanced
•
Fragmentation Threshold can be set from 60 to 2346. The default value is the
maximum, 2346. The maximum value disables the feature (no fragmentation).
•
RTS Threshold can be from 60 to 2346. The default value is the maximum,
2346. The maximum value disables the RTS/CTS mechanism.
•
Authentication Type can be Open System (no authentication), Shared Key
(requiring a key) or Both (for a cell where not all stations use Shared Key
authentication). The default selection is Both.
•
Preamble Type values can be either Short Preamble or Long Preamble. The
default is Long Preamble.
BreezeNET DS.11 Series
26
User's Manual
AP-DS.11
NOTE: This parameter should only be changed by an experienced user. It may be set to
Short Preamble only if all the wireless stations served by the AP also support
Short Preamble.
•
The Basic Rate parameter is used to define the maximum transmission rate of
the broadcasts and control packets. Available selections are 1-2 Mbps and
1-2-5.5-11 Mbps. In addition, you may enable/disable the data transmission
Auto Rate Fall Back option. The Access Point will increase the transmission
rate until it reaches the maximum rate within its defined range. The AP will
dynamically adapt its transmission rate to the quality of the wireless link. The
default selection is 1-2-5.5-11 (Mbps) with Auto Rate Fall Back enabled.
•
The Antenna Diversity parameters allow the receiving and transmitting antenna
to be defined. The available selections are Antenna 1, Antenna 2 or Both. The
default for both Receive Antenna and Transmit Antenna is Both.
5. The IP Setting tab allows you to change the IP Address and IP Mask settings.
User's Manual
27
BreezeNET DS.11 Series
Figure 10: USB Configuration Utility - IP Setting
•
The Default IP Address is 192.168.1.1. This address can be also used to
initially configure the unit using the SNMP configuration utility.
•
Default IP Mask is 255.255.255.0.
6. The Security tab allows you to change the WEP settings, enter 4 key strings and define
the default key to be used for encrypting/decrypting messages. You may use a
Passphrase to generate the keys.
BreezeNET DS.11 Series
28
User's Manual
AP-DS.11
Figure 11: USB Configuration Utility - Security
•
WEP options are Enable and Disable. The default is Disable.
•
Passphrase is a string of up to 10 characters. No default is entered.
•
WEP Key 1 through Key 4 are strings of 10 hexadecimal characters divided
into 5 sets of two characters each.
•
Default Key is for the selection of the active key (Key 1 through Key 4). The
default is Key 1.
7.
The About tab lists the Version Number of this installation as well as provides a button to
access the BreezeCOM website.
User's Manual
29
BreezeNET DS.11 Series
2.2.2
SNMP Configuration Utility
The SNMP Configuration Utility allows remote configuration of the AP-DS.11 from the
network via either the Ethernet port or the wireless LAN.
2.2.2.1
SNMP Configuration Utility Installation
To install the SNMP Configuration Utility:
1. Select Run from the Start menu.
2. Open the drop down list and select D:\AP-DS.11 SNMP CONFIG UTIL\setup.exe
(where D is the CD-ROM drive) or click the Browse button to search for the file.
3. Click OK to start the setup application.
4. Click Next to continue the installation.
5. Click the Browse button. When the correct directory and file name is selected, click
Next.
6. Setup will add the selected file to the program folder. Click Next to continue the
installation.
7. After installing the utility, click Finish.
2.2.2.2
Configuring the AP Using the SNMP Configuration Utility
To configure the unit using the SNMP Configuration Utility:
1. Click Start and then select BreezeNET DS. 11 from the Programs menu.
BreezeNET DS.11 Series
30
User's Manual
AP-DS.11
2. Select AP-DS.11 SNMP Configuration Utility.
3. You will be prompted to type in the IP Address of the AP. The IP address of the AP
must be in the same subnet as the computer on which you are running the
Configuration Utility.
NOTE: The default IP Address is 192.168.1.1.
The BreezeCOM AP-DS.11 SNMP Configuration Utility dialog box appears
open to the Status tab.
The Status tab shows the main parameters of the currently connected AP.
Figure 12: SNMP Configuration Utility - Status
User's Manual
31
BreezeNET DS.11 Series
•
Click the Find AP button to open the Available Access Points dialog
box, listing all possible APs. Select an AP to associate with and click
Connect.
Figure 13: Available Access Points dialog box
•
Click the Reconnect button to reconnect the AP and re-read the
parameters.
•
Click the Restore Defaults button to restore the default values. After
you change any settings, click the Apply button.
•
Click the Reset button to reset the Access Point.
4. The Basic Setting tab allows you to change the settings of the ESSID and Channel
parameters.
BreezeNET DS.11 Series
32
User's Manual
AP-DS.11
Figure 14: SNMP Configuration Utility - Basic Setting
•
The ESSID is a string of up to 31 printable characters, case sensitive. The default is
BreezeNET.
•
Valid Channel values are 1 – 13. The default is Channel 6. For a list of frequencies
see Regulatory Channel Frequencies on page 25.
5. The Advanced tab allows you to change the Fragmentation Threshold, RTS Threshold,
Authentication Type, Preamble Type and Basic Rate parameters.
User's Manual
33
BreezeNET DS.11 Series
Figure 15: SNMP Configuration Utility - Advanced
• Fragmentation Threshold can be from 60 to 2346. The default value is the maximum,
2346. The maximum value disables the feature (no fragmentation).
• RTS Threshold can be from 60 to 2346. The default value is the maximum, 2346. The
maximum value disables the RTS/CTS mechanism.
• Authentication Type can be Open System (no authentication), Shared Key (requiring a
key) or Both (to support a cell in which not all stations use Shared Key authentication).
The default selection is Both.
• Preamble Type values can be either Short Preamble or Long Preamble. The default is
Long Preamble.
BreezeNET DS.11 Series
34
User's Manual
AP-DS.11
NOTE: This parameter should only be changed by an experienced user. It may be set to
Short Preamble only if all the wireless stations served by the AP also support
Short Preamble.
• The Basic Rate parameter is used to define the maximum transmission rate of the
broadcasts and control packets. Available selections are 1-2 Mbps and 102-5.5-11
Mbps. In addition, you may enable/disable the Auto Rate Fall Back option. The Access
Point will increase its transmission rate until it reaches the maximum rate within the
defined range. The AP will dynamically adapt its transmission rate to the quality of the
wireless link. The default selection is 1-2-5.5-11 (Mbps) with Auto Rate Fall Back
enabled.
6. The IP Setting tab allows you to change the IP Address and IP Mask settings.
Figure 16: SNMP Configuration Utility - IP Setting
User's Manual
35
BreezeNET DS.11 Series
•
Default IP Address is 192.168.1.1. This address can also be used to initially
configure the Access Point using the SNMP Configuration Utility
•
Default IP Mask is 255.255.255.0.
7. The Security window allows you to change the WEP settings, enter 4 key strings and
define the default key to be used for encrypting/decrypting messages. You may use a
Passphrase to generate the keys.
Figure 17: SNMP Configuration Utility - Security
•
WEP options are Enable and Disable. The default is Disable.
•
Passphrase is a string of up to 10 characters. No default is set.
•
WEP Key 1 through Key 4 are strings of 10 hexadecimal characters divided
into five sets of two characters each.
BreezeNET DS.11 Series
36
User's Manual
AP-DS.11
•
Default Key is for the selection of the active key (Key 1 through Key 4). The
default is Key 1.
8.
The Info window lists the Version Number of this installation as well as providing a
button to access the BreezeCOM website.
Figure 18: SNMP Configuration Utility – Info
•
Clicking the Stations button opens the Associated Stations dialog box that lists
those stations associated with the network.
User's Manual
37
BreezeNET DS.11 Series
Figure 19: Associated Stations dialog box
•
Clicking the Statistics button opens the Statistics message box, detailing
Wireless and Ethernet statistics for the network.
Figure 20: Statistics message box
BreezeNET DS.11 Series
38
User's Manual
AP-DS.11
•
Clicking the TrapLog button opens a list of all traps (messages) that have been
received from other devices on the network.
2.3
Verifying Proper Operation of the AP
When operating correctly, the following LEDs are lit on the front panel of the Access
Point.
•
Power: Steady green when the unit is on.
•
Ethernet: Steady green when the unit is connected to an Ethernet connection.
•
WLAN Active: Flashes green to indicate the intensity of network activity.
User's Manual
39
BreezeNET DS.11 Series
PC-DS.11 & PCI-DS.11
3.0
PC-DS.11 AND PCI-DS.11
3.1
PC-DS.11 Technical Information
3.1.1
PC-DS.11 System Requirements
To install and use the PC-DS.11 PC card, your PC system must meet the following
requirements:
•
A Type II or Type III PC card slot.
•
PC card revision 2.10 compliant card and socket services.
•
Windows 95, 98, 2000 or NT (with the Windows Installation CD for use
during installation).
•
3.1.2
500 Kbytes free disk space for utility and driver installation.
Inserting the PC-DS.11 PC Card
With the PC-DS.11 card’s 68-pin connector facing the PC card slot and the PC-DS.11
label facing up, slide the PC-DS.11 card completely into the slot until it is firmly secured.
The operating system automatically detects the PC-DS.11 card and prompts you to install
the necessary driver.
User's Manual
41
BreezeNET DS.11 Series
Figure 21: Inserting the PC-DS.11 into Notebook
After properly inserting the PC-DS.11 card into your notebook, continue with the
PC-DS.11 driver and Configuration Utility installation.
NOTE: It is possible to “hot swap” the PC card. You may insert or remove the
PC-DS.11 PC card from the slot whether your computer is switched on or off.
Windows requires that the Network card and socket services must be compliant
with the PC card revision 2.10 specification. Please check the documentation of
the PC card driver before installing the PC-DS.11 PC CARD.
To comply with FCC RF exposure requirements in section 1.1307, a minimum
separation distance of 20 cm (8 inches) is required between the antenna and all
persons.
BreezeNET DS.11 Series
42
User's Manual
PC-DS.11 & PCI-DS.11
3.2
PCI-DS.11 Technical Information
3.2.1
PCI-DS.11 System Requirements
To install and use the PCI-DS.11 PCI card, your PC system must meet the following
requirements:
•
A free PCI slot.
•
Windows 95, 98, 2000 or NT (with the Windows CD for use during
installation).
•
3.2.2
500 Kbytes free disk space for utility and driver installation.
Inserting the PCI-DS.11 PC Card
Open the desktop PC and insert the PCI-DS.11 in an available PCI slot.
The operating system automatically detects the PCI-DS.11 and prompts you to install the
necessary driver. All driver installation and configuration steps for the PCI-DS.11 are
identical to those of the PC-DS.11.
3.3
PC-DS.11 Driver Installation - Windows
95/98/2000/ME
The following driver installation procedures pertain to both the PC-DS.11 and the
PCI-DS.11 and are almost identical for Windows 95, Windows 98, Windows 2000 and
User's Manual
43
BreezeNET DS.11 Series
Windows Millennium (ME) operating systems. Operating system variations are outlined
in the instructions.
NOTE: Before proceeding, have your Windows CD ready, as it may be required during the
software installation process.
1. Physically install the PC-DS.11 or the PCI-DS.11. The operating system automatically
detects the card and prompts you to install the necessary driver.
2. Insert the driver diskette and specify the driver location according to the operating
system.
3. Follow the on-screen instructions, clicking Next as necessary. As the driver files are
copied to the appropriate location, you may be prompted to insert the Windows CD. If
so, insert the CD and finish the installation.
4. Restart the computer when prompted. Click Yes to complete the installation.
5. After you have successfully installed the PC-DS.11 driver, continue the installation
process by configuring the PC-DS.11 PC card properties (see below).
NOTE: The PC-DS.11 may be configured using either the driver or the Configuration
Utility. Typically, after installation it is recommended that the Configuration
Utility be used to configure the card.
BreezeNET DS.11 Series
44
User's Manual
PC-DS.11 & PCI-DS.11
3.4
Configuring the PC-DS.11 using the Driver
1. From the Control Panel, double-click the Network icon.
2. Select BreezeNET PC-DS.11 from the list and click the Properties button.
Figure 22: Windows Network Configuration dialog box
3. From the Properties menu, select the Advanced tab.
User's Manual
45
BreezeNET DS.11 Series
Figure 23: BreezeNET Configuration – Channel
9. Select Authentication Algorithm from the Property list. The options shown in the value
list are Open System or Shared Key. The default value is Open System.
10. Select Channel from the Property list, and choose a value from the drop-down list. FCC
regulations require a value between 1 and 11 and ETSI requires a value between 1 and 13.
The default is Channel 6. For a list of frequencies see Regulatory Channel Frequencies
on page 25.
NOTE: The Channel setting is applicable only in Ad-hoc mode and is not relevant in
Infrastructure mode since the PC card automatically uses the same channel as the
AP.
BreezeNET DS.11 Series
46
User's Manual
PC-DS.11 & PCI-DS.11
11. Select Fragmentation Threshold from the Property list. The default value is 2432.
12. Select Network Type from the Property list, and choose Infrastructure, Ad-Hoc, or
802.11b Ad-Hoc from the drop-down list.
NOTE: Infrastructure mode allows a wireless adapter to communicate with a network using the
AP-DS.11, while Ad-Hoc and 802.11b Ad-Hoc mode allow wireless-to-wireless
communication. Ad-Hoc mode allows peer-to-peer communication with similar wireless
LAN products. The 802.11b Ad-Hoc allows peer-to-peer communication with all 802.11b
based wireless LAN products. Consult your System Administrator for information about
your network communication type.
13. Select Power Save Mode from the Property list and choose Disabled or Enabled from the
drop-down list.
NOTE: To allow uninterrupted data communication, choose Disabled as the value. Choosing
Enabled allows your notebook to enter Sleep mode. However, this may interrupt data
communication. Consult your System Administrator to find out the best setting for your
Network type.
14. Select Preamble Mode from the Property list and choose Long Tx Preamble from the
drop-down list as the default value.
15. Select RTS Threshold from the Property list. The default value is 2432.
User's Manual
47
BreezeNET DS.11 Series
16. Select ESSID from the Property list, and type in a value in the field. The ESSID can have
any value up to 31 hexadecimal characters, and should have the same value as the Access
Point (AP) in Infrastructure mode. In Ad-Hoc mode, all clients should share the same
ESSID.
17. Select Use Wep from the Property list, and choose 128 bit, 64 bit or Disabled from the
drop-down list. The WEP settings must match those of the Access Point.
NOTE: To use WEP in a network based on the BreezeNET AP-DS.11, 64-bit must be
selected.
18. After configuring the properties, click OK.
3.5
PC-DS.11 Driver Installation for Windows NT4.0
The following driver installation procedure is for the Windows NT operating system.
1. Physically install the PC-DS.11 or PCI-DS.11 card.
2. Switch on the PC and login as Administrator, then open the Control Panel and
double-click the Network icon.
3. From the Network dialog box, select the Adapters tab, and then click Add.
4. Click Have Disk.
5. Insert the driver disk and security key and then click OK.
BreezeNET DS.11 Series
48
User's Manual
PC-DS.11 & PCI-DS.11
6. Select BreezeNET PC-DS.11 and click OK.
Figure 24: Windows Select OEM Option dialog box
7. Windows NT 4.0 displays a configuration dialog box.
Figure 25: Windows NT Configuration dialog box
User's Manual
49
BreezeNET DS.11 Series
8.
Set the I/O Base and IRQ Level. These settings should be unique and not conflict with
any other device. If needed, they can be changed in order to avoid possible conflicts with
other system devices.
9.
Set the network type in the Mode field. Infrastructure Station mode allows a wireless
adapter to communicate with a network using the AP-DS.11, while Ad-Hoc and 802.11b
Ad-Hoc mode allow wireless-to-wireless communication. Ad-Hoc mode allows
peer-to-peer communication with similar wireless LAN products. The 802.11b Ad-Hoc
allows peer-to-peer communication with all 802.11b based wireless LAN products.
Consult your System Administrator for information about your network communication
type.
10. Set the ESSID in the SS ID field The ESSID can have any value, but must have the same
value as the Access Point (AP) in Infrastructure mode. In Ad-Hoc mode, all clients
should share the same ESSID.
11. Set the channel in the DS Channel field. FCC regulations require a value between 1 and
11 and ETSI between 1 and 13. For a list of frequencies see Regulatory Channel
Frequencies on page 25.
12. Set the Tx Rate (Transmit Rate) in the Tx Rate field. The Tx Rate selects the allowable
transfer rates of the wireless client. To optimize performance and range, the Tx Rate
should be set to Fully Automatic, which will automatically adjust the transfer speed for
best performance and longest range.
13. Select a RTS Threshold in the RTS Threshold field. The default value is Disabled.
14. Select a Fragmentation Threshold in the Fragmentation Threshold field. This value
defines the number of bytes used for the fragmentation boundary for directed messages.
BreezeNET DS.11 Series
50
User's Manual
PC-DS.11 & PCI-DS.11
The default value is Disabled.
15. Select the power mode in the Power Saving field. To allow uninterrupted data
communication, choose Disabled as the value (selected by default). Choosing Enabled
allows your notebook to enter “sleep” mode, however, this may interrupt data
communication. Consult your System Administrator to find out the best setting for your
network type.
16. Set the WEP in the WEP field, choosing 128-bit, 64-bit or Disabled. The WEP settings
must match those of the Access Point. The default value is Disabled.
NOTE: To use WEP in a network based on the BreezeNET AP-DS.11, 64-bit must be
selected.
17. The ATIM Window value in the ATIM Window field should be set to Disabled.
18. Set the listen interval in the Listen Interval field. This value is used to indicate to the AP
how often a station in Power Save mode wakes to listen to Beacon Management Frames.
The default value is Disabled (continuously listening, never entering sleep mode).
19. After configuring the properties, click OK.
20. In the Network dialog box, click Close. Windows NT will auto-bind the new adapter with
any network protocols already installed on the system.
User's Manual
51
BreezeNET DS.11 Series
3.6
Installing and Operating the Configuration Utility
3.6.1
Installing the Configuration Utility
1. Insert the Configuration Utility diskette into the diskette drive. Run A:\setup.exe (where
A represents the diskette drive).
2. The wizard opens.
3. Click Next.
4. Click Browse to change the install folder. Click Next.
5. Change the program folder. Click Next.
The system will install the files in the appropriate location. After the installation is
complete, the system displays a windows dialog. Select Yes to restart the PC.
3.6.2
Using the Configuration Utility
The following section describes and defines the various functions of the Configuration
Utility.
Quick-Launch Icon: After installation is complete and you launch the program, a utility
icon will appear in the Quick-Launch menu in the lower right hand corner of the Status
bar.
BreezeNET DS.11 Series
52
User's Manual
PC-DS.11 & PCI-DS.11
NOTE: The utility icon will not appear if there is no properly installed PC/PCI card in the
computer
The Configuration Utility: Double-clicking the Quick Launch utility icon opens the
Configuration Utility main menu, providing quick access to all settings. The following
image shows the Configuration Utility with the About tab selected, where you will find
Version, Copyright and Manufacturer information.
Figure 26: BreezeNET Configuration Utility – About
User's Manual
53
BreezeNET DS.11 Series
Link Info: The Link Info menu provides information about the current link quality
between the PC card and the base station, in addition to the Channel and the Tx Rate.
Click Rescan to reestablish a connection with the AP.
Figure 27: BreezeNET Configuration Utility - Link Info
BreezeNET DS.11 Series
54
User's Manual
PC-DS.11 & PCI-DS.11
Configuration: Selecting this tab opens the Configuration menu. Here you will find
options for configuring your PC card.
Figure 28: BreezeNET Configuration Utility - Configuration
Description of Configuration Settings
Following is an explanation of each adapter setting presented by the Configuration menu.
•
Mode: The Mode setting determines the architecture of your wireless LAN. Choose
Ad-Hoc or Infrastructure mode depending on your network type. A brief explanation of
each mode follows:
Ad-Hoc and 802.11b Ad-Hoc: These modes are used for a simple
peer-to-peer network. These types of networks allow the sharing of local
User's Manual
55
BreezeNET DS.11 Series
resources between wireless clients without a wireless Access Point (AP) and
are best suited for small or temporary networks.
Infrastructure: This mode allows a wireless LAN to be integrated into an
existing wired network through an AP. Infrastructure type networks also
permit roaming between Access Points while maintaining connection to all
network resources. Infrastructure mode provides additional features, such as
WEP security, power saving and extended range.
•
ESSID: An acronym for Extended Service Set Identifier, ESSID is the unique name
shared among all clients and Access Points in a wireless network. The ESSID must be
identical for all clients or Access Points participating in the network. The ESSID is case
sensitive and must not exceed 31 printable characters.
•
Tx Rate: The transmit rate or Tx Rate selects the allowable transfer rates of the wireless
client. To optimize performance and range, the Tx Rate should be set to Fully Automatic,
which will automatically adjust the transfer speed for best performance and longest range.
NOTE: The Tx rate setting must be supported by the AP. If the AP does not support the Tx rate,
undesired results may occur.
•
PS Mode: Power Saving Mode enables or disables the power saving features of your
wireless adapter. When enabled on a laptop, the power saving mode can reduce power
consumption by the wireless card and extend the battery life of your laptop. This setting is
only implemented in a network operating in Infrastructure mode.
Changing the PS mode: The PS Mode on your adapter is set to Disabled by
default. To change the setting, select Enabled from the drop-down list, click
BreezeNET DS.11 Series
56
User's Manual
PC-DS.11 & PCI-DS.11
OK and wait a few seconds. The screen is then updated to show the current
Connection Status, Link Quality and Signal Strength.
•
Channel: This setting specifies the default 802.11b channel used by the Wireless LAN. In
an Infrastructure type network without an Access Point active on the default channel, clients
will scan through all available channels searching for a network with a matching ESSID.
Changing the Channel: Changing the channel is only effective in Ad-Hoc
networks. Networks operating in Infrastructure mode automatically scan for
a channel. For a list of frequencies see Regulatory Channel Frequencies on
page 25.
Encryption: Selecting the Encryption tab allows you to create new WEP keys.
NOTE: Wired Equivalent Privacy, (WEP) is an encryption scheme used to protect your wireless
data communications. WEP uses a combination of 64-bit or 128-bit keys to provide
access control to your network and encryption security for every data transmission. To
decode a data transmission, each wireless client on the network must use an identical
64-bit or 128-bit key. This feature is only available in Infrastructure Mode and must also
be enabled on the Access Point.
User's Manual
57
BreezeNET DS.11 Series
Figure 29: BreezeNET Configuration Utility - Encryption
The 64-bit or 128-bit WEP keys can be generated from a user-defined password
(consisting of any text string) or a manual entry. To generate encryption keys for each
client communicating in the wireless network, complete the following steps:
For 64-bit encryption:
a. Select Create with Passphrase and type a case sensitive passphrase in the field. This
passphrase must be the same for all APs and workstations in the ESS. Select the key to be
used as the default from the Default Tx Key field and click Apply.
OR
b. Select Manual Entry, and complete the five, two hexadecimal fields in each of the four
BreezeNET DS.11 Series
58
User's Manual
PC-DS.11 & PCI-DS.11
keys. Select the key to be used as the default from the Default Tx Key field and click Apply.
For 128-bit encryption:
a. Select Create with Passphrase and type a case sensitive passphrase in the field and click
Apply. This passphrase must be the same for all APs and workstations in the ESS.
OR
b. Select Manual Entry, and complete the 13, two hexadecimal fields and click Apply.
3.7 Verifying Proper Operation of the PC-DS.11
The Red LED on the card itself should be on indicating that the unit is associated
(synchronized) with an AP. It will blink when scanning (searching for an AP or another
station). The Green LED’s blinking rate indicates the volume of traffic on the wireless
link.
The Configuration Utility icon at the Quick Launch bar should be green to indicate a good
wireless link. Yellow indicates marginal quality and red indicates no wireless link.
3.8
Troubleshooting
Problem: My computer does not recognize the PC-DS.11.
Probable Solution:
• The PC-DS.11 is not properly inserted into the PC card slot.
User's Manual
59
BreezeNET DS.11 Series
• Reinstall the driver.
Problem: The PC-DS.11 station cannot communicate with other computers
linked via Ethernet in the Infrastructure configuration.
Probable Solution:
1. Ensure that the PC-DS.11 with which the station is associated is powered on and verify
the link quality.
2. Confirm the station is configured with the same operating radio channel as the PC-DS.11.
If the IDs are different, change the PC-DS.11 and all the stations within the BSS to another
radio channel.
3. Ensure that the station is configured with the same security options as the PC-DS.11, and
can be turned off and on with the same security key.
4. Confirm that the ESSID is the same as the PC-DS.11 for a roaming disabled station.
Alternately confirm that the ESSID is the same as the PC-DS.11 for a roaming enabled
station.
BreezeNET DS.11 Series
60
User's Manual
TECHNICAL SPECIFICATIONS
4.0
APPENDIX A: SPECIFICATIONS
4.1
AP-DS.11 Technical Specifications
Radio
Wireless LAN Standards
Compliant with IEEE 802.11b HR
Radio Type
Direct Sequence Spread Spectrum
Supported Data Rates
11, 5.5, 2,1 Mbps with Dynamic rate switching
2.400 - 2.4835 GHz ISM band – ETSI
Frequency Range
2.400 - 2.4835 GHz ISM band – FCC
2.400 - 2.4835 GHz – Japan
2.4465 GHz – 2.4835 GHz – France
Selectable Sub Channels
ETSI
FCC
1-13
1-11
Japan
1-13
France
10-13
Typical Output Power
18 dBm at maximum radiation direction
Minimum Output Power
15 dBm
–82 dBm @ 11 Mbit/s
Sensitivity (BER 1E-6)
–84 dBm @ 5.5 Mbit/s
–86 dBm @ 2 Mbit/s
–90 dBm @ 1 Mbit/s
Range
1300ft (400m) open environment
Typical Range at 1Mbps
User's Manual
240ft (80m) office environment
61
BreezeNET DS.11 Series
360ft (120m) open environment
Typical Range at 11Mbps
100ft (30m) office environment
Security
Authentication and Data Encryption
64 bit RC4 WEP
Configuration and Management
Enhanced in-band SNMP based graphic
Management and Setup
Configuration utility
Enhanced out-of-band USB interface graphic
Configuration utility
LED Indicators
Power, Ethernet connection, Wireless LAN
Activity
Power
Power Voltage
Power Consumption
DC 5.0 Volt, AC Adapter AC 100V-240V
1.0 A (Typical)
Mechanical Dimensions
Housing Without Antennas
133.5 mm x 70 mm x 33 mm
Environmental
Operating Temperature
Operating Humidity
Operating:
0 C to +50 C
Storage:
-20 C to +60 C
0% to 70% non-condensing
Standards Compliance
EMC
EN 300-385, FCC Part 15
Safety
EN 60950, UL 1950
BreezeNET DS.11 Series
62
User's Manual
TECHNICAL SPECIFICATIONS
4.2 PC-DS.11 Technical Specifications
Radio
Wireless LAN Standards
Compliant with IEEE 802.11b HR
Radio Type
Direct Sequence Spread Spectrum
Supported Data Rates
11, 5.5, 2,1 Mbps with Dynamic rate switching
2.400 - 2.4835 GHz ISM band – ETSI
Frequency Range
2.400 - 2.4835 GHz ISM band – FCC
2.400 - 2.4835 GHz – Japan
2.4465 GHz – 2.4835 GHz – France
Selectable Sub Channels
ETSI
FCC
1-13
1-11
Japan
1-13
France
10-13
Typical Output Power
18 dBm at maximum radiation direction
Minimum Output Power
15 dBm
–82 dBm @ 11 Mbit/s
Sensitivity (BER 1E-6)
–84 dBm @ 5.5 Mbit/s
–85 dBm @ 2 Mbit/s
–90 dBm @ 1 Mbit/s
Network Architecture Types
Communication to wired networks via Access
Points
Ad-Hoc Peer-to-peer networking
Range
1300ft (400m) open environment
Typical Range at 1Mbps
User's Manual
240ft (80m) office environment
63
BreezeNET DS.11 Series
Typical Range at 11Mbps
360ft (120m) open environment
100ft (30m) office environment
Security
Authentication and Data
Encryption
64 bit RC4 WEP
128 bit RC4 WEP
Software Drivers
Supported Operating Systems
Windows 2000, 98, 95, NT, Linux
Configuration and Management
Management and Setup
Enhanced graphic configuration utility
Site Survey Tool
Integrated into the configuration utility
LED Indicators
Wireless Link, Wireless LAN Activity
Power Consumption
Transmit
300mA typical (500mA max)
Receive
170mA typical (300mA max)
Sleep
10mA (25mA max)
BreezeNET DS.11 Series
64
User's Manual
GLOSSARY
5.0
APPENDIX B: GLOSSARY
Access Point
An Access Point is a wireless hub that provides wireless workstations
access to wired Ethernet LANs. It also contains the wireless relaying
functions that enable workstations equipped with a wireless adapter to
communicate with one another.
Ad-Hoc
A group of 2 or more wireless workstations that communicate directly
with one another without the need for a central AP (peer-to-peer).
Authentication
Type
•
Open System: A null authentication algorithm (no
encryption).
•
Shared Key: Requires workstations to have a secret
key installed for authentication.
NOTE: Open System authentication is the default
authentication algorithm in BreezeNET products.
BSS
Basic Service Set. An Access Point and all wireless workstations.
Several BSSs form an ESS (Extended Service Set).
DSSS
Direct sequence spread spectrum.
ESS
Extended Service Set. More than one BSS can be configured to
become an Extended Service Set. LAN mobile users can roam
between different BSSs in an ESS.
ESSID
In Infrastructure mode – all associated workstations and APs must
have the same ESSID.
Fragmentation
Threshold
Fragmentation Threshold determines the largest possible data packet
transmitted. Transfer reliability can be increased by cutting a MAC
Service Data Unit (MSDU) into several smaller MAC Protocol Data
Units (MPDU).
User's Manual
65
BreezeNET DS.11 Series
Infrastructure
An integrated wireless and wired LAN is called an Infrastructure
configuration.
Preamble Type
A sequence of bits transmitted at 1Mbps that allows the PHY circuitry
to reach steady-state demodulation and synchronization of bit clock
and frame start. Two different preambles and headers are defined: the
mandatory supported Long Preamble and header, which interoperates
with the 1 Mbit/s and 2 Mbit/s DSSS specification (as described in
IEEE Std 802.11), and an optional Short Preamble and header (as
described in IEEE Std 802.11b). At the receiver, the Preamble and
header are processed to aid in demodulation and delivery of the
PSDU. The Short Preamble and header may be used to minimize
overhead and thus maximize the network data throughput. However,
the Short Preamble is supported only by the IEEE 802.11b
(High-Rate) standard and not by the original IEEE 802.11. That
means that stations using Short-Preamble cannot communicate with
stations implementing the original version of the protocol.
PSDU
Physical Layer Convergence Protocol (PLCP) Service Data Unit.
Roaming
A function that allows mobile devices to move from 1 cell to another
in the ESS, while maintaining network connectivity.
RTS Threshold
Defines the packet size threshold. Beyond this threshold the RTS/CTS
mechanism will NOT be enabled.
WEP
Wired Equivalent Privacy. An encryption scheme used to protect
wireless data communication. Enabling the WEP prevents other
stations without the same WEP key from accessing the AP.
BreezeNET DS.11 Series
66
User's Manual