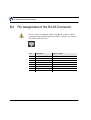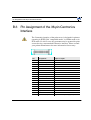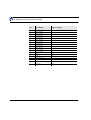
1
BaseLine Print Servers
User Manual
High Speed Connectivity
for all Printers and
Networks
• Quick and easy installation
• High speed data transfer
• Built-in web server for
system-independent
management
• Models for all printers
and networks
Names of companies and products mentioned in this manual are trademarks or registered
trademarks of their respective owners.
SEH Computertechnik GmbH has endeavoured to ensure that the information in this
manual is correct. If you detect any inaccuracies please inform us at the address
indicated below. SEH Computertechnik GmbH will not accept any liability for any error
or omission. The information in this manual is subject to change without notification.
All rights are reserved. Copying, other reproduction, or translation without the prior
written consent from SEH Computertechnik GmbH is prohibited.
BaseLine Print Server User Manual release 1.1
©
2004 by SEH Computertechnik GmbH,
Suedring 11, D-33647 Bielefeld/Germany
Phone:
+49 (5 21) 9 42 260
Fax:
+49 (5 21) 9 42 26 - 99
Internet:
http://www.seh.de
E-Mail:
[email protected]
Contents
Contents
CHAPTER 1
Your New Print Server........................................... 1-1
1.1 What Does Your Print Server Offer?..............................................................................1-2
1.2 Scope and Operating System ..........................................................................................1-3
1.3 Which Documentation Applies to Your Print Server? ...................................................1-4
1.4 Symbols and Conventions...............................................................................................1-5
CHAPTER 2
Print Server Homepage......................................... 2-1
2.1 Calling the Print Server Homepage ................................................................................2-2
2.2 Displaying Status Information ........................................................................................2-4
2.2.1 General Status .................................................................................................................................... 2-5
2.2.2 Printer Port Status .............................................................................................................................. 2-5
2.3 Print Server Configuration ..............................................................................................2-6
2.3.1 General Configuration........................................................................................................................ 2-7
2.3.2 Configuring the Printer Port............................................................................................................... 2-8
2.3.3 Configuring TCP/IP ........................................................................................................................... 2-8
2.3.4 Configuring Microsoft Windows ....................................................................................................... 2-9
2.3.5 Configuring Print Server Protection ................................................................................................ 2-10
2.4 Enabling or Disabling HP JetAdmin Compatibility .....................................................2-11
2.5 Querying the Printer Status ...........................................................................................2-12
2.6 Protecting Print Servers ................................................................................................2-13
2.7 Setting the Language.....................................................................................................2-14
2.8 Restarting the Print Server ............................................................................................2-15
2.9 Resetting the Print Server Parameters...........................................................................2-16
BaseLine Print Server User Manual
i
Contents
2.10 Firmware Update ........................................................................................................2-17
CHAPTER 3
Print Server Controls ............................................. 3-1
3.1 Basic Principles ..............................................................................................................3-2
3.2 Function of the LEDs .....................................................................................................3-3
3.3 Printing the Status Page ..................................................................................................3-4
3.3.1 Printing the Status Page ..................................................................................................................... 3-4
3.3.2 Printing the Service Page ................................................................................................................... 3-5
3.4 Printing Parameters.........................................................................................................3-6
3.5 Resetting the Print Server Parameters ............................................................................3-7
REFERENCE A
Network Specifications ......................................... A-1
A.1 Basic Principles ............................................................................................................ A-1
A.2 10BaseT Ethernet Networks ......................................................................................... A-2
A.3 100BaseTX Ethernet Networks .................................................................................... A-2
REFERENCE B
Connector Pin Assignment................................... B-1
B.1 Basic Principles............................................................................................................. B-1
B.2 Pin Assignment of the RJ-45 Connector....................................................................... B-2
B.3 Pin Assignment of the 36-pin Centronics Interface ...................................................... B-3
REFERENCE C
ii
Printer Status Messages ...................................... C-1
BaseLine Print Server User Manual
CHAPTER 1
Your New Print Server
This chapter contains information
concerning the following topics:
What Does Your Print Server Offer?
Scope and Operating System
Which Documentation Applies to
Your Print Server?
Symbols and Conventions
Introduction
BaseLine Print Server User Manual
1-1
What Does Your Print Server Offer?
1.1
What Does Your Print Server Offer?
Simple
Administration
You can call device and status information at any time using the
print server homepage, JetAdmin, or WebJetAdmin. In addition,
you can print out a status page containing configuration data by
means of the status button.
Firmware Update
If required, a new firmware version can be loaded onto the Flash
EPROM of the print server. You will thus profit from future
updates, as well.
EC conformity and
FCC
The print server conforms to EC and FCC standards.
Guarantee and
Hotline
SEH Computertechnik grants a three-year guarantee on the print
server and offers extensive support and special user training
sessions. You can contact the customer support at the following
e-mail address: [email protected].
1-2
BaseLine Print Server User Manual
Scope and Operating System
1.2
Scope and Operating System
Operating systems
Your print server supports the following operating systems:
System
Windows
Note
Version
Windows XP
Windows 2000
Windows Me
Windows 98
Windows 95
Windows NT 4.0
Before starting the initial operation procedure, please note the
following safety regulations for your print server:
•
•
BaseLine Print Server User Manual
Read the documentation and make sure that your system
meets the requirements listed therein.
Before starting the installation and initial operation procedure
of the print server, read and observe the "Safety Regulations"
section of the Quick Installation Guide.
1-3
Which Documentation Applies to Your Print Server?
1.3
Which Documentation Applies to Your Print
Server?
The print server documentation consists of the following manuals:
Documentation
1-4
Content
Medium
Quick Installation
Guide
Brief description of the hardware installation
and the initial operation procedure of the
print server
Printed
manual
User Manual
Administration, Configuration,
Technical Data
PDF on
CD-ROM
BaseLine Print Server User Manual
Symbols and Conventions
1.4
Symbols and Conventions
The following conventions are used in this document:
'Name' Window
The name of menus, files, and windows are marked using single
quotation marks.
"Name" Section
The name of chapters and sections are marked using double
quotation marks. In the Acrobat Reader you can jump to the
corresponding segment by clicking the cross-reference.
y
Eye-catchers mark lists.
9
Hooks mark requirements that must be met before you can begin
the actual installation.
An arrow marks different possibilities. You can jump to the
corresponding text section by clicking the text immediately
following the diamond.
A diamond informs you that several steps must be taken in
succession. You can jump to the corresponding text section by
clicking the text immediately following the diamond.
A notice contains information that should be heeded. The notice
usually contains supplementary information or cross-references to
other relevant sections in the manual.
A warning contains important information that must be heeded.
Non-observance may lead to malfunctions.
BaseLine Print Server User Manual
1-5
Symbols and Conventions
A hand marks the beginning of instructions.
1-6
BaseLine Print Server User Manual
CHAPTER 2
Print Server Homepage
This chapter contains information
concerning the following topics:
Calling the Print Server Homepage
Displaying Status Information
Print Server Configuration
Enabling or Disabling HP JetAdmin
Compatibility
Homepage
Querying the Printer Status
Protecting Print Servers
Setting the Language
Restarting the Print Server
Resetting the Print Server Parameters
Firmware Update
BaseLine Print Server User Manual
2-1
Calling the Print Server Homepage
2.1
Calling the Print Server Homepage
The print server homepage is stored in your print server and can be
called by means of an Internet browser (Internet Explorer 4.x or
later, Netscape 3.x or later). When using other browsers, the full
functionality of the print server homepage will not be guaranteed.
Make sure that:
9
9
The print server is connected and the printer is turned on.
The IP address is saved in the print server.
Proceed as follows:
1. Open your Internet browser.
2. Enter the IP address of the print server as the URL.
The following page appears:
Fig. 2-1: Print Server Homepage
2-2
BaseLine Print Server User Manual
Calling the Print Server Homepage
If the print server homepage is not displayed, check the proxy
settings of your browser.
A selection bar with the available topics is located on the left side
of the screen, while an information window is situated on the right
side.
By means of the 'General' selection bar on the left side of the
screen, you can select the topics 'Home' and 'Manuals'.
Using the 'Home' link, you can return to the starting page of the
print server homepage at any time.
Clicking the 'Manuals' link brings you to the SEH web site. Here,
you can download the latest manuals as *.pdf files.
BaseLine Print Server User Manual
2-3
Displaying Status Information
2.2
Displaying Status Information
By means of the 'Status' selection bar on the left of the screen, you
can call pages which display status information.
The following topics will be described:
General Status
Printer Port Status
2-4
BaseLine Print Server User Manual
Displaying Status Information
2.2.1
General Status
The 'General' page shows general status information, such as the
name of the print server, the hardware address, and the serial and
version numbers.
The text which you previously entered under 'Configuration General' will now appear under 'Description'. A description can be
used to gain a better overview of the print servers and printers in
the system. Here, you can enter a printer description or the
location of the printer, for example.
2.2.2
Printer Port Status
The 'Printer Port' page displays details about the printer, such as
the printer model or the manufacturer. In addition, printer status
messages, such as offline, are displayed. For more information,
please read the "Printer Status Messages" chapter.
BaseLine Print Server User Manual
2-5
Print Server Configuration
2.3
Print Server Configuration
Using the 'Configuration' selection bar on the left of the screen,
you can call pages by means of which you can configure the print
server.
The following topics will be described:
General Configuration
Configuring the Printer Port
Configuring TCP/IP
Configuring Microsoft Windows
Configuring Print Server Protection
2-6
BaseLine Print Server User Manual
Print Server Configuration
2.3.1
General Configuration
The 'General' page is used for configuring general print server
parameters.
Under 'Description', you can enter a description of the print server
or printer to gain a better overview of the print servers and printers
in the system.
Under 'Status page mode', you can determine the data format in
which the status page will be printed. The auto mode
automatically searches for a suitable data format. ASCII,
PostScript, or DATAMAX (label printer) can also be selected
manually.
'Print server language' refers to the language of the print server.
Here, you can select the language in which the print server will
print its status and configuration information. This will not affect
the printer language.
'Ethernet settings' is used for setting the speed at which other
network components, such as switches or hubs will function. If the
value is set to 'Auto', the speed will be recognized automatically.
If you set the speed manually, the speed must correspond to the
speed of the other network components. It is not possible to
operate the print server with full duplex if the hub works with half
duplex.
'HP JetAdmin compatible' enables or disables the HP JetAdmin
and HP WebJetAdmin support. The printer can then be
administered via the HP utilities.
BaseLine Print Server User Manual
2-7
Print Server Configuration
'EPSON Status Monitor support' enables or disables the support of
the EPSON Status Monitor. If the parameter has been enabled,
printer status messages, such as display of ink level, are displayed.
If an EPSON printer is used with a print server, the parameter
should be enabled. You should disable the parameter if a printer of
a different manufacturer or an EPSON printer together with a RIP
is used.
'Job receive timeout (seconds)' specifies the time out value (in
seconds) for receiving print jobs. If the spooler does not send any
print job within the timeout period, the connection between the
print server and the spooler will be interrupted. If the value is set
to '0', this function is disabled. If you want to use the timeout
option, we recommend using the value '120'.
2.3.2
Configuring the Printer Port
'Fast mode' activates or deactivates the fast mode of box or pocket
print servers. Using the fast mode, the print server speed can be
increased. With older printer models, we recommend disabling the
fast mode.
'Port mode' specifies the communication between the print server
and the printer. You can select unidirectional or bidirectional
communication or the Konica Minolta GDI printing support.
2.3.3
Configuring TCP/IP
The 'TCP/IP' page is used for configuring the TCP/IP parameters.
2-8
BaseLine Print Server User Manual
Print Server Configuration
Via 'TCP/IP', you can disable TCP/IP completely.
Using 'IP address,' ' Subnet mask,' and 'Gateway,' you can
configure the relevant addresses.
In addition, you can enter a host name, the printer location, and a
contact partner for the printer.
Under 'DHCP', 'ARP/PING' and 'ZeroConf', you can enable or
disable all the different ways of saving the IP address in the print
server. We recommend that you deselect this box when the IP
address is finally assigned to the print server.
2.3.4
Configuring Microsoft Windows
The 'Microsoft Windows' page is used for configuring the
NetBIOS and WINS parameters.
Peer-to-peer printing is enabled or disabled via 'NetBIOS'.
The print server name is entered under 'NetBIOS name'.
The name of an existing domain has to be entered under 'NetBIOS
domain'. The print server will then be displayed in this domain.
'NetBIOS refresh' indicates the refresh time.
Using 'WINS registration', you can enable or disable the WINS
services.
If you have enabled 'WINS via DHCP', you can enter the IP
address of the WINS server via DHCP. If you have not enabled
BaseLine Print Server User Manual
2-9
Print Server Configuration
'WINS via DHCP', you can enter the IP address of the WINS
server manually.
2.3.5
Configuring Print Server Protection
If you have assigned a password under 'Password', the print server
parameters can only be changed using the password.
2-10
BaseLine Print Server User Manual
Enabling or Disabling HP JetAdmin Compatibility
2.4
Enabling or Disabling HP JetAdmin
Compatibility
The print server can be configured and administered using the
utilities HP JetAdmin and HP WebJetAdmin. For this reason, the
parameter HP JetAdmin compability must be enabled.
Proceed as follows:
1. Call the 'Configuration - General' page from the print server
homepage.
2. Enable 'HP JetAdmin compatible'.
3. Click 'Save'.
BaseLine Print Server User Manual
2-11
Querying the Printer Status
2.5
Querying the Printer Status
Proceed as follows:
1. Call the 'Status - Printer Port' page from the print server
homepage.
The printer status will appear on the screen.
2-12
BaseLine Print Server User Manual
Protecting Print Servers
2.6
Protecting Print Servers
The print server can be protected by a password to prevent
unauthorized changes to the parameters.
Proceed as follows:
1. Call the 'Configuration - Protection' page from the print server
homepage.
2. Enter a password.
3. Click 'Save'.
BaseLine Print Server User Manual
2-13
Setting the Language
2.7
Setting the Language
The print server supports the following languages: English,
German, French, Spanish, Italian, Portuguese, Japanese,
Simplified Chinese, Traditional Chinese, and Korean. You can set
these languages during the run-time of the print server.
If you set the language by means of the print server homepage, the
original printer language remains unchanged. This means that the
text of the operating panel and the status page of the printer remain
unchanged in the original language.
Proceed as follows:
1. Call the 'Configuration - General' page from the print server
homepage.
2. Select a language from the 'Print server language' box.
3. Click 'Save'.
2-14
BaseLine Print Server User Manual
Restarting the Print Server
2.8
Restarting the Print Server
You can use the 'Restart' page for the manual restart of the print
server.
Proceed as follows:
1. Click 'Restart Print Server'.
The print server will be restarted.
BaseLine Print Server User Manual
2-15
Resetting the Print Server Parameters
2.9
Resetting the Print Server Parameters
You can use the 'Default Settings' page for resetting the print
server parameters. This action, however, will delete all parameters,
including for example, the IP address.
You must reset the parameters, for example, if you want to use the
print server in another network by changing the location of the
printer. Before this change of location, you should reset the
parameters to their default settings to install the print server in
another network.
Since the print server's IP address has been reset as well, the print
server homepage can no longer be called. If required, use the SEH
Printer Wizard to reinstall the print server.
If a password has been set in the print server, the password has to
be entered before resetting the parameters. Only by using the
status button can the parameters be reset without entering the
password. For more information, please read the section
"Resetting the Print Server Parameters" on page 3-7.
Proceed as follows:
1. Click 'Default Settings'.
The parameters are reset.
2-16
BaseLine Print Server User Manual
Firmware Update
2.10 Firmware Update
When Is a Firmware
Update Necessary?
To guarantee that your print server is fully functional upon
purchase, the print server software has been preinstalled. For this
reason, a firmware update is generally not required. A firmware
update should be undertaken only if SEH Computertechnik has
released a new software version with new functions or bug fixes.
What Happens
During a Firmware
Update?
During a firmware update, the new firmware is saved in the flash
EPROM of the print server as a firmware file, overwriting the old
firmware in the process. The configuration parameters retain their
original settings.
Where Do I Find the
Firmware File?
You can find the firmware files for the firmware update on the
SEH web site (www.seh.de) from where they can be downloaded.
Requirements
Make sure that:
9
9
The print server is turned on and visible in the network.
All print jobs are finished.
Proceed as follows:
1. Call the print server homepage.
2. Select 'Standard Firmware Update' from the left frame.
The following window appears:
BaseLine Print Server User Manual
2-17
Firmware Update
Fig. 2-1: Firmware Update
3. Select the firmware file.
4. Click 'Download.'
The firmware is updated and the print server is restarted.
2-18
BaseLine Print Server User Manual
CHAPTER 3
Print Server Controls
This chapter contains information
concerning the following topics:
Basic Principles
Function of the LEDs
Printing the Status Page
Printing Parameters
Resetting the Print Server Parameters
Controls
BaseLine Print Server User Manual
3-1
Basic Principles
3.1
Basic Principles
On the front panel of every print server, you will find the network
connectors, several LEDs, the status button and an optional power
supply connector. In this chapter, the function of the LEDs and the
status button will be described. For information concerning the
connectors, please read the Connector Pin Assignment" chapter on
page B-1, if necessary.
The following topics will be described:
Function of the LEDs
Printing the Status Page
Printing Parameters
Resetting the Print Server Parameters
3-2
BaseLine Print Server User Manual
Function of the LEDs
3.2
Function of the LEDs
Every print server has a yellow and a green LED. The green LED
signals that the print server is operational. The yellow LED lights
up when data packets are received. The meaning of these LEDs is
described in the following text.
Another green LED above the status button indicates whether a
data connection (link) has been established or not.
Meaning of LEDs
LED display
Explanation
State
Both LEDs light
After the print server is turned on both LEDs light up Activation procedure
up for a short time for a short time and then extinguish again. Internal
tests are undertaken and the network connection is
detected while both LEDs are dark.
The yellow LED is The internal tests were carried out successfully after Activation procedure
lit
the print server activation. The yellow LED lights up
until the printer recognizes the print server.
The green LED is
blinking
The internal tests were carried out successfully after
the print server activation and the printer
recognition. The print server is now looking for the
network configuration, the print queues etc.
Activation procedure
The green LED is
permanently lit
The print server is operational.
Normal operating
state
The yellow LED is A data package is received.
blinking
Normal operating
state
The yellow LED is A firmware update is executed.
permanently lit
A configuration parameter download is executed.
Print server
installation or
configuration
BaseLine Print Server User Manual
3-3
Printing the Status Page
3.3
Printing the Status Page
Using the status button, you can print either a status page or a
service page.
The print server status page contains all important print server
parameters, such as the print server name, IP address, Novell
name, etc.
The service page contains more information than the status page
and a list of all print server parameters. The service page is only
available in English.
The following topics will be described:
Printing the Status Page
Printing the Service Page
3.3.1
Printing the Status Page
Proceed as follows:
1. Press the status button once.
The status page is printed.
3-4
BaseLine Print Server User Manual
Printing the Status Page
3.3.2
Printing the Service Page
Proceed as follows:
1. Keep the status button pressed for five seconds.
The service page is printed together with the parameter list.
BaseLine Print Server User Manual
3-5
Printing Parameters
3.4
Printing Parameters
Using the status button of the print server, you can print out a
service page with a list of the configuration parameters.
Proceed as follows:
1. Keep the status button pressed for five seconds.
The service page is printed together with the parameter list.
3-6
BaseLine Print Server User Manual
Resetting the Print Server Parameters
3.5
Resetting the Print Server Parameters
Only by using the status button can the parameters be reset without
entering the password. This action, however, will delete all
parameters, including for example, the IP address.
You must reset the parameters, for example, if you want to use the
print server in another network by changing the location of the
printer. Before this change of location, you should reset the
parameters to their default settings to install the print server in
another network.
Proceed as follows:
1. Disconnect the power socket on the print server.
2. Keep the status button pressed.
3. Turn the printer on. Reconnect the power socket on the print
server.
Both LEDs blink rapidly.
4. Release the status button within five seconds.
The LEDs blink alternatingly.
5. Press the status button again.
The parameters are reset. The yellow LED then blinks
regularly.
6. Disconnect and reconnect the power socket on the print server.
BaseLine Print Server User Manual
3-7
Resetting the Print Server Parameters
3-8
BaseLine Print Server User Manual
REFERENCE A
Network Specifications
A.1 Basic Principles
Select your network from the following list:
10BaseT Ethernet Networks
100BaseTX Ethernet Networks
BaseLine Print Server User Manual
A-1
10BaseT Ethernet Networks
A.2 10BaseT Ethernet Networks
For the cabling of the 10BaseT network of the print server, all
specifications of the ISO/IEC8802-3 standard apply. The most
important data is listed in the following table:
Data
Values
Max. cable length
100 m
Cable type
S/UTP Typ "category 5"
Impedance
100 Ohm
Connector type
RJ-45
In 100BaseTX networks, a shielded, twisted-pair cable of the
category 5 must be used for print server cabling. This guarantees
proper EMC behavior (electromagnetic compatibility).
A.3 100BaseTX Ethernet Networks
For the cabling of the 100BaseTX network of the print server, all
specifications of the ISO/IEC 8802-3u standard apply. The most
important data is listed in the following table:
Data
A-2
Values
Max. cable length
100 m
Cable type
S/UTP Typ "category 5"
Impedance
100 Ohm
Connector type
RJ-45
BaseLine Print Server User Manual
100BaseTX Ethernet Networks
In 100BaseTX networks, a shielded, twisted-pair cable of the
category 5 must be used for print server cabling. This guarantees
proper EMC behavior (electromagnetic compatibility).
BaseLine Print Server User Manual
A-3
100BaseTX Ethernet Networks
A-4
BaseLine Print Server User Manual
REFERENCE B
Connector Pin Assignment
B.1 Basic Principles
Select the connector from the following list:
Pin Assignment of the RJ-45 Connector
Pin Assignment of the 36-pin Centronics Interface
BaseLine Print Server User Manual
B-1
Pin Assignment of the RJ-45 Connector
B.2 Pin Assignment of the RJ-45 Connector
Do not connect a telephone cable to the RJ-45 connector. RJ-45
connectors may only be connected to SEL V voltages according to
EN 60950:1990 /A2:1993.
B-2
Pin
Assignment
Input or output
1
RX+ (Receive)
IN
2
RX- (Receive)
IN
3
TX+ (Transmit)
OUT
4
-
-
5
-
-
6
TX- (Transmit)
OUT
7
-
-
8
-
-
BaseLine Print Server User Manual
Pin Assignment of the 36-pin Centronics Interface
B.3 Pin Assignment of the 36-pin Centronics
Interface
The Centronics interface of the print server is designed for printers
operating in IEEE 1284 "compatible mode", in Nibble mode or in
ECP mode. No 100% error-free guarantee may be granted for print
servers having a nonstandard Centronics interface. Please consult
your printer manufacturer for more information if necessary.
Pin
Assignment
Input or output
1
nStrobe
OUT
2
Data 1 (Least Significant Bit)
Bidirectional
3
Data 2
Bidirectional
4
Data 3
Bidirectional
5
Data 4
Bidirectional
6
Data 5
Bidirectional
7
Data 6
Bidirectional
8
Data 7
Bidirectional
9
Data 8 (Most Significant Bit)
Bidirectional
10
nAck
IN
11
Busy
IN
12
PError
IN
13
Select
IN
14
nAutoFd
OUT
15
Not connected
-
16
Logic Gnd
-
17
Not connected
-
18
Not connected, optional + 5V
-, optional external power supply from printer
BaseLine Print Server User Manual
B-3
Pin Assignment of the 36-pin Centronics Interface
B-4
Pin
Assignment
Input or output
19
Signal Ground
-
20
Signal Ground
-
21
Signal Ground
-
22
Signal Ground
-
23
Signal Ground
-
24
Signal Ground
-
25
Signal Ground
-
26
Signal Ground
-
27
Signal Ground
-
28
Signal Ground
-
29
Signal Ground
-
30
Signal Ground
-
31
nInit
OUT
32
nFault
IN
33
Signal Ground
-
34
Signal Ground
-
35
Not connected
-
36
nSelectIn
OUT
BaseLine Print Server User Manual
REFERENCE C
Printer Status Messages
The print server forwards printer status messages, such as 'Paper
jam,' to the print server homepage.
The following printer status messages are displayed:
Abbrev.
Type
Description
MI
Error
Miscellaneous error
PE
Error
Paper empty
SL
Information
No select
BaseLine Print Server User Manual
C-1
C-2
BaseLine Print Server User Manual
Index
Index
Numerical
100BaseTX network A-2
10BaseT A-2
A
Address
Gateway 2-9
IP Address 2-9
Subnet Mask 2-9
ARP/PING 2-9
B
Boot Protocols 2-9
C
Centronics interface B-3
Compatibility
EPSON Status Monitor 2-8
HP JetAdmin and HP WebJetAdmin 2-7, 2-11
Controls 3-2
Conventions and symbols 1-5
D
DATAMAX 2-7
DHCP 2-9
Documentation 1-4
Download. See Firmware update
E
EC conformity and FCC 1-2
EPSON status monitor compatibility 2-8
F
Fast mode 2-8
Firmware Update 2-17
BaseLine Print Server User Manual
i
Index
G
Gateway 2-9
Guarantee 1-2
H
Hardware Address 2-5
Homepage 2-2
call 2-2
Configuration 2-6
configuring parameters 2-6
displaying status 2-4
EPSON status monitor compatibility 2-8
querying the printer status 2-12
setting language 2-7
Host name 2-9
HP JetAdmin compatibility 2-7, 2-11
I
IP Address 2-9
J
JetAdmin 1-2, 2-11
L
Language 2-7, 2-14
LED 3-3
M
Mode
fast mode 2-8
status page 2-7
N
Name
host name 2-9
NetBIOS name 2-9
print server name 2-5
NetBIOS 2-9
Network specifications A-1
O
Operating systems 1-3
ii
BaseLine Print Server User Manual
Index
P
Parameter
printing 3-6
Password 2-13
Pin assignment B-1
Print server
controls 3-2
documentation 1-4
EPSON status monitor compatibility 2-8
Firmware Update 2-17
HP JetAdmin compatibility 2-11
increase speed 2-8
operating systems 1-3
print status page 3-4
printer status messages C-1
printing parameters 3-6
protection 2-13
resetting 2-16, 3-7
restart 2-15
safety regulations 1-3
setting language 2-7, 2-14
Print server homepage. See Homepage
Printer
details about the printer 2-5
status messages 2-5, C-1
Printing
parameter list 3-6
service page 3-4
status page 3-4
Protection 2-13
Protocol
NetBIOS 2-9
TCP/IP 2-9
R
Reset. See Resetting
Resetting 2-16, 3-7
Resetting Parameters 2-16
Restart 2-15
RJ-45 connector B-2
S
Safety Regulations 1-3
Service page 3-4
BaseLine Print Server User Manual
iii
Index
Speed 2-8
Status button
print status page 3-4
printing parameter list 3-6
resetting parameters 3-7
Status page
mode 2-7
printing 3-4
Subnet Mask 2-9
Support 1-2
Symbols and conventions 1-5
T
TCP/IP
configuring 2-8
Technical support 1-2
U
Update. See Firmware update
W
WebJetAdmin 1-2
WINS 2-9
Z
ZeroConf 2-9
iv
BaseLine Print Server User Manual